Baxall ZMX plus ZMX+EXP32 User manual

Please read this manual before operating your multiplexer

Page 2
ZMX+EXP32 Installation Instructions
IMPORTANT
The first few pages of these instructions contain important information on safety and product
conformity. Please read, and ensure that you understand this information before continuing.

Page 3
Installation Instructions ZMX+EXP32
CONTENTS
Important Safeguards ................................................................................................................................................................................. 4
Safety ............................................................................................................................................................................................................ 5
Damage Requiring Service ......................................................................................................................................................................... 5
Electromagnetic Compatibility (EMC) ....................................................................................................................................................... 5
Manufacturers Declaration of Conformance ........................................................................................................................................... 5
Unpacking ...................................................................................................................................................................................................... 6
Associated Equipment .................................................................................................................................................................................. 6
Location ......................................................................................................................................................................................................... 6
Ventilation ...................................................................................................................................................................................................... 6
Temperature ................................................................................................................................................................................................... 6
Overview ........................................................................................................................................................................................................ 7
Connections ................................................................................................................................................................................................... 8
Camera Inputs ............................................................................................................................................................................................... 8
Monitors ......................................................................................................................................................................................................... 8
Alarm Inputs .................................................................................................................................................................................................. 8
Power ............................................................................................................................................................................................................. 9
Powering Up your ZMX+EXP32 .................................................................................................................................................................... 9
Setting the Mulitplexer to 32 Way ................................................................................................................................................................. 9
Specifications............................................................................................................................................................................................... 10

Page 4
ZMX+EXP32 Installation Instructions
IMPORTANT SAFEGUARDS
This product is exclusively for use in CCTV applications and has no other purpose.
Read and Retain these instructions - All the safety and operating instructions should be read before the unit is
operated and should be retained for future reference.
Cleaning - Unplug the unit from the supply outlet before cleaning. Use a damp cloth for cleaning. Do not use
liquid cleaners or aerosol cleaners.
Attachments - Do not use attachments that have not been recommended by the product manufacturer as they
may cause hazards.
Water and Moisture - Do not use this unit near water. For example, near a bathtub, wash bowl, kitchen sink, or
laundry tub, in a wet basement, near a swimming pool, in an unprotected outdoor installation, or any area that is
classified as a wet location.
Accessories - Do not place this unit on an unstable stand, tripod, bracket, or mount. The unit may fall, causing
serious injury to a person and serious damage to the unit.Any mounting of the unit should follow the manufacturers
instructions, and should use a mounting accessory recommended by the manufacturer.
Ventilation - Openings in the enclosure are provided for ventilation to ensure reliable operation of the unit and
to protect it from overheating, these openings must not be blocked or covered. This unit should not be placed in
a built-in installation unless proper ventilation is provided. Do not place directly on other hot equipment, because
this may increase its operating temperature.
Power Sources - This unit should be operated only from the class 2 isolated power supply provided.
Plugs - This unit may be equipped with a 3 wire grounding type plug, i.e. a plug having a third (grounding) pin.
This plug will only fit into a grounding type power outlet. This is a safety feature. If you are unable to insert the
plug into the outlet, contact your electrician. Do not defeat the safety purpose of the plug.
Power-cord Protection - Power supply cords should be routed so that they are not likely to be walked on or
pinched by items placed upon or against them. Pay particular attention to cords at plugs, and the point where
they exit from the appliance.
Overloading - Do not overload outlets and extension cords as this can result in a risk of fire or electric shock.
Object and Liquid Entry This equipment must be protected from the ingress of foreign materials. Never push
objects of any kind into this unit through openings as they may touch dangerous voltage points or short-out parts
that could result in a fire or electric shock. Never spill liquid of any kind on the unit.
Servicing There are no user-serviceable parts. Do not remove the covers as this may expose you to dangerous
voltages or other hazards. Refer all servicing to qualified service personnel.
Replacement Parts - When replacement parts are required, be sure the service technician has used the
replacement parts specified by the manufacturer. The use of unauthorised substitute components may result in
fire, electric shock or other hazards.
Safety Check - Upon completion of any service or repairs to this unit, ask the service technician to perform
safety checks to determine that the unit is in proper operating condition.
Coax Grounding - If an outside cable system is connected to the unit, be sure the cable system is grounded.
Lightning - For added protection of this unit during a lightning storm, or when it is left unattended and unused for
long periods, unplug it from the wall outlet and disconnect the cable system. This will prevent damage to the unit
due to lightning and power-line surges.

Page 5
Installation Instructions ZMX+EXP32
SAFETY
If you have any problems contact Baxall Security Ltd.
WARNING
Installation is only to be carried out by competent, qualified and experienced personnel in accordance
with the country of installations National Wiring Regulations.
This unit contains no user-serviceable parts inside.
This unit must not be used in a medical and/or intrinsically safe application.
Do not exceed the voltage and temperature limits given in the specification. Only operate this unit in
a clean, dry, dust-free environment.
DAMAGE REQUIRING SERVICE
Unplug the unit from the mains outlet and refer servicing to qualified service personnel under the following
conditions:
When the power supply cord or plug is damaged.
If liquid has been spilled into the unit, or objects have fallen into the unit.
If the unit has been exposed to rain or moisture.
If the unit does not operate normally when following the operating instructions.
If the unit has been dropped or the casing has been damaged.
If the unit exhibits a distinct change in performance.
If the unit has no power even when the power supply appears to operate correctly. If this is the case
then ask a service engineer to test the internal fuse.
ELECTROMAGNETIC COMPATIBILITY (EMC)
WARNING
This is a Class A product. In a domestic environment this product may cause radio interference, in which case,
the user may be required to take adequate measures.
The product must be installed in accordance with good installation practice, to enable the product to function as
intended and to prevent problems. Refer to your agent for installation guidance.
Contact Baxall Security Ltd to obtain a specification defining the acceptable levels of product degradation with
regard to EMC immunity.
MANUFACTURERS DECLARATION OF CONFORMANCE
The manufacturer declares that the product supplied with this document is compliant with the essential protection
requirements of the EMC directive 89/336 and the Low Voltage Directive LVD 73/23 EEC. Conforming to the
requirements of standards EN 55022 for emissions, IEC801 parts 2, 3 and 4 for immunity and BS415 superseded
by EN60950 for Electrical Equipment safety.

Page 6
ZMX+EXP32 Installation Instructions
UNPACKING
You should keep the original packing for use when the unit has to be stored or transported. The packaging
should contain the following items:
The expander unit
A class 2 mains power supply and cord
Expander cable
This manual
Carefully check the unit for signs of damage. If damage has occurred, please contact the supplier and the carrier
immediately and do not attempt to use the equipment.
ASSOCIATED EQUIPMENT
A typical system, using this unit could contain the following components:
A multiplexer
Two to five monitors
One or two VCRs (Standard or S-VHS)
Cameras with 1V pk-pk composite video outputs
75 ohm BNC connectors and video coaxial cable for connecting the video signals.
S-VHS connectors and leads if you are using an S-VHS VCR
A mains power outlet for your multiplexer and expander unit which permits secure isolation in accordance with
your national wiring regulations (your expander unit has no ON/OFF switch for security reasons).
LOCATION
Ensure that the sites AC power supply is stable and within the rated voltage of the external 12V DC power
supply. If the sites AC power is likely to have spikes or power dips, use power line conditioning or an uninterruptable
power supply (UPS).
Ventilation
Ensure that the location planned for the installation of the unit is well ventilated. Take note of the locations of the
cooling vents in the units enclosure, and ensure that they are not obstructed.
Temperature
Observe the units ambient temperature specifications when choosing an installation space. Extremes of heat or
cold beyond the specified operating temperature limits may cause the unit to fail.
Do not install the unit on top of other hot equipment.
Your expander unit may be placed on top of your multiplexer. Do not then place a monitor on top of the expander
unit.

Page 7
Installation Instructions ZMX+EXP32
OVERVIEW
The product described in this manual is:
ZMX+EXP32 32 way expander unit
Your expander provides the following additional facilities:
16 camera inputs (17 - 32)
16 alarm inputs (17-32)
Three analogue monitor outputs.
Fig 1. Rear Panel Layout
The rear panel of your expander unit has the following connections:
16 loop-through camera inputs with automatic termination
Three analogue monitor outputs C, D and E. Monitor connections are via BNC connectors.
16 alarm-inputs via a 25-way D-type connector. Each alarm input can be configured to be normally open (N/O)
or normally closed (N/C).
Expander connector allowing connection to the ZMX+CT16M4 multiplexer.
Fig 2. Typical connections
Page 8
ZMX+EXP32 Installation Instructions
CONNECTIONS
Camera Inputs
For each camera input there are a pair of BNC sockets, one for the camera input, the other for a looped through
output. If you connect to both BNC sockets, your expander unit automatically removes the 75 ohm termination
resistor. If you use the loop through facility make sure that your application (e.g. a monitor or VCR) provides 75
ohm termination at the end of the line.
Connect up to 16 camera inputs. You can use either the upper or the lower sockets. Connect your loop through
outputs to the through or spare BNC socket in each pair. If you have less than 16 cameras, you can disable
individual camera inputs in the menu system.
Monitors
Monitors C, D and E connect to the relevant 75 ohm BNC connectors. If you are connecting directly from the
expander unit to the monitor then select the 75 ohm impedance setting on your monitor. Note that when the 32
way expander unit is used, Monitors C, D and E attach directly to the BNC connectors provided on the
expander unit and not the multiplexer. This is to ensure that the monitor signals are correctly terminated.
Alarm Inputs
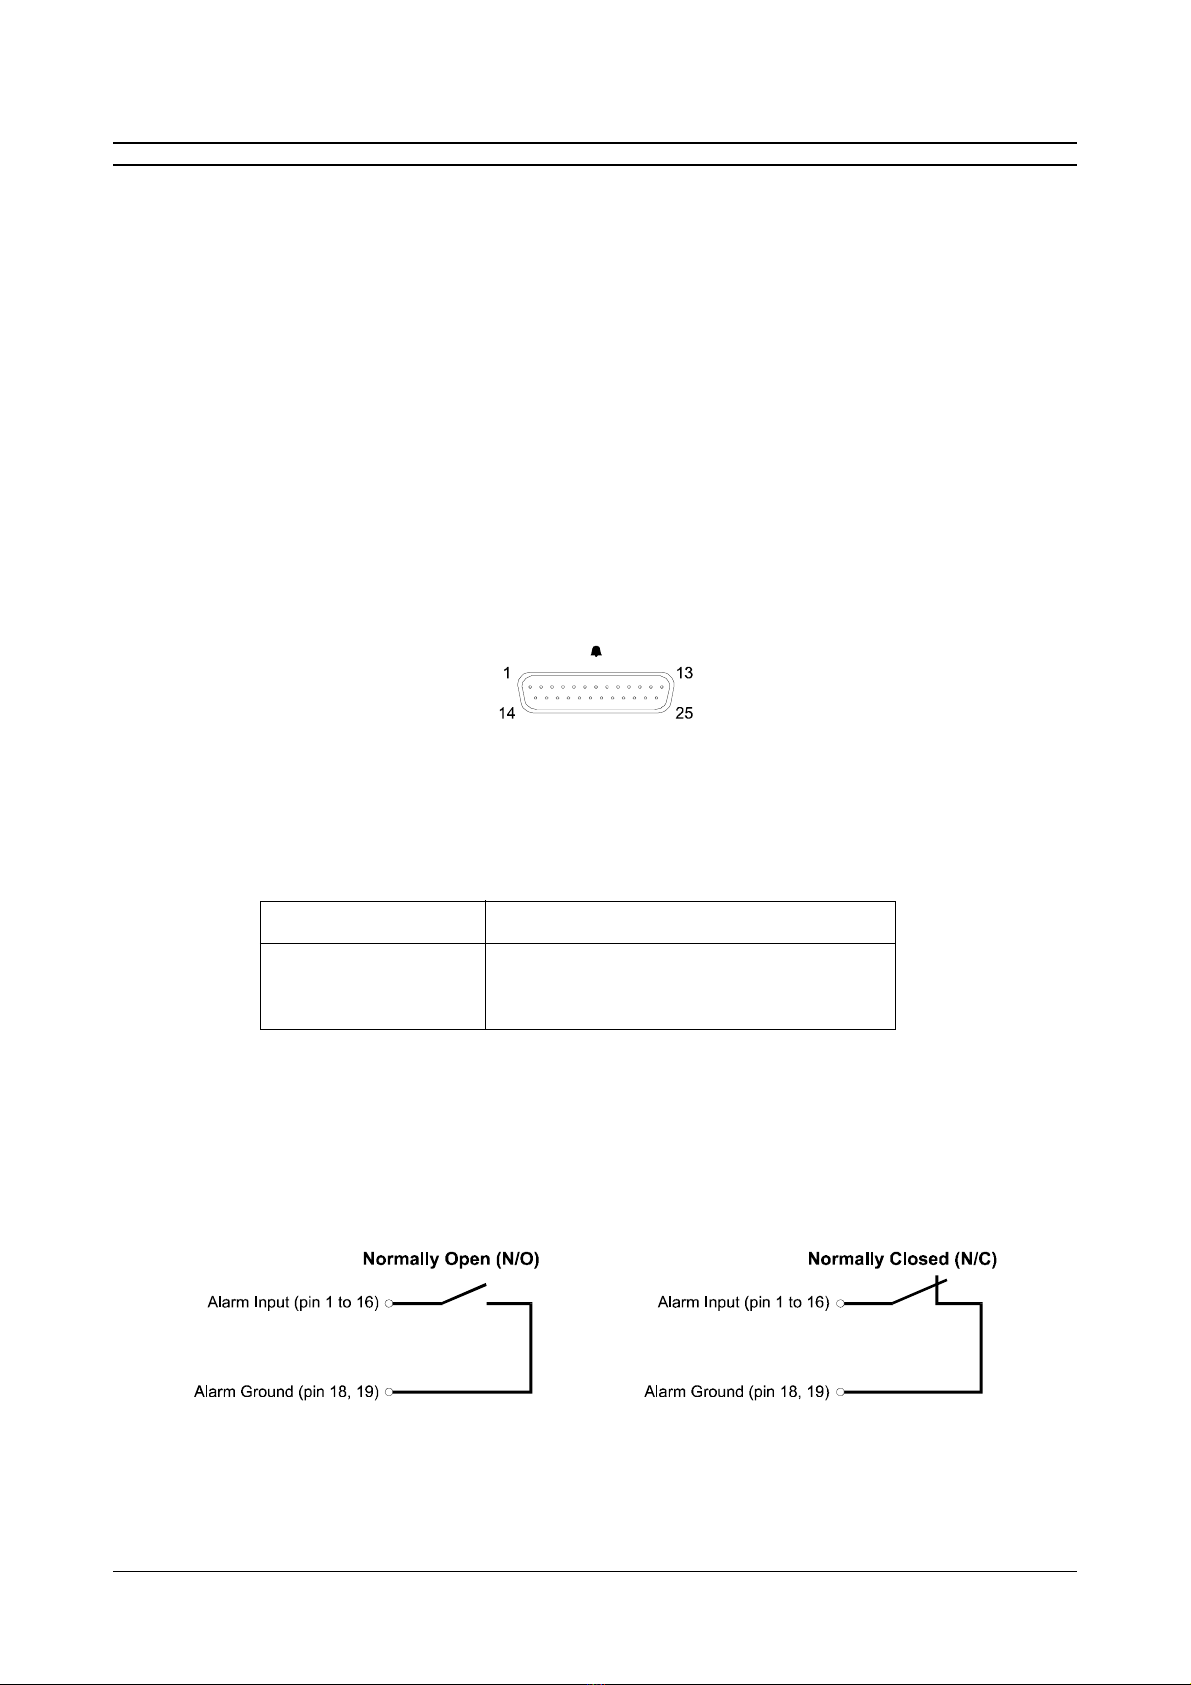
Provision for alarm inputs is by means of a 25 way D-type connector. Wire the connector as shown in Figure 3.
Do not attempt to wire directly to the socket on the back-panel.
Fig 3. 25 way D-type Connector Numbering
Figure 3 above shows the connector, looking towards the rear panel. The numbers are labelled on the connector
itself.
Pin Numbers Connections
1 to 16 Alarm Inputs 17 to 32
18, 19 Alarm Input Ground
Each alarm input line can be triggered by the relay contact from a device such as a pressure-pad, a passive
infrared detector, a smoke detector etc. (refer to the instructions provided with the device). You can configure the
alarm inputs to be Normally Open (N/O) or Normally Closed (N/C) via the menu system. Normally open and
normally closed configurations are shown in Figure 4. The alarms are disabled while the menu system is active.
Fig. 4 Normally Open and Normally Closed Connections

Page 9
Installation Instructions ZMX+EXP32
CONNECTIONS
Power
The ZMX+EXP32 is supplied with a 12V DC class 2 output, auto-ranging: 110/230V AC (+6%, -10%) 50Hz,
external power supply. Do not use any other power supply. Do not connect the power until you have read the
section, Powering Up your ZMX+EXP32 below.
Attach a suitable 3 pin plug following the wiring instructions on the label attached to the mains lead.
Note: The manufacturer accepts no responsibility for any damage caused by the use of any other power supply.
Plug the mini power connector from the 12V DC power supply into the socket marked 12V DC on the rear of your
expander unit. Adjacent to the socket is a cable anchor. Use a small cable tie to attach the power supply cord to
the cable anchor. This helps to prevent inadvertent power disconnection which may be caused by the power
cable being pulled.
Expander cable
The expander unit and multiplexer are connected together by means of a special cable. Attach the cable and
ensure the connector screws are tightened to prevent the cable being pulled out
.
POWERING UP YOUR ZMX+EXP32
Your expander unit must be powered up before the multiplexer. This is because the multiplexer polls the expander
unit as part of its power-up sequence. After all the relevant connections have been made between the expander
unit and multiplexer, perform the following sequence:
1. Disconnect the power from your multiplexer.
2. Connect the power to your expander unit
3. Reconnect the power to your multiplexer
SETTING THE MULITPLEXER TO 32 WAY
Your multiplexer must be set to 32 way in order to gain access to various menu items for the expander unit. This
is done as follows:
1. Enter the menu system of your ZMX+CT16M4 multiplexer.
2. Use the left/right arrow keys to select Main.
3. Use the up/down arrow keys to select Camera Setup and press the enter key.
4. Use the up/dwon arrow keys to select Camera Selection 16/32 and press enter.
5. In the Number of Cameras field, use the left/right arrow keys to select 32.
6. Use the up/down arrow keys to select OK and press enter.
NOTE: After selecting OK, the multiplexer will reset itself. Any parameters that were previously set up in
the multiplexer will be lost. The multiplexer must be powered down and back on again in order for the
new settings to take effect.

Page 10
ZMX+EXP32 Installation Instructions
SPECIFICATIONS
All Video Inputs and Outputs
75 Ohm BNC connectors
Video: 1V pk-pk composite (PAL compatible)
Power
Auto-ranging : 110/230V AC (10%, 50Hz, to 12V DC external power supply provided).
Power Consumption: Max : 10W
Physical Specifications
Operational temperature limits:
0OC to +40OC at 10% to 80% relative humidity (non-condensing)
Storage temperature limits:
-20OC to +60OC at 10% to 95% relative humidity (non-condensing)
Dimensions (mm) 443 (W) x 257 (D) x 44 (H)
Weight Unit: 3.5 kg Shipping: 6kg

Page 11
Installation Instructions ZMX+EXP32

HBZMX-EXP32-2 Issue 2 6/98
Baxall Security Limited, Horsfield Way, Bredbury Park Industrial Estate, Stockport SK6 2SU, England.
Tel: 0161 406 6611 Fax: 0161 406 7677
Visit our Web site: http://www.baxall.com
Baxall Security Ltd. reserve the right to make changes to the product and
specification of the product without prior notice to the customer.
Other Baxall Multiplexer manuals


Popular Multiplexer manuals by other brands


Giga-tronics
Giga-tronics 7026 manual

ADTRAN
ADTRAN MX2820 manual

East Coast Datacom
East Coast Datacom Nx8- Dual Composite MUX High-Speed 16-Port TDM... Operation manual

HEIDENHAIN
HEIDENHAIN MSE 1000 operating instructions

Miranda
Miranda ADX-104i Guide to installation and operation

Pericom
Pericom PI3USB102 user manual


