BBQ Guru Cyberq Cloud User manual

CYBERQ CLOUD
USER GUIDE
Contents
1. SAFETY WARNINGS 3
2. LIMITED WARRANTY 4
3. CYBERQ CLOUD FEATURES 4
4. PROBES 5
5. POWER DRAFT BLOWERS (FANS) 5
6. POWERING UP 6
7. MANUAL OPERATION / MAIN SCREEN 7
8. SYSTEM SETUP SCREEN 8
9. CONTROL SETUP SCREEN 9
10. WI-FI SETUP SCREEN 11
11. PAIRING DEVICES TO THE CYBERQ CLOUD IN HOT-SPOT MODE 11
12. NETWORKING QUICK START GUIDE 12

SAFETY WARNINGS
INSTALLATION / SAFETY INFORMATION: READ AND UNDERSTAND THIS USER GUIDE COMPLETELY BEFORE
INSTALLING OR USING THIS PRODUCT!!
FIRE HAZARD: Keep cooking equipment and controller a safe distance from all sources of ignition including
buildings, cars, furniture, flammable gases and liquids, and anything that may ignite from heat or embers
created during the cooking process.
FIRE HAZARD: If the cook apparatus is to be used on a combustible surface such as a wooden deck,
always place the cooker on a non-flammable pad intended for this purpose.
FIRE HAZARD: Always have a fire extinguisher on Hand. Call your local Fire Company in the case of an
emergency, before any fire gets out of control. Never leave a lit cooker unattended.
EXPLOSION HAZARD: NEVER throw water on a grease fire in the cooker. After completing a cook, the
fire may be extinguished be closing all dampers and doors, suffocating the combustion.
FIRE HAZARD: Keep cooker clean, and free of grease or fat build up. Change drip trays during a cook
cycle to reduce flammable fats or grease in the cooker to a minimum.
EXPLOSION HAZARD: Smoke can combust when oxygen is introduced, producing severe burns. ALWAYS
use caution when opening the lid or door of your cooking apparatus.
CAUTION: HOT SURFACES are present during and after cook. Always wear protective clothing when
tending the cooker, dumping a firebox, handling food, the temperature probes, fan or mounting hardware.
FIRE HAZARD: Equipment failure can result in excessive temperatures. Always inspect your fan and probe
and wires for damage and replace any damaged parts before use.
ELECTRICAL SHOCK HAZARD: Dangerous high voltages are present. Do not use the product power
supply if visibly damaged. Keep power supply dry, and off the ground. Avoid using an extension cord. If
an extension cord is used, the extension cord must be rated for outdoor use.
CAUTION: Keep controller dry. Spilled liquids, rain or excessive humidity can damage electronics and
create a hazardous condition. During adverse weather, the control may be operated from within a plastic
bag, sealed as completely as possible.
CAUTION: There are no user serviceable parts inside the controller unit. Opening or making unauthorized
modifications may cause equipment failure, creating a hazardous condition.
CAUTION: Consuming raw or undercooked meats, poultry, seafood, shellfish, or eggs may increase your
risk of foodborne illness. Use a redundant thermometer to verify operation of controller operation. Check
food for doneness with a food thermometer before consumption.
CAUTION: To satisfy exposure requirements for mobile and base station transmission devices, a
separation distance of 20 cm or more should be maintained between the antenna of this device and
persons during operation. To ensure compliance, operation at closer than this distance is not
recommended. The antenna used for this transmitter must not be co-located or operating in conjunction
with any other antenna or transmitter.
LIMITED WARRANTY
Return criteria
To qualify, all returns and exchanges must be accompanied by the original receipt, the original documentaon,
parts, and accessories) plus the original manufacturer packaging. Failure to include such items may prevent or
delay your refund or exchange.
Items must be in a condion that permits resale. The BBQ Guru will not accept the following items for return: (i)
items that have been personalized or customized: (ii) special order items, if not part of the BBQ Guru retail sales
oering (iii) items that have been used, altered or that show wear or damage; (iv) gi cards (v) services.
CyberQ Cloud controls and fans (2 Year limited warranty) The BBQ Guru warrants this product to be free from
defect in workmanship and materials for a period of 2 years from the date of purchase.
Pit/Food Probes, Power Packs, and other Accessories (90 day limited warranty) The BBQ Guru warrants these
products to be free from defect in workmanship and materials for a period of 90 days from the date of purchase.
Should a product malfuncon within the warranty period, you should obtain a Service Ticket number to return it to
the factory by emailing a descripon of your problem and your name, address, email, phone number, and date of
purchase to customerservice@thebbqguru.com. If defecve, it will be repaired or replaced (at the discreon of
BBQ Guru) at no cost. There are no user serviceable parts on this unit.
This warranty is void if the unit shows evidence of tampering or being subjected to moisture, excessive heat, corro-
sion or other misuse, including being used with equipment not made by BBQ Guru. Components with excessive
wear or damage due to misuse will not be covered under warranty.
If your control, probe power pack or fan is malfunconing and is out of warranty, we may be able to troubleshoot
it by phone or email. If it is determined that your part has been damaged in any way during use, we will recom-
mend that you purchase a new part.
The BBQ Guru shall not be responsible for any damage or losses, however caused, which may be experienced as a
result of the installaon or use of this product.
CYBERQ CLOUD FEATURES
Cloud-enabled website allows direct or remote access from your mobile device or PC
2.4 GHz, IEEE Std. 802.11g™, Wi-Fi® certified (WFA ID: WFA16869)
16 character by two line backlit LCD display
Email alert capability
Armored high-temperature pit and food (meat) probes
Controls your pit and monitors up to 3 food (meat) temperatures
All new full-time adaptive control algorithm learns your pit to provide better stability/accuracy
Open lid detect senses when the pit’s lid is open to minimize the temperature disturbance and
recover quickly to the setpoint, can be turned on/off (default is ON).
Exclusive patented ramp feature (cook and hold) lowers your pit temperature as food tempera-
ture rises, so your food doesn’t overcook
Scrolling display shows all of your temps, time, and status
Audible alarm sounds on food done (default is ON)
Adjustable deviation alarm sounds when your pit temp goes either too high or low
Real time blower status indication and output % helps you to estimate fuel use
Display in degrees F or C
User adjustable number of beeps setting
PROBES
The probes provided with your CyberQ Cloud are precision stainless steel ther-
mocouples, rated for temperatures up to 500 degrees F. and have a moisture
and smoke resistant stainless steel armor braid. Be careful not to kink these
wires or let them come in contact with flames.
IMPORTANT NOTE: Be sure to fully insert your probes into the control by
pushing the plug in until you feel and hear it snap in place. Failing to plug the
probes in securely, may cause sporadic temperature readings causing your
cooker to get excessively hot.
Prior to use, inspect the probe and cable for signs of heat or mechanical
damage. If a probe appears damaged, replace it with a back up and contact
BBQ Guru Customer Service.
POWER DRAFT BLOWERS (FANS)
The 10 CFM Pit Viper fan is suited to medium-sized grills and smokers, including
all ceramic grills and bullet-style smokers.
The 25 CFM Pit Bull fan is suited to offset smokers and larger cabinet smokers;
two fans can be used for large custom built and trailer-based models.
All blowers are equipped with an adjustable damper and an aluminum nozzle. This
feature allows the user to make fine adjustments on their own grill or smoker due
to natural drafts that effect cooking temperature.
Open the damper fully for quick start-up or grilling at high temperatures.
Close it half way for smaller cookers or low and slow cooking.
Close three-quarters of the way for cold smoking.
Close all the way to kill the fire.
MOUNTING AND SETUP
The CyberQ Cloud should be placed in a stable position with easy access to the
controls and protected from the elements. Connect the fan and probes before
connecting the power. Routinely inspect the unit, probes and wiring for damage.
Contact BBQ guru Customer service for repair or replacement.
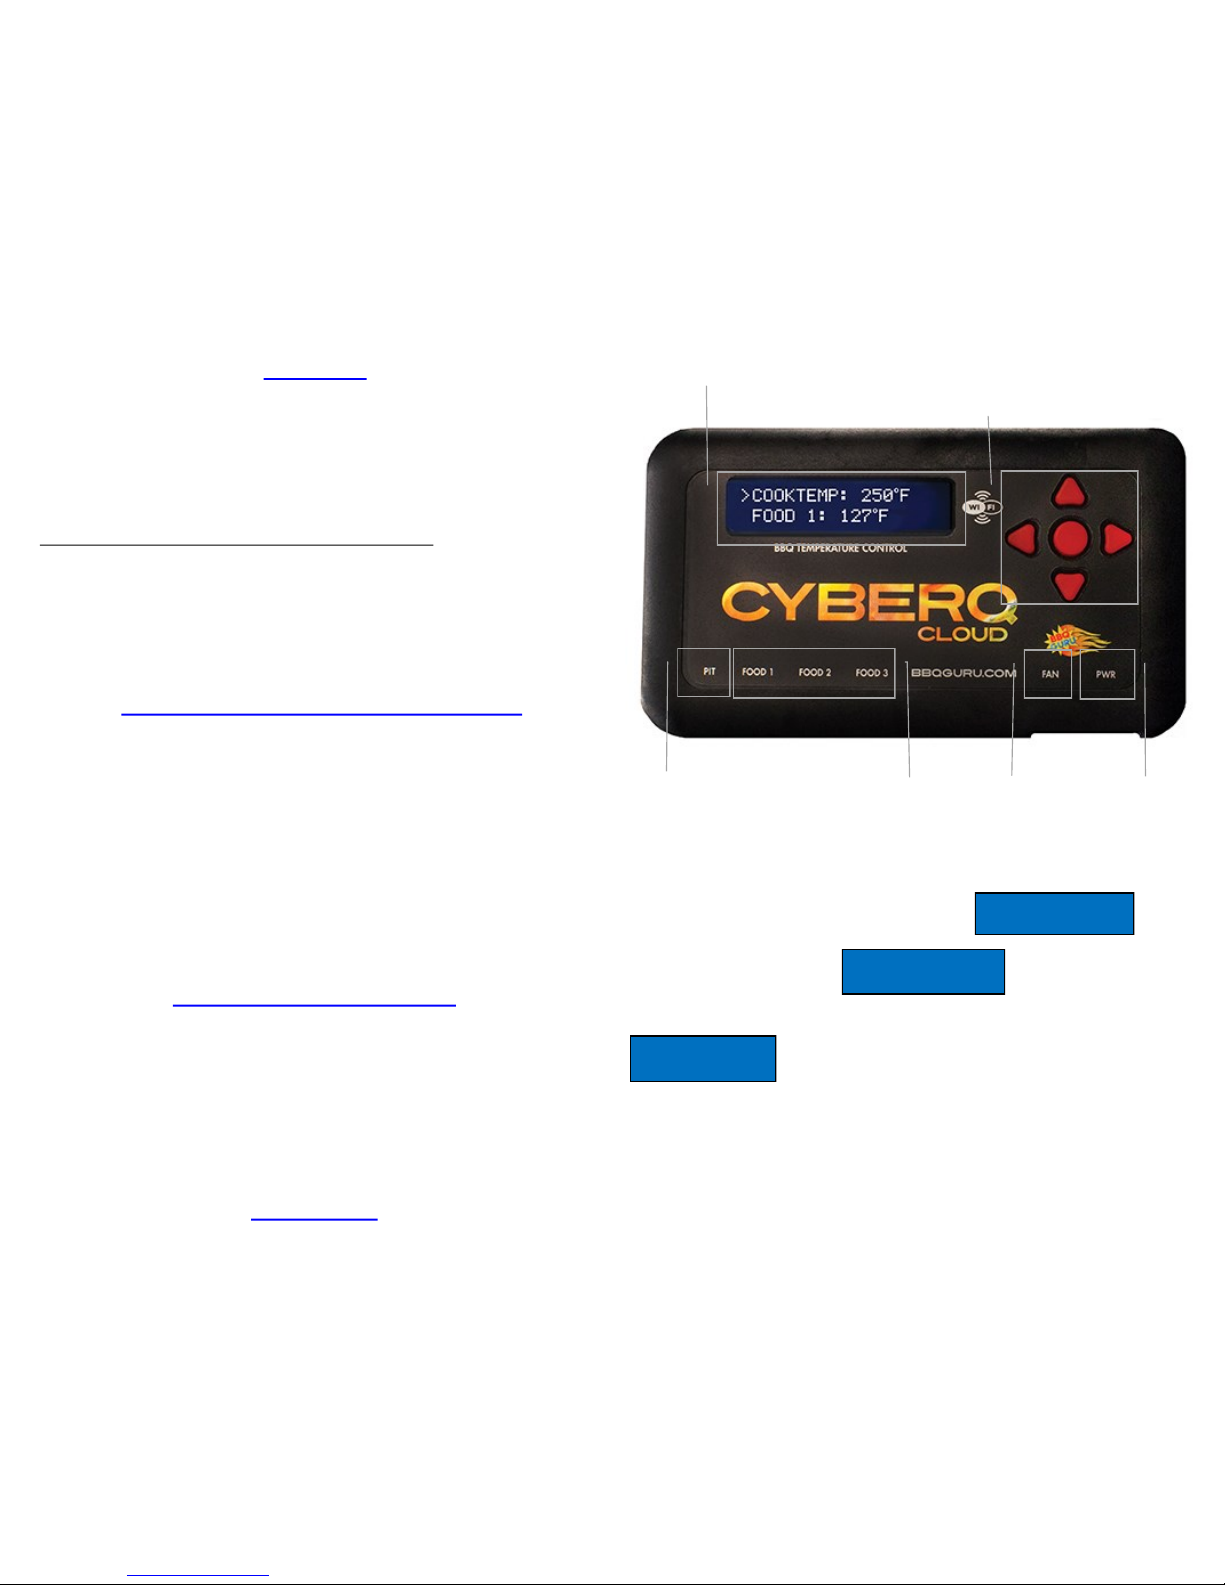
CLEANING
UP / DOWN /
LEFT / RIGHT
ENTER
DISPLAY
POWER
INPUT
FAN
FOOD PROBE
INPUTS
PIT PROBE
INPUT
POWERING ON/OFF
Plug the power supply into the CyberQ Cloud and connect to a home wall outlet. The
CyberQ Cloud will automatically power on and display:
If this is the first time powering up will display for 5 sec.
If the CyberQ Cloud is already connected to your home Wi-Fi network,
will display for 5 seconds.
TURNING OFF – Press and hold the center button for 4 seconds.
You may also unplug the unit.
TURNING ON – Press and hold the Center button for 2 seconds
If there is a power interruption at any time while cooking with your CyberQ Cloud the
unit will automatically restart once power is restored, and continue to control your grill/
smoker at the temperatures you originally set.
If you are operating in hot-spot mode, you may need to reset power to the CyberQ
HOT-SPOT PAIRING
192.168.101.10
CYBERQ CLOUD
CONTROL v4.08
IP ADDRESS INFS
CONNECTING...
MANUAL OPERATION
The CyberQ will automatically revert to manual mode if a Wi-Fi signal is not
present. Therefore a cook in progress will not be interrupted by an Internet or
Wi-Fi problem.
MAIN SCREEN
>COOKTEMP: 275OF
FOOD 1: 32OF
FOOD 2: 180OF
FOOD 3: OPEN
To change Pit, Food, and Timer values, use UP/DOWN buttons to select line
and press Enter. Use the LEFT/RIGHT buttons to select the character and
UP/DOWN to change the values. Press Enter to save values.
Once Timer value is entered, the control will begin counting down. When the
countdown is finished, the action specified in TIME- OUT will be taken.
If Pit or Food probe is unplugged or damaged, it will show as “OPEN”.
When the Food Temp reaches its set point, the “FOOD DONE” message will
blink and the Alarm will sound. (Press any key to clear alarm)
Pit Set Temp: 32-475OF (0-270OC)
Food Set Temp
Fan Output %
FAN OUTPUT %
The output percent is not changeable. It is computed by the control.
The ‘*’ character is shown next to the output % value when the fan is blowing.
TIP: During your cook if you notice the output percentage hovering around 80-100% for
a long time, you may be running out of charcoal. If you notice the output % hanging around
10% for a long time, and the temperature is oscillating, you may want to close the blower
damper adjustment slightly for better control.
SYSTEM SETUP SCREEN
>SYSTEM SETUP
SCROLLING: ON
BACKLIGHT: 50%
CONTRAST: 10%
UNITS: DEG F
To access System Setup Screen, hold both UP
and DOWN Buttons simultaneously for 3 seconds.
SCROLLING
Select automatic scrolling on the MAIN SCREEN. The default value is OFF.
BACKLIGHT
Adjustable from 0-100%.
Note that any adjustment may make the display unreadable; we suggest leaving it
at the default value of 50%.
CONTRAST
Adjustable from 0-100%.
Note that any adjustment may make the display unreadable; we suggest leaving it
at the default value of 10%.
UNITS
Select to use Deg. F (Default) or Deg. C.
ALARM BEEPS
Select OFF, 1, 2, 3, 4 and 5 alarm beeps.
KEY BEEPS
Select Key Beep ON/OFF when a key is pressed. The default value is ON.
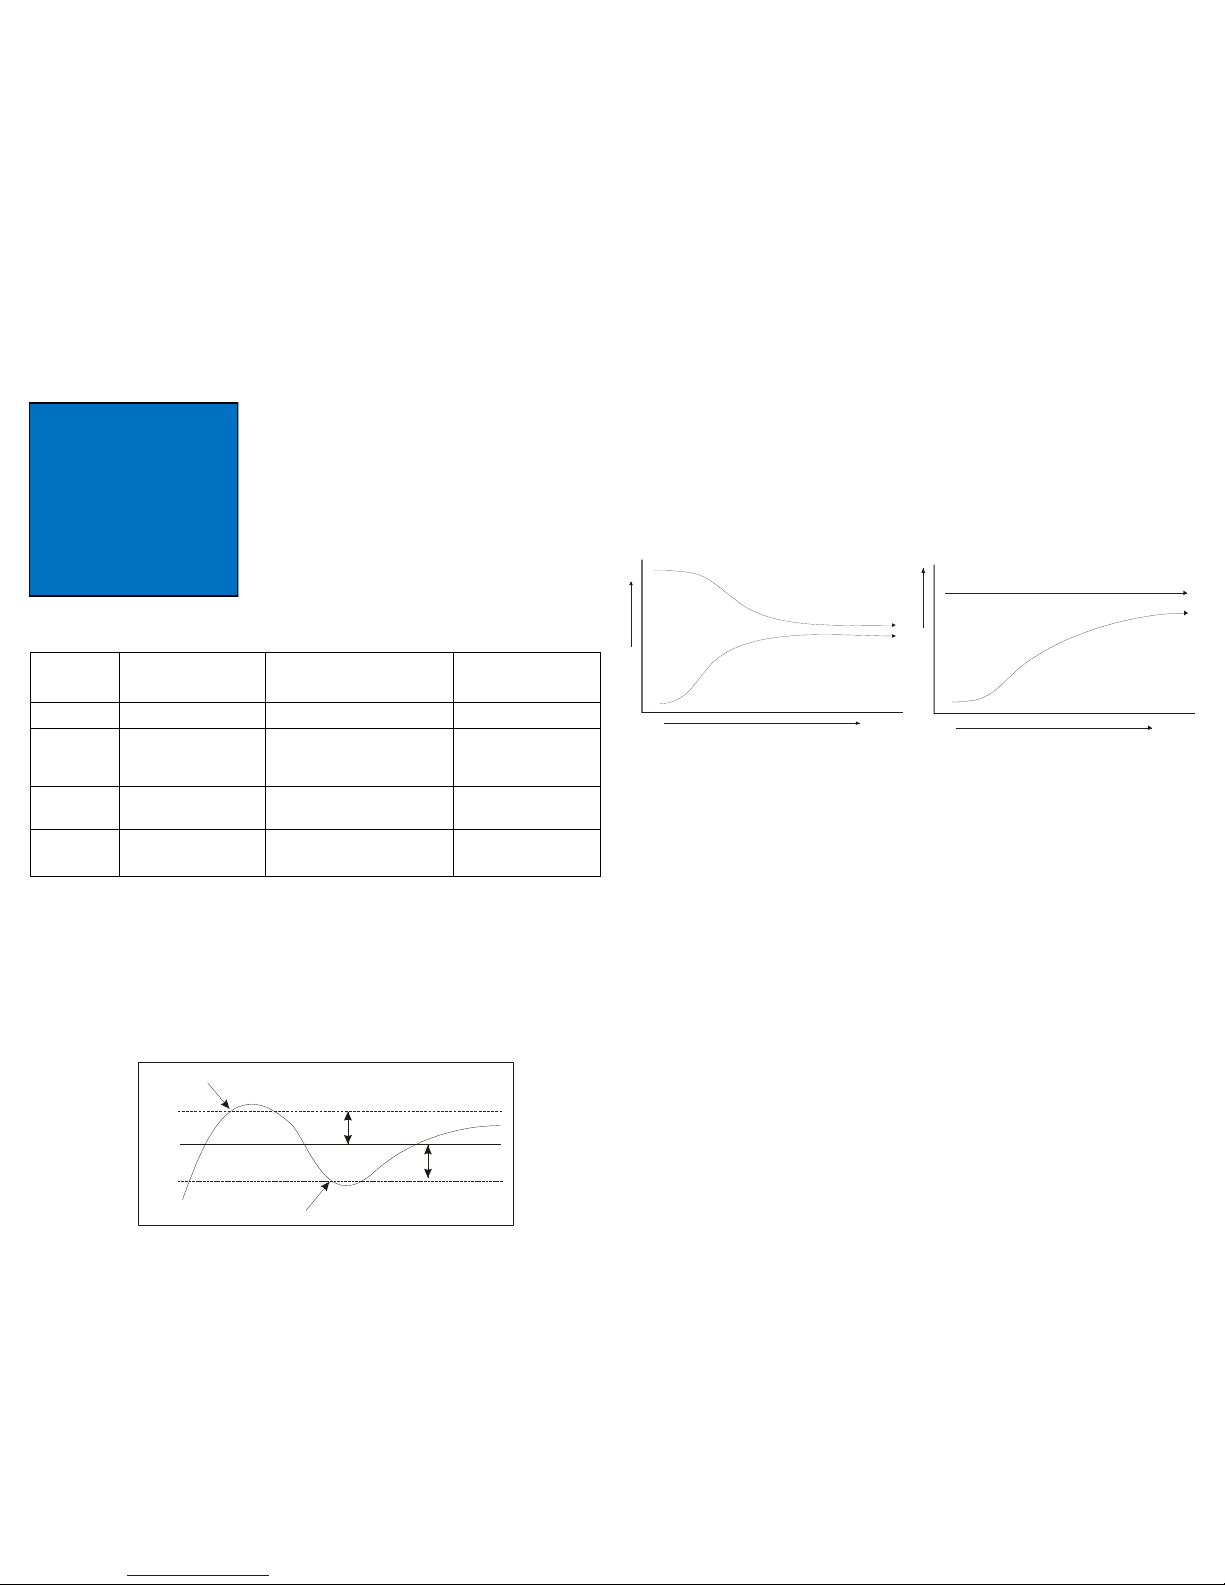
CONTROL SETUP SCREEN
COOK HOLD
Sets the temperature to the desired Cook Temp.
when the TIMER expires. TIMEOUT Action must
be set to HOLD. The default is 200° F.
TIMEOUT
Defines the action that will be taken when the timer counts down to 00:00:00.
>CONTROL SETUP
COOKHOLD: 200OF
TIMEOUT: NO ACTN
ALARM DEV: 50
RAMP: OFF
To access Control Setup Screen, press
LEFT button when arrow is on “SYSTEM
SETUP” line
Timeout
Selection
Control
Action
Message Displayed Beeper Action
NO ACTN none none none
HOLD COOKSET is set to
COOKHOLD value
TIMEOUT HOLD 200° F (or
cook hold temp) flashes contin-
uously until a key is pressed.
Alarm sounds with set
number of beeps set in
ALARM BEEPS.
ALARM none TIMEOUT ALARM flashes con-
tinuously until a key is pressed.
Beeps continuously until
a key is pressed.
SHDN Turns the fan output
OFF
TIMEOUT SHDN flashes contin-
uously until a key is pressed.
Beeps continuously until
a key is pressed.
Pit
Setpoint
Deviation Alarm
Setpoint
Gives “Hi” Alarm
Gives “Lo” Alarm
Deviation Alarm
Setpoint
P
it Temperature
Time
ALARM DEVIATION SETPOINT
Sets the degrees of deviation above and below the set Cook Temperature when
the alarm will sound. (10-100OF) The default is 50OF.
If the temperature of the pit deviates above the set Cook Temp by the Alarm
Deviation Setpoint, the alarm will sound and the display will read COOK TEMP HIGH.
If the temperature of the pit deviates below the set Cook Temp by the Alarm
Deviation Setpoint, the alarm will sound and the display will read COOK TEMP LOW .
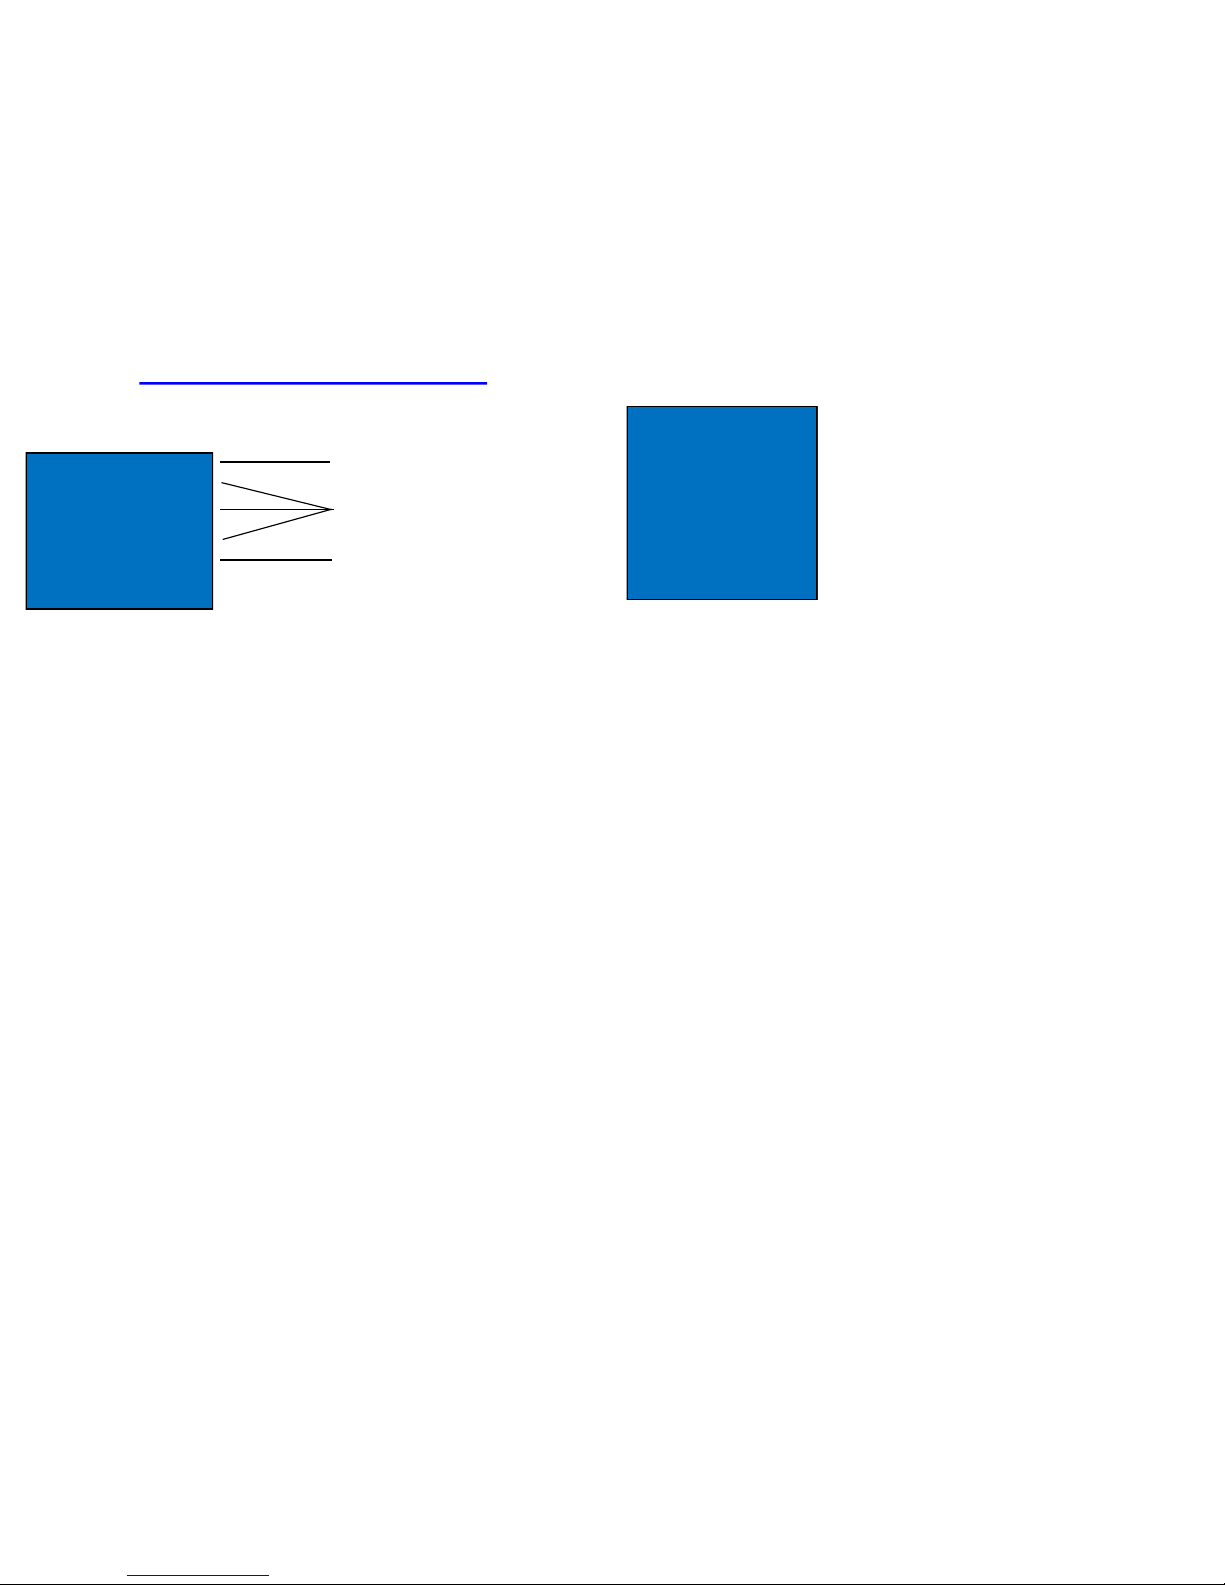
RAMP MODE
With Ramp Mode ON, the CyberQ Cloud will gradually lower the pit temperature
on the selected food probe when the food temperature is approximately 30° from
desired Food Done temperature.
Ramp selection tells the control which sensor to choose from:
OFF
Food 1
Food 2
FOOD TEMPERATURE
PITTEMPERATURE
T
E
MP
E
R
AT
U
R
E
TIME
Food / Pit plot with Ramp Set to On
FOOD TEMPERATURE
PITTEMPERATURE
T
E
MP
E
R
AT
U
R
E
TIME
Food / Pit plot with Ramp Set to off
OPEN LID DETECT
This feature minimizes the fan blowing after the cookers lid/door has been opened.
An open lid can allow an excess of oxygen to reach the flame, causing the pit temp.
to rise and overshoot the target cook temp.
WI-FI SETUP Screen
To access Wi-Fi Setup Screen, press
RIGHT button when arrow is on “SYSTEM
SETUP” line
For ease of use, we suggest setting up your
Wi-Fi link by following the instructions in the
“Connecting your CyberQ Cloud to your Wi-fi
Network” section.
The interface is much easier to use, and it can
be done from any PC or mobile device
equipped with a web browser.
*** After changing the Wi-Fi settings, the power
will have to be cycled (turned OFF/ON) to save
the settings.
If changing parameters from a Hot-Spot or
Wi-Fi connection, you can use the reboot
button at the bottom of the web page.
>WIFI SETUP
SCAN WIFI
EDIT: Hotspot
LOAD: Hotspot
192.168.101.10
GW: 192.168.101.001
NM: 255.255.255.000
DNS: 192.168.101.010
SSID: HS-MY_CYB
ENC: OPEN
KEY: **************
PORT: 80
SIGNAL:--
M: (MAC address)
MOD: 2.49.12
PAIRING DEVICES TO THE CYBERQ CLOUD IN HOT-SPOT MODE
The most basic way to use the CyberQ Cloud’s features is by directly pairing it with
one or more Wi-Fi devices in hot-spot mode.
1. Apply power to the CyberQ Cloud. Will display for 5 sec.
2. On a smart phone or tablet, go to Settings > Wi-Fi.
Connect to HS-MY_CYBERQ_####
3. Once connected, the CyberQ Cloud will display:
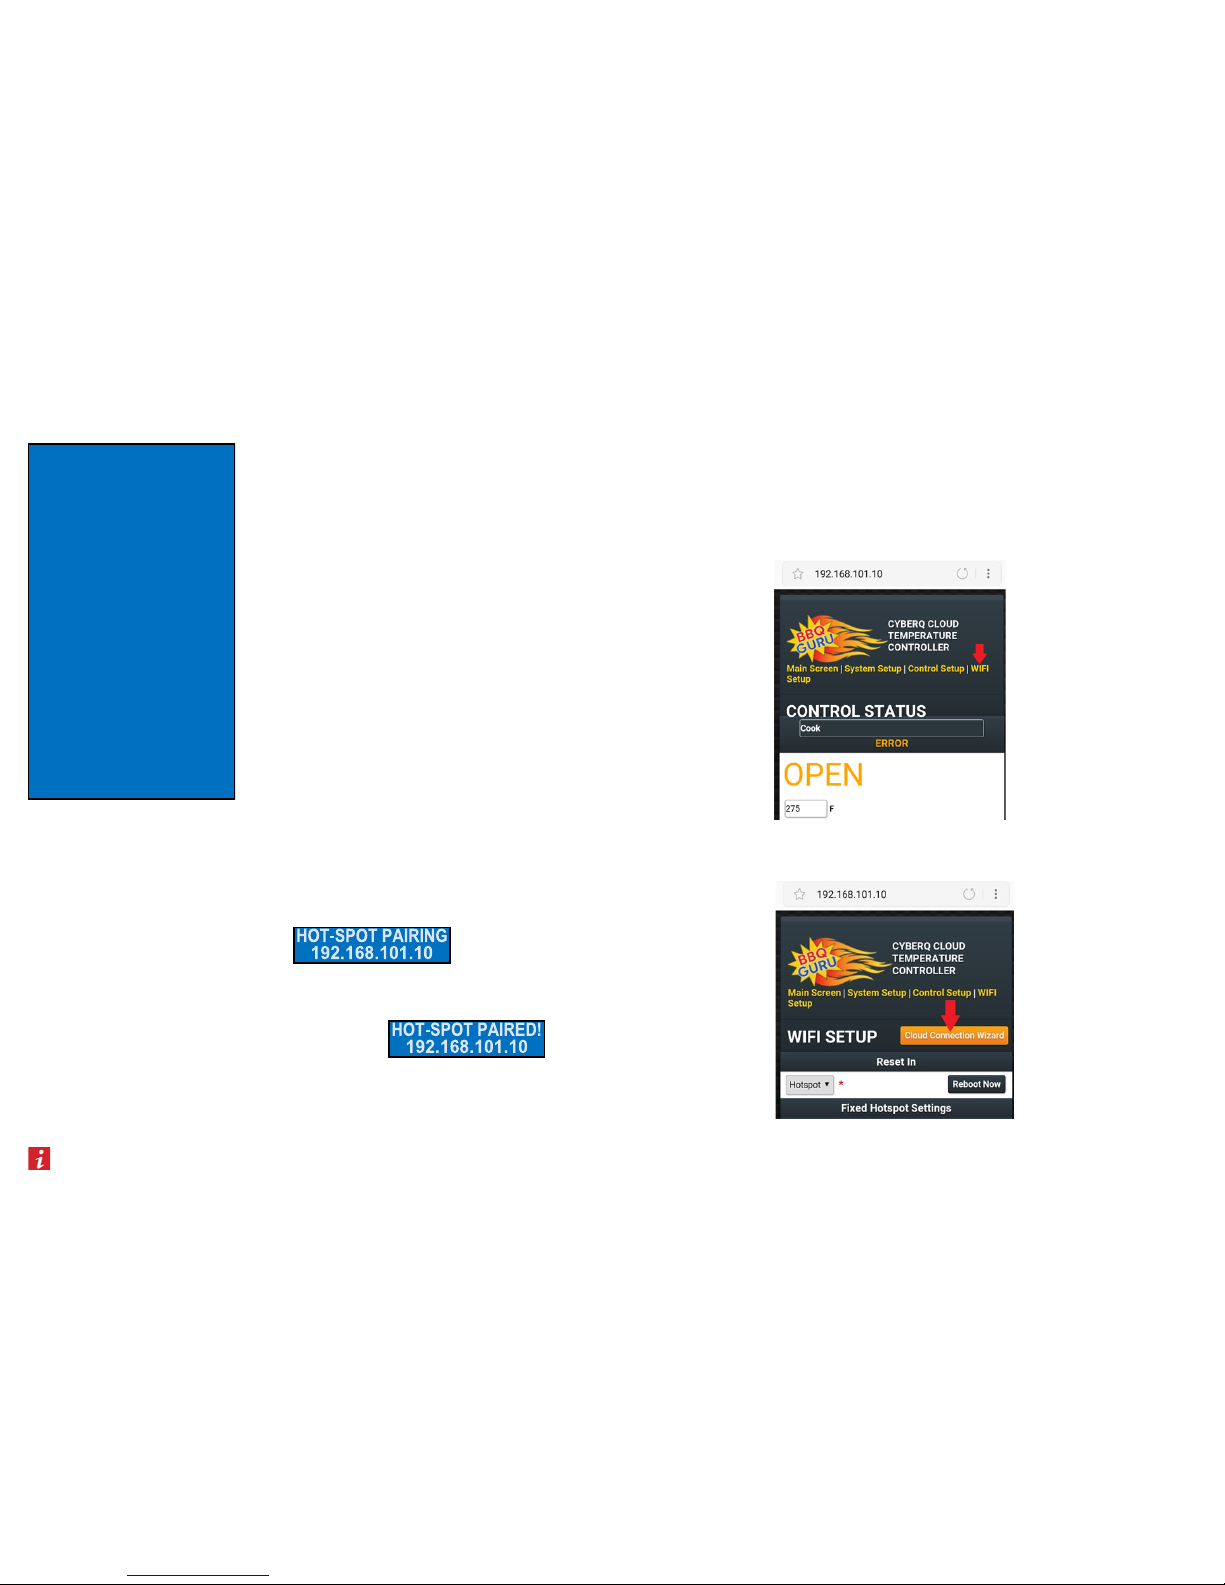
4. Open a browser window and type 192.168.101.10
This will load the CyberQ Cloud Controller pages.
From this browser window, you can monitor and control your cook and make
changes to the setup of the controller.
Networking Quick Start Guide
Before setting up the CyberQ Cloud, go to www.sharemycook.com and create an
account. Also see these instructions at: www.youtube.com/watch?v=7Y2k60Rkmq8
1) Follow the steps to connect your smart phone or tablet to the CyberQ Cloud
under the PAIRING DEVICES TO THE CYBERQ CLOUD IN HOT-SPOT MODE
section.
2) At the top of the page, click the link that says WIFI SETUP
3) Click on the yellow button that says Cloud Connection Wizard.
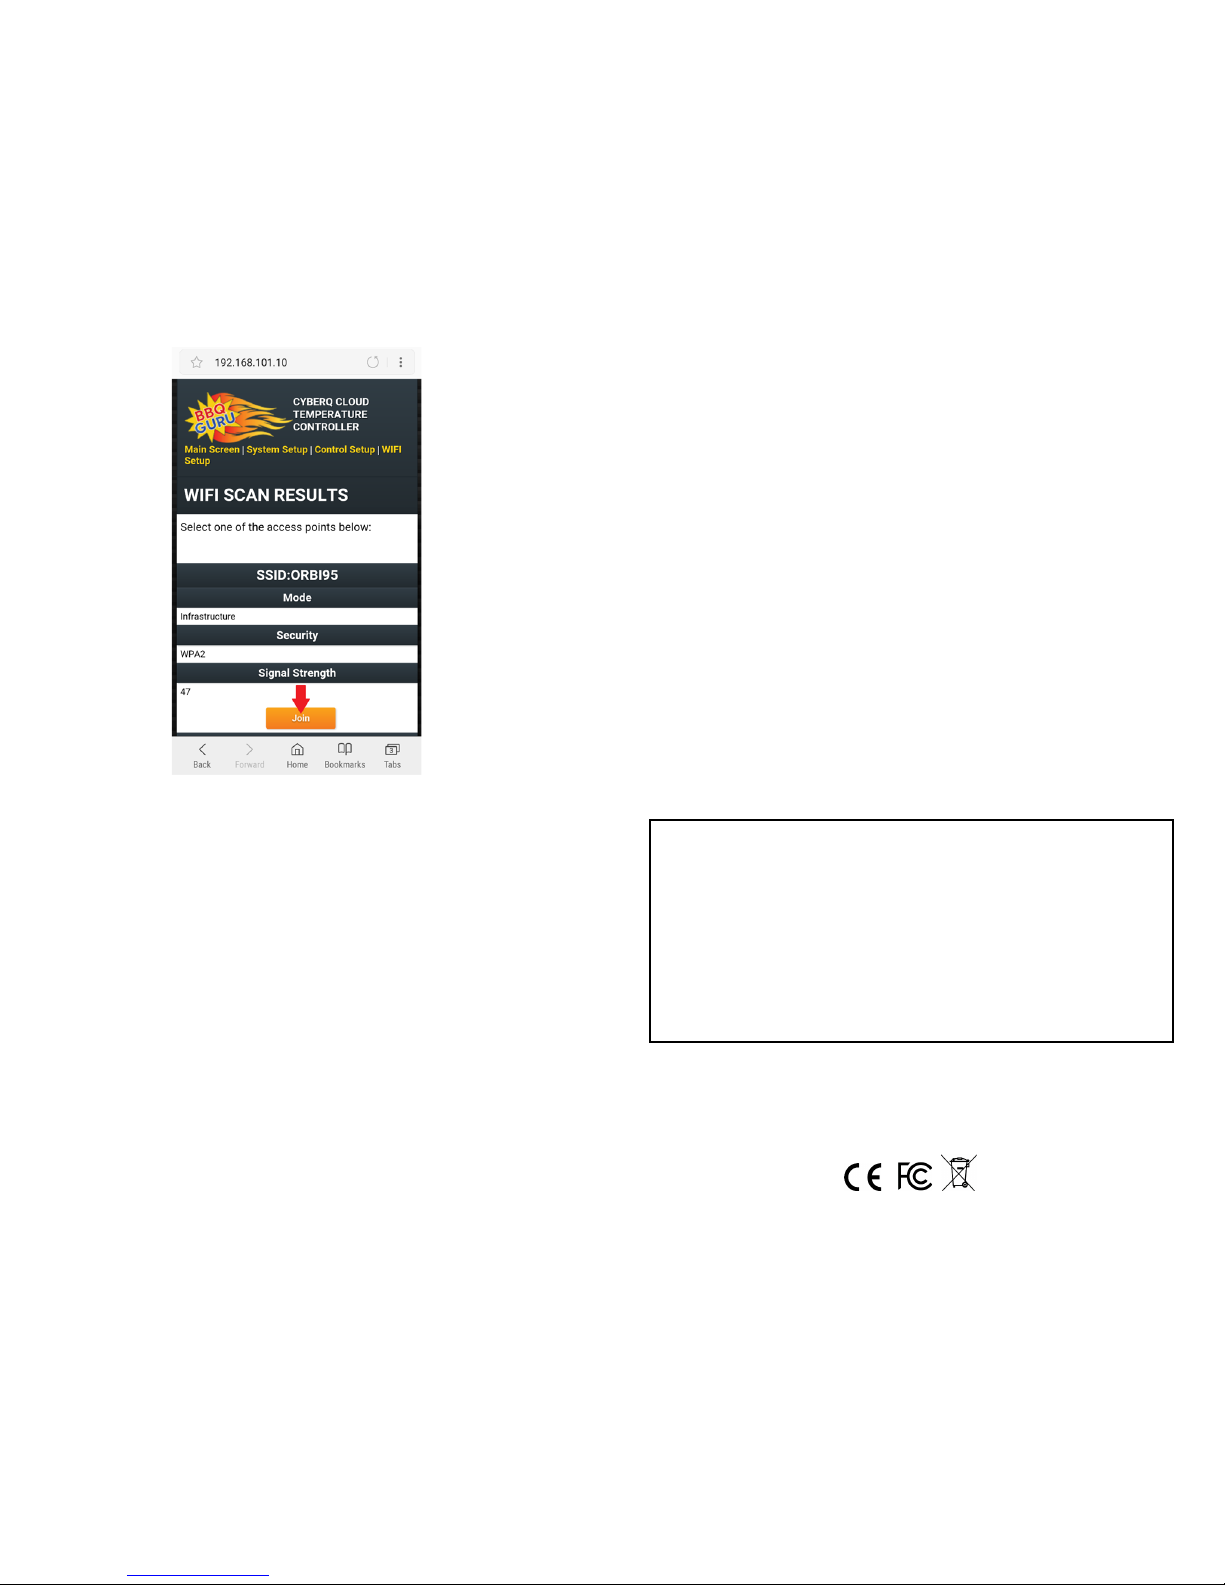
4) The CyberQ Cloud will scan for nearby WiFi routers. This can take up to 60
seconds. Scroll down to see the available networks. Find your home network and
click Join.If your WiFi router requires a password, type in the password and
click Submit.
5) The CyberQ Cloud will restart and connect to the internet. If successful, the
CyberQ Cloud will show an IP address number.
You may now switch back to your default network on your smart phone or
tablet to access the internet.
6) After the device restarts and syncs to your router, it will prompt you for a regis-
tration pin. Follow the instructions on your device to go to ShareMyCook.com.
Log in and go to Add a Device to get your pin.
7) Enter your pin in the CyberQ Cloud and hit the Enter button. When the screen
shows Registration Successful, setup is complete. You can now control the
CyberQ Cloud through the ShareMyCook.com website.
ENVIRONMENTAL OPERATING CONDITIONS:
Temperature: 5°C to 40°C
Relative Humidity: 80%
Altitude: 2000 meters
Ingress Rating: IP54
Accuracy: ± 1.2°C (5°C to 40°C ambient), ± 2.8°C (40°C to 245°C ambient)
Controller Input Supply: 12VDC, 2Amp, 24 Watt max
Power Supply Adapter: 90VAC to 264VAC, 47Hz to 63 Hz
Safety to EN60950-1
Energy Efficiency Level VI, and CoC Tier2
Configuration: Wall Plug-in
Wi-FI Module: Contains Transmitter Module FCC ID: W70MRF- 24WG0MAMB with Radio regulation
certification for United States (FCC), Can- ada (IC), Europe (ETSI), Korea(KC), and Japan (ARIB) 2.4
GHz, IEEE Std. 802.11b/ g™, and WiFi® certified (WFA ID: WFA16869)
The Wi-Fi components in this product have been certified under Wi-Fi 802.11withWPA2™, and WPA™
System Interoperability ASD Model Test Plan with Test Engine For IEEE 802.11b and g Devices). Other
2.4GHz devices, such as cordless phones and wireless networked devices, may cause interference with
the CyberQ Cloud Wi-Fi and prevent a reliable connection. It is the customer’s responsibility to diagnose
the source of the interference and determine which devices need to be turned off or eliminated from the
installation.
This equipment has been tested and found to comply with the limits for a Class B digital device,
pursuant to part 15 of the FCC Rules. These limits are designed to provide reasonable protection
against harmful interference in a residential installation. This equipment generates, uses and can
radiate radio frequency energy, and if not installed and used in accordance with the instructions, may
cause harmful interference to radio communications. However, there is no guarantee that interference
will not occur in a particular installation. If this equipment does cause harmful interference to radio or
television reception, which can be determined by turning the equipment off and on, the user is
encouraged to try to correct the interference by one or more of the following measures:
Reorient or relocate the receiving antenna.
Increase the separation between the equipment and receiver.
Connect the equipment into an outlet on a circuit different from that to
which the receiver is connected.
Consult the dealer or an experienced radio/TV technician for help.
Other manuals for Cyberq Cloud
1
Table of contents
Other BBQ Guru Thermometer manuals

Popular Thermometer manuals by other brands


Omega Engineering
Omega Engineering HH501BJ manual

Fluke
Fluke 1552A Ex Calibration manual

CDN
CDN ProAccurate DTW450L Installation and operating instructions

Oregon Scientific
Oregon Scientific RAR186 owner's manual

lavatools
lavatools Javelin Pro user manual

Hanna Instruments
Hanna Instruments HI 93551R instruction manual