BC Northern Lights BloomBox User manual

B C N O R T H E R N L I G H T S
Mothership Manual
THANK YOU FOR CHOOSING THE BC NORTHERN LIGHTS Mothership
Although this innovative product is very straight-forward to use, the following
manual contains a few guidelines to make your growing experience easier.


Table of Contents
Parts Checklist
Chapter 1: Mothership Assembly
A. Vegetation Chamber Assembly
B. PowerCloner Assembly (optional)
Chapter 2: Machine Operation Overview
A. GroSmart Control Center Overview
B. Vegetation Chamber
Chapter 3: Growing in your Mothership
A. PH Balancing
B. Seed Germination and Clone Propagation
Chapter 4: Maintaining Your Machine
A. Cleaning Your Machine
B. Important Reminders
Chapter 5: Frequently Asked Questions
Contacts
4
6
6
8
9
9
10
11
11
13
16
16
16
17
21

4
BC Northern Lights
Parts Checklist
The following accessories should be loose inside your unit:
#1001: 2 1-Gallon Square Pots #1002: 2 Coco Grow Medium #1003: Coco Carbon Filterr
#1010: Power Cloner (optional) #1011: 400W Metal Halide Bulb #1012: Clone Tray
#1004: Mothership Keys #1005: 1 - 3” Rockwool Sleeves #1006: 49 - 1” Rockwool Cubes
#1007: Hydro Tub #1008: Hydro Lid (optional) #1009: Clone Dome

5BloomBox Manual
Tools Required
Screwdriver (Robertson bit provided)•
CO2 regulator wrench (provided)•
Glass cleaner and cloth•
Useful Tools
Cordless Drill (Drill Bit provided. Used for removing top during bulb installation)•
Hair Dryer (Used for easier installation of pump adapters and air stones)•
Power Bar (Allows unit to be plugged in to 1 wall outlet)•
Flathead Screwdriver (Setting up C02 reg. to tank)•
#1013: Monkey Juice Grow A & B #1014: Robertson Screwdriver Bit #1015: Warranty Sheet

6
BC Northern Lights
Chapter 1: Mothership Assembly
Do not plug the machine into the wall outlet until the machine is fully assembled and you have
readtheinstructions.Thepumpsshouldnotbepluggedintothetopofthemachineunlessthere
is water in the tubs.
A. Vegetation Chamber Assembly
__________________________________________________________________________________________
Ensure that both the vegetation and ower rocker switches are o (down) (1. see g. 1.1), this will
ensure that the lights are o when the machine is plugged into the wall.
Remove all accessories and parts from the tub inside the unit. It is a lot easier to assemble your2.
Mothership with everything outside the unit.
Remove the Mothership chamber lid using your drill and the robertson bit that is provided. (3. g. 1.2)
Attach the square white coco carbon lter at the air circulation fan located on the back right of the4.
machine with the 4 bolts provided. (g. 1.3)
Remove the 2 nuts from the metal glass clip on the bottom side of the glass from inside the grow5.
chamber. There are 2 metal glass clips, remove the nuts from the metal glass clip located more towards
the front of the Mothership. (g. 1.4) This will let the glass swing open and down into the chamber. Be
careful with the glass and lower gently. (g. 1.5)
Install the 400-watt MH bulb from inside the growth chamber. Turn bulb clockwise and do not over6.
tighten. Try not to touch the bulb with your ngers since the oils from your ngers can harm the bulb.
(g. 1.6)
g. 1.1 g. 1.2 g. 1.3
g. 1.4 g. 1.5 g. 1.6

7BloomBox Manual
Close the glass and tighten the 2 glass clip nuts. (7. g. 1.7)
Place the Mothership lid back on top and tighten the bolts. (8. g. 1.8)
Place the 2 gallon pots in the tub and insert the coco coir bricks. (9. g. 1.9)
g. 1.7 g. 1.8 g. 1.9
Helpful Hints
You may need to soak the adapter in hot water to make inserting easier.•
Make sure both the pump cord and clear airline are placed in the notch at the back of the tub.•
Place the tub in the chamber at a 45 degree angle to make placing the tub easier.•
8
BC Northern Lights
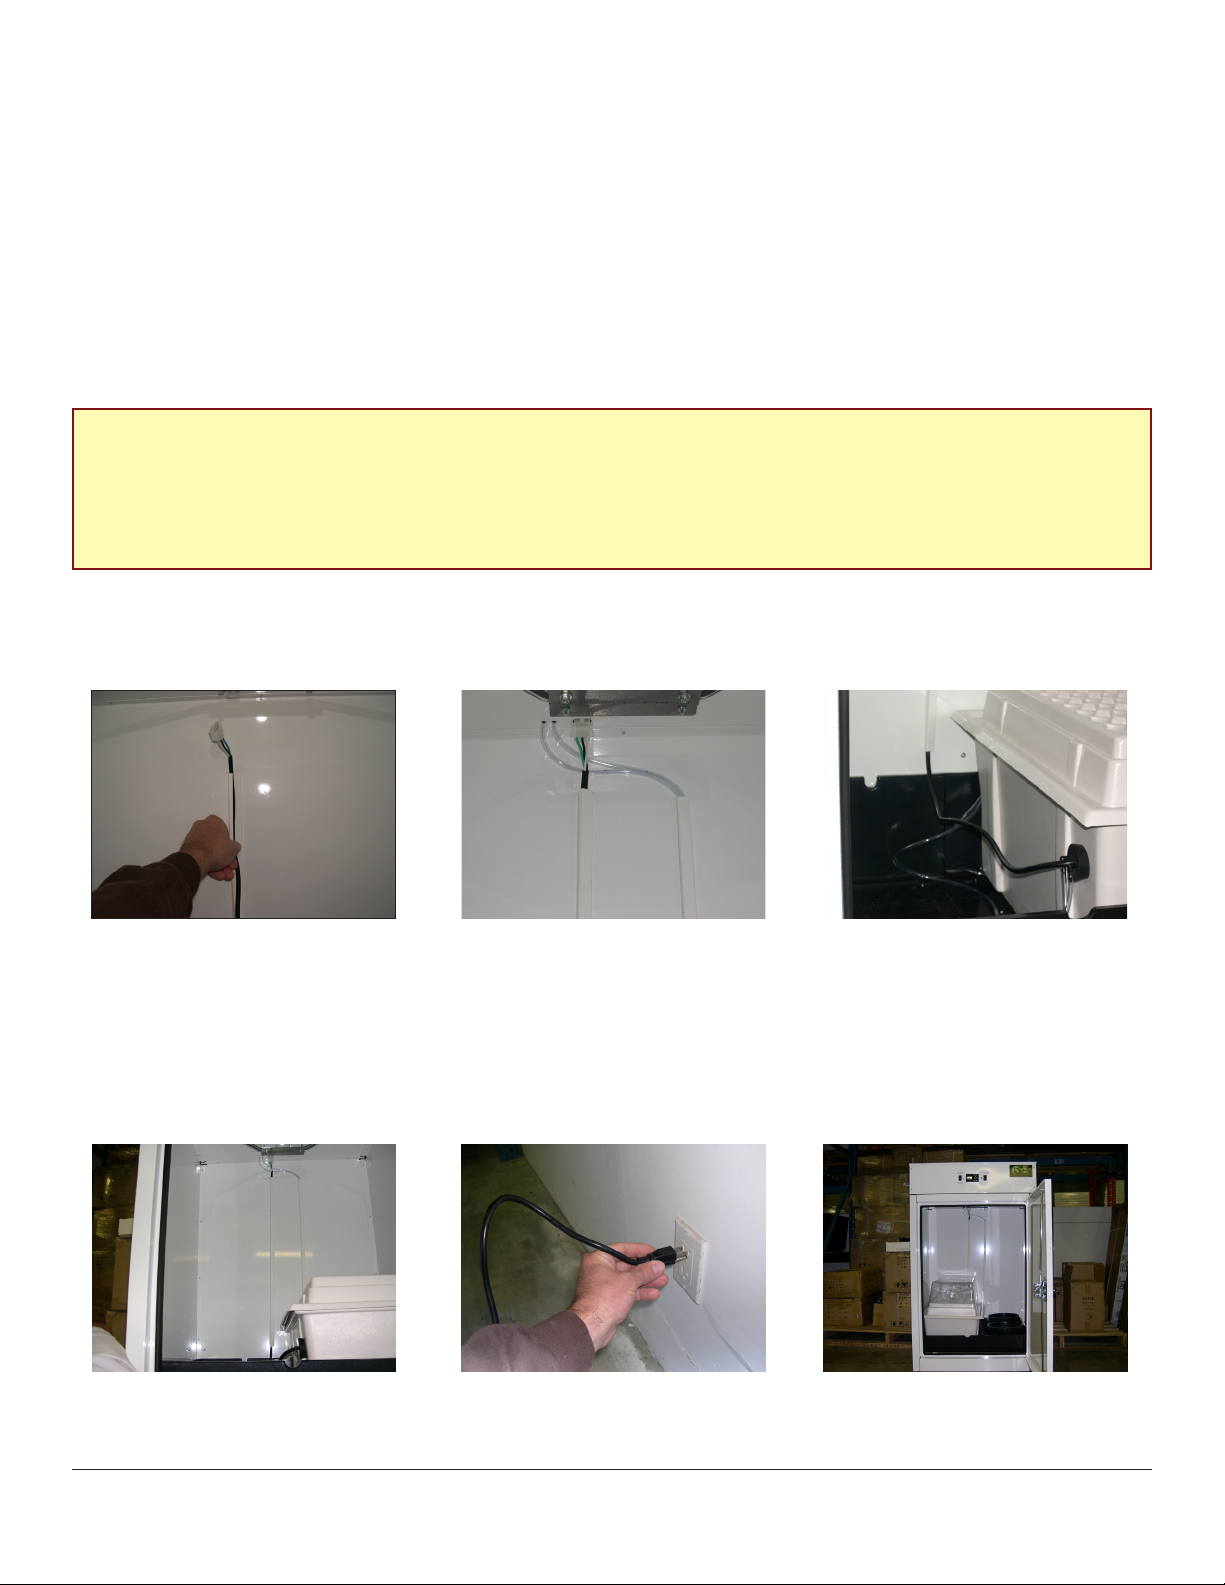
B. PowerCloner Assembly (optional)
__________________________________________________________________________________________
Open Up PowerCloner box and remove all contents.1.
Please read through the PowerCloner parts checklist amd pump maintenance before attempting the set2.
up instructions.
Read through the PowerCloner set-up instructions and complete steps 1 through 15.3.
Once the PowerCloner is completed insert the PowerCloner pump cord in the plastic white channel4.
located in the back of the Mothership chamber. (g 2.1) The channel opens from one side. Plug the
white end into the receptacle at the top. (g 2.1)
Connect the 2 airlines (running out of the bottom of the raceway) to the 2 black grommet on the5.
neoprene cork on the Power Cloner. (g 2.2)
Oxygen is supplied to the water in the cloner through the air pump. It is important that the air pump be6.
running at all times as it provides the oxygen necessary for the roots to stay alive.
Plug your Mothership located on the back of the machine into a 110V grounded receptacle. This is the7.
most common electrical outlet in a house. (g 2.4)
g. 2.3 g. 2.4 g. 2.5
g. 2.0 g. 2.1 g. 2.2
Warning
Only plug the PowerCloner in when water is in the cloner
and you are ready to begin using it.

9BloomBox Manual
Chapter 2: Machine Operation Overview
A. GroSmart Control Center Overview
__________________________________________________________________________________________
BC Northern Lights has taken great pride in oering you the most state of the art control center available.
After years of testing and research with data loggers, and other scientic instruments we are condent that
all levels of the Mothership are perfect.
The GroSmart control center has already been pre-programmed for you and will ensure that throughout the
day your plants will have optimal levels of light, air movement, CO2, and water/nutrient solution. Please see
below on how to initialize your pre-programmed customized control center.
The GroSmart is the heart and soul of your Mothership. Please make sure that before you plug the machine
in that all switches are in the OFF position. Before you can start to enjoy using your new machine, you must
rst set the time. You can set the time on your Mothership only when all of your switches are o.
Setting Time and Date on your Mothership
The Mothership control center is already pre-programmed with light and watering cycles, all you need to do
is set the clock to your local time.
To do this from the main display (screen A.) rst press the OK key.•
From the sub menu (screen B.) use the up/down arrow keys to select SET•
CLOCK & press OK (screen C. will appear) SET CLOCK will be ashing.
Press OK again to get to (screen D.) The last digit of the date will be•
highlighted & ashing, press OK. The number will begin to ash and it can
now be changed (screen E.)
Use the up/down arrow keys to change the day & the left/right arrow keys to•
move the cursor from left to right. Set the month & year the same way using
up/down keys.
When done use the left or right arrow key to move cursor to bottom line•
(screen E.)You can now use up/down keys to set the time
When clock is set press OK to conrm (screen F. will appear) If the time is•
correct then press OK (screen 3. will appear) From screen 3. press the ESC key
twice to return to the main screen
You are now ready to use your machine. Please refer to machine operation
overview in Chapter 2 for instructions on engaging your lights.
A) MOTHERSHIP/ 00:00
SYSTEM OFF
B) PROGRAM
RUN
PARAMETER
C) SET CLOCK
SUMMER TIME
F) SET CLOCK
SET?
E) SET CLOCK
yy/mm/dd
07/04/20
D) SET CLOCK
yy/mm/dd
07/04/2_
Helpful Hints
Clock is in 24hr format*•
Example 4:20 pm = 16:20 / 4:20 am = 4:20 (add 12 after = 1:00pm)•

10
BC Northern Lights
B. Vegetation Chamber
__________________________________________________________________________________________
This machine is used to vegetate mother plants as well as propagate seedlings and newly cut clones. A 400
watt metal halide bulb is used in to accomplish this which will provide an ideal lighting spectrum for lush
vegetative growth. When you are ready to use the light, turn the rocker switch either up or down depending
on what schedule you prefer. You will have 2 lighting schedules for your preference. The majority of people
use 18/6. The middle on the rocker switch is the o position.
Vegetation Schedule
The timer that operates this chamber is programmed as follows:
Vegetation Schedule
6:00 AM ON 18 HOURS ON /6 HOURS OFF
12:00 AM OFF
OR
24 HOURS CONSTANTLY ON
Clone Dome
The cloning tray provided is used to propagate your plants from seed or cuttings. The seedlings are grown in
the dome until a good root system is visible protruding out of the 1-inch rock wool cubes. The clear dome is
placed close to the bulb and will allow water to condense on the inside of the lid to create the warm humid
environment that is needed during the propagating stage.
PowerCloner (Optional)
The PowerCloner allows you to easily replicate your favorite plants. Plant propagation is quick and easy with
the 45-site aeroponic PowerCloner. In this system, cuttings are sprayed with a high output pump and microjets
to deliver a highly oxygenated rooting solution to plants that will exhibit root growth within 5 to 10 days. The
right hand rocker switch is either o (down position) or on (up position).
Vegetation in Your Mothership’s 2 gallon pots
The newly rooted cuttings or seedlings are placed here after a good root structure is developed in the clear
clone dome. The one-inch rock wool cubes are placed inside the larger 3-inch Rock wool cubes and then
inserted in to the coco coir bricks in your 2 gallon pots.

11 BloomBox Manual
Chapter 3: Growing in your Mothership
Before you begin using the Mothership there are a few basic things you should know about growing in the
machine in order to have successful yields.
The Mothership is designed for vegetative growth and that requires 18 or 24 hours of sunlight in the blue
color spectrum, while owering requires 12 hours of light in the red color spectrum. The plants should not
be disturbed when they are in the darkness stage of their day if you choose the 18 hour cycle.
A. PH Balancing
__________________________________________________________________________________________
Plant growth occurs best when there is an optimal pH level. Anytime water is given to your plants it
should be pH balanced. pH Balancing your water and nutrient mixture is of the utmost importance. It
is recommended that a pH pen be used to monitor your pH levels to ensure productive healthy plants.
First you will need to calibrate you pH pen.
Pour a couple of ounces of calibration solution (buer 7.0) in a small cup or shotglass.
Turn pH pen on and place in solution. Make sure you only dip pen in the solution about an inch or so. You
don’t want liquid to get into the electrionics of the pen

12
BC Northern Lights
Using the small screwdriver turn dial on the back of the pen until it reads 7.0
Discard calibration solution. Do not re-use.
Once you have successfully calibrated your pen you are ready to accurately measure the pH of any
mixture you add to your plants. You should re-calibrate your pen every couple of weeks by repeating
steps 1 through 4. When you are ready to add a nutrient mixture to your plants pH balance and adjust
accordingly.
Place pH pen in nutrient mixture.•
If pH reads above 5.6 you will need to add pH down. Add a few drops at a time until pH reads 5.6.•
Be careful not to pour too much in the mixture.
If pH reads below 5.6 you will need to add pH up. Add a few drops at a time until pH reads 5.6. Be•
careful not to pour too much in the mixture.
Turn o pH pen after using it and place in a couple ounces of calibration or storage solution. You do•
not want the probe to dry out.
Warning
Do not immerse your PH or PPM pen more than 1 to 2 inches into the nutrient or
calibration solutions.

13 BloomBox Manual
B. Seed Germination and Clone Propagation
__________________________________________________________________________________________
To begin growing in this machine you will need seeds and or clones from a mother plant. Growing from seed
takes more time to get the plants ready to be transplanted to a owering environment. All growth occurs in
this chamber under an 18-hour lighting period or a 24-hour period.
Seed Germination
Soak seeds in a cup of pH-balanced (5.6) water overnight. Do not let seeds soak more than 24 hours.1.
Once soaked seeds are ready to be placed in your jiy pellets or one inch rock wool cubes.
Soak rock wool or jiy pellets in pH-balanced (5.6) water for 5 minutes. Give them a light squeeze2.
to remove excess water.
Sew one seed in each jiy pellet or rock wool cube. Place seed about 1⁄2 inch down center of cube3.
or pellet.
Place rock wool cubes into the clone tray and place the lid on the tray. Keep pellets or rock wool4.
moist. Do not over water. There should not be free standing water in the bottom of the tray.
Place tray in a warm dark location 80 to 90 degrees Fahrenheit.5.
The seedling will begin to germinate over the next few days. As soon as growth is visible it is6.
important to move the clone tray to the light source in your vegetation chamber.
When seed has germinated you can water with a very mild grow mixture (refer to the nutrient7.
feeding manual or applicable nutrient manufacturers instructions for seedlings). Be careful not to
over water.
Mother Plant
The mother plants are grown in the 1-gallon nursery pot provided (#1001) and placed on the side of the
Powercloner (if purchase) for quick removal when pruning or cuttings are required. The coco brick provided
(#1002) is used for your mother plants growing medium.
Place half the brick in a bucket and add water a few cups at a time. Break up the brick and mix well.1.
Keep adding water until the brick is totally expanded and you have uy moist soil like mixture.
Pour the coco mixture into your 1 gallon pot and plant your seedling or cutting that you would like to be2.
your mother plant into the coco brick growing medium.
Your mother plant can be hand watered once or twice a week with a mild vegetative nutrient.3.
Cloning and Propagation without a PowerCloner
Choose a mother plant that is at least 6 weeks old before taking cuttings.1.
Presoak 1 inch rock wool cubes in a mild pH balanced grow solution for 5 minutes2.
Using a clean, sterile scalpel cut a 45-degree angle across a rm branch (1/8”in diameter) about 3 tthrough3.
4 inches from the end of the branch with at least 2 sets of leaves on the end. When cutting your branch,
make cut halfway between sets of nodes.

14
BC Northern Lights
Immediately place cut end of cutting in water and re-cut at a 45-degree angle.This will prevent air bubbles4.
from getting trapped in the center of the stem.
Slightly scrape the outer layer of the sidewall of the cutting stem. This will allow the rooting hormones to5.
penetrate the vascular system to enhance root initiation
Take the bottom end of cutting and dip in rooting hormonal gel and place in 1 inch cube. (6. g 2.6) Be
careful not to rub o gel when pushing in cube.
Place cubes in tray and cover with clear lid. Place clone tray on shelf provided in the Mothership under the7.
metal halide bulb. (g 2.7)
In approximately 7-10 days roots should be visible out the bottom of the cubes. Begin hardening the plant8.
by slowly raising the clear dome o the tray over the period or a few days to get the plants used to the
outside environment.
Once seedlings have established roots and they have been in the clone tray uncovered for a day or two9.
you can place them into the larger 3-inch rock wool cube. (g 2.8, g 2.,9)
Continue to grow the seedlings in the clone tray until you begin to establish roots growing out of the10.
3-inch rock wool cubes. (g 3.0)
You are now ready to place the 3-inch cubes in the coco coir bricks in the 1 gallon pots located in the11.
mothership tub.
Hand water the plants with a mild grow solution every few days until roots begin to grow out of the12.
bottom.
g. 2.8 g. 2.9 g. 3.0
g. 2.6 g. 2.7

15 BloomBox Manual
Cloning and Propagation with the PowerCloner
Please refer to cloning instructions provided with the PowerCloner1.
Once completed step 1 through 17 in cloning instructions provided with the PowerCloner please read2.
the following steps to transplant the seedlings to the rockwool cubes.
Transplanting from PowerCloner to Rockwool
Cut a slit in the 1 inch rockwool from the center of the cube to outer side of the cube. (by cutting the1.
cube you are trying to mimic the functionality of the neoprene pucks provided in the PowerCloner.)
Open up the cut 1 inch rockwool cube wide enough to allow for the seedling to enter unharmed.2.
Remove seedling from the neoprene puck and encase the 1 inch cube around the stem with roots3.
hanging down below.
Lay the roots of the seedling into the hole of the 3 inch cube and push the 1 inch cube into the hole4.
gently.
Repeat steps 1 through 4 for all your seedlings.5.
You are now ready to place the 3-inch cubes in the coco coir bricks in the 2 gallon pots that sit in the
Mothership tub.

16
BC Northern Lights
A. Cleaning Your Machine
__________________________________________________________________________________________
It is extremely important to keep your machine clean and sterile in order to prevent insects and diseases from
invading your machine and destroying your crop. We recommend that the following precautions be taken to
minimize the chance of problems:
Always wash your hands with disinfectant soap.•
Try to wear freshly laundered clothes.•
In between crop cycles wash the walls and tubs with a 10% bleach solution.•
If you have a PowerCloner, follow the pump maintenance and cloner cleaning instructions that come with the unit•
B. Important Reminders
__________________________________________________________________________________________
Never press clear program on your timer or you will have to order a $50 chip to reprogram your Mothership•
Remember to return the override rocker switches to their original position after use.•
Make all connections on machine rst before plugging into wall•
A 400, watt HPS, 430-watt HPS or 400 watt Metal halide bulbs should be put in the machine ONLY.•
Ensure there is water in the PowerCloner whenever the cloner is plugged in. The pump will burn out if run dry.•
Do not block the fans at the rear of the unit. It exhausts the heat that is created from the Metal Halide bulb•
and brings in fresh air for your plants. Leave at least 1 foot of clearance.
Air pump should be running 24 hours a day when using the PowerCloner.•
Do not unplug the machine from the wall with out making sure the lights are o.•
Do not open the door of the machine when the lights are“OFF”The plants are in their night cycle and will•
get confused if light interrupts their sleep.
The internal temperature of the unit should be between 72 and 85 degrees when the lights are on and•
should not drop below 62 degrees when they are o.
Ambient room temperature should be 68 to 72 degrees.•
The clones should be grown for approximately 7 to 10 days or until roots are clearly visible. Using a rooting•
gel will improve you success rate dramatically. Try to create as much humidity as possible.
Once you have established a strain you are happy with you will have to experiment with the amount of•
time you want to grow your plants in the vegetative chamber. Some plants grow tall fast when others are
bushier. If you leave the plants in the vegetative stage for too long they may grow into the glass during the
owering cycle, as they will continue to grow in height in the owering stage.
The owering stage will take 6 to 8 weeks depending on your strain.•
Check reservoirs water levels from day to day. The plants will use more water at dierent stages in growth•
and evaporation can be a factor. If the water levels are low just simply add pH balanced water until desired
water levels are achieved
If you have to remove a plant ensure you put a cover over the mesh pot cutout in order not to let light•
reach the water in the tub.
Chapter 4: Maintaining Your Machine

17 BloomBox Manual
Chapter 5: Frequently Asked Questions
How big are the machines?
Both the Mothership and the Producer are approximately the size of a large freezer. The Mothership and
Producer measures 50 inches tall x 54 inches wide x 26 inches deep. The Mother Ship measures 47 inches tall
x 28 inches wide by 26 inches deep.
How big is the dryer and how long does it take to dry?
The Dryer is approximately 2 feet tall X 2 feet wide X 2 feet tall. It holds 3 - 18” X 21” screens. Curing
times vary depending on the food type. Generally 2 to 4 days is all you need..
Do you provide tech support?
Absolutely! You can call us toll free with any question you may have. (Any reference to the cultivation
of marijuana or any other illegal substance will result in the immediate termination of the phone call).
What is the main dierence between the Mothership and Producer?
The Producer is essentially a full owering unit that oers larger yields while the Mothership is a dual chambered
allowing simultaneous growth of the vegetative and Flowering stages. The Mothership also houses a mother
plant to provide cuttings for future cycles.
What is the Mothership used for?
The mother ship is a smaller unit that can be used to house up to 4 mother plants to take cuttings to supply
multiple Mothership and Producers or simply for those customers who do not require the larger yields of the
Mothership or Producer and just want to ower 4 mature plants.
Can you Flower in the Mothership?
Yes all stages of growth can be accomplished in this unit.
Can I grow in soil in the Mothership or Producer?
Yes, the units can be purchased with or without the hydro option.
Do you oer a warranty?
Yes, we oer a full 1 year warranty on all parts excluding bulbs. We cannot warranty light bulbs.
How easy are the Mothership and Producer to set up and operate?
Quite simple! These units have been designed with the novice grower in mind. Setup time is minimal
and everything is preprogrammed at the factory for ease of use.
How long does it take for my machine to arrive?
We ship on the 5th and 20th of every month. Shipping usually takes 5 to 7 business days.

18
BC Northern Lights
What type of payment do you accept?
Visa, M/C, Cashiers check and International money orders.
How much power do these machines draw?
About the same as a refrigerator (Approximately 6 amps). This translates in about $15 to $20 per
month.
How warm does the Mothership and Producer get?
The Mothership and Producer utilize 5 strategically placed fans throughout to ensure cooler operating
temperatures. If the ambient room temperature is kept at 70 -72 degrees Fahrenheit the chamber temperature
will stay below 80 degrees.
Are the fans supposed to be running even though my lights are o?
Yes, the fans will run continuously as long as the machine is plugged in and the program is activated.
This ensures constant negative pressure to reduce odor.
My pump is not turning on when it is supposed to.
Ensure that the pump rocker switch is in the down position. Ensure that the pump adapter is connected
properly.
How do I manually engage my watering pump?
Turn the watering rocker switch to the up position. As a safety precaution the pump will automatically
stop after 20 minutes. Remember to return the rocker switch to its down position or the pump will not
water during its programmed cycle.
How often do my pumps cycle?
The pumps are programmed to cycle twice per day for 5 minutes.
How often do I change the water?
It is recommended that you change the water nutrient mix every 5 to 7 days. A PH pen and PPM tester
are recommended to ensure water nutrient strengths are optimum.
Is it Ok that when I drain my tubs there is still a bit of water left?
Yes there should always be a few inches or water in your tubs to ensure the pumps don’t run dry.
The CO2 is not injecting when it is supposed to.
Ensure the CO2 rocker switch is in the down position. Ensure the tank valve is open. Ensure the
regulator is set to 5 psi.
How do I manually engage my CO2?
Turn the CO2 rocker switch to the up position. As a safety precaution Co2 will automatically stop
injecting after 20 minutes. Remember to return the rocker switch to its down position or Co2 will not
inject during its programmed cycle

19 BloomBox Manual
How often does CO2 inject?
CO2 will inject periodically throughout the daylight period to maintain an average of 1200 to 1600
ppm.
When should I begin to use CO2?
Begin to use Co2 at week 2 of the owering stage only if your plants show vigorous health.
Where can I purchase a CO2 tank?
CO2 must be purchases locally at a beverage or hydroponics stores. We cannot ship CO2 tanks.
How long will a 20lb CO2 take last?
The tank should last for approximately 4 to 6 weeks.
What temperature should the inside of the chamber be?
Optimal internal temp should be 72 degrees Fahrenheit to 86 degrees Fahrenheit.
What temperature should the outside of the chamber be?
Optimal ambient room temp should be 68 degrees Fahrenheit to 72 degrees Fahrenheit.
How close should the plants be to the glass in the top of the owering chamber?
Try and prune the tops of the plants so they are 2 to 4 inches below the glass.
What is the lighting schedule in each of the chambers in the Mothership?
The smaller vegetation chamber should be set for 18 hours on and 6 hours o. The larger owering
chamber should be set at 12 hours on 12 hours o.
What is the lighting schedule in the Producer and can I vegetate my plants in this machine?
The Producer is primarily used as a full owering machine however with the addition of the Fluorescent
bulb option propagating plants can be achieved quite easily. The Producer is pre-programmed for a
owering cycle of 12 hours on and 12 hours o. If you choose the vegetation option for this machine
the timers will need to be re-programmed to an 18 hour on and 6 hour o lighting period.
How tall should the plants be vegetated in the Producer before switching to the owering cycle?
Plants should not spend much time in the vegetative stage with in the Producer. Plants normally 8 to 10
inches in height (depending on strain) with a good root structure before they are ready to switch to the
owering lighting schedule. The producer is designed to grow plants short but densely packed.
How tall should the plants be in the Mothership before they are moved from the vegetation chamber to the
owering chamber?
Depending on the strain the plants should be 8 to 10 inches tall before switching to the owering side.
More importantly good root development should be established.

20
BC Northern Lights
What prevents the High Pressure Sodium bulb from making the unit too hot?
The bulbs are located in a glass sealed chamber that houses its own separate exhaust fans to remove
the heat immediately. One fan directs cool air across the bulb while the second exhausts the heated air
created from the bulb.
How long does the lter last?
The lter should last approximately 1-2 years.
How do I know what nutrients to use?
Included with the unit are a set of nutrient mixing instructions and a set up manual. The nutrient mix
is broken down into a week-by-week schedule to make the machine more user-friendly.
How long should the clones be propagated?
The clones should be grown for 7 to 10 days or when roots are clearly visible.
How long should the plants be in the owering chamber?
Depending on the strain, 6 to 8 weeks.
What should the PH level read in my nutrient tank?
Ph levels should be between 5.5 and 6.5
What should the PPM read in my nutrient tank?
PPM levels will vary depending on the stage of growth. Typical PPM levels are between 800(Mild) and
2000 (Strong)
My drip emitters are clogged?
Simply soak in a hot lemon juice solution.
How far down do I place the seed in the rock wool?
Place the seed approx 1 inch deep.
Other manuals for BloomBox
1
Table of contents
Other BC Northern Lights Lawn And Garden Equipment manuals

Popular Lawn And Garden Equipment manuals by other brands

Sunforce
Sunforce SOLAR user manual

GARDEN OF EDEN
GARDEN OF EDEN 55627 user manual

Goizper Group
Goizper Group MATABI POLMINOR instruction manual

Rain Bird
Rain Bird 11000 Series Operation & maintenance manual

Cub Cadet
Cub Cadet BB 230 brochure

EXTOL PREMIUM
EXTOL PREMIUM 8891590 Translation of the original user manual


Vertex
Vertex 1/3 HP Maintenance instructions

GHE
GHE AeroFlo 80 manual

Land Pride
Land Pride Post Hole Diggers HD25 Operator's manual

Yazoo/Kees
Yazoo/Kees Z9 Commercial Collection System Z9A Operator's & parts manual

Premier designs
Premier designs WindGarden 26829 Assembly instructions

Snapper
Snapper 1691351 installation instructions