BE Power Equipment 126 LSED10T20 User manual
AUS
Model: 126 LSED10T20
Electric / Hydraulic
Dual Action Log Splitter
OPERATOR’S MANUAL

Please read the manual first. It will help you assemble, prepare, operate and maintain the unit for best
performance. Pay special attention to the safety instructions before operating. For future reference, please
copy the model number and the serial number of the equipment you purchased in the space below.
Model Number:
Serial Number:
If you have difficulty or any problems regarding the assembling, operation or maintenance of this unit,
please call customer support of an authorized dealer or the manufacturer.
Table of Contents
SECTION 1: Know your log splitter
1. Machine overview…………………………………………………………………………..
2. Decals on machine…………………………………………………………………………
4. Technical specifications…………………………………………………………………….
5. Component parts diagram…………………………………………………………………
6. Electric circuit principle diagram…………………………………………………………
7. Hydraulic circuit principle diagram……………………………………………………….
SECTION 2: Safe operating instructions
1. Assembling your log splitter……………………………………………………………….
2. Preparation before operating………………………………………………………………
3. Operation…………………………………………………………………………………..
4. Transportation………………………………………………………………………………
5. Maintenance and repair……………………………………………………………………
6. Storage………………………………………………………………………………………
1
2
2
4
5
7
7
7
8
9
9
10
10
SECTION 1: Know Your Log Splitter
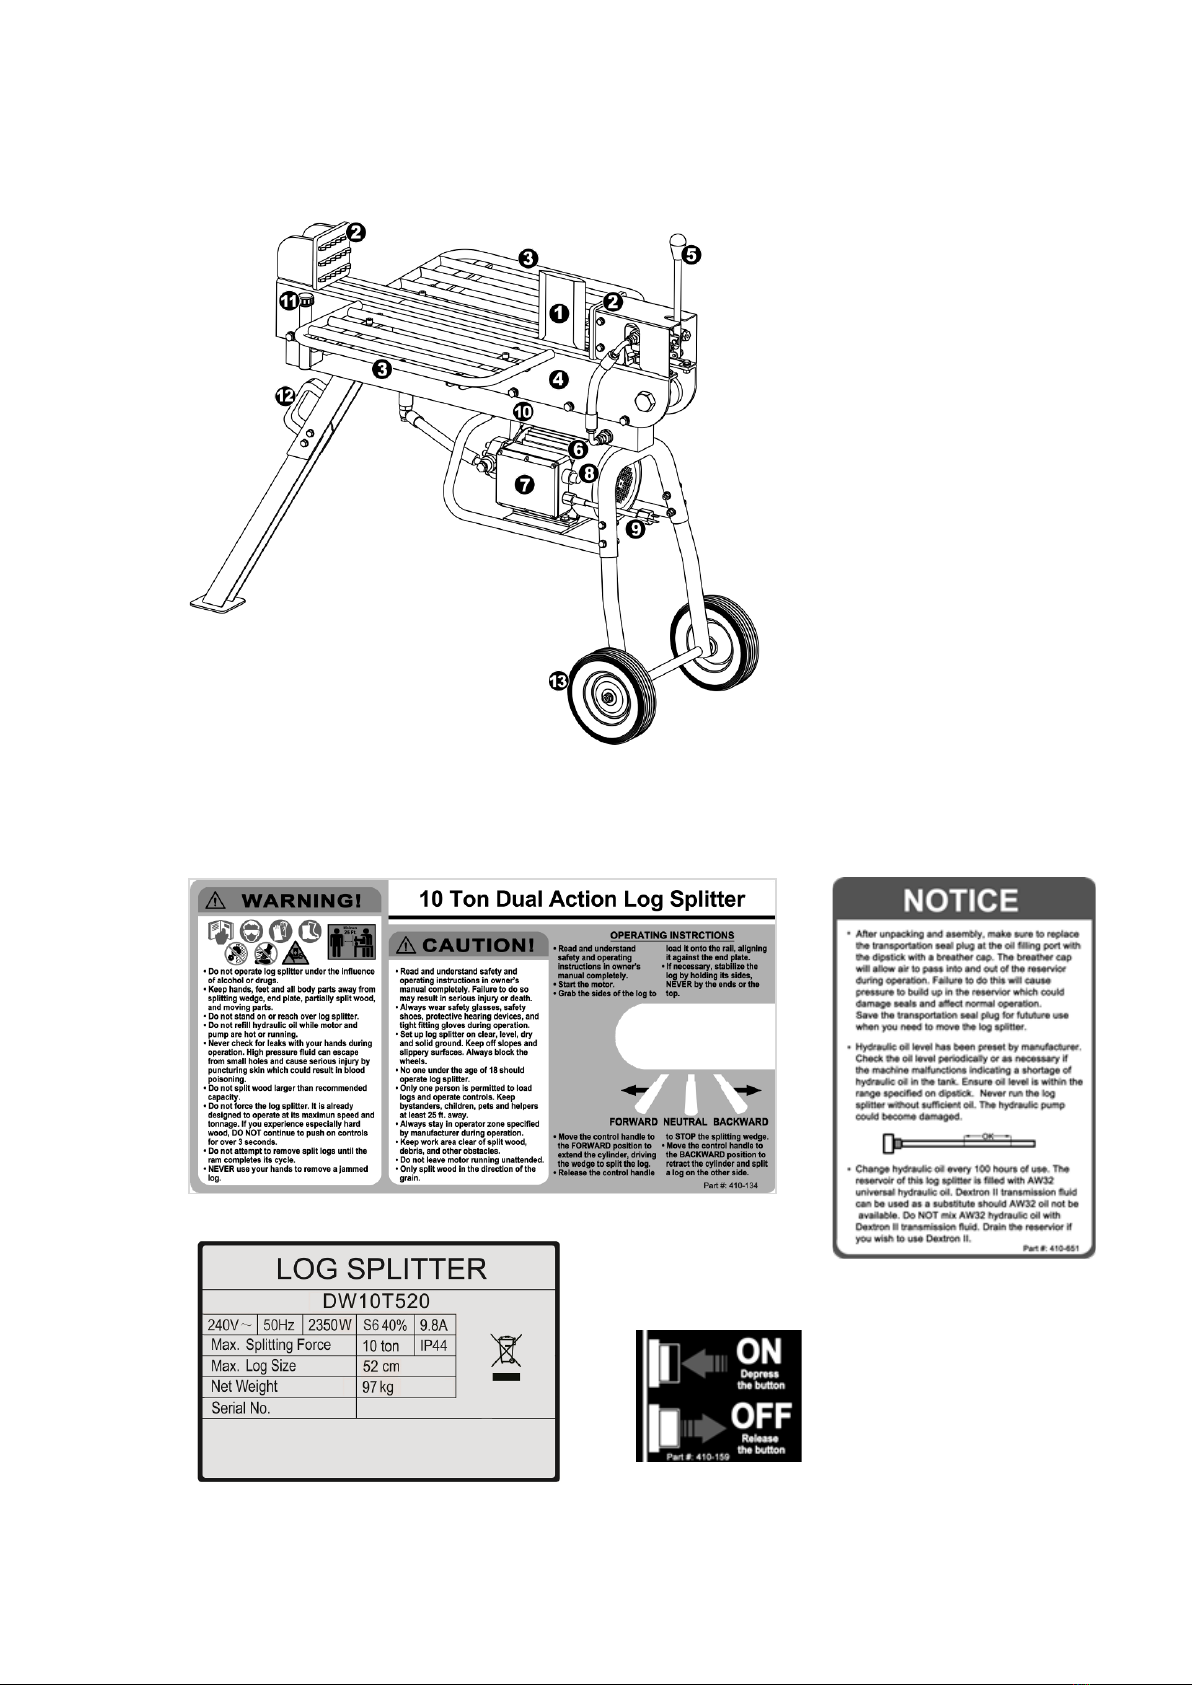
1. Machine overview
1. 2-blade splitting wedge
2. End plate
3. Log tray
4. Machine body
5. Control handle
6. Electric motor
7. Connecting box
8. On-Off switch
9. Power cable
10. Oil reservoir tank
11. Dipstick with breather cap
12. Towing handle
13. Wheel
2. Decals on machine
Locate rating label, operation label and safety labels on the equipment. Read and follow the instructions in
them.
Note: S6 %40, continuous operation periodic duty: time of one load cycle is 10 minutes,
operation time at constant load is 4 minutes, operation time at no-load is 6 minutes.
2

SYMBOL NAME DESIGNATION/EXPLANATION
VVolts Voltage
A
Amperes Current
Hz Hertz Frequency (cycles per second)
WWatt Power
min
Minutes Time
Alternating Current Type of current
Direct Current Type or a characteristic of current
no No Load Speed Rotational speed, at no load
Class II Construction Double-insulated construction
.../min Per Minute
Revolutions, strokes, surface speed, orbits etc., per
minute
Wet Conditions Alert Do not expose to rain or use in damp locations.
Read The Operator’s
Manual
To reduce the risk of injury, user must read and
understand operator’s manual before using this
product.
Eye, Face & Ear Protection
Always wear safety goggles or safety glasses with side
shields, earplugs and a face shield when operating this
product.
Safety Alert Precautions that involve your safety.
Wear Gloves Always wear nonslip, heavy-duty protective gloves
when operating this product.
Wear Safety Footwear Always wear nonslip safety footwear when operating
this product.
Keep Bystanders Away Always keep bystanders at least 25 ft. (7.5 m) away.
Keep Hands Away Always keep hands away from the wedge and the ram.
Pinch Point Never touch the cylinder bed, ram, or wedge during
machine operation.
Rotating & Moving Parts
Alert Beware of rotating and moving parts, serious injury
could occur.
Electric Shock Alert Never touch damaged or exposed wires while the
machine is connected to a power source.
WEEE label
Do not abandon the waste product freely; the product
should be sent to relevant recycle organization.
Dispose of the packing in the proper manner. Should
you wish to part with the product, dispose it in
accordance with the latest provision. Regarding the
detail information, please refer to us.
3

3.Technical specifications
Technical specifications DW10T520
Electrical
Requirement
Voltage 240V±10%
Frequency 50±1 Hz
HVF <0.02
Power input 2350W
Power output 1800 W
Rated current 9.8A
Motor speed 2800 rpm
Thermal protector 130°C
Protection degree IP44
Motor working mode S6 40%
Power cable 3G1.5mm²
Technical specifications DW10T520
Machine dimension
(L×W×H) (cm)
117x66x91.5
Machine net weight 97kg
Min. oil capacity 3.2Liter
Max. splitting force 10ton
Max. splitting length 520mm
Max. splitting diameter 305mm
Hydraulic pressure 22MPa
Cylinder inner diameter 70mm
Feed time 16s
Retract time 13s
Max. cylinder stroke 470mm
Noise emission value ≤68dB(A)
Vibration of control
handle
≤2.5m/s2
Environmental data DW10T520
Operation Altitude ≤1000m
Temperature 5~40℃
Humidity
40°C
≤50%
20°C
≤90%
Transportation & storage temperature (℃) -25~+50
4
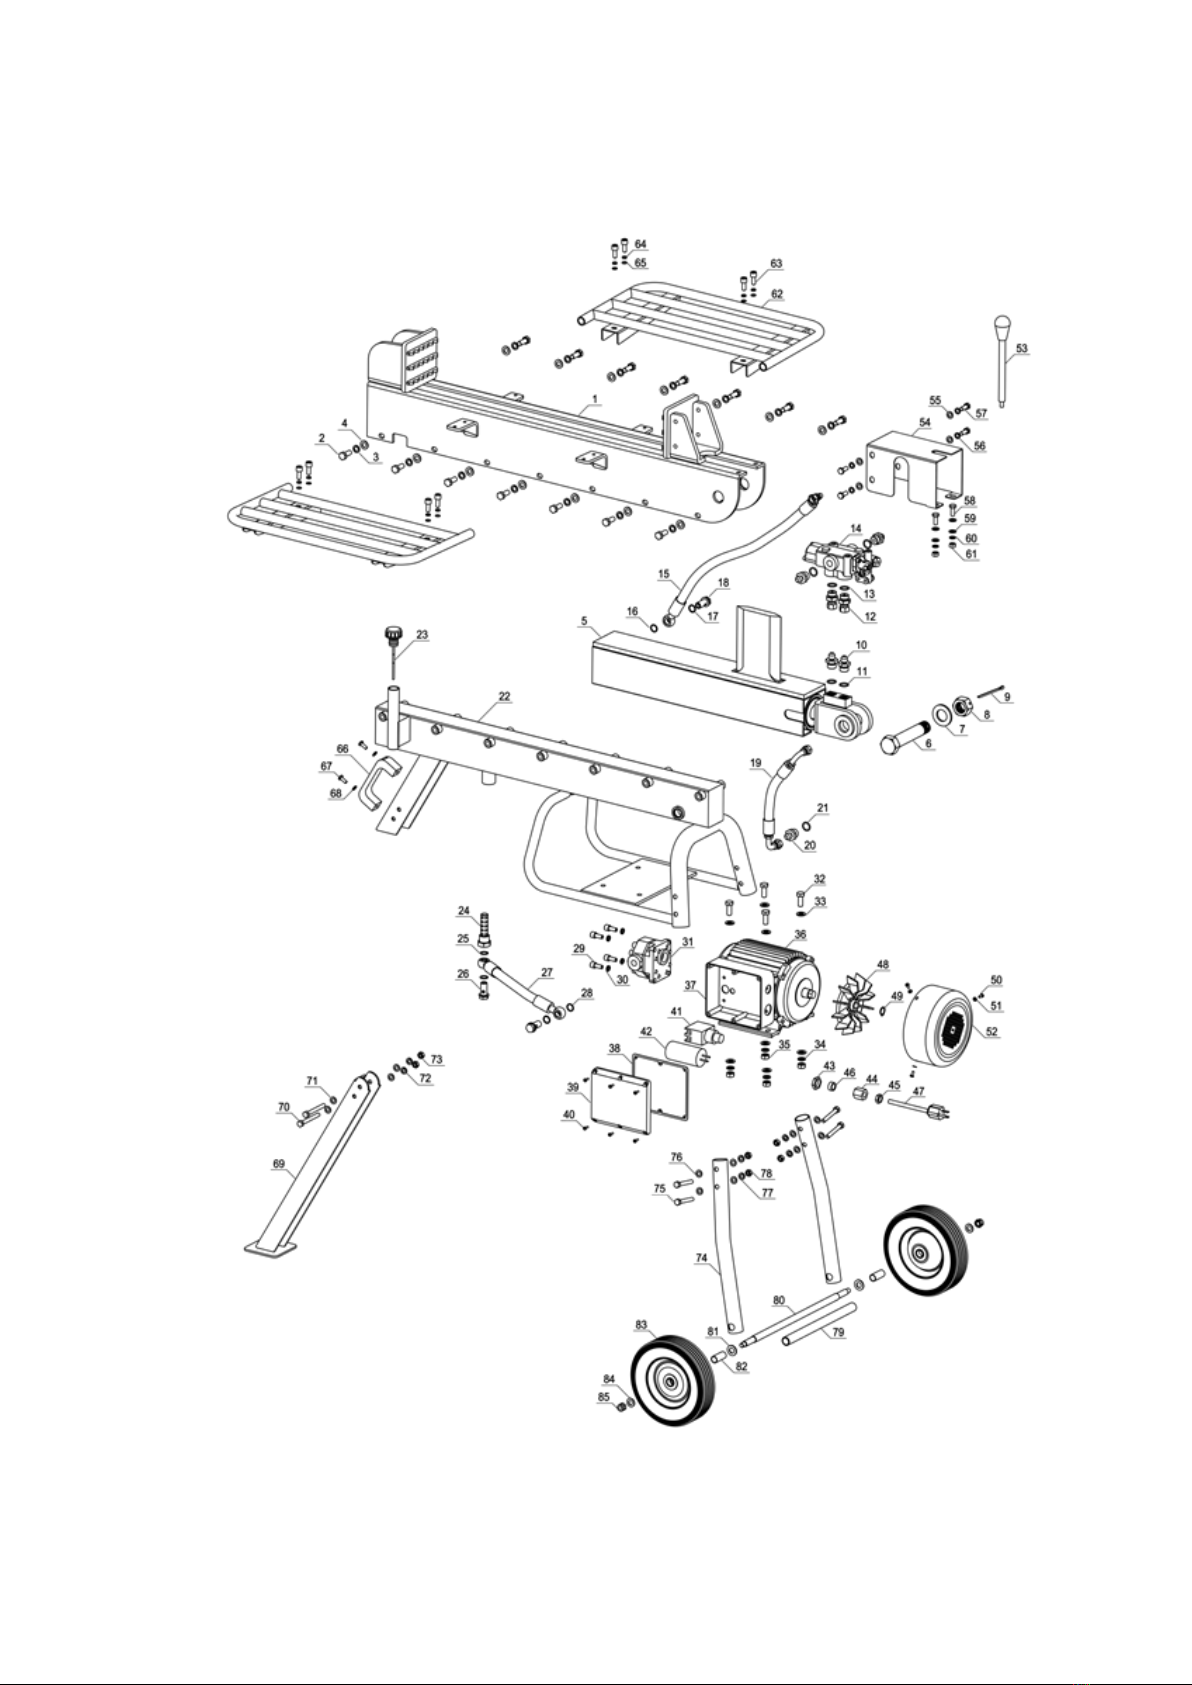
4. Component parts diagram
5
Note: Due to continuous product improvement, we
reserve the right to change the product without prior
notice.

6
Ref. No. Part Description QTY Ref.
No.
Part Description QTY
1 Machine Body w/ End Plates 1 42 Capacitor 1
2 Hex head bolt, ZP, M10*25 14 43--46 Cable Fastener 1
3 Spring Washer, ZP, M10 14 47 Power Cable 1
4 Flat Washer, ZP, M10 14 48 Fan 1
5 Cylinder w/ two blade splitting wedge 1 49 Circlip for Shaft,Ø16 1
6 Bored Hex Head Bolt, PH, M27*133 1 50 Cross Recess Pan Head Screw, ZP, M4*10 3
7 Flat Washer, PH, M27 1 51 Flat Washer, ZP, M10 3
8 Bored Nut, PH, M27 1 52 Fan Cover 1
9 Split Pin, Ø 4*50 1 53 Control Handle Lever 1
10 Hydraulic Adapter 4 54 Valve cover 1
11 O Seal Ring,
Ø21*2.4 4 55 Flat Washer, ZP, M10 4
12 Hydraulic Adapter 2 56 Spring Washer, ZP, M10 4
13 O Seal Ring,
Ø22*2.4 2 57 Hex Head Bolt, ZP, M10*20 4
14 Hydraulic Valve 1 58 Hex Head Bolt, ZP, M8*20 2
15 Hydraulic hose (Pump - Valve) 1 59 Flat Washer, ZP, M8 4
16 O Seal Ring,
Ø18*1.9 1 60 Spring Washer, ZP, M8 2
17 Copper Seal Washer,
M14 1 61 Nut, ZP, M8 2
18 Oil Tube Screw,
M14*30 1 62 Log Tray 2
19 Hydraulic hose (Valve - Reservoir) 1 63 Inner Hex Head Bolt, M8*20 8
20 Hydraulic Adapter 1 64 Spring Washer, M8 8
21 O Seal Ring,
Ø21*2.4 1 65 Flat Washer, M8 8
22 Hydraulic Reservoir w/ Motor Bracket 1 66 Towing Handle 1
23 Oil Dipstick w/ Breather Cap 1 67 Cross Recess Pan Head Screw, ZP, M6*15 2
24 Inlet Oil Filter 1 68 Flat Washer, ZP, M6 2
25 Copper Seal Washer,
M14 3 69 Jack Stand 1
26 Oil Tube Screw, M14*30 2 70 Hex Head Bolt, ZP, M8*70 2
27 Hydraulic Hose (Reservoir – Pump) 1 71 Flat Washer, ZP, M8 4
28 O Seal Ring, Ø18*1.9 1 72 Spring Washer, ZP, M8 2
29 Inner Hex Head Bolt, M8*20 4 73 Nut, ZP, M8 2
30 Spring Washer, M8 4 74 Wheel Stand 2
31 Pump 1 75 Hex Head Bolt, ZP, M8*55 4
32 Hex Head Bolt, ZP, M10*25 4 76 Flat Washer, ZP, M8 8
33 Flat Washer , ZP, M10 8 77 Spring Washer, ZP, M8 4
34 Spring Washer, ZP, M10 4 78 Nut, ZP, M8 4
35 Nut, ZP, M10 4 79 Axle Bushing 1
36 Electric Motor, 2.5hp 1 80 Wheel Axle 1
37 Connecting Box (Bottom) 1 81 Flat Washer, ZP, ½” *2 2
38 Connecting Box (Rubber Ring) 1 82 Bearing spacer,
Ø 16*1.2*36.8 2
39 Connecting Box (Cover) 1 83 Wheel 8”*2” 2
40 Cross Recess Pan Head Screw, M4*10 6 84 Flat Washer,
ZP, M10 2
41 Power Switch 1 85 Lock Nut,
ZP, M10 2

5. Electric circuit principle diagram A. Power cable
B. Switch
C. Wiring board
D. Motor lead wire
E. Thermal protector
F. Main winding
G. Aux. winding
H. Capacitor
6. Hydraulic circuit principle diagram
A. Hydraulic tank
B. Oil filter
C. Oil pump
D. Electric motor
E. Relief valve
F. Control handle
G. Cylinder
SECTION 2: Safe Operating Instructions
NOTE: This machine is only intended for homeowners to split firewood as detailed in instructions, not for any
other purpose.
Danger This machine was built to be operated according to the safety instructions in this manual. As with
any type of power equipment, carelessness or error on the part of operator could endanger the personal safety
and/or property of yourself and others. It can result in serious injury or death, such as amputating hands or feet,
throwing objects and other unforeseeable damage. Read and follow all instructions before initial operation. The
manufacturer isn’t liable for any damages by disregard of the instructions.
1. Assembling your log splitter
•This product has been shipped partially assembled. Cut and
remove straps bound to the carton and unpack the carton.
•Remove the loose parts included with unit (i.e.,
operator’s manual, accessories, etc.).
•Set the foams aside.
•Put the machine on a sturdy level surface and assemble the long
frames by two persons.
1) Put the machine on a sturdy level surface, install the
long front frame tightly (Fig. 1)
2) One person takes care of the machine in case falling down
when another person assemble the frames.
3) Attach the two long wheel frames, and assemble the
wheel axis. Then install the two wheels. (Fig. 2)
4) Move the machine down by two persons.
7
Note: The mains connection must have maximum 16A fuse.
Fig. 2
Fig. 2
Fig. 1
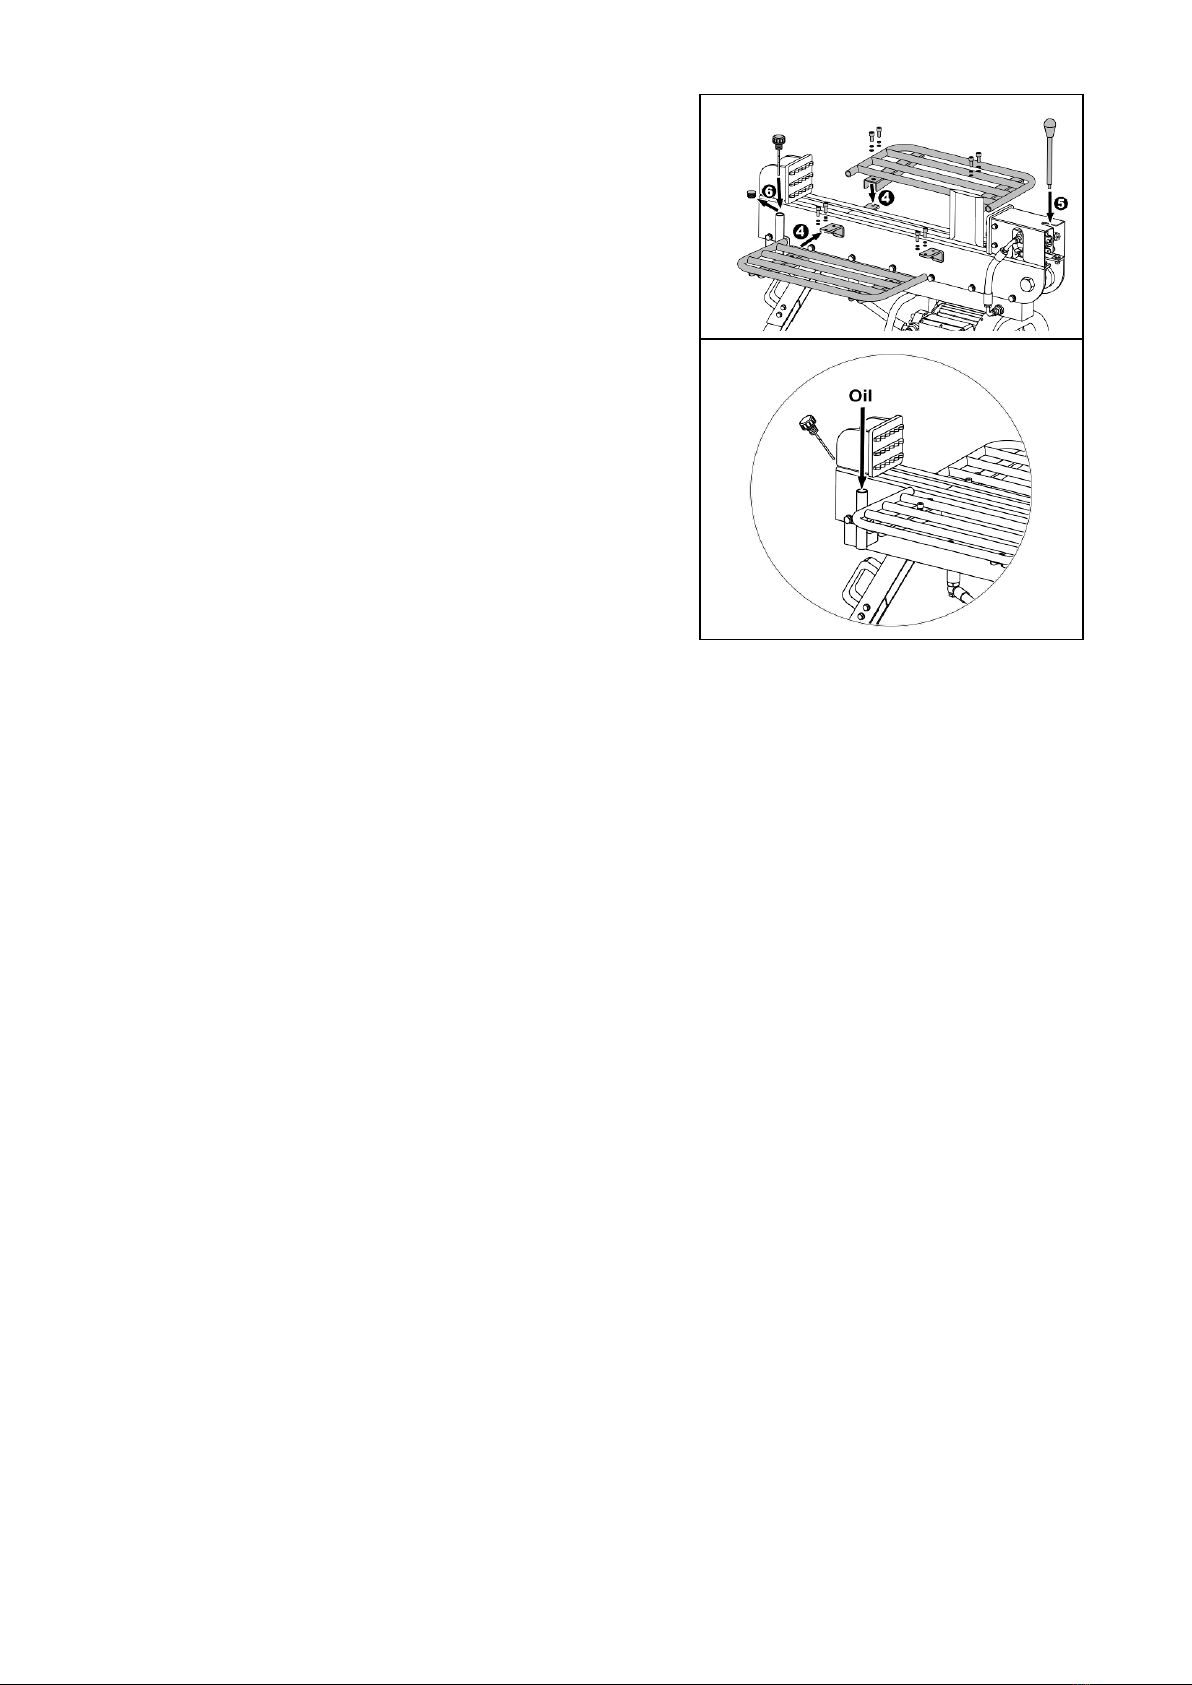
Attach the log tray assemblies to the brackets on the
two sides of the machine. (Fig. 3)
Screw on the control handle lever. (Fig.3)
Remove the white transportation seal plug from the oil filling
port, and then insert the dipstick with a breather cap into the
oil filling port firmly. (Fig. 3)
•Fill the tank with universal hydraulic oil (3210W AW
hydraulic fluid). (Fig. 4)
NOTE:
a) Dispose of the packing in an environmental friendly manner. Take to a proper collecting point.
b) If you notice transport damage while unpacking, notify your supplier immediately. Don’t operate the
machine.
c) Read, understand and follow all safety instructions in this manual and labels on the equipment carefully.
d) Keep the manual in a safe place for future and regular reference.
e) Ensure the machine is disconnected from power supply while assembling.
2. Preparation before operating
•
Put the machine on the level surface.
•
Always block the wheels to prevent movement of the log splitter while in operation.
•
Oil the wedge and upper side of the tank, which would make your operating more smoothly.
•
Check all nuts, bolts and hydraulic fittings are tight to be sure the equipment is in safe working condition.
•
Make sure your outlet, mains voltage and frequency match the data stated on the model
plate (or “Technical specifications” in this manual).
•
The power supply for this splitter must have the protection device of under-voltage, over-voltage, circuit
breaker with a residual current device (RCD) which maximum residual current rated at 0.03A.
•
Check the switch, power cable and plug are not damaged (no cracks, etc.) to exclude the risk of electric
shock and circuit short.
•
Check all safe shields to be sure they are in the proper position.
•
Wear non-slip safety shoes, safety goggles, safety gloves and suitable work clothing. Never wear jewelry,
necktie and other loose clothing.
•
Logs should be cut with square ends and permissible dimensions in advance within the limited capacity .
Uneven log (e.g. knotted, curved, etc) should not be cut.
Note:
a) Make sure the power cable is unplugged while adjusting.
b) After adjusting, take away the accessories on or around the unit before switching on.
c) Ensure the motor properly earthed or apply protection device.
d) Use only rubber-jacketed cable of sufficient lead cross section as extension cable. Never use an
extension cord longer than 25 feet. Cord gage must be 14 or lower.
e) Keep away from inflammable liquids or gases before starting the machine.
f) Hydraulic oil is flammable and can explode. Always take a Class B fire extinguisher with you when
operating this log splitter in dry area as a precautionary measure against possible flying sparks.
g) Always check the oil level of the hydraulic reservoir before operation. Operating the log splitter without an
adequate oil supply will cause severe damage to the pump.
h) Keep handles free of oil, grease and resin.
i) Before starting work, hydraulic pipes and hoses shall be inspected and the stopping devices should be
tested.
j) Selection and preparation of a suitable working are free from obstructions.
8
1) Remove the dipstick.
2) Fill the tank at least the range marked on the dipstick.
3) After filling, insert the dipstick.
4) Operate the unit fully extended for several times to repel
out the air trapped in the tank.
Fig. 3
Fig. 4

k) The need to keep the working area free from obstructions, e.g. logs, split wood, etc.
l) Check on the function of the machine: operate the unit without loading to check whether this unit works
normally (Refer to terms 3. Operation below). If the noises becoming louder and the ram running erratic
indicate there’s excessive air or a shortage of hydraulic oil in tank for you to release vent plug or add
hydraulic fluid.(Refer to Term 5. Maintenance and repair)
3. Operation
NOTE:
a) After log splitting, switch off and unplug the power cable.
b) Ensure the horizontal distance between splitter and outlet is more than 3m in case of the dust influence.
c) Allow only responsible adults who have read and understood the manual to operate this machine.
d) Be familiar with all controls and proper operation. Know how to stop the machine quickly in the event of an
emergency.
e) Don’t operate the machine while under the influence of alcohol, drugs or medication.
f) Only a single operator is allowed to load and operate this log splitter. Keep bystanders, helpers, pets and
children a sufficient distance to the machine.
g) Only use your hands to operate the control handles and the switch. Arms, feet, knees, rope, heavy objects
and extension device are not allowed.
h) Never put any part of your body between the extending ram and the wedge.
i) Don’t step over the splitter when the motor is running.
j) Always split log along its grain. If across the grain, some types of wood may burst or fly out resulting in
injury.
k) If you experienced problems splitting especially hard wood, don’t keep pushing on the handles. Release
both control handles at once, the ram will return. If keep pushing, the ram will fail to retract. If this occurs,
turn off the motor and on again to continue operation
l) If the log is clipped on the wedge, release both hands and unplug the power cable immediately. Knock off
the log with a hammer slightly (not with your hands).
m) Never attempt to split more than one log at a time unless the ram has fully extended and a second log is
needed to complete the separation of the first log. Never attempt to split one log on top of another.
n) Regularly clear the split wood to keep work area tidy for firm footing.
o) Periodically check that all nuts, bolts, screws, hydraulic fittings and hose clamps are tightened.
p) Never operate your splitter on wet, muddy or icy surface. Safe footing is essential in preventing accidents.
q) Never leave the machine unattended with the motor running.
r) Never use this machine in damp or rainy environment to avoid electric shock or short circuit.
s) Operate log splitter in proper lighting.
t) Never tamper with the motor to run it at excessive speeds. The maximum motor speed is preset by the
manufacturer and is within safety limits.
u) Switch off and unplug power cable quickly when the machine is out of order. For example: the noises
becoming louder and the ram running erratic indicate there’s excessive air or a shortage of hydraulic oil in
tank for you to release vent bolt or add hydraulic fluid.(Refer to Term 5. Maintenance and repair)
v) Don’t pull on power supply cable to unplug.
4. Transportation
•Put in the trunk of your car for a distant transportation.
•Hold the towing handle to move about.
NOTE:
a) Never move this machine while the motor is running.
b) Be extra cautious when moving this machine on rugged and rough terrain.
c) Be careful to keep upright, not to be tipped or crashed during transportation
d) Never allow anyone to ride on the machine while moving.
9
•Plug the power cable and switch on.
•Place the log firmly against one of the end plates on
the machine body between log trays.(Fig. 5)
•Move control handle left or right to split the log.
Release the handle to stop the splitting wedge at
desired position and begin loading the next log.
•After log splitting, switch off and unplug the
power cable.
Fig. 5

5. Maintenance and repair
•Refer to the Components drawing and parts list should it become necessary to disassemble the unit for
repair or replacement of parts.
NOTE:
a) Ensure the power cable is unplugged while performing any maintenance and repair.
b) The hydraulic system is preset at the factory. Don’t adjust the valve.
c) Never alter this machine in any manner under any circumstances.Any alteration circumventing the design
capabilities and capacities of this machine could result in serious injury and will void the warranty.
d) Replace all damaged and worn parts immediately with original equipment and manufacturer’s parts
only.
e) Wipe unit with an oiled rag to prevent rust. If the wedge becomes dull or nicked, it can be sharpened.
Wear safety gloves while handling the wedge.
f) Never check for leaks of hydraulic fluid with your hand. Escaping fluid under pressure can have sufficient
force to penetrate skin causing serious personal injury or even death. Leaks can be detected by passing a
piece of cardboard over the suspected leak and looking for discoloration.
g) Never loosen or remove hydraulic fittings or the cap of hydraulic tank while the log splitter is running.
h) If the motor is overload for a long time, the thermal protector in it which operating temperature is
130°C will disconnect the power of motor. Switch off and unplug the power cable, cool down the motor for
half an hour and it will connect again for continual operation. If not, it’s necessary for you to call your
dealer for customer support.
i) The troubles of hydraulic system and motor other than described above should only be handled by
qualified specialists.
j) Periodically check the oil level in the hydraulic reservoir. If there’s a slow or erratic ram running during
operation, it indicates the problem of oil shortage or excessive air in the reservoir. To solve this problem,
please refer to following Term l).
k) After each season use, check if the hydraulic oil need to change. Generally, this log splitter has oil filter in
the tank, so just change the oil when there’s abnormal louder noise or ram block during operation. To
solve this problem, please refer to following Term l).
l) .Directions: how to changing hydraulic oil, fill the hydraulic reservoir and repel the excessive air in
the reservoir. (Fig 6)
Note: The hydraulic tank is shipped with AW32 hydraulic fluid. Use only clean oil and take care to prevent
dirt from entering the hydraulic reservoir.
6. Storage
NOTE:
a) Store this unit switched off and unplugged.
b) Allow machine to cool 5 minutes after every use before storing.
c) Protect power supply cable from heat, sunshine, aggressive liquids and sharp edges.
d) Store unit in a clean, dry area. Don’t store it unprotected outdoors, next to corrosive materials or in damp
environment.
e) Store this splitter where children can’t start it. 10
•Unplug the log splitter.
•Remove the dipstick with breather cap to ensure oil
drained out easily.
•Place a container of no less than 4 liter capacity under
the oil drain port on bottom of the reservoir. Screw off
the oil suction hose screw, seal washers, and the oil
filter at the oil drain port. Hold the open end of oil
suction hose over the container, to ensure hydraulic
oil drained into the container.
•Once the oil has drained from the oil tank, clean the oil
filter; screw back the filter, seal washers, oil suction
hose and hose screw. Tighten securely.
•Refill the oil tank with fresh hydraulic oil.
•Place the cleaned dipstick into the oil tank. Remove
and check the oil level.
•
If the proper level is reached, start the motor and
cycle the ram several times to remove excess air from
the reservoir.
Note: The oil level should be between the two grooves
Fig. 6
Table of contents
Popular Log Splitter manuals by other brands

Wallenstein
Wallenstein 3652A300 installation instructions

Troy-Bilt
Troy-Bilt TB 27 LS Operator's manual

Range Road
Range Road RR27T Assembly manual

ATIKA
ATIKA ASP 6 N Original instructions

STEELE PRODUCTS
STEELE PRODUCTS SP-LS22 owner's manual

BETST POWER EQUIPMENT
BETST POWER EQUIPMENT GM5T Operating & parts manual


