BE Power Equipment COMMERCIAL HW255E1CNG User manual

User Manual
NATURAL GAS
HOT WATER WASHER
85.610.594
COMMERCIAL
SERIES
HW255E1CNG
HW255E3CNG
HW2775E1CNG
HW2775E3CNG

2
TABLE OF CONTENTS
Introduction & Product Info
3 Introduction & Production info
Important Safety Warnings
4 Important Safety Warnings & Symbols
Product Specifications
7 Specifications Chart
Before Starting The Unit
8 Pre-Operation Safety & Inspection Procedures
9 Combustion Air Supply
Start-Up & Shutdown Operations
10 Starting the Unit
10 Shutting down the Unit
Safety Components
11 Saftey Components Specifications
Maintenance
12 Maintenance Chart
Storage & Winterizing
13 Storing the Unit
13 Winterizing the Unit
Parts Breakdown
14 5 HP units Breakdown
15 5 HP Phase units Parts Reference List
16 7 HP units Breakdown
17 7 HP Phase units Parts Reference List
Electrical Box Assembly
18 5 HP Electrical Box Assembly Breakdown
19 5 HP Electrical Box Assembly Parts
Reference List
20 7.5 HP Electrical Box Assembly Breakdown
21 7.5 HP Electrical Box Assembly Parts
Reference List
Wiring Diagrams
22 5 HP Wiring Diagram
23 7.5 HP Wiring Diagram
Coil Servicing
24 Coil Maintence & Servicing
Warranty
25 Unit & Coil Warranty
Maintenance Notes
26 Notes

3
INTRODUCTION & PRODUCT INFO
Using the Operator’s Manual
Thank you for purchasing our hot water pressure washer! This operating manual is an important part of the
unit. It should be read thoroughly before initial use, and referred to often to make sure adequate safety and
service concerns are being addressed.
Reading the owner’s manual thoroughly will help avoid any personal injury or damage to your pump, engine,
and other components. By knowing how best to operate this machine you will be better positioned to show
others who may also operate the unit.
You can refer back to the manual at any time to help troubleshoot any specific operating functions, so store
it with the machine at all times.
Product Registration
Please register your product online to get the maximum benefit from your warranty. Use the QR code below
or register online at: bepowerequipment.com/product-registration
It is recommended that you record the product identification numbers in this manual. These numbers are
important to have on hand if you need to contact technical support (1-866-850-6662). The model and serial
number can be found on the box and on decal on the machine.
ATTENTION: Read through the complete manual
prior to the initial use of your pressure washer.
PRODUCT SPECIFICATIONS
MODEL GPM PSI HP PHASE MOTOR VOLT PUMP UNIT
WEIGHT SHIPPING DIMS
HW255E1CNG 3.5 2500 5 1 BALDOR 240V COMET 598lbs 51” x 35” x 57”
MODEL GPM PSI HP PHASE MOTOR VOLT PUMP UNIT DIMS SHIPPING DIMS
HW255E3CNG 3.5 2500 5 3 BALDOR 240V COMET 568lbs 51” x 35” x 57”
MODEL GPM PSI HP PHASE MOTOR VOLT PUMP UNIT DIMS SHIPPING DIMS
HW277E1CNG 4.6 2700 7.5 1 BALDOR 240V COMET 675lbs 51” x 35” x 57”
MODEL GPM PSI HP PHASE MOTOR VOLT PUMP UNIT DIMS SHIPPING DIMS
HW277E3CNG 4.6 2700 7.5 3 BALDOR 240V COMET 628lbs 51” x 35” x 57”
PRODUCT IDENTIFICATION
Model Number:
Serial Number:
Date of Purchase:
Dealer Name:
4
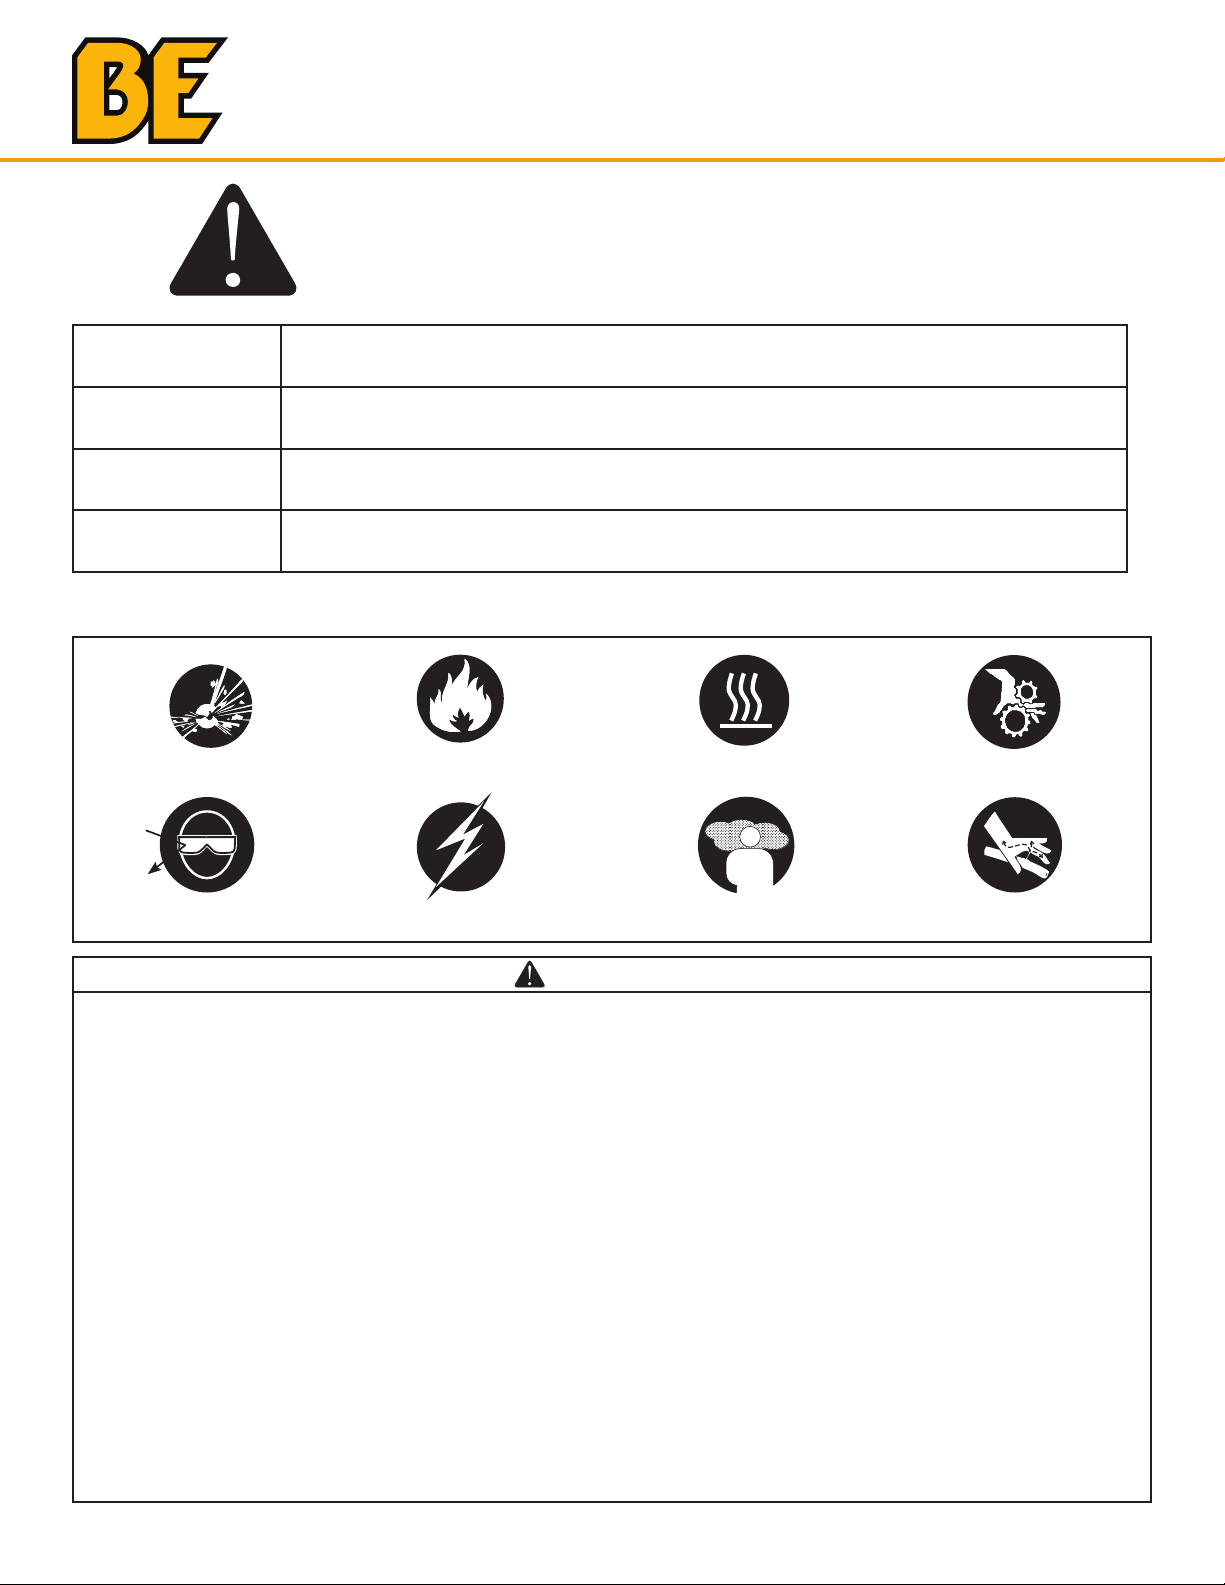
IMPORTANT SAFETY WARNINGS
This is the safety alert symbol. It is used to alert you
to potential personal injury hazards. Obey all safety
messages that follow this symbol to avoid possible
injury or death.
explosion fire
toxic fumes
hot surface
flying objects injection
moving parts
electric shock
DANGER This is indicates a hazard which, if not avoided, will result in serious injury or
death.
WARNING This indicates a hazard which, if not avoided, will result in a severe injury or
property damage.
CAUTION This indicates a hazard which, if not avoided, might result in a minor or
moderate injury.
NOTICE This indicates a situation that could result in equipment damage or damage
to other property. Ensure all safety messages are observed and adhered to.
Hazard Symbols and Meanings
DANGER
• Always operate the pressure washer in a well-ventilated area free of flammable vapors, combustible dust, gases, or
other combustible materials.
• Do not store the pressure washer near an open flame or any equipment such as a stove, furnace, water heater, etc.,
which utilizes a pilot light or sparking device.
• Do not use this pressure washer to spray flammable material.
• Do not smoke while filling burner fuel tank.
• Never fill the fuel tanks while the pressure washer is running or hot. Allow unit to cool for two minutes.
• Always refuel slowly to avoid the possibility of spilled fuel which may cause a risk of fire.
• Always leave room for fuel to expand in the gas tank. Do not overfill.
• Engine Fuel Tank: If using a Gasoline Engine, refuel with gasoline only. Do not use diesel or kerosene.
• Burner Fuel Tank (Black): When refueling the Burner Fuel Tank, use No. 1 or No. 2 fuel oil/diesel or kerosene. Do not
use gasoline.
• Do not operate the unit if gasoline or diesel fuel is spilled. Wipe the pressure washer clean and move it away from the
spill. Avoid creating any ignition until the gasoline or diesel fuel has evaporated.
• When the battery is being activated, hydrogen and oxygen gases in the battery are extremely explosive. Keep open
sparks and flames away from the battery at all times, especially when charging.
• Be certain to disconnect the battery ground terminal before servicing. When disconnecting the cable from the
battery, start with the negative terminal. When connecting them, start with the positive cable.
• When charging the battery, remove the battery vent plugs.
• Use only a voltmeter or hydrometer to check a battery charge.
• DO NOT jump start the battery unless both batteries are of equal voltage and amperage.
5
IMPORTANT SAFETY WARNINGS
WARNING
Serious injury or death may occur from a fire caused by a muer spark.
Serious injury or death may occur if system safety’s are not properly maintained.
• A spark arrester must be added to the muer of this engine when using on land covered with any
flammable agricultural crop (hay and grain), and if they are used in or near brush or forested areas. The
arrester must be maintained in eective working order by the operator of the equipment. In the state
of California, the above is required by law. (Section 4442 and 4443 of the California Public Resources
Code.) Other states/provinces may have similar laws. Federal laws apply on Federal lands.
• This pressure washer has a Safety Relief Valve . This should never be altered, modified, removed or
made inoperative. If the device fails, replace immediately with genuine manufacturer replacement part.
WARNING
Serious injury or death may occur from inhaling engine/burner exhaust or dangerous
vapors. The engine exhaust from this product contains chemicals known to the State of
California to cause cancer, birth defects, or other reproductive harm.
• Never operate this pressure washer in an enclosed area. Always ensure there is adequate ventilation
(fresh outside air) for breathing and combustion. This will prevent the buildup of dangerous carbon
monoxide gases. Beware of poorly ventilated areas, or areas with exhaust fans which can cause poor
air exchange. This unit should only be used outdoors to ensure ventilation is never an issue.
• Follow all safety instructions provided with the materials you are spraying. Use of a respirator may be
required when working with some materials. Do not use this pressure washer to dispense hazardous
detergents.
WARNING
Serious injury or death could occur from high pressure spray penetrating the skin.
• Keep clear of nozzle and spray! Never put your hand, fingers or body directly over the spray nozzle.
• Do not direct discharge stream at self, other persons, or pets.
• This product is to be used only by trained operators.
• Always keep operating area clear of other people.
• Do not allow children to operate this unit or be in the vicinity while you operate it.
• Seek emergency medical care if spray seems to have penetrated the skin. Do not treat as a simple cut!
• High pressure hoses and fuel lines should be inspected daily for signs of wear. If evidence of failure
exists, promptly replace all suspect hoses and fuel lines to prevent the possibility of injury from the
high pressure spray. If a hose or fitting is leaking, do not place your hand on the leak.
• Never operate the gun with the trigger held in the open position. To prevent accidental discharge, the
trigger gun should be securely locked when not in use.
• Before removing the spray nozzle or servicing the unit, always shut the unit o and pull the trigger of
the gun to release trapped pressure (even after you shut o the unit, there is high pressure water left in
the pump, hose and gun until you release it by pulling the trigger the gun).
WARNING
Serious injury or death may occur from contact with electricity.
• Do not direct spray on or into electrical installations of any kind! This includes electrical outlets, light
bulbs, fuse boxes, transformers, and the unit itself.
• Do not allow metal components of the pressure washer to come in contact with live electrical
components.

6
IMPORTANT SAFETY WARNINGS
WARNING
Serious injury may occur from touching the gasoline engine, muer, or heat exchanger. These
areas can remain hot for some time after the pressure washer is shutdown.
• Never allow any part of your body to contact the gasoline engine, muer, or heat exchanger.
WARNING
Serious injury may occur to the operator from moving parts on the pressure washer.
• Before making any adjustments, be certain the engine is turned o and the ignition cable(s) is removed
from the spark plug(s). Turning the machinery over by hand during adjustment or cleaning might start the
engine and machinery with it.
• Do not operate the unit without all protective covers in place.
WARNING
Serious injury may occur from a pressure washer malfunction or exploding accessories if
incorrect system components, attachments, or accessories are used.
Serious injury or death may occur if attempting to start the pressure washer when the
pumping system is frozen.
• Never make adjustments to the factory set pressures.
• Never exceed manufacturers maximum allowable pressure rating of attachments.
• Do not allow any hoses to make contact with heat exchanger to prevent the possibility of bursting. Avoid
dragging the hoses over abrasive surfaces such as cement.
• Use only manufacturer recommended repair parts for your pressure washer.
• In freezing temperatures, the unit must always be warm enough to ensure there is no ice formation in
the pump. Do not start the pressure washer if it has been transported in an open or under heated vehicle
without first allowing the pump to thaw.
WARNING
Serious injury or death may occur from detergents contacting the skin.
Serious injury can occur from loose debris being propelled at a high speed from the spray gun.
Injury may occur if the operator loses their balance caused by the thrust of water traveling
through the spray nozzle.
• Never use any solvents or highly corrosive detergents or acid type cleaners with this pressure washer.
• Protective equipment such as rubber gloves and respirators are advisable, especially when using cleaning
detergents.
• Keep all detergents out of the reach of children!
• Always wear protective goggles when operating the unit to shield the eyes from flying debris and
detergents.
• Do not direct spray toward fragile materials such as glass.
• Stay alert: watch what you are doing. Do not operate the unit when fatigued or under the influence of
alcohol or drugs.
• Never squeeze the trigger unless securely braced.
• Do not overreach or stand on unstable support.
• Wet surfaces can be slippery. Wear protective foot gear and keep good footing/balance at all times.
• Never pull the trigger of the gun while on a ladder, roof, or other unstable surface.
• Always hold on firmly to the gun/lance assembly when starting and operating the unit. Failure to do so
can cause the lance to fall and whip dangerously.
• Do not leave pressurized unit unattended. Shut o the pressure washer and release trapped pressure
before leaving.
• Do not operate the unit if you see any fuel, oil, or water leaking from the machine. DO NOT resume
operation until the unit has been inspected and repaired by a qualified technician.
• Do not transport the unit by pulling on hoses or cords.
WARNING
If you smell gas, shut o the gas supply to the appliance, extinguish any open flame, and test all joints with
a soap solution. If the odor persists, call your gas supplier immediately.

7
UNIT SPECIFICATIONS
MODEL HW255E1CNG HW255E3CNG HW2775E1CNG HW2775E3CNG
HEATER
PSI & GPM 2500 @3.5 GPM 2500 @3.5 GPM 2700 @4.6
GPM
2700 @4.6
GPM
BTU’s 345,500 345,500 345,500 345,500
SPECIFICATIONS
INPUT
PRESSURE
NG
7 INCHES 7 INCHES 7 INCHES 7 INCHES
MANIFOLD
PRESSURE
NG
2.6 INCHES 2.6 INCHES 2.6 INCHES 2.6 INCHES
INPUT
PRESSURE
PROPANE
14 INCHES 14 INCHES 14 INCHES 14 INCHES
MANIFOLD
PRESSURE
PROPANE
10 INCHES 10 INCHES 10 INCHES 10 INCHES
ORIFICE SIZE #53NG
or #65LP
#53NG
or #65LP
#53NG
or #65LP
#53NG
or #65LP
SAFETY
COMPONENTS
Thermostat YES YES YES YES
Flow Switch YES YES YES YES
High Temp
Limit Protector YES YES YES YES
High Pressure
Relief Valve YES YES YES YES
Dimensions
(LxWxH) in. 43”x20”x42” 43”x20”x42” 43”x20”x42” 43”x20”x42”
DRAFT HOOD
SIZE
(diameter)
9” 9” 9” 9”
Weight
(pounds) 598 568 675 628
8
Whenunpackingtheunitifyoufinddamage
duetoshippingcontactyourdealerorBEPower
Equipmentimmediately
ELECTRICALSUPPLY
Arrangewithanelectriciantoinstallaproperly
groundedthreewirereceptacle
Toprotectthereceptaclefromsplashestherecom-
mendedheightabovethegroundlevelisaminimum
offourfeetMakesurethesupplyvoltageiscorrect
Thevoltageisshownontheratingplateoftheunit
orsee“SpecificationsFeaturesandOptions”sheet
inthismanual
INCOMINGWATERSUPPLY
Connectagardenhosetothewaterinletoftheunit
Thewatersupplymustbeabletodeliverfromto
gallonsperminuteataminimumpressureof
psiSeethe“SpecificationsFeaturesandOptions”
sheetinthismanual
OUTGOING(HIGHPRESSURE)WATER
Tothewateroutletfittingconnectthehighpres-
surehosetriggergunextensionandnozzle(The
nozzleislocatedinaplasticbagwiththismanual)
PUMP-OIL
Beforeoperatingthepumpchecktoseethatthe
oilislevelwiththedotonthesightgaugewhichis
locatedattherearofthepumpTheoillevelcan
alsobecheckedusingthedipstickwhichisattached
totheoilfillercapEnsurethattheventholeinthe
capdipstickisclearofdirtWhenoilisrequired
useornon-detergentheavydutyoil
ENGINE-OIL
RefertotheEngineManual
FUELSUPPLY
Forstationaryinstallationshavethegaspiping
installedbyalicensedgasfitterThismustbedone
inaccordancewiththegascodes
BforNaturalGas
BforPropaneGas
Forportablemachinesconnectthesupplyhose
andregulatorintothePOLfittinginthevalveon
thesupplytankRememberthatthisfittinghasa
lefthandthreadOpenthetankvalveandcheck
forleaksinthepropaneconnectionswithasoap
solutionDepressthepilotvalveforapproximately
aminutetopurgethelinesofairWaitminutes
toallowanyescapedpropanetodissipatebefore
lightingthepilot
DETERGENTSUPPLY
Onlyusechemicalswithaphbetweenand
ForstrongerchemicalsuseaDownStream
injectionsystemContactyourdealerforadditional
information
PROTECTFROMFREEZING
Whentransportingorstoringyourpressurewasher
attemperaturesbelowfreezingmakesurethatthe
unithasbeenproperlywinterized(SeeWinterizing
YourPressureWasher)
Evenanovernightfrostcansplitacoilorcracka
pump
BEFORE STARTING THE UNIT
WARNING
DONOTCHANGETHEACPLUGONTHEUNIT
TOADIFFERENTTYPE
DONOTCUTOFFTHEGROUNDPINORTHE
OPERATORWILLBEEXPOSEDTOSEVERE
SHOCKKEEPELECTRICALCORDSAND
CONNECTIONSDRYATALLTIMES
CAUTION
Propanegasinheavierthanairandcancollectin
lowhollowareasinanexplosivemixtureEnsure
thattheareaswhereyouoperatethismachine
areopentobreezesetc

9
COMBUSTION AIR SUPPLY
The 5004N/P heater is comprised with an
Atmospheric burner and requires air for
combustion and ventilation.
The appliance installer will know how and
where to place a supply air duct. Take care
that this opening will not promote drafts
which could blow out the pilot light.
Keep the area around the machine clear so
this air can get to the burner.
APPLIANCE IN CONFINED SPACE
The confined space shall have two per-
manent openings: one near the top of the
enclosure and one near the bottom of the
enclosure. Each opening shall have a free
area of not less than one (1) square inch
per 4000 BTU’s per hour of the total input
of all appliances within the enclosure. The
openings shall have free access to the room
interior which should have adequate infiltra-
tion from the outside.
OUT DOOR ROOF STACK SPACING RE-
QUIREMENTS
Must Conform to local standards. Below
drawing is a Guide.
PRE-OPERATING INSTRUCTIONS

10
STARTING & SHUTTING DOWN
THE PRESSURE WASHER
STARTING THE MACHINE
1) Turn gas supply valve “ON”
2) Turn control valve “ON”
START UP
1) Make sure that switches are “OFF”
2) Connect electrical supply
3) Connect machine to water supply
4) Connect high pressure hose gun and
wand to outlet of pressure washer
5) Grasp gun firmly and turn “pump” switch
“ON”
6) When spray is constant turn on “burner”
switch “ON” then turn thermostat to de-
sired temperature
SHUTDOWN
1) Turn “burner” switch o
2) Pump cold water through spray gun for
two minutes
3) Shut o “pump” and activate spray gun
to release pressure in the line
4) Shut o gas supply valve if machine is to
be left for long periods of time
CHANGING PRESSURE
The variable Unloader Valve is already set
to full pressure. Do not adjust the Unloader
past the maximum pressure, as this will not
increase the performance, and the excessive
shut-o pressure will damage the Washer.
CLEANING CHEMICALS
For chemical application, a chemical injec-
tor is required. Open the valve at the lance.
To change concentration, adjust metering
valve toward open or close. Use only chem-
icals with a pH between 7.0 and 10.0. For
stronger chemical, use a Downstream Injec-
tion System. (Contact dealer for details.)
CAUTION
The force of the water leaving the nozzle
causes a kick-back or recoil at the trigger
gun.
CAUTION
Afteryouusechemicaladditivesthoroughly
FLUSHthesystemwithcleanwater
WARNING
Neverrunthewasherwithoutwater

11
FLOWSWITCH
Theflowswitchpreventstheburnerfrombeing
turnedonifthereisinsufficientwaterProper
waterflowcausesthemagneticcoretobe
pushedupclosingthereedcontactThiscon-
tactisinterlockedwiththegascontrolvalve
UNLOADERVALVE
TheUnloaderValveallowsallofthewater
deliveredbythepumptoreturntothepump
suctionsideIfthetriggergunisclosedor
“OFF”theUnloaderValvegoesintothe
“bypassmode”andthepumprunswithout
pressureHoweverthepumpmaybeseverely
damagedduetoexcessiveoverheatingifleft
runninginthe“bypassmode”or“gun-off”
situationformorethanminutes
SAFETYRELIEFVALVE
TheReliefValvepreventsthemachinefrom
beingsubjectedtoabnormallyhighpressures
Ifthissituationoccursthevalvewillblowoff
relievingthepressureinthecoilThisvalvemay
alsooperateiftheunloaderisadjustedtoo
high
PRESSURESWITCH
ThePressureSwitchensuresthatthereis
pressureandthereforethereiswaterflowat
theheadofthepumpThiscontroldoesnot
operateatlessthanpsiThereforeifthe
pumpison“bypassmode”theburnerwillnot
operateAlsoiftheUnloaderisturnedback
lessthanpsiinthesteammodetheburner
willnotoperateTheeffectofthisswitchis
verysimilartothatoftheflowswitch
THERMOSTAT
Thebuilt-inthermostatstopstheunitfrom
overheatingMaximumtemperatureoftheunit
is°F(°C)Abovethistemperaturethe
burnerstopsautomatically
HIGHLIMITSWITCH
TheHighLimitSwitchisathermostatwhich
operatesatahighertemperaturethanthe
built-inthermostatabout°F(°C)This
switchisnotadjustableandwillonlyoperate
whenothercontrolsfailtokeepthewater
temperaturewithinthenormaloperatingrange
Unliketheotherburnercontrolswitchesthis
switchcutsthepowertothewholegasvalve
notjustthegassolenoid
COMBINATIONAUTOMATICGASVALVE
Thegasvalveincorporatesamanualshut-off
valveagasregulatorthepilotcontrolanda
timedautomaticshut-offThefunctionsofthe
manualshut-offandregulatoraresimpleThe
manualshut-offclosesthegasinletsothat
nogascanentertheburnerTheregulator
regulatestheflowofgastokeepitatconstant
pressureThepilotcontrolisapilotcontrol
valveandthermocouplesensorThepilot
valvecanbeopenedtolightthepilotburner
Whenlittheburnerflameisdirectedtoa
thermocouplesensorThesensorheatsupfrom
theflameandallowsthepilotvalvetostay
openpermittingautomaticoperationofthe
burnerIfthepilotgoesoutthethermocouple
willcooldownandthecontrolwillshut-offthe
gassupplyThepilotmustthenbemanually
relit
SAFETY COMPONENTS

12
MAINTENANCE SCHEDULE
PROCEDURE DAILY 3 MONTHS 6 MONTHS 9 MONTHS 12 MONTHS
Check engine oil level
(ONLYusethetypeandgradeofoil
specifiedforthispump)
X
Change engine oil***** X X X X
Check water pump oil level X
Change water pump oil ** X X X X
Oil leak inspection X
Fuel leak inspection X
Water leak inspection X
Hose inspection X
Water inlet screen inspection X
Check fuel filter X X X X
Replace fuel filter X
Inspect belts X X X X
Replace high pressure nozzle*** X X X X
Inspect fuel pump filter* X
Replace fuel nozzle* X
Check burner air adjustment X X X X
Check burner electrodes* X
Test water pressure* X X X X
Test fuel pressure* X X X X
Test water temperature* X X X X
Descale coil**** X
Power Cord/Outlet Socket inspection
(replace worn or damaged parts
immediately) X
* Must be performed by an authorized service technician.
** The pump oil must be changed after the first 50 hours of operation and then every
250 hours or 3 months, whichever comes first.
*** High pressure nozzle should be replaced whenever pressure drops to less than 85%.
**** Scale build-up will vary with mineral content in the water and amount of usage.
Descaling can range from weekly to yearly maintenance.
***** The engine oil must be changed after the first 8 hours of operation and then every
50 hours or 3 months, whichever comes first.
13
CAUTION
Be certain the hoses and spray gun are not
attached to the pump during application
of pump saver or use of the blowout tool.
Having a hose attached greatly reduces
the amount of water/debris removed from
the pump and coil.
STORAGE & WINTERIZING
When storing the unit for winter, it is
important to ensure it is stored in the right
environment. Ensure the storage area stays
above freezing during cold weather, and try
to limit the amount of dust gathered on the
unit via a cover.
STORINGWITHAFLOATBOX
•Shutoffthewatersupplyanddisconnect
hose
•RemovecoverfromFloatBox
•Runthepressurecleaneruntilthelevelofthe
waterintheFloatBoxisjustabovetheoutlet
screen
•Turnoffthecleaner
•FilltheFloatBoxtoaboutwith
windshieldwasherorantifreeze
•Turnonthecleanerandopengununtilliquid
comesoutofnozzle“foamy”or“soapy”
•PutguninOFFpositionforfivesecondsto
allowantifreezeintobypassline
•Shutoffmotor-unitisnowwinterized
STORINGWITHOUTAFLOATBOX
•Shutoffthewatersupplyanddisconnect
hose
•Youneedashort(”)lengthofhosewitha
malegardenhosefittingononeend
•Connecttheshorthosetotheinletofthe
machine
•Puttheotherendofthehoseintoa
containerofwindshieldwasherorantifreeze
•TurnonCleanerandopengununtilliquid
comesoutofnozzle“foamy”or“soapy”
•PutguninOFFpositionforsecondstoget
antifreezeintobypasslineShutoffmotor
Theunitisnowwinterized
• BE “Pump Saver” Solution
(P/N: 85.490.046). This is an anti-freeze
solution that is used before storing the
unit. It coats to inside of the pump to
ensure that any residual water doesn’t
freeze. To use BE Pump Saver, follow
the instructions written on the bottle.
Water freezing in the pump will damage
seals and other internal parts. Freezing
damage is not covered by warranty.
• BE “Pump & Coil Blowout Tool”
(P/N: 59.400.000). This tool utilizes
compressed air to forcefully remove
any water left in the pump. One end of
the tool attaches to an air compressor,
while the other attaches to the inlet
of your water pump via an adapter.
Follow the instructions on the back of
the packaging to use the Pump and Coil
Blowout Tool.
STORAGE & WINTERIZING
CAUTION
Ifyourhoseislongerthanfeetthefloat
boxmayemptybeforetheliquidfromthe
nozzlegetsfoamyIfthishappensrefillthe
floatboxwithantifreezeintobypassline

14
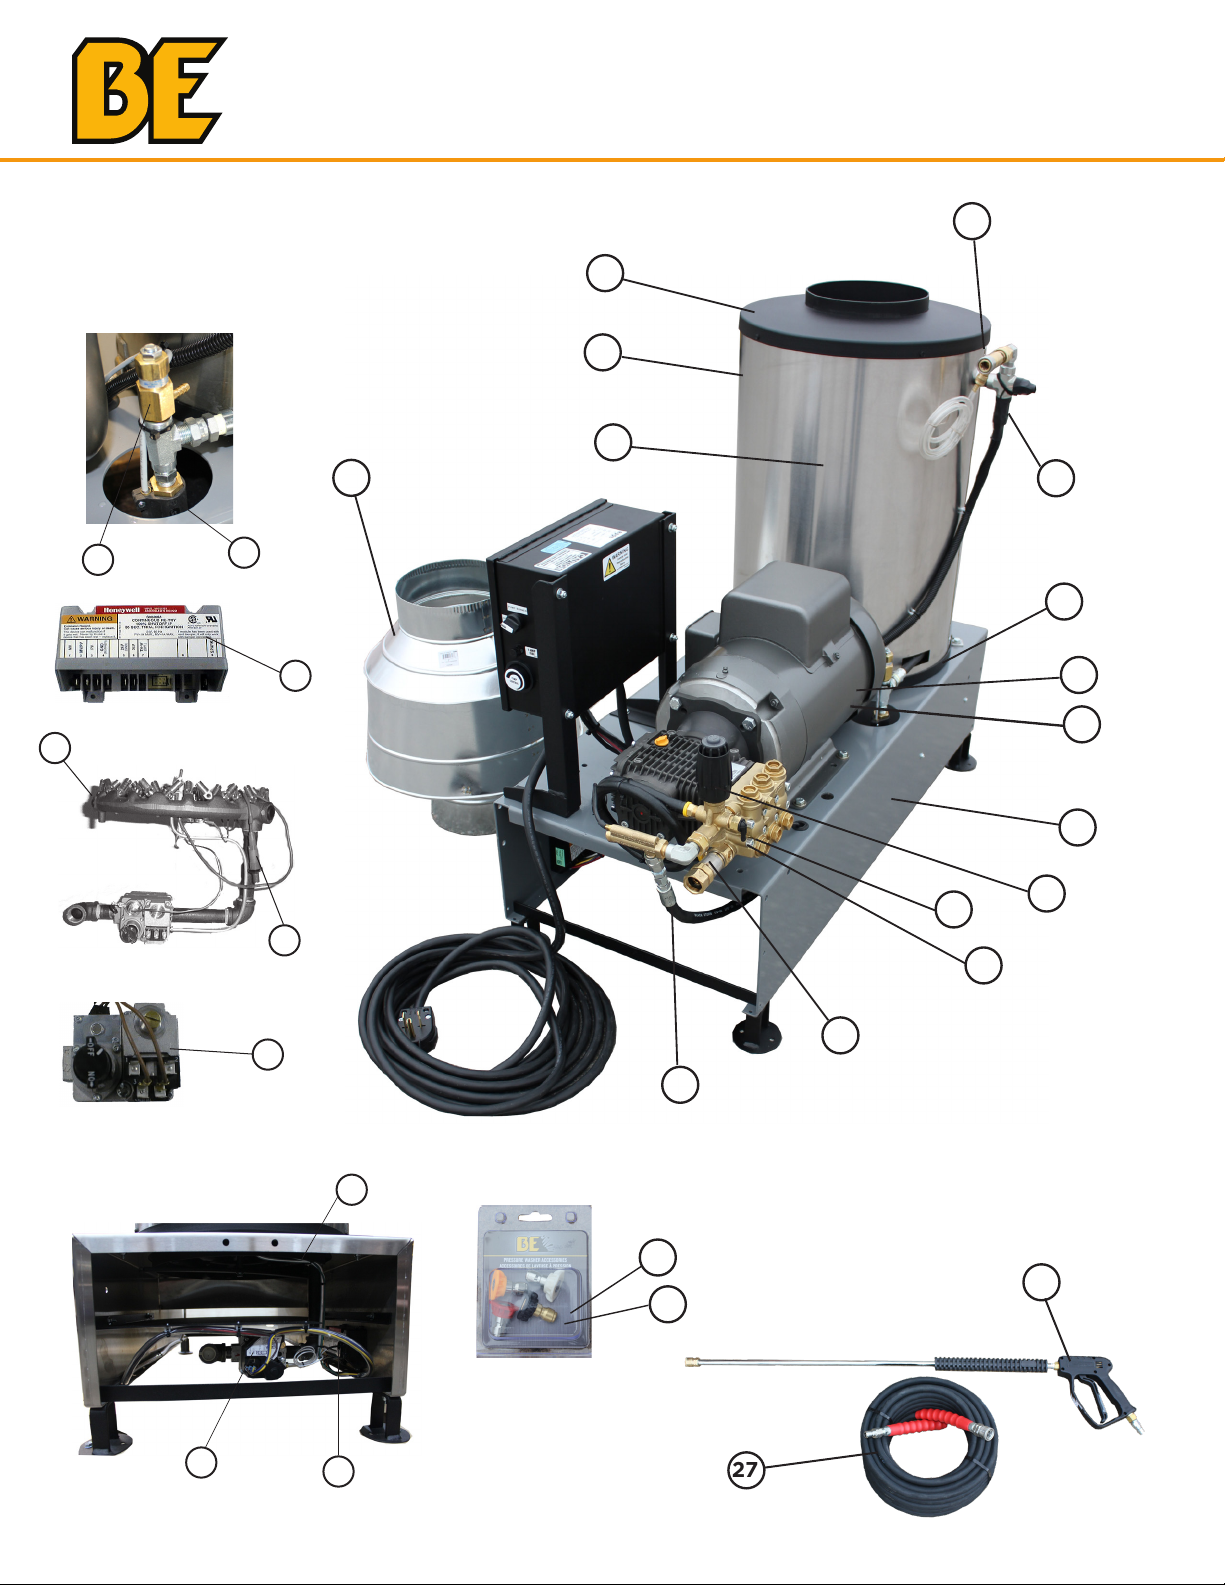
UNIT BREAKDOWN
1
2
10
3
4
6
89
7
5
HW255E1CNG
HW2775E1CNG
11
12
13
14
15
16
17
18
19
20
25
26
27
28
21
22
23
24

15
PARTS REFERENCE LIST
ITEM PART NUMBER DESCRIPTION QT Y.
1 HEX- BURNERRING 1
2 HEX- BURNERRING 1
3 HEC-B GASVALVEELECTRONICIGNITION-PILOTRELIGHT 1
4 HES ELECTRONICIGNITIONMODULE 1
5 QASSY PILOTBURNERASSEMBLY 1
6 H- VELECTRONICIGNITIONGASVALVE 1
7 SH IGNITIONMODULE 1
8 RUB-T RELIEFVALVE 1
9 PUST FLOWSWITCH 1
10 85.300.097 CHEMICAL INJECTOR 1
11 T44110 HI LIMIT 1
12 24606 BOTTOM PAN 1
13 70.001.005 230V, 5HP MOTOR (HW255E1CNG) 1
14 70.001.075 230V, 7.5HP MOTOR (HW2775E1CNG) 1
15 24601 BASE 1
16 85.300.037 UNLOADER 1
17 85.149.017B COMET FWS23530E, TRIPLEX, 3000 PSI 5HP PUMP (HW255E1CNG) 1
18 85.0149.033B COMET FWS2, TRIPLEX, 3000 PSI 7.5HP PUMP (HW2775E1CNG) 1
19 85.300.056 WATER INLET ASSEMBLY 1
20 FIA59LD36A CONNECTOR HOSE 1
21 40362 DRAFT HOOD 1
22 40168 HEATING COIL 1
23 246115 S.S. COIL SKIN 1
24 24609 COIL CAP 1
25 85.210.045BEP 5 HP QUICK CONNECT SPRAY NOZZLE 45 1
26 85.210.055BEP 7.5 HP QUICK CONNECT SPRAY NOZZLE 55 1
27 85.238.251 50FT 6000 PSI 3/8” RUBBER HOSE 1
28 85.205.064 36” GUN AND WAND ASSEMBLY 1
HW255E1CNG
HW2775E1CNG
16
10
HW255E3CNG
HW2775E3CNG
11
12
13
14
15
16
17
18
19
20
21
22
23
24
UNIT BREAKDOWN
1
2
3
4
6
89
7
5
25
26
27
28

17
ITEM PART NUMBER DESCRIPTION QT Y.
1 HEX- BURNERRING 1
2 HEX- BURNERRING 1
3 HEC-B GASVALVEELECTRONICIGNITION-PILOTRELIGHT 1
4 HES ELECTRONICIGNITIONMODULE 1
5 QASSY PILOTBURNERASSEMBLY 1
6 H- VELECTRONICIGNITIONGASVALVE 1
7 SH IGNITIONMODULE 1
8 RUB-T RELIEFVALVE 1
9 PUST FLOWSWITCH 1
10 85.300.097 CHEMICAL INJECTOR 1
11 T44110 HI LIMIT 1
12 24606 BOTTOM PAN 1
13 70.003.005 230V/460V, 5HP MOTOR (HW255E3CNG) 1
14 70.003.075HE 230V/460V, 7.5HP MOTOR (HW2775E3CNG) 1
15 24601 BASE 1
16 85.300.037 UNLOADER 1
17 85.149.017B COMET FWS23530E, TRIPLEX, 3000 PSI 5HP PUMP (HW255E3CNG) 1
18 85.0149.033B COMET FWS2, TRIPLEX, 3000 PSI 7.5HP PUMP (HW2775E3CNG) 1
19 85.300.056 WATER INLET ASSEMBLY 1
20 FIA59LD36A CONNECTOR HOSE 1
21 40362 DRAFT HOOD 1
22 40168 HEATING COIL 1
23 246115 S.S. COIL SKIN 1
24 24609 COIL CAP 1
25 85.210.045BEP 5 HP QUICK CONNECT SPRAY NOZZLE 45 1
26 85.210.055BEP 7.5 HP QUICK CONNECT SPRAY NOZZLE 55 1
27 85.238.251 50FT 6000 PSI 3/8” RUBBER HOSE 1
28 85.205.064 36” GUN AND WAND ASSEMBLY 1
HW255E3CNG
HW2775E3CNG
PARTS REFERENCE LIST

18
ELECTRICAL BOX ASSEMBLY BREAKDOWN
HW255E1CNG
HW2775E1CNG
1
2
3
4
5
OVERLOAD RELAY
(REFER TO CHART ON PAGE 19) 7
CONTACTOR
(REFER TO CHART ON PAGE 19)
6
8

19
PARTS REFERENCE LIST
ITEM PART NUMBER DESCRIPTION QT Y.
1 ELCA ROTARY SWITCH PUMP/BURNER 1
2 EL SHOCKSAFE FUSEHOLDER 1/4x1.25 1
3 ELGGC5 1/2 AMP GLASS FUSE 1
4 ELTR86 OFF-120 DEGREES THERMOSTAT 1
5 ELCT1S30 CT1S30 OFF DELAY TIMER SSAC 1
6 ELMH50AG 600/24V 50A TRANSFORMER 1
7 EL6M30A2SQ 600V 30A 2POLE FUSE HOLDER 1
8 ELATDR1/2 TIME DELAY FUSE 600V 1/2A 1
HW255E1CNG
HW2775E1CNG
ELECTRICAL CONTACTOR AND OVERLOAD PARTS LIST
PART NO. PHASE MOTOR (HP) VOLTAGE (V) CONTACTOR
PART NO.
OVERLOAD
PART NO.
HW255E1CNG 15 230 ELCI-32 ELT9E1/23-28
HW2775E1CNG 7.5 230 EL42CF35AJ ELT9E1/28-40

20
ELECTRICAL BOX ASSEMBLY BREAKDOWN
HW255E3CNG
HW2775E3CNG
1
2
3
4
5
6
7
8
10
9
CONTACTOR
(REFER TO CHART ON PAGE 21)
OVERLOAD RELAY
(REFER TO CHART ON PAGE 21)
This manual suits for next models
3
Other BE Power Equipment Washer manuals

Popular Washer manuals by other brands


Smeg
Smeg STL120 user manual

Whirlpool
Whirlpool Gold GSW9550KQ0 Use and care guide

VOX electronics
VOX electronics WM1275-YTQD operating instructions

Panasonic
Panasonic NA-127VB4 Operating instructions & installation instructions

Frigidaire
Frigidaire FLCF09GGFWTU user manual

Electrolux
Electrolux ews 1042 edu user manual


