BE Power Equipment WHIRL-A-WAY User manual

pressure washer surface cleaner
USER MANUAL
WHIRL-A-WAY
85.403.003
85.403.007
85.403.008
85.403.009
85.403.010
85.403.011

Introduction
3Owners Responsibility
3Product Identication
Product Specification and Safety
4Product Specication
4Safety
Operating Instructions
5Intended Use
5Pre-Operation
5Operation
Parts Diagram
685.403.003 / 85.403.007 / 85.403.011
Parts List
785.403.003 / 85.403.007 / 85.403.011
Parts Diagram
885.403.008
Parts List
985.403.008
Parts Diagram
10 85.403.009 / 85.403.010
Parts List
11 85.403.009 / 85.403.010
Trouble Shooting and Parts List
12 Trouble Shooting
12 Parts list
Nozzle Maintenance
13 Nozzle Maintenance
Nozzle Chart and Warranty
14 Nozzle Chart
14 Warranty
TABLE OF CONTENTS
3
Congratulations on your purchase of a BE Power Equipment Whirl-A-Way Surface
Cleaner.
Reading this manual will help get you the best results for set-up, operation, maintenance
and avoid personal injury or damage to your machine. By knowing how best to operate
this machine, you will be better positioned to show others who may also operate the unit.
All the information in this manual is based on the latest product information available at
the time of printing. BE Power Equipment reserves the right to make changes at any time
without notice or incurring any obligation.
Owner/Operator Responsibility
The owner/operator must have a thorough understanding of the operation, maintenance
and dangers associated with using this machine. It must be understood that it is ultimately
up to the owner/operator to safely use this machine as outlined in this manual.
This manual is considered a part of the machine and needs to be kept in a safe location. If
the machine is resold or given to someone else, this manual needs to be included.
Record Identification Numbers
It is recommended that you record the product identification numbers in this manual.
These numbers are important to have on hand if you need to contact technical support
(1-866-850-6662). The model and serial number can be found on the box and on decal on
the machine.
PRODUCT IDENTIFICATION
Model Number:
Date of Purchase:
Dealer Name:
INTRODUCTION

4
PRODUCT SPECIFICATIONS
The pressure washer being used MUST be compatible with the below specifications to
ensure proper operation.
• 3/8" Quick Connect hose coupler
• 4,000 Maximum PSI / 5,000 PSI for 85.403.008 Model
• 1,500 Minimum PSI
• 5.0 Maximum GPM
• 3.0 Minimum GPM
• Up to 200°F/82°C water temperature
• (Changing nozzles will alter the min and maxes, see NOZZLE CHART)
SAFETY
• ALWAYS review and know all the warnings and safety alerts for the pressure washer
that you are using that can be found in the pressure washer manual.
• ALWAYS be aware of where the Whirl-A-Way is being used or pointed. High-pressure
spray can cause injury or damage.
• If this type of injury occurs, DO NOT TREAT AS A SIMPLE CUT. SEEK
EMERGENCY MEDICAL ATTENTION IMMEDIATELY. If you are using
cleaning detergents, be prepared to tell the physician exactly what kind.
• Spray guns can have signicant kickback. ALWAYS brace yourself and have rm
footing when operating.
• NEVER attempt to repair high-pressure components if damaged. Always replace parts.
• ALWAYS use on at surfaces.
• WARNING: Hitting any raised obstacle with the surface cleaner can cause damage.
If performance changes, or if it begins to vibrate aer impact, immediately turn o the
pressure washer. Inspect for damages and make repairs.
• ALWAYS ensure all component connections and ttings are securely fastened. High-
pressure water can turn loose ttings or spray nozzles into projectiles causing injury or
damage.
• CAUTION: If stones or debris collect in the whirl-a-way they can be cleared by tilting
it in safe direction to ush away the debris.
• ONLY use cold water pressure washers. Hot water pressure washers will cause failures
and will void warranty.
• ALWAYS be aware of surfaces that will become wet and may become slippery.
• ALWAYS wear appropriate personal safety equipment. Eye protection is especially
important.
• NEVER use without wearing foot protection.
• ALWAYS have a secure grip of the gun and stable footing.
• NEVER modify the Whirl-A-Way in any manner.
• NEVER reach under the Whirl-A-Way while it is operating.
• ALWAYS test in a safe location when rst using.
PRODUCT SPECIFICATIONS AND SAFETY

5
Pre-Operation Instructions
1. Remove Whirl-A-Way from packaging. Ensure there is no damage and that
rotary arm freely spins by hand.
2. Connect Whirl-A-Way to the end of the high-pressure hose. e high-pressure
hose will need to have 3/8” quick connect coupler to attach to the 3/8” quick
connect plug on the Whirl-A-Way.
3. Prepare your pressure washer for start-up as per its start-up procedure found its
manual.
4. Once water is connected to the pressure washer, squeeze the trigger of the spray
wand to ensure that water ows through the whirl-a-way.
5. Level the Whirl-A-Way onto a at surface.
6. Start the pressure washer as instructed in its manual.
Operating Instructions
1. Walk slowly behind the Whirl-A-Way moving it in a rhythmic side-to-side
motion.
2. If striping or swirling occurs then slow your pace.
3. If striping or swirling continues then it is likely the nozzles are clogged or
damaged. If they are damage you will see visible deformation of the nozzle from
impact. If there is no damage, then they need to be cleaned. See the Nozzle
Maintenance section for details.
4. When done working, always ush with clean water. Detach from your pressure
washer and drain out any water to prevent possible freezing damage. Store in a
manner so not to deform the bristle skirt.
Intended Use
1. e Whirl-A-Way is designed to rapidly clean large, at surfaces such as concrete
oors.
2. It is not intended to clean rough or uneven surfaces such as stairs. Uneven surfaces
can cause damage.
3. e pressure washer must be rated to make the Whirl-A-Way operate properly. For
the standard nozzles that come with the Whirl-A-Way the pressure washer must
have the following.
• 3/8” Quick-connect coupler on the end of the high-pressure hose
• 1,500 - 4,000 PSI rating / 5,000 for 85.403.008 Model
• 3.0 - 5.0 GPM rating
OPERATING INSTRUCTIONS

6
PARTS DIAGRAM
5.
13.
4.
7.
2.
3.
10.
9.
11.
12.
16.
8.
1.
6.
85.403.003
85.403.007
85.403.011
PARTS LIST
14.
15.

7
85.403.003
85.403.007
85.403.011
NO#
1
2
3
4
5
6
7
8
9
10
11
12
13
14
15
PART #
85.792.003
85.790.004
85.792.004
85.238.059
AC7501
85.300.105
85.792.008K
85.602.005
85.792.010
85.792.009
85.792.011
85.225.025
85.791.020
85.419.102
85.419.103
DESCRIPTION
Bracket, Mounting Head 16"
Rotary Head, 16"
Mounting Blocks
Hose, 62" x 3/8"
Easy Pull Gun
Plug, 3/8" MNPT
Handle
Hand Grip
Brush, 16"
Cover, Polypropylene 16"
Rotary Arm, 16"
Nozzle, 25 Deg. 025
Sleeve For DC5090 WAW Gun
Cotter Pin Set, 2-1/4"
Cotter Pin Set, 2-5/8"
NO#
1
2
3
4
5
6
7
8
9
10
11
12
13
14
15
NO#
16
PART #
85.792.003
85.790.004
85.792.004
85.238.059
AC7501
85.300.105
85.792.002K
85.602.005
85.792.006
85.792.005
85.792.007
85.225.025
85.791.020
85.419.102
85.419.103
PART #
85.793.016
DESCRIPTION
Bracket, Mounting Head 20"
Rotary Head, 20"
Mounting Blocks
Hose, 62" x 3/8"
Easy Pull Gun
Plug, 3/8" MNPT
Handle
Hand Grip
Brush, 20"
Cover, Polypropylene 20"
Rotary Arm, 20"
Nozzle, 25 Deg. 025
Sleeve For DC5090 WAW Gun
Cotter Pin Set, 2-1/4"
Cotter Pin Set, 2-5/8"
See 85.403.007 for parts 1-13.
DESCRIPTION
Castor Kit
PARTS LIST

8
85.403.008
5.
13.
4.
7.
2.
3.
10.
9.
11.
12.
14.
8.6.
15.
PARTS DIAGRAM PARTS LIST
9
85.403.008
NO#
1
2
3
4
5
6
7
8
9
10
11
12
13
14
15
PART #
85.792.003
85.790.004
85.792.004
85.238.046
85.202.133
85.300.105
85.792.050K
85.660.035
85.792.006
85.792.005
85.792.007
85.225.025
85.300.102S
85.211.007
85.792.051
DESCRIPTION
Bracket, Mounting Head 20”
Rotary Head, 20”
Mounting Blocks
Hose, 46” x 3/8”
Italian design linear spray gun
Plug, 3/8” MNPT
Handle
Hand Grip
Brush, 20”
Cover, Polypropylene 20”
Rotary Arm, 20”
Nozzle, 25 Deg. 025
Quick Connect plug
Inline lter
Handle hardware kit
Includes nozzle cleaning tool
(sold separately with other models)
Part # 85.211.008
PARTS LIST

10
85.403.009
85.403.010
5.
4.
7.
2.
3.
11.
10.
9.
12.
13.
1.
6.
8.
PARTS DIAGRAM PARTS LIST
14.
15.

11
85.403.009/85.403.015
85.403.010
NO#
1
2
3
4
5
6
7
8
9
10
11
12
12
13
14
15
PART #
85.791.002
85.790.004
85.792.019
85.238.059
AC7501
85.300.105S
85.792.018K
85.602.005
85.792.013
85.790.029
85.792.012
85.792.017
85.791.010S
85.225.020
85.419.102
85.419.103
DESCRIPTION
Bracket, Mounting Head 20"
Rotary Head, 20"
Mounting Blocks
Hose, 62" x 3/8"
Spray Gun
Plug, 3/8" MNPT
Handle
Hand Grip
Brush Skirt, 20"
Castor Wheel
Cover, Stainless Steel 20"
Rotary Arm, 20" SS WAW, 2 Arm
Rotary Arm, 20" SS WAW, 3 Arm
Nozzle, 25 Deg. 020
Cotter Pin Set, 2-1/4"
Cotter Pin Set, 2-5/8"
NO#
1
2
3
4
5
6
7
8
9
10
11
12
12
13
14
15
PART #
85.791.002
85.790.004
85.792.019
85.238.059
AC7501
85.300.105S
85.792.018K
85.602.005
85.792.015
85.790.029
85.792.014
85.792.016
85.791.033
85.225.020
85.419.102
85.419.103
DESCRIPTION
Bracket, Mounting Head 24"
Rotary Head, 24"
Mounting Blocks
Hose, 62" x 3/8"
Spray Gun
Plug, 3/8" MNPT
Handle
Hand Grip
Brush Skirt, 24"
Castor Wheel
Cover, Stainless Steel 24"
Rotary Arm, 24" SS WAW, 2 Arm
Rotary Arm, 24" SS WAW, 3 Arm
Nozzle, 25 Deg. 020
Cotter Pin Set, 2-1/4"
Cotter Pin Set, 2-5/8"
PARTS LIST

12
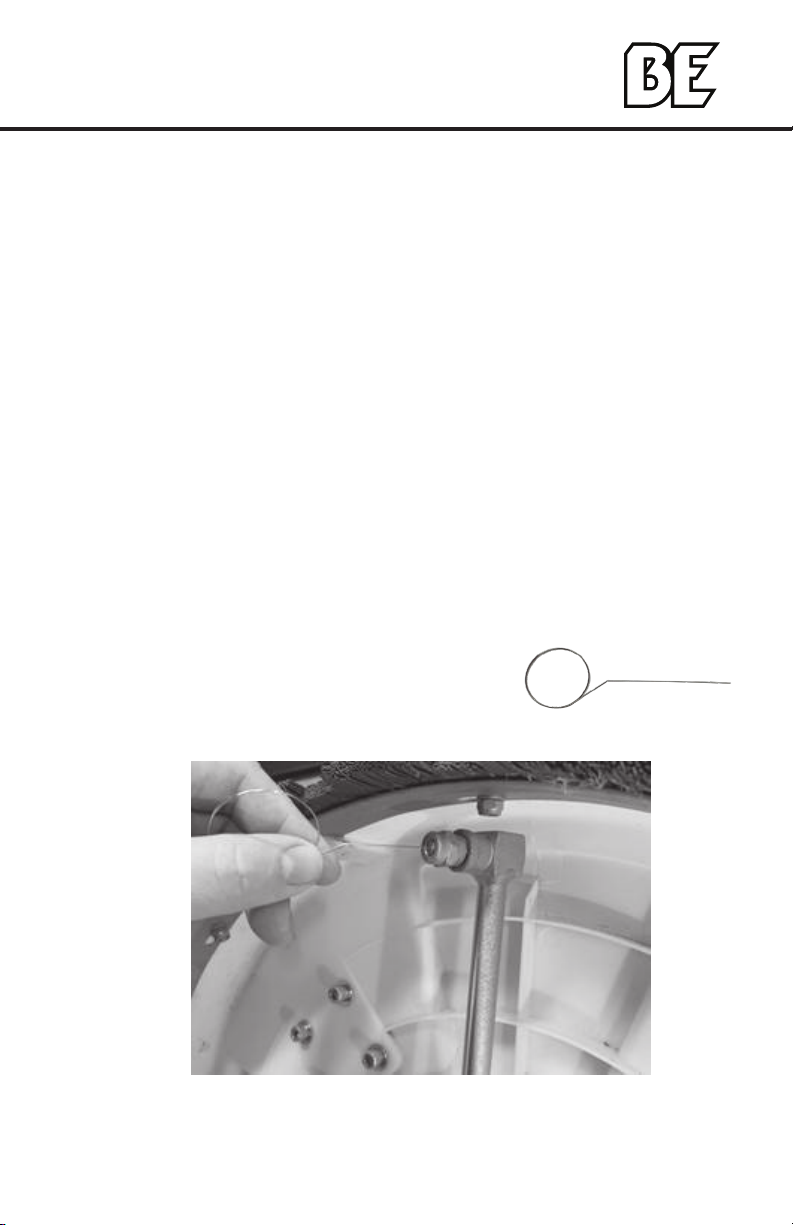
Rotary Head Repair Parts
A repair kit for this Whirl-a-Way’s rotary head, is available.
If you encounter problems with the rotary head aer the 1 year warranty
has expired, this repair kit (part #85.790.010) allows you to replace the inner
components very quickly.
e rotary head has a snap ring on the bottom holding all the bearings inside.
By removing the snap ring and washer, you can tap o the outer shell with a
hammer while the output sha is held in a vice. e rotary head repair kit can
then be used to replace the worn items inside the rotary head shell.
NO#
1
2
3
4
PART #
85.790.010
85.790.001
85.790.002
85.790.011
DESCRIPTION
Rotary Head Rebuild Kit
Inlet Valve
Inlet Valve Viton O-Ring
Outlet Sha
Troubleshooting
Problem Cause Solution
Rotary arm not spin-
ning
• 1 or more plugged nozzles
• Nozzles not aligned with arm
• Damaged nozzle or rotary arm
• Clean or replace nozzles
• Realign nozzles
• Replace damaged part(s)
Low pressure or slow
spinning
• Inline lter in the plug is
clogged • Clean or replace
Leaking water from
weep hole • Damaged or worn seals • Replace rotary head
Leaking water from
QC plug • Damaged or missing o-ring in coupler • Replace o-ring
Unit vibrating while
in use
• One or more plugged nozzles
• Uneven nozzle wear
• Damaged nozzle or rotary arm
• Miss matched nozzles
• Clean nozzles
• Replace damaged part(s)
• Replace nozzles
TROUBLESHOOTING / PARTS LIST NOZZLE MAINTENANCE

13
Nozzle Maintenance
e Whirl-A-Way comes with 25° nozzles that have an orice size of 020. ey are
installed and aligned properly during production. To conrm proper alignment, inspect
the nozzles. e indent line of the nozzle has to be in line with the rotary arm. If they are
out of alignment the resulting spray angle will result in striping with the possibility of the
rotary arm not spinning at all.
If there are any performance issues, including vibration, pulsing, or stripping, then it is very
likely the nozzles are damaged or clogged.
Always turn o the pressure washer and detach the Whirl-A-Way when performing any
inspection or maintenance.
1. If the nozzle struck any hard object it can be damaged. If the metal nozzle is
deformed it will need to be replaced.
2. If there is no damage, then it is likely the nozzle is clogged.
3. To clean, remove the nozzles. Use CAUTION when removing the nozzles as
trapped pressure may be suddenly released.
4. Use the included cleaning tool (or a ne metal wire) to remove any debris or
foreign material that has built up in the nozzle.
5. Use water to back ush the nozzle. (Run the water through the nozzle in the
opposite direction the water would normally spray out).
6. Use Teon tape or paste on the threads to prevent leaks when reinstalling.
7. Install nozzles back on. Ensure the indent on the nozzles are in line with the
rotary arm.
8. Reconnect your pressure washer and start.
9. Always ush the Whirl-A-Way with clean water aer use, especially if soaps or
detergents were used.
10. When not in use, make sure water has been drained from the Whirl-A-Way to
prevent freezing damage.
Nozzle Cleaning Tool
NOZZLE MAINTENANCE
Part # 85.211.008

14
Warranty
is surface cleaning unit has a 1-Year warranty on all components except for
the nylon brush ring. is includes the rotary head, spray gun, hose, the nylon
brush ring, and plastic cover.
is warranty covers manufacturer defects only and does not extend
to any damage caused by the user. It also does not extend to any wear and tear
caused by regular use of the product.
Nozzle Chart
is Whirl-A-Way comes equipped with 020 nozzles. ese can be swapped out with
larger nozzles to increase the PSI and GPM capacities as per the cart below.
Orifice Size MIN PSI/GPM MAX PSI/GPM
015 1,500 PSI / 2.0 GPM 4,000 PSI / 3.0 GPM
020 1,500 PSI / 2.5 GPM 4,000 PSI / 4.0 GPM
025 1,500 PSI / 3.0 GPM 4,000 PSI / 5.0 GPM
030 1,500 PSI / 3.5 GPM 4,000 PSI / 6.0 GPM
035 1,500 PSI / 4.5 GPM 4,000 PSI / 7.0 GPM
040 1,500 PSI / 5.0 GPM 4,000 PSI / 8.0 GPM
If the minimum requirements are not observed, then the Whirl-A-Way will spin poorly, if
it at all.
If the maximum requirements are not observed, then there will be risk of damage or injury.
NOZZLE CHART / WARRANTY NOTES
15
NOTES


nettoyeur de surface
nettoyeur haute pression
WHIRL-A-WAY
85.403.003
85.403.007
85.403.008
85.403.009
85.403.010
85.403.011
GUIDE DE L’UTILISATEUR

Introduction
19 Responsabilité des propriétaires
19 Identication du produit
Spécification et sécurité du produit
20 Spécication du produit
20 Sécurité
Mode d’emploi
21 Utilisation prévue
21 Pré-opération
21 Fonctionnement
Schéma des pièces
22 85.403.003 / 85.403.007 / 85.403.011
Liste des pièces
23 85.403.003 / 85.403.007 / 85.403.011
Schéma des pièces
24 85.403.008
Liste des pièces
25 85.403.008
Schéma des pièces
26 85.403.009 / 85.403.010
Liste des pièces
27 85.403.009 / 85.403.010
Dépannage et liste des pièces
28 Dépannage
28 Liste des pièces
Entretien des buses
29 Entretien des buses
Tableau des buses et garantie
30 Tableau des buses
30 Garantie
TABLE DES MATIÈRES
19
INTRODUCTION
Félicitations pour votre achat d’un nettoyeur de surface Whirl-A-Way BE Power
Equipment.
Lire ce manuel vous aidera à le configurer adéquatement, fonctionnement, entretien
afin d’éviter des blessures ou dommage à votre appareil. En sachant comment utiliser au
mieux cet appareil, vous serez mieux placé pour montrer aux autres comment l’utiliser
adéquatement
Toutes les informations dans ce manuel sont bases sur les dernières informations
disponibles au moment de l’impression. BE Power Equipment se réserve le droit de faire
des changements à tout moment sans préavis ou contracter une obligation.
Responsabilité du Propriétaire/ Opérateur
Le propriétaire/ opérateur doit avoir une compréhension approfondie du fonctionnement,
entretien et dangers associé à l’utilisation de cet appareil. Il faut comprendre qu’il
appartient en fin de compte au propriétaire/ opérateur d’utiliser cet appareil en toute
sécurité comme indiqué dans ce manuel.
Ce manuel est considéré comme une pièce de l’appareil et doit être conserver dans un
endroit sur. Si cet appareil est revendu ou donné à quelqu’un d’autre, ce manuel doit être
inclus.
Enregistrer les Numéros d’Identification
Il est recommandé d’enregistrer les numéros d’identification du produit dans ce manuel.
Ce numéros sont importants d’avoir en mains si vous avez besoin de contacter le support
technique (1-866-850-6662). Le numéro de modèle et série peut être trouvé sur la boîte et
sur le décalque de l’appareil.
IDENTIFICATION DU PRODUIT
Numéro de Modèle:
Date d’Achat:
Nom du Détaillant:

20
SPÉCIFICATIONS PRODUIT
La laveuse à pression utilise DOIT être compatible avec les spécifications ci-bas afin d’assurer une
utilisation adéquate.
• 3/8" Raccord de boyau à connection rapide
• 4,000 Maximum lb/po2 / 5,000 PSI for 85.403.008
• 1,500 Minimum lb/po2
• 5.0 Maximum GPM
• 3.0 Minimum GPM
• Up to 200°F/82°C water temperature
• (Changer les buses modiera le min et max, voir TABLEAU DE BUSES)
SÉCURITÉ
• TOUJOURS passer en revue et connaître tous les avertissements et alertes de sécurité de la
laveuse à pression que vous utilisez qui se trouvant dans le manuel .
• TOUJOURS être conscient de l’endroit où le Whirl-A-Way est utilise ou pointe. Une
pulvérisation à haute pression peut causer blessures ou dommages.
• Si ce genre de blessure survient, NE PAS TRAITER COMME UNE SIMPLE COUPURE.
ALLEZ CHERCHER DES SOINS MÉDICAUX D’URGENCE IMMÉDIATEMENT. Si
vous utilisez des détergents de nettoyage, soyez prêt à mentionner exactement lequel au médecin.
• Les pistolets peuvent avoir des rebonds important. Préparez-vous TOUJOURS et ayez une base
ferme lors de l’utilisation.
• Ne JAMAIS tenter de réparer des composantes haute pression si endommagées. Toujours les
remplacées.
• TOUJOURS utiliser sur des surfaces planes.
• ATTENTION: Heurter un obstacle avec le nettoyeur de surface peut causer des dommages. Si la
performance change, ou si elle commence à vibrer suite à un impact, arrêter immédiatement la
laveuse. Vérier les dommages et réparer.
• TOUJOURS s’assurer que toutes les connections et raccords des composantes sont solidement
xés. L’eau à haute pression peut desserer les raccords ou buses et ainsi devenir des projectiles
causant blessures ou dommages.
• AVERTISSEMENT: Si des pierres ou débris s’accumulent dans le whirl-a-way ils peuvent être
dégagés en l’inclinant dans une direction sécuritaire an de libérer les débris.
• Utiliser SEULEMENT des laveuse à eau froide. Les laveuses à pression à eau chaude
provoquera des échecs et annulera la garantie.
• Soyez TOUJOURS conscient que les surfaces deviendront mouillées et pourront être glissantes.
• TOUJOURS porter un attirail sécuritaire approprié. La protection des yeux est spécialement
importante.
• JAMAIS Utiliser sans protection pour les pieds.
• TOUJOURS avoir une prise sûre de pistolet et une assise stable.
• Ne JAMAIS modier le Whirl-A-Way d’aucune manière.
• Ne JAMAIS mettre la main sous le Whirl-A-Way lorsqu’il est en marche.
• TOUJOURS tester dans un endroit sécuritaire lors de la première utilisation.
SPÉCIFICATIONS PRODUIT ET SÉCURITÉ
This manual suits for next models
6
Table of contents
Languages:
Other BE Power Equipment Washer manuals

Popular Washer manuals by other brands


Smeg
Smeg STL120 user manual

Whirlpool
Whirlpool Gold GSW9550KQ0 Use and care guide

VOX electronics
VOX electronics WM1275-YTQD operating instructions

Panasonic
Panasonic NA-127VB4 Operating instructions & installation instructions

Frigidaire
Frigidaire FLCF09GGFWTU user manual

Electrolux
Electrolux ews 1042 edu user manual


