Beamz Wi-par 8x 3w LED tri color battery 2.4Ghz... User manual

Ref. Nr. 150.569
WI-PAR 8X 3W LED TRI COLOR
BATTERY 2.4GHZ DMX
MANUAL

- 2 -
Thank you for purchasing our company products. Please read these instructions carefully to enjoy
optimum performance and a longer service life before you start to use.
CONTENTS
pCONTENTS........................................................................................................................................... 2
Unpacking Inspections ............................................................................................................................ 3
Unpacking instructions ........................................................................................................................ 3
Checking the contents of the carton:................................................................................................... 3
Safety Instructions................................................................................................................................... 3
Product Overview.................................................................................................................................... 4
Functions Introductions ........................................................................................................................... 4
Main Functions .................................................................................................................................... 4
Operation Instructions ......................................................................................................................... 5
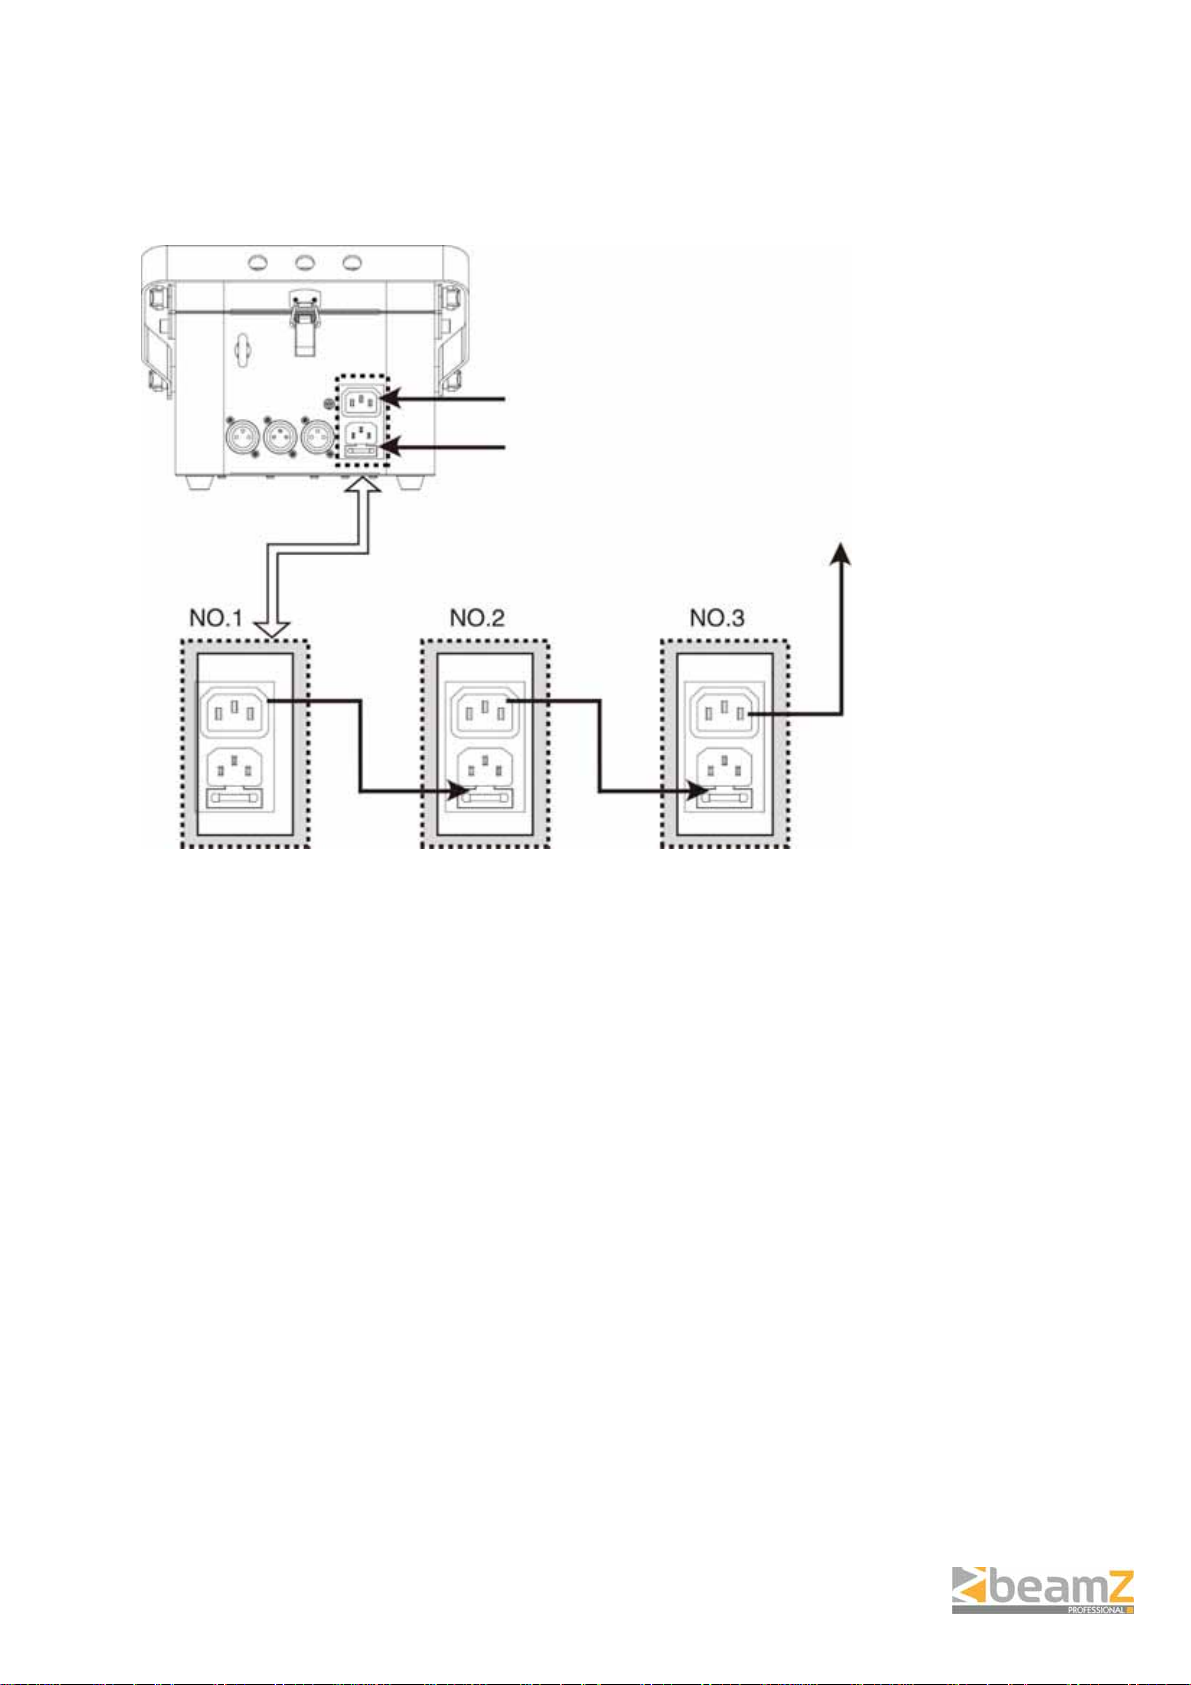
Power supply connecting:............................................................................................................. 5
Control panel operation................................................................................................................... 5
DMX Mode........................................................................................................................................... 6
Set DMX adres................................................................................................................................ 6
Act mode(Standalone) ...................................................................................................................... 8
IR control ............................................................................................................................................. 9
Automatic Mode............................................................................................................................... 9
Sound Active Mode ......................................................................................................................... 9
Manual Color Control....................................................................................................................... 9
DMX Mode Auto Sync....................................................................................................................... 10
For the transmitting product........................................................................................................... 10
For the receiving product(s)........................................................................................................... 10
DMX Mode Manual Sync:.................................................................................................................. 10
For the transmitting product........................................................................................................... 10
For the receiving product(s)........................................................................................................... 11
IR/standalone mode auto Sync ......................................................................................................... 11
For the transmitting product:.......................................................................................................... 11
For the receiving product(s)........................................................................................................... 11
Master/slave mode............................................................................................................................ 12
Standalone master/slave............................................................................................................... 12
Master/slave mode with DMX signal ............................................................................................. 12
Multi-groups connecting with DMX................................................................................................ 13
Out-of-factory parameter setup ......................................................................................................... 13
Charge the battery............................................................................................................................. 13
Reset the software......................................................................................................................... 13
Maintenance.......................................................................................................................................... 14
Specification .......................................................................................................................................... 14
CE & R&TTE Declaration of Conformity................................................................................................ 15

- 3 -
UNPACKING INSPECTIONS
Unpacking instructions
Please unpack the carton and check the goods carefully when you receive it , if discover
packing damage, shortage or quality problem, please notify the shipper and reject the goods.
Before using this product, please read the instructions carefully and keep it in a safe place for
future reference.
Checking the contents of the carton:
The product, Power cord, Instruction Manual, Remoter
SAFETY INSTRUCTIONS
Safety and regulatory power socket with high quality output should be used .
Always connect the product to a grounded circuit to avoid the risk of electrocution.
Never put tiny metal objects such as a screwdriver, iron wire and coins, etc. into the internal or
stretch into the machine in case of short circuit .
Please make sure to connect the proper voltage and do not higher or lower than that stated on
the decal or rear panel of the product .
Avoid hitting, crashing or squeezing with other objects in transportation. Never carry the
product from the power cord or any moving part . Always use the hanging / mounting bracket
or the handles.
The product is used in door only .
Never pull or tug on the cord and change it for another one , stop using it when it is damaged
or becomes hot .
Stop using the product once there is sparks when connecting with the power plug .
Can not operate product with wet hands and never place it near the water or other liquid.
Make sure there are no flammable materials close to the fixture while operating . Always install
it in a location with adequate ventilation.
Never replace the lighting source with different specification and rating when the original one
is damaged.
Make sure to power off before replacing the light source or the fuse. Never do it while it is on.
The ambient temperature is no more than 40°C(104°F) .
Never clean the fixture by water, thinner or other dissolved agent .
Stop using the product in case of a serious operating problem and send it to our maintenance
agent immediately. Never repair by non-professional workers .
Avoid direct eye exposure to the light source while the product is on.

- 4 -
PRODUCT OVERVIEW
1. Control Panel
2. Power on/off
3. Battery indicator
4. Microphone
5. Auto Search
6. Safety Eyebolt
7. Master/Slave signal output
8. DMX signal input
9. DMX signal output
10. Power input
11. Power output
12. Antenna
13. LEDs
14. IR
FUNCTIONS INTRODUCTIONS
Main Functions
3 or 4 DMX channels
Automatic, sound active and master/slave mode
Built-in 23 actions, run speed and strobe speed can be adjusted
With static colors, strobe, dimmer, color mixing and changing effects
IR Remote control
Can receive and transmit signal wirelessly

- 5 -
Operation Instructions
Power supply connecting:
Two sockets in the product, Power In and Power Out , the product can be supplied power by the
power out. Maximum output power of the socket is 480W .
Control panel operation
Use the four buttons《MODE》《ENTER》《UP》and《DOWN》to operate the control panel:
SYS System settings
S-Ir IR control
ACT Action control, stand alone programs
SLAU Slave mode, set receive frequency for IR & ACT use
Press 《MODE》to find an operation mode or to back out of the current menu option.
Press 《UP》to scroll up the list of options or to find a higher value.
Press 《DOWN》to scroll down the list of options or to find a lower value.
Press 《ENTER》to activate a menu option or a selected value.
Maximum connecting machines are 8
units with the same model
POWER OUT
POWER IN

- 6 -
MODE Description
SYS
S dAd DMX address setup(001-509)
d-CH 3CH 3CH DMX mode
4CH 4CH DMX mode
s-tr
t.CH Manually select transmit frequency (for IR&Act use) t001-t016
tA.S Automatically select Receive frequency (for IR&Act use)
dt.CH Manually select Transmit frequency (for DMX use) dt01-t16
dtA.S Automatically select Transmit frequency (for DMX use)
dr.CH Manually select receive frequency (for DMX use) dr.01-dr.16
drA.S Automatically select receive frequency (for DMX use)
d-SL Sensitivity low to high (SL.00-SL.32)
S AAd Reset software
S-Ir IR Infrared remote control
SLAu rA.S r-AU Automatically select receive frequency (For IR&Act use)
r-St r001-r016 Manually select receive frequency (For IR&Act use) r001-r016
ACt A000
-
A023
F000-F100 Strobe speed (slow to fast )
SL.00-SL.32 Sensitivity low to high (SL.00-SL.32)
P000-P100 Run speed (slow to fast )
C000-C100 Brightness adjustment (dark to bright)
DMX Mode
Set DMX adres
When selecting a starting DMX address, always consider the number of DMX channels. If you choose
a starting address that is too high, you could restrict the access to some of the product’s channels.
With 3Ch & 4CH, when in 4-channel DMX mode, it defines the highest configurable address 509.
Follow below to select the DMX starting address
Press <MODE> repeatedly until SYS,ACt,SLAv,or S-1r shows on the display.
Use <UP> or <DOWN> to select SYS.
Press <ENTER>
Use <UP> or <DOWN> to select SdAd from the menu
Press <ENTER>
Use <UP> or <DOWN> to select the starting address.
Press <ENTER>
With 3CH and 4CH,follow below to setup
Press <MODE> repeatedly until SYS, ACt, SLAv, or S-1r shows on the display.
Use <UP> or <DOWN> to select SYS
Press <ENTER>
Use <UP> or <DOWN> to select d-CH from the menu
Press <ENTER>
Use <UP> or <DOWN> to select either the 3-channel mode (3CH) or the 4-channel mode (4CH)
Press <ENTER>

- 7 -
DMX Value Functions 4 CH
CHANNEL VALUE FUNCTION CH 2 CH 3 CH 4
1
Static colors
Flash speed
000 – 249
Sound
Active
250 – 255
000 – 009 Blackout
010 – 019 Red
020 – 029 Green
030 – 039 Blue
040 – 049 Red + Green
050 – 059 Red + Blue
060 – 069 Blue + Green
070 – 079 Red + Green + Blue
Color Changes
Run Speed
Automatic
000 – 127
Sound Active
128 – 255
Flash speed
000 – 249
Sound
Active
250 – 255
080 – 089 Color change 1
090 – 099 Color change 2
100 – 109 Quadrant Effect 1
110 – 119 Quadrant Effect 2
120 – 129 Quadrant Effect 3
130 – 139 Quadrant Effect 4
140 – 149 Quadrant Effect 5
150 – 159 Quadrant Effect 6
160 – 169 Quadrant Effect 7
170 – 179 Quadrant Effect 8
180 – 189 Color change 3
190 – 199 Color change 4
200 – 209 Color change 5
210 – 219 RGB Color Mix mode Red
0-100% Green
0-100% Blue
0-100%
220 – 229 Color Mode Fade speed
0-100%
230 – 255 Auto Run (sound active only)
DMX Value Functions 3 CH
VALUE CH 1 CH 2 CH 3
000 – 255 RED GREEN BLUE

- 8 -
Act mode(Standalone)
Set the product in one of the standalone modes to control without connecting a DMX controller.
Note: Never connect a product that is operating in any standalone mode to a DMX string connected to
a DMX controller.
Follow below actions to setup standalone mode:
Press <MODE> repeatedly until SYS,ACt,SLAv,or S-1r shows on the display.
Use <UP> or <DOWN> to select Act
Press <ENTER>
Use <UP> or <DOWN> to choose your desired program (A000-A023).
Press <ENTER>
Note: Certain programs will have additional functionality. To find these options, press <ENTER> after
selecting an auto program. Then press <UP> or <DOWN>. Not every program will feature all the
added functionality.
Function: F000 - F100 SL.00 – SL.32 P000 – P100 C000 – C1000
Description: Flash speed
(slow to fast) Sound sensitivity Run speed
(slow to fast) Dimmer
Please refer to below:
Display Function Run Speed (P) Flash Speed (F) Color (C)
A000 Black
0 – 100
A001 Red 0 – 100
A002 Green 0 – 100
A003 Blue 0 – 100
A004 Yellow 0 – 100
A005 Purple 0 – 100
A006 Cyan 0 – 100
A007 White 0 – 100
A008 Color Change
Run Speed
Automatic
0 – 50
Run Speed
Sound
51 – 100
0 – 100
A009 Action 1 0 – 100
A010 Action 2 0 – 100
A011 Action 3 0 – 100
A012 Action 4
A013 Action 5
A014 Action 6
A015 Action 7
A016 Action 8
A017 Action 9
A018 Action 10
A019 Action 11
A020 Action 12
A021 Any Color 0 – 100 (red) 0 – 100 (green) 0 – 100 (blue)
A022 Color Fade 0 – 100
A023 Auto Run 0 – 100

- 9 -
IR control
It is fully compatible with the IRC (Infrared Remote Control),please follow below to setup.
Press <MODE> repeatedly until SYS, ACt, SLAv, or S-1r shows on the display.
Use <UP> or <DOWN> to select S-1r, Press <ENTER>, Begin using the IRC
The functions of IRC:
Automatic Mode
Automatic Mode will enable you to run the automatic programs on the
product.
Press AUTO on the IRC.
Press + or - to choose different auto programs.
To adjust the speed of the automatic program.
Press SPEED on the IRC
Press + or - to either increase or decrease the speed of the program.
Sound Active Mode
Sound Active Mode will enable the product to respond to music and
follow below actions.
Press sound button.
Adjust the sound sensitivity.
Press sensitivity button.
Press + or - to either increase or decrease sound sensitivity.
Manual Color Control.
To choose a specific color with the IRC.
Press MANUAL on the IRC.
Press any number between 0-9 to choose your color.
To manually control the RGB percentage.
Press MANUAL on the IRC.
Press R, G, or B to choose your color.
Press the number (percentage) you desired
Press the button of %.
For example:
[MANUAL] -> [R] -> [5] -> [0] -> [%], red changes as 50%.
strobe control.
Follow below actions.
Press the strobe button on the IRC, Use + o - to adjust strobe speed.
Fade/snap.
Press the button of Fade/snap, Use + or - to adjust speed.
BLACK OUT.
Use the button of BLACK OUT to turn on or turn off.
Press the BLACK OUT to turn off.
Press Auto button to turn on and press BLACK OUT to turn on or turn off with power of the product.

- 10 -
DMX Mode Auto Sync
It offers wireless control of two or more products with a single DMX controller. To set syncing function
for DMX functionality automatically, do the following:
For the transmitting product.
Press <MODE> repeatedly until SYS, ACt, SLAv, or S-1r shows on the display.
Use <UP> or <DOWN> to select SYS.
Press <ENTER>.
Press <UP> or <DOWN> until S-tr appears on the display.
Press <ENTER>.
Press <UP> or <DOWN> until dtA.S appears on the display.
Press <ENTER>.
The display should show dt.AU.
For the receiving product(s).
Press <MODE> repeatedly until SYS, ACt, SLAv or S-1r shows on the display.
Use <UP> or <DOWN> to select SYS.
Press <ENTER>.
Press <UP> or <DOWN> until S-tr appears on the display.
Press <ENTER>.
Press <UP> or <DOWN> until dRA.S appears on the display.
Press <ENTER>.
The display should show dR.AU.
Once the steps above are done, press and hold <AUTO> on the transmitter for about 20 seconds and
the signal LED of receiver will flash to indicate sync is activated.
Cancel Auto Sync.
Press the Auto button of the receiving product until the signal stops flash, which means the between
the receiver and transmitter is cancelled.
Auto Sync for receivers and transmitters:
Repeat operations, match the next group after finishing matching the first group. (Power off other
fixtures when you follow the actions and multiple groups can not be matched at the same time)
One transmitter to multiple receivers.
Follow the instructions and set one as transmitter, the others as receivers, set the auto Sync between
one receiver and one transmitter, and then power off the receiver, match another pair. Power on all
the receivers after finishing, multiple receivers can be controlled by one transmitter.
DMX Mode Manual Sync:
It can wireless control of two or more products with a single DMX controller. To manually set up the
syncing function for DMX functionality, do the following.
For the transmitting product.
Press <MODE> repeatedly until SYS,ACt,SLAv,or S-1r shows on the display.
Use <UP> or <DOWN> to select SYS.
Press <ENTER>.
Press <UP> or <DOWN> until S-tr appears on the display.
Press <ENTER>.
Press <UP> or <DOWN> until dt.CH appears on the display.
PRESS <ENTER>.
Use <UP> or <DOWN> to select the transmitting signal (dt.01-dt.16).

- 11 -
For the receiving product(s).
Press <MODE> repeatedly until SYS, ACt, SLAv, or S-1r shows on the display.
Use <UP> or <DOWN> to select SYS.
Press <ENTER>.
Press <UP> or <DOWN> until S-tr appears on the display.
Press <ENTER>.
Press <UP> or <DOWN> until dR.CH appears on the display.
Press <ENTER>.
Use <UP> or <DOWN> to select the receiving signal (dr.01 - dr.16). The channel. number should
match the transmitting signal you chose in the prior steps.
Two products can be matched after finishing above steps.
Note: one transmitter can be used with multi receivers. Follow this actions and set one as transmitter,
the others as receivers, one transmitter can be used with multi receiver products.
IR/standalone mode auto Sync
Two or more products can be controlled with no external controllers or with the IRC. To automatically
set up syncing function for IR/standalone functionality, do the following.
For the transmitting product:
Press <MODE> repeatedly until SYS, ACt, SLAv, or S-1r shows on the display.
Use <UP> or <DOWN> to select SYS.
Press <ENTER>.
Press <UP> or <DOWN> until S-tr appears on the display.
Press <ENTER>.
Press <UP> or <DOWN> until tA.s appears on the display.
Press <ENTER>.
The display should show t-AU.
For the receiving product(s).
Press <MODE> repeatedly until SYS, ACt, SLAv, or S-1r shows on the display.
Use <UP> or <DOWN> to select SLAv.
Press <ENTER>.
Press <UP> or <DOWN> until rA.S appears on the display.
Press <ENTER>.
The display should show r-AU.
Once the steps above are done, press and hold <AUTO> on the transmitter for approximately 20
seconds. The signal LED of the receiver will flash to indicate sync is activated.
Note:
cancel IR/standalone Auto Sync
Press the Auto button of the receiver until the indicator stops flash, which means Sync data is
cancelled.
IR/standalone Auto Sync of multiple receivers and transmitters.
Repeat operations, match the next group after finishing match the first group. (Power off other fixtures
when you follow the actions and multiple groups can not be matched at the same time)
One transmitter to multiple receivers:
Follow the instructions and set one as transmitter, the others as receivers, set the auto Sync between
one receiver and one transmitter, and then power off the receiver, match another pair. Power on all
the receivers after finishing, multiple receivers can be controlled by one transmitter.
Note:
The distance of receiver and transmitter should be between 0.6 meter and 10 meter.

- 12 -
Master/slave mode
Standalone master/slave
The Master/Slave Runway Effect enables one product (the “master”) to control the actions of one or
more other products (the “slaves”) in sequential order for a “runway” effect without the need of a DMX
controller. The master product will be set to operate in specific automatic modes, while the slave
products will be set to operate in slave mode. Once set and connected, the slave products will operate
in unison with the master. Configure the products as indicated below.
Connect the DMX input of the first slave product to the DMX link output of the master. The slave
product will automatically switch to slave mode. The display will show SLA.
Connect the DMX input of the subsequent slave products to the DMX link output of the previous
slave.
Set the Master as standalone mode after finishing all above actions.
Master/slave runway effect can be displayed in standalone mode, auto programs A014-A020 on the
master product can achieve this function.
Note:
Never connect a DMX controller to a DMX string configured for Master/Slave operation because the
controller may interfere with the signals from the master product
Master/slave mode with DMX signal
The Master/Slave with DMX signal enables one product (the “master”) to control the actions of one or
more other products (the “slaves”). Link the master and slave, once set and connected, the slave
products will operate in unison with the master. Configure as indicated below.
Connect the DMX controller to the DMX input of the master.
Connect the DMX input of the first slave product to the DMX output of the master. The slave product
will automatically switch to slave mode. The display will show SLA when this occur.
Connect the DMX input of the subsequent slave products to the DMX link output of the previous
slave.
Once your setup is complete, SYS is shown on the master.
Slave
M
aste
r
/S
l
a
v
e
link

- 13 -
Multi-groups connecting with DMX
Wonderful colors and beautiful lighting effect can be displayed by multi-groups of products controlled
by DMX512, DMX512 signal is received and transmitted by the the first product for each groups.
Out-of-factory parameter setup
Press the mode button for about five seconds to recover the out-of-factory parameter.
Charge the battery
Built-in 12V 17.6AH Lithium battery and can work 6 hours with full charge. When the battery life is less
than 25%, the indicator will flash, please charge the battery about six hours.
There is a relay between the lithium battery and electric supply and it makes sure that the product can
be supplied power prior to the battery, the battery will supply power without electric supply.
Note:
With overcharge and discharge protections and it is no harm to the battery. It takes time to
interchange between the battery and power supply, so in order to make the actions in unison, the
software of the first product needs to be reset.
Reset the software
Press <MODE> button repeatedly until SYS,ACT,SLAV or S-Ir is displayed.
Use <UP> or <DOWN> button until SYS is displayed.
Press <ENTER>.
Use <UP> or <DOWN> button until SAAd is displayed.
Press <ENTER>.
DMX
No.1 No.2 No.3 No. ..
DMX

- 14 -
MAINTENANCE
The unit should be cleaned periodically to ensure the optimum performance, the smudginess can
decrease the life of light and the output of light is affected by the dust which can make the machine
overheating. In general, make the maintenance at least two times a month. Be sure to power off the
unit before cleaning .
Do not clean until the unit recovers normal temperature since high temperature for using, use the lens
tissue or soft cotton cloth with alcohol to wipe gently.
Cleaning frequency depends on the environment in which the fixture operates, damp, smoky or dirty
surrounding can cause greater accumulation of dirt on the optics. Never rub or press strongly on the
panel.
SPECIFICATION
Voltage......................................100-240V AC 50/60Hz
Input current ........................................................0.68A
Power...................................................................156W
Fuse............................................................3.15A 250V
Light source................................. 8x 3W tri-color LEDs
Built-in lithium battery.................................12V 17.6Ah
Wireless DMX frequency..........2.433GHz – 2.481GHz
Distance:...................... R-T signal far from 250 meters
Weight...................................................................4.3kg
Size........................................L187 x W187 x H159mm

- 15 -
CE & R&TTE DECLARATION OF CONFORMITY
Importer: TRONIOS BV
Bedrijvenpark Twente 415
7602 KM - ALMELO
Tel : 0031546589299
Fax : 0031546589298
The Netherlands
Product number: 150.569
Product Description: Beamz, Wi-Par 8x 3W LED Tri Color Battery 2.4GHz DMX
Regulatory Requirement: EN 60598-1/-2-17:2009
EN 62031:2008
EN 61347-2-13:2007
EN 300440-1/-2:2010
EN 62479:2010
EN 55015:2006/A2:2009
EN61547:2009
EN 301489-1/-3:2011/2012
EN 61000-3-2/-3-3
The product meets the requirements stated in the above mentioned Standards. This certificate does not
cover the aspects that may be relevant such as performance and fitness for purpose.
Almelo,
10-03-2012
Signature:

Specifications and design are subject to change without prior notice..
www.tronios.com
Copyright © 2013 by TRONIOS the Netherlands
This manual suits for next models
1
Table of contents
Other Beamz Dj Equipment manuals

Beamz
Beamz TP36 User manual

Beamz
Beamz 160.563 User manual

Beamz
Beamz PANTHER 70 User manual

Beamz
Beamz LCB224 User manual

Beamz
Beamz LCB145 User manual

Beamz
Beamz BBP44 MINI UPLIGHT User manual

Beamz
Beamz 3-SOME User manual

Beamz
Beamz BBP9 User manual

Beamz
Beamz SLIMPAR 30W User manual

Beamz
Beamz FUZE 75S SPOT User manual

Beamz
Beamz SLIMPAR 37 User manual

Beamz
Beamz MultiAce2 User manual

Beamz
Beamz COB30 UV User manual

Beamz
Beamz BTF50Z MINI Fresnel User manual

Beamz
Beamz Magic 1 User manual

Beamz
Beamz 151.347 V1.2 User manual

Beamz
Beamz Magic 2 User manual

Beamz
Beamz LSB340 User manual

Beamz
Beamz PS6WB User manual

Beamz
Beamz 153.691 V1.2 User manual