BearCreeks BC202 User manual

BC202 User manual

1
BC202 Intelligent Sonar Fish Finder User Manual
OVERVIEW......................................................................................................................................................................................................... 2
HOW DOES SONAR WORK....................................................................................................................................................................... 2
PRODUCT SPECIFICATION ......................................................................................................................................................................... 3
PRODUCT FUNCTIONS ............................................................................................................................................................................... 4
PRODUCT LIST ................................................................................................................................................................................................ 5
•TRANSMITTER LIST ....................................................................................................................................................................................................................6
•RECEIVER LIST..............................................................................................................................................................................................................................6
PRODUCT PORT CONNECTION INTRODUCTION .........................................................................................................................7
•TRANSMITTER PORT..................................................................................................................................................................................................................7
•RECEIVER PORT ...........................................................................................................................................................................................................................7
HOW TO CONNECT THE CABLES..........................................................................................................................................................8
•EXTERNAL POWER CABLE CONNECTION....................................................................................................
ERROR!BOOKMARK NOT DEFINED.
•CONNECT THE ANTENNA.................................................................................................................................
ERROR!BOOKMARK NOT DEFINED.
•CHARGING PORT INTRODUCTION.................................................................................................................
ERROR!BOOKMARK NOT DEFINED.
KEY FUNCTIONS............................................................................................................................................................................................. 9
•POWER ON/OFF ........................................................................................................................................................................................................................9
•DISPLAY VIEW .........................................................................................................................................................
ERROR!BOOKMARK NOT DEFINED.
•SONAR ZOOM VIEW............................................................................................................................................
ERROR!BOOKMARK NOT DEFINED.
•STOP CHART ............................................................................................................................................................................................................................ 13
•SONAR VIEW...........................................................................................................................................................
ERROR!BOOKMARK NOT DEFINED.
ACCESSING MENU FEATURES..................................................................................................................................................................14
•SONAR ........................................................................................................................................................................................................................................ 14
oSensitivity..............................................................................................................................................................................................................................14
oDepth Range......................................................................................................................................................................................................................16
oUpper and Lower Limit..................................................................................................................................................................................................17
oFish Symbols & Depth....................................................................................................................................................................................................17
oDepth Cursor .....................................................................................................................................................................................................................18
oSimulator..............................................................................................................................................................................................................................18
•SETUP........................................................................................................................................................................................................................................... 19
oBacklight...............................................................................................................................................................................................................................19
oVolume.................................................................................................................................................................................................................................. 19
oUnits ......................................................................................................................................................................................................................................19
oChart Speed........................................................................................................................................................................................................................ 19
oFish Alarm............................................................................................................................................................................................................................ 20
oDepth Alarm.......................................................................................................................................................................................................................20
oBattery Alarm.....................................................................................................................................................................................................................20
oTransparency......................................................................................................................................................................................................................21
•ADVANCED ...............................................................................................................................................................................................................................21
oKeel Offset ..........................................................................................................................................................................................................................21
oSonar Chart Mode........................................................................................................................................................................................................... 22
oSurface Clarity....................................................................................................................................................................................................................22
oNoise Rejection .................................................................................................................................................................................................................22
oLanguage............................................................................................................................................................................................................................. 23
IMPORTANT NOTE (RESET CODE) ........................................................................................................................................................23

2
Overview
BC202 intelligent sonar fish finder is a directional research and development,
suitable for its matching fishing boats high precision and sensitive detection of
river, river, lake, sea and other water environment.This fish finder can also
provide with the depth of the bottom, bottom contours, water temperature,
density of fish or the depth of fish and other parameters for your reference.
How Does Sonar Work
Sonar technology is based on sound waves.
The system uses sonar to locate and define the structure,
bottom contour and composition, as well as depth directly
below the transducer. The transducer sends a sound wave
signal and determines distance by measuring the time
between the transmission of the sound wave and when the
sound wave is reflected off an object, then it uses the
reflected signal to interpret location, size, and composition
of an object.

3
Product Specification
Content Receiver Transmitter
Display Type: 4.3 "LCD display /
Resolution: 480*272 /
Back lighting: White /
Power:3.6W 5.4W
Main body
waterproof:
IP4 /
Sonar
Frequency:
200KHZ&83KHZ
Depth Range
Max:
0.6-73M±0.1M
Depth Range
Min:
0.6 M
Operating
temperature:
-20-70
℃
Operating
voltage:
10.8-18V
Radio frequency: 433.92MHz
Radio Range
Max:
500 meters in open area

4
Product Functions
Water bottom profile and water temperature display
Big/small fish identification and fish depth indicator
Fish situation and depth alarm
Kell offset
Zoom in on display of bottom tracking
Kell offset setting
Automatic depth range
Noise Rejection
100-level sensitivity setting
Automatic and manual selection of depth range
Auto zoom and quick manual zoom
Measurement unit can be set to meters or feet
User selectable sonar chart mode

5
Product List
1. Receiver
2. Transmitter
3. Receiver antenna
4. Transmitter antenna
5. Transmitter Power Cable
6. Battery Charger
7. Rechargeable Battery (8 pcs)
8. Charger Power Cable
9. Sonar Transducer

6
•
Transmitter List
1. Transmitter power Cable
2. Transmitter
3. Sonar Transducer
4. Transmitter Antenna
•
Receiver List
1. Receiver
2. Receiving antenna
7
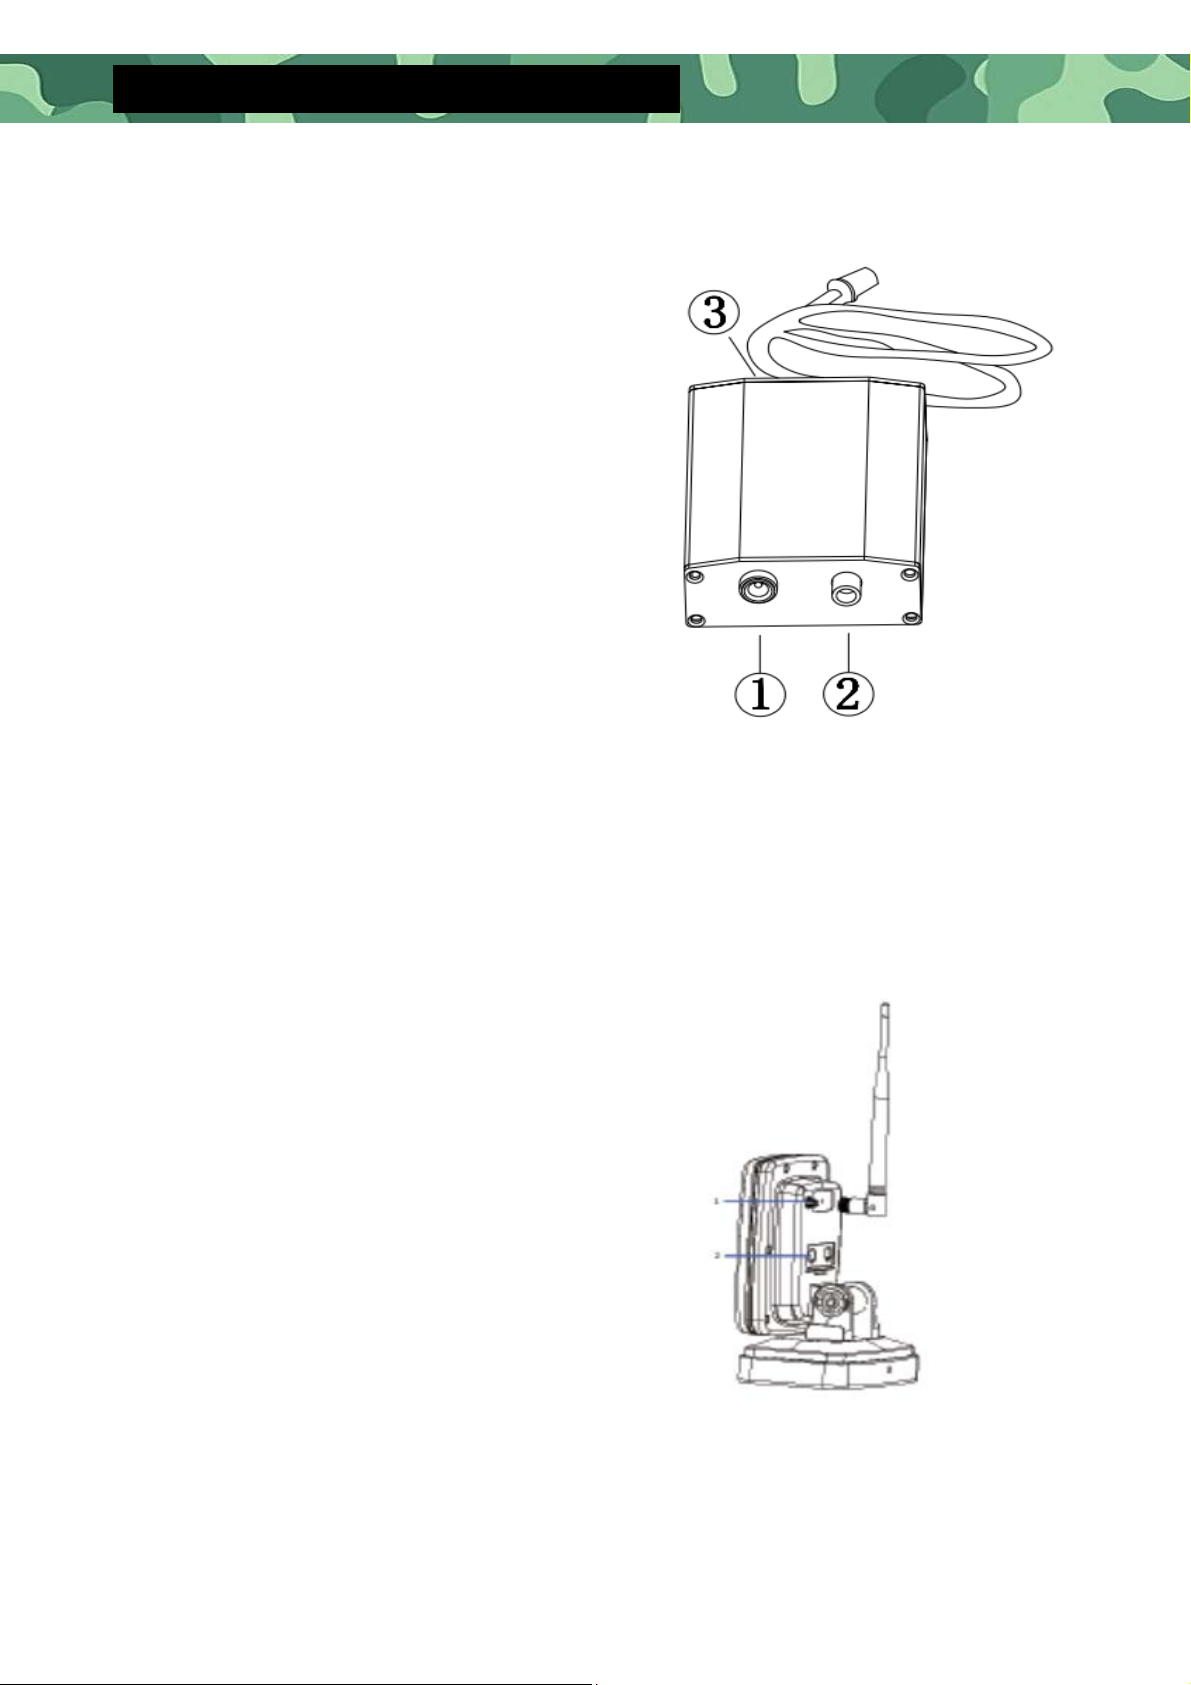
Product port connection introduction
•
Transmitter port
1.Power port
2.Snoar transducer port
3.Antenna
•
Receiver port
1. Antenna pedestal
2. Receiver power input

8
Power supply mode
•
Receiver power supply mode
Use 8 pcs AA batteries, put 8 pcs AA batteries into the battery box.
•
Transmitter power supply mode
The Transmitter is powered by 12V external power supply, and the
Transmitter Power Cable is connected to the 12V battery on the boat.

9
Key functions
•
Power On/off
Starting up: In the off state, press and hold the Power On / Off key for 3
seconds and the screen will display “Loading”, then the system automatically
enters the mode and sets values which were set up before last normal
shutdown.
Shutdown: In the on state, press and hold the Power On / Off key for 3
seconds, the screen will display "Shutdown".
Stop Chart: When the unit is working, press the Power Key to stop the
screen chart on the screen, and press the key again to restore the screen
chart.
Save settings: Long press the Power on / off Key for 3 seconds to turn off the
device normally. The system will automatically save the data settings in your
current menu.
Warm tip: ***When the product is incorrectly installed or exceeds the
detection range, the depth value will display "0.0", and it will automatically
shutdown after 5 minutes.

10
•
Menu Key
In the power on mode, press the menu key and the menu will appear on
the screen.
There are 3 tabs in the menu system:
Sonar", "Setup" and "Advance". You can press the Menu Key to switch
between different menu tabs.
In menu components, user can use the up and down arrow keys to select
the menu to be modified, select the menu item and press
enter
key, and
then use the up and down arrow keys to modify the setting value. Once
the setting value appears on the screen, the system immediately performs
the operation according to the new setting value.
•
Exit Key
When accessing the menu or sonar signal amplification, press the EXIT key,
the system returns to the detection mode.
Sonar frequency conversion: When the unit starts working, you can press
the EXIT key to switch between different frequencies. There are 200KHZ
single frequency, 83khz single frequency.
•
Enter / Zoom Key
When the device is working, press the Enter key once to magnify the
sonar view displayed on the current screen display (2x) Press it again, and
screen will return to the normal display status.
Choose Menu Item: In menu components, after selecting the Menu Item
that needs to be adjusted, press the ENT Enter key to select this menu
item, and then use the up/ down arrow keys to modify the setting value.
Automatic power off feature: The display will shut off automatically when
the depth display reads "---" continuously for 5 minutes
11
•
Up / Down Arrow Keys
When pressing the menu key to enter the menu, with the up / down arrow
keys user can move up and down to select the options that setting value need
to be modified.
After selecting the menu item that needs to be modified, press ENT key, and
the menu item will turn red. Then press the up arrow key, it will select the left
option, press the down arrow key and it will select the right option. When
there are multiple options in the submenu, press the up and down arrow keys
successively to select the options that need to modify the setting value.
When the sonar signal is manually zoomed in, you can move the zoom
preview box up and down to select the position you want to zoom in on.
When the depth cursor is turned on, press the up and down keys to move
the depth cursor up and down.
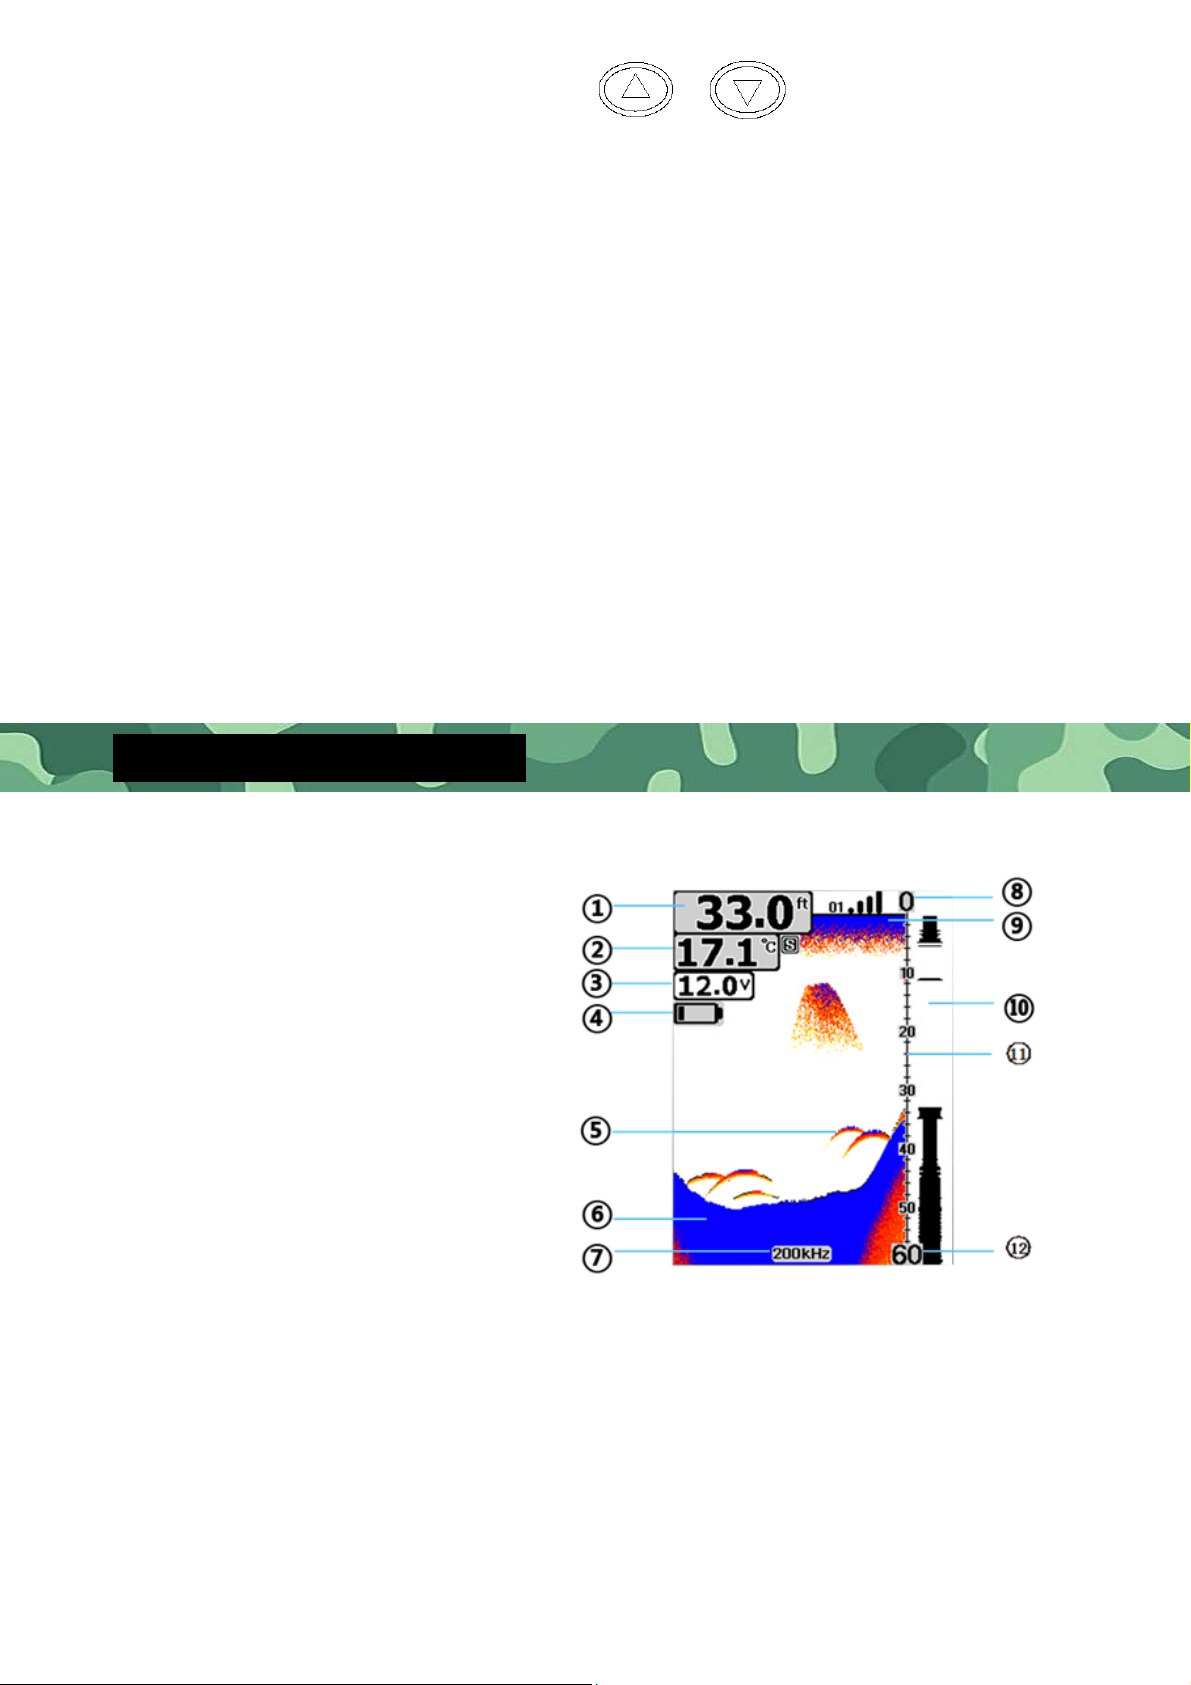
Screen Display Description
1. Water Depth
2. Water Temperature
3. Receiver Battery voltage
4. Battery level indication
5. Fish Icon
6. Bottom Contour
7. Sonar Frequency
8. Upper Limit of Depth Range
9. Water surface
10. Real-time single
11. Depth Scale
12. Lower Limit

12
Sonar Signal Display
•
Current Signal Chart (Real-time Signal RTS)
The current signal chart box is to display the strength of the latest echo in
horizontal lines at the far right of the display screen. The wider the horizontal
line indicates the stronger the signal, and the depth of the echo refers to the
depth scale.
•
Sonar Signal Zoom View (200KHZ or 83KHZ)
In the 200KHZ or 83KHZ single-frequency Zoom View,
the screen view is automatically split into left and right.
The unzoomed view is displayed on the right side of the
screen, and the zoomed view is displayed on the left
side of the screen.
In the Sonar Zoom View, on the unzoomed display
screen on the right, there will be a zoomed preview
box. The contents of zoomed preview box will be
displayed on the left side screen after zoomed in(2x ).
When zooming in automatically, the Zoom Preview
Box will track the bottom and moves up and down as
the bottom gets higher and lower.
When zooming in manually, the Zoom Preview Box will
move up and down as the user presses the up and
down keys.
•
Manual Zoom
When the depth range is set to manual, press the ENT key to
magnify the sonar view displayed on the screen.
Press the up and down key to manually move up and down the
Zoom Preview Box.

13
•
Auto Zoom
When the depth range is set to automatic, if press the ENT key, the system
will automatically adjust the position of the Zoom Preview Box based on the
underwater depth reading. At this point, you cannot manually adjust the
position of the zoom preview box.
There are 3 tabs in the menu system:
"Sonar", "Setup" and "Advanced". You can press the Menu Key to switch
between different menu tabs.
•
Stop Chart
When the unit starts working, you can press the Power Key to stop the
screen chart in the main screen, then press the Power Key again and the
screen chart will be recovered.
Stop Chart Icon
14
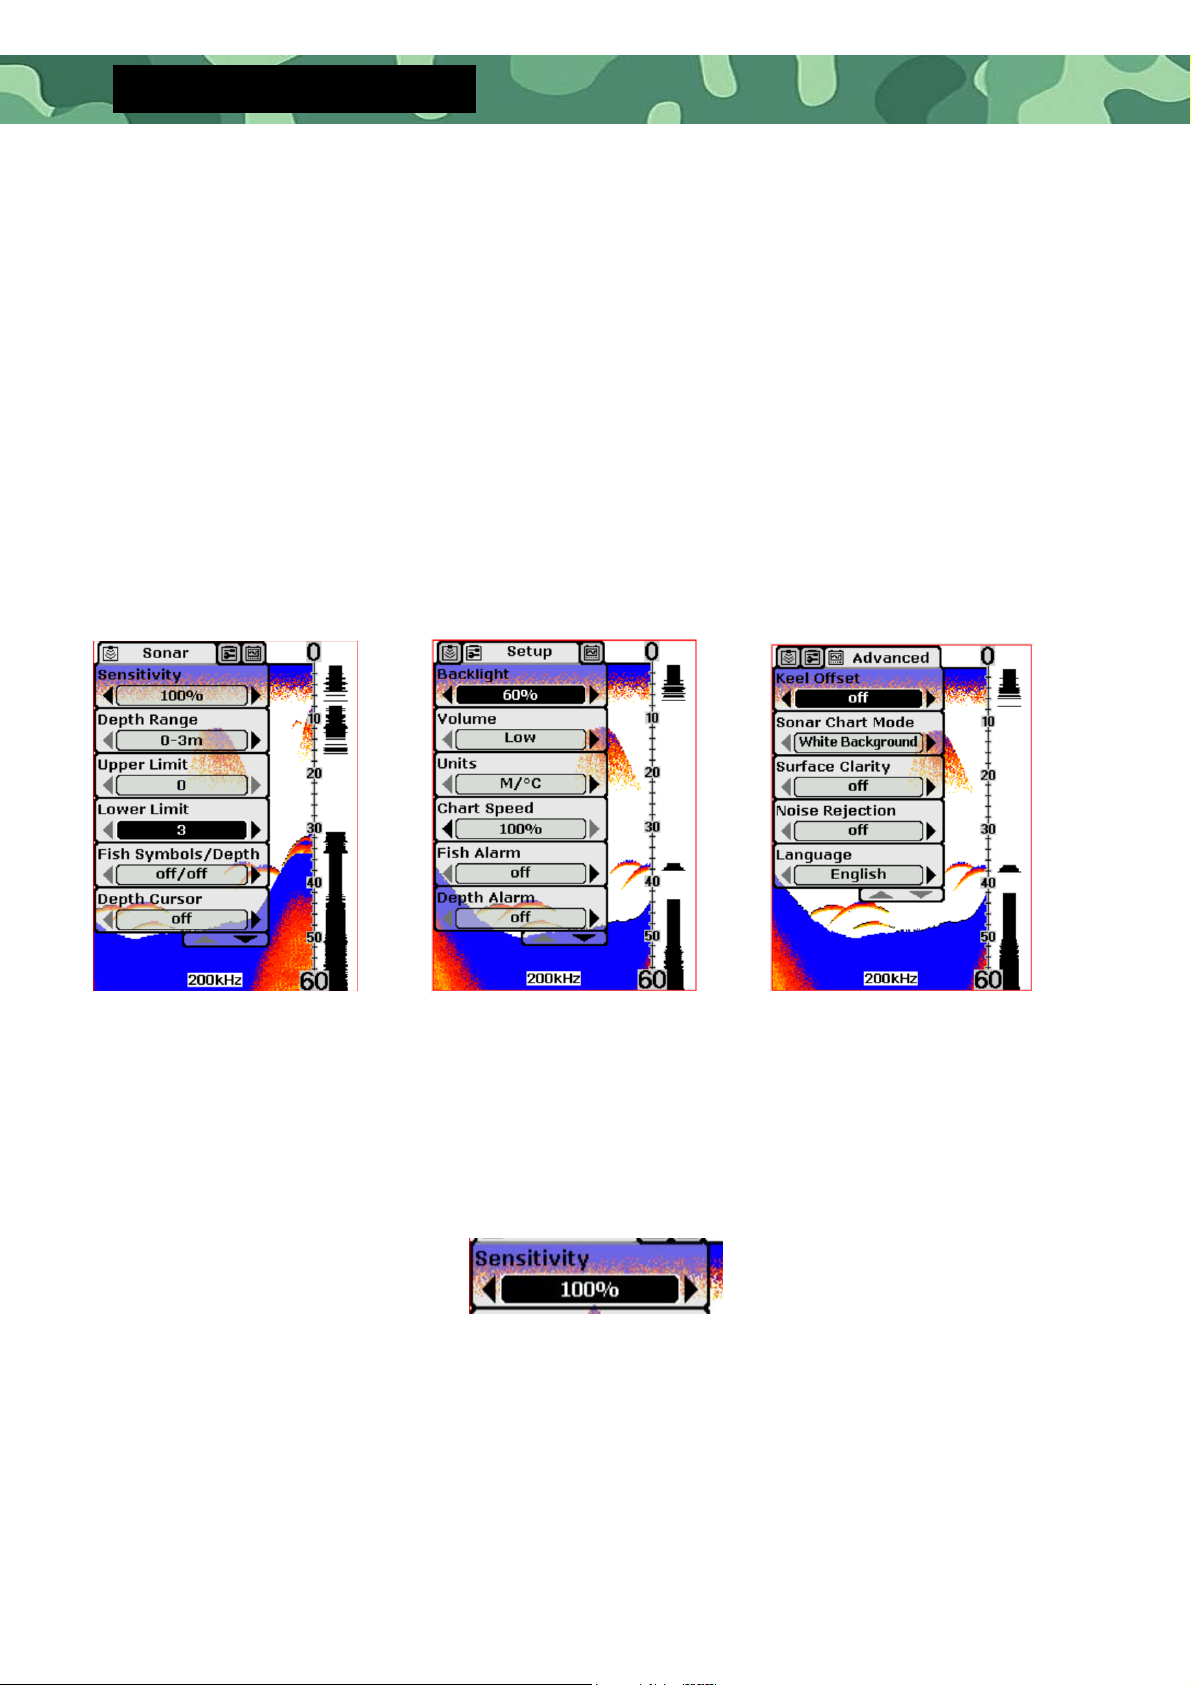
Function Menu Settings
•
Menu Components
The Menu Key is used to access the menu system.
When you press the Menu Key once, the menu system immediately appears
on the display.
The menu system has 3 tabs:
“Sonar”, “Setup” and “Advance”. You can press the Menu Key to switch
between different menu tabs.
In each menu tab use the lower or Upper Key to select a specific menu item,
and use the Left or Right Key to change a menu setting, then press the Esc
Key to return to the top to close menu system.
•
Sonar Menu Components Settings
o
Sensitivity
Settings: “Auto”, “1%” to “100%”
Sensitivity controls the unit´s ability to pick up echoes. If you want to see
more details, try increasing the sensitivity, a little at a time.
Sonar menu
Setup menu Advanced menu

15
Press the menu key to select "sonar" menu to enter the sensitivity sub-menu.
Optional settings:"1%"to"100% or "Auto".
Users can filter the sonar echo signals by adjusting the sensitivity until the
signal information they need is displayed on the screen. If you want to see
more details, try increasing the sensitivity, a little at a time. At high sensitivity
value, a lot of underwater noise will also be displayed on the screen. If you
don't want to see these underwater noises, you can reduce the sensitivity
value to filter them. When the sensitivity is set to "Auto", the system will
automatically set the sensitivity value according to different depths of water, so
that the users do not need to manually adjust the sensitivity
There are 1%~100% sensitivity levels in the menu for users to choose.
Sonar fish finder is a device that can emit ultrasonic waves and analyze
reflected waves. When the fish finder emits sound waves in the water, all
objects whether they are large, small, soft or hard, will generate a reflection
wave. Larger or harder objects sometimes generate multiple reflection waves.
So it needs a "sieve" filters out unnecessary information. The sensitivity here is
the "sieve pore" of the "sieve". The higher the sensitivity, the "smaller" the
"sieve pore".
Increasing the sensitivity is equivalent to reducing the "sieve pore", so there will
be more stuffs left on the "sieve" (the information displayed on the screen),
which may cause the information displayed on the screen to be cluttered.
Decreasing the sensitivity is equivalent to increasing the "sieve pore", so there
will be less stuffs left on the "sieve"(the information displayed on the screen),
and the system will filter out some information to make the display screen
more concise. But be aware that what you filter out may be also important
information.
Therefore, it is important to choose the appropriate sensitivity value and the
depth range. In general, we recommend that you increase the sensitivity when
the water is deep or clear. You can reduce the sensitivity when there are
more impurities or turbidity water or there is in shallower water to reduce
some false detection results.
When there are many fish, you can also use this function to distinguish big and
small fish. Decrease the sensitivity, the "sieve pore" will be enlarged, then the
objects with weak reflection waves will be filtered out, and the rest are
relatively large fish.

16
Higher sensitivity
Low sensitivity
o
Depth Range
Select “Auto” to have the unit automatically select the Depth Range, the
bottom signal is automatically placed in the lower half of the screen.
Select specific value to lock the depth range to a specific setting.
Press the menu key to select "sonar" menu to select the depth range option
by the up and down keys. Press the ENT key and then press up and down
keys to select Settings: "0-9ft" to "0-240ft", "Auto" ("0-3m" to "0-80m", "Auto").
There are 8 setting values in this menu.
When the depth unit is set to "FT" (feet), the 8 setting values are: "0-9FT",
"0-15FT", "0-30FT", "0-60FT", "0-90FT", "0-120FT", "0-240FT", "Auto".
When the depth unit is set to "M"(meter), the 8 setting values are: "0-3m",
"0-5m", "0-10m", "0-20m", "0-30m", "0-40m", "0-80m" "Auto".
When the depth range is set to a fixed value, the screen adjusts to the
corresponding display range according to the setting value. content beyond
the setting range will no longer be displayed.
Please Note:
In manual operation, if the depth is greater than the depth range setting, the
bottom will not be visible on the screen. You can select “Auto” to return to
automatic operation.

17
o
Upper and Lower Limit
Settings: “0ft” to “231ft”
(“0m” to “70m”)
Settings: “9ft” to “240ft”
(“3m” to “80m”)
Changing the upper and lower limits gives you far greater control over the
depth range. This feature lets you “zoom in” the display in almost unlimited
combinations.
o
Fish Symbols & Depth
Settings: “On/On”, “On/Off”, “Off/Off”
"On/On": shows both the fish symbol and
the depth of the fish
"On/off": shows only the Fish Symbols and
not the depth of the fish.
"off/off": sign and the depth of the fish are
all not displayed.
When the Fish Symbols and the display of
fish depth are set as "on", the system will
analyze the echo signal and display different sizes Fish Symbols according to
the strength of the echo signal and then displayed the corresponding depth
value above the Fish Symbols.

18
This product is a very powerful echo signal analysis system. Part of the water
noise, surface clutter and temperature variable layer can be removed by menu
setting, and then the rest of the signal information corresponding to display as
Fish Symbols. However, the system is also limited, and some situations cannot
be recognized, such as deadwood floating in water, air bubbles, garbage, etc.,
may also be shown as fish symbols.
The sonar system is not an underwater video system. It cannot visually display
fish and other floating objects, such as water plants, deadwood, air bubbles,
garbage, etc. The user needs to judge by the reflected sonar signal.
Please Note:
The sonar’s microcomputer is sophisticated, but it can be fooled. It can't
distinguish between fish and other suspended objects such as trotlines,
submerged floats, air bubbles, etc.
o
Depth Cursor
Settings: “On”, “Off”
The depth cursor consists of a horizontal line with a digital depth
box on the right side. The numbers inside the box show the depth
of the cursor.
You can move the cursor to any location on the screen, letting you
pinpoint the depth of a target.
o
Simulator
Settings: “On”, “Off”
The Simulator is a very powerful tool that
simulates on the water operation. Use the
Simulator to learn how to use your fish finder
before taking your boat on the water The
Simulator Indicator will be visible on screen
when Simulator is set to “On”.
Simulator
Indicator

19
•
Setup Menu Components Settings
o
Backlight
Optional settings: “10%” to “100%”
User can switch the Front light or adjust the brightness as needed.
When the screen backlight is set to turn on, (10%~100%), the background
light will always be on, which will consume a lot of power and reduce the
battery life. So you better use this feature only in low light.
The screen of this fish finder is clear viewing in direct sunlight, so the backlight
can be turned off when used outdoors during the day.
o
Volume
Settings: “High”, “Medium”, “Low”
Volume setting allows you to adjust the Alarm Volume so that you can select
the tone that you can hear best.
o
Units
Settings: “ft/°C”, “ft/F”, “m/°C“, “m/F“
o
Chart Speed
Settings: “10%” to “100%”
The chart speed is the rate echoes scroll across the screen. User can adjust
the chart speed as needed.
It is recommended that the chart speed should be set to the maximum so
that the reflected wave information can be updated in a timely manner.
Table of contents
Other BearCreeks Fish Finder manuals


