Venterior VT-FF005 User manual

User Manual
Venterior Wireless Fish Finder
Model Number: VT-FF005 Brand Name: Venterior
Countryof origin: China

Contents
Introduction to the Fish Finder ……........................... 1
How to Use the Sonar Sensor …..……...………..….. 3
Setting of the Handheld Host ………...…...….…...... 6
Storage of the Fish Finder ……………..…….......... 12
Product Specification ………………...….….….…. 12
Frequently Asked Questions ……..…………......…. 13
Warranty and After-sale Support ………..…...…..... 17
Compliance ………..…...….....……..…...……...…..17

1
Introduction to the Fish Finder
1. What’s in the Box
Please check if the following product and accessories are
in the box before using this product. Write to
A sonar sensor
A handheld host
A charging cord for sonar sensor
A charging cord for handheld host
A Neck strap
A copy of user manual
2. Fish finder display
3. Charge the fish finder

2
1) There are 2 charging cords in the package, the Micro
USB for the host and the DC for the sonar sensor.
2) When the battery indicator icon on the screen flashes,
please stop using the fish finder and charge the fish finder.
3) When the host is charging, the indicator light is red. It
will turn green if the host is fully charged. When the sensor
is charging, the indicator light is red. It will turn off if the
sensor is fully charged.
4) When the sensor is out of water, it is off and will NOT
connect with the host. If you would like to check the
sensor's battery status from
the screen, you need to put
the sensor in water first.
Note: Please use 5V USB
charger (not included). The
cover of the sensor should be
removed when charging, and
should NOT be removed
when working.

3
4. Attentions
1) The host is not waterproof. If water splashes on the host,
please dry it immediately.
2) The sensor is supposed to float on water when working.
Please don’t drag it into water bottom, or submerge and
hold the whole sensor under water.
3) Its reading might be interfered with other high power
sonar device close to your sonar sensor.
4) If water wave is too strong, please protect the sensor
from crashing into rock. Otherwise it will cause irreparable
damage to the sensor.
5) The fish finder will only operate properly in open water
that is deeper than 2.6 feet.
How to Use the Sonar Sensor
1. How the sonar fish finder works
1) The system uses sonar to locate
and define structure, bottom contour,
and depth directly below the sensor.
It transmits sound pulse from the
sensor, and then measures the time
it takes for the echoes to return to
the sensor. Different objects in water echo the pulse at a

4
different intensity. The built-in computer then organizes all
of this information and shows it on the display screen.
2) Sonar usually determines there is fish when it detects
the air in fish swim bladders. That is also why the small
bubbles in water might affect the fish finder's performance.
3) The first column of fish indicators on the right of the
screen shows the most current information. This icon is
then moved to the left as a new reading is displayed. This
motion in no way reflects actual movement of the fish.
2. Sonar sensor
1) How to turn on the sensor
There are 2 pins on the sonar bottom, which are the
automatic switch of the sensor. The sensor will turn on
only when you toss it in water.
Note: Please dry water on the sensor after it is out of water.
Otherwise the sensor might keep working.

5
2) How to use the sensor
There are 2 small holes on the sensor. Tether the sensor
with fishing line (not included) and toss it into water. You
can use a rod to guide the sensor to a fix spot or use a
remote-controlled boat to send the sensor to the fishing
spot.
3. Application methods
1) Toss the sensor into water, drag it at a very slowly and
stable speed. It will display information of water under the
sensor, including water depth, bottom contour, and fish
location.
2) Toss the sensor into water, guide it to a desirable
position and let it undisturbed. It will float on water and
monitor submarine news in a real-time method.
Information will be automatically updated on the screen
once fish enter the sensor detection range.

6
Setting of the Handheld Host
1. Keys on the host/display unit
Power Key --- Press and hold the power key for 2 seconds,
the display unit will power on. The display unit starts working.
Press and hold the power key for 3 seconds, the display unit
will power off.
Menu Key --- Press this key to enter menu setting. There
are 3 menu pages: Sonar, Setup, and Senior. Press Menu
Key to enter “Sonar” menu, press the Menu Key again, to
enter the next menu page “Setup”, and press Menu Key
once again, to enter the 3rd menu page “Senior”.
Exit Key --- Press this key to exit menu or preference
setting
Zoom Key --- Press this key to magnify the image display.
Direction Key --- Press the direction key to select and
adjust the preference you would like to set.

7
2. Feature Setup (Preference Setting)
There 3 setting/menu pages (Sonar, Setup, and Senior).
Press Menu Key to enter and switch setting page.
1) Sensitivity
There are 20 levels of sensitivity setting for user to choose
from. It greatly depends on the clarity and depth of the water.
Very clear water allows for a moderate sensitivity setting.
Conversely, dirty water requires a higher sensitivity setting
to target detail but will increase the irritating false readings.
Targeting fish in deep water generally requires higher
sensitivity, especially in dirty water. Otherwise, the sensitivity
can be lowered in shallow water. Salt and brackish water
also require a comparatively higher sensitivity setting. As
the sensitivity is enhanced, smaller details show on the
screen (but trash & debris might be detected as fish).
Operation guide:

8
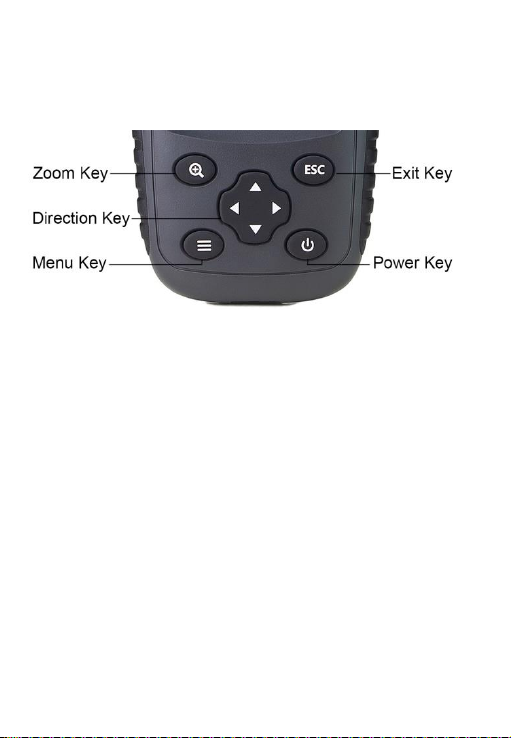
Press Menu Key to enter “Sonar” menu. Press up/down
Direction Key to select the “Sensitivity”. When “Sensitivity” is
selected, press left/right Direction Key to adjust the value (5%
- 100%) of this feature.
Press up/down direction key to select other feature setting
or press “ECS” to exit feature setting.
2) Depth Range
This feature has 7 depth ranges (10 Ft, 20 Ft, 30 Ft, 60 Ft,
120 Ft, 164 Ft,AUTO). Depth range setting is used to adjust
the bottom display width. For example, the actual water
depth is 10 Ft, and the depth range is 20 Ft, the display
width of the bottom will be 50% of the screen. User can
adjust the depth range according to the actual water depth.
Recommended depth range is set to be larger than and
closest to the actual depth of water, in order to obtain the
best display. Or it can be set to beAUTO.
3) Noise Filter
Noise Filter Setting is used for filtering sonar noise. The fish
finder has 4 Noise Filtering levels (off, low, medium, high) for
user to choose from.
4) Fish Depth

9
Fish depth will display above the fish icon when this feature
is turned on. Otherwise it will only display the fish icon when
fish is detected.
5) Fish Symbols
When this feature is on, fish icon will display on the screen if
fish is detected. Otherwise it will not display any fish icon
even fish is detected.
6) Units
Units of measure for depth and temperature can be set as
M/℃or Ft/℉.
Operation guide:
Press Menu Key to enter “Sonar” menu. Press Menu Key
again to enter the next menu page “Setup”. Press up/down
Direction Key to select the “Units”. When “Units” is selected,
press left/right Direction Key to adjust the value (M/℃or Ft/
℉) of this feature.
7) Chart Speed
The fish finder has ten levels (10-100%) of chart speed for
the user to choose from. 10% chart speed is the slowest
while the 100% is the fastest.

10
8) Backlight
Setting the backlight to be highest will greatly reduce the
battery life. It is suggested to adjust the backlight at a proper
number.
9) Fish Alarm
An alarm sounds when a group of fish is detected. The
alarm feature can be turn off if you prefer quiet fishing.
10) Depth Alarm
The depth alarm can be turned off or range from 7Ft/2M to
164Ft/50M. When the detected water depth is equal or less
than setting value of depth alarm, it will alarm.
This feature is mainly used for ships. Users can set a depth
alarm value according to actual needs to avoid hitting rocks.
It is also a great function for sea fishing users looking for
reefs. It helps to find good fishing spots.
11) Background
There are 2 Background modes available --- Black or White.
The default setting of background is Black. Please change
the background to white in bright sunlight. White
background will makethe readout more visible.
Operation guide:

11
Press Menu Key 3 times to enter “Senior” menu. Press
up/down Direction Key to select the “Background”.
12) Volume
There are 4 volume levels for users to choose from --- off,
low, medium, high. Select the proper volume level according
to the fishing environment.
13) Simulator
Simulator mode helps beginner to learn readings on the
display quickly.
Operation guide:
When “Simulator” is selected, press left/right Direction Key
to change the value (on/off) of this feature. Press “ECS” to
exit feature setting, the device is now in Simulator mode.
14) Language
The language is available in both English and Russian.
15) Restore factory setting
This feature allows you to restore factory setting quickly.
When “Restore factory setting” is selected, press left/right
Direction Key to change the value (yes/no) of this feature.

12
Once “yes” is selected, the device will restore factory
setting.
Storage of the Fish Finder
1. Clean the sensor with fresh water and dry off. Do not
submerge or spraythe screen with water.
2. Keep the sensor and the display unit in dry condition after
use. Don’t place them in wet condition. Don’t place the
sensor in metal container.
3. Never leave the fish finder in temperatures over 113°
Fahrenheit (45° Celsius) as the extreme temperatures can
damage the electronic components.
4. Keep the unit in temperatures above 14° Fahrenheit (-10°
Celsius).
Note: Please leave sensor in air for a few days if there is
water in the sensor.
Product Specification
1. Display
Display Size: 2.6 inches
Display resolution: 240*320
Backlight: LED backlight
2. Sonar & Radio

13
Depth Range: 2.6-164Ft/0.8-50M
Maximum Wireless Distance Range: 262Ft/80M
Sonar BeamAngle: 105 degree
Operational Temperature: 14°F to 113°F(-10°C to 45°C)
3. Power Supply
Displayunit: Built in Polymer battery 3.7V
Sensor: Built in Polymer battery 3.7V
Frequently Asked Questions
1. It will not power on
Press and hold the power key for 2 seconds to turn on the
display unit. If the display unit does not turn on under
properly operation, please send your order number and fish
finder issue to venterior@yahoo.com for help.
2. Depth reading is “---” or incorrect
1) Ship motor or other high power sonar fish finder close to
the fish finder will interfere with the fish finder’s sonar and
cause incorrect reading.
2) Oil, dirt would adhere to the surface of the sensor and will
affect the sonar sensor's performance. Please make sure

14
the surface of the sensor is clean.
3) Please make sure the water is within the depth range of
2.6Ft/0.8M to 164Ft/50M.
4) Suspended matter, muddy water, or extremely heavy
vegetation may also confuse the sonar and cause
misreading of depth.
5) Please make sure the sonar is not out of power and floats
on water in peace. If water wave is too strong, the depth
reading might be incorrect.
6) Please make sure the sensor is verticallydownward.
7) Please make sure the temperature is above -10℃/14℉.
8) When fishing on ice or “shooting-through” the hull of a
boat, depth reading might be unstable or displays as “---” if
there is bubble under the sonar. Sonar will not travel through
air. So the smallest air bubble between the sensor and the
water will cause the unit to operate incorrectly.
3. It shows fish / It is not working in mypool
The fish finder will NOT function properly in a bath tub,
swimming pool, bucket, or any body of water that has hard
sides. It must be used in an open body of water to function
properly.
4. Is the displaywaterproof?

15
The display is not waterproof. Do NOT submerge or spray
the fish finder screen with water.
5. How long is the batteryduration (fully charged)?
It depends on the backlight level you set. It usually lasts
about 4-6 hours in continuous use. Reduce the backlight
level to extend battery life.
6. There are fish in water, but the fish finder shows
nothing.
The fish finder can only detect fish in detectable area (105
degrees beam angle under the sensor). And the fish finder
will not detect any objects that are closer than 2 feet from
the sensor. It is the blind area of sonar. If you’re fishing in
water that is less than 3 feet deep, it is recommended to
discontinue use of the fish finder. Besides that, the fish
finder might not be able to distinguish fish from weeds if fish
swimming too close to the water bottom.
7. False fish indications
Tall weed may cause false fish indications. If weeds grow
taller than 50% of the total water depth, the sonar will
mistake it for fish. Trash & debris may also result in false fish
indications. Adjusting the sensitivity setting to the lowest

16
level may reduce these false readings, but if they do not go
away, it is suggested that you discontinue use of the fish
finder under these conditions.
8. Will it work for ice fishing?
It can work for ice fishing. It is suggested to drill hole on ice
and put the sensor into the water.
9. How far do you cast it out?
The maximum wireless distance range is about 262Ft/80M.
10. Does it show the size of fish?
It displays fish symbol by 3 different fish sizes --- small,
medium, big.
11. How to make it more visible in bright sunlight?
The default setting of background is Black. Please change
the background to white in bright sunlight. White
background will makethe readout more visible.
12. Can this be mounted to the boat?
There are 2 holes in the sensor for you to tether with fishing
line. You can mount it to your boat. Please make sure it is

17
floating vertically downward.
Warranty and After-sale Support
1. Warranty
This fish finder is eligible for a 2-year warranty. To get a
2-year warranty for your fish finder, please register your
product on our brand website www.venterior.com, or just
send your order number to venterior@yahoo.com directly
(we will register it in our system for you).
2. After-sale Support
If there is any issue with your fish finder or you would like to
get any of our technical support, please feel free to write to
venterior@yahoo.com. We are always happy to assist
you.
Compliance
FCC Statement
This device complies with Part 15 of the FCC Rules.
Operation is subject to the following two conditions: (1) this
device may not cause harmful interference, and (2) this

18
device must accept any interference received, including
interference that may cause undesired operation.
CAUTION: Modification or changes to this equipment
not expressly approved by Radio Systems Corporation
mayvoid the user's authorityto operate the equipment.
NOTE: This equipment has been tested and found to
comply with the limits for a Class B digital device, pursuant
to part 15 of the FCC Rules. These limits are designed to
provide reasonable protection against harmful interference
in a residential installation. This equipment generates, uses,
and can radiate radio frequency energy and, if not installed
and used in accordance with the instructions, may cause
harmful interference to radio communications. However,
there is no guarantee that interference will not occur in a
specific installation. If interference does occur to radio or
television reception, which can be determined byturning the
equipment off and on, the user is encouraged to try to
correct the interference by one or more of the following
measures:
- Reorient or relocate the receiving antenna.
- Increase the separation between the equipment and the
receiver.
Table of contents
Other Venterior Fish Finder manuals