Venterior VT-FF004E User manual

Contents
Introduction to the Fish Finder …….......................…1
How to Use the Sonar Sensor ……..……..…............ 4
Setting of the Handheld Host …….…….................... 6
Storage of the Fish Finder .……………….…......… 11
Product Specification ……………..……...………. 12
Frequently Asked Questions……..….…….........…. 12
Warranty and After-sale Support..……..……..…..... 16
Compliance ………..…...….....……..…. .…..…..17

1
Introduction to the Fish Finder
1. What’s in the Box
Please check if the following product and accessories
are in the box before using this product. Write to
venterior@yahoo.com if anything is missing or broken.
A sonar sensor
A handheld host
A charging cord for sonar sensor
An antenna for the handheld host
A Neck strap
A copy of user manual
2. Fish Finder Display
3. Charge the Fish Finder

2
1) The handheld host use 4*AAA alkaline batteries (not
include).
2) There is one charging cord for the sonar sensor in
the package. When the sensor is charging, the indicator
light is red. The light will turn off if the sensor is fully
charged.

3
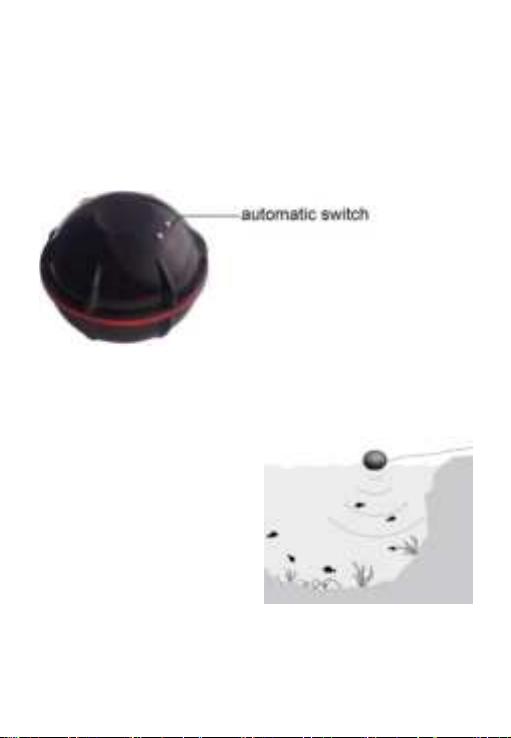
3) When the sensor is out of water, it is off and will not
connect with the host, and the sensor's Battery
Indicator on the screen is incorrect. If you would like to
check the sensor's battery status from the screen, you
need to put the sensor in water and install the antenna
of the handheld host first.
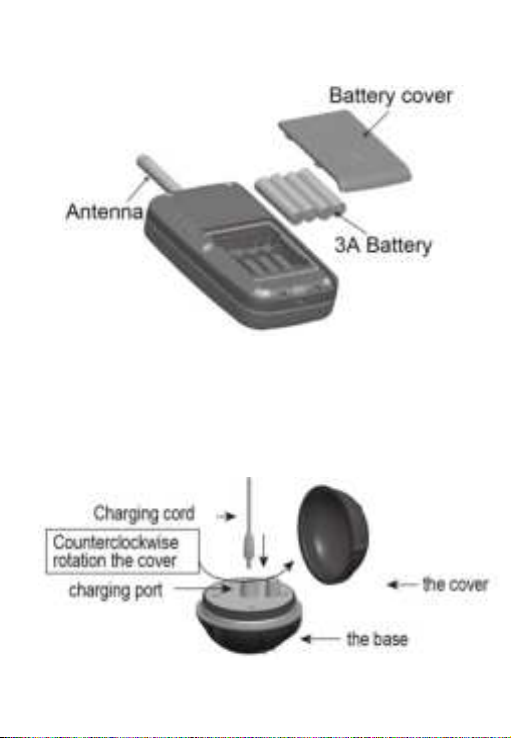
Note: The cover of the sensor should be removed
when charging, and should NOT be removed when
working.
4. Attentions
1) The host is not waterproof. Please do not submerge
it in water. If water splashes on the host, please dry it
immediately.
2) The sensor is supposed to float on water when
working. Please don’t drag it into water bottom, or
submerge and hold the whole sensor under water.
3) Its reading might be interfered with other high power
sonar device close to your sonar sensor.
4) If water wave is too strong, please protect the sensor
from crashing into rock. Otherwise it will cause
irreparable damage to the sensor.
5) The fish finder will only operate properly in open
water that is deeper than 2.6 feet.

4
How to Use the Sonar Sensor
1. How the sonar fish finder works
1) The system uses sonar to
locate and define structure,
bottom contour, and depth
directly below the sensor. It
transmits sound pulse from
the sensor, and then
measures the time it takes for
the echoes to return to the sensor. Different objects in
water echo the pulse at a different intensity. The built-in
computer then organizes all of this information and
shows it on the display screen.
2) The first column of fish indicators on the right of the
screen shows the most current information. This icon is
then moved to the left as a new reading is displayed.
This motion in no way reflects actual movement of the
fish.
2. Sonar sensor
1) How to turn on the sensor
There are 2 pins on the sonar bottom, which are the
automatic switch of the sensor. The sensor will turn on

5
only when you toss it in water. Once these 2 pins touch
water, the sonar sensor will automatically turn on,
connect with the host (please install the antenna of the
host in advance), and start working.
Note: Please dry water on the sensor after it is out of
water. Otherwise the sensor might keep working.
2) How to use the sensor
There are 2 small holes
on the sensor. Tether the
sensor with fishing line
(not included) and toss it
into water. You can use a
rod to guide the sensor
to a fix spot or use a
remote-controlled boat
to send the sensor to the fishing spot.

6
3. Application methods
1) Toss the sensor into water, drag it at a very slowly
and stable speed. It will display information of water
under the sensor, including water depth, bottom contour,
and fish location.
2) Toss the sensor into water, guide it to a desirable
position and let it undisturbed. It will float on water and
monitor submarine news in a real-time method.
Information will be automatically updated on the screen
once fish enter the sensor detection range.
Setting of the Handheld Host
1. Keys on the host/display unit

7
Power Key --- Press and hold the power key for 2
seconds, the display unit will power on. The display unit
starts working. Press and hold the power key for 3
seconds, the display unit will power off.
Menu Key --- Press this key to enter menu setting.
There are 3 menu pages. Press Menu Key to enter the
1st menu page, press the Menu Key again to enter next
menu page, and press Menu Key once again, to enter
the 3rd menu page.
Exit Key --- Press this key to exit menu or preference
setting
Zoom Key --- Press this key to magnify the image
display.
Direction Key --- Press the direction key to select and
adjust the preference you would like to set.
2. Feature Setup/Preference Setting

8
1) Sensitivity
There are 20 levels of sensitivity setting for user to
choose from. It greatly depends on the clarity and depth
of the water. Very clear water allows for a moderate
sensitivity setting. Conversely, dirty water requires a
higher sensitivity setting to target detail but will increase
the irritating false readings. Targeting fish in deep water
generally requires higher sensitivity, especially in dirty
water. Otherwise, the sensitivity can be lowered in
shallow water. Salt and brackish water also require a
comparatively higher sensitivity setting. As the
sensitivity is enhanced, smaller details show on the
screen (but trash & debris might be detected as fish).
Operation guide:
Press Menu Key to enter into the 1st menu page.
Press up/down Direction Key to select the
“SENSITIVITY”. When “SENSITIVITY” is selected,
press left/right Direction Key to adjust the value (5% -

9
100%) of this feature.
Press up/down direction key to select other feature
setting or press “ECS” to exit feature setting.
2) Fish Alarm
An alarm sounds when a group of fish is detected. The
alarm feature can be turn off if you prefer quiet fishing.
3) Depth Alarm
The depth alarm can be turned off or range from
2M/7Ft to 50M/164Ft.
When the detected water depth is equal or less than
setting value of depth alarm, it will alarm.
This feature is mainly used for ships. Users can set a
depth alarm value according to actual needs to avoid
hitting rocks. It is also a great function for sea fishing
users looking for reefs. It helps to find good fishing
spots.
4) Backlight
Setting the backlight to be highest will greatly reduce
the battery life. It is suggested to adjust the backlight at
a proper number.

10
5) Chart Speed
The fish finder has ten levels (10-100%) of chart speed
for the user to choose from. 10% chart speed is the
slowest while the 100% is the fastest. Generally it is
suggested to set the chart speed highest, so that you
can get update of underwater information in time.
6) Unit Set
Units of measure for depth and temperature can be set
as M/℃or Ft/℉.
7) Depth Range
This feature has 6 depth ranges (AUTO, 10 Ft, 20 Ft,
30 Ft, 60 Ft, 120 Ft,). Depth range setting is used to
adjust the bottom display width. For example, the actual
water depth is 10 Ft, and the depth range is 20 Ft, the
display width of the bottom will be 50% of the screen.
User can adjust the depth range according to the actual
water depth. Recommended depth range is set to be
larger than and closest to the actual depth of water, in
order to obtain the best display. Or it can be set to be
AUTO.
8) Mode Set

11
Simulator mode helps beginner to learn readings on the
display quickly.
9) Noise Filter
Noise Filter Setting is used for filtering sonar noise. The
fish finder has 4 Noise Filtering levels (off, low, medium,
high) for user to choose from. Choose different value
according to the actual situation.
Storage of the Fish Finder
1. Remove batteries from the display unit before storing
to prevent battery leakage and corrosion.
2. The display unit is not waterproof. Please do not
submerge or spray the screen with water.
3. Clean the sensor with fresh water and dry off.
4. Keep the sensor and the display unit in dry condition
after use. Don’t place them in wet condition. Don’t place
the sensor in metal container.
5. Never leave the fish finder in temperatures over 113°
Fahrenheit (45° Celsius) as the extreme temperatures
can damage the electronic components.
6. Keep the unit in temperatures above 14° Fahrenheit

12
(-10° Celsius).
Product Specification
1. Display
Display Size: 52 x 39 mm
Display resolution: 240*320
Backlight: LED backlight
2. Sonar & Radio
Depth Range: 2.6-118Ft/0.8-36M
Maximum Wireless Distance: 131FT/40M.
Sonar Frequency: 125KHZ
Sonar Beam Angle: 90 degree
Radio Frequency:2.4GHz
Operational Temperature: 14°F to 113°F(-10°C to 45°C)
3. Power Supply
Display unit: 4*AAA batteries (not included)
Sensor: Built in Polymer battery 3.7V
Frequently Asked Questions
1. It will not power on
Please make sure the 4*AAA batteries are installed
correctly. Press and hold the power key for 2 seconds

13
to turn on the display unit. If the display unit does not
turn on under properly operation, please send your
order number and fish finder issue to
venterior@yahoo.com for help.
2. Depth reading is “---” or incorrect
1) Other high power sonar fish finder close to the fish
finder will interfere with the fish finder’s sonar and
cause incorrect reading.
2) Please make sure the sonar is not out of power and
it is floats on water in peace. If water wave is too strong,
the depth reading might be incorrect.
3) Please make sure the water is within the depth range
of 2.6Ft/0.8M to 118Ft/36M.
4) Suspended matter, muddy water, or extremely heavy
vegetation may also confuse the sonar and cause
misreading of depth.
5) Oil, dirt would adhere to the surface of the sensor
and will affect the sonar sensor's performance. Please
make sure the surface of the sensor is clean.
6) Please make sure the sensor is vertically downward.
7) Adjust the sensitivity of the fish finder to be higher or
lower.
8) Please make sure the temperature is above -10℃/14
℉.

14
9) When fishing on ice or “shooting-through” the hull of
a boat, depth reading might be unstable or displays as
“---” if there is bubble under the sonar. Sonar will not
travel through air. So the smallest air bubble between
the sensor and the water will cause the unit to operate
incorrectly.
3. It shows fish / It is not working in my pool
The fish finder will NOT function properly in a bath tub,
swimming pool, bucket, or any body of water that has
hard sides. It must be used in an open body of water to
function properly.
4. Is the display waterproof?
The display unit is not waterproof. Do NOT submerge
or spray the fish finder screen with water.
5. How long is the battery duration (fully charged)?
It depends on the backlight level you set and the
capacity of the batteries you use.. It usually lasts about
4-6 hours in continuous use. Reduce the backlight level
to extend battery life.

15
6. There are fish in water, but the fish finder shows
nothing.
The fish finder can only detect fish in detectable area
(105 degrees beam angle under the sensor). And the
fish finder will not detect any objects that are closer
than 2 feet from the sensor. It is the blind area of
sonar. If you’re fishing in water that is less than 3 feet
deep, it is recommended to discontinue use of the fish
finder. Besides that, the fish finder might not be able to
distinguish fish from weeds if fish swimming too close to
the water bottom.
7. False fish indications
Tall weed may cause false fish indications. If weeds
grow taller than 50% of the total water depth, the sonar
will mistake it for fish. Trash & debris may also result in
false fish indications. Adjusting the sensitivity setting to
the lowest level may reduce these false readings, but if
they do not go away, it is suggested that you
discontinue use of the fish finder under these
conditions.
8. Will it work for ice fishing?
It can work for ice fishing. It is suggested to drill hole on

16
ice and put the sensor into the water.
9. How far do you cast it out?
The maximum wireless distance range is about
131FT/40M.
10. Does it show the size of fish?
It displays fish symbol by 3 different fish sizes --- small,
median, big.
11. Can this be mounted to the boat?
There are 2 holes in the sensor to tether with fishing
line. You can mount it to your boat. Please make sure
the sensor bottom is in water and the sensor is floating
vertically downward.
Warranty and After-sale Support
1. Warranty
This fish finder is eligible for a 2-year warranty. To get
a 2-year warranty for your fish finder, please register
your product on our brand website
www.venterior.com, or just send your order number

17
to vent[email protected]m directly (we will register it
in our system for you).
2. After-sale Support
If you are not satisfied with the fish finder or would
like to get any of our technical support, please feel
free to send your questions or the fish finder issue to
[email protected]. We are always happy to
assist you.
Compliance
FCC Statement
This device complies with Part 15 of the FCC Rules.
Operation is subject to the following two conditions: (1)
this device may not cause harmful interference, and (2)
this device must accept any interference received,
including interference that may cause undesired
operation.
CAUTION: Modification or changes to this
equipment not expressly approved by Radio
Systems Corporation may void the user's authority
to operate the equipment.

18
NOTE: This equipment has been tested and found to
comply with the limits for a Class B digital device,
pursuant to part 15 of the FCC Rules. These limits are
designed to provide reasonable protection against
harmful interference in a residential installation. This
equipment generates, uses, and can radiate radio
frequency energy and, if not installed and used in
accordance with the instructions, may cause harmful
interference to radio communications. However, there
is no guarantee that interference will not occur in a
specific installation. If interference does occur to radio
or television reception, which can be determined by
turning the equipment off and on, the user is
encouraged to try to correct the interference by one or
more of the following measures:
- Reorient or relocate the receiving antenna.
- Increase the separation between the equipment and
the receiver.
- Connect the equipment to an outlet on a circuit
different from that to which the receiver is connected.
- Consult customer care, the dealer, or an experienced
radio/TV technician for help.
Table of contents
Other Venterior Fish Finder manuals
Popular Fish Finder manuals by other brands

Raymarine
Raymarine DS400X Owner's handbook

VEXILAR
VEXILAR FL-10 Operation manual

Standard Horizon
Standard Horizon FF520 owner's manual

Humminbird
Humminbird PiranhaMAX 197c Installation and operation manual

Raymarine
Raymarine hsb2 Series Owner's handbook

Marcum Technologies
Marcum Technologies Showdown user manual

Hummingbird Communications
Hummingbird Communications 586C HD operating instructions

Humminbird
Humminbird 788ci HD DI Operation manual

iBobber
iBobber CGG-MY-IBOBBER Product information guide

FishHunter
FishHunter DIRECTIONAL 3D manual

Garmin
Garmin Fishfinder 400C installation instructions

FishHunter
FishHunter DIRECTIONAL 3D user manual