Becker A2DIY-BKR Instruction Manual

Courtesy of: DiscountCarStereo.com
Serving the internet community since 1995
A2DIY-BKR
QUICK START BLUETOOTH INSTALLATION GUIDE FOR BECKER AUX RAEADY RADIOS
Created March1, 2017
Revised: July 27, 2020

Introduction:
Many European vehicle owners want to keep their cars as original possible
including the Becker radio and with the A2DIY-BKR kit, these proud owners can
now link up their Smartphones for Bluetooth Hands-Free, music streaming
and AUX input. An optional 3Amp USB charging port is available to keep devices
fully charged as your drive. With included wireless remote, users can change
track, accept/reject phone calls, adjust device volume and also keep eyes on the
road as you drive. The A2DIY-BKR works only on Becker radios with AUX Menu
Option and able to retain CD changer (if present). Keep the radio and car you
love while enjoying Bluetooth features only available on newer cars. For more
details, see Frequently Asked question and comparison chart at the end of
this guide.
Installation:
Most Becker radios are coded and will not operate
without the code. Do not proceed to step 4 if radio code
is not available otherwise radio will not operate upon
reconnection.
Remove radio from dashboard to gain access to the connectors. Special
removal tools (See Fig. 1) are required to remove applicable Becker radios
(except PCM1)
Fig. 1
Radio removal Tools
1. Slide tools into slots on radio. (Straight edge facing away). Withdraw
radio by pulling outwards. To release keys simply press retaining
springs. See Fig. 2.
For a more detailed radio removal process, click here.
Fig. 2
2. Disconnect blue and green plug (if present) from C2 and C-3 chamber
(See Fig. 3)
Fig. 3
Radio connectors
3. Connect installation harness blue plug (See Fig. 4) into chamber C-3
vacated in step 2

Fig. 4
Audio plug
Installation notes for Ferrari with cluster display
In order to retain cluster display (see Fig. 4a) you must purchase optional
ISO8-HAR T-harness (See Fig. 4b).
Vehicles without cluster display do not require the T-harness.
Fig. 4a
Fig. 4b
Fig. 4b
4. Disconnect factory 8-pin plug from radio chamber A (See Fig. 3) and
connect to installation harness matting 8-pin connector (See Fig. 5)
5. Connect installation harness 8-pin plug to radio chamber Avacated in
step 4.
Fig. 5
installation harness

7. Connect supplied 3.5mm cable (See Fig. 6) to Module “AUX” jack (See
Fig. 10). Route other end to dash or wherever auxiliary device will
reside (within 3 ft.)
Fig. 6
3 ft. Aux cable
8. Connect push-to talk button 1/8” plug to Module (See Fig. 9), route
button to the front of the dash, remove tape backing and stick to dash
(cable is 6ft. long). (See Fig. 7)
Fig. 7
push-to-talk button
9. Install microphone to visor or headliner using included visor clip (See
Fig. 8a).
Fig. 8
Microphone on 10ft. cord
Fig. 8a
Microphone Visor clip
10. Route microphones down side pillar and behind dash. Connect
microphone plug to “MIC” jack on module (See Fig. 9)
Fig. 9
Optional push-to-talk button with built-in microphone:
This option replaces conventional visor microphone and separate push
button shown in Fig. 7 and 8, as both are built-into a single button. (See
images below) which means the button can be placed on dashboard within
driver reach or custom installed nearby.
To install simply connect 1/8” plug to module “MIC/CTR” jack (See Fig. 9),
route to dash area (cable is 6ft. long); clean surface, remove tape backing
and secure to dash. (To add to cart, simply tap option on order page)

Optional USB charging port (For charging, not audio playback)
This optional “Fast charge”module provides a charging source for your
devices. Should you decide to add it, we suggest 2 mounting options:
A. Flush to dash/panel requires drilling a ¾” hole in the dash
B. Flush with Support bracket (use this option to mount USB terminal
wherever your installation demands without drilling)
Flush to Dash or Panel (requires drilling)
1. Drill a ¾” hole in dash or panel using a step drill bit or equivalent (See
Fig. 10)
Fig. 10
Step drill bit
2. Insert 3ft. USB male terminal through ¾” hole created in step 1 and
connect to USB port from Module (See Fig. 12)
Fig. 11
USB cable with bracket
Fig. 12
optional USB terminal
3. Push USB head (See Fig. 13) until it snaps in place and flush with
mounting surface (See Fig. 14)
Fig. 13
USB head
Fig. 14
Flush mounted to dash
4. Tuck and secure any extra wire from moving parts and test operation
(See Enabling the AUX section below)

A. USB Bracket (No drilling)
1. Locate a flat surface at location of choice within 3.2 ft. of radio and
mount USB support bracket (See Fig. 15) to surface using
adhesive/tape or screws.
Fig. 15
mounting bracket
2. Repeat steps 2 from “Flush to Dash or Panel” instructions.
Tuck and secure any extra wire away from moving parts and test operation (
See
Bluetooth Pairing and Connection
Wireless remote control
Pairing wireless remote: The included wireless remote must be paired
with Smartphone for media control functions (does not operate C5 radio).
The remote pairs with multiple devices but can only operate one at a time.
Follow 3-step pairing process below:
Installing wireless remote:
Install to steering wheel, dashboard using provided double side tape, or custom
install as seen in image below.
Remote control ships with CR2032 battery pre-installed.
Remote control operation:
With wireless remote paired to smartphone, users may perform the following
functions on devices with iOS7.0 and higher and Android 4.4 and higher.
In addition to above, use wireless remote:
To answer/end call; press Play/Stop button (Android only)
To switch between streaming and AUX press, Play/Stop button (Android only). If
no AUX device is connected, Play/Stop button pauses music stream.
Push-to-talk works both Android and Apple devices:
To answer/end call; press push-to-talk button
To switch between streaming and AUX; press push-to-talk button.
If no AUX device is connected, push-to-talk button will pause music stream.

Notes:
1. If playback is distorted or low, adjust volume level on Bluetooth device.
2. On incoming calls, ring tone also plays on car speakers
3. Bluetooth range is approximately 30 ft. ensure device is within range
4. Streaming has priority.
5. *Wireless remote does not control AUX device or radio functions. Use
aux device built-in controls as customary.
Pairing:
Pairing varies among devices but basic steps are the same. This process is
done upon initial install and will not have to be repeated.
1. Turn ignition and radio “ON”
LED inside module peephole will flash rapidly (pairing mode)
2. On A2DP device: go to
Bluetooth Settings
3. Select
Bluetooth
and enable it
4. Tap
Scan for devices
.
5.
Wait for Bluetooth device name (See below) to appear and tap it.
Once
paired confirmation tone is heard on car speakers
Noteworthy: On Androids it may be possible to change device name to
something of your own liking. This may not be possible on newer iOS devices.
Radio Operation:
One important step in this process is enabling AUX function within radio menu.
Most Becker radios are pre-programmed to recognize a CD Changer connection
and because of that you must perform the following steps and change setting to
“AUX” otherwise audio playback will not be possible.
Enabling AUX Menu function
Radios with TP button: (i.e. CDR-220)
1. Turn radio "ON"
2. Press and hold the "TP" button for about 8 seconds until Becker 1 is
displayed.
3. Turn the Tuning Knob until AUX OFF is displayed.
4. Press either button located directly under the Arrows on the display to
change the present setting from OFF to ON.
Turn radio OFF.
5. Turn Radio back ON, press “S” (Source) button to enter AUX Mode. This
is the mode to use whenever you want to listen to the device connected
to the adapter.

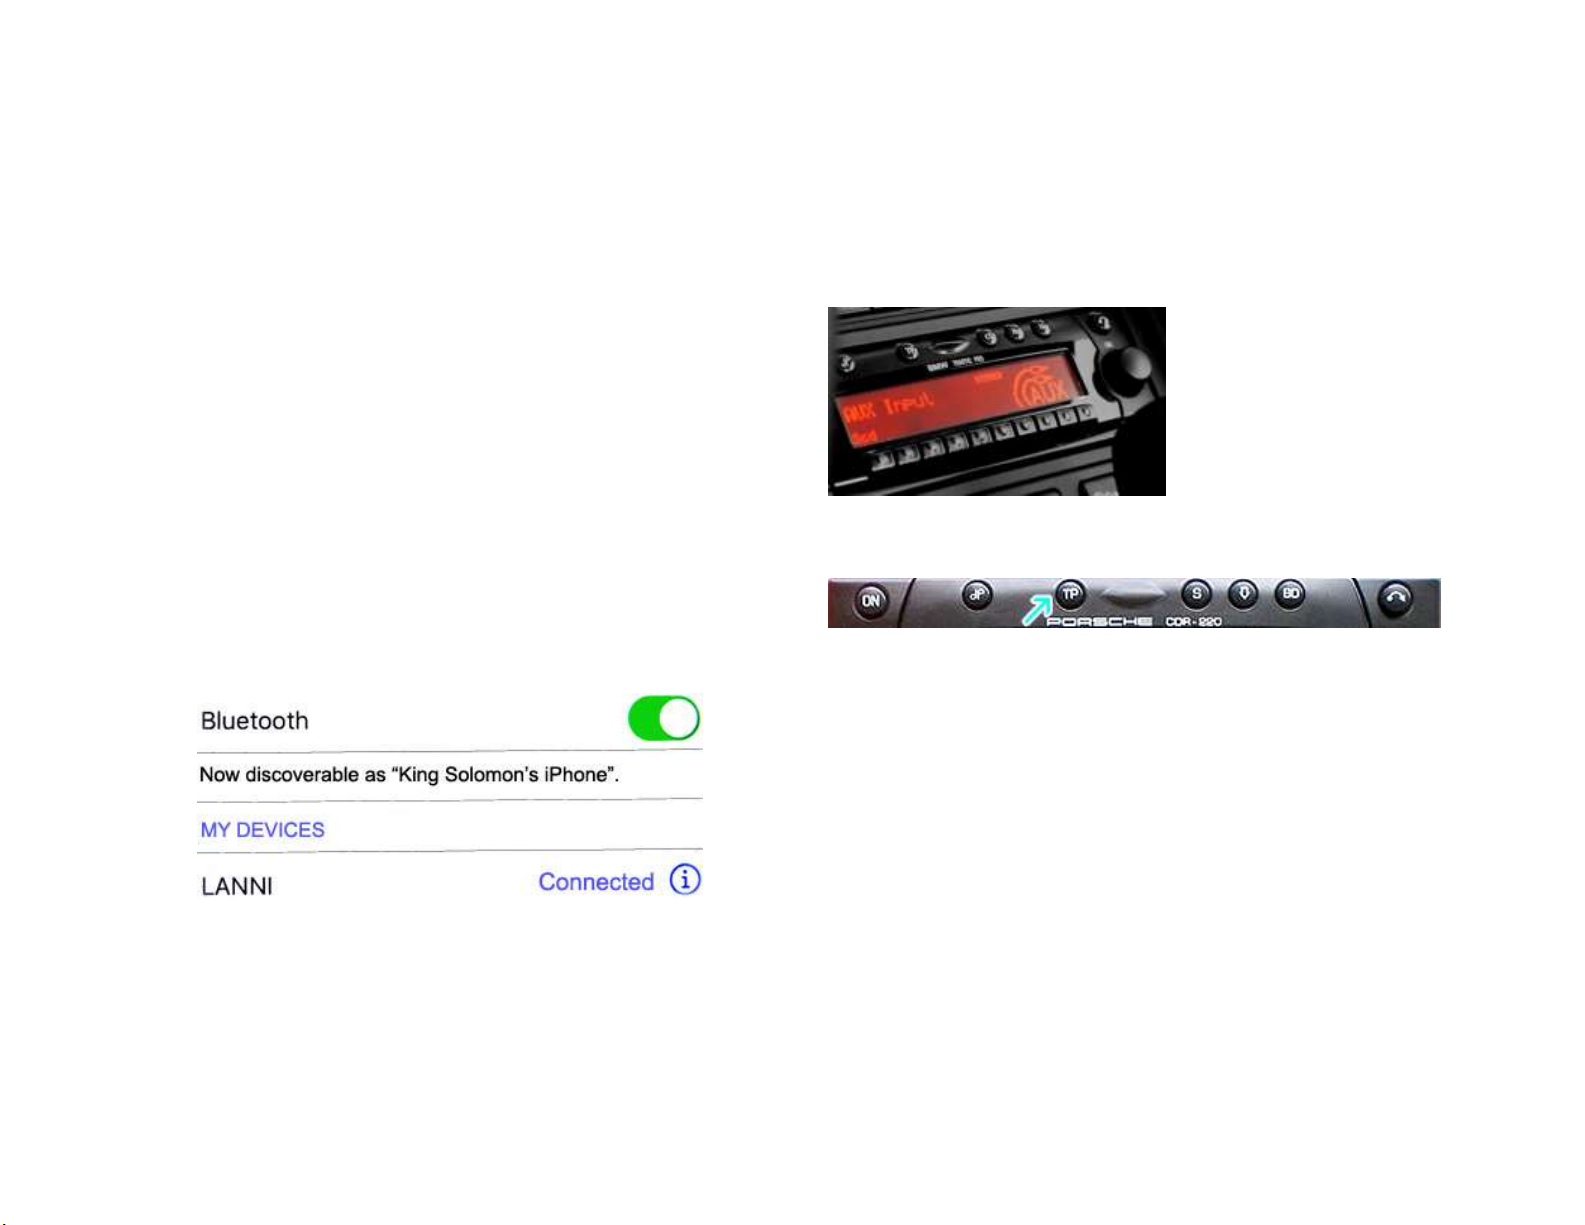
Radios with ☼button: (i.e. BE6104)
1. Turn Radio “ON”
2. Press and hold the ☼button for about 8 seconds.
3. Select AUX “ON/OFF”option.
4. Press either button located directly under the Arrows on the display to
change the setting to ON.
5. Turn radio OFF.
6. Turn Radio back ON press the “☼”button until “AUX”is displayed.
Others with ☼button (i.e. BE4602)
1. Turn radio ON.
2. Press and hold the ☼button for 8 seconds, until Becker 1 is displayed.
3. Turn the Tuning Knob until AUX OFF is displayed.
4. Press either button located directly under the Arrows on the display to
change the present setting from OFF to ON
5. Turn Radio back “ON” Press “CD” button to enter AUX Mode
Radios with 3 Function buttons (i.e. BE4527)
1. Turn radio ON.
2. Press and hold Function button #2 (center) for more than 4 seconds.
3. The accompanying menu appears on the display.
4. Press the multifunction button located directly under “AUX” on the
display to change the present setting from OFF to ON.
5. The Setting is stored automatically.
Nav Traffic Radios
1. Press the "Radio" button to enter Radio mode.
2. Press the "Navi" and "F10" simultaneously
3. Press "Next" until the AUX input, Changer Res screen
4. Press AUX to enable/disable.
Becker 4775 (Land Rover Traffic Pro)
1. With the Radio "ON" press and hold the Tone button until the sub-menu
comes up.
2. Press the soft-key labeled “Aux” until the screen displays “AUX Mode
on”.
3. Press the Tone button to exit the menu.
4. To enter "AUX" mode, press the "CD" button and select the "AUX" soft-
key.
Sound 5 (BE7077 Sprinter Van)
1. Turn radio ON.
2. Press the
dp
repeatedly until EXT menu appear.
3. Turn Rotary control knob clockwise and select EXT AUX.
4. Press the CD button repeatedly until “AUX” is displayed

Cascade Pro (i.e. BE6112, BE7941)
To activate the External Device mode
1. Turn radio ON.
2. Press the information button
3. Turn the rotary control/push (OK) button counterclockwise until
System Settings appears at the top right of the display
4. Press the rotary control/push (OK) button
5. Turn the rotary control /push (OK) button to select External Device
6. Confirm selection by pressing the rotary control/push (OK) button
7. Select “AUX” from list and turn it “ON”.
8. Exit menu
9. To listen to the “AUX” device, press the MEDIA button
10. Turn the rotary control /push (OK) button to “AUX” and press the
rotary control/push (OK) button
Becker BE7801 Infotainment (Ferrari, Maserati)
1. Press the TP button for more than 2 seconds
2. Press multifunction button “AUX”
3. Select Ext audio source
4. press the right control knob to select “ON”
5. The setting is store automatically
Becker DTM /High speed (i.e. BE-7892, BE7910)
1. Press the Sound button for more than 2 seconds
2. Press multifunction button “AUX”
3. Select Aux Mode on
4. The setting is stored automatically
In CD Operation, the multifunction button AUX must be pressed to select
AUX operation
Mercedes Sound 5
1. Press the Mode button (indicated by arrow) repeatedly until AUX is
displayed.

Test Operation:
1. Turn ignition and radio “ON”
2. Press radio “AUX” button to enter Bluetooth mode
3. Launch streaming application (e.g. Pandora, Apple music etc.)
4. Use device built-in control or wireless remote to change tracks, adjust
device volume, pause, play etc.
5. Place phone call or ask someone to call. Use push button to answer call
(iPhone or Android) or press wireless remote “Play/Pause” button
(Android only)
Note: Push button was not required in Android applications we tested;
however, it is required to answer/end calls on all Apple devices.
Wireless remote pause/play button only works to answer/end
calls and switch between optional (AUX) and Bluetooth on Android
devices. Apple users must use push button.
6. If correct operation is confirmed go ahead and reinstall radio.
Playlist and Track selection *NOT* possible from C5
radio button/display. Use audio device built-in controls
or optional wireless remote to access and control
audio files and applications.
Notes: if no auxiliary device is connected, pressing the remote play/stop button pauses music
stream. This button also makes it possible to switch to AUX.
Bluetooth Comparison Chart
Feature
BLU-BKR
A2D-BKR
BT45-BKR
A2DIY-BKR
BKR-HF
CD changer retention
X
X
X
X
x
3.5mm AUX input
X
X
X
✓
✓
USB charging
X
X
X
**
✓
Mute Audio System
*
*
✓
*
*
Hands-Free profile
×
×
✓
✓
✓
Music streaming
✓
✓
✓
✓
✓
Push to talk button
X
X
X
✓
✓
Plug-n-play
✓
✓
✓
✓
✓
Wireless remote
**
**
✓
✓
x
* Radio must be in “AUX” Mode
** Optional

Frequent asked questions
1. What’s the difference between A2D-BKR and A2DIY-BKR?
The A2D-BKR supports music streaming only, the A2DIY-BKR supports music
streaming, Hands-Free calling, auxiliary input (3.5mm jack) and optional
charging port.
2. Does the A2DIY-BKR work on all Becker radios?
NO; works only on Becker radios with “AUX” menu option. Enter radio
menu to verify radio has this option. (Becker CR210, CDR210 for example
do not have this option and therefore not compatible)
3. Is there an adapter for Becker radios that do not have “AUX” menu?
YES; Purchase our ISFM23 or ISFM2351 or the AUX-BKR if vehicle has a CD
changer (CD Changer remains functional).
4. Can I control Smartphone from the radio buttons?
NO; you must continue to use smartphone built-in controls and display
or included wireless remote control.
5. Can I pair more than one device to the A2DIY-BKR?
YES; more than one device (slaves) can be paired however only one
connection can be active at a time.
6. Can I connect and play USB flash drive to optional USB port?
NO; USB port is for charging only. No playback or synching
Disclaimer
• This product has no affiliation with Porsche, Becker etc.
• We’re not liable for misuse of this product.
•We recommend professional installation.
Email [email protected]
© 1995-Jul-20 Discount Car Stereo, Inc. All rights reserved. Information in this document is subject to
change without notice. Other products and companies referred to herein are trademarks or registered
trademarks of their respective companies or mark holders.
Other manuals for A2DIY-BKR
1
Table of contents
Other Becker Adapter manuals
Popular Adapter manuals by other brands

Newell Rubbermaid
Newell Rubbermaid baby jogger GRACO CLICK-CONNECT Car Seat... Assembly instructions

Logitech
Logitech SCREEN SHARE Setup guide

Sony
Sony BTA-NW1A - 56 Kbps Modem operating instructions

TRENDnet
TRENDnet TEW-441PC - 108Mbps Wireless PC Card... Quick installation guide

DeWalt
DeWalt XR LI-ION DCB090 Original instructions

Intermec
Intermec CN50 instructions