Beckett Beckettlink Hub 7650 Quick guide
7651A0001K
BeckettLink®
Tank Gauge Kit
Includes 7651A
BeckettLink® Tank
Gauge and 7650A
BeckettLink® Hub.
Connects to WiFi/
Bluetooth® Internet
Hub for Use with
Other BeckettLink®
Devices
Provides reliable communications from Bluetooth®-
based BeckettLink® sensors and controls to cloud-
based applications
Hub can be placed where the WiFi signal
is the strongest, up to 150 feet (46m) from
BeckettLink® sensors and controls.
Easily connects to existing WiFi networks using
the BeckettLink® App.
Four LED indicators to help with setup and
troubleshooting
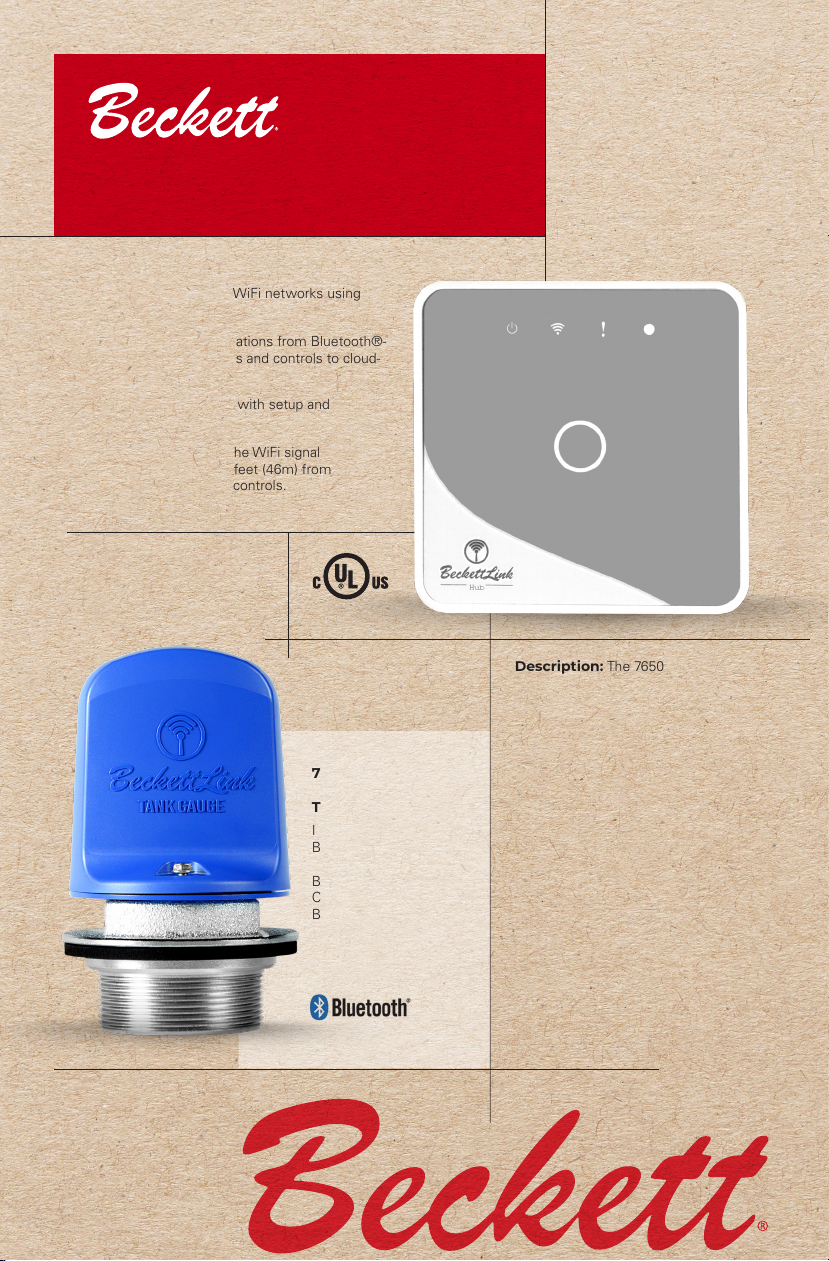
Description: The 7650
BeckettLink® Hub is designed
to connect to an existing WiFi
network and provides an internet
link between other BeckettLink®
products and cloud-based
applications. The hub can process
Bluetooth® input from multiple
BeckettLink® wireless sensors or
controls at the same time. The
BeckettLink® Hub also includes
a temperature sensor which
can provide a warning through
cloud applications if the room
temperature falls below a preset
temperature (low temperature
warning).
7650 BECKETTLINK®HUB
INSTALLATION AND INSTRUCTION MANUAL
7650 BeckettLink Hub, Form No. 62203 Rev 0 — 32 — 7650 BeckettLink Hub, Form No. 62203 Rev 0
Indicates a hazardous situation that, if not avoided, will
result in death or serious injury.
Indicates a hazardous situation that, if not avoided,
could result in minor or moderate injury.
Indicates a hazardous situation that, if not avoided,
could result in death or serious injury.
Used to address practices not related to physical injury.
Safety instructions signs indicate specific safety-related
instructions or procedures.
General Information...................................2
Hazard Definitions, Warnings .................2
Agency Approvals ..................................2
Technical Specifications.............................3
Specifications Table................................3
Product Dimensions...............................3
Product Label & How to Read................3
LED Guide..............................................4
Installation..................................................4
Using BeckettLink® App............................8
Low Temperature Warning......................8
Check WiFiSignal Strength.....................8
Warranty and Other Hub Information.....9
Edit Hub Settings ...................................9
Change WiFi Settings - WiFi Reset....... 10
Remove or Change Hub....................... 11
Main Menu .......................................... 12
Alerts ................................................... 14
Dealer WiFi Setup ................................ 14
Additional Hub Information..................... 15
Troubleshooting ....................................... 17
Limited Warranty Information ................. 18
If using the Freeze Warning feature of the BeckettLink® Hub, the hub must be
placed where it can accurately sense room temperature. Do not place the hub
inside a cabinet or other enclosure. Do not place the hub near electronics or other
heat sources. Inaccurate temperature readings could lead to failure to notify of
freezing conditions and property damage.
Frozen Plumbing & Water Damage Hazard
Hazard DefinitionsTable of Contents
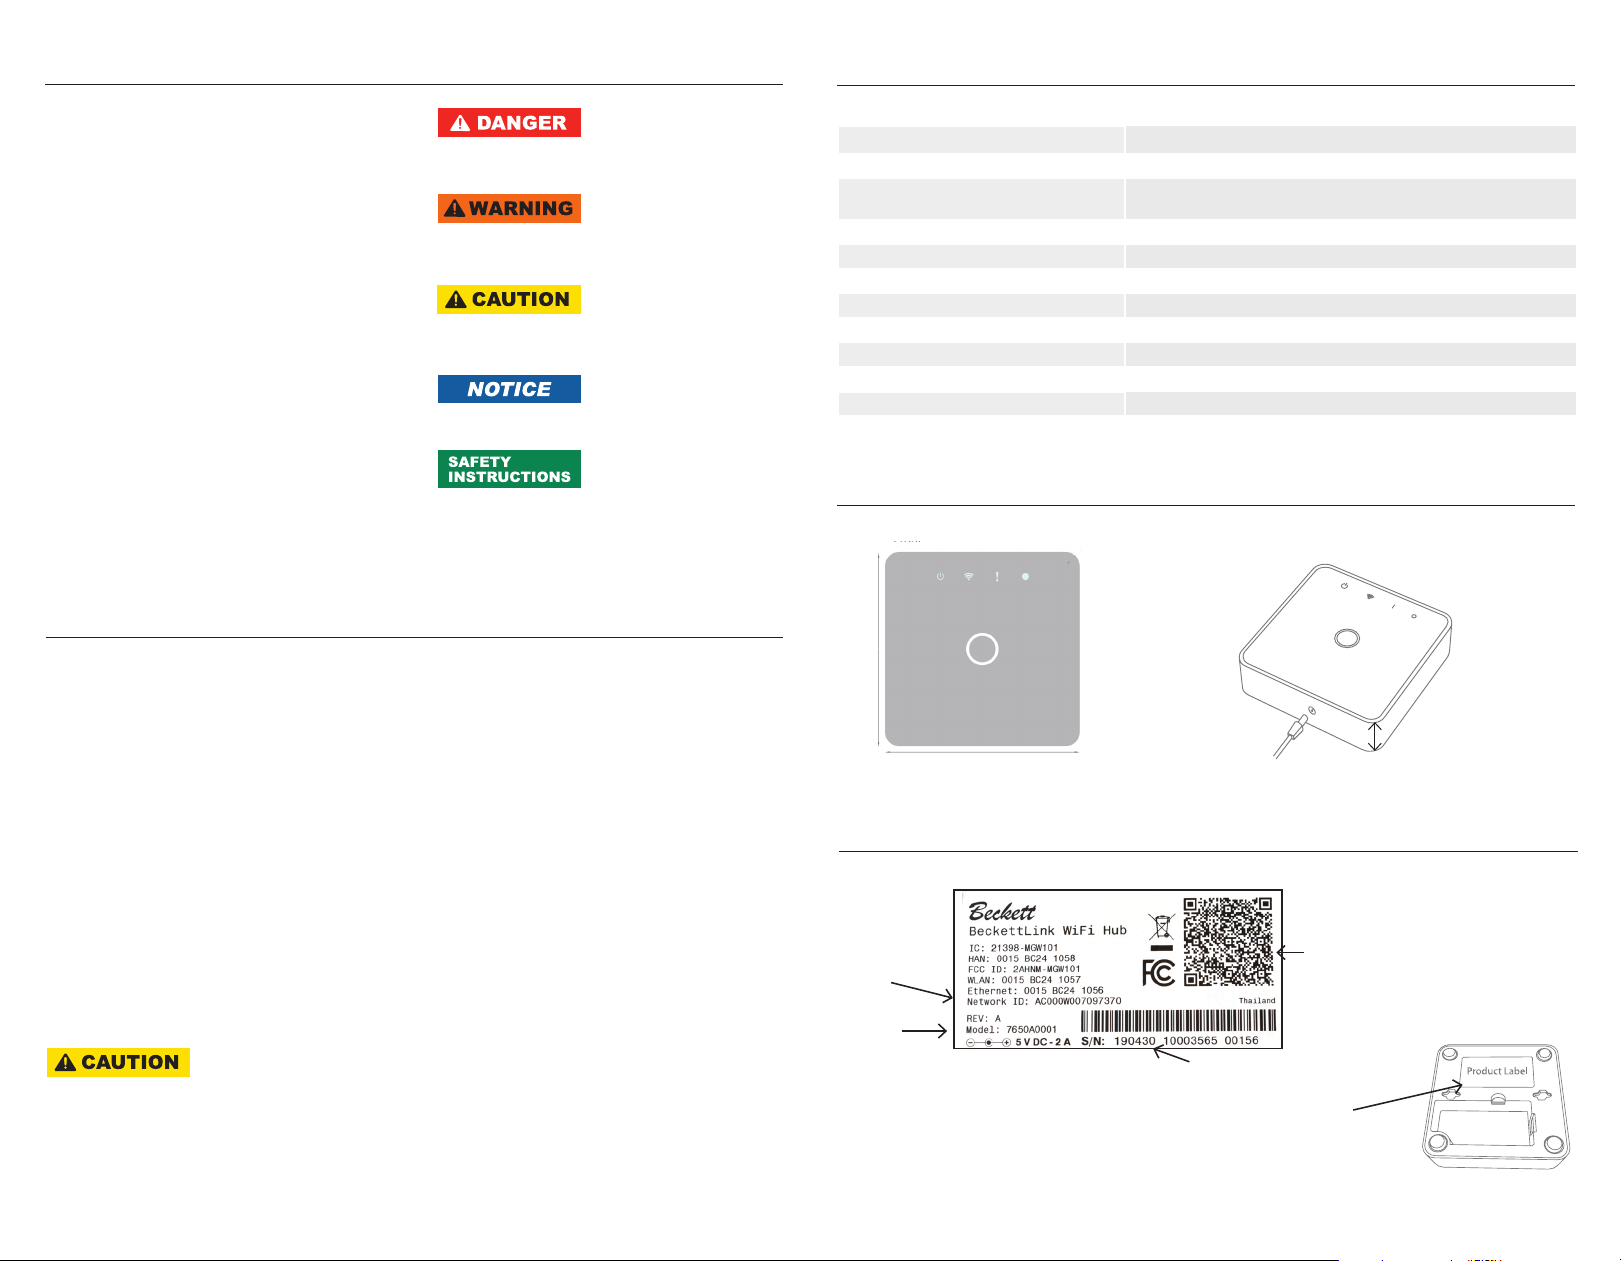
4 1/16”
4 1/16”
Product Dimensions
Depth: 1 1/5”
Power Supply
Product Label & How to Read
Product Label Located
on Bottom of Hub
Model #
Network ID for Use
with BeckettLink®
App
Serial #
QR Code for
Scanning
General Information
Agency Approvals
• FCC Part 15.247, FCC ID: 2AHNM-MGW101
• Industry Canada RSS-24, Issue 1, IC ID:21398-
MGW101
• UL 60065
• FCC PART 15, SUBPART B
• Industry Canada RSS-310, Issue 4
7650 BeckettLink® Hub
• 33149-001 Power Supply
7650 BeckettLink® Hub and power supply
is also included in the 7651A0001K
BeckettLink® ConnectedTank Gauge Kit.
Additional information on BeckettLink®
Products is available at: beckettcorp.com
Las instrucciones en espanol estan
disponibles en nuesto sitio web.
Les instructions en français sont disponibles
sur notre site Web
Technical Specifications
Table 1 — Specications
Storage Ambient Temperature: -4°F to +158°F (-20°C to 70°C)
Operating AmbientTemperature: +32°F to +104°F (0°C to +40°C)
Storage and Operating Ambient
Humidity: 10% to 90% RH Non-Condensing
Ingress Protection Class: IP 20
Installation Locations: Indoors Only
Power Consumption: 1.2 W Typical, 25 W Maximum
IndoorTemperature Range Accuracy: +/- 9°F (+/- 5°C)
WLAN: 2.4 GHz, 802.11B/G/N Protocol, -101dBm Sensitivity, +18 dBm Output Power
BLE: 2.4 GHz, BLE 5.0 Protocol, -94 dBm Sensitivity, +20 dBm Output Power
RoHS Compliant: Ye s
Network Router Ports Used: 80,443,53,55055,55056
Thank you for purchasing this Beckett
product for use with your heating system.
Please pay attention to the Safety Warnings
contained within this instruction manual.
Keep this manual for your records and
provide it to your qualified service agency
for use in professionally setting up and
maintaining your system.
If at any time the product does not appear to
be operating properly, immediately contact
your qualified service agency for consultation.
7650 BeckettLink Hub, Form No. 62203 Rev 0 — 54 — 7650 BeckettLink Hub, Form No. 62203 Rev 0
LED Guide
Green LED: Power Indicator -
solid on when powered - double
flashes during booting.
Blue LED: Bluetooth® Indicator
- solid on when operating
normally.
Yellow LED: WiFi Connection
indicator - solid on when
connected to cloud and
registered - flashing when
connected to cloud but not
registered - double flashes
during registration - off when
not connected to the internet.w
Red LED: WiFi Error Indicator - off
during normal operation - flashes
when error is detected in WiFi
connection
Hub Setup: Install
Indoors Only
The BeckettLink® Hub is
designed and rated for indoor
installation only. Do not install
where moisture or freezing
temperatures can damage
the hub.
1. Locate hub indoors (+
32°F, 0 ° C minimum)
within 150 feet (46 m) of
all BeckettLink® devices.
Place hub where WiFi signal
is strong.
2. Do not place the
BeckettLink® inside cabinets
or near other heat sources
like electronic devices. This
may prevent low temperature
warnings from operating
properly. Do not connect an
ethernet cable during the
WiFi setup and registration
process. An ethernet
cable may be used after
completing setup.
3
Plug the power cable into the
hub and connect to 120 volt
outlet or surge protector.
4
All four LEDs will light briefly
when hub is powered.
5
Green power LED will double
flash during booting process
(4-5 minutes).
6
Wait until Green and Blue
LEDs are on solid to start
using the BeckettLink® App
for setup.
Note:The WiFi function on phone
or tablet must be enabled before
starting the hub setup process.
Make sure airplane mode is off.
7
Open BeckettLink® App
and login using email and
password. App will open to
dashboard page.
The WiFi network
password will be
needed to complete
hub installation.
Note: The hub operates
only with 2.4GHz WiFi
networks. The hub
cannot connect to a WiFi
network using the 5.0 GHz
frequency. Apple Phones
(iOS) must be connected
to the 2.4 GHz WiFi signal
from the network you
want to use for the hub.
Android phones will list
the available networks.
Choose the 2.4 GHz
network you wish to use.
LED Guide & Installation Installation
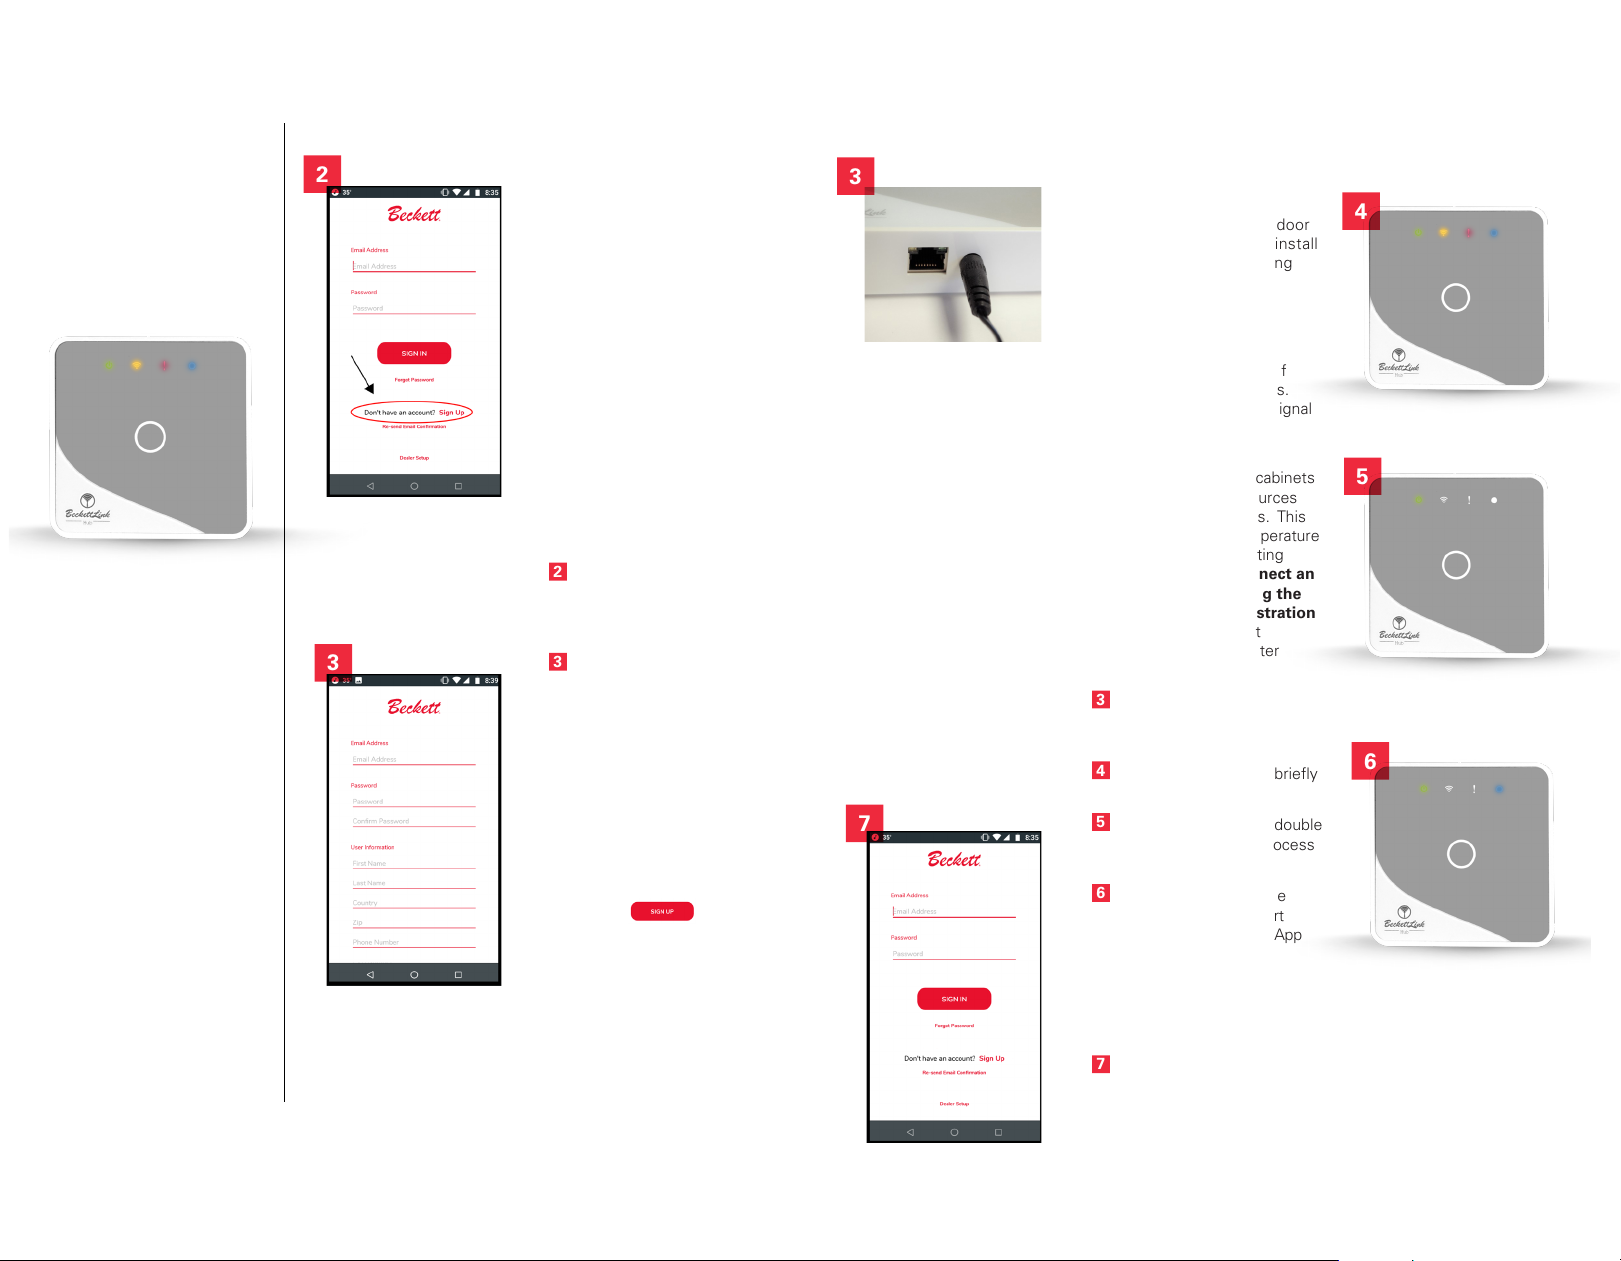
Download the
BeckettLink® App and
Setup Account
The BeckettLink® App is needed
to complete the installation of
the BeckettLink® Hub. The app
can be downloaded from the
App Store (iOS) or Google Play
(Android). Search BeckettLink or
R.W. Beckett.
1. When the download
is complete, open the
BeckettLink® App and sign
in or set up an account. If
purchased through a servicing
dealer, you may have received
an email notifying you that
an account was established
and requesting that you reset
the password.
2
If setting up a new account,
tap “Sign Up”. If account is
already set up, enter email
and password.
3
For new accounts, enter
email, password, first name,
last name, address, country,
zip or postal code, cell phone
number for push notifications.
Only one hub can be tied to
each email account.
Passwords must be between 8 and
128 characters, include at least
one number or special character as
well as one uppercase letter and
one lowercase letter.
4. Hit the ( ) sign up
button at the bottom of the
page when complete. You
should receive a confirmation
email quickly. Follow the
instructions in the email to
confirm the account setup.
5. Be sure to sign into the new
account using the email and
password.
2
3
Note:Throughout the setup
process, read the directions
and suggestions in the app,
they will help guide you
through the setup process.
4
6
5
3
7

7650 BeckettLink Hub, Form No. 62203 Rev 0 — 76 — 7650 BeckettLink Hub, Form No. 62203 Rev 0
Hub Setup
8
Tap “+” to add a device.
The hub must be added
first before adding any other
devices. Please note the “+”
sign on iOS phones will be in
the upper right corner.
9
Type in hub name and tap
hub button. Tank Gauge or
other device buttons will
not work until hub is added
and registered.
10
Click the ( ) scan
QR code button , then use
phone or tablet to scan QR
code on the bottom of the
hub. You can also type in the
Network ID shown on the
label if the scan fails.
11
If the scan is successful, the
Hub network ID will quickly
appear in app and the phone
or tablet will begin scanning
for available WiFi networks.
Make sure WiFi function
is enabled on the phone
or tablet.
12
Select the desired WiFi
network. Enter the
network password. Follow
the directions in the app
to connect.
13
The “Connecting to WiFi”
message will display. It may
take more than one attempt
to connect the hub to the
WiFi router. The app will
automatically try several
times. If multiple attempts
fail, see Troublshooting
section. Do not allow
phone screen to time out
during the connection
process or you may need to
start over.
14
Yellow WiFi LED will flash
when the hub connects to
WiFi and continue flashing
until registration is complete.
15. When the hub is connected
to WiFi and the registration
is complete, the yellow WiFi
LED will be on solid.
16
When the hub is connected,
you will see a success
message in the app. Return
to the dashboard and the
Hub will be showing on the
dashboard page. Tap the “+”
button to add a tank gauge or
other BeckettLink® device.
Please note the “+” sign on
iOS phones will be in the
upper right corner.
It may take several minutes for
connected devices to update in
the BeckettLink® app.
Note: Have the network
password ready. If the
yellow WiFi LED is on or
flashing, see “Change
WiFi Settings - WiFi
Reset”.
Note: The phone will
alternate between
direct connection to
the hub and using
WiFi during the setup
process
Installation Continued Installation Continued
8
9
QR Code
Network ID
10
11
12
13
14
16
iOS
Android
7650 BeckettLink Hub, Form No. 62203 Rev 0 — 98 — 7650 BeckettLink Hub, Form No. 62203 Rev 0
Warranty and Other
Hub Information
C
Scroll down the hub
detail page to view
Network Information,
Installation Date,
Warranty Period,
Hardware and Firmware
Versions and the Hub
CheckTemperature
A temperature sensor in the
BeckettLink® Hub provides an
approximate (+/- 9° F, +/- 5°C)
room temperature. When
enabled, the Low Temperature
Warning will provide a push
notification through the phone
and an email if the room
temperature falls below the
temperature chosen in the app.
16
From the dashboard page,
tap the hub button
16
. The hub detail page shows
the Indoor Temperature
indicator and the WiFi Signal
Strength graph.
16
If temperature is above the
warning level “OK” will display.
16
If temperature is below the
warning level temperature
will display.
We recommend setting the
low temperature warning
at 45° F (7°C) or above.
Learn how in the “Edit Hub
Settings” section on page 10.
40° F (Digits Displayed) =
Room Temperature below
the warning level
BeckettLink® Dashboard BeckettLink® Dashboard
OK = Room Temperature
above the warning level
Check WiFi Signal
Strength
Below the Indoor
Temperature on the hub
detail page is the WiFi
signal strength.
A
The Signal Strength
graph should be 2-3
bars minimum. Move
hub closer to router
to improve WiFi
signal strength.
B
The signal strength
graph also displays
the time of the last
message received from
the hub. When the
hub is connected to
WiFi, the time should
be current. When the
hub is disconnected
from WiFi, it will show
when the last message
was received.
1
Viewing Accessories
added to Hub
1
As accessories are added
to the hub they will appear
in the dashboard.
2
When selecting the
accessory, relevant
information will display.
Please consult your
accessories manual for
instructions.
2
3
4
Do not place the hub inside a cabinet or other enclosure or near other heat sources.
A
B
C
1
2

7650 BeckettLink Hub, Form No. 62203 Rev 0 — 1110 — 7650 BeckettLink Hub, Form No. 62203 Rev 0
WiFi reset.
3
Follow the instructions in the
app for a WiFi reset.
4
Push the pin hole button on
the bottom of the hub once
to reset WiFi settings. Use a
pen or paperclip.
5
Yellow WiFi LED on the Hub
will flash 5 times quickly to
show WiFi reset has started.
6. Wait for the yellow WiFi LED
to turn off, this may take a
minute or more while WiFi
settings are cleared.
7. Once yellow WiFi LED
has turned off, press the
button on the
bottom of the WiFi Setup page
in the app.
8. Hub will begin scanning for
available WiFi networks.
Choose the desired network
and enter the correct
password. Apple (iOS)
phones must be connected to
the network you want to use
the hub.
Change WiFi Settings /
WiFi Reset
To update to a new WiFi router
or change WiFi password
1
Select the “Change WiFi
Settings” button at the
bottom of the Edit Hub
Settings page of the app.
2. Follow the instructions in the
app to change WiFi settings.
If the yellow WiFI LED continues
flashing it means registration of
the hub was not successful and
the WiFi reset should be used to
change the WiFi settings.
Remove or Change
Hub
To replace an existing or
faulty hub.
1
Select “Remove this Hub”
at the bottom of the Edit
Hub Settings page of
the app.
2
A warning will appear that
unregistering the hub will
also unregister all devices
associated with the hub.
3
Tapping on “OK” will
unregister the hub and
unregister all the devices
registered to the hub.
Start the setup and
registration process over with
the new hub. Redo the WiFi
network setup and enter the
WiFi password. Any devices
previously connected to the
old hub will need to be added
and paired to the new hub. If
a tank gauge is installed, you
will need to un-pair the tank
gauge (hold button on tank
gauge for 5 seconds, release,
hold button for another 5
seconds) before re-pairing
the tank gauge to the new
hub. A tank gauge can only
pair to one hub, so it cannot
pair to the new hub until it is
un-paired from the old hub.
Follow the instructions in the
BeckettLink® Tank Gauge
Manual 62202.
Using BeckettLink® App Using BeckettLink® App
Edit Hub Settings
1
From the dashboard page tap
on the hub button.
2
On the hub detail page,
click the word ‘Edit” in iOS
apps or click on the pencil in
Android apps. The Edit Hub
Setting page will appear.
3
To edit or change the hub
name, tap on the hub name
and enter the new name then
tap “Save Changes”.
4
To activate the low
temperature warning, move
the slider (right) to the on
position and tap “Save
Changes”.
5
To change the low
temperature alert trigger
level, tap on the temperature
and enter the new
temperature then tap “Save
Changes”.
The allowed temperature
range for the low temperature
warning is 35° - 60° F (2° to
15°C). We recommend setting
the temperature at 45°F (7°C) or
above to allow for variations in
room temperature throughout
1
iOS
Android
3
2
3
4
5
1
1
4
5
2
3
7650 BeckettLink Hub, Form No. 62203 Rev 0 — 1312 — 7650 BeckettLink Hub, Form No. 62203 Rev 0
A
Main Menu
By tapping the menu symbol
in the upper left corner of
the dashboard page the main
menu is accessed.
B
Account
Use the account page to
update Name, Address, City,
Zip/Postal Code, Phone (cell
phone for push notifications),
change Email address or
the Account Password. An
account can be closed by
using the “Delete Account
“ button at the bottom of
the page.
C
Settings
Set up login requirements,
finger print ID and choose
temperature units (°F or °C).
D
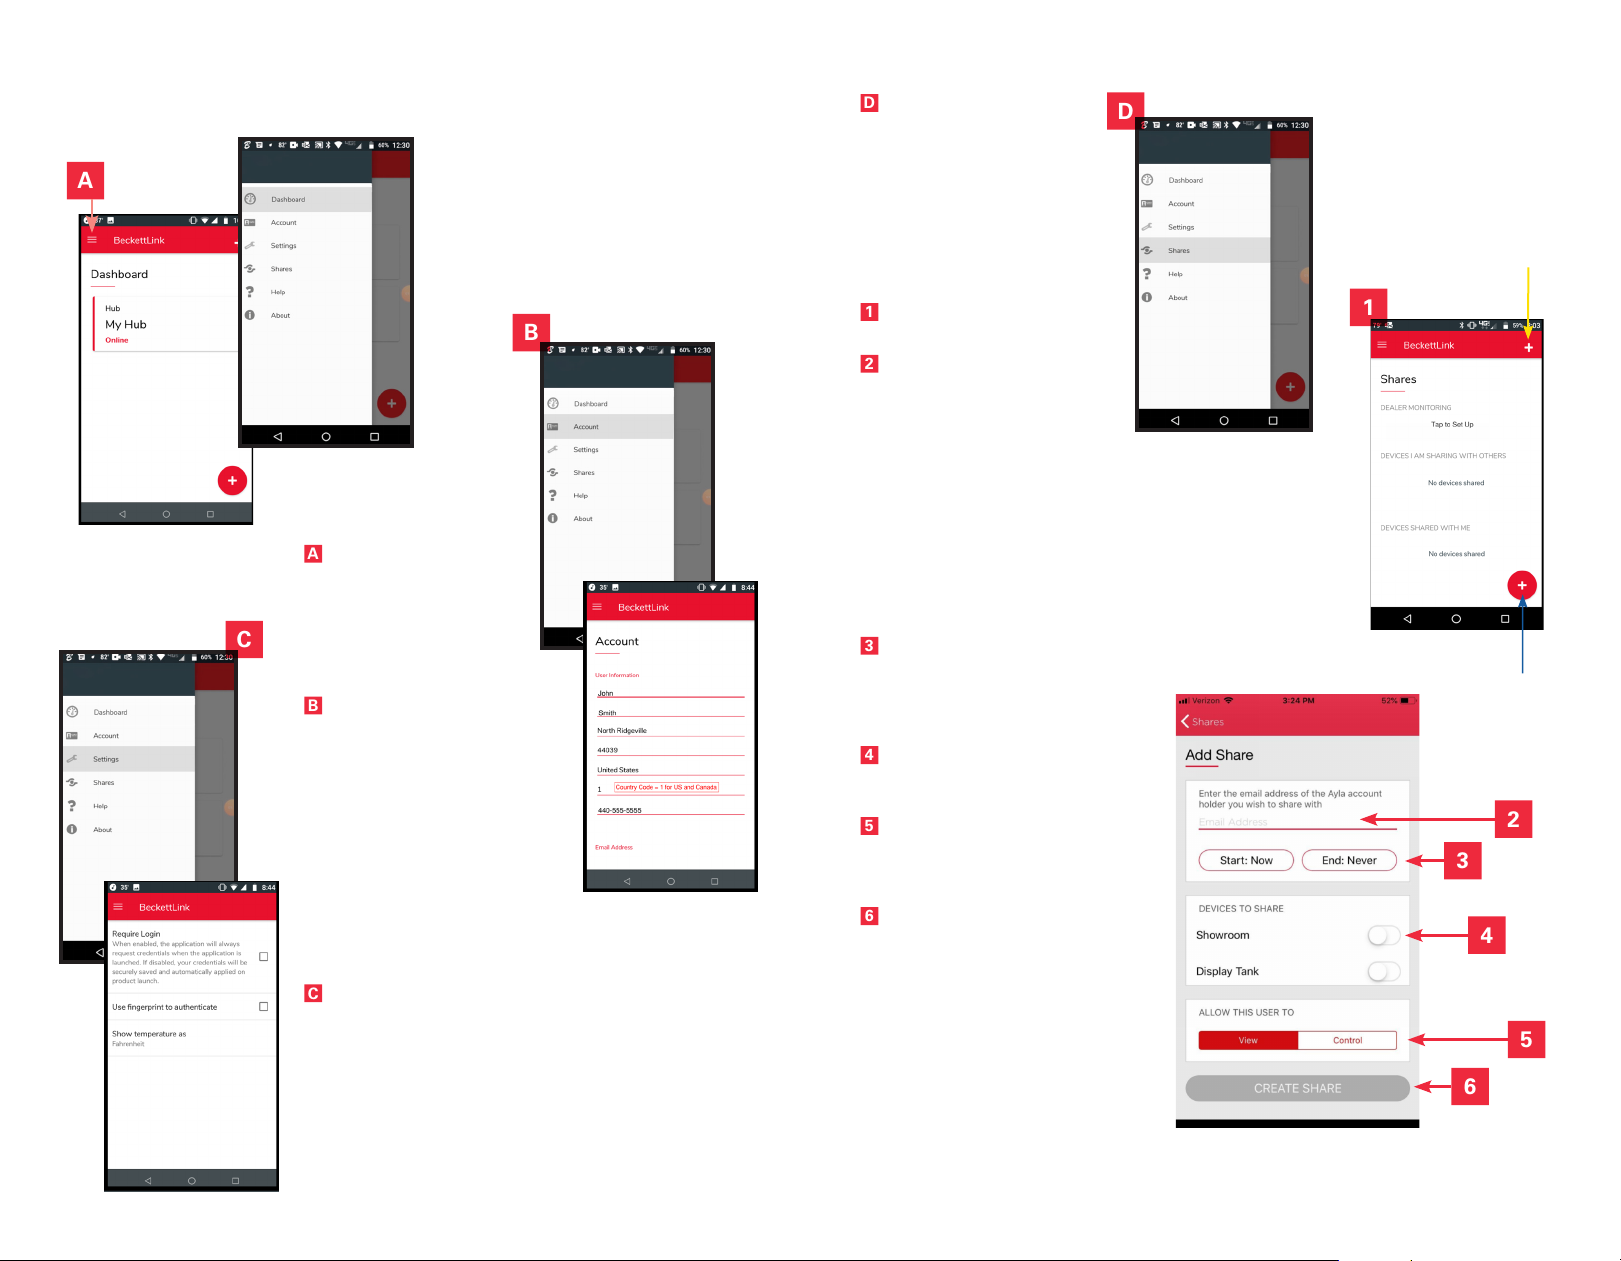
Shares
Use the shares page to set up
information sharing with family,
friends or servicing dealers.
The app can help identify local
servicing dealers using the
BeckettLink® system to monitor
BeckettLink® devices.
1
Click the “+” button to add
a share.
2
To share with friends or
family members, they
must first download the
BeckettLink® App and set
up an account. Then enter
the email address for the
friend or family member with
whom you want to share
information. The share will
not be accepted unless the
email address is for a valid
BeckettLink® account. Use
Dealer Monitoring to share
with a dealer.
3
By default, shares start
“Now” and end “Never”. You
can enter specific start and
end dates by tapping the
“Start” and “End” buttons.
4
Select devices to share by
moving the slider buttons to
the right.
5
Select “View” for view only
rights or “Control” to allow
the share receiver to adjust
or change settings.
6
Tap the “Create Share”
button.
Removing a Share
Apple (iOS): touch the share to
be removed and slide to the left.
Tap delete button.
Android: hold down the share
to be removed. When the pop
up appears, tap okay to delete
the sharing.
Using BeckettLink® App Using BeckettLink® App
A
iOS
Android
B
C
2
D
1
3
4
5
6
7650 BeckettLink Hub, Form No. 62203 Rev 0 — 1514 — 7650 BeckettLink Hub, Form No. 62203 Rev 0
Dealer Monitoring
The BeckettLink® App can be
used to set up sharing with a
dealer or help locate servicing
dealers using the BeckettLink®
system for monitoring.
1. Touch the “Tap to Set Up “
button.
2. The app will search for dealers
providing service in your zip or
postal code.
3. Select a dealer from the list if
you wish to share your data
with them.
Help
The help page provides links to
Alerts
The BeckettLink® system will
provide push notifications to the
app and email warnings for many
events. Some notifications will
also appear in the app dashboard
under the device button. Push
notifications will appear only
on the phone or tablet used to
registered the BeckettLink®
device.
Other BeckettLink® products,
such as the BeckettLink® Tank
Gauge, will provide additional
alerts including low fuel level and
low battery alerts.
Using BeckettLink® App
BeckettLink® Hub Alerts
Status Email Push Dashboard
Hub Connection Lost X X X
Hub Connection Restored X X X
Low Temperature X X X
Sign up Confirmation X
Password Reset X
Shares X
2
7650 BeckettLink Hub, Form No. 62203 Rev 0 — 1716 — 7650 BeckettLink Hub, Form No. 62203 Rev 0
Additional Hub Information
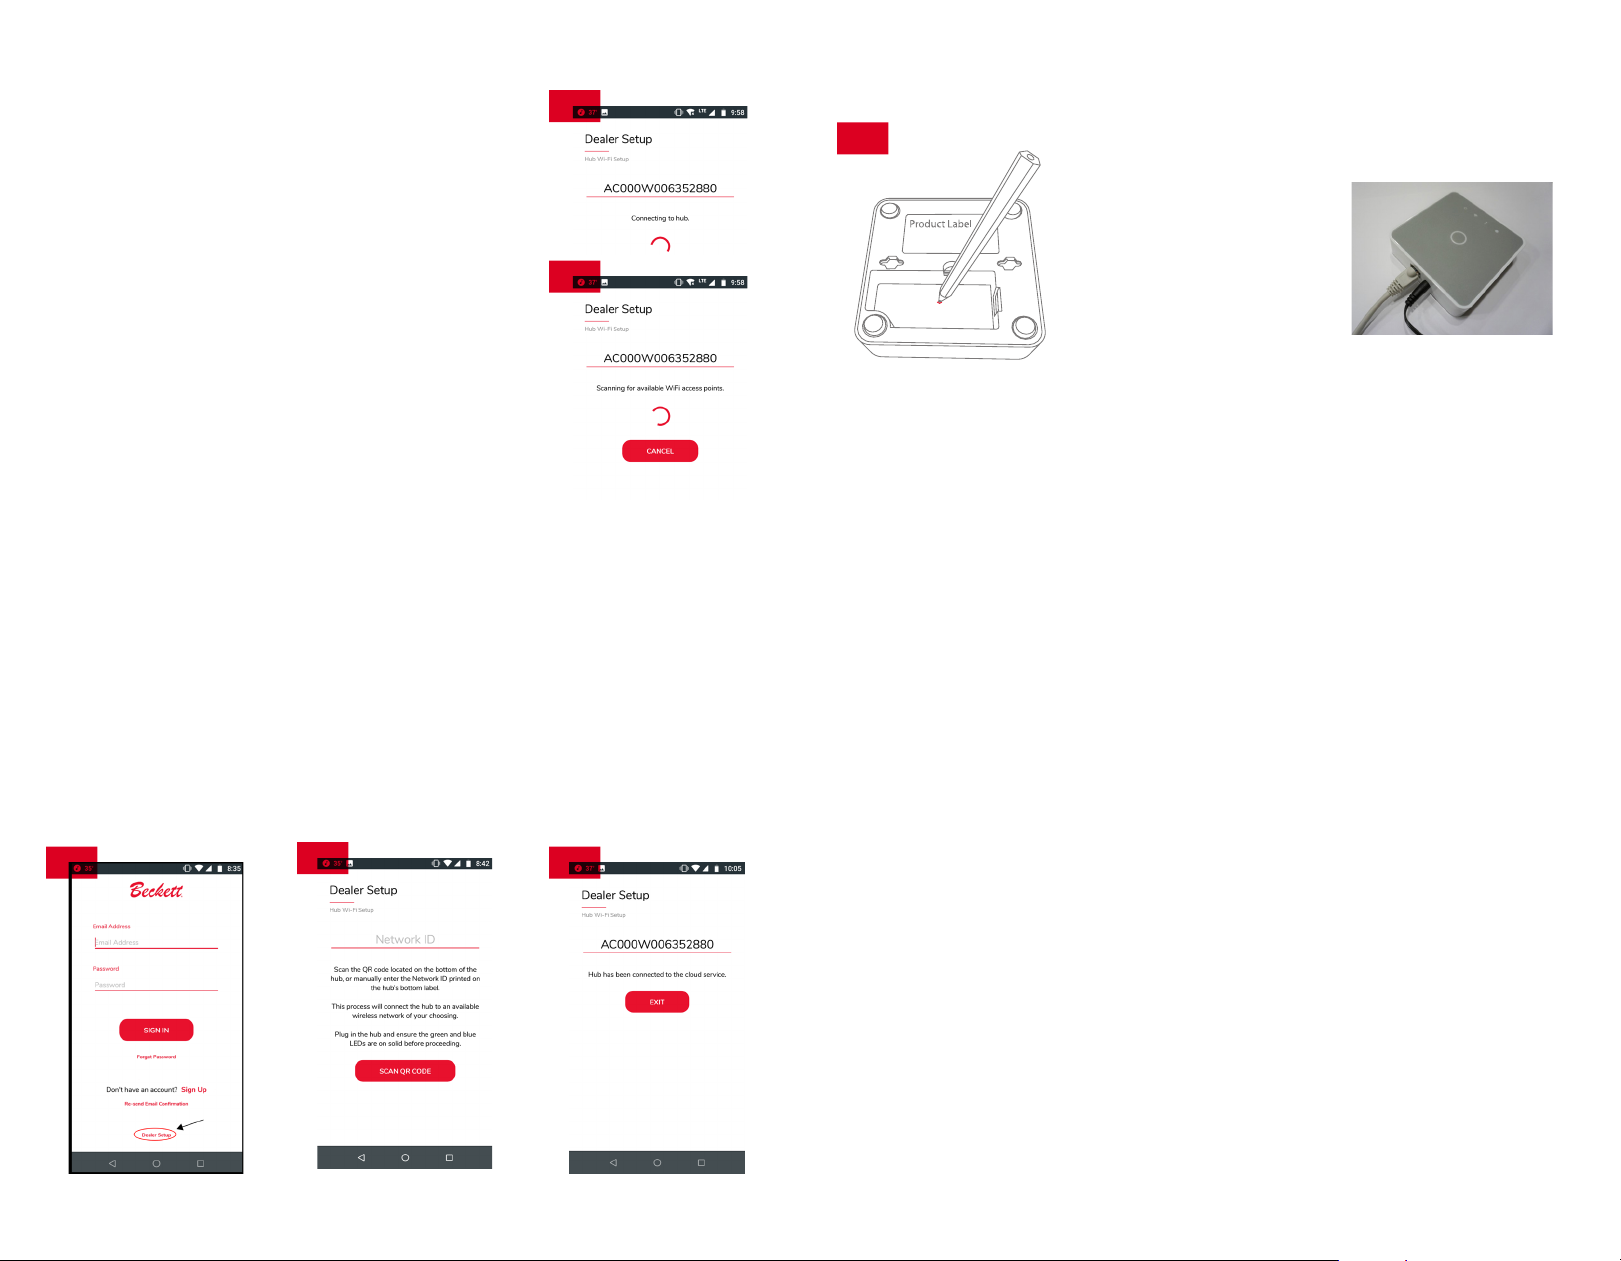
Dealer WiFi Setup -
Dealers Only
Dealer Setup is designed for use
by installing dealers and can only
be used to connect to the local
WiFi network when the Hub
has been registered through the
Dealer Dashboard.
1. Click on Dealer Setup at
bottom of login screen.
2. Scan QR Code on bottom
label of hub.
3. App will scan for Hub.
4. App will scan for available
WiFi networks. Apple (iOS)
phones must be connected to
the WiFi network the Hub will
use. Hub will only connect
to a 2.4 GHz network.
Enter network password
when requested.
5. When connected to cloud,
exit dealer setup and continue
adding devices.
Factory Reset
If the hub has not been able
to connect to the internet or
if the system stops operating
properly, a factory reset may
help restore normal operation.
A factory reset is different from
the WiFi reset described earlier.
The WiFi reset clears only the
WiFi settings. A factory reset
restores all settings in the hub to
the original factory settings.
1. Use a pen or paperclip to
hold down the reset button
as indicated in the drawing.
Hold the button down for
approximately 10 seconds.
2. Release the pen when
the green power LED on
the front panel starts to
flash continuously.
3. The system will reboot in 4-5
minutes and the hub should
return to normal operation.
4. The WiFi network connection
will need to be set up again.
Any devices previously
connected must be
reconnected (added) to the
hub after a factory reset.
Ethernet Connection
Once the hub and other
BeckettLink® devices have
been registered, if the WiFi
signal is not providing a reliable
connection, an ethernet cable
can be used to connect the hub
to the internet. This can only
be done once the registration
process has been completed.
251
1
3
4
7650 BeckettLink Hub, Form No. 62203 Rev 0 — 1918 — 7650 BeckettLink Hub, Form No. 62203 Rev 0
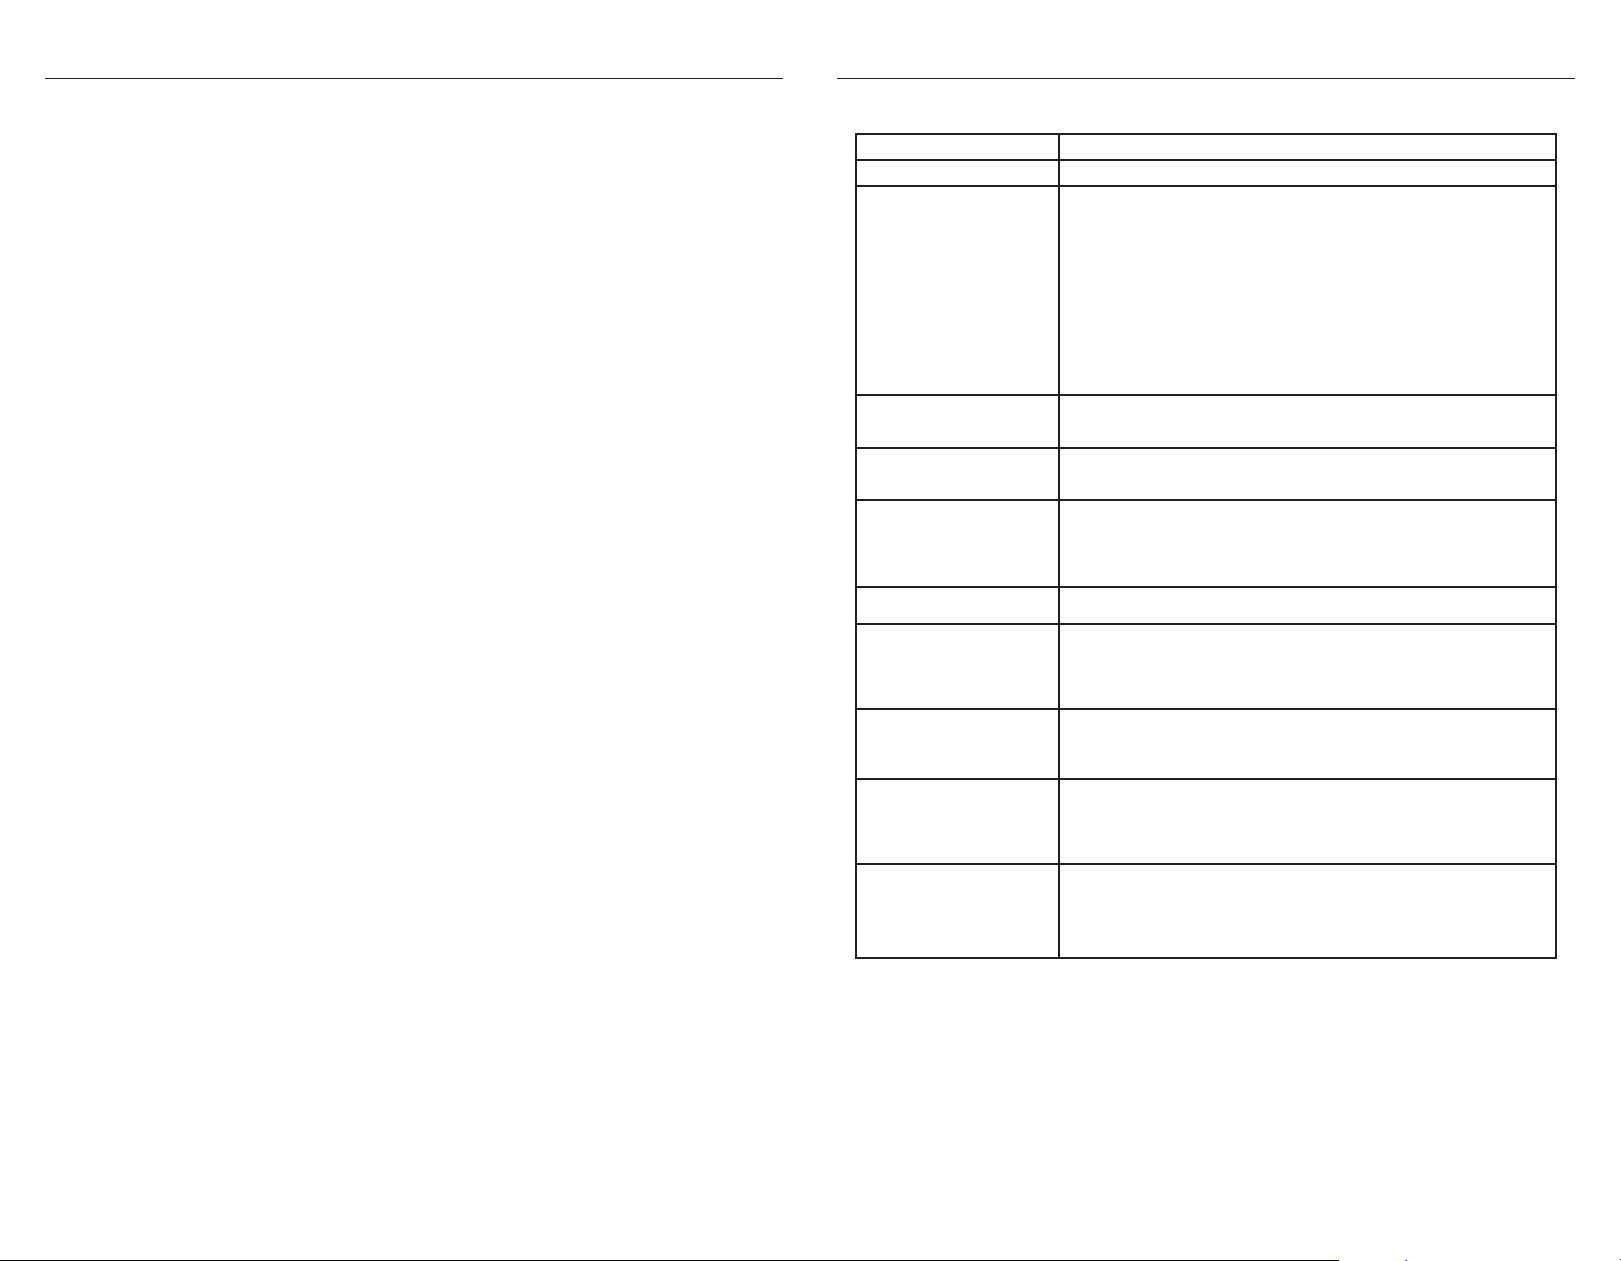
Troubleshooting
Issues Suggestions
No LEDs on Check power at the outlet and make sure power cable is connected to hub.
Can’t connect hub to WiFi
Hub registration keeps failing
Keep the phone close to the hub during the registration process.
Move hub closer to WiFi router.
Make sure the WiFi is enabled on the phone or tablet.
Check yellow WiFi LED on hub, if flashing, use paperclip to push reset once.
Make sure you are connecting to a 2.4 GHz WiFi network.
The network name may contain a reference to 2.4 or 5.0 GHz.
If the WiFi network has anti-spoofing protocols enabled, whitelist SSiDs
that start with “AC000W. Make sure these network ports are open or
whitelisted on your router: 80,443,53,55055,55056.
WiFi LED will be on solid when hub is registered.
Only iOS version 11.0 or later is supported by the BeckettLink® Hub
No available WiFi networks Make sure WiFi is enabled on the phone.
Makes sure phone is not in “airplane” mode.
Yellow WiFi LED flashing Hub is connected to internet, but hub is not registered in cloud application.
Use paperclip to push reset button once, continue WiFi setup process.
Not receiving any updates
from BeckettLink® devices
Use BeckettLink® App to check WiFi signal strength on hub detail page.
Move hub closer to router if signal is 1 or 2 bars.
Check Bluetooth® signal strength on device detail page in BeckettLink® App.
Move hub closer to device (gauge) if signal is 1 or 2 bars.
QR Scan doesn’t work Enter Network ID manually. ID is on label on bottom of hub.
I keep receiving hub
connection lost alerts.
WiFi signal continues to drop
out
Move hub closer to WiFi router. Consider using an ethernet cable to connect
the hub to the router. Hub must be registered to cloud before using ethernet
cable.
Power and Bluetooth® LEDs
are on, but WiFi LED is off.
Check WiFi router to make sure it is powered and broadcasting a signal.
Remove then restore power to hub. Allow hub to reboot.
WiFi LED will not be powered if using ethernet cable connection
Hub is offline Check WiFi router to make sure it is powered and broadcasting a signal.
Remove then restore power to hub. Allow hub to reboot.
Check app for signal, if still no signal, from hub detail page, touch edit.
From Edit Hub Settings, touch Change WiFi settings and follow instructions.
Installed tank gauge or other
device but have not received
update or reading
Try moving the device closer to the hub temporarily and check signal strength.
With the tank gauge, it may be necessary to push the button next to the
battery holder in the tank gauge once to generate an update.
With some devices, like the tank gauge, it could take up to 4.5 hours for the
hub and app to receive an update.
Visit www.beckettcorp.com for additional Information, videos and Frequently Asked Questions
Changes or modification to the equipment not
expressly approved by the party responsible for
compliance could void the user’s authority to operate
the equipment.
NOTE: This equipment has been tested and found
to comply with the limits for a Class B digital device,
pursuant to Part 15 of the FCC Rules. These limits
are designed to provide reasonable protection against
harmful interference in a residential installation.
This equipment generates, uses, and can radiate
radio frequency energy and, if not installed and
used in accordance with the instructions, may cause
harmful interference to radio communications.
However, there is no guarantee that interference will
not occur in a particular installation. If this equipment
does cause harmful interference to radio or television
reception, which can be determined by turning the
equipment off and on, the user is encouraged to try
to correct the interference by one or more of the
following measures:
• Reorient or relocate the receiving antenna.
• Increase the separation between the equipment
and receiver.
• Connect the equipment into an outlet on a
circuit different from that to which the receiver
is connected.
• Consult the dealer or an experienced radio/TV
technician for help.
This device complies with FCC RF radiation exposure
limits set forth for an uncontrolled environment. The
antenna used for this transmitter must be installed to
provide a separation distance of at least 20cm from
all persons and must not be co-located or operating
in conjunction with any other antenna or transmitter.
This device complies with part 15 of the FCC Rules.
Operation is subject to the two following conditions:
1. This device may not cause harmful interference,
and
2. This device must accept any interference
received, including interference that may cause
undesired operation.
English
This device complies with Industry Canada’s Licence-
Exempt RSS standard(s). Operation is subject to the
following two conditions:
1. This device may not cause interference, and
2. This device must accept any interference,
including interference that may cause undesired
operation of the device.
Français
Le présent appareil est conforme aux CNR
d’Industrie Canada applicables aux appareils radio
exempts de licence. L’exploitation est autorisée aux
deux conditions suivantes:
1. l’appareil ne doit pas produire de brouillage;
2. l’appareil doit accepter tout brouillage
radioélectrique subi, même si le brouillage
est susceptible d’en compromettre
le fonctionnement.
IC Statement
ISED Statement
Innovation, Science and Economic Development
Canada ICES-003 Compliance Label: CAN ICES-3 (B)/
NMB-3(B).
Statements
FCC Statement
USA:
R.W. Beckett Corporation, 1-833-473-2004
Canada:
R.W. Beckett Canada Ltd., 1-800-665-6972
www.beckettcorp.com
Form No. 62203 R0, Printed in the USA 10/19
61628
©
2018 R.W. Beckett Corporation. All rights reserved.
This document and all information contained herein are the sole property of the
R.W. Beckett Corporation and cannot be reproduced or transmitted in whole or
part without express written permission of the R.W. Beckett Corporation.
Limited Warranty Information
Before Calling Beckett . . .
Before contacting us about your hub, please review the installation instructions.
Additional information, videos and Frequently Asked Questions can be found on our
website at www.beckettcorp.com.
The R. W. BECKETT CORPORATION (“Beckett”) warrants to persons who purchase its
“Products” from Beckett for resale, or for incorporation into a product for resale (“Customers”),
that its equipment is free from defects in material and workmanship. To qualify for warranty
benefits, products must be installed by a qualified service agency in full compliance with all
codes and authorities having jurisdiction, and used within the tolerances of Beckett’s defined
product specifications.
To review the complete warranty policy and duration of coverage for a specific product, or obtain
a written copy of warranty form 61545, please choose one of the following options:
1. Visit our website at: www.beckettcorp.com/warranty
2. Email your request to: rwb-customer-service@beckettcorp.com
3. Write to: R. W. Beckett Corporation, P. O. Box 1289, Elyria, OH 44036
NOTE: Beckett is not responsible for any labor cost for removal and replacement
of equipment.
THIS WARRANTY IS LIMITEDTOTHE PRECISE TERMS SET FORTH ABOVE, AND PROVIDES
EXCLUSIVE REMEDIES EXPRESSLY IN LIEU OF ALL OTHER REMEDIES, AND IN PARTICULAR
THERE SHALL BE EXCLUDED THE IMPLIED WARRANTIES OF MERCHANTABILITY AND
FITNESS FOR A PARTICULAR PURPOSE. IN NO EVENT WILL BECKETT BE LIABLE FOR ANY
INCIDENTAL OR CONSEQUENTIAL DAMAGE OF ANY NATURE.
Beckett neither assumes, nor authorizes any person to assume for Beckett, any other liability
or obligation in connection with the sale of this equipment. Beckett’s liability and Customer’s
exclusive remedy is limited to the cost of the product.
Table of contents
Other Beckett Switch manuals


Popular Switch manuals by other brands

Allied Telesis
Allied Telesis AT-9812T V2 Quick install guide

D-Link
D-Link DGS-1005G Quick install guide

Huawei
Huawei CloudEngine 7800 Series Hardware description

F5
F5 ARX-500 Hardware installation guide

S&C
S&C Alduti-Rupter Switches Outdoor Distribution Installation and operation

HP
HP 6125XLG Command reference

Travel Vision
Travel Vision Dish Diversity Switch Instruction and user's manual

Nexans
Nexans Berk-Tek PowerGIG-OAC installation guide

Cisco
Cisco MDS 9120 - Fabric Switch installation guide

Raritan
Raritan PX3TS user guide

ALFAtron
ALFAtron ALF-WU4K HUB manual

Cisco
Cisco Nexus 9396PX Hardware installation guide


