BEE STAR BEEMOVE 7x10W User manual

BEE STAR
BEEMOVE
7x10W
Notice d’utilisation
User manual

Merci d’avoir choisi ce produit BEESTAR. Pour votre propre
sécurité et pour une utilisation optimale de l’appareil, nous vous
recommandons de lire l’ensemble des instructions de ce manuel.
Contenu de l’emballage:
1 x Lyre wash à LED
1 x Etrier de xation (avec 2 vis)
1 x Câble d’alimentation
1 x Notice d’utilisation
- Conservez ce manuel pour une future consultation.
- Pour des raisons de sécurité, l’appareil doit être installé solide-
ment.
- Ne pas couvrir l’appareil.
- L’appareil doit être installé par une personne qualiée et doit être
placé hors de portée du public.
- Tenir au sec, ne pas utiliser sous la pluie ou dans un environne-
ment humide. Cet appareil est destiné à une utilisation en intérieur
uniquement.
- Laisser une distance de sécurité de 1m minimum entre l’appareil
et d’autres objets.
L’utilisateur doit respecter toutes les consignes et avertissements
de ce manuel. La garantie ne couvre en aucun cas les dommages
survenus à la suite d’une mauvaise manipulation ou utilisation du
produit.
BEE STAR

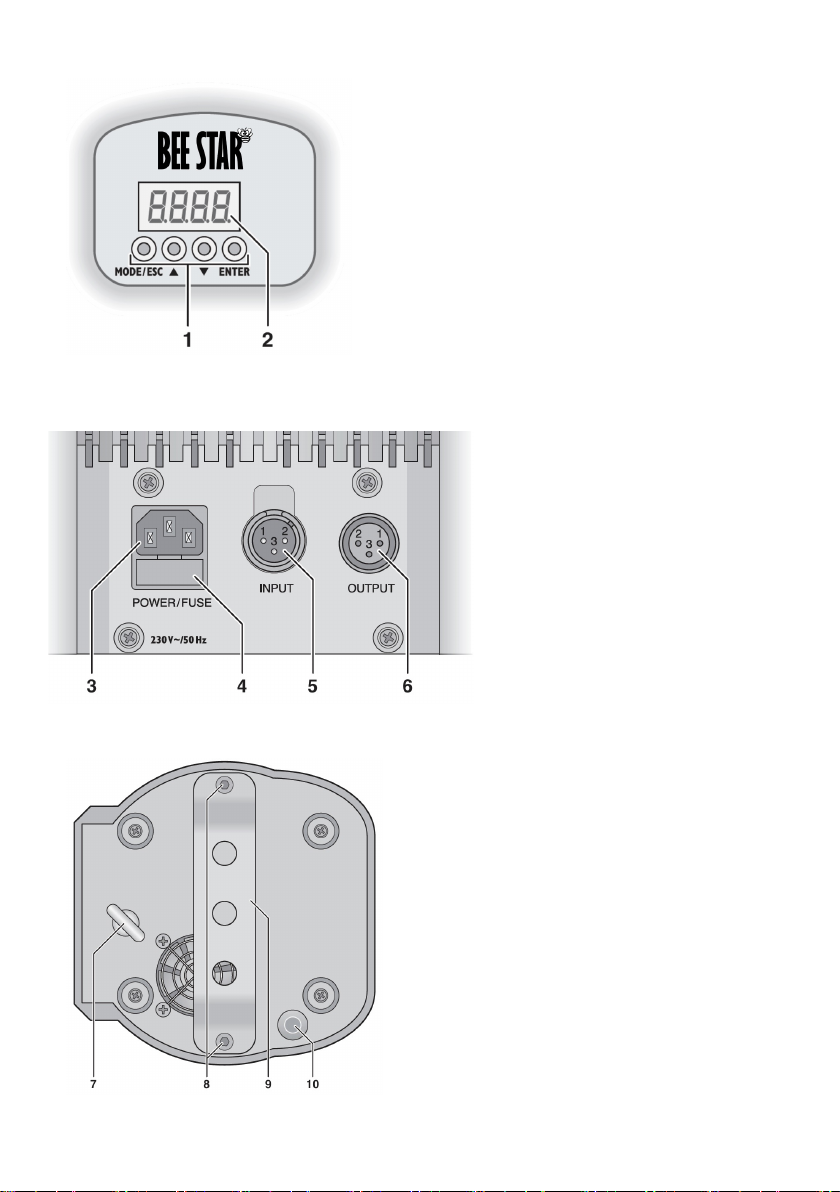
Présentation du BEEMOVE 7x10W.
1 Touches de commande
2 Achage
3 Prise secteur
4Porte-fusible
5Entrée signal DMX
(XLR 3 pôles)
Pin 1 = masse, 2 = DMX-
3 = DMX+
6Sortie signal DMX
(XLR 3 pôles)
Pin 1 = masse, 2 = DMX-
3 = DMX+
7Crochet pour élingue
de sécurité
8 Vis de xation
9 Etrier
10 Microphone
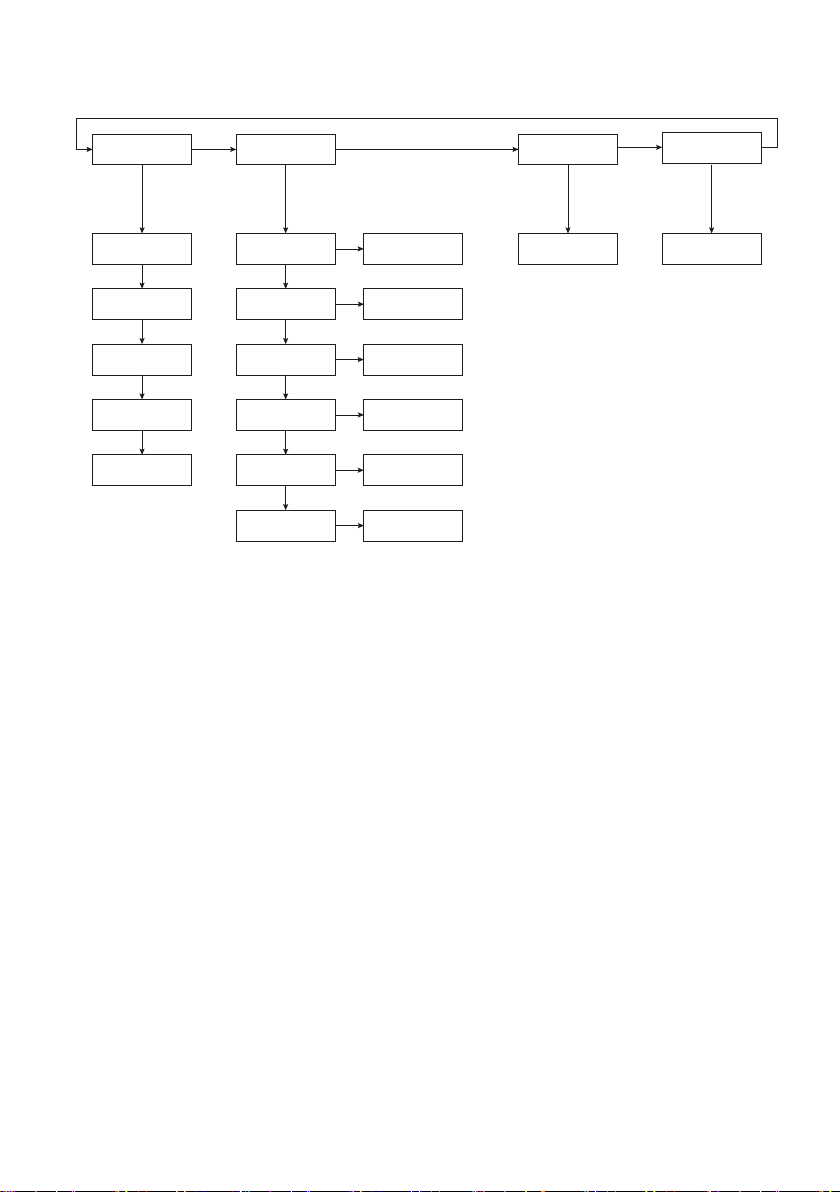
Structure du Menu
d001
d001 - d512
LoAd
rSt
EASy Pro
MAFA
MASL
SLAv
MStc
MStS
xxCH 9CH / 14CH
rPAn YES/NO
YES/NO
YES/NO
rtiL
rdiS
PAxx PA54/PA36/PA18
Ti27/Ti18/Ti09
Tixx
EASy Mode «Easy» , Facile
Pro Mode «PRO», pour utilisateur averti
LoAd Mode «RESET» , Remise à zéro
d001 Mode «DMX», pour utilisation avec contrôle DMX
MAFA Programme MASTER : AUTO Rapide (Fast)
MASL Programme MASTER : AUTO Lent (Slow)
SLAv Mode SLAVE : Mode Esclave
MStc Programme AUTO Rapide - Autre séquence de couleur- sans
fonction MASTER.
MStS Programme MASTER : AUTO Musical (Mouvements cadencés
au rythme de la musique).
xxCH Sélection du nombre de canaux DMX utilisés (9 ou 14 canaux).
rPAN Inversion de la rotation PAN
rtiL Inversion de la rotation TILT
rDIS Inversion du sens de lecture de l’écran d’achage
(tête en haut / tête en bas).
PAxx Sélection de l’angle total de rotation du PAN ( 540°/360°/180°).
Tixx Sélection de l’angle total de rotation du TILT (270°/180°/90°).
rST Remise à zéro des réglages de l’appareil.
d001 Adressage DMX

Utilisation / Mise en service
ATTENTION : Ne regardez jamais directement la source lumineuse, cela
pourrait causer des troubles de la vision.
Commencez par brancher le cordon secteur fourni, d’un côté à l’embase
d’alimentation de l’appareil (3), puis de l’autre côté à la prise secteur.
Pour une utilisation en mode AUTO, ne rien brancher sur les prises DMX
IN et OUT.
Pour une utilisation en DMX, brancher alors vos câbles DMX sur les
prises DMX IN (5) et DMX OUT (6).
Les réglages de l’appareil s’eectuent via un menu (voir page précédente)
accessible grâce aux touches MODE / ENTER / UP et DOWN.
Fonctionnement en mode AUTO - Sans contrôleur DMX
L’appareil dispose de plusieurs programmes AUTO pour une utilisation
simple et rapide.
1) Appuyez sur la touche MODE/ESC jusqu’à ce que l’achage indique :
EASy.
2) Appuyez sur la touche ENTER an de valider ce mode
3) Avec les touches UP&DOWN, sélectionnez le Mode de fonctionnement
voulu parmi les choix suivants: MAFA,MASL,MStc et MStS.
4) Appuyez sur la touche ENTER pour valider votre choix.
Note: Vous trouverez le détail de chaque Mode de fonctionnement à la
page précédente.

Fonctionnement en Mode Maître/Esclave
Le Mode Maître/esclave permet de créer un show avec plusieurs appa-
reils du même type très rapidement.
En eet, le 1er appareil désigné en tant que «maître» va prendre en
charge, de manière totalement synchrone, la gestion des autres appa-
reils (appareils esclaves).
Il vous sut pour cela de sélectionner un Mode Auto ou Musical sur
votre 1er appareil parmi les choix suivants: MAFA,MASL et MStS, et
de paramétrer vos appareils «esclaves» en mode SLAv.
Paramétrage de l’appareil «Maître»: voir le chapitre «Fonctionne-
ment en mode AUTO» ci dessus.
Paramétrage des appareils «Esclaves» :
1) Appuyez sur la touche MODE/ESC jusqu’à ce que l’achage in-
dique : EASy.
2) Appuyez sur la touche ENTER an de valider ce mode
3) Avec les touches UP&DOWN, sélectionner le Mode de fonctionne-
ment suivant: SLAv.
4) Appuyez sur la touche ENTER pour valider votre choix.
Fonctionnement en Mode DMX
Ce projecteur dispose de 14 canaux de commande DMX. Si toutes les
options de commande ne sont pas nécessaires, la BEEMOVE 7x10W
peut être commutée sur 9 canaux de commande DMX. (Pour cela , il
faut entrer dans le Mode Pro )
Vous trouverez les fonctions des canaux et les valeurs DMX dans le
tableau ci dessous.
Adressage DMX:
1) Appuyez sur la touche MODE/ESC jusqu’à ce que l’achage in-
dique : d001
2) Appuyez sur la touche ENTER an de valider ce mode
3) Avec les touches UP&DOWN, sélectionnez l’adresse DMX désirée
(001 à 512)
4) Appuyez sur la touche ENTER pour valider votre choix.
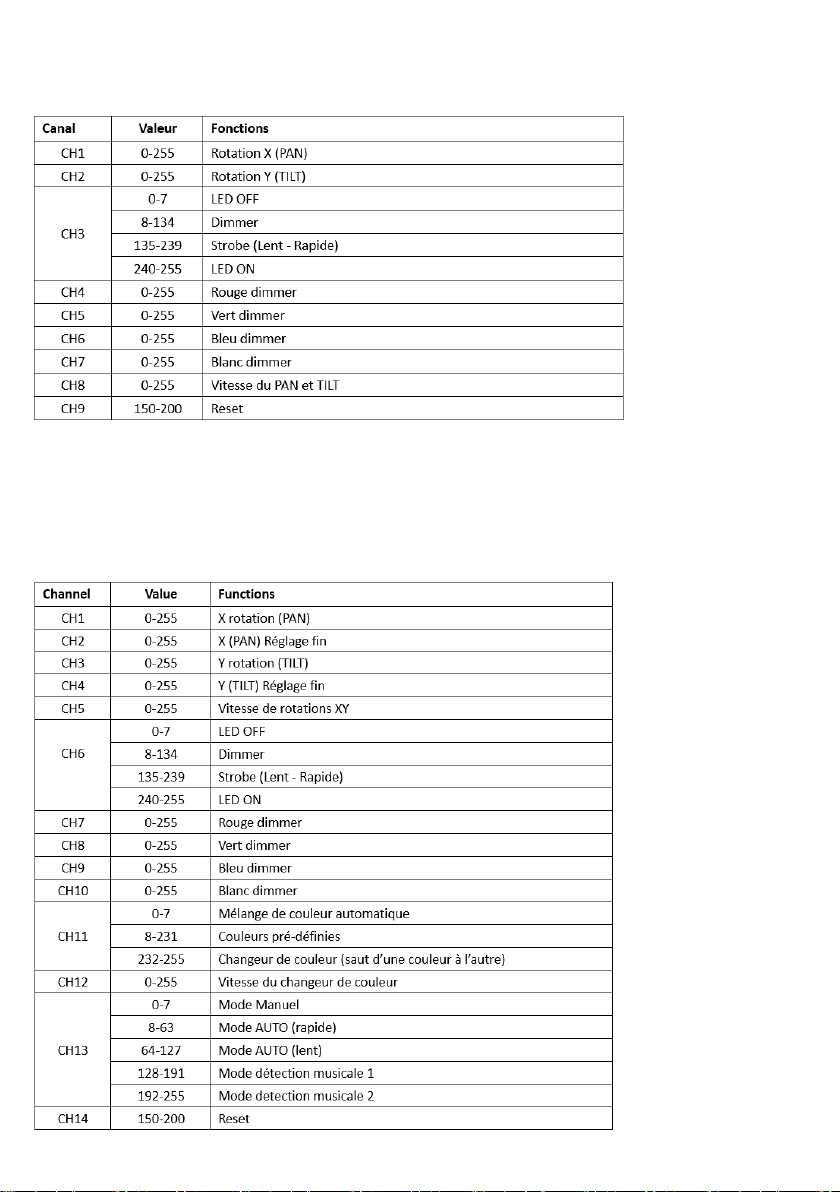
Mode 9 canaux DMX
Mode 14 canaux DMX

Mode Pro
Un mode Pro est disponible sur cet appareil. Dédieé aux utilisateurs
avertis, il permet le réglage avancé de plusieurs fonctions .
xxCH - Réglage du nombre de canaux DMX . 9 ou 14 canaux.
rPAn - Permet l’inversion du sens de rotation de l’axe X (PAN).
Très pratique pour obtenir un eet «miroir» du 2ème appareil,
paramétré en mode esclave.
rTILT - Permet l’inversion du sens de rotation de l’axe Y (TILT).
Très pratique pour obtenir un eet «miroir» du 2eme appareil,
paramétré en mode esclave.
rdiS - Permet de retourner l’achage de l’écran de contrôle. Très
pratique lorsque l’appareil est xé tête en bas.
PAxx - Sélection de l’angle total de rotation du PAN. Choix parmi
540°, 360° ou 180°.
TIxx - Sélection de l’angle total de rotation du TILT. Choix parmi
270°, 180° ou 90°.
Caractéristiques Techniques
Type: Lyre Wash à LED
Modes: Mode AUTO, MUSIC, Esclave et DMX
Nombres de canaux DMX: Sélectionnable 9 ou 14 canaux
Source lumineuse: 7 x LED 10W RGBW
Angle de diusion: 10°
Rotation PAN: 540° / 360° ou 180°
Rotation TILT: 270° / 180° ou 90°
Alimentation: 230V AV / 50Hz
Consomation Max.: 80W
Dimensions: 180x180x230 mm
Poids: 3Kg

Thank you for purchasing a BEESTAR product. For your own safety and
better use of this product, please read this manual carefully before using
this unit.
Packing list:
1 x LED Wash Moving Head
1 x Bracket with screws
1 x Power cord
1 x User manual
- Please keep this manual for future consultation.
- For safety reasons, the unit must be rmly installed.
- Do not cover the unit.
- This equipment must be installed by professional people and must be
xed away of touch of people.
- To prevent or reduce risk of electrical shock or re, do not expose the
xture to rain or moisture.
- Leave at least 1m distance between the unit and other objects.
- The user should comply with the instructions and warnings of this ma-
nual. Any damage which is caused by incorrect operation or not following
the manual, is not covered by the warranty.
- Do not disassemble or repair the system by yourself unless you are pro-
fessional . If there is any problem with your xture, please contact your
local dealer.
BEE STAR
BEEMOVE 7x10W. - Operating elements and connections
1 Controls
2 Display
3 Mains input
4Fuse holder
5 Input signal DMX (XLR
3 pins)
Pin 1 = ground, 2 = DMX-
, 3 = DMX+
6Output signal DMX
(XLR 3 pins)
Pin 1 = ground, 2 = DMX-
, 3 = DMX+
7Ring bolt for safety
cable
8 Bracket screws
9 Bracket
10 Microphone
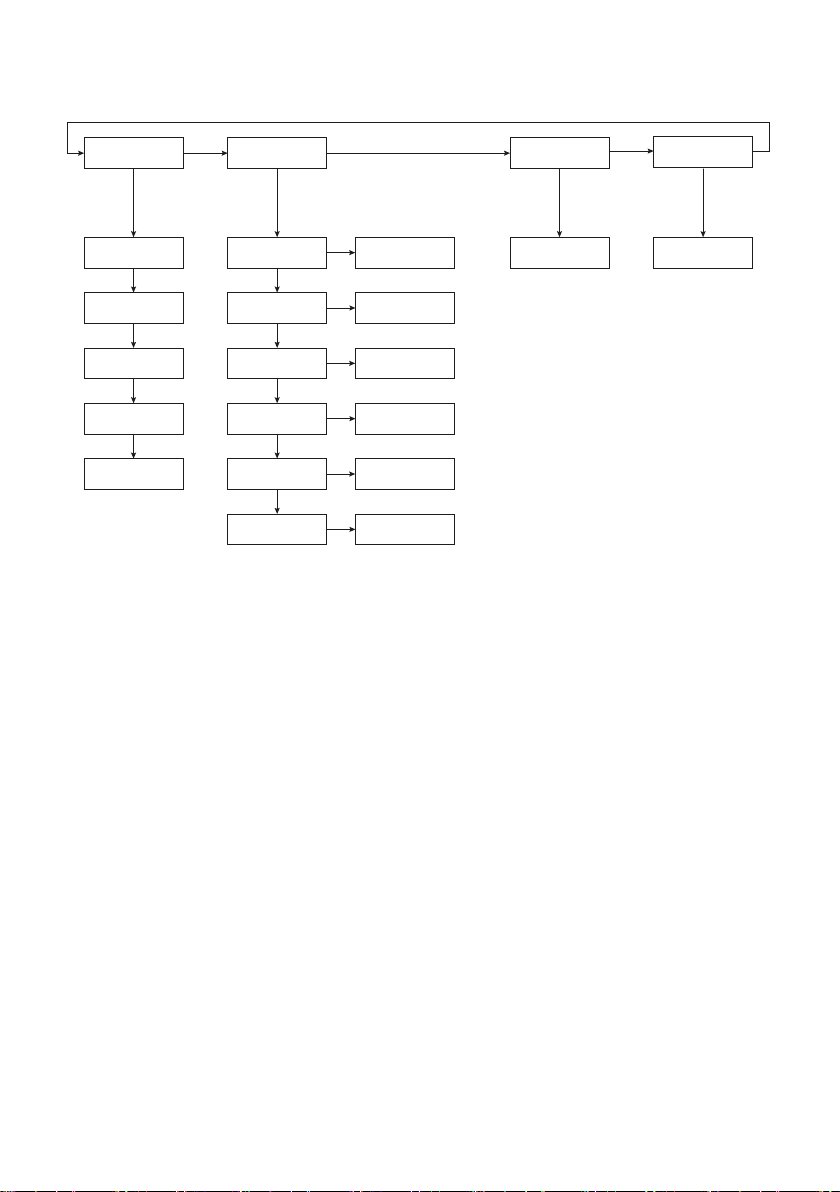
Menu structure
d001
d001 - d512
LoAd
rSt
EASy Pro
MAFA
MASL
SLAv
MStc
MStS
xxCH 9CH / 14CH
rPAn YES/NO
YES/NO
YES/NO
rtiL
rdiS
PAxx PA54/PA36/PA18
Ti27/Ti18/Ti09
Tixx
EASy Mode «Easy»
Pro Mode «PRO», for PRO users
LoAd Mode «RESET»
d001 Mode «DMX», to be used with DMX controller
MAFA MASTER Prog : AUTO (Fast)
MASL MASTER Prog : AUTO (Slow)
SLAv Mode SLAVE
MStc AUTO prog fast - More colors sequences- No Master function in this
mode.
MStS MASTER prog. Music detection.
xxCH Setting the number of DMX channels.(9 or 14 channels).
rPAN PAN reversed
rtiL TILT reversed
rDIS Display reversed ( upside down).
PAxx Setting the total PAN angle ( 540°/360°/180°).
Tixx Setting the total TILT angle (270°/180°/90°).
rST Reset.
d001 DMX addresses setting.

Operations
To prevent damage to your eyes, never look directly into the light
source.
Connect the mains cable provided to the mains jack (3) and then to a
socket (230 V~ / 50 Hz). The unit is then ready for operation and may
be operated via a DMX light controller or may independently execute the
control program that has been set.
For DMX control, connect DMX cables to DMX IN (5) et DMX OUT (6).
To dene the unit settings, use the system menu which can be operated
with the buttons (1) and the display (2). After power switch-on, the moving
head will rst conduct a reference move for position adjustment; then the
operating mode most recently set will be indicated on the display.
Auto Mode - without DMX controller
The unit provides automatic show programs, no need controller ! just
Plug&play.
1) Press the button MODE/ESC until the display indicates : EASy.
2) Press the button ENTER to conrm your choice.
3) Press the button UP&DOWN, select the desired mode: MAFA,-
MASL,MStc and MStS.
4) Press the button ENTER to conrm your choice.
Note: More details about Modes in previous page.

Master/Slave Mode
Multiple BEEMOVE 7x10W can be operated in sync.
In this mode, one unit (master unit) controls the other units (slave
units). Connect the units in a chain.
On the master unit, call up an automatic or music-controlled program.
1) Press the button MODE/ESC until the display indicates : EASy.
2) Press the button ENTER to conrm your choice.
3) Press the button UP&DOWN, select the desired mode: MAFA,-
MASL, and MStS.
4) Press the button ENTER to conrm your choice.
Proceed as follows to set the slave units to slave operation:
1) Press the button MODE/ESC until the display indicates: EASy.
2) Press the button ENTER to conrm your choice.
3) Press the button UP&DOWN, select the mode: SLAv.
4) Press the button ENTER to conrm your choice.
A slave unit may also be synchronously controlled in a mirror-inverted
way with regard to the master unit. For this, the pan and tilt directions
can be inverted. ( please check chapter «Pro Mode»)
DMX Mode
For operation via a DMX light controller, the BEEMOVE 7x10W is
equipped with 14 DMX control channels. If all control options are not
required or if the controller does not provide 14 control channels, the
BEEMOVE 7x10W may be switched to 9 DMX control channels.
Connect the control INPUT (5) to the DMX output of the light control-
ler or to the DMX output of another DMX-controlled unit. Connect the
control OUTPUT (6) to the control input of the following DMX-controlled
unit. Connect the output of this DMX-controlled unit to the input of the
following unit etc. until all DMX-controlled units have been connected in
a chain.


PRO Mode
The BEEMOVE 7x10W provides an «expert» Mode called «Pro Mode».
This menu allows the pro-user to modify some seetings.
xxCH- Setting the number of DMX Channels
rPAn - Inverting the PAN direction
rTILT - Inverting the TILT direction
rdIS - Rotating the display
PAxx - Limiting the PAN angle ( 540°/360° or 180°)
TIxx - Limiting the TILT angle ( 270°/180° or 90°)
Specications
Type: LED Wash Moving Head
Modes: Mode AUTO, MUSIC, Slave or DMX
Number of DMX channels: 9 or 14 DMX channels
Light Source: 7 x 10W LED RGBW
Beam angle: 10°
PAN angle: 540° / 360° / 180°
TILT angle: 270° / 180° / 90°
Power supply: 230V AV / 50Hz
Power consumption: 80W max.
Dimensions: 180x180x230mm
Weight: 3kg

BEE STAR
Imported by CONOR
9 Avenue du Canada
Les Ulis
91940 - FRANCE
Table of contents
Languages:
Popular Lighting Equipment manuals by other brands


Hamron
Hamron 005076 operating instructions

Acuity Brands
Acuity Brands LITHONIA LIGHTING AFFINITY AFB OELR manual

PR Lighting
PR Lighting PR-8836 manual

DIMON TECHNOLOGY
DIMON TECHNOLOGY LED Neon flex user manual

Raytec
Raytec RAYMAX RM200 installation instructions

Beamz professional
Beamz professional BAC508 Aluminium ProPar instruction manual

Golight
Golight RadioRay 2000 Instruction guide

Larson Electronics
Larson Electronics GAU-PT-150LTL-LED-480V instruction manual

Energetic
Energetic E6SLB Series installation instructions

Pfannenberg
Pfannenberg AB Operating and installation instruction

Marmitek
Marmitek LM12 user manual

Vision & Control
Vision & Control A-DIF-90x120-G525-SL Instructions for use