manuals.online logo
Brands
  1. Home
  2. •
  3. Brands
  4. •
  5. Pfannenberg
  6. •
  7. Lighting Equipment
  8. •
  9. Pfannenberg AB Assembly instructions

Pfannenberg AB Assembly instructions

085501826c 1/2
Betriebs- und Montageanleitung für Blitzleuchten: AB, WB, WB-Quick, WB-Ü, KBL, DWB, BLS
Operating and installation instruction for: AB, WB, WB-Quick, WB-Ü, KBL, DWB, BLS
Notice de montage et d'utilisation des lampes à éclairs AB, WB, WB-Quick, WB-Ü, KBL, DWB, BLS
1. Technische Daten * / Technical Data * / Caractéristiques techniques *
Haube Lens Calotte Polycarbonat (PC)
Gehäuse Housing Boîtier Aluminium (AlMgSi 1), gelb/ yellow / jaune
Betriebstemperatur Operating temperature Température service -40°C ... +55°C
WB-Ü: -20°C ... +50°C
Lagertemperatur Storage temperature Température de stockage -40°C ... +70°C
Schutzart Ingress protection Indice de protection IP 54 ( EN 60529 )
Blitzfolge Flashing frequency Fréquence d'éclair 60 /min = 1Hz
Blitzenergie Flashing power Energie d'éclair AB WB, WB..., BLS, KBL DWB
15J 5J 2,5J
Kabeleinführung Cable gland Entrée de câble M20x1,5
* Daten für Standardgeräte / Data valid for standard versions / Pour versions standards
2. Anwendung und Funktion
Blitzleuchten sind optische Gefahrenmelder für Arbeitsstätten. Es können optische Warn- und Notsignale bis zu einer Blitzenergie von
15 Joule erzeugt werden. Achtung: Um eine Beeinträchtigung des Sehvermögens zu verhindern, ist der dauernde, direkte Blick in die
aktivierte Leuchte zu vermeiden.
Die Blitzleuchten sind für den Einsatz sowohl in Gebäuden als auch im Freien konzipiert. Aggressive Umweltbedingungen, Schlagre-
gen und Betauung führen bei den Geräten zu keiner Schädigung. Innere Betauung ist zulässig. Gegen einen Einsatz bei 90% relati-
ver Luftfeuchte bestehen keine Bedenken.
2. Application and Function
The flashing lights are visual alarms designed for workplaces. They generate intermittent intensive flashes of light with an intensity of
up to 15 joules. Attention: In order to avoid damage to eyesight, please refrain from looking at the flashing light for any length of time
when it is in operation.
The flashing lights are designed for applications inside or outside buildings. Neither aggressive environmental conditions nor heavy
rain nor dew formation can cause damage. Internal dew formation is admissible. The equipment can be used without reservation for
applications with a relative humidity of 90%.
2. Fonction et utilisation
Les lampes à éclairs sont conçues pour résister aux conditions d’environnement industriel les plus sévères. Elles émettent à intervalle
régulier de puissants flashes jusqu'à 15 Joules, pour la signalisation de danger ou d’évacuation. Attention: Pour empêcher des lé-
sions des yeux, il faut éviter de fixer longuement la lampe allumée.
Ces lampes à éclairs conviennent aussi bien pour des applications à l’intérieur comme à l’extérieur. Elles résistent à tout type
d’environnement agressif, à la condensation, aux pluies battantes et aux chocs physiques. La formation de condensation à l’intérieur
de ces appareils est tolérée. Elles peuvent fonctionner dans une humidité relative de 90 %.
3. Montage
Die Blitzleuchten werden vorzugsweise mit Schrauben oder Gleichwertigem auf der Montagefläche befestigt. Das Gehäuse und der
Befestigungswinkel bestehen aus eloxiertem Aluminium.
3. Installation
The best method of installing the flashing lights is to mount them at their final location using bolts or similar fixing materials. The hous-
ing and the fixing brackets are made of aluminium.
3. Installation
La meilleure façon d’installer ces lampes à éclairs est d’utiliser des vis ou tout autre système de fixation identique. Le boîtier et
l’équerre de fixation sont en aluminium anodisé.
Montageschraube z. B.
242 KBL=190
50
40
65 2x M6x20
Ø80
Ø6,5
84
M20x1,5
200
50
36
Ø54
Ø6,5
30 64
M20x1,5
fixing bolt e.g.
vis de fixation p. ex.
ABL/ABS, KBL, BLS, WBL-Ü / WBS-Ü
WBL-Quick / WBS-Quick WBL / WBS
DWBL / DWBS
085501826c 2/2
4. Inbetriebnahme
Der elektrische Anschluss darf nur von hierfür autorisierten Personen durchgeführt werden. Vor Öffnen des Gehäuses 15 Minuten
warten! Vor dem Anschließen ist sicherzustellen, dass die Leuchte nicht unter Spannung steht.
Durch Lösen der beiden seitlichen Kreuzschlitzschrauben lässt sich das Gehäuse nach oben hin abheben. Bei den Wechselspan-
nungsgeräten ist dabei auf die Erdungsleitung zwischen Gehäuse und Platine zu achten.
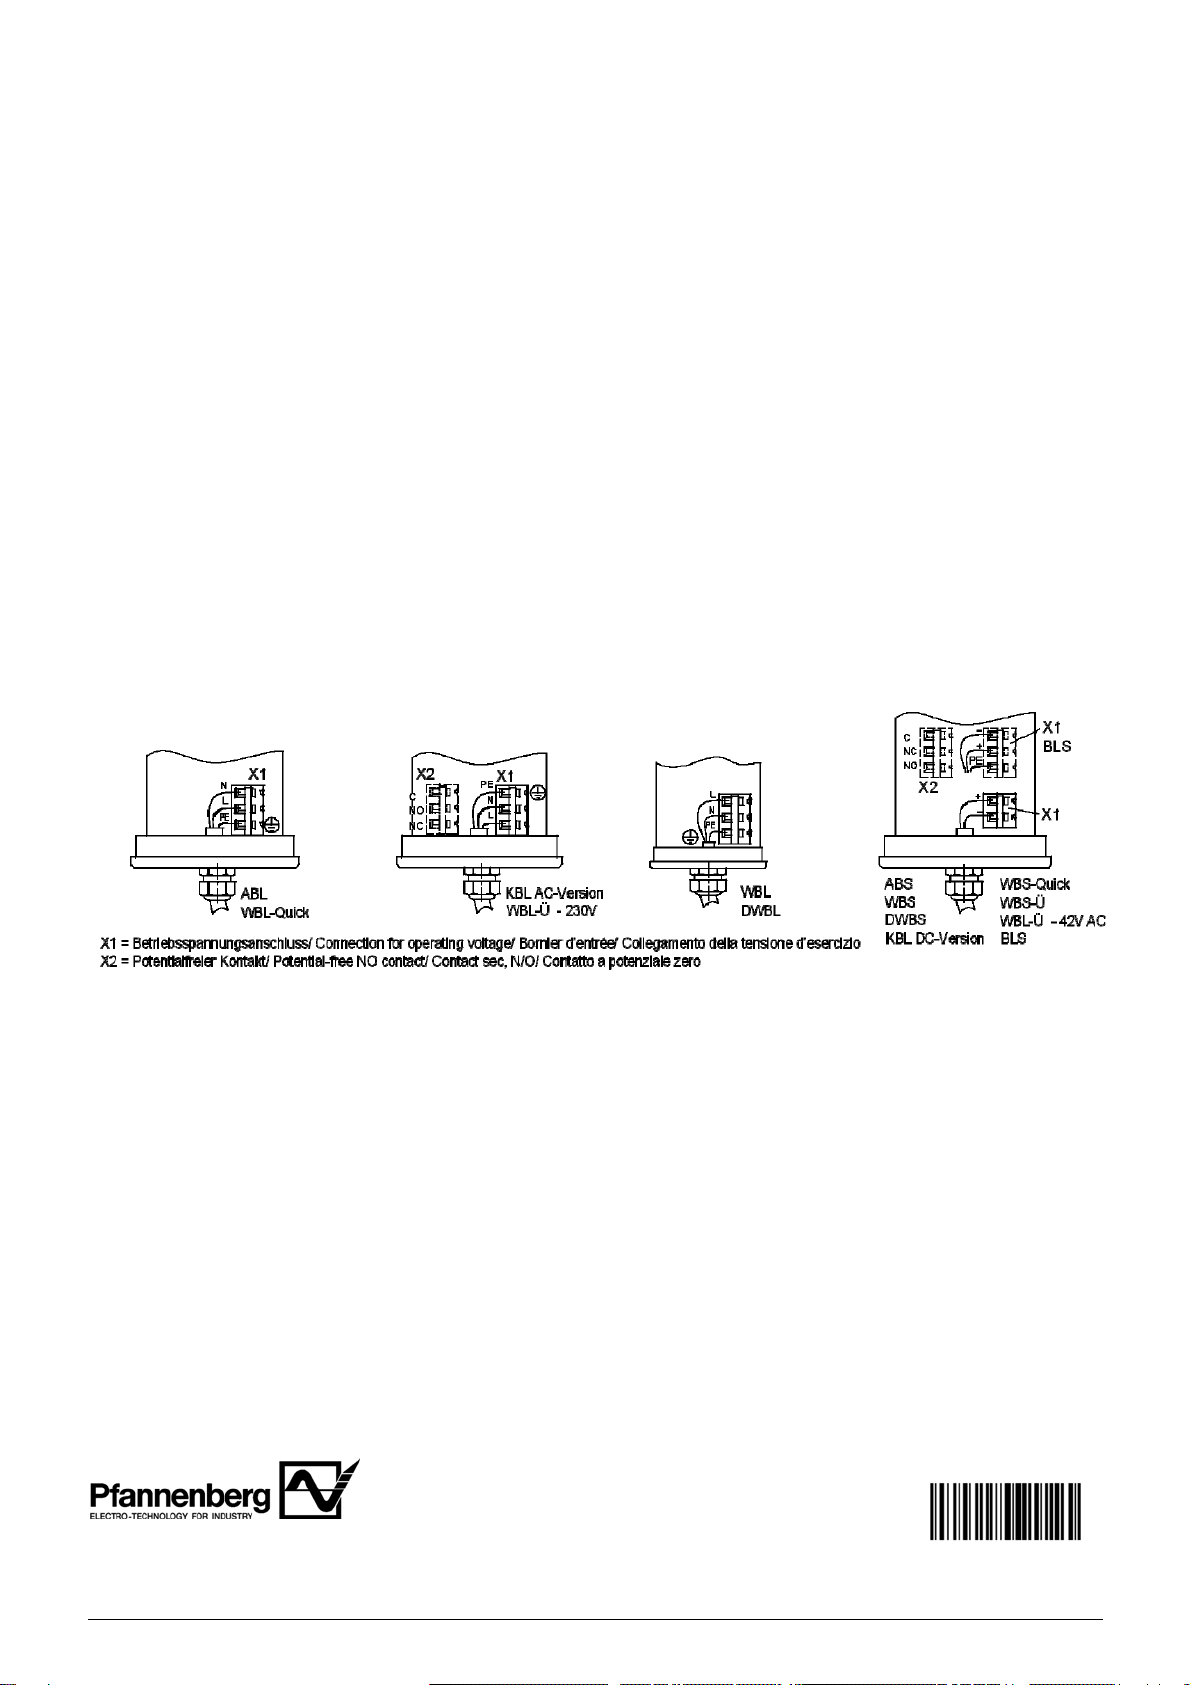
Die Blitzleuchten mit integrierter Überwachungsfunktion (WBL-Ü, WBS-Ü) verfügen über einen potentialfreien Umschaltkontakt, der
auf eine dreipolige Klemme (X2) herausgeführt wird. Das Schaltvermögen der Auswerteelektronik beträgt 230V 2A.
Bei der Installation ist darauf zu achten, dass die Anschlussleitung gegen Zug und Verdrehen abgesichert ist. Bitte beachten: Die
Geräte sind nicht für einen ortsveränderlichen Einsatz bestimmt.
DC-Spannung: Das Gerät ist mit einem Verpolungsschutz ausgestattet. Keine Funktion bei Verpolung der Anschlüsse!
4. Taking into Operation
The flashing light may only be connected to the electricity supply by a suitably authorized person. Wait 15 minutes before opening the
housing. Prior to connection, it must be ensured that no voltage is applied to the flashing light.
You can detach the housing in an upward movement after removing the 2 Phillips screws. When working on AC-voltage lights, watch
for the earth conductor between housing and pcb.
For the flashing lights with integrated flash monitoring system (WBL-Ü, WBS-Ü) there is a potential-free NO contact (X2) available.The
make-and-break capacity of fault indication amounts to 230 V, 2A.
During installation it must be ensured that the connection cables are secured against tension and distortion. Please observe: The
devices are not designed for portable use.
DC voltage: The device is provided with a reverse polarity protection. No function when polarity is reversed !
4. Mise en route
Les lampes à éclairs ne doivent être câblées que par une personne habilitée. Attendre 15 minutes avant d’ouvrir le boîtier. Avant la
connexion, s’assurer que l’appareil n’est pas sous tension.
Pour désolidariser le boîtier du circuit, il suffit de dévisser les deux vis situées sur le boîtier. Pour une application en courant alternatif,
s’assurer que le conducteur correspondant à la terre relie bien le circuit au boîtier.
Les lampes à éclairs avec monitoring de flash intégré (WBL-Ü, WBS-Ü) sont pourvues d'un contact sec, N/O (X2). Le pouvoir de
coupure de la sortie "défault" est de 2A sour 230V CA.
Lors de l’installation it faut prévoir un dispositif de protection contre les forces de tension et de torsion sur le câble. Attention: Les
appareils n’ont pas été conçus en tant qu’appareils portables.
Tension continue: La lampe est équipée avec une protection contre l'inversion de polarité. Pas de fonction en cas de l‘inversion de la
polarité!
Nach Anschluss der Betriebsspannung, Aufsetzen und Befestigung des Gehäuses ist die Blitzleuchte einsatzbereit. Mit einem sich
anschließenden Test ist die einwandfreie Funktion sicherzustellen.
After connecting it to the power supply and fixing/tightening the housing in place, the flashing light is ready for operation.
A subsequent test is made to ensure satisfactory functional integrity.
Après le câblage et la fixation, l’appareil est prêt à fonctionner. Réaliser un test pour s’assurer du bon fonctionnement.
5. Wartung, Service, Ersatzteilbeschaffungm
Die Blitzleuchte ist weitgehend wartungsfrei.
Die Haube aus Polycarbonat darf nur mit Wasser und einem Hand-Spülmittel gereinigt werden.
Reparaturen sind grundsätzlich im Herstellerwerk auszuführen. Der Austausch von Originalersatzteilen kann durch entsprechend
qualifizierte Personen durchgeführt werden.
5. Maintenance, Service and Ordering Spare Parts
The flashing light is extensively maintenance-free.
The polycarbonate globe may only be cleaned with water and a mild detergent solution.
As a principle, repairs are to be carried out at the manufacturer’s factory. Parts (only use original spare parts) can be replaced by
suitably qualified personnel.
5. Maintenance, Service, Pièces détaches
Les lampes à éclairs ne nécessitent pas de maintenance.
La calotte en polycarbonate peut être nettoyée à l’eau et au détergent.
Les réparations doivent en principe être effectuées chez le fabricant. Les pièces détachémes (n’utilisez que des pièces d’origine)
peuvent être remplacées, l’opération étant faite par une personne qualifiée.
Pfannenberg GmbH
Werner-Witt-Straße 1 ·D- 21035 Hamburg 7600-004-4c 01/2018
Tel.: +49/ (0)40/ 734 12-0 ·Fax: +49/ (0)40/ 734 12-101 Technische Änderungen, die dem Fortschritt dienen, vorbehalten.
[email protected] We reserve the right to make any technical alterations in the interests of improvement.
http://www.pfannenberg.com Nous nous réservons le droit de modifier certaines des caractéristiques ci-dessus selon l'évolution des normes et des techniques.

This manual suits for next models

6

Other Pfannenberg Lighting Equipment manuals

Pfannenberg Quadro-LED HI User manual

Pfannenberg

Pfannenberg Quadro-LED HI User manual

Pfannenberg BE BG05E-P Series User manual

Pfannenberg

Pfannenberg BE BG05E-P Series User manual

Pfannenberg Quadro-LED HI Assembly instructions

Pfannenberg

Pfannenberg Quadro-LED HI Assembly instructions

Pfannenberg PY X-M-05 User manual

Pfannenberg

Pfannenberg PY X-M-05 User manual

Pfannenberg PY L-S User manual

Pfannenberg

Pfannenberg PY L-S User manual

Pfannenberg PY L-S-TL User manual

Pfannenberg

Pfannenberg PY L-S-TL User manual

Pfannenberg BR 50 Manual

Pfannenberg

Pfannenberg BR 50 Manual

Pfannenberg Quadro LED-RGB-3G/3D Original instructions

Pfannenberg

Pfannenberg Quadro LED-RGB-3G/3D Original instructions

Pfannenberg Quadro LED-TL User manual

Pfannenberg

Pfannenberg Quadro LED-TL User manual

Pfannenberg PY L-S-TL User manual

Pfannenberg

Pfannenberg PY L-S-TL User manual

Pfannenberg Quadro LED-RGB-3G/3D User manual

Pfannenberg

Pfannenberg Quadro LED-RGB-3G/3D User manual

Pfannenberg Quadro-LED Flex-3G/3D User manual

Pfannenberg

Pfannenberg Quadro-LED Flex-3G/3D User manual

Pfannenberg ABL User manual

Pfannenberg

Pfannenberg ABL User manual

Pfannenberg PMF 2015-M Product guide

Pfannenberg

Pfannenberg PMF 2015-M Product guide

Popular Lighting Equipment manuals by other brands

Utilitech FSI UT-201-1200BRZ quick start guide

Utilitech

Utilitech FSI UT-201-1200BRZ quick start guide

Westfalia WeteLux 96 76 78 instruction manual

Westfalia

Westfalia WeteLux 96 76 78 instruction manual

Beamz professional BAC508 Aluminium ProPar instruction manual

Beamz professional

Beamz professional BAC508 Aluminium ProPar instruction manual

SWS 82 Series quick start guide

SWS

SWS 82 Series quick start guide

Rollei Lumen Stick manual

Rollei

Rollei Lumen Stick manual

Lightronics FXLE3030W owner's manual

Lightronics

Lightronics FXLE3030W owner's manual

PROLED FLEX STRIP manual

PROLED

PROLED FLEX STRIP manual

LUMEN CENTER ITALIA HINODE Assembly instructions

LUMEN CENTER ITALIA

LUMEN CENTER ITALIA HINODE Assembly instructions

American DJ mace User instructions

American DJ

American DJ mace User instructions

Good Earth Lighting AC1214-WHG-24LF1-G quick start guide

Good Earth Lighting

Good Earth Lighting AC1214-WHG-24LF1-G quick start guide

V-TAC VT-ST42 Installation instruction

V-TAC

V-TAC VT-ST42 Installation instruction

Philips 100LT instructions

Philips

Philips 100LT instructions

Color Sage CS-B144B user manual

Color Sage

Color Sage CS-B144B user manual

Lightolier Lytespan 8239 specification

Lightolier

Lightolier Lytespan 8239 specification

SWS 166 Series instructions

SWS

SWS 166 Series instructions

ACME Sunrise user manual

ACME

ACME Sunrise user manual

Whelen Engineering Company Towman's Liberty Series installation guide

Whelen Engineering Company

Whelen Engineering Company Towman's Liberty Series installation guide

EuroLite LED DMX FLASH user manual

EuroLite

EuroLite LED DMX FLASH user manual

manuals.online logo
manuals.online logoBrands
  • About & Mission
  • Contact us
  • Privacy Policy
  • Terms and Conditions

Copyright 2025 Manuals.Online. All Rights Reserved.