Beemo BeeBox 503 User manual

User manual
Version 3.08

Remarks, Notes and Warnings
REMARK : The word REMARK refers to important information to help you to use the ’Data
Safe Restore’ solution in the most appropriate manner.
NOTE : The word NOTE indicates a potential risk to equipment, operation malfunction, or
potential data loss.
WARNING : The word WARNING indicates a hazard that can lead to property damage,
physical damage, or even death.
The information contained here is subject to change without notice.
Names and brands in this document : Beemo Technologie , Beemo appliancerand Data Safe Restorerare trade-
marks of Beemo Technologie. Microsoftr, Windowsr, Exchanger, Mac OSr, AIXr, Solarisrand Javarbelong to
their respective owners.
Reproduction in any manner without permission from Beemo Technologie is strictly forbidden.
Beemo Technologie
SAS with 849 680 Euro capital.
R.C.S. Montpellier 444 063 705
2656 Avenue Georges Frêche
34470 Pérols France

Safety instructions
Use the following safety instructions to ensure your personal safety and protect your system and your working envi-
ronment from possible damage.
WARNING : the Beemo appliance must be connected to an electrical outlet that is properly
grounded.
•the Beemo appliance’s power cord must be connected to an easily accessible nearby
electrical socket.
•For maintenance and repair work other than that described in the operating instruc-
tions, please contact Beemo Technologie or an approved reseller.
•In any case, opening or disassembling the Beemo appliance is strictly forbidden and
will void the warranty.
WARNING : To safely move the Beemo appliance , you must switch it off through the user
interface, unplug the ethernet cable and remove the power cord from the electrical socket.

Table of contents
1 Setting up the Beemo appliance 1
1.1 Hardware set-up . . . . . . . . . . . . . . . . . . . . . . . . . . . . . . . . . . . . . . . . . . . . . . . . 1
2 Initial network set-up 2
2.1 Set-up from a Windows computer . . . . . . . . . . . . . . . . . . . . . . . . . . . . . . . . . . . . . . . 2
2.2 Set-up from a GNU/Linux computer . . . . . . . . . . . . . . . . . . . . . . . . . . . . . . . . . . . . . 3
2.3 Set-up from a MacOS computer . . . . . . . . . . . . . . . . . . . . . . . . . . . . . . . . . . . . . . . 3
3 Installing Data Safe Restore Client 4
3.1 Downloading Data Safe Restore Client . . . . . . . . . . . . . . . . . . . . . . . . . . . . . . . . . . . . 4
3.2 Windows Installation . . . . . . . . . . . . . . . . . . . . . . . . . . . . . . . . . . . . . . . . . . . . . . 5
3.3 MacOS installation . . . . . . . . . . . . . . . . . . . . . . . . . . . . . . . . . . . . . . . . . . . . . . . 7
3.4 GNU/Linux installation . . . . . . . . . . . . . . . . . . . . . . . . . . . . . . . . . . . . . . . . . . . . . 9
3.5 SCO installation . . . . . . . . . . . . . . . . . . . . . . . . . . . . . . . . . . . . . . . . . . . . . . . . 9
3.6 Solaris installation . . . . . . . . . . . . . . . . . . . . . . . . . . . . . . . . . . . . . . . . . . . . . . . 10
3.7 AIX 4.3+ installation . . . . . . . . . . . . . . . . . . . . . . . . . . . . . . . . . . . . . . . . . . . . . . 10
3.8 ESX 4.0+ installation . . . . . . . . . . . . . . . . . . . . . . . . . . . . . . . . . . . . . . . . . . . . . . 11
3.9 ESXi 4.1+ installation . . . . . . . . . . . . . . . . . . . . . . . . . . . . . . . . . . . . . . . . . . . . . 11
3.10 ESX/ESXi hypervisor setup . . . . . . . . . . . . . . . . . . . . . . . . . . . . . . . . . . . . . . . . . . 12
4 The administration console of the Beemo appliance 14
4.1 Connection to the administration console of the Beemo appliance .................... 14
4.2 Presentation of the administration console . . . . . . . . . . . . . . . . . . . . . . . . . . . . . . . . . . 15
4.2.1 Adding and removing rows . . . . . . . . . . . . . . . . . . . . . . . . . . . . . . . . . . . . . . 16
4.2.2 Sorting the list of backupsets . . . . . . . . . . . . . . . . . . . . . . . . . . . . . . . . . . . . . 16
4.2.3 Detail of the list of backupsets . . . . . . . . . . . . . . . . . . . . . . . . . . . . . . . . . . . . 17
5 Configuring the the Beemo appliance 19
5.1 System settings . . . . . . . . . . . . . . . . . . . . . . . . . . . . . . . . . . . . . . . . . . . . . . . . . 19
5.2 Network settings . . . . . . . . . . . . . . . . . . . . . . . . . . . . . . . . . . . . . . . . . . . . . . . . 20
5.3 Maintenance . . . . . . . . . . . . . . . . . . . . . . . . . . . . . . . . . . . . . . . . . . . . . . . . . . 22
5.4 Network drives . . . . . . . . . . . . . . . . . . . . . . . . . . . . . . . . . . . . . . . . . . . . . . . . . 23
6 Backupsets 24
6.1 Creating the first backupset. . . . . . . . . . . . . . . . . . . . . . . . . . . . . . . . . . . . . . . . . . . 24
6.1.1 Information . . . . . . . . . . . . . . . . . . . . . . . . . . . . . . . . . . . . . . . . . . . . . . . 24
6.1.2 Storage destination . . . . . . . . . . . . . . . . . . . . . . . . . . . . . . . . . . . . . . . . . . 26
6.1.3 Scheduler . . . . . . . . . . . . . . . . . . . . . . . . . . . . . . . . . . . . . . . . . . . . . . . . 27
6.1.4 User access . . . . . . . . . . . . . . . . . . . . . . . . . . . . . . . . . . . . . . . . . . . . . . 27
6.1.5 Local network security . . . . . . . . . . . . . . . . . . . . . . . . . . . . . . . . . . . . . . . . . 28
6.1.6 Backup Scripts . . . . . . . . . . . . . . . . . . . . . . . . . . . . . . . . . . . . . . . . . . . . . 28
6.1.7 Data Versionning Rules . . . . . . . . . . . . . . . . . . . . . . . . . . . . . . . . . . . . . . . . 28
6.1.8 Add ................................................... 29
6.2 Creating an additional backupset . . . . . . . . . . . . . . . . . . . . . . . . . . . . . . . . . . . . . . . 29
6.3 Selecting the data to be backed up . . . . . . . . . . . . . . . . . . . . . . . . . . . . . . . . . . . . . . 29
6.4 Advanced filters . . . . . . . . . . . . . . . . . . . . . . . . . . . . . . . . . . . . . . . . . . . . . . . . . 32
7 Restoring Data 34
7.1 Basic restoration . . . . . . . . . . . . . . . . . . . . . . . . . . . . . . . . . . . . . . . . . . . . . . . . 34
7.2 Advanced restore . . . . . . . . . . . . . . . . . . . . . . . . . . . . . . . . . . . . . . . . . . . . . . . . 36
7.2.1 Version display . . . . . . . . . . . . . . . . . . . . . . . . . . . . . . . . . . . . . . . . . . . . . 36
7.2.2 Details.................................................. 36
Data Safe Restore User manual Version 3.08 Page i

7.2.3 Data filtering . . . . . . . . . . . . . . . . . . . . . . . . . . . . . . . . . . . . . . . . . . . . . . 36
8 Data deletion 38
9 Logs, Alerts 39
9.1 Consulting backup logs . . . . . . . . . . . . . . . . . . . . . . . . . . . . . . . . . . . . . . . . . . . . 39
9.2 Details on alert emails . . . . . . . . . . . . . . . . . . . . . . . . . . . . . . . . . . . . . . . . . . . . . 40
10 Backing up Microsoft Exchange 42
10.1Foreword .................................................... 42
10.2 Requirements and limitations . . . . . . . . . . . . . . . . . . . . . . . . . . . . . . . . . . . . . . . . . 42
10.3Backup ..................................................... 43
11 Disk image backup 45
11.1 Setting up image backup . . . . . . . . . . . . . . . . . . . . . . . . . . . . . . . . . . . . . . . . . . . 45
11.2 Restore an image backup . . . . . . . . . . . . . . . . . . . . . . . . . . . . . . . . . . . . . . . . . . . 45
11.2.1 Full disk restore mode . . . . . . . . . . . . . . . . . . . . . . . . . . . . . . . . . . . . . . . . . 46
11.2.2 Volume restore mode . . . . . . . . . . . . . . . . . . . . . . . . . . . . . . . . . . . . . . . . . 47
11.2.3 Partition table restore mode . . . . . . . . . . . . . . . . . . . . . . . . . . . . . . . . . . . . . . 48
11.2.4 Delete partitions . . . . . . . . . . . . . . . . . . . . . . . . . . . . . . . . . . . . . . . . . . . . 49
11.3 Using Flash Rescue to restore the system . . . . . . . . . . . . . . . . . . . . . . . . . . . . . . . . . 50
12 Files attributes management (ACL) 54
13 Open File Support (VSS) 55
14 Shared Folders (NAS option) 56
14.1 Configuration of the Beemo appliance NAS . . . . . . . . . . . . . . . . . . . . . . . . . . . . . . . . 56
14.2 Backing up the Beemo appliance ...................................... 57
A Assistance and contacts 59
B Legal 60
Data Safe Restore User manual Version 3.08 Page ii

Chapter 1
Setting up the Beemo appliance
1.1 Hardware set-up
Upon unpacking check the contents of the box. It should contain :
•The Beemo appliance
•One power cord
•One Ethernet cable
•The installation CD
•The quick installation guide
1. Setup the Beemo appliance in a properly ventilated and cool location.
2. Connect the power cord to an appropriate electrical socket and to the location specified on the Beemo ap-
pliance (①Figure 1.1),
3. Connect the Ethernet cable to your switch or router and to the location specified on the Beemo appliance (
②Figure 1.1),
4. Press the power button ( ③Figure 1.1),the the Beemo appliance starts up.
FIGURE 1.1 – Front and back views of the Beemo appliance
REMARK : It is best to use the Ethernet cable supplied with the Data Safe Restore solution.
In any case, a category 5 straight Ethernet cable must be used.
Data Safe Restore User manual Version 3.08 Page 1

Chapter 2
Initial network set-up
Network prerequisites : the Beemo appliance ships without a predefined IP address. It must be connected to a
TCP/IP network via an ethernet cable. You will need to assign a fixed IP address to the Beemo appliance and
supply the subnet mask,the internet gateway’s IP address (router) and the DNS server’s IP address. If your
internet connection is protected by a firewall, outgoing connexions from the Beemo appliance on TCP port 6666
and UDP port 123 must be enabled.
REMARK : You must have previously connected the Beemo appliance to the network and
turned it on according to chapter 1.
2.1 Set-up from a Windows computer
1. On a computer running Windows and connected to the same network as the Beemo appliance, insert the
"installation CD". The Beemo appliance setup program ("BeemoFirstConfiguration.exe") is then automatically
launched (autorun) and the ’Beemo First Configuration’ window is displayed (Figure 2.1).
FIGURE 2.1 – Set-up window ’Beemo First Configuration’
REMARK : If the ’Beemo First Configuration’ window is not displayed automatically after
a few seconds, run the application manually from the content of the CD. You must be the
system administrator for the ’BeemoFirstConfiguration.exe’ application to work correctly.
Data Safe Restore User manual Version 3.08 Page 2

2. Fill out all the fields, then click on Configure Beemo Appliance (Figure 2.1). The operation can take several
minutes.
3. A dialog box is displayed, indicating the success or failure of the the Beemo appliance setup.
If Figure 2.2 is visible, the Beemo appliance is ready to perform backups of servers and workstations on your
network.
If Figure 2.3 is visible, check that the Beemo appliance is turned on and connected to the network, check your
network settings, your license number and make sure port TCP 6666 is indeed open then rerun the ’Beemo
First Configuration’ .
FIGURE 2.2 – ’Beemo First Configuration’ succeeded
FIGURE 2.3 – ’Beemo First Configuration’ failed
2.2 Set-up from a GNU/Linux computer
In a terminal window, run the backup client in command line mode with the following settings : --detect ’Licence
number’ ’IP Address’ ’Subnet mask’ ’Gateway’ ’DNS’
Using the example in Figure 2.1, the command line would be :
# /usr/local/dsr/dsr --detect 6606010999 192.168.1.108 255.255.255.0 192.168.1.254
192.168.1.254
2.3 Set-up from a MacOS computer
In a terminal window, run the backup client in command line mode with the following settings : --detect ’Licence
number’ ’IP Address’ ’Subnet mask’ ’Gateway’ ’DNS’
Using the example in Figure 2.1, the command line would be :
# /Applications/Data\ Safe\ Restore/dsr --detect 6606010999 192.168.1.108
255.255.255.0 192.168.1.254 192.168.1.254
Data Safe Restore User manual Version 3.08 Page 3

Chapter 3
Installing Data Safe Restore Client
Data Safe Restore is a multi-station, multi-platform network backup solution. To back up a machine, you must first
install a backup client on this machine. This software is specific to the operating system of the machine to be backed
up. Please follow the procedure pertaining to your operating system.
3.1 Downloading Data Safe Restore Client
1. On the machine you wish to back up, open a web browser and enter the IP address of the Beemo appliance (Fi-
gure 3.1).
2. Click on the Data Safe Restore Client icon corresponding to the operating system of the machine you wish to
back up (Figure 3.1).
FIGURE 3.1 – Home page
Data Safe Restore User manual Version 3.08 Page 4

3.2 Windows Installation
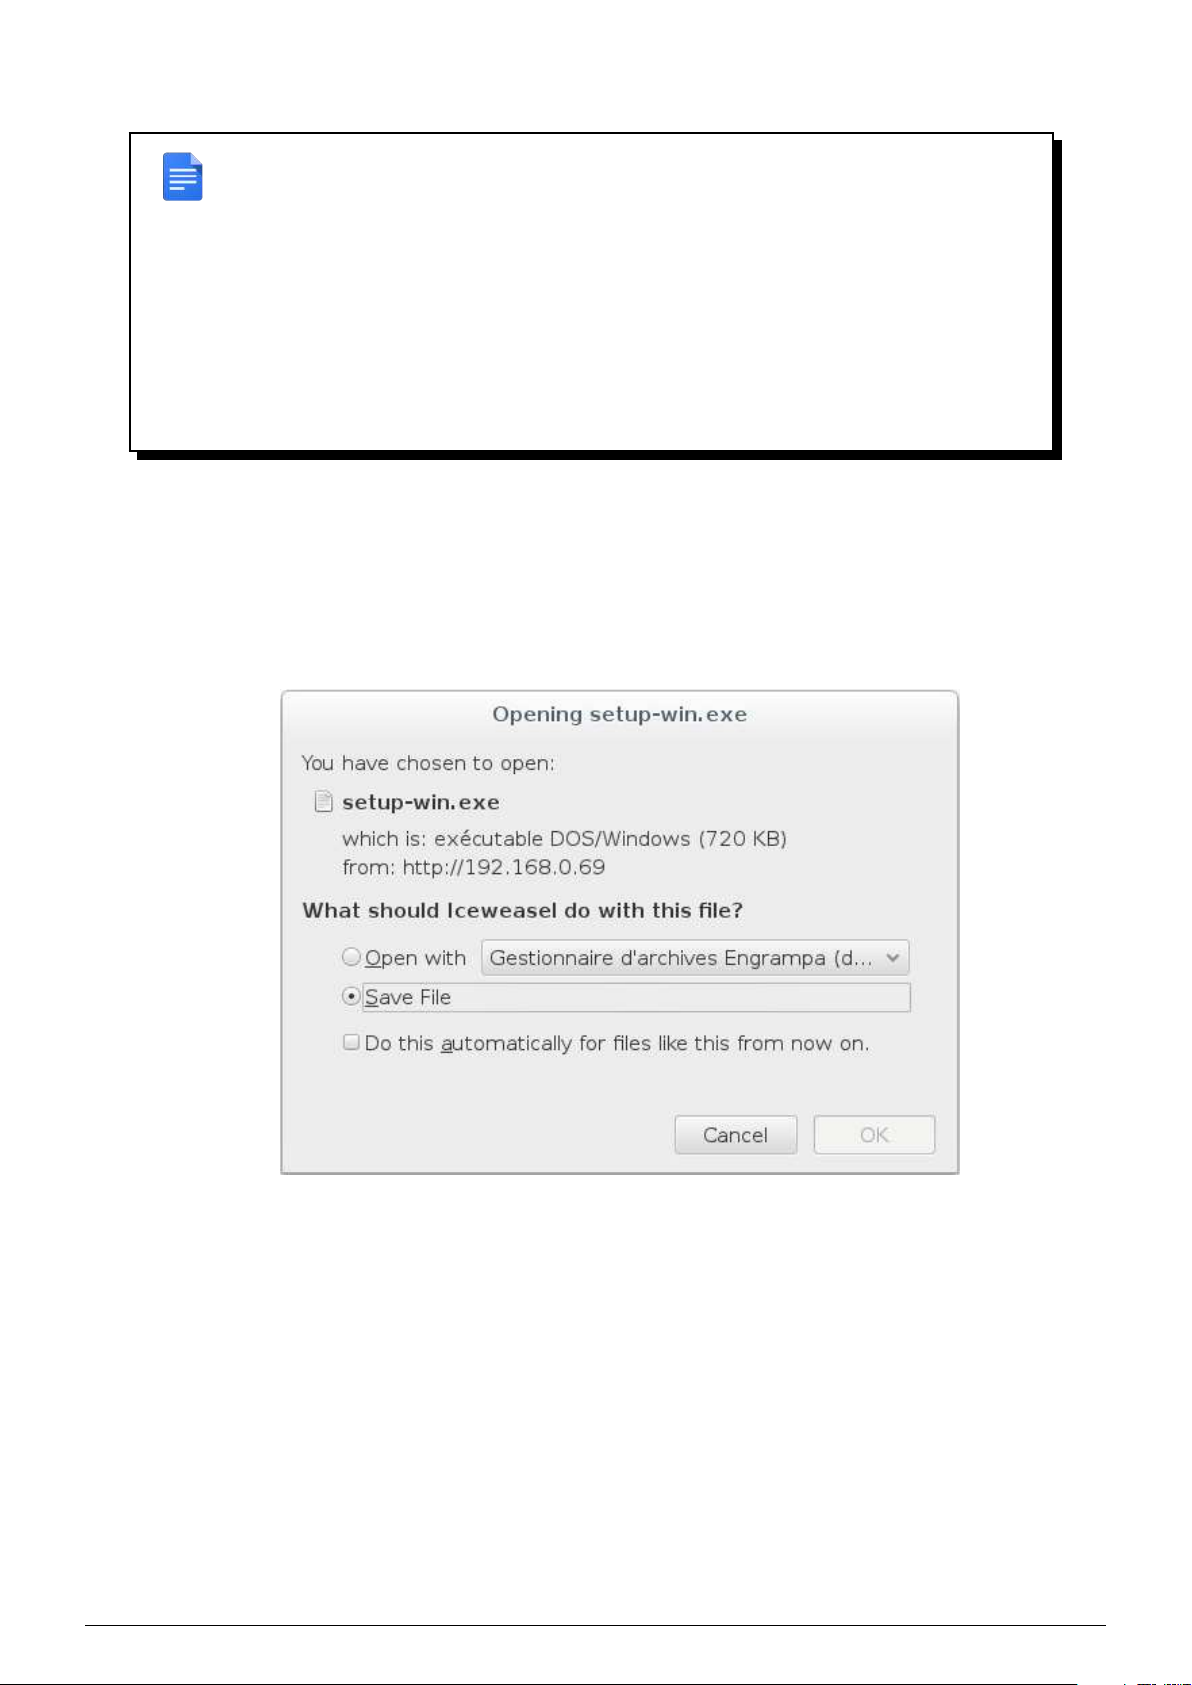
1. Click on the Windows icon on the home page (Figure 3.1), Once the setup-win.exe file is downloaded, execute
it : a dialog box (Figure 3.2) asks you to authorize this app to make changes to your PC, click ’Yes’.
FIGURE 3.2 – Downloading the Windows client
2. Select the client’s installation path (c :\Program Files (x86)\Data Safe Restore\ is the default) then click on
’Install’.
FIGURE 3.3 – Select the installation path
Data Safe Restore User manual Version 3.08 Page 5

3. The installation is performed (Figure 3.4), wait for the client’s icon to be displayed in your taskbar (Figure 3.5).
FIGURE 3.4 – Installing the Windows client
4. The installation is complete, click Close (Figure 3.4).
FIGURE 3.5 – Data Safe Restore Client installed
Data Safe Restore User manual Version 3.08 Page 6

3.3 MacOS installation
1. Click on the MacOS icon on the home page (Figure 3.1), a dialog box (Figure 3.6) prompts you to ’Open with’
or ’Save the file’, choose Open with DiskImageMounter.app.
FIGURE 3.6 – Downloading the MacOS client
2. Click the icon ’Install Universal.mpkg’ to start the installation.
FIGURE 3.7 – Downloading the MacOS client (cont’d)
Data Safe Restore User manual Version 3.08 Page 7

3. Click on Continue.
FIGURE 3.8 – Installing the MacOS client
4. Select the installation disk then click on Continue.
FIGURE 3.9 – Installing the MacOS client (cont’d)
5. The installation is complete, click on ’Close’.
Data Safe Restore User manual Version 3.08 Page 8
3.4 GNU/Linux installation
REMARK : If your GNU/Linux machine does not have a graphical interface, you can down-
load the file by typing in a console :
# wget http://{IP of the Beemo appliance}/exe/setup-lin.tgz
or, if your don’t have wget command :
# curl -O http://{IP of the Beemo appliance}/exe/setup-lin.tgz
1. Click on the Linux icon, save the ’setup-lin.tgz’ file on your GNU/Linux machine from the dialog box displayed,
then in a console, type the following commands :
# tar -vxzf setup-lin.tgz
# cd dsr_linux
# sudo ./install.sh
FIGURE 3.10 – Downloading the Linux client
2. The installation is now complete. The Data Safe Restore Client is installed in the /usr/local/dsr folder and will
be run when you start up your machine (if you are running Ubuntu, Debian, RedHat, Suse or Mandrake). The
client start and stop script is installed in ’/etc/init.d/dsr’.
3.5 SCO installation
1. Click on the SCO icon, save the ’setup-sco.tar.Z’ file on your SCO machine. Then in an administrator console,
type the following commands :
# uncompress setup-sco.tar.Z
# tar -vxf setup-sco.tar
# cd dsr_sco
# ./install.sh
Data Safe Restore User manual Version 3.08 Page 9

REMARK : If your SCO machine does not have a graphical interface, you can download
the file by typing in a console :
# wget http://{IP of the Beemo appliance}/exe/setup-sco.tar.Z
2. The installation is now complete. The Data Safe Restore Client is installed in the /usr/local/dsr folder and will be
run when you start up your machine. The client start and stop script is installed in ’/etc/init.d/dsr’.
3.6 Solaris installation
1. Click on the Solaris icon, save the ’setup-solaris.tgz’ file on your Solaris machine. Then in an administrator
console, type the following commands :
# tar -vxzf setup-solaris.tgz
# cd dsr_solaris
# ./install.sh
REMARK : If your Solaris machine does not have a graphical interface, you can download
the file by typing in a console :
# wget http://{IP of the Beemo appliance}/exe/setup-solaris.tgz
2. The installation is now complete. The Data Safe Restore Client is installed in the /usr/local/dsr folder and will be
run when you start up your machine. The client start and stop script is installed in ’/etc/init.d/dsr’.
3.7 AIX 4.3+ installation
1. Click on the AIX icon, save the ’setup-aix.tgz’ file on your AIX machine from the dialog box displayed. Then in
an administrator console, type the following commands :
# gunzip setup-aix.tgz
# tar -vxf setup-aix.tar
# cd dsr_aix43
# ./dsr -v
The client returns the version number
# ./install.sh
REMARK : If your AIX machine does not have a graphical interface, you can download the
file by typing in a console :
# wget http://{IP of the Beemo appliance}/exe/setup-aix.tgz
Data Safe Restore User manual Version 3.08 Page 10

REMARK : If an error message is displayed when requesting the version, you must install
the zlib library by entering the commands :
# cp ./libz.a /usr/lib/
# ./install.sh
2. The installation is now complete. The Data Safe Restore Client is installed in the /usr/local/dsr folder and will
be run when you start up your machine. The client start and stop script is installed in ’/etc/rc.tcpip.dsr’.
3.8 ESX 4.0+ installation
1. Enable SSH access on your ESX host :<
•Connect to your ESX as root with Vsphere client
•Cliquez sur Users & Groups
•Right-click on a blank area and click Add
•Enter a username and password (8 characters in length)
•Select Grant shell access to this user and click OK
2. Login as root on your ESX host :
•Connect on the ESX host with an SSH client using previously created user
•Once connected, type "su -" then provide root password
3. Install Data Safe Restore Client :
# cd /tmp
# esxcfg-firewall -allowOutgoing
# curl -O http://{IP de the Beemo appliance}/exe/setup-esx.tgz
# tar -vxzf setup-esx.tgz
# cd dsr_esx
# ./install.sh
# esxcfg-firewall -blockOutgoing
REMARK : It is also possible to download the installation package using the the Beemo
appliance web interface. Then copy the setup-esx.tgz file on your ESX system by another
way to proceed with the installation.
WARNING : ESX system update may involve reinstallation of Data Safe Restore Client on
the host
3.9 ESXi 4.1+ installation
1. Enable SSH access on your ESXi host :
•Connect to your ESXi as root with Vsphere client
•Select the host in the inventory panel
•In the Configuration tab,click Security Profile
•In the Services section, click Properties
•On ESX 4.1, select Remote Tech Support (SSH)
On ESXi 5.X, select ESXi Shell and SSH
•Click Options and start the service then click OK
Data Safe Restore User manual Version 3.08 Page 11

2. Login as root on your ESXi host :
•Connect on the ESXi host with an SSH client
•Provide root credentials when prompted
3. Install Data Safe Restore Client :
# cd /tmp
# wget http://{IP de the Beemo appliance}/exe/setup-esx.tgz
# tar -vxzf setup-esx.tgz
# cd dsr_esx
# ./install.sh
REMARK : It is also possible to download the installation package using the the Beemo
appliance web interface. Then copy the setup-esx.tgz file on your ESXi system by another
way to proceed with the installation.
WARNING : ESXi system update may involve reinstallation of Data Safe Restore Client on
the host
3.10 ESX/ESXi hypervisor setup
1. In order to function correctly, you must modify System Resource Pools so the Data Safe Restore Client can
allocate memory.
•Connect to your ESX/i as root with Vsphere client
•Select the host in the inventory panel
•In the Configuration tab, click System Resource Allocation
•Click Advanced (allow allocated CPU/memory modifications of host functions or resources)
FIGURE 3.11 – Advanced setup configuration of ESX/i host
You have to modify the limits of the following elements in the tree.
Select each element and click Edit settings...
In the Memory Resources section, if the Unlimited checkbox is not ticked then set the limit to 2500MB.
REMARK : Depending on ESX/i version certain elements might not exist.
Data Safe Restore User manual Version 3.08 Page 12

•host > vim > vmvisor
•host > vim > vmvisor > init
•host > vim > vmuser > shell
•host > vim > vmuser > ssh
FIGURE 3.12 – ESX/i Resource Allocation
Data Safe Restore User manual Version 3.08 Page 13

Chapter 4
The administration console of the Beemo
appliance
the Beemo appliance is a network solution configured through a Java console accessible by a web browser. To
administer the Beemo appliance you must have installed the Java Runtime Environment on the station(s) intended
for this function. It is not necessary to install Java to be able to do backups, only to administer the Beemo
appliance.
4.1 Connection to the administration console of the Beemo appliance
1. Open a web browser and enter the IP address you assigned to the Beemo appliance. When the home page is
displayed (Figure 4.1), click on ’Launch the administration console’.
FIGURE 4.1 – Home page
2. An "Authentication" dialog box is displayed (Figure 4.2).
Data Safe Restore User manual Version 3.08 Page 14

If the dialog does not appear, you must first install the latest version of the Java Runtime Environment.
FIGURE 4.2 – Authentication
3. If you are an administrator, type ’admin’ as the login followed by your password (the default password is your
license number and it is highly recommended that you change it). If you are not an administrator, enter the
name of the backupset you want to access as the login then the password that the administrator assigned to
you.
4. Click on Enter. If your authentication is correct, you can now administer the Beemo appliance or access the
settings of your backupset depending on the rights you have.
4.2 Presentation of the administration console
The Data Safe Restore administration console (Figure 4.3) consists of two windows separated by a vertical axis :
•The left window contains :
1. the ’Settings’ button of the Beemo appliance (Figure 4.4)
2. a bar of icons giving you different ways to sort the list of backupsets (Figure 4.6)
3. the list of backupsets.
•The right window is used to configure the item selected in the left window.
Data Safe Restore User manual Version 3.08 Page 15
This manual suits for next models
4
Table of contents
Popular Storage manuals by other brands


Maxtor
Maxtor 1394 External Storage installation guide

Sun Microsystems
Sun Microsystems DLT4700 Installation and user guide

Sun Microsystems
Sun Microsystems StorEdge S1 Array Installation and maintenance manual

Apacer Technology
Apacer Technology AH190 user manual

Hitachi
Hitachi Virtual Storage Platform G800 reference guide

Sun Microsystems
Sun Microsystems Sun StorageTek SL24 Getting started