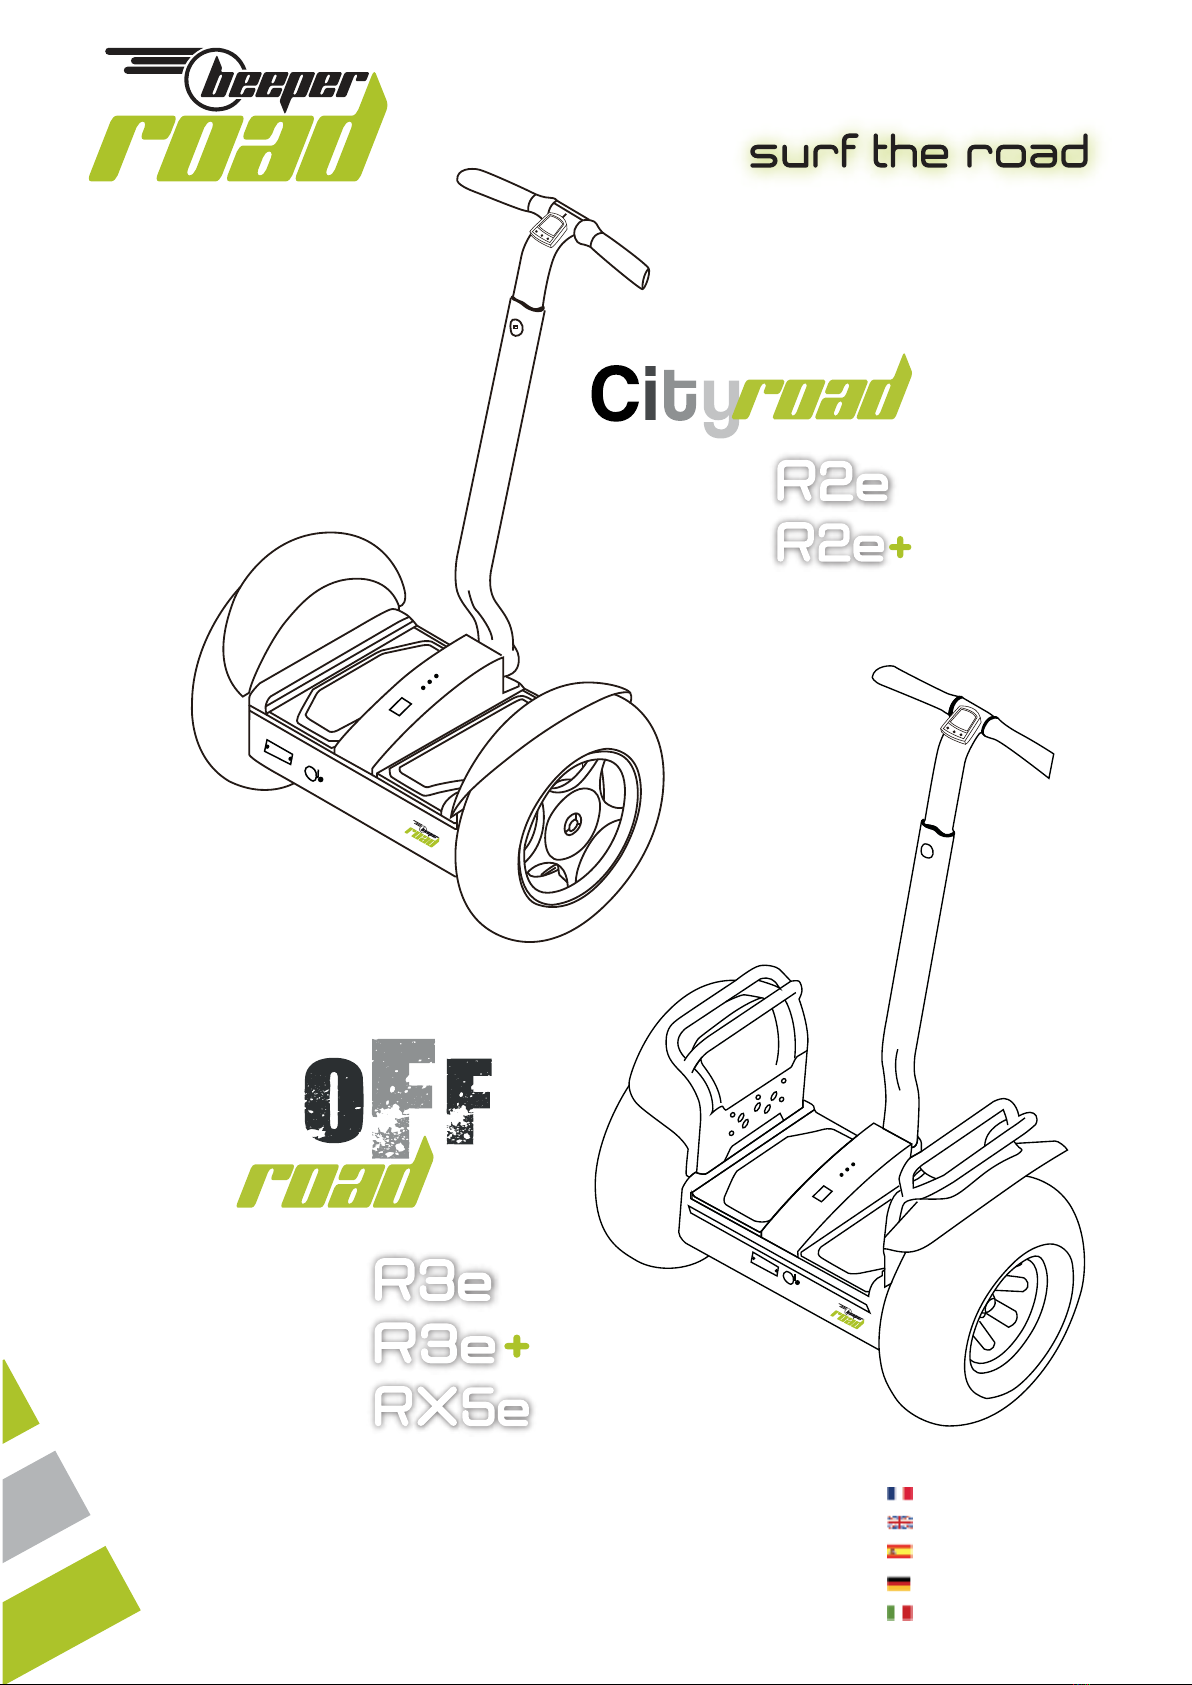
Beeper Road City road R2e User manual
Guide dʼutilisation
User manual
Guía de utilización
Gebrauchsanweisung
Guida d'utilizzo

R2e
R2e+
R3e+
R3e
RX5e
2

3
Bienvenue / Welcome / Bienvenida / Willkommen / Benvenuto
Bienvenue / Welcome / Bienvenida / Willkommen / Benvenuto 4
Dans la boîte / In the box / En la caja / In der Kiste / Nella scatola 5
Vue détaillée / Detailed sight / Vista detallada / Detaillierte Sicht / Vista dettagliata 6
Attention / Warning / Atención / Beachtung / Attenzione 7
Installation / Install / Instalación / Einrichtung / Impianto 8
Recharge / Charge / Recambio / Auffüllung / Ricarica 9
Télécommande / Remote / Mando a distancia / Fernsteuerung/ Telecomando 10-12
Voix / Voice / Voz / Stimme / Voce 13
Bluetooth / Bluetooth / Bluetooth / Bluetooth / Bluetooth 13
Tuto / Learn / Comience / Beginnen Sie / Cominciate 14-16
Caractéristiques / Characteristics / Características / Eigenschaften / Caratteristiche 17-18
Maintenance / Maintenance / Mantenimiento / Wartung / Manutenzione 19
Accessoires / Accessories / Accesorios / Zubehör / Accessori 20
Technique / Technical / Técnica / Technik / Tecnica 21
Garantie / Warranty / Garantia / Garantie/ Garanzia 21
Conformité / Conformity / Conformidad / Übereinstimmung / Conformità 22
Circulation / Circulation / Circulación / Verkehr / Circolazione 22
Mentions légales / Legal infos / Menciones legales / Impressum / Menzioni legali 22

Nous vous remercions d'avoir choisi un produit BEEPER Road pour surfer sur les routes et les chemins. Les produits BEEPER Road sont conçus et développés pour
vous assurer plaisir et sécurité.
Les CityRoad R2e / R2e+ et OffRoad R3e / R3e+ / RX5e sont des ''gyropodes électriques''. Cʼest un nouveau moyen de locomotion simple &
performant, Ils utilisent une technique gyroscopique* offrant une grande facilité d'utilisation, par de simples balancements en avant ou en arrière, qui permettent
une mobilité intuitive & dynamique.
Nous espérons que les produits BEEPER Road vous apporteront entière satisfaction.
Pour toute demande complémentaire sur nos produits, nos surfeurs sont à votre disposition.
We thank you for having chosen a BEEPER ROAD product for surfing on the roads and the ways. The products BEEPER ROAD are designed and developed to ensure you pleasure and security.
CityRoad R2e/R2e+ and OffRoad R3e/R3e+/RX5e are “electric gyropodes”. It is a new simple & powerful means of transport, They use a technique gyroscopique* offering a great facility of use, by simple
swingings ahead or behind, which allow an intuitive & dynamic mobility.
We hope that the BEEPER Road products will bring whole satisfaction to you.
For any complementary request on our products, our surfers are at your disposal.
Le agradecemos hemos elegido un producto BEEPER Road para navegar sobre las carreteras y los caminos. Los productos BEEPER Road son concebidos y desarrollados para garantizarle placer y seguridad.
Les CityRoad R2e/R2e+ et OffRoad R3e/R3e+/RX5e sont des “gyropodes eléctricos”. Es un nuevo medio de locomoción simple y potente, utilizan una técnica gyroscopique* ofreciendo una gran facilidad
de utilización, por simples balanceos a continuación o detrás, que permiten una movilidad intuitiva y dinámica.
Esperamos que los productos BEEPER Road le aportarán entera satisfacción.
Para toda la demanda complementaria sobre nuestros productos, nuestros surfistas están a su disposición.
Wir danken Ihnen dafür, ein Produkt BEEPER Road gewählt zu haben, um auf den Straßen und den Wegen zu surfen. Die Produkte BEEPER Road sind geplant und werden entwickelt, um Ihnen Vergnügen
und Sicherheit zu gewährleisten.
Les CityRoad R2e/R2e+ et OffRoad R3e/R3e+/RX5e sont des „gyropodes elektrisch“. Es ist ein neues einfaches & leistungsstarkes Fortbewegungsmittel, sie benutzen eine Technik gyroscopique*, die eine
große Benutzerfreundlichkeit anbietet, durch ein einfaches Schwingen vorwärts oder rückwärts, die eine intuitive & dynamische Mobilität erlauben.
Wir hoffen, dass die Produkte BEEPER Road Ihnen ganze Zufriedenheit bringen werden.
Für jeden Zusatzantrag über unsere Produkte stehen unsere Surfer zu Ihrer Verfügung.
Li ringraziamo di avere scelto un prodotto BEEPER Road per fare surf sulle strade ed i cammini. I prodotti BEEPER Road è concepito e sviluppato per garantirvi piacere e sicurezza.
Les CityRoad R2e/R2e+ ed OffRoad R3e/R3e+/RX5e sont des “gyropodes elettrici„. È un nuovo mezzo di locomozione semplice & efficiente, utilizzano una tecnica gyroscopique* che offre una grande
facilità d'utilizzo, mediante semplici oscillazioni davanti o dietro, che permettono una mobilità intuitiva & dinamica.
Speriamo che i prodotti BIPPARE Road vi porterà soddisfazione piena.
Per ogni domanda complementare sui nostri prodotti, i nostri surfisti sono a vostra disposizione.
www.beeperroad.fr
hello@beeperroad.fr
BEEPER® & BEEPER ROAD®sont des marques déposées de la société IXIT • COPYRIGHT IXIT 2016
BEEPER® & BEEPER ROAD®is registered trademarks of company IXIT • COPYRIGHT IXIT 2016
BEEPER® & BEEPER ROAD® son marcas registradas de la sociedad IXIT • COPYRIGHT IXIT 2016
BEEPER® & BEEPER ROAD® sind Warenzeichen der Gesellschaft IXIT • COPYRIGHT IXIT 2016
BEEPER® & BEEPER ROAD® sono marchi depositati della società IXIT • COPYRIGHT IXIT 2016
&5&1ĽiĽ""-"/Ľ/,!ĽiĽ->O@ĽABPĽ$OFIILKPĽiĽĽORBĽABĽIf>K@FBKKBĽAFPQFIIBOFBĽiĽĽiĽ$)"&7"ĽiĽ#/+ "ĽFBKSBKRBĽĽ4BI@LJBĽĽFBKSBKFA>ĽĽ4FIIHLJJBKĽĽBKSBKRQL

Dans la boîte / In the box / En la caja / In der Kiste / Nella scatola
5
Pas de mauvaise surprise : tout est dans la boîte !
Découvrez ci-dessous le contenu détaillé de votre gyropode BEEPER Road :
Discover below the detailed contents of your gyropode BEEPER Road:
Descubra abajo el contenido detallado de su gyropode BEEPER Road:
Unten entdecken Sie den detaillierten Inhalt Ihres gyropode BEEPER Road:
Scoprite sotto il contenuto dettagliato del vostro gyropode BEEPER Road:
1gyropode électrique
1electric gyropode
1gyropode eléctrico
1gyropode elektrisch
1gyropode eléctrico
+
ref : R2e / R2e+
ref : R3e / R3e+
ref : RX5e
1manuel dʼinstallation & dʼutilisation
1user & isntall manual
1manual de instalación y de utilización
1Einrichtungs- & Benutzungshandbuch
1manuale d'impianto & d'utilizzo
1télécommande avec afficheur
1remote control with display
1mando a distancia con cartelero
1Fernsteuerung mit Plakatkleber
1telecomando con attacchino
1chargeur secteur
1charger sector
1cargador sector
1Bereichladegerät
1caricabatterie settore
1kit de fixation
1fixing kit
1equipo de fijación
1BefestigungsSatz
1kit di fissazione
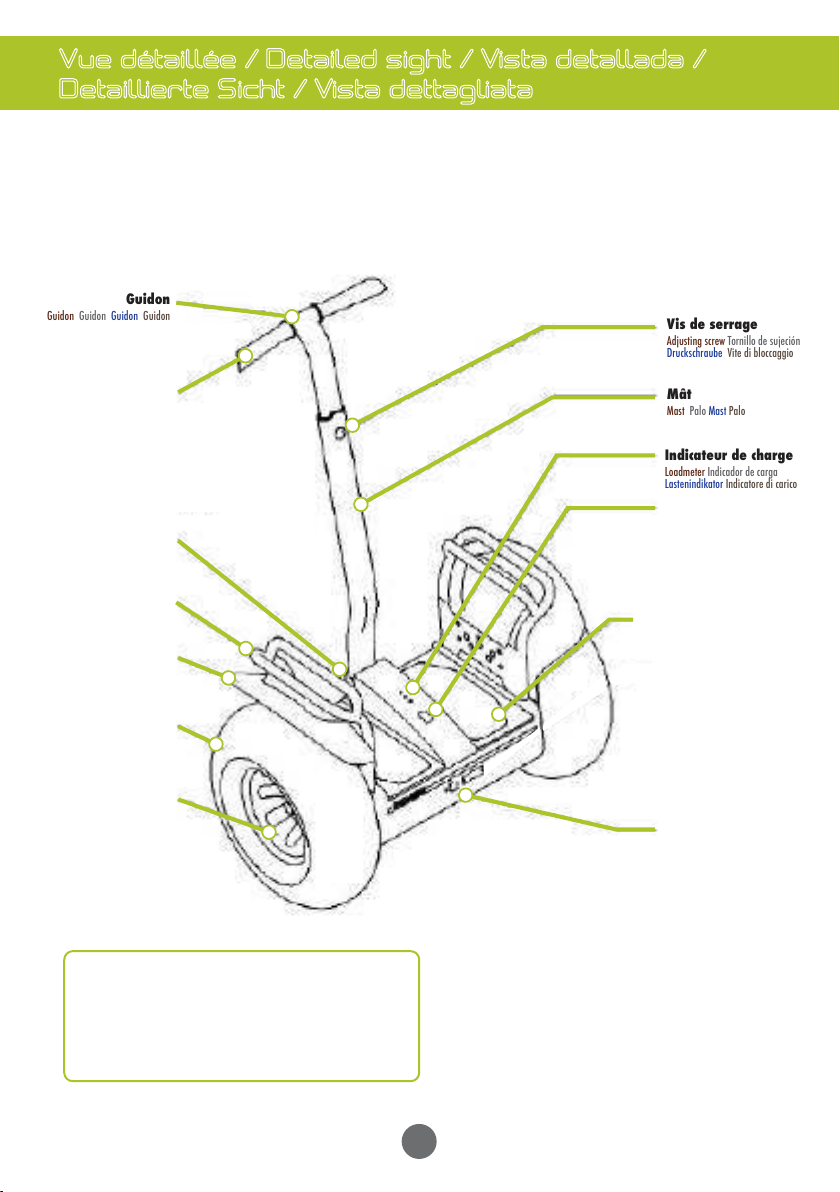
Vue détaillée / Detailed sight / Vista detallada /
Detaillierte Sicht / Vista dettagliata
6
Guidon
Guidon Guidon Guidon Guidon Vis de serrage
Adjusting screw Tornillo de sujeción
Druckschraube Vite di bloccaggio
Mât
Mast Palo Mast Palo
Indicateur de charge
Loadmeter Indicador de carga
Lastenindikator Indicatore di carico
Port de recharge
Charging port Toma de recambio
Port der Auffüllung Port di ricarica
Roue
Wheel Rueda
Rad Ruota
Pneu
Tire Neumático Reifen Pneumatico
*4 batteries Plomb-acide (R2e, R3e)
1 batterie Lithium-ion (R2e+, R3e+, RX5e)
*4 batteries Lead acid (R2e, R3e) 1 battery Lithium-ion (R2e+, R3e+, RX5e)
*4 baterías Plomo ácido (R2e, R3e) 1 batería Lithium-ion (R2e+, R3e+, RX5e)
*4 batterien Säurehaltiges Blei (R2e, R3e) 1 batterie Lithium-ion (R2e+, R3e+, RX5e)
*4 Batterie Piombo acido (R2e, R3e) 1 Batteria Lithium-ion (R2e+, R3e+, RX5e)
Garde-boue
Mudguard Guardabarros
Kotflügel Parafango
Axe de direction
Axis of direction Eje de dirección
Direktionsachse Asse di direzione
Poignée à grip
Handle with grip Punado a grip
Griff grip Impugnatura a grip
Interrupteur ON/OFF
Switch ON/OFF Interruptor ON/OFF
Schalter ON/OFF Commutatore ON/OFF
Supports de pieds
Feet support Apoyos de pies Supporte
von Füssen Appoggi di piedi
Porte-bagages (R3e, R3e+, RX5e)
Luggage rack Portaequipajes
Gepäckträger Portabagagli

Attention / Warning / Atención / Beachtung / Attenzione
7
Veillez à recharger la batterie avant la première utilisation & avant toute utilisation (pour éviter de le porter durant quelques kilomètres).
Veillez à bien gonfler les roues avant toute utilisation.
Ne mettez pas le gyropode en marche lors de sa recharge.
Veuillez surfer sur le gyropode de la façon la plus prudente possible :
• pas dʼaccélération ou décélération brusque
• pas de passage dans des endroits à risque et pouvant entraîner des chutes et des blessures.
Nous vous conseillons de porter des protections lors de l'utilisation de votre gyropode : gants, pantalon renforcé, genouillères, protection pour les chevilles,
casque, ...
Évitez lʼutilisation de votre gyropode dans la foule, dans des lieux fortement passants ou des rues bondées. Vous engagez votre responsabilité si vous
percutez quelquʼun ou quelque chose.
Veuillez éviter lʼutilisation de votre gyropode dans des conditions pluvieuses, ce qui peut provoquer des risques de glissade des roues ou ne pas permettre
une bonne stabilité.
Lʼutilisation dʼun gyropode en état d'ébriété peut entraîner un retrait de permis.
De manière générale, veuillez utiliser le gyropode en pleine possession de vos moyens et dans des conditions de sécurité optimales, vous êtes le seul
responsable de votre conduite.
Pour toute alerte de sécurité (alerte sonore) et inclinaison automatique du gyropode (forte vitesse), nous vous conseillons dʼarrêter lʼutilisation de votre
gyropode pour éviter toute chute et blessure.
IXIT BEEPER Road se dégage de toute responsabilité en cas de blessures que vous vous infligeriez ou infligeriez aux autres lors de lʼutilisation de votre
gyropode.
Lʼutilisation dʼun gyropode est déconseillée aux personnes de moins de 16 ans.
Take care to reload the battery before the first use & any use (to avoid carrying it during a few kilometers).
Take care of well inflating the nose gear wheels any use.
Do not put the gyropode goes from there at the time of its refill.
Please surf on the gyropode in the most careful possible way:
• no acceleration or abrupt deceleration
• no the passage in places at the risk and being able to involve falls and wounds.
We advise you to carry protections during the use of your gyropode: gloves, reinforced trousers, knuckles, protection for the ankles, coughs up,…
Avoid the use of your gyropode in crowd, strongly busy places or crammed streets. You engage your responsibility if you strike somebody or something.
Please avoid the use of your gyropode under rainy conditions, which can cause risks of slip of the wheels or not allow a good stability.
The use of a gyropode in a state of intoxication can involve a withdrawal of licence.
In a general way, please use the gyropode in full possession of your means and under optimal security conditions, you are the only person in charge of your control.
For very alarm of security (sound alarm) and automatic slope of the gyropode (strong speed), we advise you to stop the use of your gyropode to avoid any fall and wound.
IXIT TO BEEP Road is released from any responsibility in the event of wounds that you would inflict yourselves or would inflict with the others during the use of your gyropode.
The use of a gyropode is disadvised to the people of less than 16 years.
Vele por recargar la batería antes de la primera utilización y antes de toda utilización (para evitar llevarlo durante algunos kilómetros).
Vele por inflar bien las ruedas antes de toda utilización.
No ponen el gyropode en marcha en su recambio.
Quiere navegar sobre el gyropode de la manera más prudente posible:
• no hay aceleración o desaceleración brusca
• no hay paso en lugares de riesgo y pudiendo implicar caídas y heridas.
Le aconsejamos llevar protecciones en la utilización de su gyropode: guantes, pantalones reforzados, rodilleras, protección para las clavijas, casco,…
Evite la utilización de su gyropode en la muchedumbre, en lugares muy ocupados o calles abarrotadas. Se responsabiliza si percute alguien o algo.
Quiere evitar la utilización de su gyropode en condiciones lluviosas, lo que puede causar riesgos de resbalón de las ruedas o no permitir una buena estabilidad.
La utilización de un gyropode en estado de embriaguez puede implicar una retirada de permiso.
Generalmente, quiere utilizar el gyropode en pleno uso de sus facultades y en condiciones de seguridad óptimas, es el único responsable de su conducta.
Para muy alerta de seguridad (alerta sonora) e inclinación automática del gyropode (fuerte velocidad), le aconsejamos decidir la utilización de su gyropode para evitar toda caída y herida.
IXIT BEEPER Road se retira de toda responsabilidad en caso de heridas que se infligiría o infligiría a los otro en la utilización de su gyropode.
La utilización de un gyropode se desaconseja a las personas menores de 16 años.
Achten darauf Sie, die Batterie vor der ersten Benutzung & vor jeder Benutzung wieder aufzuladen (um zu vermeiden, es während einiger Kilometer zu tragen).
Achten darauf Sie, die Räder vor jeder Benutzung gut aufzublasen.
Stellen das gyropode in Ablauf nicht bei seiner Auffüllung.
Surfen Sie bitte auf dem gyropode der vorsichtigsten Art und Weise:
• keine Beschleunigung oder plötzliche Abbremsung
• kein übergang in Risikostellen und könnend Fälle und Verletzungen bewirken.
Wir raten Ihnen, einen Schutz bei der Benutzung Ihres gyropode zu tragen: Handschuhe, verstärkte Hose, Knieschützer, Schutz für die Gelenke, Helm…
Vermeiden Sie die Benutzung Ihres gyropode in der Menge, in stark belebten Orten oder voll gestopften Straßen. Sie übernehmen Ihre Verantwortung, wenn Sie jemandes oder etwas perkutieren.
Vermeiden Sie bitte die Benutzung Ihres gyropode unter regnerischen Bedingungen, was Risiken des Rutsches der Räder verursachen oder keine gute Stabilität erlauben kann.
Die Benutzung eines gyropode in Trunkenheitsstand kann einen Genehmigungswiderruf bewirken.
Im Allgemeinen benutzen Sie bitte das gyropode in vollem Besitz Ihrer Mittel, und unter optimalen Sicherheitsbedingungen sind Sie der Verantwortliche allein für Ihre Leitung.
Für alarmiert ganz von Sicherheit (sonorer Alarm) und automatische Neigung des gyropode (starke Geschwindigkeit), raten wir Ihnen, die Benutzung Ihres gyropode einzustellen, um jeden Fall und Verletzung zu vermeiden.
IXIT BEEPER Road setzt sich von jeder Verantwortung bei Verletzungen frei, die Sie sich zufügen würden oder den anderen bei der Benutzung Ihres gyropode zufügen würden.
Die Benutzung eines gyropode wird an den Personen unter 16 Jahren abgeraten.
Attenzione a ricaricare la batteria prima del primo utilizzo & prima di qualsiasi utilizzo (per evitare di portarlo durante alcuni chilometri).
Attenzione bene a gonfiare le ruote prima di qualsiasi utilizzo.
Non mettete il gyropode in marcia in occasione della sua ricarica.
Volete fare surf sul gyropode nel modo più prudente possibile:
• non un'accelerazione o decelerazione brusca
• non un passaggio in posti rischio e potendo comportare cadute e ferite.
Vi consigliamo di portare protezioni in occasione dell'utilizzo del vostro gyropode: guanti, pantalone rafforzato, articolazioni, protezione per gli spilli, casco,
Evitate l'utilizzo del vostro gyropode nella folla, in luoghi fortemente occupati o vie pieno zeppe. Impegnate la vostra responsabilità se colpite qualcuno o qualcosa.
Volete evitare l'utilizzo del vostro gyropode in condizioni piovose, cosa che può causare rischi di scivolata delle ruote o non permettere una buona stabilità.
L'utilizzo di un gyropode in stato d'intossicazione può comportare un ritiro di patente.
Generalmente, volete utilizzare il gyropode in pieno possesso dei vostri mezzi ed in condizioni di sicurezza ottimali, siete il solo responsabile della vostra condotta.
Per molto dà l'allarme di sicurezza (allarme sonoro) e pendenza automatica del gyropode (forte velocità), vi consigliamo di stabilire l'utilizzo del vostro gyropode per evitare ogni caduta e ferita.
IXIT BEEPER Road si libera di qualsiasi responsabilità in caso di ferite che vi infliggereste o infliggereste alle altre in occasione dell'utilizzo del vostro gyropode.
L'utilizzo di un gyropode è sconsigliato alle persone di meno di 16 anni.

Installation / Install / Instalación / Einrichtung / Impianto
8
• Montage sur les modèles R2e / R2e+ / R3e / R3e+ :
• Assembly on the models R2e/R2e+/R3e/R3e+: • Montage den Modellen R2e/R2e+/R3e/R3e+:
• Montaje sobre los modelos R2e/R2e+/R3e/R3e+: • Assemblaggio sui modelli R2e/R2e+/R3e/R3e+:
• Montage sur le modèle RX5e+ :
• Assembly on the RX5e+ model: • Montage dem RX5e+-Modell:
• Montaje sobre el modelo RX5e+: • Assemblaggio sul modello RX5e+:
1. Assemblez le guidon : Utilisez un tournevis pour fixer les 3 vis de la barre auxiliaire avec le guidon.
2. Assemblez le tuyau de direction : Sortez lʼanneau à l'extrémité du tuyau, et sortez la vis du côté gauche du tuyau ; poussez le tuyau dans le joint, fixez ensuite la
vis.
3. Assemblez le tuyau de direction avec les différentes pièces : Poussez la partie haute dans vers le bas la partie, réglez soigneusement la hauteur du montant selon
votre taille. Enfin, serrez le boulon de réglage.
1. Assemble the handlebar: Use a screwdriver to fix the 3 screws of the auxiliary bar with the handlebar.
2. Assemble the pipe of direction: Leave the ring at the end the pipe, and leave the screw on the left side of the pipe; push the pipe in the joint, fix then the screw.
3. Assemble the pipe of direction with the various parts: Push the high part in to the bottom the part, carefully regulate the height of the amount according to your size. Lastly, tighten the bolt of adjustment.
1. Arme el manillar: Utilice un destornillador para fijar los 3 tornillos de la barra auxiliar con el manillar.
2. Arme el tubo de dirección: Saque el anillo a la extremidad del tubo, y saque el tornillo del lado izquierdo del tubo; empuje el tubo en la junta, fija a continuación el tornillo.
3. Arme el tubo de dirección con las distintas partes: Empuje la alta parte en hacia abajo la parte, regula cuidadosamente la altura del importe según su tamaño. Por fin, aprietan el perno de ajuste.
1. Setzen Sie die Lenkstange zusammen: Benutzen Sie einen Schraubenzieher, um die 3 Schrauben der Hilfsstange mit der Lenkstange festzulegen.
2. Setzen Sie das Direktionsrohr zusammen: Kommen Sie den Ring am Ende des Rohres heraus und kommen Sie die Schraube der linken Seite des Rohres heraus; drücken Sie das Rohr in der Fuge, festlegen danach die Schraube.
3. Setzen Sie das Direktionsrohr mit den verschiedenen Stücken zusammen: Nach unten drücken Sie den hohen Anteil am Teil, regulieren sorgsam die Höhe des Betrages nach Ihrer Größe. Schließlich ziehen die Einstellungsschraube an.
1. Riunite il manubrio: Utilizzate un cacciavite per fissare le 3 viti della sbarra ausiliaria con il manubrio.
2. Riunite il condotto di direzione: Fate uscire l'anello all'estremità del condotto, e fate uscire la vite del lato sinistro del condotto; spingete il condotto nel giunto, fissate in seguito la vite.
3. Riunite il condotto di direzione con le varie parti: Spingete la parte alta verso il basso nella parte, regolate accuratamente l'altezza dell'importo secondo la vostra dimensione. Infine, stringete il bullone di messa a punto.
1. Assemblez le guidon : Utilisez un tournevis pour fixer les 3 vis de la barre auxiliaire avec le guidon.
2. Assemblez lʼaxe de direction : Placez le guidon dans lʼaxe de direction, puis serrez le tout à lʼaide du boulon central.
3. Assemblez lʼaxe de direction avec la partie basse du gyropode, puis verrouillez le tout en refermant le clip.
1. Assemble the handlebar: Use a screwdriver to fix the 3 screws of the auxiliary bar with the handlebar. 2. Assemble the axis of direction: Place the handlebar in line with direction, then tighten the whole using the central bolt. 3. Assemble the axis of direction with the low part of the
gyropode, then lock the whole while closing the clip.
1. Arme el manillar: Utilice un destornillador para fijar los 3 tornillos de la barra auxiliar con el manillar. 2. Arme el eje de dirección: Coloque el manillar en el eje de dirección, luego aprietan todo ello con ayuda del perno central. 3. Arme el eje de dirección con la parte baja del gyropode,
luego cierran el volviendo a cerrar al mismo tiempo el clip.
1. Setzen Sie die Lenkstange zusammen: Benutzen Sie einen Schraubenzieher, um die 3 Schrauben der Hilfsstange mit der Lenkstange festzulegen. 2. Setzen Sie die Direktionsachse zusammen: Setzen Sie die Lenkstange in der Direktionsachse dann drücken das Ganze mittels des zentralen
Bolzens. 3. Setzen Sie die Direktionsachse mit dem niedrigen Teil des gyropode zusammen dann verriegeln, indem man den Klipp wieder schließend.
1. Riunite il manubrio: Utilizzate un cacciavite per fissare le 3 viti della sbarra ausiliaria con il manubrio. 2. Riunite l'asse di direzione: Mettete il manubrio nell'asse di direzione, quindi stringete la totalità per mezzo del bullone centrale. 3. Riunite l'asse di direzione con la parte bassa del
gyropode, quindi chiudete pur richiudendo la graffa.
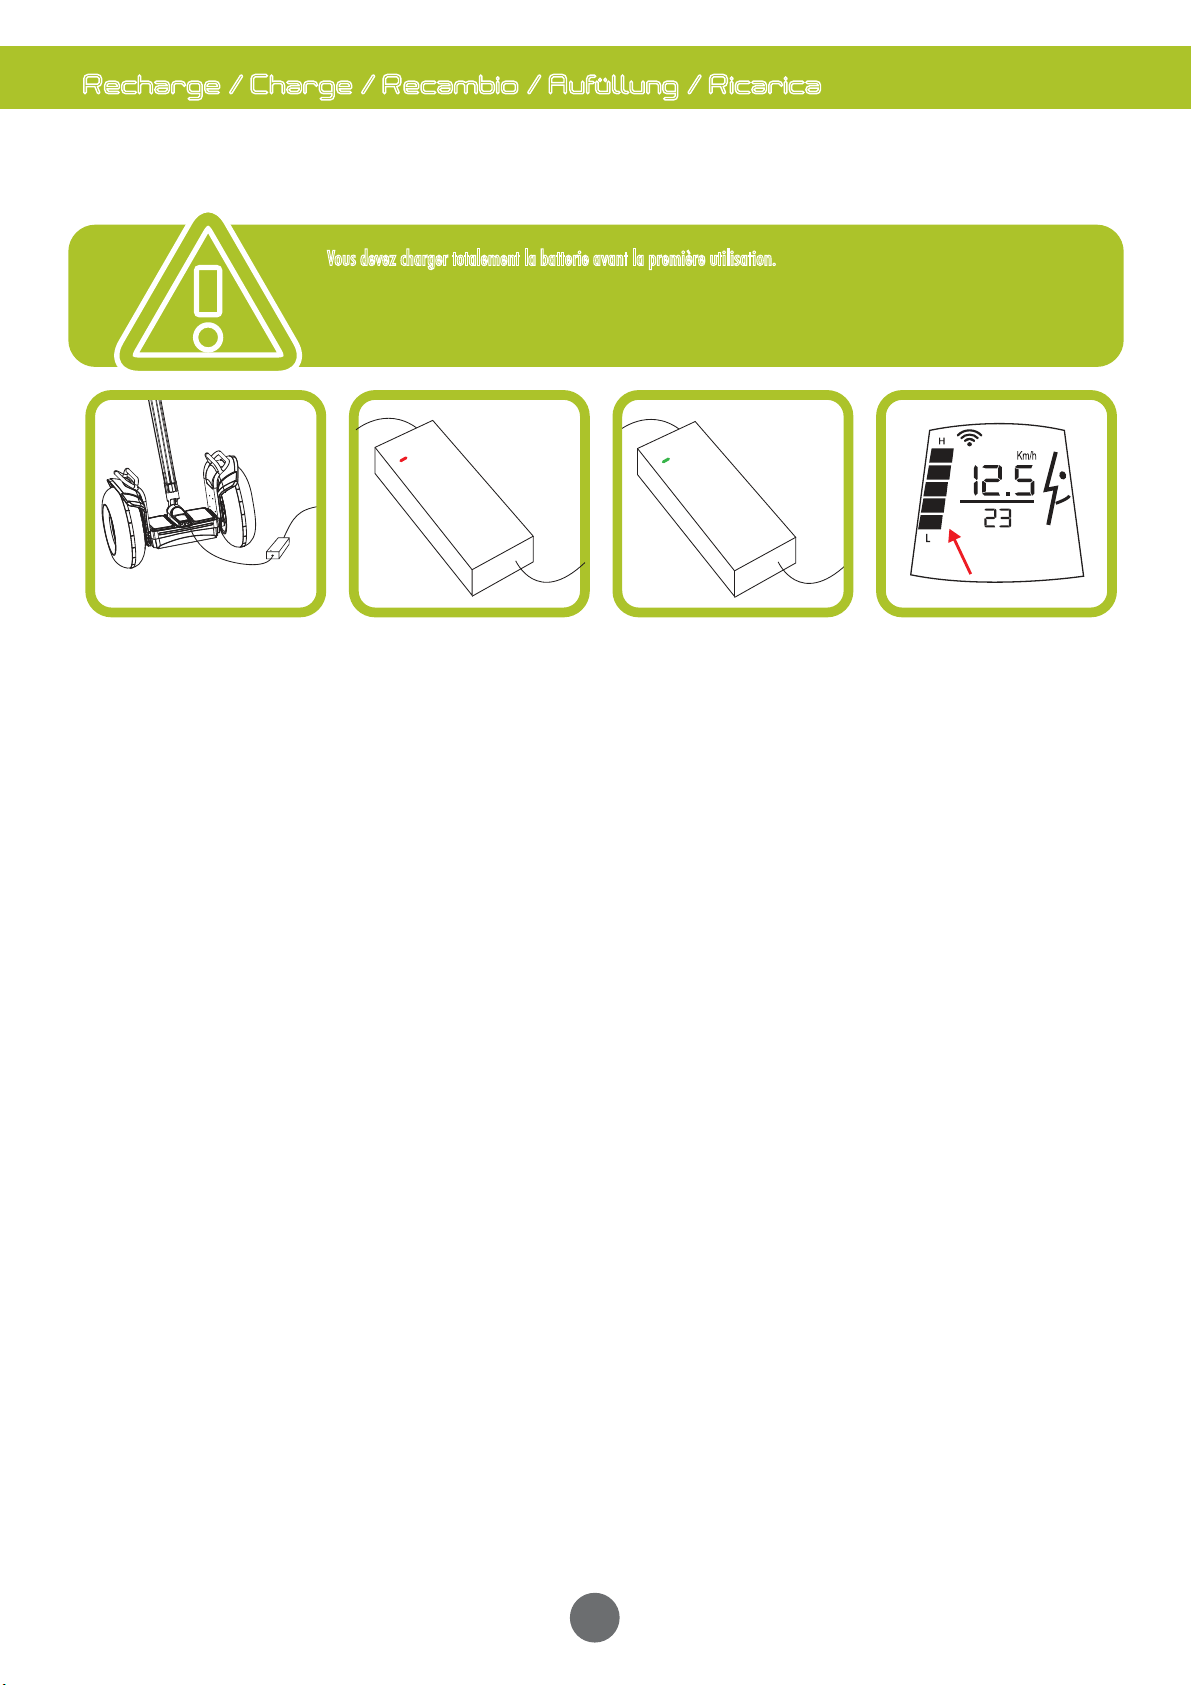
Recharge / Charge / Recambio / Aufüllung / Ricarica
9
Voici une opération à faire régulièrement sur votre BEEPER Road : Recharger les batteries !
Here an operation to be made regularly on your BEEPER Road: To reload the batteries!
Ahí tienes una operación pendiente regularmente sobre su BEEPER Road: ¡Recargar las baterías!
Vous devez charger totalement la batterie avant la première utilisation.
You must completely charge the battery before the first use.
Debe encargar completamente la batería antes de la primera utilización.
Sie müssen die Batterie vor der ersten Benutzung gänzlich beauftragen.
Dovete incaricare completamente la batteria prima del primo utilizzo.
Mettre le connecteur du chargeur sur
votre gyropode. Branchez la prise du
chargeur sur le secteur 220V.*
Put the connector of the charger on your gyropode. Connect the
catch of the charger on the sector 220V.*
Poner el conector del cargador sobre su gyropode. Conecte la
toma del cargador sobre el sector 220V.*
Die Verbindung des Ladegerätes auf Ihrem gyropode stellen.
Schließen Sie die Ergreifung des Ladegerätes auf dem Bereich
220V.*
Mettere il connettore del caricabatterie sul vostro gyropode.
Collegate la presa del caricabatterie sul settore 220V.*
La LED du chargeur est rouge. La
charge est en cours.
The LED of the charger is red. The load is in hand.
El LED del cargador es rojo. La carga está en curso.
Das LED des Ladegerätes ist rot. Die Last ist im Gange.
Il LED del caricabatterie è rosso. Il carico è in corso.
La LED du chargeur est verte.
Vous pouvez rouler.
The LED of the charger is green. You can roll.
El LED del cargador es verde. Puede rodar.
Das LED des Ladegerätes ist grün. Sie können rollen.
Il LED del caricabatterie è verde. Potete rotolare.
Lʼafficheur batterie sur lʼécran LCD
est totalement rempli, il est chargé
à 100%.
The bill-poster battery on screen LCD is completely filled, it is
charged at 100%.
Se llena al cartelero batería sobre la pantalla LCD
completamente, se encarga al 100%.
Der Plakatkleber Batterie auf dem LCD-Bildschirm wird
gänzlich gefüllt, er wird an 100% beladen.
L'attacchino batteria sullo schermo LCD è completamente
riempito, è caricato al 100%.
• Nous vous conseillons de recharger le gyropode après chaque utilisation.
• La durée de la recharge est dʼenviron 5 heures pour les modèles R2e+, R3e+ & RX5e et dʼenviron 10 heures pour les modèles R2e & R3e. Plus les batteries sont
utilisées, plus la durée de recharge peut sʼallonger.
• We advise you to reload the gyropode after each use.
• The duration of the refill is of approximately 5 hours for the models R2e+, R3e+ & RX5e and of approximately 10 hours for the models R2e & R3e. The more the batteries are used, the more the duration of refill can lengthen.
• Le aconsejamos recargar el gyropode después de cada utilización.
• La duración del recambio es de cerca de 5 horas para los modelos R2e+, R3e+ y RX5e y de cerca de 10 horas para los modelos R2e y R3e. Cuanto más las baterías se utilizan, más la duración de recambio puede alargarse.
• Wir raten Ihnen, das gyropode nach jeder Benutzung wieder aufzuladen.
• Die Dauer der Auffüllung ist ungefähr 5 Stunden für die Modelle R2e+, R3e+ & RX5e und ungefähr 10 Stunden für die Modelle R2e & R3e. Mehr werden die Batterien benutzt, mehr kann sich die Auffüllungsdauer verlängern.
• Vi consigliamo di ricaricare il gyropode dopo ogni utilizzo.
• La durata della ricarica è di circa 5 ore per i modelli R2e+, R3e+ & RX5e e di circa 10 ore per i modelli R2e & R3e. Più le batterie sono utilizzate, più la durata di ricarica può allungarsi.
• Lorsque le niveau dʼautonomie est inférieur à 20-25% : les LEDs du gyropode indiquent un niveau charge ORANGE & ROUGE & le gyropode émet une alerte sonore
: « Batterie faible, veuillez ralentir & recharger ». Vous devez freiner et stopper le gyropode afin de recharger. Si la batterie est totalement vidée, il sʼarrête brutalement
et vous risquez une chute.
• When the level of autonomy is lower than 20-25%: LEDs of the gyropode indicate a level charges ORANGE & RED & the gyropode emits a sound alarm: “Weak battery, please slow down & reload”. You must slow down and stop the gyropode in order to reload. If the battery is
completely emptied, it stops brutally and you risk a fall.
• Cuando el nivel de autonomía es inferior al 20-25%: el LEDs del gyropode indican un nivel está cargado NARANJA y ROJO y el gyropode emite una alerta sonora: “Batería escasa, quiere retrasar y recargar”. Debe frenar y par el gyropode con el fin de recargar. Si la batería
se vacia completamente, se detiene brutalmente y arriesga una caída.
• Wenn das Autonomieniveau niedriger als 20-25% ist: LEDs des gyropode geben ein Niveau an belädt APFELSINE, & ROT & bringt das gyropode einen sonoren Alarm hervor: „Schwache Batterie verlangsamen & wieder aufladen Sie bitte“. Sie müssen das gyropode bremsen
und anhalten, um wieder aufzuladen. Wenn die Batterie gänzlich geleert wird, hält er sich brutal an, und Sie riskieren einen Fall.
• Quando il livello d'autonomia è inferiore al 20-25%: LEDs del gyropode indica un livello incarica ORANGE & ROSSO & il gyropode emette un allarme sonoro: “Batteria debole, volete rallentare & ricaricare„. Dovete rallentare e fermare il gyropode per ricaricare. Se la batteria
è completamente svuotata, si ferma brutalmente e rischiate una caduta.
• Lʼautonomie de la batterie (en moyenne 25 km pour R2e & R3e, 30 km pour R2e+ & R3e+, 35 km pour RX5e) varie en fonction de la température. A -15° C,
lʼautonomie chute de moitié.
• Lʼautonomie peut être fortement réduite (chute de 20% à 80%) plus le poids de lʼutilisateur est important et plus les conditions de terrain sont dégradées.
• Les batteries ont une durée vie de 600 cycles, soit environ 2 ans avec une recharge quotidienne.
• Les batteries sont remplaçables, veuillez contacter nos services techniques en cas de besoin.
• The autonomy of battery (on average 25 km for R2e & R3e, 30 km for R2e+ & R3e+, 35 km for RX5e) varies according to the temperature. With -15° C, autonomy falls of half.
• Autonomy can be strongly reduced (fall by 20% to 80%) more the weight of the user is important and more the conditions of ground are degraded.
• The batteries have one life duration of 600 cycles, that is to say approximately 2 years with a daily refill.
• The batteries are replaceable, want to contact our engineering services where necessary.
• Autonomía de la batería (por término medio 25 km para R2e y R3e, 30 km para R2e+ y R3e+, 35 km para RX5e) varía en función de la temperatura. A -15° C, autonomía caída de mitad.
• Autonomía puede mucho reducirse (caída del 20% al 80%) cuanto más el peso del usuario es importante y más se deterioran las condiciones de terreno.
• Las baterías tienen una duración vida de 600 ciclos, lo que representa alrededor de 2 años con un recambio diario.
• Las baterías son reemplazables, quiere contactar nuestros servicios técnicos en caso de necesidad.
• Die Autonomie der Batterie (im Durchschnitt 25 km für R2e & R3e, 30 km für R2e+ & R3e+, 35 km für RX5e), variiert gemäß der Temperatur. An -15°C die Autonomie Rückgang Hälfte.
• Die Autonomie kann (Rückgang um 20% bis 80%) mehr das Gewicht des Benutzers stark reduziert werden, ist wichtig, und mehr werden die Geländebedingungen verschlechtert.
• Die Batterien haben eine Dauer Leben von 600 Zyklen, das heißt ungefähr 2 Jahre mit einer täglichen Auffüllung.
• Die Batterien sind austauschbar, kontaktieren Sie bitte unsere technischen Dienste falls nötig.
• L'autonomia della batteria (in media 25 km per R2e & R3e, 30 km per R2e+ & R3e+, 35 km per RX5e) varia in funzione della temperatura. A -15° C, l'autonomia caduta di metà.
• L'autonomia può essere fortemente ridotta (caduta dal 20% all' 80%) più il peso dell'utente è importante e più le condizioni di terreno sono degradate.
• Le batterie hanno una durata vita di 600 cicli, cioè circa 2 anni con una ricarica quotidiana.
• Le batterie sono sostituibili, volete contattare i nostri servizi tecnici in caso di bisogno.
Hier eine regelmäßig auf Ihrem BEEPER Road zu machende Operation: Die Batterien wieder aufladen!
Ecco un'operazione da fare regolarmente il vostro su BIPPARE su Road: Ricaricare le batterie!

Télécommande / Remote / Mando a distancia / Fernsteuerung / Telecomando
10
Picto Fonction Picto Fonction
Charge de batterie restante (5 cases au total)
Load of remaining battery (5 boxes on the whole)
Carga de batería restante (5 casillas en total)
Übrig gebliebene Batterielast (5 Kästen an der Gesamtzahl)
Carico di batteria restante (5 scatole al totale)
Compagnon indispensable de votre gyropode BEEPER Road, une présentation complète de la télécommande avec
afficheur s’impose :
Essential companion of your gyropode BEEPER Roas, here is a complete presentation of the remote control:
Camarada indispensable de su gyropode BEEPER Road, ahí tienes una presentación completa del mando a distancia:
Unentbehrlicher Gefährte Ihres gyropode BEEPER Road hier eine vollständige Vorstellung der Fernsteuerung:
Lavoratore indispensabile del vostro gyropode BEEPER Road, ecco una presentazione completa del telecomando:
1. Vue générale / General sight / Vista general / Allgemeine Sicht / Vista generale
2. Fonctions / Functions / Funciones / Funktionen / Funzioni
Niveau de batterie de la télécommande
Battery level of the remote control
Nivel de batería del mando a distancia
Batterieniveau der Fernsteuerung
Livello di batteria del telecomando
État du gyropode
State of the gyropode
Estado del gyropode
Stand des gyropode
Stato del gyropode
Kilométrage
Mileage Kilometraje Kilometerstand Chilometraggio
Mode débutant
Initial mode
Método inicial
Anfängermethode
Modo iniziale
Changement de mode
Change of mode
Cambio de método
MethodenVeränderung
Cambiamento di modo
Verrouillage & Déverrouillage
Locking & Unlocking
Bloqueo y Desbloqueo
Verriegelung & Entriegelung
Chiusura & Déverrouillage
ON/OFF
ON/OFF ON/OFF ON/OFF ON/OFF
Verrouillé
Locked Cerrado Verriegelt Chiuso
Niveau de charge de la batterie
Battery level
Nivel de carga de la batería
Lastenniveau der Batterie
Livello di carico della batteria
Vitesse
Speed Velocidad Geschwindigkeit Velocità
Alerte technique
Technical alarm
Alerta técnica
Technischer Alarm
Allarme tecnico
Indicateur de connexion avec le gyropode
Indicator of connection with the gyropode
Indicador de conexión con el gyropode
Verbindungsindikator mit dem gyropode
Indicatore di collegamento con il gyropode
Télécommande connectée avec le gyropode
Remote control connected with the gyropode
Mando a distancia conectado con el gyropode
Mit dem gyropode verbundene Fernsteuerung
Telecomando collegato con il gyropode
Gyropode verrouillé
Locked Gyropode
Gyropode cerrado
Gyropode verriegeltes
Gyropode chiuso
Gyropode en fonction
Gyropode in function
Gyropode en función
Gyropode in Funktion
Gyropode in funzione
Mode vitesse (mode normal)
Mode speed (normal mode)
Método velocidad (método normal)
Geschwindigkeitsmethode (normale Methode)
Modo velocità (modo normale)
Mode débutant
Initial mode
Método inicial
Anfängermethode
Modo iniziale
Défaut du système
Defect of the system
Defecto del sistema
Fehler des Systems
Difetto del sistema
Etat du gyropode
State of the gyropode
Estado del gyropode
Stand des gyropode
Stato del gyropode
Vitesse (prévision 0.1 km/h)
Speed (forecast 0.1 km/h)
Velocidad (previsión 0.1 km/h)
Geschwindigkeit (Prognose 0.1 km/h)
Velocità (previsione 0.1 km/h)
Kilométrage (précision 0.1 km)
Mileage (precision 0.1 km)
Kilometraje (precisión 0.1 km)
Kilometerstand (Genauigkeit 0.1 km)
Chilometraggio (precisione 0.1 km)
Indication de batterie faible de la télécommande (charger
par USB pendant 1 heure quand le symbole apparaît)
Weak indication of battery of the remote control (to charge by USB
during 1 hour when the symbol appears)
Indicación de batería escasa del mando a distancia (encargar por USB
durante 1 hora cuando el símbolo aparece)
Hinweis schwacher Batterie der Fernsteuerung (durch USB während 1
Stunde zu beladen, wenn das Symbol erscheint)
Indicazione di batteria debole del telecomando (caricare da parte di USB
durante 1 ora quando il simbolo appare)

11
3. Fonctions de la télécommande (Functions of the remote control / Funciones del mando a distancia / Funktionen der Fernsteuerung / Funzioni del telecomando)
Télécommande / Remote / Mando a distancia / Fernsteuerung / Telecomando
Connexion avec le gyropode
Connection with the gyropode Conexión con el gyropode
Verbindung mit dem gyropode Collegamento con il gyropode
Pour connecter la télécommande avec le gyropode, appuyez sur pour mettre la
télécommande en fonction. Puis, appuyez simmultanément sur et . Le symbole
apparaît alors en clignotant. Pendant que le symbole clignote, appuyez sur le bouton
« POWER » du gyropode. Le gyropode est alors connecté avec la télécommande.
To connect the remote control with the gyropode, support on to put the remote control in
function. Then, support simultaneously on and . The symbol appears then while
flickering. While the symbol flickers, press on button “POWER” of the gyropode. The gyropode
is then connected with the remote control.
Para conectar el mando a distancia con el gyropode, apoyan en para poner el mando a
distancia en función. Luego, apoyan simultáneamente en y . El símbolo aparece
entonces parpadeando. Mientras que el símbolo parpadea, apoye en el botón “POWER” del gyropode. El gyropode se conecta
entonces con el mando a distancia.
Um die Fernsteuerung mit dem gyropode zu verbinden unterstützen auf um die Fernsteuerung in Funktion zu stellen. Dann
unterstützen gleichzeitig auf und . Das Symbol erscheint dann indem man aufblinkt. Während das Symbol aufblinkt,
unterstützen Sie auf dem Knopf „POWER“ des gyropode. Das gyropode ist dann mit der Fernsteuerung verbunden.
Per collegare il telecomando con il gyropode, sostenete su per mettere il telecomando in funzione. Quindi, sostenete
simultaneamente su e . Il simbolo appare allora tremolando. Mentre il simbolo tremola, sostenete sul bottone
« POWER » del gyropode. Il gyropode è allora collegato con il telecomando.
Allumage des LEDs
Lighting of LEDs Encendido del LEDs
Zündung LEDs Accensione del LEDs
Pour activer lʼéclairage avant et arrière du gyropode, veuillez effectuer une longue pression sur
le bouton . Uniquement sur les modèles R2e, R2e+, R3e & R3e+. Si vous possédez
le modèle RX5e, veuillez effectuer une longue pression sur le bouton pour activer les
éclairages du gyropode.
To activate lighting before and back gyropode, please carry out a long pressure on the button
. Only on the R2e models, R2e+, R3e & R3e+. If you have the RX5e model, please carry out
a long pressure on the button to activate lightings of the gyropode.
Para activar el alumbrado antes y parte del gyropode, quiere efectuar una larga presión sobre
el botón . Solamente sobre los modelos R2e, R2e+, R3e y R3e+. Si posee el modelo RX5e,
quiere efectuar una larga presión sobre el botón para activar los alumbrados del gyropode.
Um die Beleuchtung vor und hinteren Teil des gyropode zu aktivieren führen Sie bitte einen langen Druck auf den Knopf durch
Nur auf den Modellen R2e, R2e+, R3e & R3e+. Wenn Sie das RX5e-Modell besitzen, führen Sie bitte einen langen Druck auf den Knopf
durch um die Beleuchtungen des gyropode zu aktivieren.
Per attivare l'illuminazione prima e parte posteriore del gyropode, volete effettuare una lunga pressione sul bottone . Soltanto sui
modelli R2e, R2e+, R3e & R3e+. Se possedete il modello RX5e, volete effettuare una lunga pressione sul bottone
per attivare le illuminazione del gyropode.
Mode débutant
Initial mode Método inicial
Anfängermethode Modo iniziale
Lorsque vous appuyez sur le bouton le symbole apparaît sur lʼécran de la
télécommande. Cela signifie que le mode débutant est activé. Le gyropode est donc à une
vitesse limitée à 6 km/h. Il vous suffit dʼappuyer à nouveau sur le bouton pour sortir du
mode débutant.
When you press on the button , the symbol appears on the screen of the remote control.
That means that the mode beginning is activated. The gyropode is thus at a speed limited
during 6 km/h. It is enough for you to press again on the button to leave the initial mode.
Cuando apoya en el botón , el símbolo aparece sobre la pantalla del mando a distancia.
Eso significa que se activa el método inicial. El gyropode es pues a una velocidad limitada
durante 6 km/h. Le basta que apoye de nuevo en el botón para salir del método inicial.
Wenn Sie auf dem Knopf unterstützen das Symbol erscheint auf dem Bildschirm der Fernsteuerung. Das bedeutet, dass die
Anfängermethode aktiviert wird. Das gyropode ist also mit einer Geschwindigkeit, die während 6 km/h begrenzt ist. Es reicht Ihnen aus,
erneut auf dem Knopf zu unterstützen um aus der Anfängermethode herauszukommen.
Quando sostenete sul bottone , il simbolo appare sullo schermo del telecomando. Ciò significa che il modo iniziale è attivato. Il
gyropode è dunque ad una velocità limitata durante 6 k/hm. Vi basta sostenere nuovamente sul bottone per uscire dal modo
iniziale.
Mode auto-stabilisé
Initial mode Método inicial
Anfängermethode Modo iniziale
Si vous appuyez sur le bouton et que le symbole apparaît, cela signifie que le mode
auto-stabilisé est activé. Vous pouvez ainsi facilement pousser le guidon vers lʼavant. Si vous
appuyez à nouveau sur le bouton , vous sortez du mode auto-stabilisé et le symbole
disparaît.
If you press on the button and that the symbol appears, that means that the
auto--stabilized mode is activated. You can thus easily push the handlebar forwards. If you
press again on the button , you leave the auto--stabilized mode and the symbol
disappears.
Si apoya en el botón y que el símbolo aparece, eso significa que se activa el método
autoestabilizado. Puede así fácilmente empujar el manillar hacia el frente. Si apoya de nuevo
en el botón , sale del método autoestabilizado y el símbolo desaparece.
Wenn Sie auf dem Knopf unterstützen und dass das Symbol erscheint, das bedeutet, dass die Eigen-stabilisierte Methode aktiviert
wird. Sie können die Lenkstange in Richtung der Vorderseite so leicht drücken. Wenn Sie erneut auf dem Knopf unterstützen Sie
kommen Sie aus der Eigen-stabilisierten Methode heraus und das Symbol verschwindet.
Se sostenete sul bottone e che il simbolo appare, ciò significa che il modo auto-stabilizzato è attivato. Potete così facilmente
spingere il manubrio verso la parte anteriore. Se sostenete nuovamente sul bottone , uscite dal modo auto-stabilizzato ed il simbolo
scompare.
Verrouillage/Deverrouillage
Locking/Unlocking Bloqueo/Desbloqueo
Verriegelung/Entriegelung Rilascio/Aggancio
Appuyez sur le bouton pour verrouiller le gyropode. Le picto apparaît alors à lʼécran,
et le gyropode est verrouillé. Si quelquʼun bouge lʼappareil, une alarme retentit. Pour
désactiver lʼalarme, appuyez de nouveau sur .
Press on the button to lock the gyropode. The picto appears then with the screen, and
the gyropode is locked. If somebody moves the device, an alarm resounds. To disable alarm,
support again on .
Apoye en el botón para cerrar el gyropode. El picto aparece entonces a la pantalla,
y el gyropode es cerrado. Si alguien mueve el aparato, una alarma resuena. Para desactivar la
alarma, apoyan de nuevo en .
Unterstützen Sie auf dem Knopf um das gyropode zu verriegeln. Das picto erscheint
dann dem Bildschirm, und das gyropode wird verriegelt. Wenn jemandes das Gerät bewegt, ertönt ein Alarm. Um den Alarm abzustellen
unterstützen erneut auf .
Sostenete sul bottone per chiudere il gyropode. Il picto appare allora allo schermo, ed il gyropode è chiuso. Se qualcuno muove
l'apparecchio, un allarme echeggia. Per disattivare l'allarme, sostenete nuovamente su .
État de la batterie
State of the battery Estado de la batería
Stand der Batterie Stato della batteria
La batterie du gyropode est représentée par une barre contenant 5 cases. Au fur et à mesure
que la batterie se décharge, le gyropode va automatiquement limiter sa vitesse, afin de vous
assurer plus de sécurité.
Note : 5 cases = vitesse maximum; 4 cases = vitesse limitée à 16 km/h; 3 cases = vitesse
limitée à 14 km/h; 2 cases = vitesse limitée à 8 km/h; 1 case = vitesse limitée à 5 km/h.
The battery of the gyropode is represented by a bar containing 5 boxes. As the battery
discharges, the gyropode automatically will limit its speed, in order to ensure you more
security.
Note: 5 boxes = maximum speed; 4 boxes = speed limited to 16 km/h; 3 boxes = speed limited
to 14 km/h; 2 boxes = speed limited to 8 km/h; 1 box = speed limited to 5 km/h.
La batería del gyropode está representada por una barra que contiene 5 casillas. A medida que la batería se descarga, el gyropode va
automáticamente a limitar su velocidad, con el fin de garantizarle más seguridad.
Nota: 5 casillas = velocidad máxima; 4 casillas = velocidad limitada a 16 km/h; 3 casillas = velocidad limitada a 14 km/h; 2 casillas =
velocidad limitada a 8 km/h; 1 casilla = velocidad limitada a 5 km/h.
Die Batterie des gyropode ist durch eine Stange vertreten, die 5 Kästen enthält. In dem Maße, wie die Batterie sich entlädt, wird das
gyropode automatisch seine Geschwindigkeit begrenzen, um Ihnen mehr Sicherheit zu gewährleisten.
Vermerk: 5 Kästen = maximale Geschwindigkeit; 4 Kästen = mit 16 km/h begrenzte Geschwindigkeit; 3 Kästen = mit 14 km/h begrenzte
Geschwindigkeit; 2 Kästen = mit 8 km/h begrenzte Geschwindigkeit; 1 Kasten = mit 5 km/h begrenzte Geschwindigkeit.
La batteria del gyropode è rappresentata da una sbarra che contiene 5 scatole. Man mano che la batteria si scarica, il gyropode
automaticamente limiterà la sua velocità, per garantirvi più sicurezza.
Nota: 5 scatole = velocità massima; 4 scatole = velocità limitata a 16 km/h; 3 scatole = velocità limitata a 14 km/h; 2 scatole = velocità
limitata ad 8 km/h; 1 scatola = velocità limitata a 5 km/h.
Signal de connexion
Signal of connection Señal de conexión
Verbindungssignal Segnale di collegamento
La distance de connexion entre le gyropode et la télécommande est inférieure à 15 mètres. Une
fois cette distance dépassée, la télécommande indique quʼil nʼy a pas de connexion (symbole
triste).
The distance from connection between the gyropode and it remote control is lower than 15
meters. Once this exceeded distance, the remote control indicates that there is no connection
(sad symbol).
La distancia de conexión entre el gyropode y el mando a distancia es inferior a 15 metros. Una
vez esta distancia pasada, el mando a distancia indica que no hay conexión (símbolo triste).
Die Verbindungsdistanz zwischen dem gyropode und der Fernsteuerung ist niedriger als 15
Meter. Einmal diese überschrittene Distanz hebt die Fernsteuerung hervor, dass es keine
Verbindung (trauriges Symbol) gibt.
La distanza di collegamento tra il gyropode ed il telecomando è inferiore a 15 metri. Una volta questa distanza superata, il telecomando
segnala che non ci sono collegamenti (simbolo triste).
Rétro-éclairage de l’écran
Retro-lighting of the screen Retroalumbrado de la pantalla
Retrobeleuchtung des Bildschirms Retroilluminazione dello schermo
Pour activer le rétro-éclairge de lʼécran de la télécommande, effectuez une longue pression sur
le bouton .
To activate retro-éclairge screen of the remote control, carry out a long pressure on the button
.
Para activar el retroéclairge de la pantalla del mando a distancia, efectúan una larga presión
sobre el botón .
Um das Rück-éclairge des Bildschirms der Fernsteuerung zu aktivieren führen einen langen
Druck auf den Knopf durch .
Per attivare il retro-éclairge dello schermo del telecomando, effettuate una lunga pressione sul
bottone .

Télécommande / Remote / Mando a distancia / Fernsteuerung / Telecomando
12
4. Afficheur bas (uniquement sur RX5e) (Low display only on RX5e / Cartelero bajo (solamente sobre RX5e) / Niedriger Plakatkleber (nur auf RX5e) / Attacchino basso (soltanto su RX5e)
RUN
I RUN
!
Picto Fonction Picto Fonction
Bluetooth (connecté quand le picto clignotte)
Bluetooth (connected when the picto clignotte)
Bluetooth (conectado cuando el picto clignotte)
Bluetooth (verbunden, wenn das picto clignotte)
Bluetooth (collegato quando il picto clignotte)
En mode veille, le cercle bleu situé à l’extérieur clignotte. En charge ou en mode apprentissage, le cercle tourne dans le sens des aiguilles d’une montre.
In mode takes care, the blue circle outside located clignotte. In load or learning mode, the circle turns in the direction of the needles of a watch.
En método vela, el círculo azul situado exteriormente clignotte. En carga o en método aprendizaje, el círculo vuelve en el sentido de las agujas de un reloj.
In Methode, passt der blaue Kreis, der außerhalb angesiedelt ist, clignotte auf. In Last oder in Lehrmethode dreht der Kreis im Uhrzeigersinn.
In modo veglia, il cerchio blu situato all'esterno clignotte. In carico o in modo apprendistato, il cerchio gira nel senso degli aghi di un orologio.
Jauge de batterie
Battery level
Capacidad de batería
Batteriemeßstab
Misura di batteria
Activer le mode apprentissage
Activer learning mode
Activar el método aprendizaje
Die Lehrmethode aktivieren
Attivare il modo apprendistato
Gyropode en fonction
Gyropode in function
Gyropode en función
Gyropode in Funktion
Gyropode in funzione
Problème sur le gyropode
Problem on the gyropode
Problema sul gyropode
Problem auf dem gyropode
Problema sul gyropode
Mode apprentissage (vitesse limitée à 6 km/h)
Learning mode (speed limited to 6 km/h)
Método aprendizaje (velocidad limitada a 6 km/h)
Lehrmethode (mit 6 km/h begrenzte Geschwindigkeit)
Modo apprendistato (velocità limitata a 6 km/h)
I RUN
!
RUN
Le OFF ROAD RX5e possède un écran LED supplémentaire, situé entre les deux supports de pieds.
Voici un bref descriptif des différentes indications qu’il vous donne :
OFF the ROAD RX5e has a screen LED additional, located between the two supports of feet.
Here a short description of the various indications that it gives you:
El APAGADO ROAD RX5e posee una pantalla LED suplementaria, situada entre los dos apoyos de pies.
Ahí tienes una breve descripción de las distintas indicaciones que le da:
/!\ Le rétroéclairage de cet afficheur s’éteint automatiquement si aucune action n’a été choisie pendant 120 secondes.
/!\ The retro lighting of this bill-poster dies out automatically if no action were selected during 120 seconds
/!\ El retro alumbrado de este cartelero se apaga automáticamente si ninguna acción se eligió durante 120 segundos.
/!\ Löscht sich die Rückbeleuchtung dieses Plakatklebers automatisch, wenn keine Aktion 120 Sekunden gewählt worden ist.
/!\ L'illuminazione retro di questo attacchino si estingue automaticamente se nessun'azione è stata scelta durante 120 secondi.
OFF ROAD RX5e besitzt einen zusätzlichen LED-Bildschirm, der zwischen den zwei Supporten von Füssen angesiedelt ist.
Hier eine kurze Beschreibung der verschiedenen Hinweise, die er Ihnen gibt:
LONTANO la ROAD RX5e possiede uno schermo LED supplementare, situato tra i due appoggi di piedi.
Ecco una breve descrizione delle varie indicazioni che vi dà:
Extinction du système
Extinction of the system Extinción del sistema
Löschen des Systems Estinzione del sistema
Pour mettre le système hors tension, appuyez sur le bouton « POWER » du gyropode puis
appuyez longuement et simultanément sur les boutons et de la télécommande.
To put the system not under tension, press on button « POWER » of the gyropode then press
lengthily and simultaneously on the buttons and of remote control.
Para poner el sistema fuera de la tensión, apoyan en el botón « POWER » del gyropode luego
apoyan detenida y simultáneamente en los botones y del mando a distancia.
Um das System außerhalb der Spannung zu stellen unterstützen auf dem Knopf « POWER » des
gyropode dann unterstützen lang und gleichzeitig auf den Knöpfen
und von der Fernsteuerung.
Per mettere il sistema fuori tensione, sostenete sul bottone « POWER » del gyropode quindi
sostenete lungamente e simultaneamente sui bottoni e del telecomando.
Lorsque le picto apparaît, cela signifie que la batterie de la télécommande est faible.
Veuillez alors éteindre la télécommande, puis la charger sur un ordinateur ou une source
dʼalimentation 5V à lʼaide du câble micro USB fourni. Lorsque la charge est complète, le picto
va automatiquement disparaître.
When the picto appears, that means that the battery of the remote control is weak. Please
then extinguish the remote control, then to charge it on a computer or a source with food 5V
using the cable micro USB provided. When the load is complete, the picto automatically
will disappear.
Cuando el picto aparece, eso significa que la batería del mando a distancia es escasa.
Quiere entonces apagar el mando a distancia, luego encargarlo sobre un ordenador o una
fuente de alimentación 5V con ayuda del cable micro USB proporcionado. Cuando la carga está
completa, el picto va automáticamente a desaparecer.
Wenn das picto erscheint, das bedeutet, dass die Batterie der Fernsteuerung schwach ist.
Dann löschen Sie bitte die Fernsteuerung dann, es auf einem Rechner oder einer
Ernährungsquelle 5V mittels des gelieferten USB-Kabels zu beladen. Wenn die Last vollständig
ist, das picto geht automatisch verschwinden.
Quando il picto appare, ciò significa che la batteria del telecomando è debole. Volete allora estinguere il telecomando, quindi
caricarla su un computer o una fonte d'alimentazione 5V per mezzo del cavo micro USB fornito. Quando il carico è completo, il picto
automaticamente scomparirà.
Batterie de la télécommande
Battery of the remote control Batería del mando a distancia
Batterie der Fernsteuerung Batteria del telecomando

Indications vocales & Bluetooth
13
1. Voix / Voice / Voz / Stimme / Voce
2. Application / App / Aplicación / Anwendung / Applicazione
Le gyropode RX5e possède un haut-parleur intégré pour vous fournir des indications vocales lors de lʼutilisation
du produit.
Vous pouvez changer la langue via lʼapplication smartphone correspondante (langues disponibles : français & anglais).
The gyropode RX5e has a loudspeaker integrated to provide you vocal indications during the use of the product. You can change the language via the corresponding smartphone application (languages available: French & English).
El gyropode RX5e posee un altavoz integrado para proporcionarle indicaciones vocales en la utilización del producto. Puede cambiar la lengua mediante la aplicación smartphone corresponsal (lenguas disponibles: francés y inglés).
Das gyropode RX5e besitzt einen integrierten Lautsprecher, um Ihnen Stimmhinweise bei der Benutzung des Produktes zu liefern. Sie können die Sprache via der Anwendung KorrespondentinSmartphone ändern (verfügbare Sprachen: Französisch & Englisch).
Il gyropode RX5e possiede un altoparlante integrato per fornirvi indicazioni vocali in occasione dell'utilizzo del prodotto. Potete cambiare la lingua attraverso l'applicazione smartphone corrispondente (lingue disponibili: francese & inglese).
Le gyropode RX5e est compatible avec la technologie Bluetooth 4.0. Pour contrôler votre gyropode via Blue-
tooth, vous devez :
1. Télécharger et installer lʼapplication BEEPER ROAD sur votre smartphone (Apple ou Android) et activer le Bluetooth.
2. Passer le RX5e en mode veille (si le RX5e nʼest pas encore activé, appuyez dʼabord sur le bouton power).
3. Recherchez le terminal BEEPER ROAD via lʼapplication et connectez-le. Une fois connecté le picto Bluetooth situé sur lʼafficheur bas va sʼallumer. Vous pouvez
à présent utiliser votre gyropode RX5e.
4. Le mot de passe par défaut est 666666.
The gyropode RX5e is compatible with technology Bluetooth 4.0. To control your gyropode via Bluetooth, you must:
1. To download and install the application BEEPER ROAD on your smartphone (Apple or Android) and to activate Bluetooth.
2. To pass RX5e in mode takes care (if RX5e is not activated yet, press initially on the button power).
3. Search the terminal BEEPER ROAD via the application and connect it. Once connected the picto Bluetooth located on the low bill-poster will ignite. You can now use your gyropode RX5e.
4. The password by default is 666666.
El gyropode RX5e es compatible con la tecnología Bluetooth 4.0. Para controlar su gyropode mediante Bluetooth, debe:
1. Cargar a distancia e instalar la aplicación BEEPER ROAD sobre su smartphone (Apple o Android) y activar Bluetooth.
2. Pasar el a RX5e en método vela (si el RX5e no se activa aún, apoyan en primer lugar en el botón power).
3. Busque el terminal BEEPER ROAD mediante la aplicación y conecta el. Una vez conectado el picto Bluetooth situado sobre el cartelero bajo va a encenderse. Puede ahora utilizar su gyropode RX5e.
4. La contraseña por defecto es 666666.
Das gyropode RX5e ist kompatibel mit der Technologie Bluetooth 4.0. Um Ihr gyropode via Bluetooth zu kontrollieren müssen Sie:
1. Die Anwendung BEEPER ROAD auf Ihren Smartphonen (Apple oder Android) laden und installieren, und Bluetooth aktivieren.
2. RX5e in Methode übergehen achtet darauf (ob RX5e noch nicht aktiviert wird, unterstützen zuerst auf dem Knopf power).
3. Suchen Sie den Terminal BEEPER ROAD via der Anwendung und verbinden. Einmal verbunden wird sich das picto Bluetooth, das auf dem niedrigen Plakatkleber angesiedelt ist, anzünden. Sie können jetzt Ihr gyropode RX5e benutzen.
4. Das Passwort mangels ist 666666.
Il gyropode RX5e è compatibile con la tecnologia Bluetooth 4.0. Per controllare il vostro gyropode via Bluetooth, dovete:
1. Trasferire ed installare l'applicazione BEEPER ROAD sulla vostra smartphone (Apple o Android) ed attivare Bluetooth.
2. Passare RX5e in modo veglia (se RX5e non è ancora attivato, sostenete inizialmente sul bottone power).
3. Ricercate il terminale BEEPER ROAD attraverso l'applicazione e collegate. Una volta collegato il picto Bluetooth situato sull'attacchino basso si accenderà. Potete ora utilizzare il vostro gyropode RX5e.
4. La parola d'ordine per difetto è 666666.
21
Tuto - Learn - Comience - Beginnen Sie - Cominciate
14
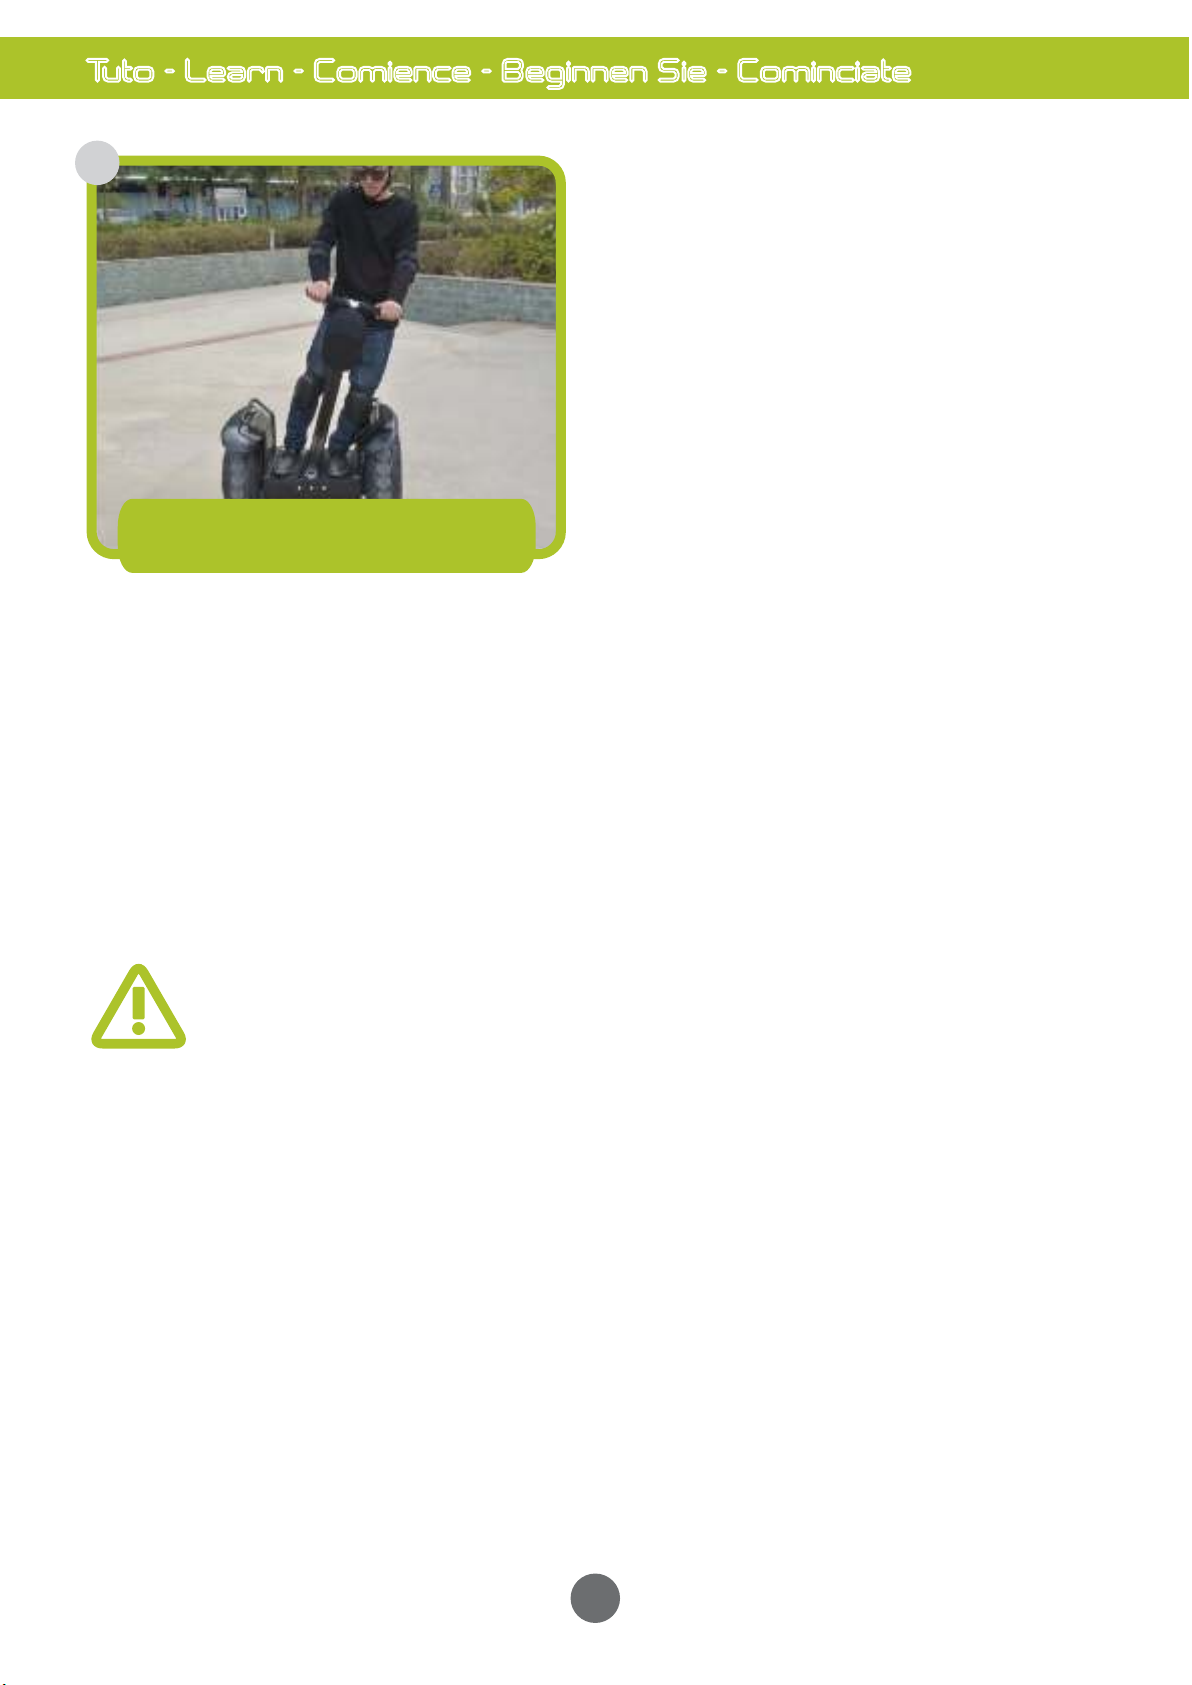
/!\ Pour vos premières sorties, nous vous conseillons de porter un casque ainsi que des protections (genoux, coudes, poignets). En effet, la
conduite du gyropode est assez simple en apparence mais il est quasi inévitable que cet apprentissage vous conduise à quelques chutes. Vous
appréhendrez alors les limites de lʼengin ainsi que vos propres limites. Ne franchissez donc pas trop rapidement les étapes !
/!\ For your first outputs, we advise you to carry a helmet as well as protections (knees, elbows, wrists). Indeed, the control of the gyropode is rather simple seemingly but it is quasi inevitable that this training leads you to some falls. You will then appréhendrez the limits
of the machine like your own limits. Thus do not reach too quickly the stages!
/!\ Para sus primeras salidas, le aconsejamos llevar un casco así como protecciones (rodillas, codos, muñecas). En efecto, la conducta del gyropode es bastante simple aparentemente pero es casi inevitable que este aprendizaje le conduzca a algunas caídas. Appréhendrez
entonces los límites de la unidad así como sus propios límites. ¡No cruzan pues demasiado rápidamente las etapas!
/!\ Für Ihre ersten Ausgänge raten wir Ihnen, einen Helm sowie einen Schutz zu tragen (Kniee, Ellbogen, Handgelenke). In der Tat ist die Leitung des gyropode scheinbar ziemlich einfach, aber es ist fast unausweichlich, dass diese Lehre Sie zu einigen Fällen führt. Sie
appréhendrez dann die Grenzen des Geräts sowie Ihre eigenen Grenzen. Überqueren also nicht schnell zu die Etappen!
/!\ Per le vostre prime uscite, vi consigliamo di portare un casco e protezioni (ginocchia, gomiti, polsi). Infatti, la condotta del gyropode è abbastanza semplice apparentemente ma è quasi inevitabile che quest'apprendistato li conduca ad alcune cadute. Appréhendrez
allora i limiti della macchina e i vostri limiti. Non superate dunque troppo rapidamente le tappe!
3
Réglez
Regulate
Regule
Regulieren Sie
Regolate
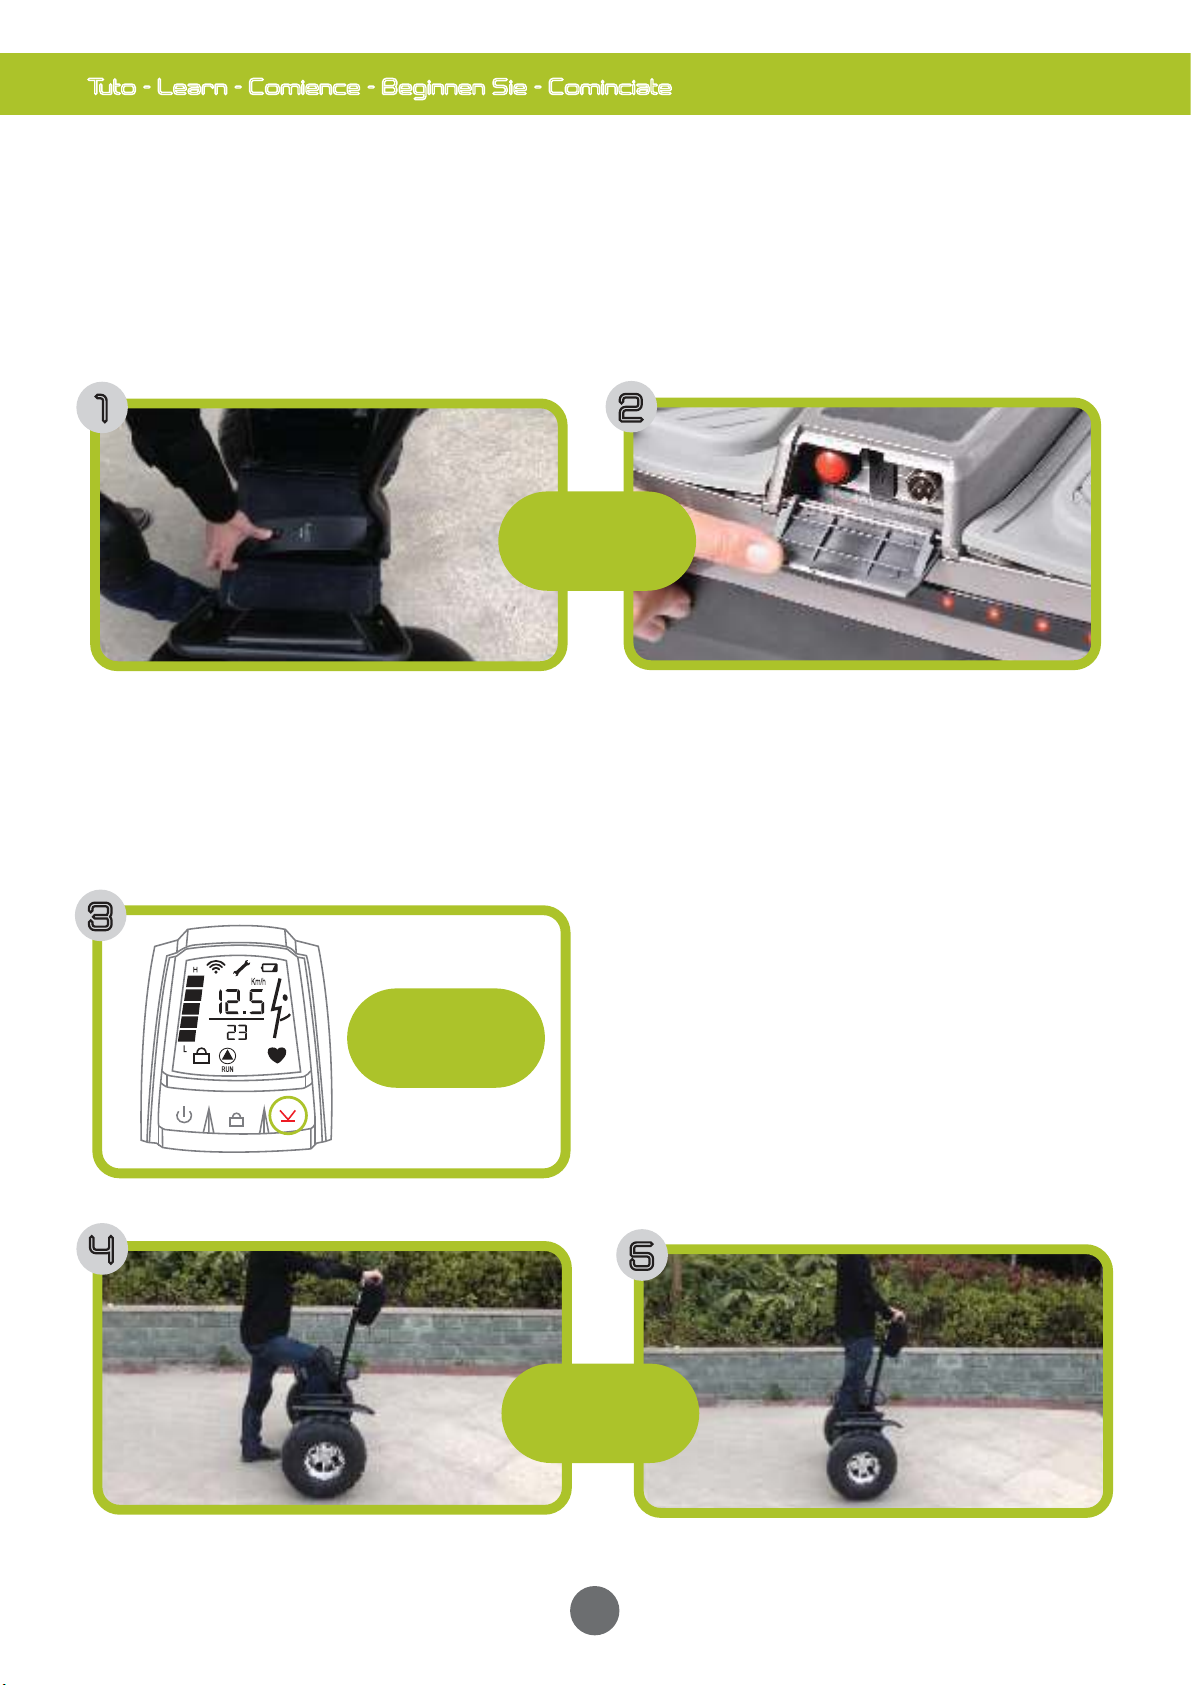
Pour votre première utilisation, nous vous conseillons de mettre le gyropode en MODE APPRENTISSAGE
(voir p. 10). Pressez sur le bouton de la télécommande pour entendre sur la version RX5e+ʼʼMode
APPRENTISSAGEʼʼ (Un bip retentit sur les versions R2e / R2e+ / R3e / R3e+). La vitesse est
alors limitée à 6 km/h.
For your first use, we advise you to put the gyropode in LEARNING MODE (see p. 10). Press on the button remote control to hear on
the RX5e+' version 'Learning mode'' (a beep resounds on the versions R2e/R2e+/R3e/R3e+). Speed is then limited to 6 km/h.
Para su primera utilización, le aconsejamos poner el gyropode en MÉTODO APRENDIZAJE (véase p. 10). Presione sobre el botón del
mando a distancia para oír sobre la versión RX5e+' 'Método APRENDIZAJE'' (un BIP resuena sobre las versiones R2e/R2e+/R3e/R3e+).
La velocidad se limita entonces a 6 km/h.
Für Ihre erste Benutzung raten wir Ihnen, das gyropode in METHODE LEHRE zu stellen (siehe S. 10). Pressen Sie auf dem Knopf von
der Fernsteuerung, um auf der Version RX5e+' 'Methode LEHRE' zu hören' (ein Signalton ertönt auf den Versionen
R2e/R2e+/R3e/R3e+). Die Geschwindigkeit ist dann mit 6 km/h begrenzt.
Per il vostro primo utilizzo, vi consigliamo di mettere il gyropode in MODO APPRENDISTATO (vedere p. 10). Premete sul bottone del
telecomando per intendere sulla versione RX5e+''modo APPRENDISTATO'' (un cercapersone echeggia sulle versioni
R2e/R2e+/R3e/R3e+). La velocità è allora limitata a 6 km/h.
2
1
Versions R2e/R2e+/R3e/R3e+ : Pressez lʼinterrupteur central ON pour activer le
gyropode. Un bip retentit alors. Vérifiez grâce aux voyant que la charge est pleine. Nʼutilisez pas un
gyropode lorsque la charge est intérieure à la moitié.
R2e/R2e+/R3e/R3e+ versions: Press the central switch ONE to activate the gyropode. A beep resounds then. Check
thanks to the indicator that the load is full. Do not use a gyropode when the load is interior with half.
Versiones R2e/R2e+/R3e/R3e+: Presionan el interruptor central ÉL para activar el gyropode. Un BIP resuena
entonces. Comprueban gracias al indicador que la carga es llena. No utilizan un gyropode cuando la carga es interior a la mitad.
Versionen R2e/R2e+/R3e/R3e+: Pressen den zentralen Schalter MAN, um das gyropode zu aktivieren. Ein Signalton
ertönt dann. Prüfen dank dem Kontroll-Licht, dass die Last voll ist. Benutzen kein gyropode, wenn die Last an der Hälfte inner ist.
Versioni R2e/R2e+/R3e/R3e+: Premete il commutatore centrale SI per attivare il gyropode. Un cercapersone echeggia
allora. Verificate grazie alla spia luminosa se il carico è pieno. Non utilizzate un gyropode quando il carico è interno alla metà.
Version RX5e : Ouvrez la petite trappe située sur lʼavant et appuyez longuement sur le
bouton rouge.
RX5e version: Open the small trap door located on before and press lengthily on the red button.
Versión RX5e: Abren la pequeña trampilla situada sobre el frente y apoyan detenidamente en el botón rojo.
RX5e-Version: Öffnet die kleine Falltür, die angesiedelt ist, auf vor, und unterstützt lang auf dem roten Knopf.
Versione RX5e: Aprite la piccola valvola situata sulla parte anteriore e sostenete lungamente sul bottone rosso.
5
4
Montez
Go up
Suba
Steigen Sie
Montate
Activez
Active
Active
Aktivieren Sie
Attivate

15
Tenez le guidon des 2 mains sans lʼincliner et en ne le maintenant pas trop fermement. Posez votre pied directeur (droit ou gauche au choix) sur le support de pied du gyropode. Le BEEPER Road détecte
la pression et se met automatiquement en équilibre gyroscopique. Inclinez légèrement votre pied en avant ou en arrière pour tester la gyroscopie. Prenez alors appui sur ce pied pour monter sur le
gyroscope et poser le second pied comme si vous montiez une marche. La gyroscopie vous équilibre automatiquement, Tentez dʼabord de rester sur place en vous inclinant légèrement en avant puis en
arrière sans mouvement brusque. Ne vous appuyez pas sur le guidon pour éviter lʼamplification du mouvement. Vous devez pouvoir de suite lâcher le guidon et maintenir lʼéquilibre uniquement avec les
pieds.
Hold the handlebar of the 2 hands without inclining it and by not maintaining it too firmly. Pose your directing foot (right or left with the choice) on the support of foot of the gyropode. TO BEEP Road detects the pressure and equilibrizes themselves gyroscopic automatically.
Incline your foot slightly to test the gyroscopy ahead or behind. Then take support on this foot to go up on the gyroscope and to pose the second foot as if you assemble a walk. The gyroscopy balances you automatically, initially Try to remain on the spot by inclining you
slightly ahead then behind without abrupt movement. You do not press on the handlebar to avoid the amplification of the movement. You must be able continuation to release the handlebar and to maintain balance only with the feet.
Tenga el manillar de las 2 manos sin inclinarlo y no manteniéndolo demasiado firmemente. Coloque su pie director (derecho o izquierdo a la elección) en el soporte de pie del gyropode. El BEEPER Road detecta la presión y se pone automáticamente en equilibrio giroscópico.
Incline ligeramente su pie a continuación o detrás para probar el gyroscopie. Tome entonces apoyo sobre este pie para subir sobre el giroscopio y colocar el segundo pie como si subía una marcha. El gyroscopie le equilibra automáticamente, intenta en primer lugar
permanecer in situ inclinándole ligeramente a continuación luego detrás sin movimiento brusco. No apoya en el manillar para evitar la amplificación del movimiento. Debe poder inmediatamente liberar el manillar y mantener el equilibrio solamente con los pies.
Halten Sie die Lenkstange der 2 Hände, ohne es, und indem man es nicht aufrechterhalten zu fest zu neigen. Stellen Sie Ihren leitenden Fuß (gerad oder link an der Wahl) auf dem Support von Fuß des gyropode. BEEPER Road stellt den Druck fest und stellt sich automatisch
in gyroskopischem Gleichgewicht. Leicht vorwärts oder rückwärts neigen Sie Ihren Fuß, um das gyroscopie zu testen. Dann nehmen Sie Unterstützung auf diesem Fuß, um auf das Gyroskop zu steigen und den zweiten Fuß zu stellen, als ob Sie einen Ablauf stiegen. Das
gyroscopie balanciert Sie automatisch aus, versucht zuerst, vor Ort, indem es Sie leicht vorwärts zu bleiben dann rückwärts ohne plötzliche Bewegung neigt. Unterstützen Sie nicht auf der Lenkstange, um die Erweiterung der Bewegung zu vermeiden. Sie müssen von Folge
können die Lenkstange loslassen und das Gleichgewicht mit den Füssen nur aufrechterhalten.
Tenete il manubrio delle 2 mani senza inclinarlo e non mantenendolo troppo fermamente. Porte il vostro piede direttore (diritto o sinistro alla scelta) sul supporto di piede del gyropode. BIPPARLO Road individua la pressione e si mette automaticamente in equilibrio
giroscopico. Inclinate leggermente il vostro piede davanti o dietro per provare la gyroscopie. Prendete allora appoggio in questi piedi per montare sul giroscopio e porre il secondo piede come se montaste una marcia. La gyroscopie li equilibra automaticamente, tenta
inizialmente di restare sul posto inclinandoli leggermente davanti quindi dietro senza movimento brusco. Non sostenete sul manubrio per evitare l'amplificazione del movimento. Dovete potere di seguito liberare il manubrio e mantenere l'equilibrio soltanto con i piedi.
6Accélérez en ligne droite
Accelerate online right Acelere en línea recta
Geradlinig beschleunigen Sie Accelerate in linea retta
Nous vous conseillons de faire vos premiers essais
de conduite dans un lieu si possible privé,
spacieux, sans obstacle et sous la responsabilité
dʼun accompagnateur expérimenté.
Il est temps de tester lʼaccélération en ligne droite. Inclinez le haut du corps vers lʼavant sans vous
reposer sur le guidon (tenez-le lâchement). Le gyropode prend de la vitesse au fur et à mesure de votre
inclinaison. Lʼaccélération est intuitive et douce selon votre aptitude à incliner votre poids du corps vers
lʼavant. Ne tentez jamais de vous pencher de façon brusque ou excessive. Le système gyroscopique ayant
ses limites, si votre poids incliné sur lʼavant est supérieur à la limite du système, le gyropode basculera
vers lʼavant avec un risque de chute et de blessure.
It is time to test acceleration online right. Incline the top of the body forwards without you resting on the handlebar (hold it loosely). The
gyropode takes speed as your slope. Acceleration is intuitive and soft according to your aptitude to incline your weight of the body forwards.
Never try to lean you in an abrupt or excessive way. The gyroscopic system having its limits, if your weight inclined on before is higher than
the limit of the system, the gyropode will rock forwards with a risk of fall and wound.
Es hora de probar la aceleración en línea recta. Incline la cumbre del cuerpo hacia el frente sin basarustedes en el manillar (tenga la
suelta). El gyropode toma de la velocidad a medida de su inclinación. La aceleración es intuitiva y suave según su aptitud a inclinar su peso
del cuerpo hacia el frente. No intentan nunca inclinarse de manera brusca o excesiva. El sistema giroscópico que tendrá sus límites, si su
peso inclinado sobre el frente es superior al límite del sistema, el gyropode oscilará hacia el frente con un riesgo de caída y herida.
Es ist Zeit, die Beschleunigung geradlinig zu testen. Neigen Sie den oberen Teil des Körpers in Richtung der Vorderseite, ohne Sie auf der
Lenkstange (halten Sie lâchement) zu beruhen. Das gyropode gewinnt je nach Ihrer Neigung an Geschwindigkeit. Die Beschleunigung ist
nach Ihrer Eignung intuitiv und zart, Ihr Gewicht des Körpers in Richtung der Vorderseite zu neigen. Versuchen nie, plötzlich oder sich
übermäßig zu neigen. Das gyroskopische System, das seine Grenzen hat, wenn Ihr auf der Vorderseite schräges Gewicht höher als die
Grenze des Systems ist, wird das gyropode in Richtung der Vorderseite mit einem Fall- und Verletzungsrisiko umkippen.
È tempo di provare l'accelerazione in linea retta. Inclinate la cima del corpo verso la parte anteriore senza riposarli sul manubrio (tenete
vergognosamente). Il gyropode prende della velocità secondo la vostra pendenza. L'accelerazione è intuitiva e morbida secondo la vostra
attitudine ad inclinare il vostro peso del corpo verso la parte anteriore. Non tentate mai di tendersi in modo brusco o eccessivo. Il sistema
giroscopico avendo i suoi limiti, se il vostro peso inclinato sulla parte anteriore è superiore al limite del sistema, il gyropode oscillerà verso
la parte anteriore con un rischio di caduta e di ferita.
We advise you to carry out your first tests of control in a place if possible private, roomy, without obstacle and under the responsibility of an experienced guide.
Le aconsejamos hacer sus primeras pruebas de conducta en un lugar si es posible privado, espacioso, sin obstáculo y bajo la responsabilidad de un acompañante con experiencia.
Wir raten Ihnen, Ihre ersten Leitungsversuche in einem wenn möglich privaten, geräumigen Ort ohne Hindernis und unter der Verantwortung eines erfahrenen Begleiters zu machen.
Vi consigliamo di fare le vostre prime prove di condotta in un luogo possibilmente privato, spazioso, senza ostacolo e sotto la responsabilità di un accompagnatore esperto.
Tuto - Learn - Comience - Beginnen Sie - Cominciate
8Pour votre premier freinage, pliez simplement les jambes progressivement en mettant le poids de votre
corps en arrière. Le freinage est progressif et sans à-coups. Vous pourrez ensuite tenter des freinages plus
brusques et énergiques. La marche arrière ne doit être tentée que lorsque vous avez déjà utilisé le
gyropode en marche avant durant quelques minutes et que vous sentez la maîtrise du gyropode.
Commencez par incliner légèrement les pieds vers lʼarrière sans changer le poids de votre corps, la
marche arrière sera lente et progressive. Ne tentez pas une marche arrière longue sans voir les obstacles
éventuels, ce qui vous ferait prendre des risques de blessure et de dommages.
For your first braking, gradually fold simply the legs by putting the weight of your body behind. Braking is progressive and without jolts.
You will be able to then try more abrupt and energetic brakings. Reverse running should be tried only when you already used the gyropode
walks from there before during a few minutes and that you feel the control of the gyropode. Start by slightly inclining the feet towards the
back without changing the weight of your body, reverse running will be slow and progressive. Do not try a long reverse running without
seeing the possible obstacles, which would make you take chances of wound and damage.
Para su primer frenado, doblan simplemente las piernas progresivamente poniendo el peso de su cuerpo detrás. El frenado es progresivo
y sin sacudidas. Podrá a continuación intentar frenados más bruscos y más enérgicos. No debe intentarse la marcha atrás hasta que ya ha
utilizado el gyropode en marcha antes de durante algunos minutos y que siente el control del gyropode. Comience por inclinar ligeramente
los pies hacia la parte sin cambiar el peso de su cuerpo, la marcha atrás será lenta y progresiva. No intentan una marcha atrás larga sin
ver los posibles obstáculos, lo que le haría tomar riesgos de herida y daños.
Für Ihre erste Bremsung falten einfach die Beine progressiv, indem man das Gewicht Ihres Körpers stellt rückwärts. Die Bremsung ist und
ohne Rucke progressiv. Sie können danach plötzlichere und energischere Bremsungen versuchen. Der Rückwärtsgang darf versucht werden
nur, wenn Sie bereits das gyropode benutzt haben davon gehen vor während einiger Minuten, und dass Sie fühlen Sie die Beherrschung des
gyropode. Beginnen Sie, mit die Füsse in Richtung des hinteren Teils leicht zu neigen, ohne das Gewicht Ihres Körpers zu ändern, der
Rückwärtsgang wird langsam und progressiv sein. Versuchen keinen langen Rückwärtsgang, ohne die möglichen Hindernisse zu sehen, was
Ihnen würde Verletzungs- und Schadenrisiken eingehen lassen.
Per la vostra prima frenata, piegate semplicemente le gambe gradualmente mettendo il peso del vostro corpo dietro. La frenata è
progressiva e senza sobbalzi. Potrete in seguito tentare frenate più brusche e energiche. La retromarcia deve essere tentata soltanto quando
avete già utilizzato il gyropode in marcia di durante alcuni minuti e che sentite il controllo del gyropode. Cominciate per inclinare
Freinage & marche arrière
Braking & reverse running Frenado y marcha atrás
Bremsung & Rückwärtsgang Frenata & retromarcia
16
Le virage doit être abordé avec précaution car il peut générer des risques de chute et de blessure.
Testez tout dʼabord un virage sur place en faisant une rotation à 360°. Balancez latéralement le
guidon du gyropode à droite. Les roues se mettront progressivement à tourner en sens opposé lʼune
de lʼautre afin de faire une rotation sur place. Testez cette rotation progressive afin de vous
familiariser avec lʼutilisation latérale du guidon. Avancez ensuite tout droit, puis penchez légèrement
le guidon dʼun côté pour tourner. Le gyropode calcule automatiquement la vitesse de rotation des
roues afin de vous faire éxécuter un virage progressif. A haute vitesse (forte inclinaison vers lʼavant),
si vous penchez le guidon, les roues nʼéxécuteront pas un virage serré mais un virage progressif.
Toutefois, il est essentiel de pencher le poids du corps à lʼintérieur du virage exécuté (virage à gauche
= se penchez à gauche = poids à gauche), si vous exécutez un virage tout en tentant de rester droit,
lʼinertie vous fera rapidement éjecter du gyropode en risquant blessure et dommage.
First of all test a turn on the spot by making a rotation with 360°. Balance the handlebar of the
gyropode laterally on the right. The wheels will be gradually put to turn in opposite direction one of
the other in order to make a rotation on the spot. Test this progressive rotation in order to familiarize
you with the side use of the handlebar. Advance straight then, then slightly lean the handlebar on a
side to turn. The gyropode automatically calculates the number of revolutions of the wheels in order
to make you carry out a progressive turn. At high-speed (strong forward tilt), if you lean the
handlebar, the wheels will not carry out a tight turn but a progressive turn. However, it is essential to
lean the weight of the body inside the turn carried out (turn on the left = lean on the left = weight
on the left), if you carry out a turn while trying to remain right, inertia will quickly make you eject
gyropode by risking wound and damage.
Pruebe en primer lugar una vuelta in situ haciendo una rotación a 360°. Equilibre lateralmente el
manillar del gyropode a la derecha. Las ruedas se pondrán progresivamente a volver en sentido
opuesto a una del otro con el fin de hacer una rotación in situ. Pruebe esta rotación progresiva con el fin de ustedes familiarizar con la utilización lateral del manillar. Avance a continuación todo derecho,
luego inclinan ligeramente el manillar por una parte para volver. El gyropode calcula automáticamente la velocidad de rotación de las ruedas con el fin de hacerle realizar una vuelta progresiva. A alta
velocidad (fuerte inclinación hacia el frente), si inclina el manillar, las ruedas no realizarán una vuelta apretada pero una vuelta progresiva. No obstante, es esencial inclinar el peso del cuerpo dentro de
la vuelta realizada (vuelta a la izquierda = se inclina a la izquierda = peso a la izquierda), si realiza una vuelta intentando al mismo tiempo seguir siendo derechos, la inercia le hará rápidamente expulsar
del gyropode arriesgando herida y daño.
Zunächst vor Ort testen Sie eine Kurve, indem man eine Umdrehung an 360° machend. Längsseitig rechts balancieren Sie die Lenkstange des gyropode. Die Räder werden progressiv beginnen, in
Gegensinn eine der anderen zu drehen, um eine Umdrehung vor Ort zu machen. Testen Sie diese progressive Umdrehung, um Sie mit der Seitenbenutzung der Lenkstange vertraut zu machen. Rücken
Sie danach jedes Recht vor dann neigen leicht die Lenkstange einerseits, um zu drehen. Das gyropode berechnet automatisch die Drehzahl der Räder, um Ihnen eine progressive Kurve ausführen zu lassen.
A hohe Geschwindigkeit (starke Neigung in Richtung der Vorderseite), wenn Sie die Lenkstange neigen, werden die Räder keine strenge Kurve, sondern eine progressive Kurve ausführen. Allerdings ist es
sich wesentlich, das Gewicht des Körpers innerhalb der ausgeführten Kurve (Kurve links zu neigen = neigt links = Gewicht links), wenn Sie eine Kurve ausführen, indem sie versuchen gerad zu bleiben,
wird die Trägheit Ihnen schnell lassen vom gyropode abwerfen, indem sie Verletzung und Schaden riskieren wird.
Provate innanzitutto un giro sul posto facendo una rotazione a 360°. Equilibrate lateralmente il manubrio del gyropode a destra. Le ruote si metteranno gradualmente a girare in senso opposto una
dell'altra per fare una rotazione sul posto. Provate questa rotazione progressiva per voi familiarizzare con l'utilizzo laterale del manubrio. Avanzate in seguito ogni diritto, quindi tendete leggermente il
manubrio da un lato per girare. Il gyropode calcola automaticamente la velocità d'avanzamento delle ruote per farvi effettuare un giro progressivo. A alta velocità (forte pendenza verso la parte
anteriore), se tendete il manubrio, le ruote non effettueranno un giro stretto ma un giro progressivo. Tuttavia, è essenziale tendere il peso del corpo all'interno del giro effettuato (giro a sinistra = vi
tendete a sinistra = peso a sinistra), se effettuate un giro pur tentando di restare diritto, l'inerzia vi farà rapidamente espellere del gyropode rischiando ferita e danno.
9
The turn must be approached with precaution because it can generate risks of fall and wound.
La vuelta debe abordarse con precaución ya que puede generar riesgos de caída y herida.
Die Kurve muss mit Vorsicht zur Sprache gebracht werden, denn er kann Fall- und Verletzungsrisiken erzeugen.
Il giro deve essere abbordato con precauzione poiché può generare rischi di caduta e di ferita.
Tuto - Learn - Comience - Beginnen Sie - Cominciate
Freinage & marche arrière
Braking & reverse running Frenado y marcha atrás
Bremsung & Rückwärtsgang Frenata & retromarcia

Caractéristiques / Characteristics / Características / Eigenschaften / Caratteristiche
17
DimensionsWeight
Net weight R2e / R2e+ / R3e / R3e+ / RX5e (en kg) 54 kg / 39 kg / 61 kg / 45 kg / 43 kg
Net weight R2e / R2e+ / R3e / R3e+ / RX5e (en kg) 58 kg / 43 kg / 71 kg / 49 kg / 46 kg
Max weight supported (en kg) 150 kg
minimum weight accepted (en kg) 20 kg
Technical datas
Dimensions R2e & R2e+ (H min/max x L x P en cm)
Dimensions R3e & R3e+ (H min/max x L x P en cm)
Dimensions RX5e (H min/max x L x P en cm)
Tire size R2e & R2e+ (Ø cm / pouces x H x L en cm)
Tire size R3e & R3e+ (Ø cm / pouces x H x L en cm)
Tire size RX5e (Ø cm / pouces x H x L en cm)
Rim diameter R2e & R2e+ (Ø cm & pouces) 25 cm / 17ʼʼ
Rim diameter R3e & R3e+ (Ø cm & pouces) 25 cm / 19ʼʼ
Rim diameter RX5e (Ø cm & pouces) 25 cm / 19ʼʼ
Max speed R2e & R2e+ (en km/h) 16 km/h / 18 km/h
Max speed R3e & R3e+ (en km/h) 18 km/h
Max speed RX5e (en km/h) 20 km/h
Autonomy (max.) R2e & R3e (en km) 25 km
Autonomy (max.) R2e+ & R3e+ (en km) 30 km
Autonomy (max.) RX5e (en km) 25 km
Type of batteries R2e & R3e Plomb acide
Type of batteries R2e+ / R3e+ / RX5e Li-thium ion Samsung
Specifications of batteries R2e & R3e 36V 12 AH / 48V 14 AH
Specifications of batteries R2e+ / R3e+ / RX5e 48V 14 AH / 48V 11 AH
Battery charger R2e+ / R3e+ / RX5e 72V 8,8 AH
Type of motor R2e,R2e+,R3e, R3e+ / RX5e Brushes motor / 2 Brushless motor
Nominal motor rating 1 000W x 2
Motor rating 400W x 2
Operating temperature -10°C / +40°C
Maximum slope 30°
IP rating (protection water, dust) IP56
European conformity CE
Steel hull Épaisseur 3 mm
Pressure sensors (support de pieds) x 4

18
PackFonctions & Equipements (en option & de série)
Packaging size R2e & R2e+ (H x L x P en cm) 131 x 70 x 43 cm
Packaging size R3e & R3e+ (H x L x P en cm)
133 x 85 x 48 cm
Packaging size RX5e (H x L x P en cm) 133 x 85 x 48 cm
Remote with LCD display Of series
Indication of autonomy
Of series (on the remote)
Mileage odometer Of series (on the remote)
Speedometer in km/h Of series (on the remote)
2 driving mode
Of series (expert & practice)
Activation without gyroscopic balance Of series
Activation with gyroscopic balance Of series
Gyroscopic balance by remote control
Of series
French voice messages Of series (only on RX5e)
English voice messages Of series (only on RX5e)
Smartphone application (Apple/Android)
Of series (only on RX5e)
Rent System Of series (only on RX5e)
BIP of prevention Of series
Integrated alarm Of series (on the remote)
Front LED lights Of series
Back LED lights
Of series
Tires hight quality
Of series
Aluminium trim
Of series
Flexible mudguards
Of series
Side tubular supports Of series (only on R3e, R3e+, RX5e)
Retractable metal crutch
Of series
Circuit breaker Of series
Switch ON/OFF
Of series
Height-adjustable handle
Of series
Handles grip on handlebar Of series
Warranty
2 years (on parts, except battery)
Colors R2e & R3e Matt black
Colors R2e+ & R3e+ Metal grey
Colors RX5e Black & Metal grey
Minis-bag on handlebar In option
Side support of golf bag
In option (only on R3e+ & RX5e)
Control-knee In option (only on RX5e)
Caractéristiques / Characteristics / Características / Eigenschaften / Caratteristiche

Maintenez / Maintenance / Mantenimiento / Wartung / Mantenimiento
19
Batteries
Les batteries PLOMB ACIDE (versions R2e /R3e) sont au nombre de 3 sur les modèles R2e / R2e+ (puissance 36V) & de 4 sur les modèles R3e / R3e+ (puissance 48V). Le modèle RX5e contient quant à lui 1 seule batterie LITHIUM ION (dʼune
puissance de 48V). Elles ont une durée de vie moyenne de 600 cycles de recharge (soit environ 2 ans avec une recharge quotidienne), elles peuvent perdre en moyenne 15 à 25% de leur capacité de charge par an.
Les batteries sont sans maintenance particulière mais doivent être changées lorsquʼelles ne sont plus efficaces et nous vous conseillons leur changement au moins tous les 3 ans.
Pour leur assurer une plus longue durée de vie, nous vous conseillons :
- de recharger systématiquement votre Road sʼil est déchargé
- de ne pas les charger plus de 15 heures de suite
- dʼéviter des recharges incomplètes (sauf si nécessaire)
- de les recharger au moins tous les mois si le Road nʼest pas utilisé
Fusible
Pour votre sécurité, le gyropode est équipé dʼun coupe circuit avec fusible de 50 ampères. En cas de non fonctionnement du gyropode, veuillez dans un premier temps vérifier ce fusible et le changer le cas échéant.
Serrage des écrous de roue
Pour votre sécurité, il est impératif de vérifier régulièrement (au démarrage et au moins tous les 6 mois) le serrage des écrous de roue. Veuillez utiliser une clé de 17 mm et un couple de serrage de 108 N·m (11 kg-m) (~11daNm).
Nettoyage
Le nettoyage au laveur haute pression est exclu. Un nettoyage au souffleur haute pression est conseillé. Vous pouvez utiliser une éponge humide mais veillez à éviter les coulées dʼeau notamment au niveau de la coque châssis afin de ne pas
endommager les éléments électroniques et électriques du gyropode.
Pneus
Le gonflage des pneus doit être contrôlé au démarrage et au moins tous les 3 mois. La pression moyenne est de 2,5 bar mais peut varier selon le poids de lʼutilisateur et les conditions du terrain dʼutilisation.
Attention une pression trop basse entraînera une surconsommation électrique et une baisse significative de lʼautonomie du BEEPER Road.
Étanchéité
Le Road offre un indice dʼétanchéité testé IP56. Cet indice signifie que le Road est :
INDICE 5(IP56) : Protégé contre les poussières.
INDICE 6(IP56) : Protégé contre les forts jets d'eau de toutes directions à la lance (buse de 12,5 mm, distance 2,5 m à 3 m, débit 100 l/min ±5%).
Concrètement, lʼutilisation est possible sous une pluie légère et le Road peut traverser une flaque inférieure à 1 cm de profondeur. Nous vous conseillons toutefois de ne pas utiliser le Road dans des conditions de forte pluie pour des raisons de
sécurité. Attention, la dégradation due à lʼhumidité est exclue de nos conditions de garantie.
Hivernage
Si vous nʼutilisez pas votre gyropode, veuillez lʼentreposer dans un lieu sec & tempéré.
Pour assurer une meilleure longévité de votre batterie, nous vous conseillons de la recharger tous les mois.
Si vous nʼutilisez pas votre gyropode plus de 3 mois, nous vous conseillons de dégonfler le pneu pour lui assurer une plus importante longévité.
Batteries: The batteries ACID LEAD (versions R2e/R3e) are 3 on the models R2e/R2e+ (power 36V) & of 4 on the models R3e/R3e+ (power 48V). The RX5e model contains as for him 1 only battery LITHIUM ION (of a power of 48V). They have one average lifetime of 600 cycles of
refill (that is to say approximately 2 years with a daily refill), they can lose on average 15 to 25% of their load capacity a year. The batteries are without particular maintenance but must be changed when they are not effective any more and we advise you their change at least every 3
years. To assure more a long life to them of life, we advise you: to reload your Road systematically if it is discharged; not to charge them more than 15 hours with continuation; to avoid incomplete refills (except if necessary); to reload them at least months if Road is not used.
Fuse: For your security, the gyropode is equipped with a cut circuit with fuse of 50 amps. In the event of failure of the gyropode, please initially check this fuse and change it if necessary.
Tightening of the nuts of wheel: For your security, it is imperative to regularly check (at starting and at least every 6 months) the tightening of the nuts of wheel. Please use a key of 17 mm and a tightening torque of 108 NR·m (11 kg-m) (~11daNm).
Cleaning: Cleaning with the washer high pressure is excluded. A cleaning with the blower high pressure is advised. You can use a wet sponge but take care to avoid water castings in particular on the level of the hull frame in order not to damage the electronic and electric elements
gyropode.
Tires: The inflation of the tires must be controlled at starting and at least every 3 months. The average pressure is of 2.5 bar but can vary according to the weight of the user and the conditions of the ground of use. Attention a too low pressure will involve an electric overconsumption
and a significant decrease of the autonomy of BEEPER Road.
Sealing: Road offers an index of sealing tested IP56. This index means that Road is: INDEX 5 (IP56): Protected against dust. INDEX 6 (IP56): Protected against the strong fountains from all directions to the lance (tube of 12.5 mm, outdistances 2.5 m to 3 m, flow 100 l/min ±5%).
Concretely, the use is possible under a light rain and Road can cross a puddle pool lower 1 cm from depth. We advise you however not to use Road under conditions of strong rain for safety reasons. Attention, degradation due to moisture is excluded from our conditions of warranty.
Wintering: If you do not use your gyropode, please store it in a dry & moderate place. To assure a better longevity of your battery, we advise you to reload it every month. If you do not use your gyropode more than 3 months, we advise you to deflate the tire to assure a more
important longevity to him.
Baterías: La VENTAJA ÁCIDA de baterías (versiones R2e/R3e) es 3 en los modelos R2e/R2e+ (poder 36V) y de 4 en los modelos R3e/R3e+ (poder 48V). El modelo de RX5e contiene en cuanto a él 1 solamente IÓN DE LITIO de la batería (de un poder de 48V). Tienen un curso de la
vida medio de 600 ciclos del repuesto (es decir de aproximadamente 2 años con un repuesto diario), ellos pueden perder por término medio 15 al 25% de su capacidad de carga al año. Las baterías están sin mantenimiento particular pero deben ser cambiadas cuando no son eficaces
más y le aconsejamos su cambio por lo menos cada 3 años. Para asegurar más una larga vida a ellos de la vida, le aconsejamos: para recargar su camino sistemáticamente si se descarga; para no encargarlos más de 15 horas de la continuación; para evitar repuestos incompletos
(excepto en caso de necesidad); para recargarlos por lo menos meses si el camino no se utiliza.
Fusible: Para su seguridad, el gyropode se equipa de un circuito del corte con el fusible de 50 amperios en caso de fracaso del gyropode, inicialmente comprueba por favor este fusible y lo cambia en caso de necesidad.
Ajuste de las nueces de la rueda: Para su seguridad, es imprescindible comprobar regularmente (en meses que comienzan y por lo menos los cada 6) el ajuste de las nueces de la rueda. Utilice por favor una llave de 17 milímetros y de un esfuerzo de torsión de ajuste de
108 NR·m (11 kilogramos-m) (~11daNm).
Limpieza: La limpieza con la alta presión de la lavadora se excluye. Una limpieza con la alta presión del ventilador se aconseja. Usted puede utilizar una esponja mojada sino tomar cuidado para evitar bastidores del agua particularmente en el nivel del bastidor del casco para no
dañar el gyropode electrónico y eléctrico de los elementos.
Neumáticos: La inflación de los neumáticos debe ser controlada en meses que comienzan y por lo menos los cada 3. La presión media está de la barra 2,5 pero puede variar según el peso del usuario y las condiciones de la tierra del uso. La atención una presión demasiado baja
implicará un consumo excesivo eléctrico y una disminución significativa de la autonomía del camino QUE EMITE UN SONIDO BREVE Y AGUDO.
Aislamiento: El camino ofrece un índice de IP56 probado lacre. Este índice significa que es el camino:
ÍNDICE 5 (IP56): Protegido contra el polvo. ÍNDICE 6 (IP56): Protegido contra las fuentes fuertes contra todas las direcciones a la lanza (el tubo de 12,5 milímetros, supera 2,5 m a 3M, fluye 100 l/min el ±5%). Concreto, el uso es posible debajo de una lluvia ligera y el camino puede
cruzar una piscina del charco más bajo 1 cm de la profundidad. Le aconsejamos sin embargo no utilizar el camino bajo condiciones de la lluvia fuerte por razones de seguridad. La atención, degradación debido a la humedad se excluye de nuestras condiciones de la garantía.
Invernada: Si usted no utiliza su gyropode, almacénelo por favor en un lugar seco y moderado. Para asegurar una mejor longevidad de su batería, le aconsejamos recargarla cada mes. Si usted no utiliza su gyropode más de 3 meses, le aconsejamos desinflar el neumático para
asegurar una longevidad más importante a él.
Batterien: Die Batterien PLOMB SÄUREHALTIGES (versions R2e/R3e), sind an der Zahl von 3 auf den Modellen R2e/R2e+ (36Vkraft) & von 4 auf den Modellen R3e/R3e+ (48Vkraft). Das RX5e-Modell enthält, was ihn betrifft, 1 Batterie allein LITHIUM ION (von einer 48Vkraft). Sie
haben eine durchschnittliche Lebensdauer von 600 Auffüllungszyklen (das heißt ungefähr 2 Jahre mit einer täglichen Auffüllung), sie können 15 bis 25% von ihrer Tragfähigkeit im Durchschnitt pro Jahr verlieren. Die Batterien sind ohne besondere Wartung, aber müssen gewechselt
werden, wenn sie nicht mehr wirksam sind, und wir Ihnen ihre Veränderung mindestens alle 3 Jahre beraten. Um ihnen eine längere Lebensdauer zu gewährleisten beraten wir Ihnen: - Ihr Road systematisch wieder aufzuladen, wenn er entladen wird - nicht sie mehr mit 15 Stunden
Folge zu beladen - unvollständige Auffüllungen (außer wenn nötig) zu vermeiden - sie alle Monate mindestens wieder aufzuladen, wenn Road nicht benutzt wird
Sicherung: Für Ihre Sicherheit wird das gyropode ausgestattet mit schneidet Kreislauf mit Sicherung von 50 Amperen. Bei Nichtfunktionieren des gyropode zunächst diese Sicherung prüfen und es ändern Sie bitte gegebenenfalls.
Festklemmen der Radmuttern: Für Ihre Sicherheit ist es überaus wichtig, regelmäßig (am Start und mindestens allen 6 Monaten) das Festklemmen der Radmuttern zu prüfen. Benutzen Sie bitte einen Schlüssel von 17 mm und ein Festklemmenpaar von 108 N·m (11 Kg-m)
(~11daNm).
Reinigung: Die Reinigung: an der Waschmaschine wird hoher Druck ausgeschlossen. Eine Reinigung am Bläser wird hoher Druck beraten. Sie können einen feuchten Schwamm benutzen, aber achten darauf, die Wassergüsse beim Rahmenrumpf insbesondere zu vermeiden, um die
elektronischen und elektrischen Elemente des gyropode nicht zu beschädigen.
Reifen: Das Aufblasen der Reifen muss mindestens am Start und allen 3 Monaten kontrolliert werden. Der durchschnittliche Druck beträgt 2,5 Bar, aber kann nach dem Gewicht des Benutzers variieren und die Bedingungen des Benutzungsgeländes. Beachtung wird ein zu niedriger
Druck einen elektrischen Überkonsum und einen erheblichen Rückgang der Autonomie BEEPER Road bewirken.
Abdichtung: Road bietet ein getestetes Abdichtungsanzeichen IP56 an. Dieser Index bedeutet, dass Road ist: INDEX 5 (IP56): Geschützt vor den Staub. INDEX 6 (IP56): Geschützt vor den starken Springbrunnen aller Direktionen an der Lanze (Rohr von 12,5 mm, Distanz 2,5 m an 3
m, Ausstoß 100 l/min ±5%). Konkret ist die Benutzung unter einem leichten Regen möglich, und Road kann eine Pfütze durchqueren, die niedriger ist als 1 cm der Tiefe. Wir raten Ihnen allerdings, Road unter Bedingungen starken Regens aus Gründen der Sicherheit nicht zu benutzen.
Beachtung, die Verschlechterung, die auf die Feuchtigkeit zurückzuführen ist, wird von unseren Garantiebedingungen ausgeschlossen.
Überwintern: Wenn Sie Ihr gyropode nicht benutzen, lagern Sie es bitte in einem trockenen & temperierten Ort. Um ein besseres langes Lebensdauer Ihrer Batterie zu gewährleisten raten wir Ihnen, es wieder aufzuladen alle Monate. Wenn Sie Ihr gyropode mehr als 3 Monate nicht
benutzen, raten wir Ihnen, dem Reifen Luft abzulassen, um ihm ein wichtigeres langes Lebensdauer zu gewährleisten.
Batterie: Le batterie PLOMB ACIDO (versions R2e/R3e) sono 3 sui modelli R2e/R2e+ (potenza 36V) & di 4 sui modelli R3e/R3e+ (potenza 48V). Il modello RX5e contiene da parte sua 1 sola batteria LITHIUM IONE (di una potenza di 48V). Hanno una durata di vita media di 600
cicli di ricarica (cioè circa 2 anni con una ricarica quotidiana), possono perdere in media 15 al 25% della loro capacità di carico all'anno. Le batterie sono senza manutenzione particolare ma devono essere cambiate quando non sono più efficaci e vi consigliamo il loro cambiamento
almeno ogni 3 anni. Per garantire loro una lunga durata di vita, vi consigliamo: - di ricaricare sistematicamente vostro Road se è scaricato - non di caricarli oltre 15 ore di seguito - di evitare ricariche incomplete (eccetto se necessario)
- di ricaricarli almeno tutti i mesi se Road non è utilizzato
Fusibile: Per la vostra sicurezza, il gyropode è fornito di taglia circuito con fusibile di 50 ampèri. In caso di fallimento del gyropode, volete inizialmente verificare questo fusibile e cambiarlo se necessario.
Bloccaggio delle noci di ruota: Per la vostra sicurezza, è imperativo verificare regolarmente (all'avviamento ed almeno ogni 6 mesi) il bloccaggio delle noci di ruota. Volete utilizzare una chiave di 17 mm ed una coppia di bloccaggio di 108 N·m (11 m) (~11daNm).
Pulizia: La pulizia alla rondella alta pressione è esclusa. Una pulizia al soffiatore alta pressione è consigliata. Potete utilizzare una spugna umida ma attenzione ad evitare le colate d'acqua in particolare al livello del guscio struttura per non danneggiare gli elementi elettronici ed
elettrici del gyropode.
Pneumatici: L'inflazione dei pneumatici deve essere controllata all'avviamento ed almeno ogni 3 mesi. La pressione media è di 2,5 atmosfera ma può variare secondo il peso dell'utente e le condizioni del terreno d'utilizzo.
Attenzione una pressione troppo bassa comporterà un sovraconsumo elettrico ed un ribasso significativo dell'autonomia di BIPPARE di Road.
Tenuta: Road offre un indice di tenuta provato IP56. Quest'indice significa che Road è: INDICE 5 (IP56): Protetto contro le polveri. INDICE 6 (IP56): Protetto contro i forti zampilli di qualsiasi direzione alla lancia (poiana di 12,5 mm, distanza 2,5 m a 3 m, flusso 100 l/min ±5%).
Concretamente, l'utilizzo è possibile sotto una pioggia leggera e Road può attraversare una pozzanghera inferiore ad 1 cm di profondità. Vi consigliamo tuttavia non di utilizzare Road in condizioni di forte pioggia per ragioni di sicurezza. Attenzione, il deterioramento dovuto all'umidità
è esclusa dalle nostre condizioni di garanzia.
Hivernage: Se non utilizzate il vostro gyropode, volete depositarlo in un luogo secco & temperato. Per garantire una migliore longevità della vostra batteria, vi consigliamo di ricaricarla tutti i mesi. Se non utilizzate il vostro gyropode oltre 3 mesi, vi consigliamo di sgonfiare il
pneumatico per garantirgli una importante longevità.
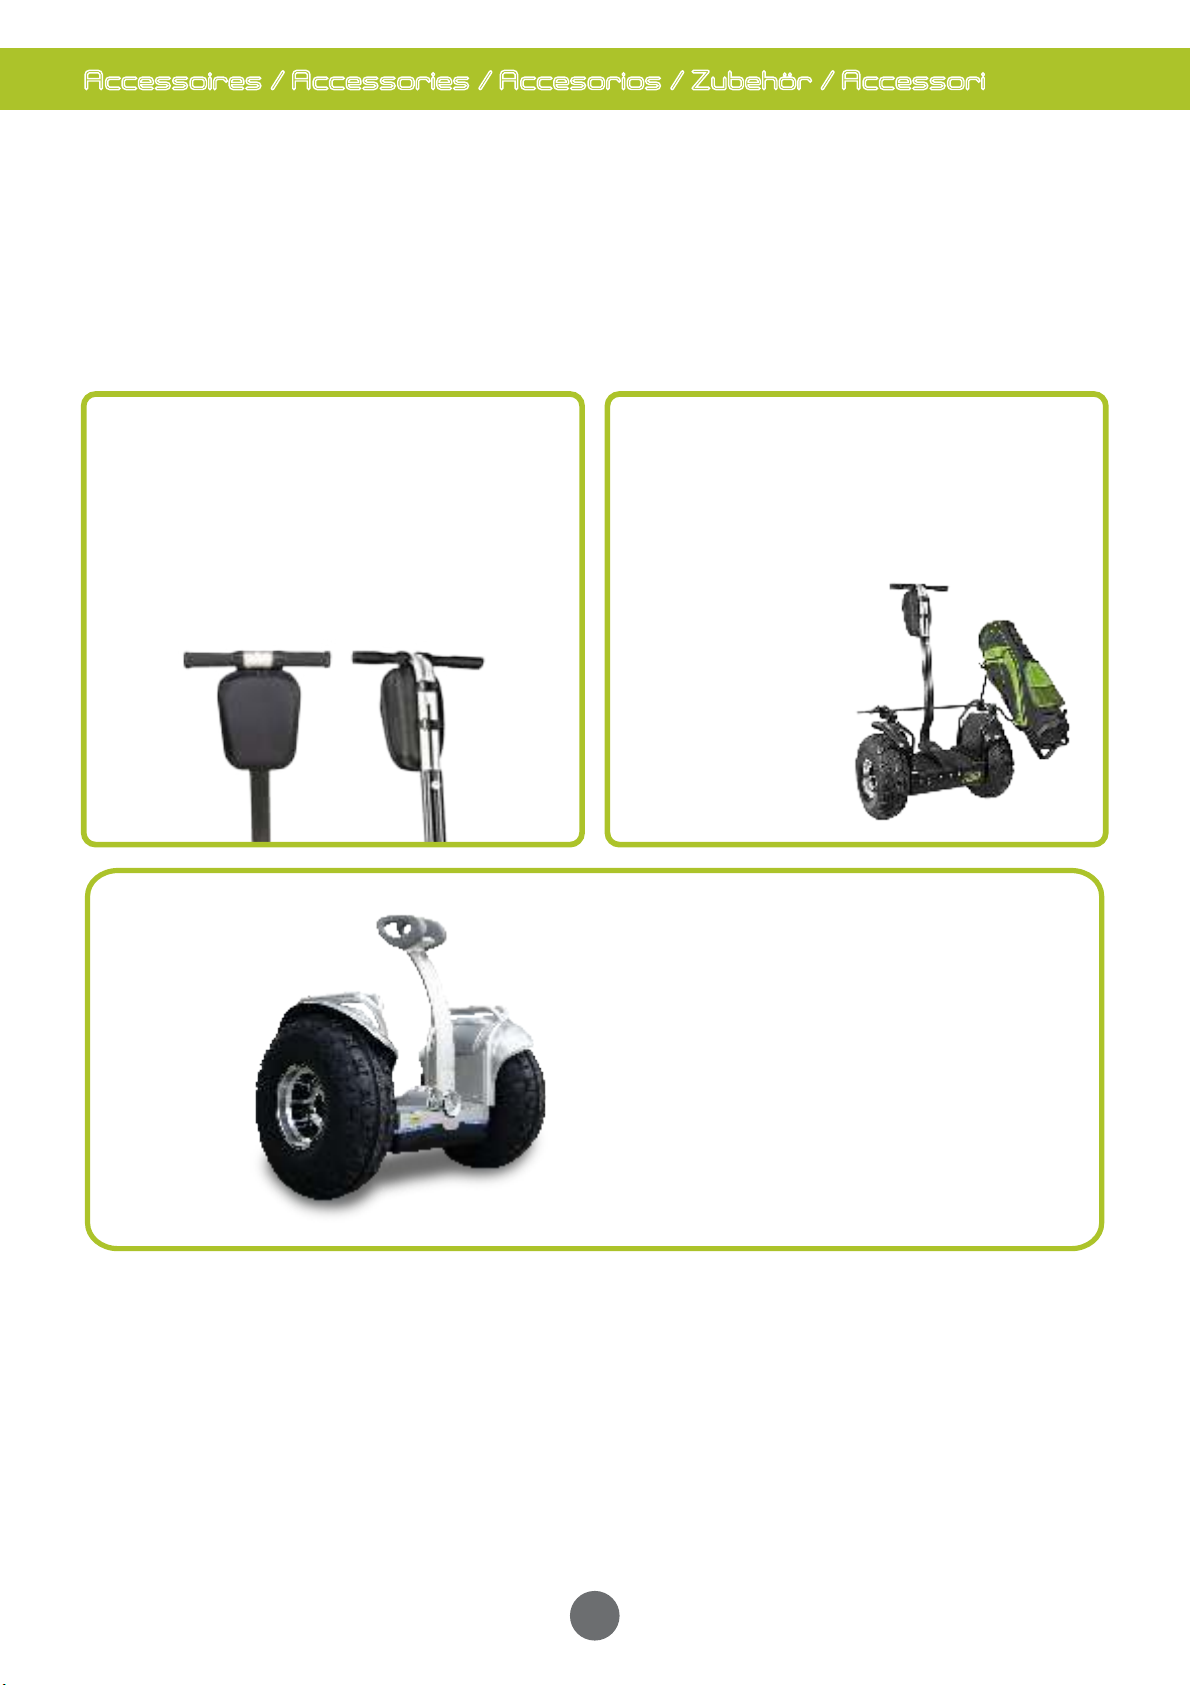
Accessoires / Accessories / Accesorios / Zubehör / Accessori
20
Envie dʼapporter un petit plus à votre BEEPER Road ? Découvrez les accessoires que nous vous proposons :
Desire for bringing small more to your BEEPER Road?
Discover the accessories that we propose to you:
¿Deseo de aportar un pequeño más a su BEEPER Road?
Descubra los accesorios que le proponemos:
Verlangen, Ihrem BEEPER Road ein kleines mehr zu bringen?
Entdecken Sie das Zubehör, das wir Ihnen vorschlagen:
Desiderio di portare un piccolo più il vostro a BEEPER Road?
Scoprite gli accessori che vi proponiamo:
Mini bag pour guidon
Satchel for handlebar
Bolsa para manillar
Umhängetasche für Lenkstange
Cartella per manubrio
Ref : R3-SP01
Contrôle-genou
(uniquement pour RX5e)
Knee-controller (only for RX5e)
Control-rodilla (solamente para RX5e)
Kontrolle-Knie (nur für RX5e)
Controllo-ginocchio (soltanto per RX5e)
Ref : RX5e-SP03
Toutes les pièces détachées des BEEPER Road R2e / R2e+ / R3e / R3e+ / RX5e sont disponibles et stockées dans
nos entrepôts, Veuillez nous contacter pour une information précise.
All the spare parts of BEEPER Road R2e/R2e+/R3e/R3e+/RX5e are available and stored in our warehouses, Please contact us for accurate information.
Todas las piezas de recambio de los BEEPER Road R2e/R2e+/R3e/R3e+/RX5e están disponibles y almacenadas en nuestros depósitos, quiere contactarnos para una información precisa.
Alle Ersatzteile BEEPER Road R2e/R2e+/R3e/R3e+/RX5e sind verfügbar, und gelagert in unseren Lagerhäusern kontaktieren Sie uns bitte für eine präzise Information.
Tutti i pezzi di ricambio del BEEPER Road R2e/R2e+/R3e/R3e+/RX5e sono disponibili e conservate nei nostri depositi, volete contattarli per un'informazione precisa.
Support sac de golf
(uniquement pour les modèles R3e+ & RX5e)
Support bag of golf (only for the models R3e+ & RX5e)
Apoyo bolso de golf (solamente para los modelos R3e+ y RX5e)
Support Golfsack (nur
für die Modelle R3e+ &
RX5e)
Appoggio borsa di golf
(soltanto per i modelli
R3e+ & RX5e)
Ref : R3-SP02
This manual suits for next models
3
Table of contents
Other Beeper Road Hoverboard manuals


