BEHAVIORAL SAFETY SD751 User manual

INNOVATION NEVER RESTS
BESAFEPRO.COM
706.705.1500
SD751 IOM
REV 0/2022 | 1
Installation, Maintenance & Operation Instructions
This refillable reservoir kit allows the use of bulk soaps and other materials in the SD750 Ligature resistant
soap dispenser.
The refillable reservoir design and optional nozzle choices allow for the use of products that can be purchased in bulk
quantities. These include soap, shampoo, body wash, foaming soap, and anti-bacterial liquids.
No longer having to purchase dedicated FMX-12 cartridges for the dispenser, reduces cost, is a greener
alternative to disposing of the cartridges, and makes a wider variety of products available to your facility.
Specifications
•Refillable reservoir design
•Optional nozzle choices for soaps or liquids
•Allows the use of products that can be purchased in bulk
REFILLABLE RESERVOIR KIT FOR THE SD750 SOAP DISPENSER #SD751
•No dedicated cartridge needed
•Reduced refill cost
The kit includes a 750ML reservoir with cap, pump support, Pump yoke, and 2 pumps (soap and liquid)
that fit into the SD750 dispenser.
The SD750 dispenser is not included
.
•750ML capacity
•Greener alternative than cartriges

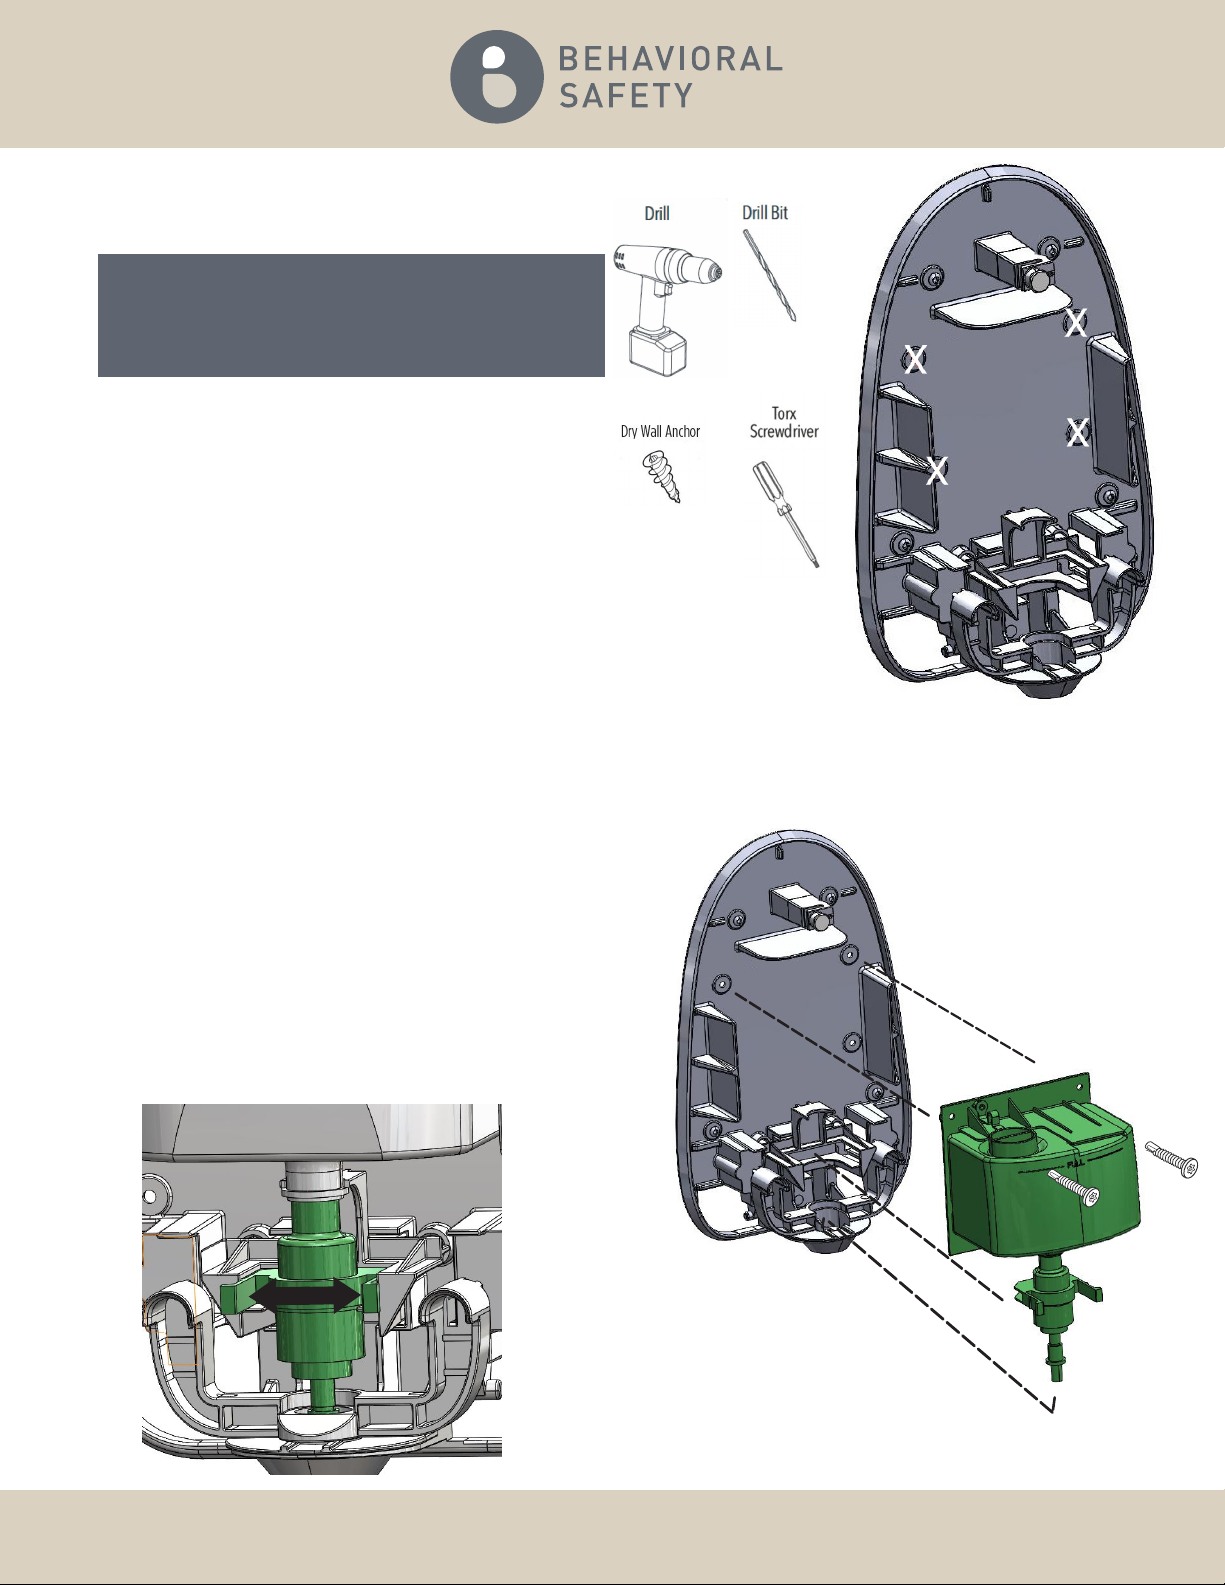
Tools and Supplies
BESAFEPRO.COM
706.705.1500
SD751 IOM
REV 0/2022 | 2
Important
•Be sure to read instructions thoroughly before beginning installation.
•Do not over-tighten any connections or damage may occur.
Safety Tips
Cover your drain to prevent loss of parts. Be sure to wear eye protection and
follow all tool manufacturer’s safety recommendations.
•Retain this manual for future reference.

Installation Instructions
Remove any caulk securing the dispenser to
the wall. Open the dispenser cover using the
Key provided.
Important
Take care not to scratch the powder coating on
the dispenser during removal of the caulk, or
corrosion may result over time.
2.Remove the mounting screws attaching the
dispenser to the wall and remove the
dispenser from the wall.
BESAFEPRO.COM
706.705.1500
SD751 IOM
REV 0/2022 | 3
1.

4. Remove and
discard
the cartridge support,
cartridge yoke, 2 springs and the cartridge
clip.(cover not shown for clarity)
3. Remove the three screws holding the
cartridge support from the back of the
dispenser.
Save the screws for future
use
.
BESAFEPRO.COM
706.705.1500
SD751 IOM
REV 0/2022 | 4
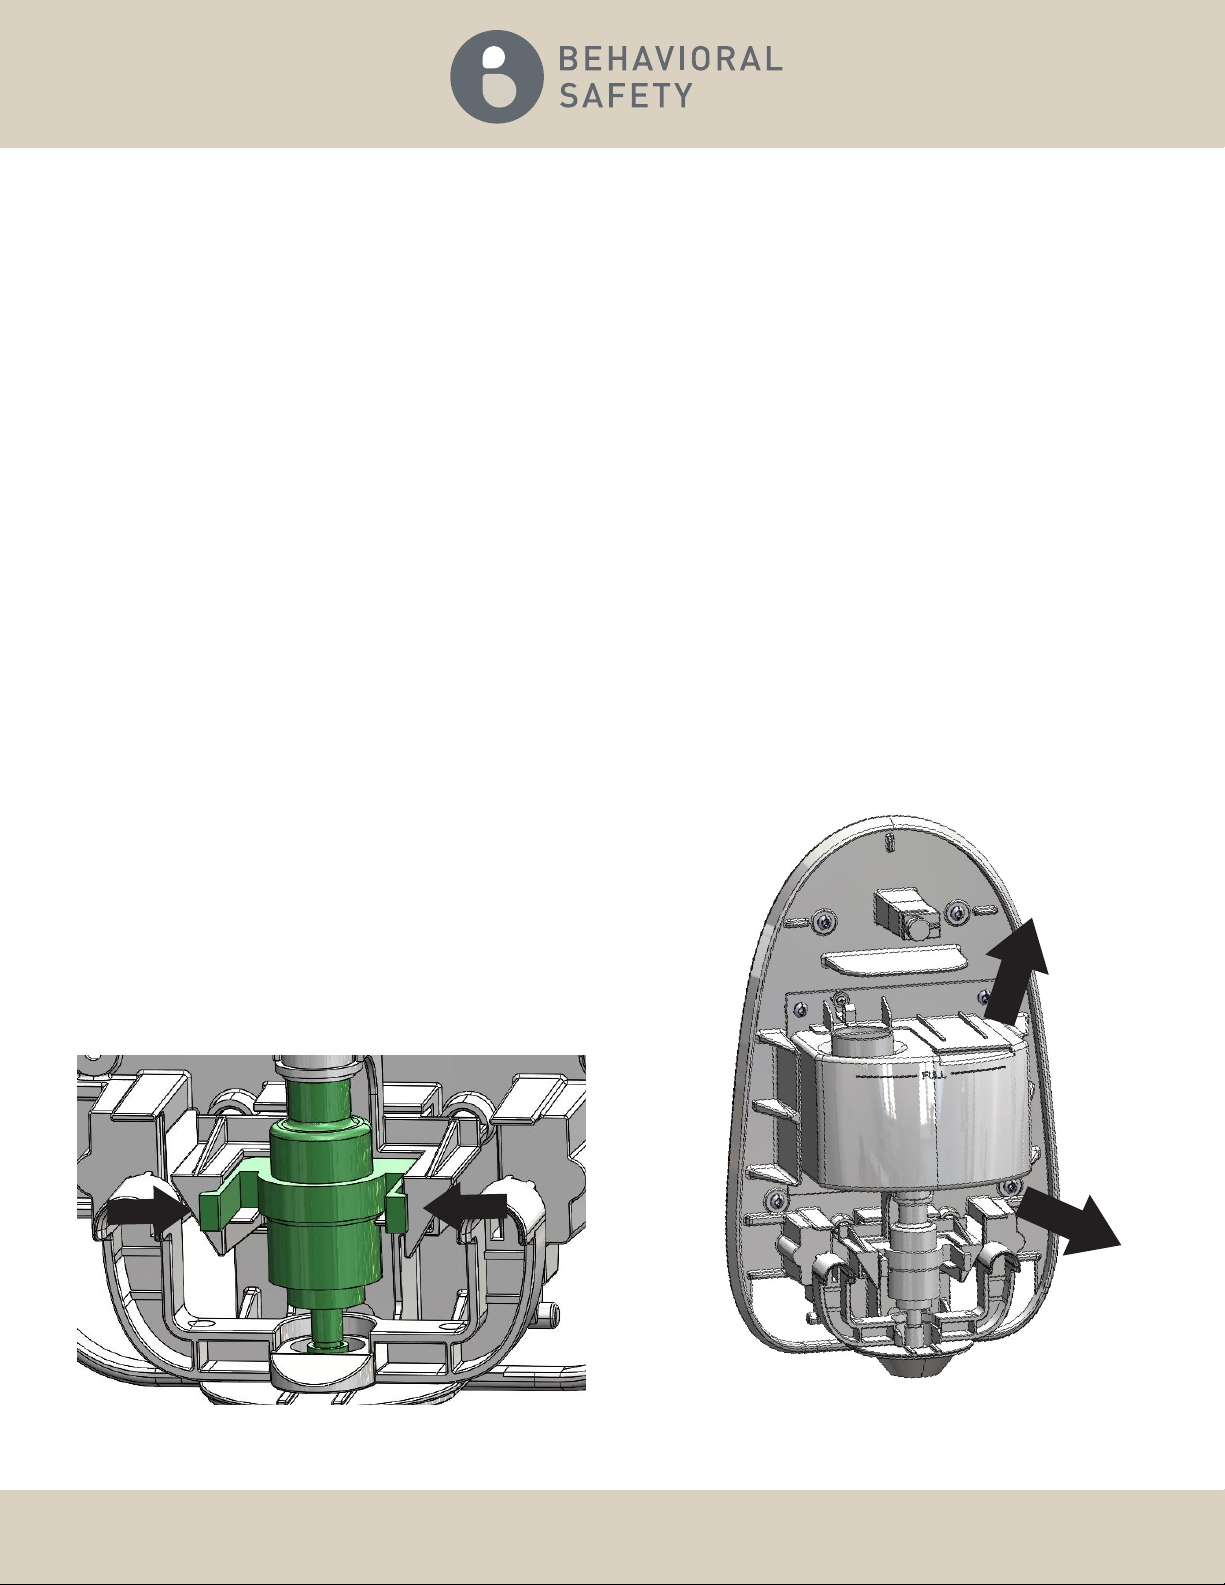
Note
Apply pressure to the sides of the
yoke to make removal easier.

6.Install the new pump yoke from the kit into
the housing by inserting the yoke into the
opening at the bottom of the dispenser, and
clipping it to the dispenser body. Be sure the
"hoods" on the top of the yoke face outward
as shown. (cover not shown for clarity)
5.Insert the pump support from the kit
into the inside of the housing in place
of the cartridge support removed in
step 4.(cover not shown for clarity)
Reuse the three screws removed the
cartridge support in step 3 to attach
the pump support to the housing.
BESAFEPRO.COM
706.705.1500
SD751 IOM
REV 0/2022 | 5
Note
Using gentle pressure on the sides of the yoke
will help to engage the clips onto the housing.

7.Choose which pump you prefer based on
the material you want to dispense.
Soap Bottle Assembly
8.Insert the desired pump into the bottom of
the reservoir O-rings first as shown, with the
full mark on the reservoir, and release tabs
on the pump facing forward.
BESAFEPRO.COM
706.705.1500
SD751 IOM
REV 0/2022 | 6
Liquid Sanitizers and Soap Thicker Soap, Shampoo, etc.
Note
Wetting the O-rings on the top of the pump
will ease installation.
9.
While supporting the resevoir, allow the
pump nipple to drop into the yoke hole from
above, and guide the pump release tabs into
the pump support. Push the reservoir into
place and clip the pump into the support.
Press outward on the release tabs to lock the
pump in place. Add the 2 screws at the top of
the resevoir to secure it to the wall.
(cover not shown for clarity)
Install The Dispenser
10.
Remount the dispenser on the wall using
a minumum of 4 screws.
If there were no screws in any of the hole
locations when the dispenser was removed
from the wall, please install screws (and
drywall inserts if needed) in those
locations.
Use only hand tools to install the screws.
Do not
over-tighten the screws or
damage may result
.
(cover not shown for clarity)
BESAFEPRO.COM
706.705.1500
SD751 IOM
REV 0/2022 | 7
Note
Do not use the holes marked in the picture for
mounting the dispenser, as they will be used
by the reservoir support.
Soap Bottle Installation

12.Close the dispenser cover and lock with the
key. Push the button to activate the
soap. (You may have to push several
times to prime the pump)
Recalk the perimeter of the dispenser
to the wall with pick resistant caulk.
BESAFEPRO.COM
706.705.1500
SD751 IOM
REV 0/2022 | 8
11.
Open the reservoir cap and fill the
dispenser to the FULL line.
Replace the cap onto the reservoir,
and wipe any excess or spilled material
after the filling process.
(cover not shown for clarity)
Important
If the dispenser is installed in a shower, we
recommend lubrication of the lock on a monthly
basis, to avoid corrosion in the lock mechanism.
BESAFEPRO.COM
706.705.1500
SD751 IOM
REV 0/2022 | 9
Troubleshoot
If no soap is dispensed as you push the
button:
1.Check to see that the reservoir has soap
in it.
2. Check to see that you have installed the
correct pump for the material you are using.
2.
If you need to change the pump, there is no
need to remove the dispenser from the wall.
Open the cover and lift the tab at the top to
release the reservoir. Squeeze the pump
release tabs while rotating the pump/
reservoir forward and lift the pump
reservoir assembly out of the dispenser.
Pull the pump out of the bottom of the reservoir
and refer to the information on page 6.
Changing the pump
1.
3.Reverse the procedure in step 1 for reassembly.
(cover not shown for clarity)

Care & Cleaning
Your new Product is designed for years of trouble-free performance. Keep it looking new by cleaning it periodically with
a soft cloth and mild soap. The use of harsh chemicals and abrasives on any of the custom finish products may damage
the finish and void the product warranty. Please be sure to only use approved cleaners.
Important
If the dispenser is installed in a shower, we recommend lubrication of the lock on a monthly basis, to avoid corrosion
in the lock mechanism.
Waiver & Disclaimer
This waiver-disclaimer is attached to and made a part of the written contract to purchase these products for use in
psychiatric and correctional facilities. Such fixtures and products are purchased to reduce the risk of self-imposed death or
injury to patients or clients in such facilities, but are NOT represented as able to prevent such death or injury.
Behavioral Safety Products, LLC (“BSP”) has not, and will not represent or warrant to the purchaser shown in this contract
(“Purchaser”) that its fixtures and products will prevent death or injury in any case whatsoever.
BSP makes no express or implied warranty with respect to the preventative quality of its products, but merely represents
that the use of such products tends to reduce deaths and injuries by patients or clients who are subject to meticulous
screening processes and diligent supervision on the part of the facility housing them.
Purchaser acknowledges the foregoing disclaimer and waives any and all claims against BSP and Speakman Company as
to express or implied warranties of fitness for any purpose whatsoever.
BESAFEPRO.COM
706.705.1500
SD751 IOM
REV 0/2022 | 10
Table of contents
Popular Dispenser manuals by other brands


InSinkErator
InSinkErator C1300 Specifications & dimensions

Cornelius
Cornelius VANTAGE installation manual

Xibu
Xibu inoxFOAM manual

Murdock
Murdock A152.8FG-BF3 Series Installation & maintenance instructions

Hewi
Hewi 950 Assembly, installation and operation instructions

Server
Server TOUCHLESS EXPRESS quick start guide