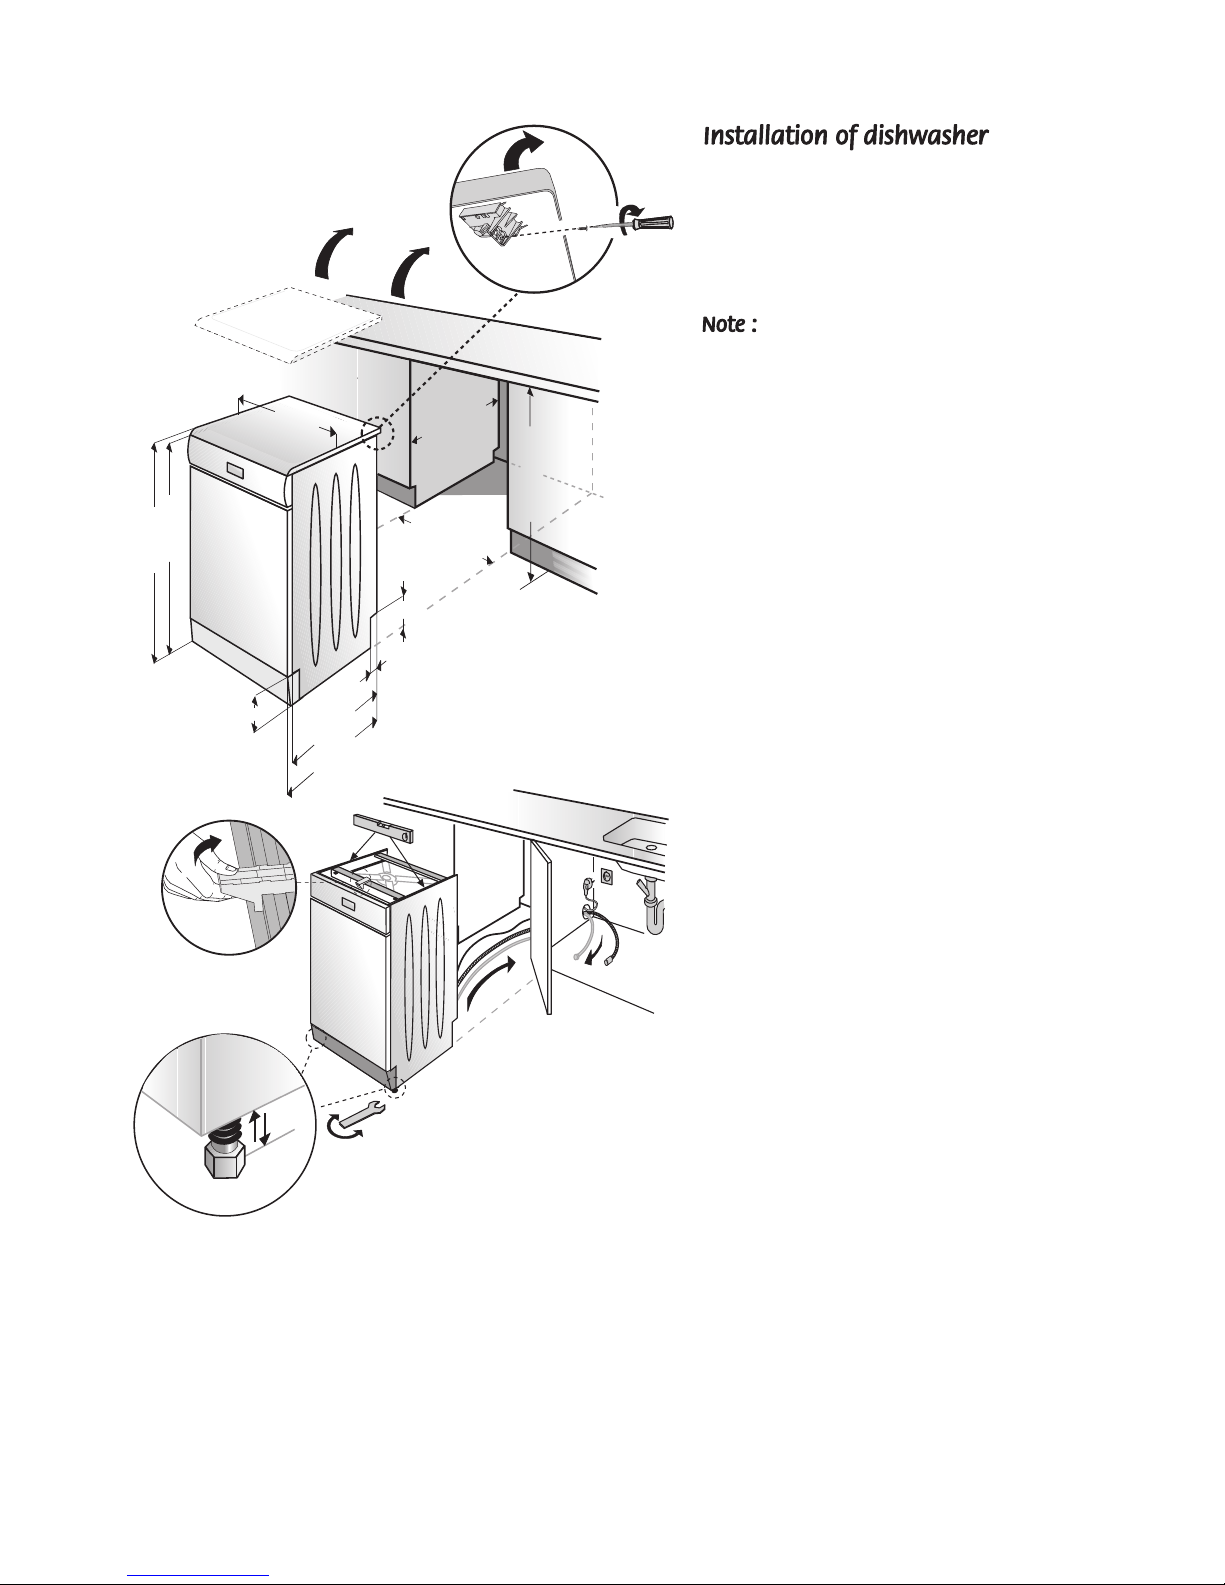
manuals.online logo
Brands
  1. Home
  2. •
  3. Brands
  4. •
  5. Beko
  6. •
  7. Dishwasher
  8. •
  9. Beko DE2541FW User manual

Beko DE2541FW User manual

Other manuals for DE2541FW

1

Other Beko Dishwasher manuals

Beko DFN2000X User manual

Beko

Beko DFN2000X User manual

Beko DFS05X11W User manual

Beko

Beko DFS05X11W User manual

Beko BDFS26120XQ User manual

Beko

Beko BDFS26120XQ User manual

Beko D 5001 E User manual

Beko

Beko D 5001 E User manual

Beko DFN39533X User manual

Beko

Beko DFN39533X User manual

Beko DIS15022 User manual

Beko

Beko DIS15022 User manual

Beko DUT25401W User manual

Beko

Beko DUT25401W User manual

Beko DIN59531 User manual

Beko

Beko DIN59531 User manual

Beko DFN28430B User manual

Beko

Beko DFN28430B User manual

Beko DFS25021W User manual

Beko

Beko DFS25021W User manual

Beko DW603 User manual

Beko

Beko DW603 User manual

Beko DDT38532XIH User manual

Beko

Beko DDT38532XIH User manual

Beko EDIS Series User manual

Beko

Beko EDIS Series User manual

Beko DFN28R22W User manual

Beko

Beko DFN28R22W User manual

Beko DIN28520 User manual

Beko

Beko DIN28520 User manual

Beko BDIS38122Q User manual

Beko

Beko BDIS38122Q User manual

Beko DIS15010 User manual

Beko

Beko DIS15010 User manual

Beko DFS04010W User manual

Beko

Beko DFS04010W User manual

Beko DIN16X10 User manual

Beko

Beko DIN16X10 User manual

Beko DIN28R22 User manual

Beko

Beko DIN28R22 User manual

Beko DIS28123 User manual

Beko

Beko DIS28123 User manual

Beko BMA 6302 FI User manual

Beko

Beko BMA 6302 FI User manual

Beko DIN28Q20 User manual

Beko

Beko DIN28Q20 User manual

Beko DIN26X20 User manual

Beko

Beko DIN26X20 User manual

Popular Dishwasher manuals by other brands

Electrolux ESI5211LOX user manual

Electrolux

Electrolux ESI5211LOX user manual

KitchenAid KUDB230B Use and care guide

KitchenAid

KitchenAid KUDB230B Use and care guide

Brandt BDJ424DB instruction manual

Brandt

Brandt BDJ424DB instruction manual

Asko DSD767UXXL.AU user manual

Asko

Asko DSD767UXXL.AU user manual

NEFF S153ITX00E INFORMATION FOR USE

NEFF

NEFF S153ITX00E INFORMATION FOR USE

Midea SV 4.45 wi manual

Midea

Midea SV 4.45 wi manual

LG LDF7932 Specifications

LG

LG LDF7932 Specifications

Gorenje GV63214 instruction manual

Gorenje

Gorenje GV63214 instruction manual

Hotpoint HDA1100ZWH Installation information

Hotpoint

Hotpoint HDA1100ZWH Installation information

Blomberg LDFN2240W instruction manual

Blomberg

Blomberg LDFN2240W instruction manual

AEG FFB83836PM user manual

AEG

AEG FFB83836PM user manual

Cylinda DM3220RFD user manual

Cylinda

Cylinda DM3220RFD user manual

Atag DW8214MB manual

Atag

Atag DW8214MB manual

GE GLD8000 Series owner's manual

GE

GE GLD8000 Series owner's manual

Siemens SN23HI02KE INFORMATION FOR USE

Siemens

Siemens SN23HI02KE INFORMATION FOR USE

Omega ODW717X instruction manual

Omega

Omega ODW717X instruction manual

BORETTI BVW-683 operating instructions

BORETTI

BORETTI BVW-683 operating instructions

Siemens SN 56N591 operating instructions

Siemens

Siemens SN 56N591 operating instructions

manuals.online logo
manuals.online logoBrands
  • About & Mission
  • Contact us
  • Privacy Policy
  • Terms and Conditions

Copyright 2025 Manuals.Online. All Rights Reserved.

contents
3
Introduction
Welcome 2
Know your dishwasher / specification 4
Standards and testing information /
EC declaration of conformity 4
Warning and safety information 5
Electrical Safety 5
Childrens safety 5
General 5
Recyclin 6
Ener y and water savin 6
What should not be washed in your dishwasher 6
Hot Air Dryin 6
Before first use 6
Installation 7
Electrical requirements 7
This appliance must be earthed 7
Fittin a different plu 7
Water inlet hose connection 8
Drain hose connection 8
Installation of dishwasher 9
How to use 1
Water hardness & Re eneration settin s 10
Fillin the (Water softener) Dishwasher salt 11
Visual indicator 11
Deter ent use 11
Fillin the deter ent dispenser 13
Rinse aid 13
Fillin the rinse aid dispenser 13
Loadin the Dishwasher 14
Foldin plate support rods 14
Upper basket hei ht adjustment (Unloaded) 15
Standard loading and testing institute information 16
Operating the dishwasher 17
Unloadin the Dishwasher 17
How to clean your Dishwasher 17
Filters 18
Upper spray arm 18
Lower spray arm 18
Before calling service / Trouble shooting 19
Guarantee 23
How to obtain service 23
4
specification
73/23/EC
89/336/EC
93/68/EC
IEC 436/DIN 44990
EN 50242
This appliance has been desi ned, constructed and
distributed in compliance with the safety requirements
of EC directives.
Load capacity : 10 place settin s.
Upper basket
Dishwasher salt cap
L wer basket
Cutlery basket
Detergent and Rinse
aid dispenser
Upper
spray arm
L wer spray arm
Filters
Upper basket track latch
Heating element
c ncealed behind
the liner
Pr gramme
Selecti n&Starting
Guide
Rem vable
w rk t p
Rem vable kick plate
H t Air Drying
On / Off
1
PRE-WASH
No Heat
3
ECONOMY
50°C
NORMAL
60°C
45
INTENSI E
70°C
2
RAPID
35°C
End
Wash
Salt
Start / Stop
Rinse Aid
3
1
2
4
5
On / off indicator li ht
&
Pro ramme startin point
Pro ramme Knob Start / Stop button Door Handle
On/Off button
Pro ress indicator li hts
Salt level indicator li ht
Rinse aid level indicator li ht
Load Capacity
Hei ht
Width
Depth
Depth/Hei ht
(without worktop)
Net wei ht
Supply volta e
Fuse currrent
Total power
Heater power
Pump powers
10 Place settin s
850 mm
448 mm
598 mm
570 mm / 820 mm
42 k
220-240 V ~ 50 Hz
13 A
1900-2200 W
2000 W
90/30 W
Because we continually strive to improve our
products, we may chan e our specifications and
desi ns without prior notice.
Diameter of plates for :
Upper basket : 25 cm max.
Lower basket : 31 cm max.
5
The dishwasher should only be operated on
the volta e specified. For electrical safety,
only earthed plu s and sockets should be
used. Always use the fused plu provided
with the appliance. The user is responsible
for meetin these basic safety requirements.
The life of your machine and your safety
depend on you usin an electrical installation
compliant to standards.
Do not use an extension cable.
When disconnectin your machine from the
mains supply, always pull from the plu .
Never pull the cord itself.
Never allow your children to play with your
dishwasher.
Dishwasher deter ents contain irritants and
abrasives. These in redients mi ht have
caustic effects in the eyes, mouth and throat.
They can be extremely dan erous if
swallowed. Avoid contact with skin and eyes.
Check that the deter ent receptacle is empty
after completion of the wash cycle.
Keep deter ents out of childrens reach and
do not put deter ent in the machine until
ri ht before you start the washin
pro ramme.
The water in your dishwasher is not suitable
for drinkin , for this reason do not allow
your children near your machine when the
front door is open.
Never allow your children to play on or sit
onto the front door when the front door is
open.
After unpackin your machine, keep the
packin material out of childrens reach.
Warning !
L ng cutlery, such as ladles and l ng knives,
etc must be placed h riz ntally n t p f
the full cutlery basket r n the racks t
prevent accidental injury.
The appliance is n t intended f r use by
y ung children r infirm pers ns with ut
supervisi n.
This dishwasher has been desi ned to clean
your dirty dishes at home.
Never use chemical solvents in your machine;
this may lead to explosion risk.
Never use materials other than specially
produced softenin salts in the salt dispenser
of your machine.
Never use materials other than specially
produced deter ents and rinse-aids in the
deter ent and rinse aid dispensers of your
machine.
Please dispose of the packa in material and
old appliances carefully. Please ensure old
machines do not become a threat to child safety.
It is known that children lock themselves in
unused machines. To avoid such a problem it
is advised that you cut the mains cable off and
break the door latch so it does not lock.
The door of your machine is desi ned to support
the wei ht of a full basket when the lower
basket is pulled all the way out. Never place
any other load on the door, otherwise the
machine may tip over.
After usin the dishwasher always close the
door as an open door can be a hazard.
Do not open the door whilst the appliance is
in operation.
6
Hot Air Dryin ensures your dishes are dried
efficiently.
Please help us to protect our environment. Packin
materials and some parts of your machine are
produced usin recyclable materials. These materials
are marked up with recyclin symbol and material
type information (>PE<, >PS<, >POM<, ). These
raw materials should not be mixed with daily
arba e and should be iven to recyclin centers.
We su est you contact your local authority for
disposal information and facilities available.
Scrape excess food from the dishes before loadin
Start your dishwasher after fully loadin the
machine. Do not use the pre-wash pro ramme
unless required. Make your pro ramme selection
as per the pro ramme chart and quick reference
uide supplied.
Do not wash items soiled with ci arette ash, candle,
paint wax, dyes, chemicals etc. since these may
dama e your machine
Do not wash forks, knives and spoons with wooden
or bone handles, items stuck to ether with
adhesives, plastic items not resistant to hi h
temperatures copper, tin items and aluminium
ware in your dishwasher.
As with hand washin , some on- laze
decorated china, aluminum or silver have a
tendency to discolour or fade. Also, certain
types of lassware and crystals may loose their
shine and become opaque in time.
A chemical reaction can occur between silver
cutlery and stainless steel cutlery. As a
precaution, do not wash to ether.
Iron and cast iron objects can rust and stain
other items.
Pay special attention to whether or not the
item you wash in the dishwasher is dishwasher-
proof.
If in doubt, contact the manufacturer of the
item.
Do not overload your dishwasher or do not
load items other than those mentioned in this
manual.
After unpackin your dishwasher, check the machine
a ainst any possible transportation dama e. Never
install and use dama ed machines. If your machine
is dama ed contact your retailer. Always have your
machine installed by qualified electrician/plumber
to ensure correct installation.
Any repairs and maintenance work on this
dishwasher should be carried out by authorised
service staff only. Repairs conducted by third persons
are not only dan erous, but also lead to the
cancellation of your warranty.
Make sure the electricity and water connections
of your dishwasher are in compliance with the
instructions for assembly as stated in the relevant
part of this booklet.
Any water remainin in the dishwasher after
production should be carefully removed due to
reasons of hy iene. Therefore, always select
a pre-wash programme before first use
(Pre-wash or Economy programme).
Before the first wash, add 1 lt of water to
the salt container of your machine.
7
When decidin on where to install your new
dishwasher, ensure that the position of your
dishwasher makes it easy and quick for you to
place the dishes in the dishwasher and also to
take them out and store away after the
dishwashin is completed.
Avoid placin the dishwasher where the ambient
temperature is likely to fall below. 0 de rees
C. (32° F)
When positionin your appliance, take care not
to dama e your floorin , pipes wall coverin s
etc. Do not move the appliance by pullin by
the door or handle
Before you insert the plu into the wall socket
make sure that the volta e and the frequency
shown in the ratin label corresponds to your
electricity supply.
We recommend that this appliance be
connected to the mains supply via a suitable
switched and fused socket in a readily accessible
position.
Should the mains lead of the appliance become
dama ed or need replacin at any time, it must
be replaced by a special purpose made mains
lead which can only be obtained from a Beko
Authorised Service A ent.
If the supply cord or the mains lead is dama ed
please do not replace it by your own. The
supply cord or the mains lead must be replaced
by a Beko Aurhorised Service A ent personel
or a similar qualified person.
If the fitted moulded plu is not suitable for
your socket, then the plu should be cut off
and an appropriate plu fitted.
Destroy the old plu , which is cut off as a plu
with a bared cord could cause a shock hazard
if inserted into a socket elsewhere in the house.
The moulded plu on this appliance
incorporates a 13A fuse. Should the fuse need
to be replaced an ASTA approved BS1362 fuse
of the same ratin must be used. Do not for et
to refit the fuse cover. In the event of losin
the fuse cover, the plu must not be used until
a replacement fuse cover has been fitted.
Colour of the replacement fuse cover must be
the same colour as that visible on the pin face
of the plu . Fuse covers are available from any
ood electrical store.
As the colours of the wires in the mains lead of
this appliance may not correspond with the
coloured markin s identifyin the terminals on
your plu , proceed as follows:
1 Connect the reen - yellow or reen (earth)
wire to the terminal in the plu marked E or
with the symbol or coloured reen and
yellow or reen.
2 Connect the blue (neutral) wire to the terminal
in the plu marked N or coloured black.
3 Connect the brown (live) wire to the terminal
in the plu marked L or coloured red.
With the alternative plu s a 13A fuse must be
fitted either in the plu or adaptor or in the
main fuse box. If in doubt contact a qualified
electrician.
L
Brown or red
N
Blue or
black
Green and yellow
or reen
8
Make sure your plumbin is suitable to
install your new dishwasher. If in doubt
contact a qualified plumber.
The appliance must be connected to the
water mains using the new hose set
supplied with your new dishwasher. Old
hose sets must not be re-used.
The water pressure comin from the water
mains supply must be a minimum of 0.3 and a
maximum of 10 bars.
Fit the draina e hose of your machine
to the draina e pipe without bendin .
Secure your hose firmly to the waste
pipe to avoid it comin off durin the
washin process.
The waste pipe must only be connected
into the foul drains and not surface water
draina e system.
The hose should be placed between
50 cm and 110 cm from the floor level
and must not be extended otherwise the
machine may not empty the waste water.
Connect the strai ht end to your water
mains supply Ensure plastic filter and
black rubber seal is in place.
Please turn on the tap and check for
leaka es after connectin the hose.
Please ensure the tap is turned off when
the machine is not used;
If you only have one cold water feed (For
example for your washin machine) dont
worry. a Y adaptor will provide you with
the additional cold water feed you need
for your dishwasher. Y adaptor is available
from most DIY stores.
1
max 110 cm
01020 30 40
50
60 70 80 90 100 110
12cm
min 4cm
max 110 cm
min 50 cm
18
21
1
Remove all packa in before positionin the
machine.
See the followin dia ram. Ensure there is a
clearance each side of the machine to allow sli ht
side ways movement for servicin .
Work top of your dishwasher is removable if
required. Hei ht without the work top is 820 mm.
By removin the machines worktop, you can
install it under a close fittin sink unit or a pre-
existin top, if the dimensions of the recess
correspond to those shown in the picture.
Position the machine next to a water tap and a
drain.
When insertin the machine, ensure that the
water inlet and drain hoses are not kinked or
squashed.
Care must be taken to ensure that the appliance
does not stand on the electrical supply cable.
Good levellin is essential for correct closure and
sealin of the door,
Make sure your dishwasher is perfectly level usin
the adjustable feet.
When the appliance is correctly levelled, the door
will not catch on the inner liner on either side of
the cabinet.
If the door does not close correctly, loosen or
ti hten the adjustable feet, until the machine is
perfectly level.
9
15mm
min450
mm
820mm
100mm
550mm
570mm
min570 mm
448mm
850mm
min 850mm
44mm
98mm
10
The dishwasher requires lime free water. Hard water leaves watermarks on your dishes. Your dishwasher
has a special water softenin system to remove the hardness of the tap water. Settin this system
correctly will increase the washin effectiveness.
To find out the water hardness level of water in your area, contact your local Water Board or Determine
water hardness level by the help of test strip provided.
Test Strip
Let the water
flow from your
tap for 1
minute.
Remove the
test strip from
its packin .
Fill a lass with
tap water and
dip the test strip
into water for 1
second.
Take the test strip
out of the water
and shake it.
Hold for
1 minute. Set the water hardness level of your dishwasher
accordin to the result shown by the test strip.
b
a
e
1 minute
1 second
cd f
No Lime
Very low lime content
Low lime content
Medium lime content
Lime content
High lime content
Level 1
Level 2
Level 3
Level 4
Level 5
Level 6
If you move to a different location, the level of water hardness will possibly be changed. It is essential to
reset the water hardness in order to obtain optimum washing efficiency.
If the hardness of the water you use is more than 80°d ( rench Hardness) or if you are using pit water, we
recommend that you use filters and purifiers.
When your machine is switched off, turn the Pro ramme Knob to position 1.
While keepin the Start/Stop button pressed, switch the machine on by pressin the On/Off button, and release the On/Off
switch.
Press and hold Start/Stop button for 10 seconds.
Last settin will be displayed on the panel of your dishwasher for 5 seconds.
Water hardness level 1 will be shown on the panel, since Pro ram Selection Button is set at that position.
You can set the level of hardness by chan in the position of the Pro ramme Knob accordin to the table iven above.
After the hardness settin is selected, save the selected value by pressin the Start/Stop button once more.
Switch the machine off by pressin the On/Off button.
* If your tap water is below 9F (French hardness), you do not need to use special dishwasher salt in your machine. In this case,
salt indicator li ht (if available) will be on continuously.
Water Hardness Level
Level 1
Level
Level 3
Level 4
Level 5
0-5
6-11
12-17
18-22
0-9
10-20
21-30
31-40
0-6
7-14
15-21
22-28
23-34 41-6029-42
Hardness
Level
Clarke
degree
s°dE
German
degrees
°dH
rench
degrees
°d Hardness Level Displayed
Position of the
Programme Knob
1
2
3
4
5
*
Level 6
35-45 61-8043-56 5
Wash li ht comes on and End li ht oes off.
End li ht comes on and Wash li ht oes off.
.
Both End and Wash li hts come on.
Both End and Wash li hts o off.
Both Wash and End li hts starts flashin .
* or level 5 and level 6 there is no difference between hardness level settings.
Progress
indicator lights
Wash
End
Only use special pelletized dishwasher salt in
your machine to soften the hard water. Never
use other types of salts includin table salt,
animal feedin salt, sea salt, culinary salt. These
types of salt do not dissolve in water easily
and will dama e your appliance beyond repair.
When you run the dishwasher, the Water
softener will be full of water. Therefore,
adding softening salt should always be
done immediately before you start the
dishwasher.
Caution : Only fill with salt just before startin
one of the complete washin pro rammes to
prevent any rains of salt causin corrosion.
You can put approximately 2 k softenin salt
in the Water softener.
To fill the container with softenin salt, remove
the lower rack first and unscrew the cap of
the water softener turnin anti clockwise .
Usin the funnel provided will make fillin
easier.
After you fill the container, screw cap ti htly
back into place turnin clockwise until you
hear a click sound.
11
The float drops and is no lon er visible when
the salt container needs to be refilled.
To fill the container with softenin salt, remove
the lower rack first and unscrew the cap of
the water softener turnin anti clockwise .
Usin the funnel provided will make fillin easier.
After you fill the container, screw cap ti htly
back into place turnin clockwise until you hear
a click sound.
Any brand of powder, el and tablet deter ents
that have been desi ned for household
dishwasher, may be used.
Keep deter ents in a cool and dry place and out
of the reach of children.
Deter ent must be added to the container before
each use.
Deter ent overdose may cause scratches on
your dishes and there may be traces of deter ent
left in your machine.
Three types of deter ent are available
- Phosphate and containin chlorine.
- Phosphate containin no chlorine
- Neither containin phosphate nor chlorine
New compact powders are enerally phosphate-
free. As phosphates have water softenin
properties, we su est you add salt to the salt
container even if the hardness of your water is
as low as a 6 clarke de rees.
In hard water areas if a phosphate free deter ent
is used, white marks on the dishes and lasses
may be observed. It may be prevented by
increasin the amount of deter ent.
Deter ents without chlorine have less bleachin
effect. Coloured stains may not be completely
removed. This may be prevented by increasin
the amount of deter ent, usin a pro ramme
with a hi her wash temperature or usin a
deter ent with chlorine.
S
A
L
Z
T
U
Z
S
A
L
T
S
E
L
unnel
S
A
L
Z
T
U
Z
S
A
L
T
S
E
L
S
A
L
Z
T
U
Z
S
A
L
T
S
E
L
Full Empty
12
You will obtain the best results from your
dishwasher if you use a separate deter ent, rinse
aid and water-softenin salt.
Deter ent manufacturers also produce combined
deter ents known as 'two-in-one' and 'three-
in-one'.
Three-in-one: These products contain deter ent,
rinse aid and water-softenin salt.
Two-in-one: These products contain deter ent
and either rinse aid or water-softenin salt.
In eneral, you will obtain satisfactory results
from combined deter ents only under specific
usa e conditions. These deter ents contain
predetermined amounts of rinse aid and/or
softenin salt. This means that you cannot adjust
the amount of water-softenin salt and rinse
aid that you use to suit the water hardness level
in your home.
You should bear the followin points in mind
when usin such deter ents:
- Be sure to check the specifications of the
product you are usin and whether it is a
combined product or not.
- Follow the instructions on the packet when
usin these products.
- The use f these pr ducts at the c rrect
appliance settings will ensure ec n mical
use f salt and/ r rinse aid.
- If the deter ent is in tablet form, never place
these in the internal section or cutlery basket
of the dishwasher. Always place the tablets
in the deter ent dispenser of the deter ent
holder.
- These deter ents will not ive you the same
dryin performance that you can obtain by
usin separate deter ent, salt and rinse aid.
To increase the dryin performance:
Put your appliance's rinse aid settin at "1"
and apply rinse aid. When the rinse aid is
used up, add more rinse aid to the rinse aid
dispenser.
- If you use combined deter ents with a rinse
aid settin hi her than 1, contact with the
hands may leave rainbow-coloured water
stains on the washed items and inside the
machine.
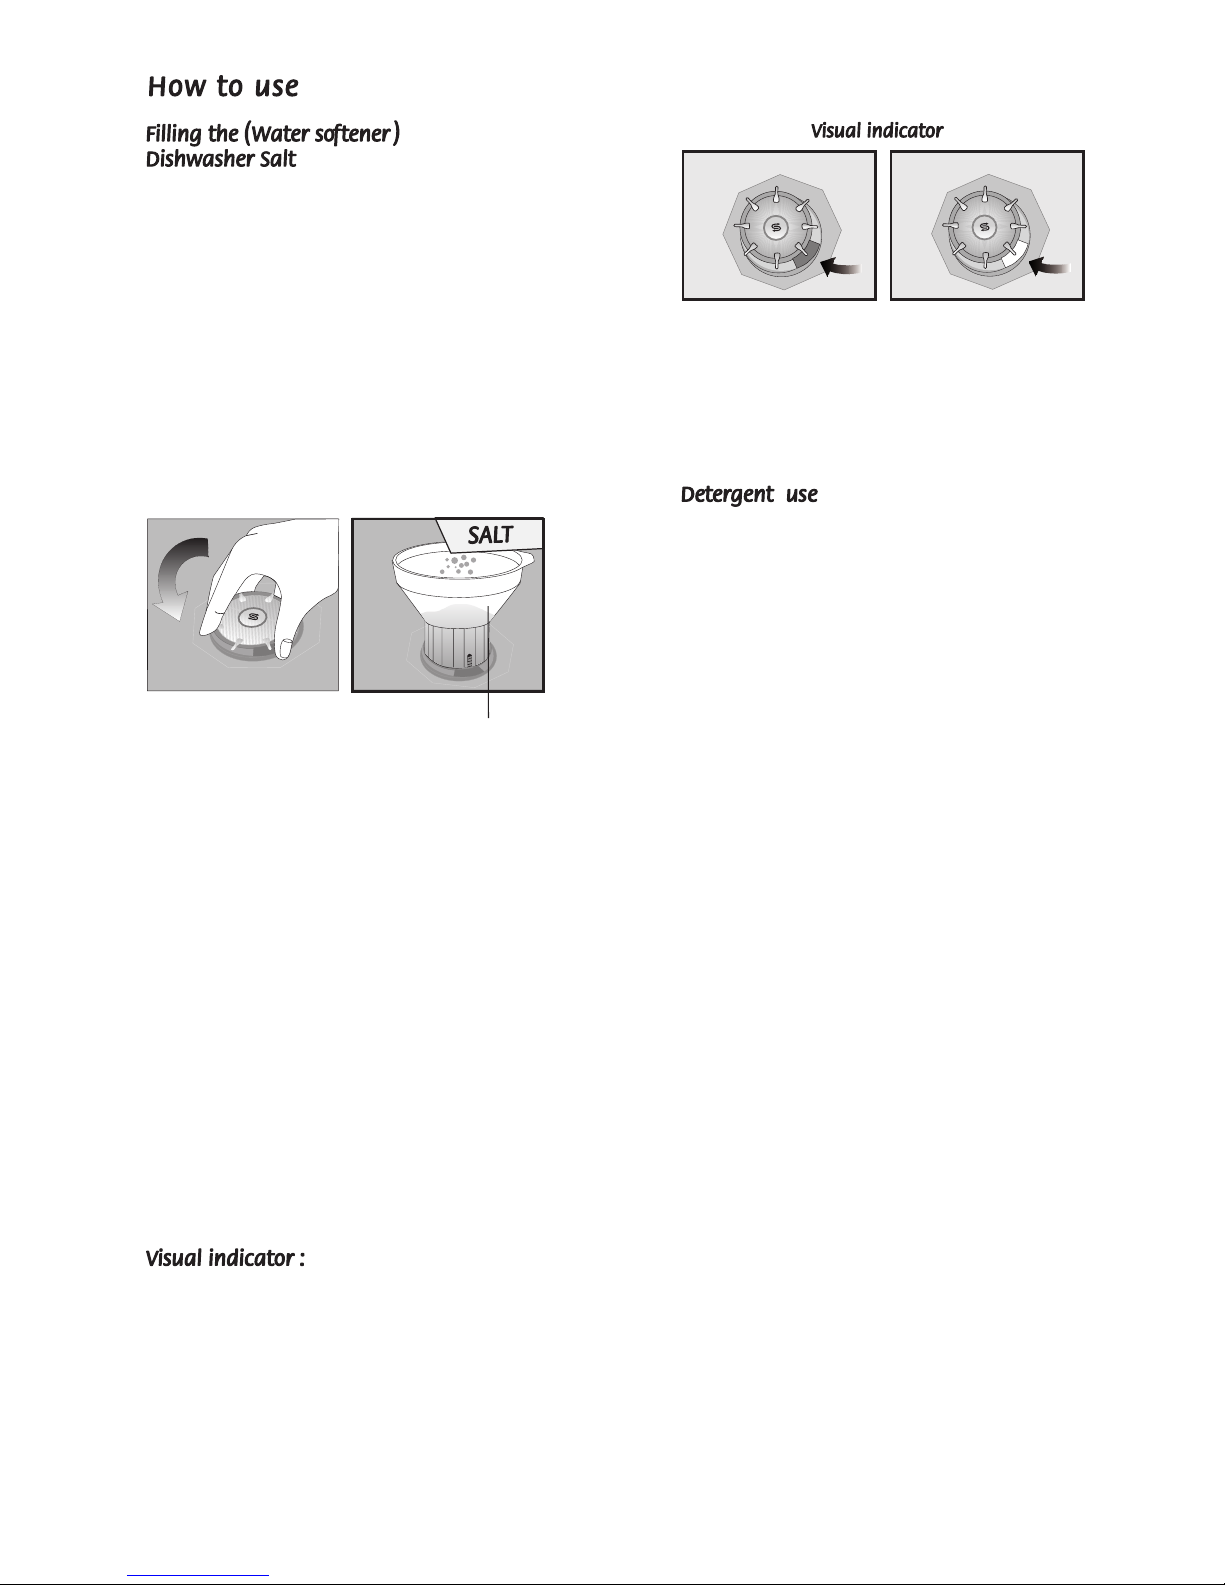
- If you use combined deter ents without addin
salt, lime scale may form especially on lasses. To
avoid lime scale formation:
Put your appliance's water softener settin at "1"
and add salt. When the salt is used up, add more
salt to the water softener.
- These deter ents do not contain rinse aid so you
need to use the rinse aid settin as described in
the manual, makin sure that there is rinse aid in
the rinse aid dispenser with every wash and that
you refill the rinse aid dispenser with rinse aid
every time it is empty.
- These deter ents will not ive you the same dryin
performance that you can obtain by usin separate
deter ent, salt and rinse aid. To increase the dryin
performance:
Put your appliance's rinse aid settin at "1" and
apply rinse aid. When the rinse aid is used up,
add more rinse aid to the rinse aid dispenser.
- If you use combined deter ents with a rinse aid
settin hi her than 1, contact with the hands may
leave rainbow-coloured water stains on the washed
items and inside the machine.
- These deter ents do not contain softenin salt so
you need to use the softenin settin as described
in the manual, makin sure that there is water-
softenin salt in the water softener with every
wash and that you refill the water softener with
salt every time it is empty.
- Should you encounter a problem that has
previously never occured after you start usin
these deter ents, contact the deter ent
manufacturer directly. You will find contact details
on the packet.
- Ensure that the salt and rinse aid dispensers are
full.
- Put the water hardness settin at the highest
level and run a wash cycle with the appliance
empty.
- After washin while empty, return the water
hardness settin to the correct level for your mains
water hardness shown in the manual.
- Put the rinse aid settin at the correct level.