Beko DSFN-6837 User manual

Dishwasher
Instruction Manual

This product was manufactured using the latest technology in environmentally friendly conditions.
Please read this user manual first!
Dear Customer,
We hope that you get the best results from the product which has been
manufactured in state-of-the-art plants and passed through a strict quality control
procedure.
Therefore, please read the entire user manual carefully before using the product
and keep it as a reference for future use. In case of transferring the product to
someone else, give the manual as well.
The user manual will help you use your product in a
fast and safe way.
• Read the user manual before installing and starting your product.
• Always follow the safety instructions.
• Keep this user manual within easy reach for future reference.
• Read also the other documents supplied with the product.
Remember that this user manual is also applicable for several other models.
Differences between models will be identified in the manual.
Explanation of symbols
Throughout this User Manual the following symbols are used:
Important information or useful hints about usage
Warning for hazardous situations with regard to life and property
Warning for electric shock

Dishwasher
Instruction Manual

Please read this user manual first!
Dear Customer,
We hope that you get the best results from the product which has been
manufactured in state-of-the-art plants and passed through a strict quality control
procedure.
Therefore, please read the entire user manual carefully before using the product
and keep it as a reference for future use. In case of transferring the product to
someone else, give the manual as well.
The user manual will help you use your product in a
fast and safe way.
• Read the user manual before installing and starting your product.
• Always follow the safety instructions.
• Keep this user manual within easy reach for future reference.
• Read also the other documents supplied with the product.
Remember that this user manual is also applicable for several other models.
Differences between models will be identified in the manual.
Explanation of symbols
Throughout this User Manual the following symbols are used:
Important information or useful hints about usage
Warning for hazardous situations with regard to life and property
Warning for electric shock
This product was manufactured using the latest technology in environmentally friendly conditions.

CONTENTS
1. Dishwasher 3
2. Important safety instructions 5
General safety 5
Intended use 5
Children’s safety 6
3. Installation 7
Appropriate installation location 7
Connecting water supply 7
Connection to the drain 8
Adjusting the feet 9
Aquasafe+ 9
Electrical connection 9
Initial use 9
Disposing of packaging material 10
Transportation of the product 10
Disposing of the old product 10
4. Prewashing 11
Tips for energy saving 11
Detergent 11
Adding detergent 11
Rinse aid 12
Silverware basket 15
Silverware basket piece 15
Movable silverware basket 15
Collapsable lower basket
wires (2 pieces) 16
Collapsable lower basket
wires (4 pieces) 16
Lower basket bottle wire 16
Lower basket multipurpose / height
adjustable service rack 17
Upper basket height adjustable rack 17
Upper basket drawer 18
Upper basket glass support piece 18
Collapsable upper basket wires 18
Collapsable upper basket wires 19
Adjusting the height of loaded upper
basket 19
Adjusting the height of loaded
upper basket 20
Adjusting the height of empty upper
basket 21
Ceiling silverware basket 22
5. Program Selection and
Operating Your Machine 23
Button and Button Descriptions 24
Program Selection 24
Adding Functions to the
Program 25
Program Steps Follow-up 25
Canceling a Program 25
Changing a Program 25
Programming the Delayed Start 25
Rinse Aid Indicator 26
Rinse Aid Indicator Setting 26
Starting Your Machine 27
6. Maintenance and cleaning 29
Cleaning the outer surface of the
product 29
Cleaning the interior of the machine 29
Cleaning the filters 29
Cleaning the hose filter 30
Cleaning the impellers 30
7. Troubleshooting 32

3
EN
1Dishwasher
Overview
1.Upper basket with rack
2.Upper impeller
3.Lower impeller
4.Filters
5.Lower basket
6.Control panel
7.Door
8.Detergent dispenser
9.Silverware basket
10.Lower impeller slot
11.Upper basket rail
12.Ceiling silverware basket
13.Tabletop (depends on the model)
14.Ceiling impeller
15.Fan drying system (depends on the model)
15

4
EN
Technical specifications
This product complies with the following EU directives:
Development, production and sales stages of this product comply with the
safety rules included in all pertaining European Community regulations.
2006/95/EC, 2004/108/EC, 93/68/EEC, IEC 60436, EN 50242
Power input 220-240 V, 50 Hz
Total power consumption 1900-2200 W
Heater power consumption 1800 W
Total current 10 A (see type plate)
Drain pump power
consumption 30 W
Water pressure 0.3 –10 bar (= 3 – 100 N/cm² = 0.03-1.0 Mpa)
CTechnical specifications may be changed without prior notice to improve the
quality of the product.
CFigures in this manual are schematic and may not match the product exactly.
CValues stated on the product labels or in the documentation accompanying
it are obtained in laboratory conditions in accordance with the relevant
standards. Depending on operational and environmental conditions of the
product, these values may vary.
Note for test institutions:
Data required for performance tests shall be provided upon request. Requests
can be e-mailed to the following address:
Do not forget to provide the code, stock and serial numbers of the product to be
tested in your request e-mail along with your contact information. Code, stock and
serial numbers of the product is located on the type label attached to the side of
the door.

5
EN
2Important safety instructions
This section contains safety
instructions that will help to get
protected from risk of personal injury
or property damage Failure to follow
these instructions shall void all
warranties.
General safety
• Never place the product on a
carpet-covered oor; otherwise,
lack of airow beneath the product
will cause electrical parts to
overheat. This will cause problems
with your product.
• Do not operate the product if the
power cable / plug is damaged!
Call the Authorised Service Agent.
• Connect the product to a grounded
outlet protected by a fuse
complying with the values in the
“Technical specifications” table. Do
not neglect to have the grounding
installation made by a qualified
electrician. Manufacturer shall not
be liable for any damages that will
arise when the product is used
without grounding in accordance
with the local regulations.
• The water supply and draining
hoses must be securely fastened
and remain undamaged.
• Unplug the product when not in
use.
• Never wash the product by
spreading or pouring water onto it!
There is the risk of electric shock!
• Never touch the plug with wet
hands! Never unplug by pulling
on the cable, always pull out by
grabbing the plug.
• The product must be unplugged
during installation, maintenance,
cleaning and repairing procedures.
• Always have the installation and
repairing procedures carried out
by the Authorised Service Agent.
Manufacturer shall not be held
liable for damages that may arise
from procedures carried out by
unauthorised persons.
• Never use chemical solvents in the
product. They bring forth risk of
explosion.
• When you pull the upper and lower
baskets out completely, the door of
the product will bear all the weight
of the baskets. Do not put other
loads on the door; otherwise, the
product may tilt.
• Never leave the door of the product
open apart from loading and
unloading procedures.
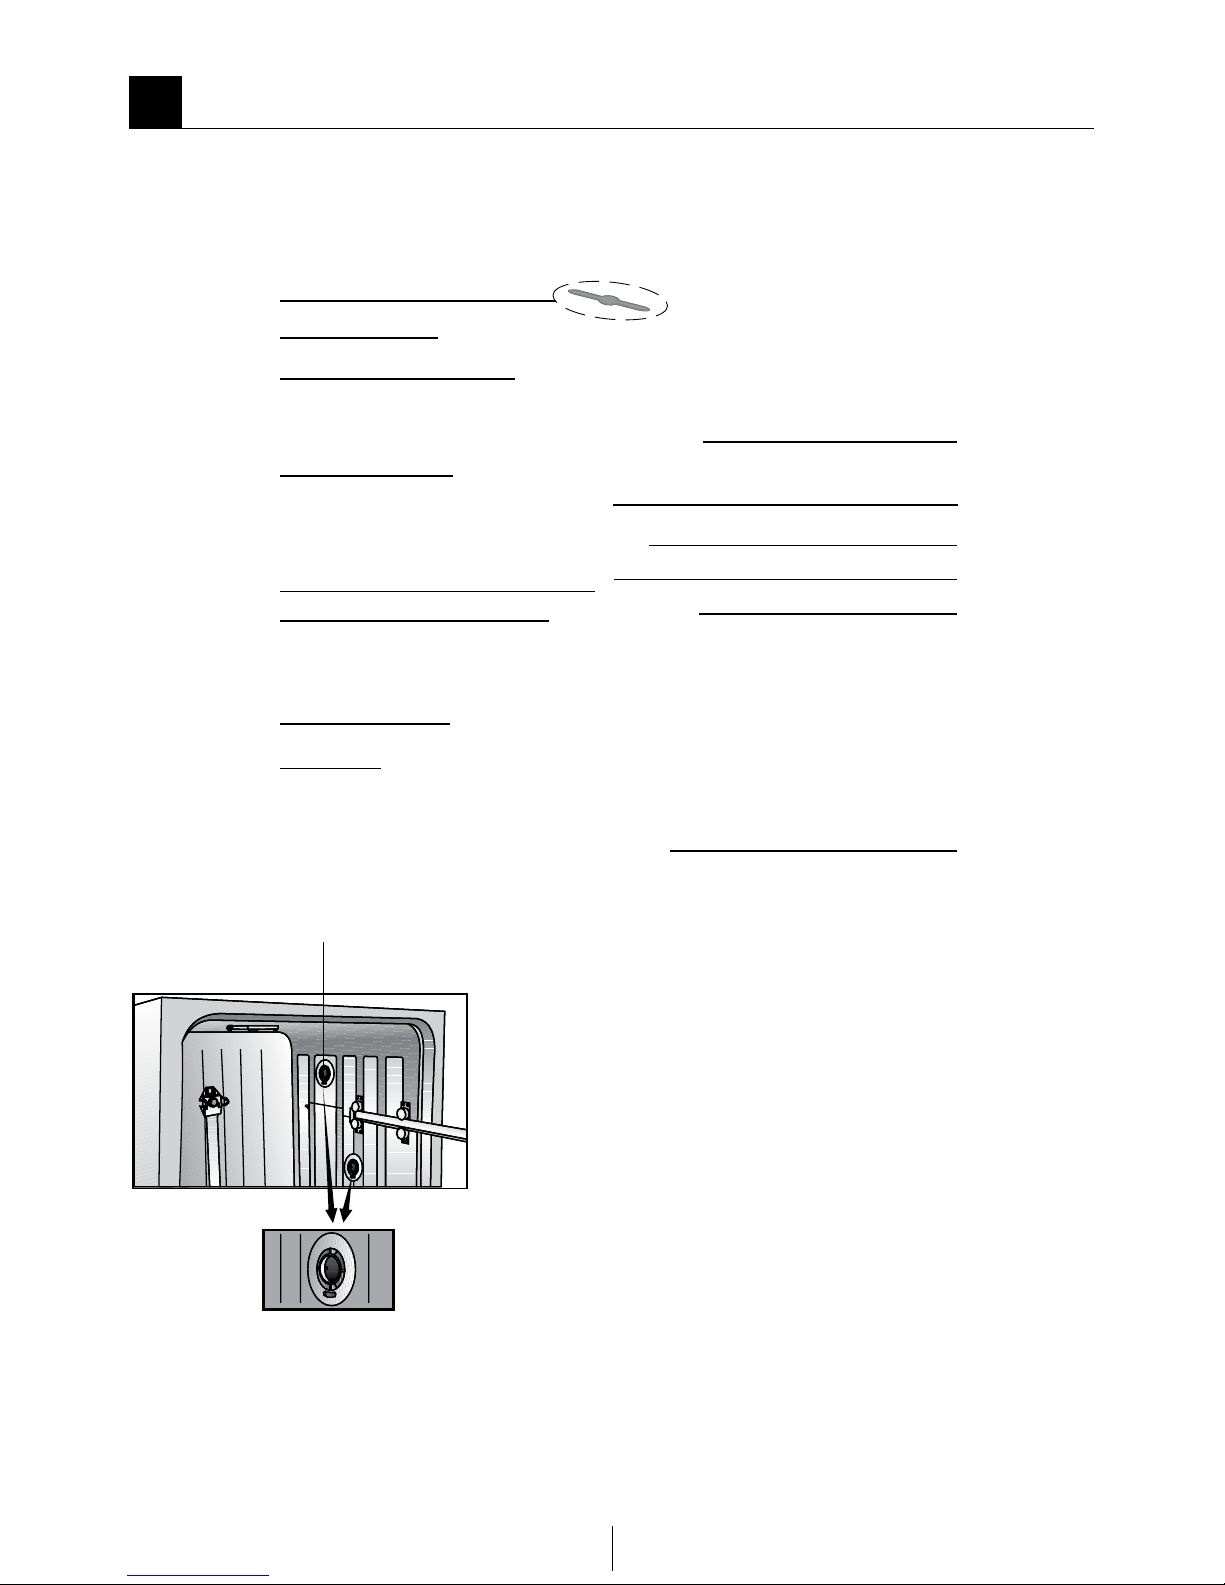
• Do not to open the door of the
product when it is running unless
necessary. Be careful for the rush
of hot vapour when you need to
open the door.
Intended use
This appliance is intended to be used in
household and similar applications such
as:
• staff kitchen areas in shops, offices
and other working environments;
• farmhouses;
• by clients in hotels, motels and
other residential type environments;
• bed and breakfast type
environments.It must be used to do
the domestic type dishes only.
• Only dishwasher safe detergents,
rinse aids and additives must be
used.
• The manufacturer waives any

6
EN
responsibility arisen from incorrect
usage or transportation.
• The service life of your product
is 10 years. During this period,
original spare parts will be
available to operate the appliance
properly.
• This product should not be
used by persons with physical,
sensory or mental disorders or
unlearned or inexperienced people
(including children) unless they are
attended by a person who will be
responsible for their safety or who
will instruct them accordingly for
use of the product.
Children’s safety
• Electrical products are dangerous
for the children. Keep children
away from the product when it is
in use. Do not let them to tamper
with the product.
• Do not forget to close the door of
the product when leaving the room
where it is located.
ADishwasher detergents are
strongly alkaline. They can be
extremely dangerous if swallowed.
Avoid contact with the skin and
eyes and keep children away
from the dishwasher when the
door is open. Check that the
detergent receptacle is empty after
completion of the wash cycle.
Store all detergents and additives in a
safe place away from the reach of the
children.

7
EN
3Installation
Refer to the nearest Authorised
Service Agent for installation of your
product. To make the product ready
for use, make sure that the electricity,
tap water supply and water drainage
systems are appropriate before calling
the Authorised Service Agent. If they
are not, call a qualified technician
and plumber to have any necessary
arrangements carried out.
CPreparation of the location and
electrical, tap water and waste
water installations at the place of
installation is under customer's
responsibility.
BInstallation and electrical
connections must be carried out
by the Authorised Service Agent.
Manufacturer shall not be held
liable for damages that may arise
from procedures carried out by
unauthorised persons.
BPrior to installation, visually check
if the product has any defects on
it. If so, do not have it installed.
Damaged products cause risks for
your safety.
AMake sure that the water inlet and
discharge hoses are not folded,
pinched or crushed while pushing
the product into its place after
installation or cleaning procedures.
When placing the product, pay
attention not to damage the floor,
walls, piping, etc. Do not hold the
product from its door or panel to
move it.
Appropriate installation
location
Place the product on a solid and
flat floor that has sufficient load
carrying capacity! The product must
be installed on a flat surface in order
for the door to be closed comfortably
and securely.
Do not install the product at places
where temperature may fall below
0ºC.
Place the product at least 1 cm away
from the edges of other furniture.
Place the product on a rigid floor.
Do not place it on a long pile rug or
similar surfaces.
BDo not place the product on the
power cable.
Make sure that you select a location
that will allow you to load and unload
the dishes in a fast and comfortable
manner.
Install the product in a place close to
the tap and the drain hole. Select the
installation location by considering
that it will not be changed after the
connections are made.
Connecting water supply
BNot recommended to run with hot
water.
CWe recommend attaching a filter
on the house/apartment supply
water inlet to protect the machine
from damages that may arise
from impurities (sand, dirt, rust,
etc.) coming from the urban water
supply system or from your own
water system as well as to prevent
complaints such as yellowing or
sludge accumulation at the end of
washing.

8
EN
Connection to the drain
Water discharge hose can directly be
connected to the drain hole or sink’s
drainage. The length of this connection
must be min. 50 cm and max. 100 cm
from the oor.
1011
Open the taps completely after
making the connections to check
for water leaks.
AFor your safety, close the water
inlet tap completely after the
washing programme is over.
The incoming water temperature
should not exceed 60°C.
B If you plan to connect your machine
to natural energy resources or to
the central hot water supply, first
check out the temperature values
written on your water inlet hose
to make sure that it is suitable for
such usage. If your hose is not
suitable, apply to your Authorised
Service Agent to have it changed.
Do not use old or used water inlet
hose on the new product. Use the
new water inlet hose supplied with
the product.
Connect the water inlet hose
directly to the water tap. Pressure
coming from the tap should be
minimum 0.3 and maximum 10
bars. If the water pressure exceeds
10 bars, a pressure relief valve
should be installed in between.
C Use a screw-on hose connector
to connect the water inlet hose to
a water tap with a ¾ inch external
thread. If required, use a filter
insert to filter deposits from the
pipes.
1009 A discharge hose longer than 4 meters
causes dirty washing.
Attach the water discharge hose
to the drainpipe without bending it.
Tightly fix the water discharge hose to
the drainpipe in order to prevent any
dislocation of the water discharge hose
during operation of the product.

9
EN
CDrainpipe must be connected to
the sewage system and it should
not be connected to any surface
water.
Adjusting the feet
If the door of the product cannot be
closed properly or if the product swings
when you push it slightly, then you
need to adjust the feet of the product.
Adjust the feet of the product as
illustrated in the installation manual
supplied with the product.
Aquasafe+
(depends on the model)
Protect the Aquasafe+ system against
water leaks that may occur at hose
inlet. Water contact with the valve
box of the system must be prevented.
Otherwise, electrical assembly will get
damaged. If the Aquasafe system is
damaged, unplug the product and call
the Authorised Service Agent.
AAs the hose set contains electrical
connections and assemblies, never
shorten or lengthen the hose with
extension hoses.
1010
Electrical connection
Connect the product to a grounded
outlet protected by a fuse complying
with the values in the “Technical
specifications” table. Manufacturer
shall not be liable for any damages
that will arise when the product is used
without grounding in accordance with
the local regulations.
Connection must comply with
national regulations.
Power cable plug must be within
easy reach after installation.
AUnplug the product after the
washing programme is over.
The voltage and allowed fuse or
breaker protection are specified
in the “Technical specifications”
section. If the current value of the
fuse or breaker in the house is less
than 16 Amps, have a qualified
electrician install a 16 Amp fuse.
The specified voltage must be
equal to your mains voltage.
Do not make connections via
extension cables or multi-plugs.
BDamaged power cables must be
replaced by the Authorised Service
Agent.
BIf the product has a failure, it
should not be operated unless it is
repaired by the Authorised Service
Agent! There is the risk of electric
shock!
Initial use
Before starting to use the product,
make sure that all preparations
are made in accordance with the
instructions in sections “Important
safety instructions” and “Installation”.
To prepare the product to do the
dishes, perform first operation
in the shortest programme with

10
EN
detergent while the machine is
empty.
CSome water might have remained
in the product due to the
quality control processes in the
production. It is not harmful for the
product.
Disposing of packaging
material
Packaging materials are dangerous to
children. Keep packaging materials in
a safe place away from reach of the
children.
Packaging materials of the product
are manufactured from recyclable
materials. Dispose of them properly
and sort in accordance with recycled
waste instructions. Do not dispose of
them with normal domestic waste.
Transportation of the product
AIf you need to move the product, do
it in upright position and hold from
the rear side. Slanting the product
onto its front side may cause the
electronic parts in it get wet and
damaged.
1. Unplug the product before
transporting it.
2. Remove water drainage and water
supply connections.
3. Drain the remaining water in the
product completely.
Disposing of the old product
Dispose of the old product in an
environmentally friendly manner.
Some parts of the product are
manufactured from recyclable
materials. Along with a recycling
symbol, information about its
nature (PE, PS, POM, etc) is also
provided on the material. These
materials should not be disposed as
normal domestic wastes.
Refer to your local dealer or solid
waste collection centre in your area to
learn how to dispose of your product.
AFor children's safety, cut the
power cable and break the locking
mechanism of the door so that
it will be non-functional before
disposing of the product.

11
EN
1014
1014
4Prewashing
Tips for energy saving
Following information will help you
use the product in an ecological and
energy-efficient manner.
• Wipe away any coarse food
remnants on the dishes before
putting them in the product.
• Operate the product after filling it
completely.
• When selecting a programme,
refer to the “Programme Table”.
• Do not put more detergent than
suggested on the detergent
package.
Detergent
You can use powder or tabltet
detergent in the machine.
COnly use in the machine the
detergents produced particularly
for use with dishwashers. We
recommend you not to use
detergents that contain chlorine
and phosphate as they are harmful
for the environment.
CContact the detergent producer if
the dishes are wet and/or if you
notice limescale spots particularly
on glasses after the washing
programme is over.
Adding detergent
CRefer to the “Programme Table”
to determine the correct amount
of detergent for the selected
programme.
BDo not put solvents into the
detergent dispenser. There is the
risk of explosion!
Put the detergent into the detergent
dispenser just before operating the
machine as illustrated below.
1. Push the latch to right to open the
detergent dispenser lid (A).
2. Put suggested amount of powder
or tabltet detergent in the
dispenser.
CInside the detergent dispenser,
there are level markings that help
you use appropriate amount of
detergent. When brimful, detergent
dispenser will contain 40 cm³ of
detergent. Fill detergent up to 15
cm³ or 25 cm³ level marks in the
detergent dispenser according
to fullness of the machine and/or
soiling degree of the dishes (1).
CIf dishes have been waiting for a
long time and have dried residues,
fill the 5 cm³ compartment too (5).
3. Close the detergent dispenser lid
by pressing on it lightly. A "click"
will be heard when the lid is closed.

12
EN
1013_redaksiyon
1013_redaksiyon
CIn programmes with prewash and at
high temperature, in which you use
tabltet detergents, make sure that
the detergent dispenser lid is closed
firmly.
CUse powder detergent in short
programmes without prewash
since the solubility of the tabltet
detergent changes depending on the
temperature and time.
AExcessive usage of powder
detergents will cause the detergent
not dissolve completely and will also
cause scratches on the glassware.
Rinse aid
CThe rinse aid used in dishwashers
is a special combination used to
increase drying efficiency and
prevent water or limescale stains on
the washed items. For this reason,
care must be paid to have rinse aid
in the rinse aid reservoir and to use
rinse aids produced specially for
dishwashers only.
Check Rinse Aid Indicator to determine
whether it is necessary to add rinse aid
or not (3). Having a dark light on the
indicator shows that there is sufficient
amount of rinse aid in the dispenser. If
the colour of the indicator is light, add
rinse aid.
1. Open the lid of the rinse aid reservoir
by pressing its latch (B).
2. Fill the reservoir until “MAX” level.
3. Close the lid of the reservoir by
pressing on it lightly.
CWipe clean any spilled rinse aid
outside the reservoir. Rinse aid
that spilled accidentally will cause
foaming and it will eventually
decrease washing performance.
4. Turn the rinse aid amount
adjuster manually to a position
between 1 and 6 (4). If there are
stains on tableware items after
washing, level must be increased
and if there is a blue trace after
wiping them by hand, it must be
decreased. This is set to position 4
as factory default.
Items not suitable for washing in the
dishwasher
• Never wash dishes soiled by
cigarette ash, candle remnants,
polish, dyestuff, chemicals, etc. in
your dishwasher.
• Do not wash iron alloy items in the
dishwasher. It can get corroded or
leave stains on other items.
• Do not wash silverware and
cutlery with wooden or bone
stems, glued pieces, or pieces that
are not resistant to heat, as well as
copper and tin-plated containers in
the dishwasher.

13
EN
they will lie horizontally on the dish
baskets.
• Unload dishes in the lower basket
first and then the dishes in the
upper basket.
CDecorative prints of chinaware as
well as aluminum and silver items
may get discoloured or tarnished
after washing in the dishwasher
just as it happens in handwashing
as well. Some delicate glass types
and crystals may become dull in
time. We strongly recommend
you to check if the tableware you
are going to purchase is suitable
for washing especially in the
dishwasher.
Placing the dishes into the
dishwasher
You can use your dishwasher in the
optimum way with respect to energy
consumption and washing and drying
performance only if you place the
dishes in an orderly way.
• Wipe away any coarse food
remnants (bones, seeds, etc.) on
the dishes before placing them in
the dishwasher.
• Place thin, narrow pieces in the
middle sections of baskets if
possible.
• There are two separate baskets in
which you can place your dishes in
the dishwasher. Place the heavily
soiled and bigger items in the
lower basket and smaller, delicate
and light items in the upper
basket.
• Place the hollowed dishes such as
bowls, glasses and pans upside
down in the dishwasher. Thus,
accumulation of water in deep
hollows is prevented.
ATo prevent possible injuries, always
place the sharp and pointed
dishes such as service fork, bread
knife, etc. upside down so as their
pointed ends will face down or

14
EN
Suggestions for loading the
dishwasher
Lower basket
Upper basket
Improper Loading Of Dishware

15
EN
2555
4-3B Tall Tub cutlery basket
1029_redaksiyon
Silverware basket
(depends on the model)
Silverware basket is designed to wash
your dishes such as fork, spoon and
etc. in a cleaner manner.
Silverware basket piece
(depends on the model)
You can place your forks, spoons and
etc. to upper basket with the additional
piece in the figure.
Movable silverware basket
(depends on the model)
Since the cutlery basket can be moved
(A, B), you can create a wider space
while placing your dishes to the lower
basket and free up space for your
dishes in different sizes.

16
EN
1054
4000_euro2_altsepet_
birlesik_altyatar_
mandal
4000_euro2_altsepet_
birlesik_altyatar_
mandal_DETAY
Collapsable lower basket
wires (2 pieces)
(depends on the model)
The two piece foldable wires located
at the lower basket of the machine are
designed for an easier placement of
large pieces such as pans, bowls, etc.
(1, 2).
You can create larger spaces by
folding each wire individually or all of
them at once. Lay the foldable wires
down by pressing on the latch (A).
Collapsable lower basket
wires (4 pieces)
(depends on the model)
The four piece foldable wires located
at the lower basket of the machine
are designed for an easier placement
of large pieces such as pans, bowls,
etc. (1, 2, 3, 4). You can create larger
spaces by folding each wire individually
or all of them at once. Lay the foldable
wires down by pressing on the latch
(A).

17
EN
Collapsable lower basket
wires (6 pieces)
(depends on the model)
The foldable wires (A) located at
the lower basket of the machine are
designed for an easier placement of
large pieces such as pans, bowls,
etc. You can create larger spaces by
folding each wire individually or all
them at once.
To bring the collapsible wires into
horizontal position, grab the wire from
mid position and push them in the
directions of arrows (B) To bring the
wires back to vertical position, just lift
them up. Collapsible wires will click into
the latch again.
Bringing the wires to the horizontal
position byholding them from the
tips may cause them to bend.
Therefore, it will be appropriate
to bring the wires in the middle to
horizontal or vertical position by
holding them from their stems and
pishing in the direction of arrow.
5000_eu2_altsepet_elle_
yatartel_ayrı
34
6
5
Table of contents
Other Beko Dishwasher manuals

Beko
Beko BDIN38640F User manual

Beko
Beko BM 6016 SC User manual

Beko
Beko DSN15420X User manual

Beko
Beko BM 5015 I User manual

Beko
Beko BDIN16520 User manual

Beko
Beko DIN28Q20 User manual

Beko
Beko DFN28422S User manual

Beko
Beko DEN36X30W User manual

Beko
Beko DIN 5840 User manual

Beko
Beko DFN05R10B User manual