Beko B3T4923DW User manual

B3T4923DW
B3T49231DW
Dryer
User Manual
EN
2 9 6 0 3 1 3 3 7 2 _ E N /26-05-23.(16:20)

13
Dryer / User manual
3 Your drying machine
3.1 Technical specifications
* Min. height: Height with the adjustable stand closed.
Max. height: Height with the adjustable stand opened at maximum height.
** Weight of dry laundry before washing.
*** Data plate is under the door on the drying machine.
In order to increase the drying machine’s quality, the technical specifications may be
changed without prior notice.
Figures in this manual are schematic and may not exactly match the product.
The values provided with the drying machine or its accompanying documents are
laboratory readings in accordance with the respective standards. These values may
differ depending on the use and ambient conditions.
EN
Height (Min. / Max.) 84,6 cm / 86,6 cm*
Width 59,8 cm
Depth 60,5 cm
Capacity (max.) 9 kg**
Net weight (± %10) 44 kg
Voltage
See type label***Rated power input
Model code

14 Dryer / User manual
3.2 General appearance
11
10
1
2
3
4
5
6
7
8
9
1. Top panel
2. Control panel
3. Loading door
4. Toe board handle
5. Ventilation grids
6. Adjustable feet
7. Toe board
8. Rating plate
9. Lint filter
10. Water tank drawer
11. Power cord
3.3 Scope of delivery
1. Water
discharge
hose*
6. Water
filling cap*
2. Filter
drawer
spare
sponge*
7. Pure
Water*
3. User
Manual
8. Odour
Capsule
Group*
4. Drying
basket* 9. Brush*
5. Drying
basket user
manual*
10. Filter
cloth*
*Optional - may not be included, depends on
model.

15
Dryer / User manual
4 Installation
Read the “Safety Instructions” first!
Before consulting the nearest Authorized
Service for installing the drying machine, see
the information in the user guide and make sure
the electric and water utilities are as required. If
not, call an electrician and plumber to arrange
the utilities as necessary.
It is customer's responsibility to
prepare the location the drying
machine shall be placed on and
also have power and waste water
installation prepared.
Check for any damage on the
drying machine before installing it. If
drying machine is damaged, do not
get it installed. Damaged products
cause a risk for your safety.
Wait 12 hours prior to operating the
drying machine.
NOTICE
The product includes a cooling
agent and if the product is operated
right after its transported, it may
get damaged. After each time the
product is moved, it shall be left to
rest for 12 hours.
4.1 Right place for installation
• Install the drying machine on a flat and
stable surface.
• Dryer machine is heavy. Do not move it by
yourself.
• Operate the drying machine in an
environment free of dust with good
ventilation.
• The gap between the drying machine and
the floor shall not be reduced via materials
such as rugs, pieces of wood and bands.
• Do not block the ventilation grilles of the
drying machine.
• There shall not be doors that can be
locked, sliding doors or hinged doors near
the installation environment of the drying
machine that may block the loading door
to be opened.
• Once the drying machine is installed,
the connections must stay stable. After
placing the drying machine, ensure that
the back wall does not come in contact
with any extrusion (a water tap, electrical
outlet etc.).
• Place the drying machine with at least 1
cm space between the product and the
furniture edges.
• Your drying machine is suitable to be
operated between +5°C to +35°C. If
operated outside this temperature range,
your drying machine’s operation may be
compromised and get damaged.
• The drying machine shall not be placed
with the back side against a wall.
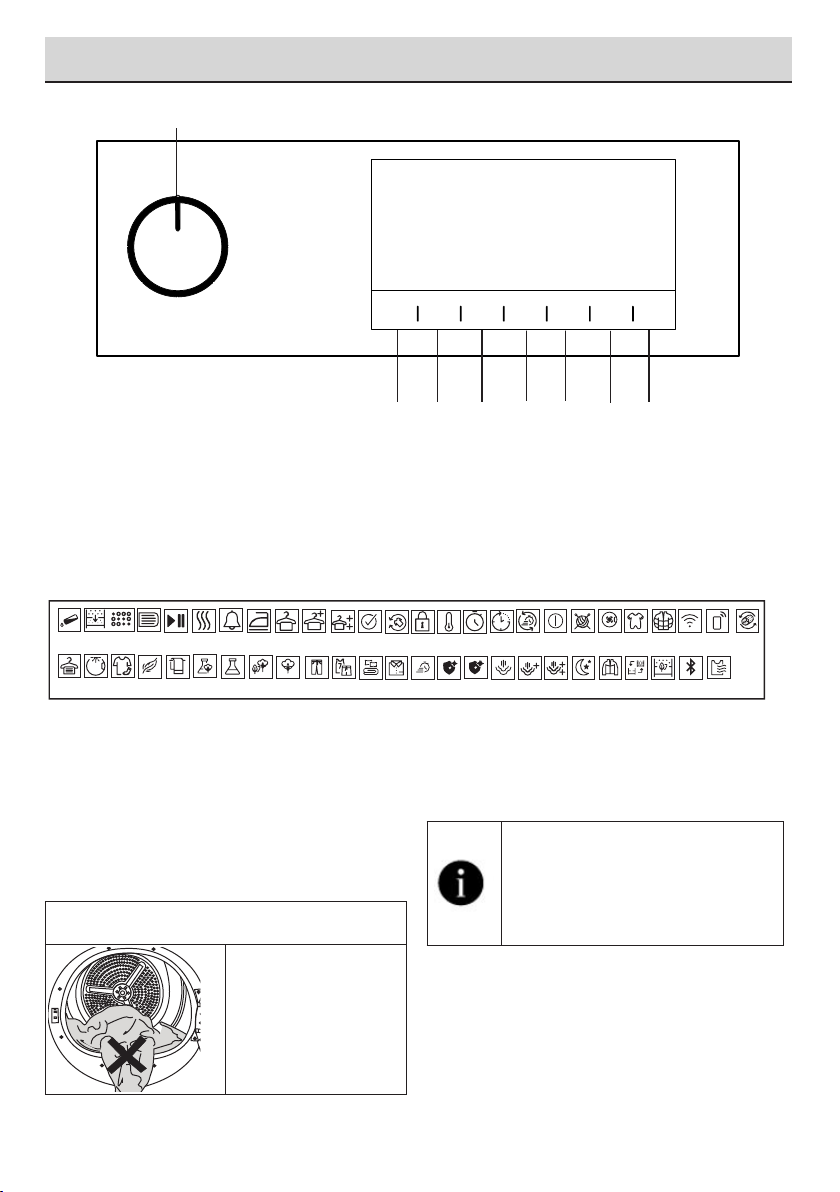
BDo not place the drying machine on
its power cord.
*Ignore following warning if your
product’s system does not contains
R290.
Dryer contains R290 refrigerant.*
R290 is an environment-friendly, but
flammable refrigerant.*
Ensure that the air inlet of the dryer
is open and it is well-ventilated.*
Keep potential flame sources away
from the dryer.*
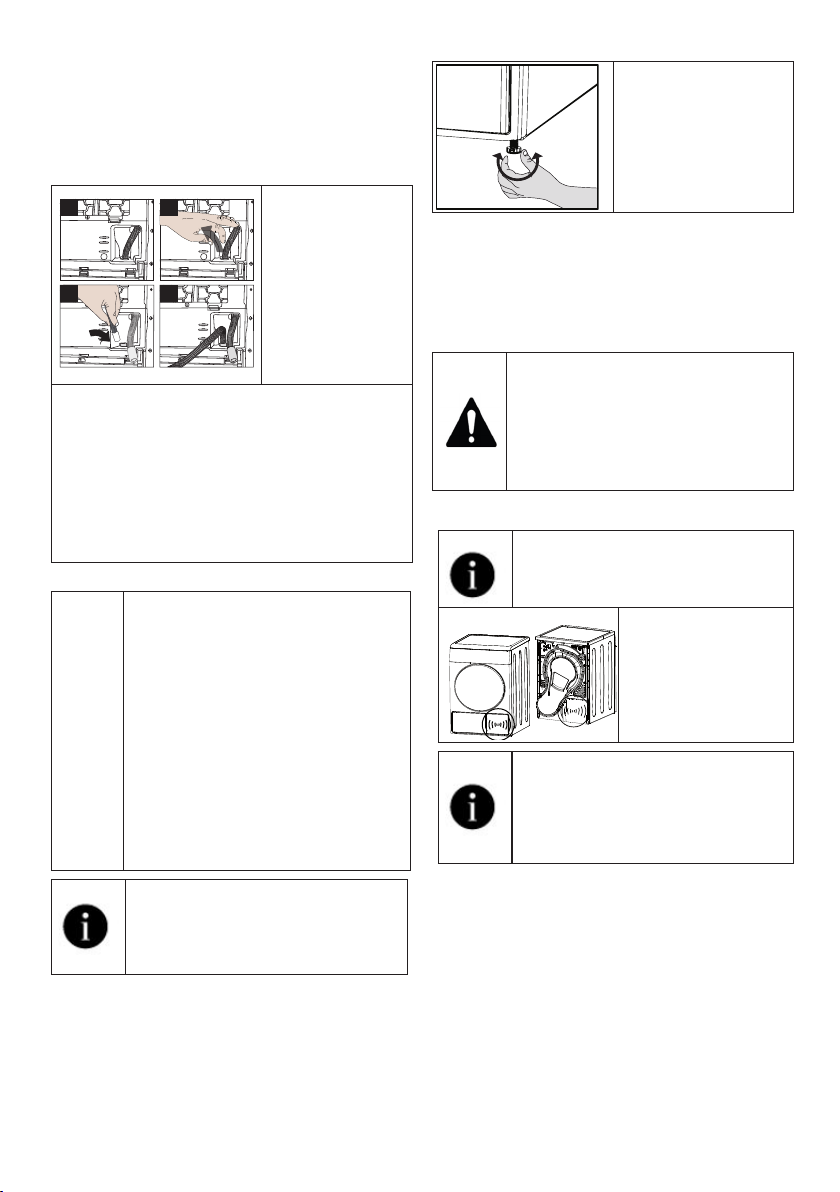
4.2 Removing the shipping
safety group
Remove the shipping
safety group prior to
first use the product.
NOTICE
Do not leave an accessory or any
parts of the shipping safety group
inside the drum.

16 Dryer / User manual
4.3 Water connection
Instead of periodically draining the water
accumulated in the water tank, you can
discharge via the water discharge hose
supplied with the drying machine.
Connecting the water drainage hose
1
3 4
21-2 Remove the
hose behind the
drying machine
by pulling it
manually from
where it is
attached. Do
not use a tool
to remove the
hose.
3 Insert one end of the water discharge hose
supplied with the drying machine to where
you have removed the hose on the drying
machine.
4 Fix the other end of the water discharge
hose to directly waste water drainage or a
sink.
NOTICE
The water discharge hose shall be
fixed at maximum 80 cm height.
Ensure that the water discharge
hose do not get kinked, collapsed
or pressed on between the
discharge and the drying machine.
Hose shall be connected not to
be disconnected from its location.
Leaked water may cause damage.
Do not extend the water drainage
hose.
Check whether the water runs at an
appropriate flow. The drainage line
shall not be closed or clogged.
If an accessory package is provided
with your product, check the
detailed instructions.
4.4 Adjusting the stands
Until the drying
machine stands level
and sturdy, adjust
the stands by turning
them left and right.
4.5 Moving the drying machine
• Drain the water in the drying machine
completely.
• If the product is connected via direct
discharge, remove the hose connections.
The drying machine is
recommended to be moved in
upright position. Otherwise, tilt it to
the right side when viewed from the
front and move the drying machine.
Wait 12 hours prior to operating the
drying machine.
4.6 Warning regarding the noise
As the product is
operated, metallic
noises may come
from the compressor
from time to time, it is
normal.
When the product is operated,
the accumulated water is pumped
to the water tank. It is normal to
hear pumping sounds from the
appliance during this operation.
4.7 Replacing the lighting bulb
If your drying machine has drum lighting lamp;
Consult the authorized service to replace the
bulb/LED used in lighting your drying machine.
The bulb in this product is not suitable for home
lighting. The intended use of this lamp is to
ensure safely loading the laundry to the drying
machine. The lamps used in this appliance is
resistant to heavy physical conditions such as
temperatures over 50°C.

17
Dryer / User manual
Read the “Safety Instructions” first!
5.1 Laundry suitable for
drying in drying machine
NOTICE
Laundry that are not drying machine
safe may damage the appliance and
the laundry during drying. Follow
the instructions on the labels on the
laundry to be dried. Only dry the
laundry with “drying machine safe”
written on their labels.
Do not dry
with dryer
5.2 Laundry not suitable for
drying in drying machine
NOTICE
Undergarments with metal supports
shall not be dried in drying machine.
If these metal supports get loose
and ripped from the garment, it may
damage the machine.
Delicate embroidery textiles, cotton
and silk garments, garments
manufactured from delicate and
valuable textiles, non breathing
garments and tulle curtains shall not
be dried in drying machine.
5.3 Preparing the laundry to be dried
NOTICE
Items such as coins, metal parts,
needles, nails, screws, stones etc.
may damage the drum group of the
product or may cause functional
operation issues. Therefore check
all laundry that will be loaded to the
product.
Dry the laundry with metal
accessories such as zippers by
turning them inside out.
Close the zippers, hooks and
clasps, button up the covers’
buttons, tie textile belts and apron
belts.
5.4 What to do for energy saving
• Use the highest possible wringing option
as you wash the laundry. Therefore you
can reduce the drying period and reduce
energy consumption. Sort the laundry
based on their types and thickness.
Dry same types of laundry together. For
instance kitchen towels and table cloths
dry faster than bathroom towels.
• Follow the recommendations in the user
manual for program selection.
• During drying do not open the loading
door unless necessary. If you are required
to open the loading door, do not keep it
open for too long.
• Do not add wet laundry as the drying
machine operates.
• Clean the Fibre Filter before and after
each drying session.
• For condensation models, be sure to
clean the condenser at least once a
month or after each 30 drying sessions.
• Make sure the filters are clean. Refer to
maintenance and cleaning for details.
• For models with flue, follow the flue
connection rules specified in the guides
and clean the flue.
• During drying session, properly ventilate
the environment in which the drying
machine is in.
• On models with heat pump, check the
condenser at least every six months and
clean it if it is dirty.
5 Preparation

18 Dryer / User manual
• If you are using environment friendly filter,
you are not required to clean the filter
after every cycle. When the environment
friendly icon is lit on the screen, change
the filter cloth.
5.5 Correct load capacity
NOTICE
If the laundry in the
product exceed
maximum load
capacity, it may not
operate as intended
and may cause
material damage or
damage the product.
For each program,
follow the maximum
load capacity.
The weights below are provided as examples.
Laundry
Approx.
weight
(g)*
Laundry Approx.
weight (g)*
Cotton
bedding
(double size)
1500 Cotton dress 500
Bedding
(single size) 1000 Dress 350
Bed sheet
(double size) 500 Denim 700
Bed sheet
(single size) 350 Handkerchief
(10 pcs) 100
Large table
cloth 700 T-Shirt 125
Small table
cloth 250 Blouse 150
Tea napkin 100 Cotton shirt 300
Bath towel 700 Shirt 200
Hand towel 350
*Weight of dry laundry before washing.

19
Dryer / User manual
6.1 Control Panel
6 Running the product
3
4
5
2
6
7
8
1
1. On/Off/Program Selection button.
2. Start / Stand-by button.
3. End time selection button.
4. Time program selection button.
5. Low temperature selection button.
6. Audible warning and child lock selection
button.
7. Wrinkle prevention selection button/ Drum
light button.
8. Dryness level selection button.
6.2 Symbols
6.3. Preparation of drying machine
• Plug the drying machine.
• Open the loading door.
• Place the laundry to the drying machine
without jamming them.
• Push and close the loading door.
NOTICE
Ensure that no
laundry is jammed to
the loading door.
Do not close the
loading door with
force.
• Select the desired program by using
On/Off/Program Selection button, the
machine will turn on.
Selecting the program with the On/
Off/Program Selection button does
not mean that the program started.
Press Start / Stand-by button to
start the program.
Filter
cleaning
Tank
full
Filter drawer /
Heat exchanger
cleaning
Start
pause
cancel
Iron Dry
Drying Buzzer Cupboard
Dry
Cupboard
Dry +
Extra dry End Anti-
creasing
Child-proof
lock
Low
temperature
TimeDry Ending In RapiDry
Drum
Light
Dryness
Level
Daily Delicates Synthetics
Towels Mix Cottons
Eco
Cottons Jeans Sport Bedding/
Duvet
Shirts Express Hygienic
Drying
Hygienic
Refresh
Steam Steam
Level1
Steam
Level2
On / O Wool Protect
Night
Freshen
Up
Outdoor
Hygiene
(Baby Protect+)
Environmentally
friendly lter full
Environmentally
friendly lter
Downwear Wi Remote
Control
Bluetooth Gentle
Dry
Reverse
Drum

20 Dryer / User manual
6.4 Program selection and consumption chart
EN
Programmes Programme Description
Capacity (kg)
Spin speed
in washing
machine
(rpm)
Drying Time
(minutes)
Cottons
You can dry your heat-resistant cotton textiles
with this programme. A drying setting suitable for
the thickness of the products to be dried and the
desired level of dryness should be selected.
9 1000 220
Cottons Eco It dries single layer, casual cotton textiles in the
most economical way. 9 1000 209
Cottons Iron dry
You may dry your cotton laundry to be ironed in
this program to have them slightly damp for ease
of ironing. (Shirt, T-shirt, tablecloth, etc.)
9 1000 155
Synthetics
You can dry all your synthetic textiles with this
programme. A drying setting suitable for the level
of dryness you desire should be selected.
4 800 70
Mix
Use this programme to dry non-pigmenting
synthetic and cotton laundry items together.
Sports and fitness clothes may be dried with this
program.
4 1000 115
Towels Drying towels such as kitchen towel, bath towel
and hand towel. 5 1000 175
Gentle Care
You may dry your delicate laundry or laundry
with hand wash symbol (silk blouses, thin
underwear, etc.) at low temperature in this
program.
2 1200 55
Daily
You can dry both cotton and synthetic laundry
with this programme.Sports and fitness clothes
may be dried with this program.
4 1000 110
Timer Programme /
Steamcure
You may select from time programmes
between 10 and 160 minutes to achieve the
desired drying level at low temperature. In this
programme, tumble drier’s operation lasts for
the set time independently from the dryness
of laundry. SteamCure is a refreshing function
making ironing easier on less worn clothes and
reducing odours (cigarette, food etc.) due to
medium air.
- - -
Jeans You may dry denim pants, skirts, shirts or jackets
in this program. 4 1200 125
Sports
Use it to dry your clothes made of synthetics,
cotton or mixed fabrics or waterproof products
such as functional jacket, raincoat etc. Turn them
inside out prior to drying.
2 1000 135
Duvet
You can dry your feather or fibre filled textile that
bears can be dried in drier label as a single piece
of laundry. You can dry double duvet, pillow or
coats as single piece of laundry. Dry your cloths
such as coats and jackets turned inside out.
- 800 165
Shirts It dries the shirts in a more sensitive manner, and
causes less creasing and easier ironing. 1,5 1200 50

21
Dryer / User manual
* : Energy Label standard program EN 61121The values in the table are determined according to
the EN 61121 standard. Consumption values may vary from the valued in the chart depending on
laundry type, wringing speed, ambient conditions and voltage levels.
Super Short 0.5kg Use this program to have 2 shirts ready for
ironing. 0,5 1200 30
Hygienic Drying
It is the programme that you can dry your
washed products you want to provide with extra
hygiene (baby clothes, underwear, towels, etc.).
It provides high hygiene for your textiles via heat
effect.
5 800 200
Hygienic Refresh
You can use this programme for your dry clothes
and laundry that you want to provide with
hygiene without washing them. It provides high
hygiene for your dry textiles via heat effect.
1,5 - 120
Energy consumption values
Programmes Capacity (kg)
Spin speed in washing
machine (rpm)
Approximate amount of
remaining humidity
Energy consumption value
kWh
Cottons Eco * 9 1000 60% 2,17
Cottons Iron dry 9 1000 60% 1,65
Synthetics cupboard
dry 4 800 40% 0,70
“Cottons Eco programme” used at full and partial load is the standard drying programme to which the
information in the label and the fiche relates, that this programme is suitable for drying normal wet Cottons
laundry and that it is the most efficient programme in terms of energy consumption for Cottons.
“If you regularly dry the 9 Kg maximum load of Cottons we suggest to connect the drain hose to prevent
the dryer stopping mid-cycle in order to empty the tank” (see Section “Connection to the drain”)

22 Dryer / User manual
Allergy UK is the trademark of
the British Allergy Foundation.
The Seal of Approval has been
created to guide people
requesting an advice that the
product significantly reduces
the amount of the allergens in an
environment where allergic people are
present or the product restricts/reduces/
eliminates the allergens. The purpose is to
provide evidence that the products have
been scientifically tested or analysed to yield
measurable results.
6.5 Auxiliary functions
Dryness level
Dryness level button is used for adjusting to
desired dryness. Program time may change
depending on the selection.
You can activate this function only
prior to start of program.
Wrinkle prevention
You can turn on and off the wrinkle prevention
function by pressing the wrinkle prevention
selection button. If you will not take the
laundry out immediately after the program has
completed, you may use Wrinkle prevention
function to prevent wrinkling of your laundry.
Audible warning
Drying machine makes an audible warning
when the program is completed. Press the
“Audible Warning” button if you do not want
audible warning. When you press the audible
warning button, the light goes off and it does
not sound when the program is completed.
You can select this function before
the program starts or after the
program starts.
Low temperature
You can activate this function only prior to start
of a program. You can activate this function
if you want to dry your laundry at a lower
temperature. The program duration will be
longer after it becomes activated.
End time
You can delay the end time of the program up
to 24 hours with end time function.
1. Open the loading door and place the
laundry.
2. Select the drying program.
3. Press the End Time selection button and
set the delay time you wish. End time LED
turns on. (When pressed and hold the
button, End Time proceeds non-stop).
4. Press the Start / Stand-by button. End
Time countdown begins. The “:” sign in the
middle of displayed delay time flashes.
You can add or remove laundry
within end time. Displayed time is
the sum of normal drying time and
end time. End Time LED turns off at
the end of countdown, the drying
starts and the drying LED turns on.
Changing the end time
If you want to change the duration during the
countdown:
Pause the program and Turn the On/Off/
Program Selection button and cancel the
program. Select the desired program and
repeat the End Time selection.
Cancelling the end time function
If you want to cancel the end time countdown
and start the program immediately:
Pause the program and Turn the On/Off/
Program Selection button and cancel the
program. Select the desired program and press
the “Start/Pause” button.
Drum Light
You can turn on and off the drum light by
pressing this button. The light turns on when
the button is pressed and turns off after certain
time.
6.6 Warning indicators
Warning indicators may vary
depending on the model of your
drying machine.
Filter cleaning
When the program is completed, the warning
indicator for filter cleaning turns on.

23
Dryer / User manual
Water tank
If the water tank fills up while the program
continues, the warning indicator starts flashing
and the machine goes into stand-by. In this
case, empty the water tank and start the
program by pressing the Start / Stand-by
button. Warning indicator turns off and program
resumes.
Cleaning of filter drawer/
heat exchanger
Warning symbol flashes periodically to remind
that filter drawer must be cleaned.
6.7 Starting the program
Press the Start/Stand-by button to start the
program.
Start/Stand-by and Drying indicators turn on to
show that program started.
6.8 Child Lock
The drying machine has a child lock which
prevents the program flow from being
interrupted when the buttons are pressed
during a program. When the Child Lock is
activated, all buttons on the panel except
the On/Off/Program Selection button are
deactivated.
Press the Audible Warning button for 3
seconds in order to activate the child lock.
The child lock has to be deactivated to be
able to start a new program after the current
program is finished or to be able to interfere
with the program. To deactivate the child lock,
keep the same buttons pressed for 3 seconds.
When the child lock is activated,
the child lock warning indicator on
the screen turns on.
When the child lock is active:
The drying machine runs, or in stand-by state
the indicator symbols will not change upon
changing the position of the program selection
button.
When the drying machine is
operated and the child lock is
active, if the program selection
button is turned, a double beeping
noise will be heard. If the child lock
is deactivated before the program
selection button is turned to its
original place, the program will
be terminated since the program
selection button is displaced.
6.9 Changing the program
after it is started
You can change the program you selected to
dry your laundry with a different program after
the drying machine starts running.
• For example, Pause the program and turn
the On/Off/Program Selection button to
select the Extra Dry program in order to
select the Extra Dry program instead of
Ironing Dryness.
• Press the Start/Stand-by button to start
the program.
Adding and removing clothes during
stand-by
If you want to add or remove clothes to/from
the drying machine after the drying program
starts:
• Press the Start/Stand-by button to put
the drying machine in Stand-by state. The
drying operation stops.
• Open the loading door while in Stand-
by state, and close the door after you
remove or add laundry.
• Press the Start/Stand-by button to start
the program.

24 Dryer / User manual
Adding laundry after the drying
operation starts may cause the
dried laundry inside the drying
machine to mix with wet laundry
and leave the laundry damp at the
end of operation.
Adding or removing laundry
during drying may be repeated as
many times as you wish. But this
operation continuously interrupts
the drying operation, and thus
increases program duration and
energy consumption. So, it is
recommended to add laundry
before the program starts.
If a new program is selected by
turning the program selection
button while the drying machine is
in stand-by, the running program
terminates.
Do not touch the inner surface of
the drum while adding or removing
clothes during a continuing
program. The drum surface is hot.
6.10 Cancelling the program
If you want to cancel the program and
terminate the drying operation for any reason
after the drying machine starts running, Pause
the program and turn the On/Off/Program
Selection button; the program terminates.
The inside of the drying machine
shall be extremely hot when you
cancel the program during machine
operation, so run the refreshing
program to allow it to cool down.
6.11 End of program
When the program ends, the LED’s of End/
Wrinkle Prevention and Fibre Filter Cleaning
Warning on the program follow-up indicator
turn on. Loading door can be opened and
drying machine is ready for another operation.
Turn the On/Off/Program Selection button to
On/Off position in order to turn off the drying
machine.
If the Wrinkle Prevention mode
is active and the laundry is not
removed after the program is
completed, the wrinkle prevention
function activates for 2 hours to
prevent the laundry inside the
machine to get wrinkled. The
program tumbles the laundry with
10-minute intervals to prevent them
from wrinkling.
6.12 Odour feature
If your drying machine has odour feature, read
the ProScent manual to use this feature.
6.13 SteamCure Odour and
Wrinkle Removal Function
SteamCure is a refresher function that helps
ironing the dry clothes that worn very little and
aims to reduce airborne (cigarettes, food, etc.)
odours.
It is recommended to wash the clothes to
remove odours that can be absorbed by them
such as perfumes, deodorants and sweat.
Do not dry products that includes sharp or hard
accessories and leather.
Filling the water tank
1 blue wing in the machine performs the
process of watering the laundry.
If the wing is on top, you can manually rotate
the drum to the lower position and fill the water.
Before using the Steamcure program, the water
in the filling container at max. Level must be
filled manually into the wing.
To remove wrinkles, tap or drinking water
should be used.
A few drops of water that may overflow from
the wing during filling will not cause any
problem.

25
Dryer / User manual
Additives or descaling agents
should not be used.
Chemicals that can be dissolved
with liquid chemicals and liquids
should not be used.
Starting the Program
The wing should be brought to the lower
position and should be filled with water up
to the marked area with the filling container.
The SteamCure program must be selected.
When you select the program, the screen
time will appear as 10 minutes. The time
program is set to the desired time by
pressing the selection button and the Start/
Standy-By button is pressed.
For an effective odour removal,
it is recommended to operate 1-6 pieces of
dry clothing for 50 minutes.
This function does not clean clothes, it
reduces the odours and wrinkles and allows
you to wear them again.

26 Dryer / User manual
7 Maintenance and cleaning
Read the “Safety Instructions” first!
7.1 Lint filters (internal and external
filters) / Cleaning of the Interior
Surface of the Loading Door
The hair and fibres that are separated from the
laundry during drying process is collected by
the Lint filter.
After each drying cycle, clean the
lint filter and the inner surface of the
loading door.
NOTICE
Your drying machine has 2 lint filters
with one placed inside the other. Do
not operate the product without the
lint filters.
To clean the lint filter:
• Open the loading door.
• Hold the first part (inner filter) of the two part
lint filter and remove it by pulling it upwards.
• Remove the second part (outer filter) by
pulling it upwards.
Ensure that hair, fibre and cotton
balls do not fall into the slot where
the filters are installed.
• Open both of the lint filters (outer and inner)
and remove the fibres with your hands or
with the brush on the air deflector. You can
clean the hair in the filters with a vacuum
cleaner.
• Clean both filters under water running in
reverse direction of fibre accumulation or
with a soft brush. Dry the filter before placing
it back.

27
Dryer / User manual
• Insert the lint filters on one another and
place it back in its place.
• Clean the inner surface of the loading door
and the gasket with a soft damp cloth or the
brush on the air deflector.
7.2 Cleaning the sensor
The drying machine has humidity sensors that
detect whether the laundry is dry.
To clean the sensors:
Open the drying machine loading door.
If the machine is hot due to drying operation,
wait until it cools.
Clean the metal surfaces of the sensor with a
soft cloth dampened with vinegar and then dry.
Clean the metal surfaces of the
sensor 4 times a year.
Do not use metal tools to clean the
sensors’ metal surfaces.
Due to fire and explosion hazard, do
not use solutions, cleaning materials
or similar tools to clean sensors.
7.3 Emptying the water tank
During drying, the moisture is removed from
the laundry and condensed, then the water is
accumulated in the water tank. Empty the water
tank after each drying session.
Condensed water is not potable
water!
Do not remove the water tank as a
program is running!

28 Dryer / User manual
If you do not empty the water tank, during the
next drying sessions the machine will stop
operating due to the water tank being full and a
Water Tank warning icon will blink. In this case
empty the water tank and to continue drying
operation, press the Start / Stand-by button.
To drain the water tank:
Pull the water tank out from its drawer carefully.
Drain the water in the tank.
Remove the water tank in the drawer or the
kickplate carefully.
If fibre is accumulated in the funnel on the water
tank, remove it under running water.
Place back the water tank.
If direct discharge option is used,
water tank is not required to be
drained.
7.4 Cleaning the condenser
The hair and the fibre that are not collected by
the lint filter accumulates on the metal surface
of the condenser behind the air deflector. These
fibres shall be cleaned regularly.
If the condenser cleaning icon blinks, check
the metal surface. If there is any fibre, clean it. It
must be checked at least every 6 months.
Open the toe board
by pulling its button.
Move the latches to
open the air deflector
lid.
Pull the brush to the
left to remove it. You
can use the cleaning
brush to clean
filter, condensing
metal surface and
accumulated fibre on
the door.
The cleaning brush is inside the
documentation bag. Get your
brush from the documentation bag
and insert it to its place on the air
deflector to store it.
Clean the fibre on the
metal surface of the
condenser with damp
cloth or the brush on
the air deflector in
up - down direction.
Do not clean with
left - right direction
since it will damage
the metal plates of the
condenser.
You can use a
vacuum cleaner with
a brush for cleaning.
If the vacuum cleaner
does not have
a brush, it is not
recommended to be
used for condenser
cleaning.
After cleaning the
filter, door and the
condenser, drag the
brush to the right and
lock it in its place.
After the cleaning
process is completed,
place the air deflector
cover to its place,
move the latches to
close it and close the
toe board.

29
Dryer / User manual
You can clean by hand, provided
you wear protective gloves. Do not
try to clean with bare hands. The
condenser fins may damage your
hands. Cleaning from left to right
may damage the condenser fins.
This may lead to drying issues.
When the air deflector cover is
removed, it is normal to have water
at the plastic section in front of the
condenser.
If you see fibre
accumulation on the
fan cover and the toe
board, remove with a
cloth.
Do not have weight
on the toe board
when it is open.
NOTICE Do not use abrasive materials or
steel wool to clean the drum.

30 Dryer / User manual
8 Troubleshooting
The drying operation takes too long.
Fibre filter (interior and exterior filters) pores may be clogged. >>> Wash the fibre filters with warm water and dry them
The front side of the condenser may be clogged. >>> Clean the front side of the condenser.
The ventilation grills in front of the machine may be closed. >>> Remove any object in front of the ventilation grills that
blocks ventilation.
Ventilation may be insufficient due to the very small area where the machine is installed. >>> Open the door or
windows to prevent the room temperature from rising too much.
If there is a humidity sensor;
Limescale may have accumulated on the humidity sensor. >>> Clean the humidity sensor.
The machine may be overloaded with laundry. >>> Do not load the drying machine excessively.
The laundry may not have been spun enough.. >>> Spin at a higher speed in the washing machine.
The laundry comes out damp after drying.
The program suitable for the laundry type may not be used. >>> Check the care labels on the laundry and select a
program ideal for the kind of laundry or use additional time programs.
Fibre filter (interior and exterior filters) pores may be clogged. >>> Wash the filters with warm water and dry them
The front side of the condenser may be clogged. >>> Clean the front of the condenser.
The machine may be overloaded with laundry. >>> Do not load the drying machine excessively.
The laundry may not have been spun enough.. >>> Spin at a higher speed in the washing machine.
The dryer does not turn on, or the program cannot be started. The dryer does not turn on when set.
The power plug may not be plugged in. >>> Make sure the power plug is plugged in.
The loading door may be left open. >>> Make sure that the loading door is properly closed.
The program may not have been set or the Start / Pause button may not have been pressed. >>> Make sure that the
program is set and it is not in Standby position.
Child lock may be activated. >>> Turn off the child lock.
The program was interrupted for no reason.
Loading door might not be closed properly. >>> Make sure that the loading door is properly closed.
There might be a power outage. >>> Press the Start / Standby / Cancel button to start the program.
Water tank may be full. >>> Empty the water tank.
Laundry shrunk, matted or spoiled.
The program suitable for the type of laundry may not have been used. >>> Select a program suitable for the type of
laundry by checking the care labels on the laundry.
Water is flowing from the loading door.
Fibres might have gathered on the inner surfaces of the loading door and on the surfaces of the loading door gasket.
>>> Clean the inner surfaces of the loading door and the loading door gasket surfaces.
The loading door opens by itself.
The loading door might not be closed properly. >>> Push the loading door until the closing sound is heard.
The water tank warning symbol is on/flashing.
The water tank may be full. >>> Empty the water tank.
The water discharge hose might have folded. >>> If the product is connected directly to the water discharge check
the hose.
The lighting inside the drying machine does not turn on (in models with lamps).
The drying machine might not have been turned on by the On/Off button. >>> Check that the drying machine is
turned on.
Lamp might be broken. >>> Contact Authorized Service to replace the lamp.
Anti-Wrinkle icon or light is lit.
An anti-wrinkle program that prevents the laundry in the dryer from creasing may be activated. >>> Turn the dryer off
and remove the laundry.

31
Dryer / User manual
The fibre filter cleaning icon is lit.
Fibre filters (interior and exterior filters) may be unclean. >>> Wash the filters with warm water and dry them.
A layer may be formed in the fibre filter pores, leading to clogging. >>> Wash the filters with warm water and dry
them.
A layer may be formed in the fibre filter (internal and external filters) pores that leads to clogging.<<Wash the filters
with warm water and dry>>
Fibre filters may not be in place. >>> Insert the interior and exterior filters into their places.
Eco-friendly filter cloth may not be installed on the plastic part, and the front of the condenser may have
clogged.>>>Install the eco--friendly filter to the plastic part and place it on the filter housing.
Eco-friendly filters may not have been replaced, although the warning symbol is illuminated. “Replace your filter.”
An audible warning is heard from the machine
Fibre filters may not be in place. >>> Insert the interior and exterior filters into their places.
Filters of the machine may not have been installed.>>> Install the fibre filters (internal and external) or the
environmentally-friendly filter to their housing.
The condenser warning icon is flashing.
Condenser front may be clogged with fibres. >>> Clean the front of the condenser.
Fibre filters may not be place. >>> Insert the interior and exterior filters into their places.
The lighting inside the drying machine turns on (in models with lamps).
If the drying machine is plugged into the power outlet, the On/Off button is pressed, and the door is open; the light
turns on. >>> Unplug the dryer or turn the On/Off switch to the off position.
Wi-Fi icon flashes continuously. (HomeWhiz Function models)
>>> The product may not be connected to the wireless network. Follow the instructions to connect to the network.
The appliance which the product utilizes to connect to network may be faulty. Check it. The product may not be
connected to the network due to the proximity.
Check the steps below if you see "F L t" on the screen.
The filters may be dirty. >>> Clean the inner and outer filters or replace the eco-friendly filter.
In the cover area, if you are using the inner and outer dual filters. >>> Make sure that both filters are installed.
If you use the eco-friendly filter feature, make sure the filter cloth is attached to the plastic part. >>>Insert the filter
cloth into the plastic part if it is not inserted.
The front side of the condenser may be dirty. >>> Open and check the kick zone and make sure it is clean.
Check out the Maintenance and Cleaning section.
WARNING !
If the problem persists after following the instructions in this section, contact your vendor or an Authorized Service.
Never attempt to repair a malfunctioning product yourself.
NOTE!
• If you experience a problem with any part of your device, you can request a replacement by consulting
the nearest authorised service with the appliance model number.
• Operating the device with non-original parts may cause malfunction of the appliance.
• The manufacturer and distributor are not responsible for malfunctions caused by non-original parts.
Other manuals for B3T4923DW
1
Table of contents
Other Beko Dryer manuals

Beko
Beko DRYPOINT RA 1080-8800 User guide

Beko
Beko DS 733120 PX0BX User manual

Beko
Beko DS8433RX User manual

Beko
Beko DRYPOINT RAX 125 NA-E-OB Series User guide

Beko
Beko DS 7433 RX User manual

Beko
Beko B5T44133W User manual

Beko
Beko DS8432TX0 User manual

Beko
Beko DCU 720030 BX User manual

Beko
Beko 500732CH User manual

Beko
Beko DTBP 7001 W User manual

Beko
Beko DTBC 8001 A User manual

Beko
Beko TR320 User manual

Beko
Beko B5T69233WPB User manual

Beko
Beko BDP83HW User manual

Beko
Beko DC 7110 User manual

Beko
Beko B5T68243W2 User manual

Beko
Beko DS 8312 PX User manual

Beko
Beko DSY10PB46W User manual

Beko
Beko DPU 7305 XEL User manual

Beko
Beko DS 73300 MM User manual