20 / EN Dryer / User Manual
Operating the product
CYou can add or remove laundry
within end time. At the end of
the Time Delay countdown, the
Time Delay warning indicator
turns off and drying begins
Changing the end time
If you want to change the duration during
the countdown:
Cancel the program by turning the On/Off/
Program selection knob. Select the program
you want and repeat the End Time selection
process.
Cancelling the end time function
If you want to cancel the end time
countdown and start the program
immediately:
Cancel the program by turning the On/Off/
Program selection knob. Select the program
you want and press the Start/Stand-by
button.
5.6 Warning indicators
CWarning indicators may vary
depending on the model of your
dryer.
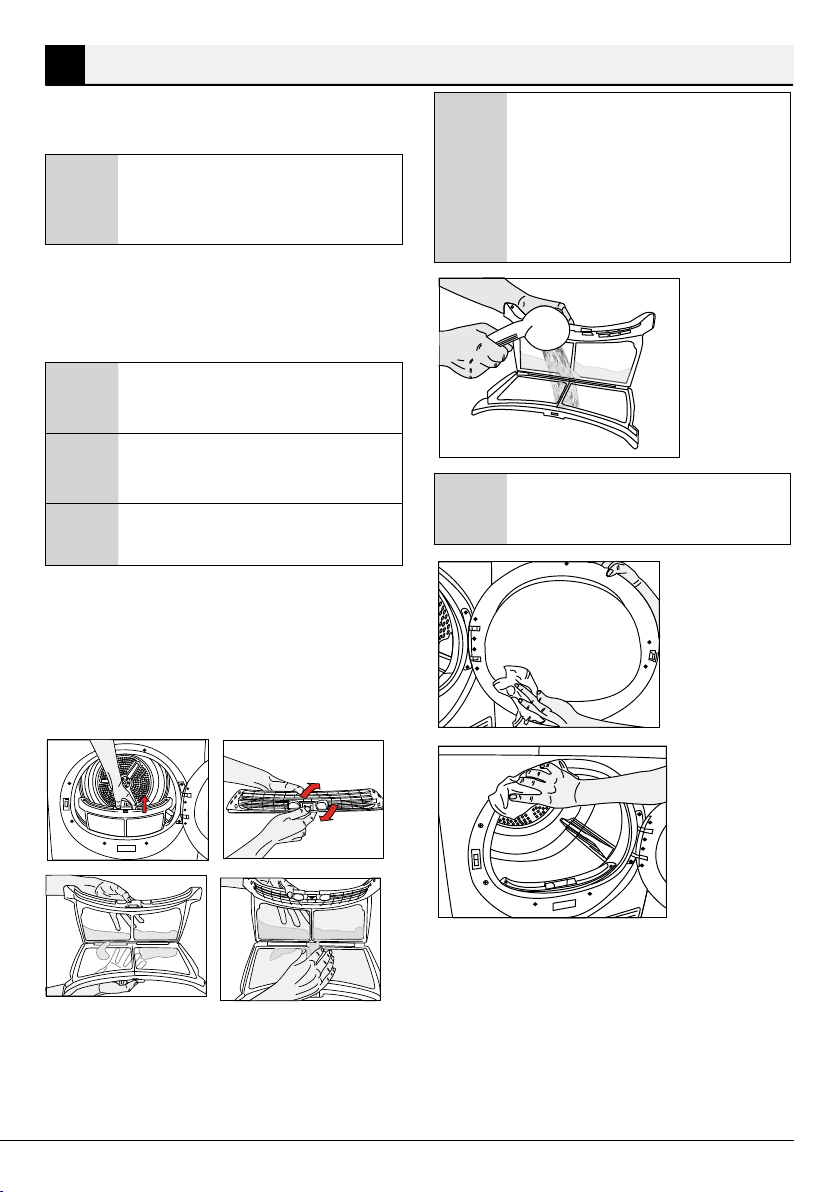
Filter cleaning
When the program is completed, the warning
indicator for filter cleaning turns on.
Water tank
When the program is completed, the warning
indicator to empty the water tank turns on.
If the water tank fills up while the program
continues, the warning indicator starts
flashing and the machine goes into stand-by.
In this case, empty the water tank and start
the program by pressing the Start / Stand-
by button. Warning indicator turns off and
program resumes.
Condenser
Clean the condenser periodically when there
is a visible accumulation of fluff or when the
condenser cleaning indicator « » lights
up, if any.
5.7 Starting the program
Press the Start/Stand-by button to start the
program.
Drying indicator will light up, indicating that
the program has started.
5.8 Child Lock
The drying machine has a child lock which
prevents the program flow from being
interrupted when the buttons are pressed
during a program. When the child lock is
activated, all buttons on the panel except
the On/Off/Program selection knob are
deactivated.
Press the End Time and Buzzer buttons
simultaneously for 3 buttons to activate the
child lock.
The child lock has to be deactivated to be
able to start a new program after the current
program is finished or to be able to interfere
with the program. To deactivate the child
lock, keep the same buttons pressed for 3
seconds.
CWhen the child lock is activated,
the child lock warning indicator
on the screen turns on.
CChild lock deactivates when the
drying machine is turned off and
on by the On/Off/Cancel knob.
When the child lock is active:
When the drying machine runs, or in stand-
by state, the indicator symbols won’t change
upon changing the position of the program
selection knob.
CWhen the drying machine runs
and the child lock is active, it
beeps twice when the program
selection knob is turned. If the
child lock is deactivated without
returning the program selection
knob to its previous position,
program will terminate due
to the change in the program
selection knob position.