Beko ATH8130 User manual

Evaporation humidier
User Manual
ATH8130
EN

Please read this User Manual rst!
Dear Customer,
Thank you for purchasng the Beko product. We hope that you get the best results
from your product manufactured wth hgh qualty and state-of-the-art technology.
Therefore, please read ths entre User Manual and all the attached documents
carefully before usng the product and keep t as a reference for future use. If you
handover the product to someone else, gve the User Manual as well. Follow all
warnngs and nformaton n the User Manual.
Meanings of the symbols
The followng symbols are used n the sectons of ths manual:
C
Important nstructons or
useful tps about usage.
A
Warnng for hazardous
stuatons endangerng lfe
and property.
Warnng to actons that must
never be performed.
B
Warnng for electrc shock.
Warnng for danger of fre.
Warnng for hot surfaces.
This product is produced in environmentally friendly, modern facilities
Complies with the WEEE Regulations. Technical and design
modifications reserved.

Evaporaton humdfer / User Manual 3 / 28 EN
1 Safety nstructons 4
2 Components 7
3 Functon nformaton 8
4 Product effcacy 11
5 Use method 12
5.1 Installaton notce of usng pure type humdfer for the frst tme . . . . . . . . . . . . . . . . . . . . . . . . . . . . . . . 12
5.2 Dsassembly of humdfer . . . . . . . . . . . . . . . . . . . . . . . . . . . . . . . . . . . . . . . . . . . . . . . . . . . . . . . . . . . . . . . . . . . . . . . . 16
5.3 Installaton of humdfer. . . . . . . . . . . . . . . . . . . . . . . . . . . . . . . . . . . . . . . . . . . . . . . . . . . . . . . . . . . . . . . . . . . . . . . . . . 18
6 Cleanng and mantenance 21
7 Techncal specfcatons 24
8 Crcut dagram 25
9 Troubleshootng 26
CONTENTS

4 / 28 EN Evaporaton humdfer / User Manual
Read the User Manual carefully before usng the product and keep t
n good custody for future reference.
•
Don’t dsassemble, repar or alter the machne wthout
authorzaton. Otherwse, t may cause falure or danger.
Unauthorzed alteraton may result n fre or breakdown.
•
The nput voltage must not exceed the ratng. Otherwse, t may
result n fre or damage the machne.
•
Don’t damage the power cord or attach any object on t. Don’t
bend, drag or twst the power cord. Don’t stack heavy objects on
the power cord or drag t between objects. Damaged power cord
may result n electrc shock or fre.
•
Before replacng the flter, addng water, cleanng or movng the
machne, turn off the power and pull out the plug. Otherwse,
operatons above may damage the machne or cause electrc
shock.
•
Don’t use damaged power cord or deformed plugs. Use of unsafe
power cord may result n short crcut, electrc shock or fre.
•
If the power cord s damaged, t must be replaced by manufacturer
or the specalst of ts mantenance department or smlar
department for safety reason.
•
Don’t nstall the machne n a most place, e.g. bathroom. The vapor
may result n electrc shock or damage the machne.
•
Don’t use the humdfer n a place wth heavy ol stan, e.g.
machne ol. Otherwse there may be rsks of machne breakdown,
electrc shock or combuston.
1 Safety nstructons

Evaporaton humdfer / User Manual 5 / 28 EN
•
Don’t nstall the machne n outdoor or under drect sunlght.
Otherwse, the machne cabnet may dscolour.
•
Don’t nstall the machne near any heat source, e.g. heater.
Otherwse, the machne cabnet may dscolour or deform.
•
To maxmze the effect of purfcaton, t s recommended to place
the machne on the floor and at least 30cm away from the wall.
•
Don’t attempt to use the machne for absorbng soot ejecton
or ventlaton n ktchen. Otherwse the servce lfe of the flter
screen may be shortened and the machne may be damaged.
•
Don’t stck fngers or any other object nto the ar nlet and outlet.
Otherwse, t may cause electrc shock or damage.
•
When usng pestcde, stop the machne frst to prevent any
chemcals from beng sucked n. as chemcals may otherwse
accumulate n the machne and generate hazardous pungent
substance under some crcumstances.
•
Don’t let volatle substances or combustbles such as smoke or
ncense fume nto the nsde of the machne.
•
Don’t block the ar nlet and outlet. Otherwse t may reduce the
machne’s cleanng capacty and result n machne breakdown.
•
Don’t use benzene or dluents to wpe the machne or spray
pestcde to t. These chemcals may result n the crack of machne
cabnet and cause electrc shock or fre.
•
If the machne s not n use for a long tme, pull the plug.
•
To unplug the machne, hold the plug between your fngers and
take t out carefully. Don’t drag the cord forcefully. Otherwse, the
power cord may be damaged.
1 Safety nstructons

6 / 28 EN Evaporaton humdfer / User Manual
•
Don’t st or stand on the machne or shake t. Otherwse, t may
cause falure.
•
Keep chldren away from handlng the machne.
•
Don’t use the machne at heavly smoky or dusty place, e.g. ktchen
or where flammable gas, caustc gas or metal dust may have
access. Otherwse, t may cause fre or falure.
•
Don’t use solvents lke alcohol or dluents to clean the humdfer
and also keep t away from aerosol bomb. Otherwse, t wll cause
crack on the humdfer, even short crcut, thus results n electrc
shock or fre.
•
Please pour the water out from tank and trough, otherwse when
the weather s cold, t wll possbly freeze the water. (Operatng
under cy condton may trgger malfuncton).
•
If the machne s not used, please pour the water out from the
tank and trough completely, so as to avod the reproducton of
mold.
•
Put the machne at least 2m away from the weak electromagnetc
wave sources, e.g. TV set, rado, sound equpment, quartz clock,
cable TV, cordless phone, cordless mcrophone, etc. Otherwse, t
may affect the vsual and sound performance of the above sad
equpments. However, under some crcumstances, even t s 2m
away, electromagnetc nterference may stll occur based on the
electromagnetc wavelength. Ths s partcularly clear when ndoor
antenna s used. Therefore, put t away from the equpment as far
as possble to prevent nose.
1 Safety nstructons

Evaporaton humdfer / User Manual 7 / 28 EN
1
2
3
4
5
6
7
8
9
10
11
1. Back cover plate
2. Water tank
3. Water trough
4. Water Wheel
5. Antbacteral box
6. Floater box
7. Vewport
8. Dsplay screen
9. Touch key
10. Actve carbon flter
11. Ar nlet plate
Packng lst
Complete humdfer machne 1
User Manual 1
2 Components

8 / 28 EN Evaporaton humdfer / User Manual
On/O Humidication mode Heat humidication Humidity Timer
1. On/Off
After connectng the machne to power, the buzzer makes harmonous rngs for four tmes wth the
whole LED screen flckerng once, and the machne s now n power-on state.
Press On/Off, the machne enters nto standard humdfcaton mode. The buzzer makes harmonous
rngs for four tmes, and the ndcator lght s on. Current humdty wll be shown on the LED screen.
The humdty default s 88-77-66-55-44-33-22-11..
The frst ten mnutes after startup s preheatng tme for humdty sensor.
If the machne s n heat humdfcaton or turbo status, motor wll delay by 1 mn to be standby.
2. Humdfcaton mode
There are 4 humdfcaton modes, .e. sleep humdfcaton mode, standard humdfcaton mode,
ntensve humdfcaton mode and smart humdfcaton mode. Please see the fgure for LED screen
dsplay.
The electrc motor and thermal fuse are connected to humdfcaton functon. (Motor: 220V/50Hz,
rated power 30W; Thermal fuse: rated power 250W)
Sleep humdfcaton mode : The motor operates at 700rpm. The dsplay screen only shows .
When the humdty s 5% over the set pont, the machne wll enter nto standby mode. When the
humdty s 5% below the set pont, t wll reenter nto sleep humdfcaton mode.
Standard humdfcaton mode : The motor operates at 1000rpm. When the humdty s 5% over
the set pont, the machne wll enter nto standby mode. When the humdty s 5% below the set pont,
t wll reenter nto standard humdfcaton mode.
Intensve humdfcaton mode : The motor operates at full power. The heatng power s 250W.
When the humdty s 5% over the set pont, heatng wll stop, and also the motor wll enter nto
standby mode after 1 mnute. When the humdty s 5% below the set pont, t wll reenter nto
ntensve humdfcaton mode.
3 Functon nformaton

Evaporaton humdfer / User Manual 9 / 28 EN
Smart humdfcaton mode : When the humdty level s below 45%, the machne wll enter nto
standard humdfcaton mode plus heat humdfcaton. When the humdty level s between 45% and
60%, the machne wll enter nto standard humdfcaton mode. When the humdty level s over 60%,
the machne wll enter nto sleep humdfcaton mode where the ndcator lght shows normally. When
the humdty level s over 70%, the machne wll enter nto standby mode.
C
Note: Humdty control and heat humdfcaton keys are not avalable n smart mode.
We recommend that you select sleep humdfcaton mode when sleepng. The machne has very low
nose n ths mode, thus t wll not affect your sleep qualty.
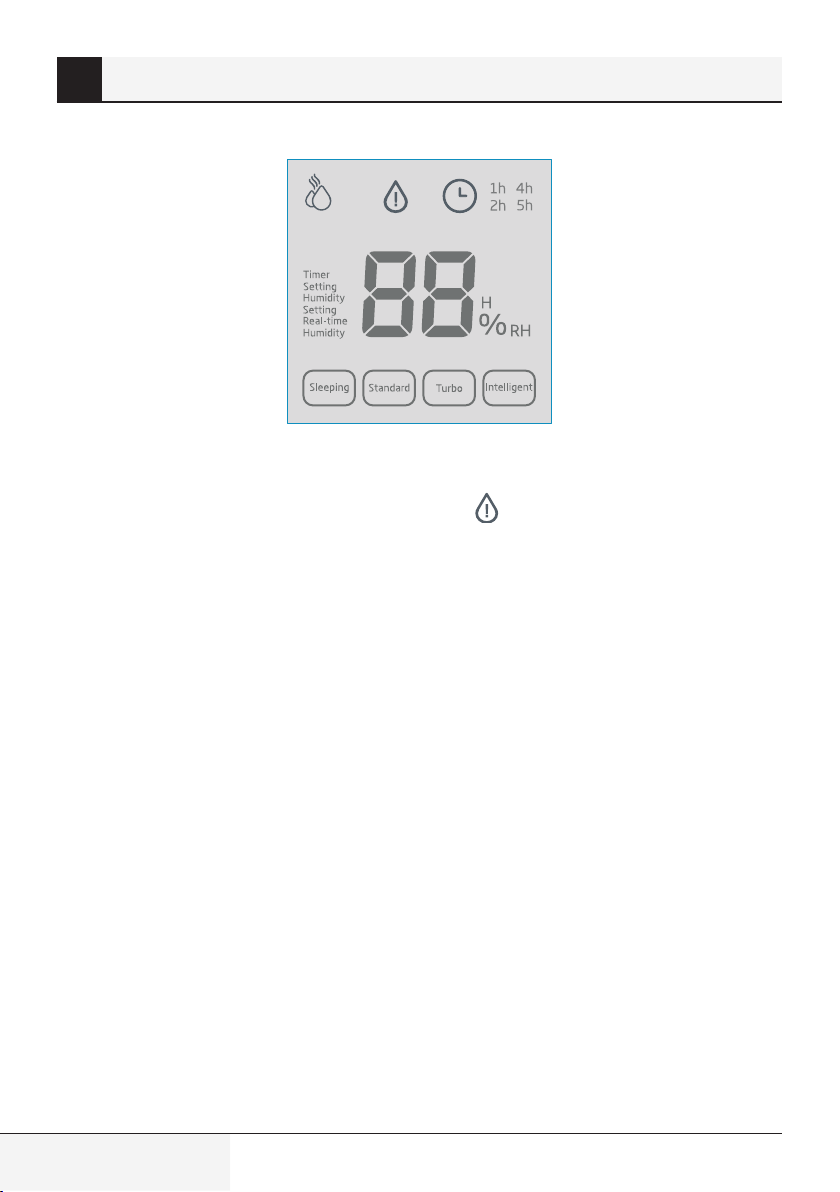
3. Heat humidificaiton
There are 2 workng states of heat humdfcaton: sleep humdfcaton mode + heat humdfcaton,
standard humdfcaton mode + heat humdfcaton.
Sleep humdfcaton mode + heat humdfcaton : The motor operates at 700rpm, heatng
power s 150W. The dsplay screen only shows + ndcator lght of heat humdfcaton . When
the humdty s 5% over the set pont, heatng wll stop, and also the motor wll enter standby mode
after 1 mnute; when the humdty s 5% below the set pont, t wll reenter heat humdfcaton mode.
Standard humdfcaton mode + heat humdfcaton : The motor operates at 1000rpm,
heatng power s 200W. When the humdty s 5% over the set pont, heatng wll stop, and also the
motor wll enter standby mode after 1 mnute; when the humdty s 5% below the set pont, t wll
reenter heat humdfcaton mode.
We recommend that you select sleep humdfcaton mode when sleepng. The machne has very low
nose n ths mode, thus t wll not affect your sleep qualty.
4. Humdty control
Press the humdty control key, the machne can be set to -- and 11 humdty levels ncludng 40%,
45%, 50%, 55%, 60%, 65%, 70%, 75%, 80%, 85%, 90%. When the machne detects the ambent
humdty s 5% hgher than the set pont, t wll automatcally stop workng. The dsplay screen shows
“set humdty” and “current humdty” at the same tme. When the ambent humdty s 5% lower than
the set pont, the machne wll automatcally start workng.
5. Tmer
Press “Tmer” to set tme. It has 13 reserved tmes to select from “0-12 hours”. Select the needed tme.
After the set tme flckers for 5 seconds, the current humdty wll show on the screen. The sum of
numbers on the top rght of the screen s the remanng tme.
3 Functon nformaton

10 / 28 EN Evaporaton humdfer / User Manual
The whole machne wll power off after tme s up. See the fgure for detals.
6. Water shortage ndcator
When water n the tank s nadequate, water shortage sgn shows and flckers on the screen.
After water s added n the tank, water shortage sgn wll be off, and the machne wll reenter nto the
selected workng mode.
7. LED Dsplay Auto-off
For energy save purpose, LED dsplay screen wll be automatcally off after no performance change on
top control panel wth 2 mnutes. And once there s a performance change managed on control panel,
LED dsplay wll resume back on.
3 Functon nformaton

Evaporaton humdfer / User Manual 11 / 28 EN
1. Cleaner humdfcaton wthout whtenng
Ar s washed and water s purfed, solvng the whtenng ssue thoroughly.
2. Healthy humdfcaton
It humdfes the ar through antbacteral wetted pad and natural evaporaton.
3. Odor elmnaton and ar purfcaton
Fne dust can be perfectly handled by water wheel washng. Over 98% of odor n the ar can be
elmnated va actve carbon net.
4. Use mxed humdfcaton to humdfy faster, more, and wder.
5. Double sterlzaton makes the ar cleaner.
Before water goes nto the tank, antbacteral ball wll sterlze once, and antbacteral plate wll
sterlze the polluted ar and water n the tank agan.
6. Humdty level can be adjusted.
It has 5 humdty levels to meet the humdfcaton needs n dfferent envronment.
7. Smart LED dsplay screen
It shows current humdty; you can have a vsual recognton of current ambent humdty.
4 Product effcacy

12 / 28 EN Evaporaton humdfer / User Manual
5.1 Installaton notce of usng pure type humdfer for the
frst tme
C
Note:
•
Durng use and movement, when the machne nclnes more than 8°, water wll spll,
so please put the machne on a flat place durng workng. Please empty the water n
the tank and trough f the machne s to be moved or transported to a far place.
•
Install the actve carbon net
Reach nto the buckle wth your hand and pull. See 1 n the fgure. Take off the packng bag outsde of
actve carbon net, and nstall t nto the ar nlet plate. See 2 n the fgure.
1
2
5 Use method

Evaporaton humdfer / User Manual 13 / 28 EN
•
Install the ar nlet plate. See 1 n the fgure.
Insert snap of ar nlet plate nto back cover slot. See 3 n the fgure. Press the ar nlet plate. See 4 n
the fgure.
3
Snap
Slot
4
5 Usng method

14 / 28 EN Evaporaton humdfer / User Manual
•
Install the water tank components
-
Put your hand at the buckle and lft. The back cover plate wll be dsmounted. See 1 n the fgure.
1
-
Hold the handle wth your hand, and take out the tank. See 2 n the fgure.
2
5 Usng method

Evaporaton humdfer / User Manual 15 / 28 EN
-
Screw off the tank ld, and wash the tank wth clean water.
-
Add water nto the tank. See 3 n the fgure.
-
Screw on the tank ld clockwse. See 4 n the fgure.
4
•
Grasp the tank and put t nto the back cover. See 5 n the fgure.
•
Insert the front end of back cover plate nto the back cover, and press down. See 6 n the fgure.
5
6
5 Usng method

16 / 28 EN Evaporaton humdfer / User Manual
5.2 Dsassembly of humdfer
•
Put your hand at buckle and lft. The back cover wll be dsmounted. See 1 n the fgure.
1
•
Grasp the handle and take out the tank. See 2 n the fgure.
2
5 Usng method

Evaporaton humdfer / User Manual 17 / 28 EN
•
Grasp the handle and pull out the trough. See 3 n the fgure.
3
•
Dsmount the water wheel components.
Grasp the water wheel and lft, the water wheel components wll be taken out. See 4 n the fgure.
4
5 Usng method

18 / 28 EN Evaporaton humdfer / User Manual
•
Dsmount the ar nlet plate and actve carbon net.
Reach nto the buckle wth your hand and pull. The ar nlet plate wll be pulled out. See 5 n the
fgure.
5
5.3 Installaton of humdfer
•
Install the water wheel. Grab the wheel and put t nto the trough. See 1 n the fgure.
1
5 Usng method

Evaporaton humdfer / User Manual 19 / 28 EN
•
Install the water trough. Grab the trough and push t nto the back cover slowly. See 2 n the fgure.
2
•
Install the water tank components
-
Screw off the tank ld, and add water nto the tank. See 3 n the fgure.
-
Screw on the tank ld clockwse. See 4 n the fgure.
2
3
4
5 Usng method

20 / 28 EN Evaporaton humdfer / User Manual
-
Grasp the tank and put t nto the back cover. See 5 n the fgure.
-
Insert the front end of back cover plate nto the back cover, and press down. See 6 n the fgure.
5
6
5 Usng method
Other manuals for ATH8130
1
Table of contents
Languages:
Other Beko Humidifier manuals