manuals.online logo
Brands
  1. Home
  2. •
  3. Brands
  4. •
  5. BELLATERRA HOME
  6. •
  7. Plumbing Product
  8. •
  9. BELLATERRA HOME 12119B3 User manual

BELLATERRA HOME 12119B3 User manual

PACKING LIST
IMPORTANT NOTICES: For easy installation, please read all the instruction completely before beginning.
Before installing this product, make sure that water line trash is cleared to avoid blockage.
YOU MAY NEED
After you open this package, please check to ensure that all of the following items are included.
A-Faucet B-Mounting Nut C-Flexible Hoses(2) D-Allen wrench
Basin Faucet - 12119B3
D
A
C
B
Optional accessories
Connect hot and cold water supply lines to the Water
Supply Valves.
4
INSTALLATION PROCEDURES
You should clean all the dirts from valve outlets.
Turning off the water supply valves. This is usually
found near the water meter. If you are replacing
an existing faucet, remove the faucet from the
sink and clean the sink surface thoroughly.
Install without Deck Plate. Make sure the O-RING
is placed onto the bottom of Base Ring. Install
faucet through hole in sink. From underside sink,
put Plastic Washer and Mounting Nut. Position
faucet on sink properly and tighten Mounting Nut.
If necessary, tighten screws using a adjustable
wrench until the faucet is firmly connected to the
sink.
1 2
3
Install with Deck Plate. Place a bead of plumber’s
putty between faucet and sink. Place Deck Plate
over the three holes of sink. From underside sink,
tighten Wing nut.
Make sure the O-RING is placed onto the bottom
of Base Ring. Install faucet through Deck Plate.
From underside sink, put Plastic Washer and
Mounting Nut. Position faucet on sink properly
and tighten Mounting Nut.
2A 2B
TROUBLE-SHOOTING
If you've followed the instruction carefully and your faucet still does not work properly, take these corrective steps.
Problem Cause Action
Leaks underneath handle. Cartridge has come loose. Tighten the cartridge.
Aerator leaks or has an
inconsisitent water flow
pattern.
Aerator is dirty or worn
out or misfitted.
Unscrew the aerator to
clean or replace washer,
or replace the aerator.
Water will not shut off
completely.
Dirty or worn out washer
in cartridge.
Remove handle and cartridge
to check if the washer is damaged
permanently or dirty. Re-install
cartridge.
CAUTION: Maintenance
1. Replacement parts may be available at the store where you purchased your faucet.
2. Always turn off water and relieve pressure before working on your faucet.
NOTES: Cleaning Instructions
1. To keep the faucet clean, you should clean the faucet frequently and regularly.
2. Clean the faucet with clear water or mild liquid, rinse the faucet with clear water and then
dry the faucet with soft cotton cloths.
3. Do not use any abrasive cleansers, cloths, or paper towel.
4. Do not use any acid or abrasive detergent.
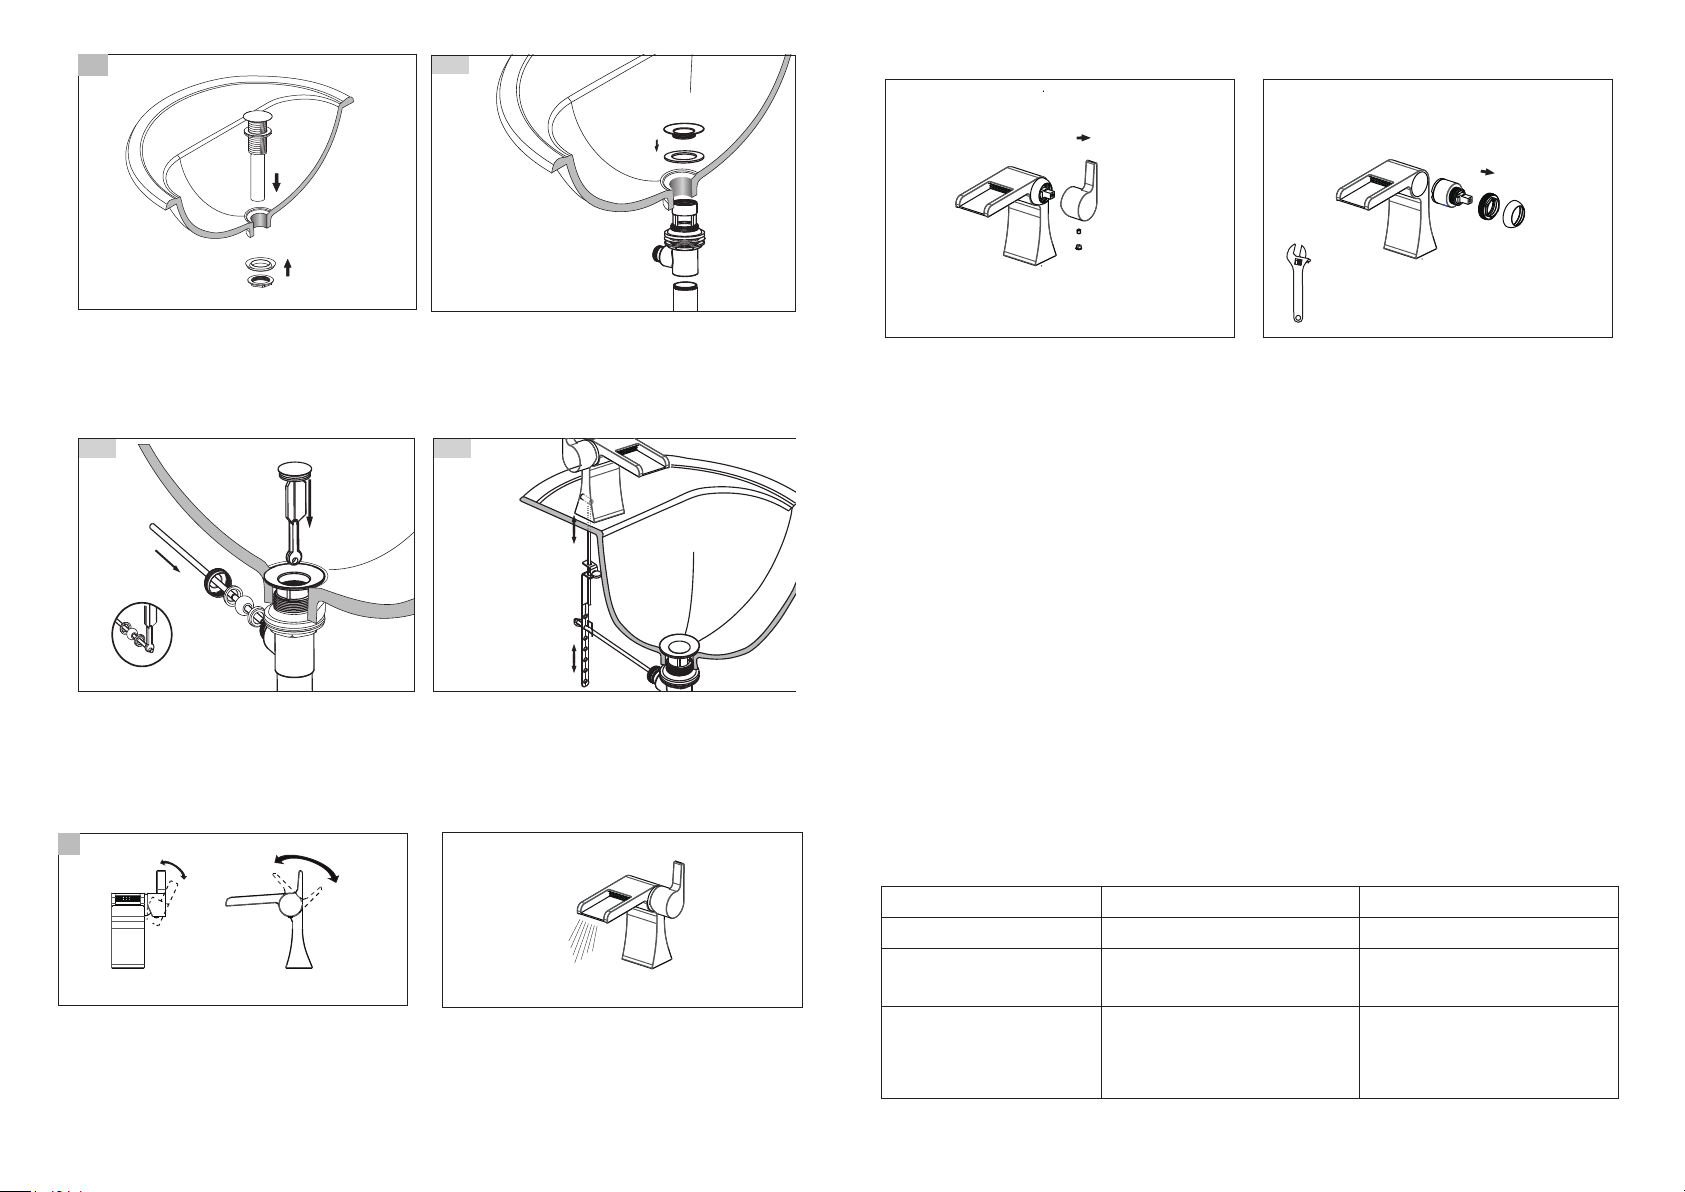
Turn off water and relieve pressure! Detach handle button
using a small flathead screwdriver, unscrew set screw
using Allen Wrench and take off handle.
Remove handles. Unscrew Dome Cap counter clockwise
by hand. Unscrew Retaining Nut using adjustable wrench,
take out cartridge assembly and inspect. Replace parts
as necessary. Reassemble parts by reversing steps.
Handle Removal Maintenance Valve Cartridge Removal Maintenance
Lift the handle up, the cartridge will be activated
allowing water to flow. The water flow will increase
by continuing to rotate handle. By rotating the
handle to the right, the water temperature will
decrease to cold flow only. By rotating Handle to
the left, the water temperature will increase to hot only.
6Close
Open
Hot
Cold
After installation is complete, remove aerator and rotate
handle to the closed position. Turn on the water supply
valves, and check all connections for a leak. Turn on
your faucet and allow both hot and cold water to run at
least one minute each. Replace Aerator.
Faucet Start Up
Unscrew Locknut. Make sure the Rubber Washer in
the right position under Flange. Insert Pop-up
Assembly into Sink drain Hole. From underneath,
tighten with Lockset.
5A
As shown. Place the Drain stopper into the drain
body from the top rear. Slide the ball rod into the Ball
Rod Opening through Stopper Hole, and threaded it
on to the Drain Body.
Insert Lift Rod through Lift Rod strap and secure
with Set Screw. Place the Ball Rod through one of
the holes on the Lift Rod Strap. Secure it with the
Spring Clip. Adjust the height of the lift by resetting
Set Screw. No interference between faucet and knob.
As shown. Insert Flange with Washer through Sink
drain Hole. From underside, thread Drain Body into
Flange. Holding the drain body in position with Ball
Rod Opening facing back, tighten Metal Locknut
securely. Thread Drain Tailpiece into Drain body.
5B-1
5B-2
5B-3

Other BELLATERRA HOME Plumbing Product manuals

BELLATERRA HOME 10118A1 User manual

BELLATERRA HOME

BELLATERRA HOME 10118A1 User manual

BELLATERRA HOME S8228-8 User manual

BELLATERRA HOME

BELLATERRA HOME S8228-8 User manual

BELLATERRA HOME 10167P4 Reference guide

BELLATERRA HOME

BELLATERRA HOME 10167P4 Reference guide

Popular Plumbing Product manuals by other brands

Metalac X ELIPSE Installation guidelines

Metalac

Metalac X ELIPSE Installation guidelines

Flowserve Limitorque MX Device Net Field Unit User instructions

Flowserve

Flowserve Limitorque MX Device Net Field Unit User instructions

Newport Brass METRO 2540 installation instructions

Newport Brass

Newport Brass METRO 2540 installation instructions

Kessel Ultraflat 54 44740.62M manual

Kessel

Kessel Ultraflat 54 44740.62M manual

fine fixtures CR1818 installation instructions

fine fixtures

fine fixtures CR1818 installation instructions

Lefroy Brooks M2-4400 Installation, operating,  & maintenance instructions

Lefroy Brooks

Lefroy Brooks M2-4400 Installation, operating, & maintenance instructions

Moen ONE-HANDLE KITCHEN FAUCET installation guide

Moen

Moen ONE-HANDLE KITCHEN FAUCET installation guide

Caroma CIRRUS installation instructions

Caroma

Caroma CIRRUS installation instructions

Olympia SOLANA Installation and Maintenance

Olympia

Olympia SOLANA Installation and Maintenance

Elkay LK76 Specifications

Elkay

Elkay LK76 Specifications

Moen TS3302TB installation guide

Moen

Moen TS3302TB installation guide

Brizo Sotria 65350LF Series manual

Brizo

Brizo Sotria 65350LF Series manual

Hans Grohe Allegro E 04076 0 Series Installation instructions / warranty

Hans Grohe

Hans Grohe Allegro E 04076 0 Series Installation instructions / warranty

Spectrum Brands Pfister Pendleton F-042-PN Quick installation guide

Spectrum Brands

Spectrum Brands Pfister Pendleton F-042-PN Quick installation guide

Oras Signa 6391-11 Installation and maintenance guide

Oras

Oras Signa 6391-11 Installation and maintenance guide

Klein Tools 56065 instructions

Klein Tools

Klein Tools 56065 instructions

American Standard Right Height Elongated Toilet Triumph Cadet... Specification sheet

American Standard

American Standard Right Height Elongated Toilet Triumph Cadet... Specification sheet

Burlington T5 Installation instructions manual

Burlington

Burlington T5 Installation instructions manual

manuals.online logo
manuals.online logoBrands
  • About & Mission
  • Contact us
  • Privacy Policy
  • Terms and Conditions

Copyright 2025 Manuals.Online. All Rights Reserved.