Bellhowell MONSTER DOUBLE ZAPPER User manual

INSTRUCTIONS

Thank you for choosing the Bell+Howell® Double Zapper. This manual will provide you
with the instructions for using the Double Zapper effectively and efficiently. Please read
the manual carefully before using the Double Zapper and keep it on file for future
reference.
WARNING-To reduce the risk of electric shock, turn unit off before cleaning or servicing.
Skin or eye damage may result from directly viewing the light produced by this lamp.
Always turn off the unit before opening the cover.
• High voltage. Risk of electrical shock.
• Keep out of reach of children.
• Do not touch the electric coil; do not place fingers or hands, or insert any
object into the unit while it is powered on.
• CAUTION-This product is intended for use indoors only. To avoid risk of fire or
electric shock, do not use where it may be exposed to water or direct sunlight,
including roofed, but open porches. Do not expose the unit to rain or wet
conditions. Do not use near showers, bathtubs, sinks or other areas with
a high moisture content.
• Always turn unit off before servicing or cleaning.
• Do not position the unit near heat, gas, oil or other flammable materials.
• Keep away from flammables; such as paper, clothing, or any other material
that may catch fire.
• To reduce the risk of injury, close supervision is necessary when an appliance is used
near children.
• Never operate this product if it is not working properly, if it has been dropped or
damaged, or if it has been dropped into water.
• Do not insert fingers or any foreign objects into the unit during operation.
• Do not touch the lamp with an unprotected hand when it is on or when
powered o, as it may be hot.
• Collected insects within the unit may contribute to fire, so clean insects from the unit
frequently.
• Never attempt to clean the unit by spraying it with water or any other liquid.
Use a small brush (included) for cleaning.
• Do not place where it can fall into water, or near flammable materials.
• Indoor use only. Do not use outdoors.
• When not in use and during cleaning, press ON/OFF button to turn the unit off.
SAVE THESE INSTRUCTIONS
FOR HOUSEHOLD USE ONLY
IMPORTANT SAFETY INSTRUCTIONS
READ ALL INSTRUCTIONS BEFORE USING.KEEP AWAY FROM WATER.
WARNING: CAUTION HOT SURFACES: Proper precautions must be taken
to prevent the risk of burns, fires, or other injury to persons or damage to property.
This device complies with Part 18 of the FCC Rules
(1): “This equipment has been tested and found to comply with the limits for a Consumer
ISM equipment, pursuant to Part 18 of the FCC Rules. These limits are designed to provide
reasonable protection against harmful interference in a residential installation. This
equipment generates uses and can radiate radio frequency energy and, if not installed
and used in accordance with the instructions, may cause harmful interference to radio
communications. However, there is no guarantee that interference will not occur in a
particular installation.”
(2): “Please note that changes or modifications of this product is not expressly approved
by the party responsible for compliance could void the user's authority to operate the
equipment.”
(3): “If this equipment does cause harmful interference to radio or television reception,
which can be determined by turning the equipment off and on, the user is encouraged
to try to correct the interference by one or more of the following measures:
-- Reorient or relocate the receiving antenna.
-- Increase the separation between the equipment and receiver.
-- Connect the equipment into an outlet on a circuit different from that to which the
receiver is connected.
-- Consult the dealer or an experienced radio/TV technician for help.”
This device complies with Part 18 of the FCC Rules.: E. Mishan & Sons, Inc
Address: 230 Fifth Ave, Suite 800 New York, NY 10001
This product uses a Lithium battery. When it can no longer be used, it should be removed from the unit and
recycled. The battery must not be incinerated or composted. The battery can be taken for disposal to any
local retailer participating in the national recycling program sponsored by the RBRC (SEE RBRC seal).
Call your local details, or the RBRC hotline at 1-800-820-8837 for the closest recycling center to you.
1 21 2

USAGE
CHARGING
PARTS IDENTIFICATION
Hang the unit using the metal handle, located on the top of the unit.
For optimal results, hang the Double Zapper 4 to 6 feet above the floor.
The Double Zapper needs to be fully charged.
Follow the below directions to charge the unit.
1. Remove the protective cover from the
charging port.
2. Connect Micro USB cable:
Option 1: Insert USB end into the power adapter
(not included) and the other end into the Micro
USB port on the side of the unit, then plug into
a power outlet.
Option 2: Insert Micro USB end into the Micro USB
port on the side of the unit, then plug into any USB port.
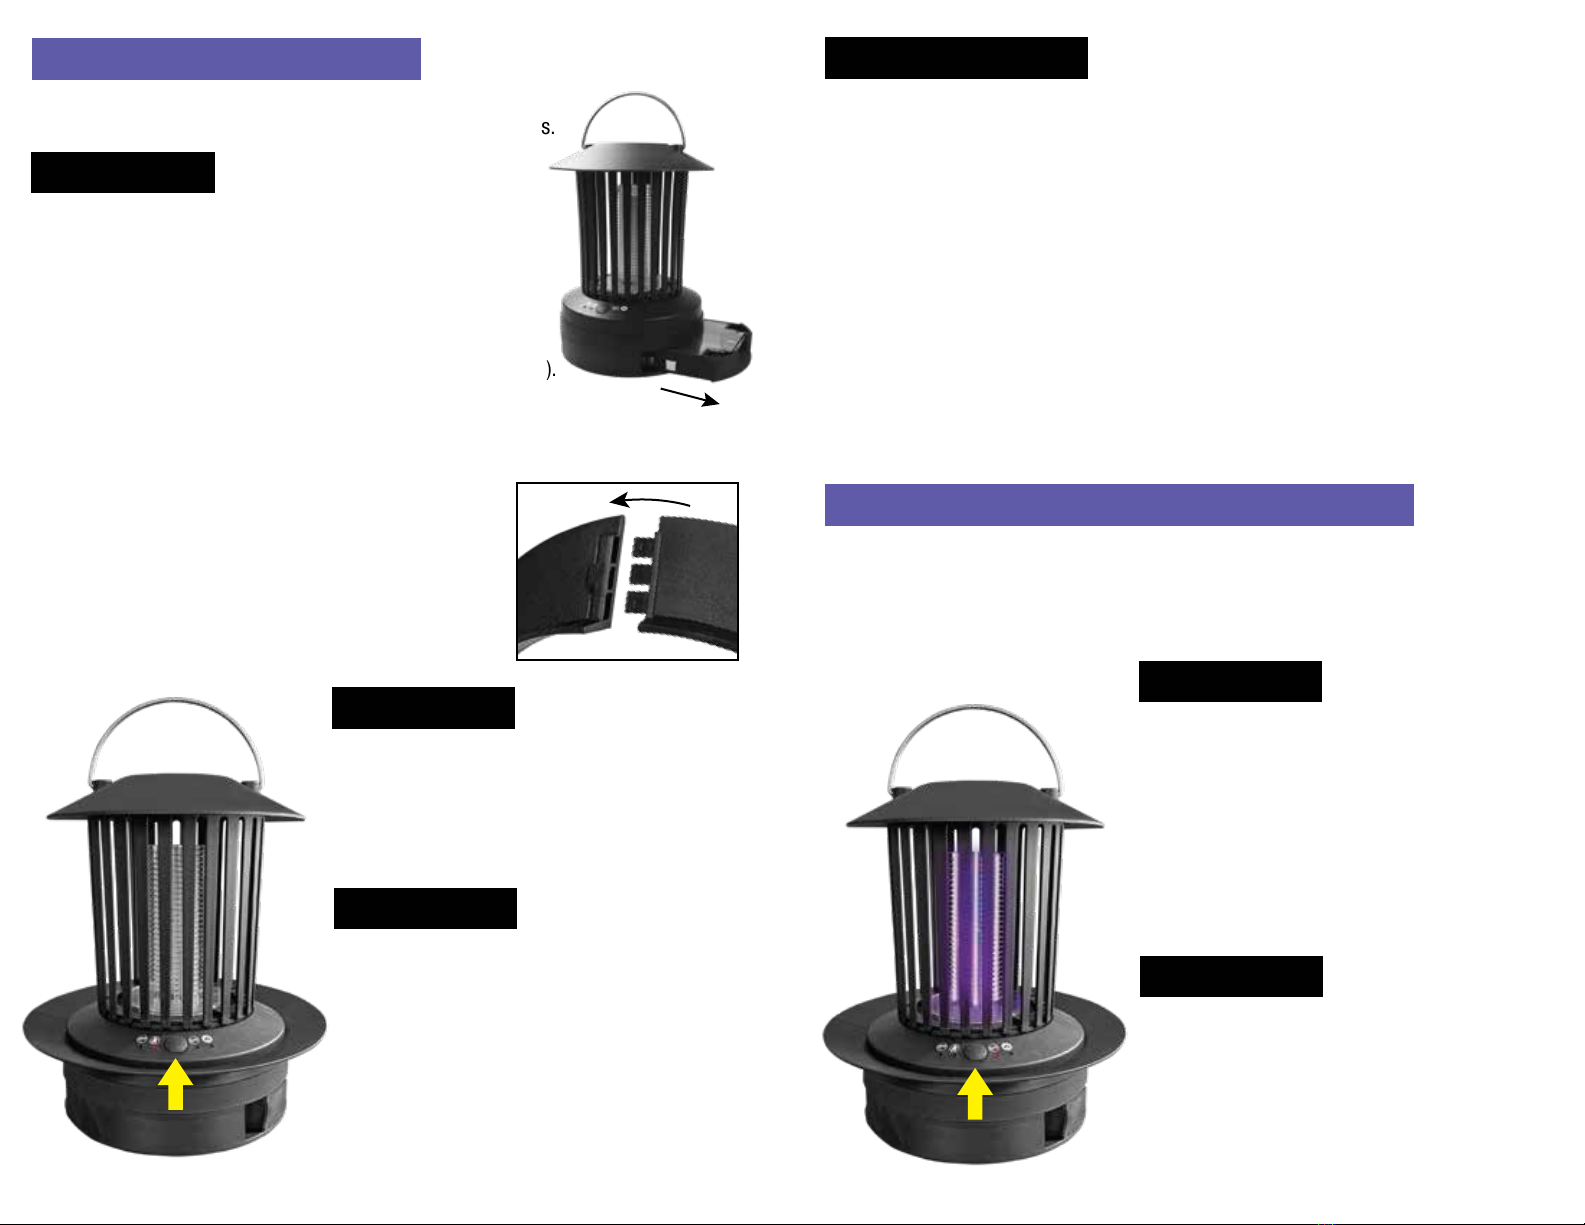
1. Protective top
2. High voltage Lamp
3. Handle
4. Base
5. ON/OFF button
6. 4 Settings:
Mosquito/Roach/Both/Heat
7. Removable tray
12
13
14
12
3
4
6
7
910
5
TO KILL MOSQUITOES AND FLYING BUGS
PRESS
1 time
Mosquitoes will fly towards the light and will die
when come in contact with the UV lamp. The unit
can operate up to 7.5 hours in this mode on a fully
charged battery.
Press the ON/OFF button once to activate the
Mosquito Mode. The indicator light will turn on
and the lamp will emit the UV light.
CAUTION: When unit is used in Mosquito Mode,
a high voltage will be produced. To reduce the
risk of injury, keep hands away from grid.
To turn the unit OFF at any time, press and hold
the ON/OFF button for 3 seconds.
HOW TO ACTIVATE
WHAT HAPPENS
8
11
8
3 4
8. Trap door (2)
9. Cover
10. Bait compartment
11. Charging port
12. Ring (for Roach/Both settings)
13. USB cord
14. Cleaning brush
3. Once plugged it, charging will start automatically. First indicator light (Mosquito)
will flash. Charging time is approximately 4 hours. When charging is complete,
the light will turn to solid.
4. When the unit needs to be charged, the Heat light will flash. Follow the Charging
directions to charge your unit.
PLUG AND PLAY FEATURE
Double Zapper can also operate continuously while plugged into outlet or any
USB source. Please refer to Charging section of the manual on previous page
to connect the unit to a power source.
CAUTION: Arrange cord away from traffic area and where it will not be
tripped over.
Since this is a setting that will kill a variety of insects, it is best to place the unit on
a flat, hard surface. Make sure to place away from high-traffic areas and out of the
reach of children and pets.
Make sure to fill the bait tray and place the ring on the unit, as shown on previous page.
1. There are 2 openings in the base of the unit that
allow the roaches to enter. Tray with bait will trap the
roach (it will be able to get in, but not able to get out).
2. Once the unit detects a roach inside, the Roach
Mode indicator light will begin to flash. Three hours
after the first roach gets in, the heat will turn on
automatically. The Roach Mode light will continue
to flash. Heat will be generated for about 8 minutes
to kill the trapped insect(s) inside.
A. FILL THE BAIT TRAY (Roach & Both Modes)
1. Slide the bait tray out from the base of the unit.
Tray can be removed from one side only.
2. Place roach bait inside the 4 corners of the tray. You can use
pieces of banana peel, overripe fruit, or anything fragrant and
sweet. You may also use a specially designed bait (sold separately).
3. Slide the tray back inside the unit. Tray will go in one way only.
Place the unit on a flat, hard surface. Make sure to place away
from high-traffic areas and out of the reach of children and pets.
B. ASSEMBLY THE RING (Roach & Both Modes)
1. Connect both pieces of the ring to form a circle.
Snap into place. See Diagram on right.
2. Twist the top of the unit counterclockwise to
remove it. Set aside.
3. Drop the assembled ring over the lamp (with sides
pointing up). Press down to ensure a snug fit.
4. Replace the top and twist clockwise to lock it in place.
TO KILL ROACHES AND CRAWLING BUGS
HOW TO ACTIVATE
WHAT HAPPENS
Press the ON/OFF button 2 times to activate the
Roach Mode. The indicator light will turn on
(lamp will not turn on during this setting).
To turn the unit OFF at any time, press and hold
the ON/OFF button for 3 seconds.
PRESS
2 times
3. After 8 minutes, the heat will turn off and the Roach Mode light will become solid.
This completes the 1st cycle. There are a total of 3 heating cycles that will be
performed on a full charge.
Ex.: Roach gets in ----> wait 3 hours ----> 8 minutes of heating ----> heat OFF
DO NOT PLACE YOUR FINGERS/HANDS OR ANY OBJECT INSIDE THE OPENING
OF THE TRAY DURING USE.
4. If the heating function has been activated more than 3 times, you have to manually
activate it the next time a roach enters the unit (indicator light will flash). Just press
the ON/OFF button 2 times until the indicator light of the Heat mode will go on.
The heat will come on and it will automatically turn off after 8 minutes.
5. When the unit needs to be charged, the Heat light will flash. Follow the Charging
directions to charge your unit.
6. To turn the unit OFF at any time, press and hold the ON/OFF button for 3 seconds.
WHAT HAPPENS continued
TO KILL MOSQUITOES, FLYING BUGS, ROACHES, CRAWLING BUGS
PRESS
3 times
Press the ON/OFF button 3 times to activate the
Both Mode. The indicator light will turn on
and the lamp will emit the UV light.
CAUTION: When unit is used in Both Mode,
a high voltage will be produced. To reduce the
risk of injury, keep hands away from grid.
To turn the unit OFF at any time, press and hold
the ON/OFF button for 3 seconds.
HOW TO ACTIVATE
WHAT HAPPENS
1. Mosquitoes will fly towards the light and will
die when come in contact with the UV lamp.
2. There are 2 openings in the base of the unit
that allow the roaches to enter. Tray with bait
will trap the roach (it will be able to get in,
but not able to get out).
HOW TO ACTIVATE
5 6

CLEANING
SPECIFICATIONS
Frequent cleaning will prolong the life of the unit,
ensure fire prevention and provide for more
efficient operation.
IMPORTANT: Always make sure the unit is
turned off prior to cleaning. Wait a few
minutes for the lamp to cool down.
Be sure to clean the unit at least once a week.
TO CLEAN THE LAMP
1. Grasp the top with one hand and bottom of the
unit with the other hand. Twist the top of the unit
counterclockwise. Remove the top and set aside.
2. Using the provided brush, clean the UV lamp.
IMPORTANT: Never attempt to clean the unit
by spraying it with water or any other liquid.
3. Assemble the top by aligning the tabs on the
plastic cage with the slots on the unit.
Twist clockwise until locked.
Dimensions: 200mm x 200mm x 215mm
Net Weight: 720g
Battery type: 2pcs 18650 Lithium battery
Battery Capacity: 1500mAh for 2pcs 18650 Lithium battery
Battery Run Time: 7.5 hours for Mosquito Mode only,
4 times for Roach Mode only (heating 8 minutes for each time)
Battery Charge Time: 4h
Charging Input: DC5V1A
Working Current: 2.5A±5%
Electrical Rating: 18.5W±5%
Voltage: 7.4V
Bulb Type: UV LED
Modes: Mosquito Mode/Roach Mode/ON-OFF/Both Mode/Heat Mode
Accessories: 1M USB cable, cleaning brush
WHAT HAPPENS continued
3. Once the unit detects a roach inside, the Roach indicator light will begin to flash.
Press the ON/OFF button 1 time to activate the Heat function - the Heat mode indicator
light will turn on. The UV lamp will turn off. Heat will be generated for about 8 minutes
to kill the trapped insect(s) inside.
DO NOT PLACE YOUR FINGERS/HANDS OR ANY OBJECT INSIDE THE OPENING
OF THE TRAY DURING USE.
4. The unit will turn off automatically when the heating is complete.
5. If there is power remaining in the unit, you can press the ON/OFF button 3 times
to activate the BOTH Mode again.
6. When the unit needs to be charged, the Heat light will flash. Follow the Charging
directions to charge your unit.
TO CLEAN THE TRAY
Important: Do not wash the tray.
1. Slide the bait tray out from the base of the unit.
Tray can be removed from one side only.
2. Remove the cover.
3. Empty out the dead insects and remove the food bait.
4. Use a provided brush or soft cloth to clean the tray.
5. When done cleaning, replace the cover and slide the tray back inside the unit.
Tray will go in one way only.
7 8
Table of contents
Popular Lawn And Garden Equipment manuals by other brands

Grundfos
Grundfos Conex DIS-C Installation and operating instructions

Milwaukee
Milwaukee M18 FUEL 2825-20ST Operator's manual

Trac Vac
Trac Vac 865 Operating and assembly manual

Atom
Atom 710 Operator owner's manual

Blastrac
Blastrac BMP-320 operating manual

FRAME IT ALL
FRAME IT ALL Stack & Extend VEGGIE WALL Assembly instructions


Lux Tools
Lux Tools E-VL-1800/36 Original instructions

Bergman
Bergman 318 4225 Safety Instructions and Operating Manual

Sioux Chief
Sioux Chief StreamLine installation guide

Autopot
Autopot AQUAvalve5 1Pot Simple care guidelines

Wolf Garten
Wolf Garten Li-Ion Power 60 Original operating instructions

Cub Cadet
Cub Cadet CS 552 manual