EnglishDeutsch
 logo
Brands
  1. Home
  2. •
  3. Brands
  4. •
  5. BELLOSTA
  6. •
  7. Plumbing Product
  8. •
  9. BELLOSTA Revivre Young User manual

BELLOSTA Revivre Young User manual

This manual suits for next models

1

Other BELLOSTA Plumbing Product manuals

BELLOSTA funtanin 8101/A User manual

BELLOSTA

BELLOSTA funtanin 8101/A User manual

BELLOSTA micheli 5805/P/SN User manual

BELLOSTA

BELLOSTA micheli 5805/P/SN User manual

BELLOSTA life 0512/P User manual

BELLOSTA

BELLOSTA life 0512/P User manual

BELLOSTA ixs 86-4503/2Q User manual

BELLOSTA

BELLOSTA ixs 86-4503/2Q User manual

BELLOSTA IXS 4505/R/B User manual

BELLOSTA

BELLOSTA IXS 4505/R/B User manual

BELLOSTA ludo 7301/2/A User manual

BELLOSTA

BELLOSTA ludo 7301/2/A User manual

BELLOSTA n-joy 0105/R/B User manual

BELLOSTA

BELLOSTA n-joy 0105/R/B User manual

BELLOSTA romina 0305/6/C User manual

BELLOSTA

BELLOSTA romina 0305/6/C User manual

BELLOSTA bellini 6300/3 User manual

BELLOSTA

BELLOSTA bellini 6300/3 User manual

BELLOSTA BAMBU 0401/2/J/P/A User manual

BELLOSTA

BELLOSTA BAMBU 0401/2/J/P/A User manual

BELLOSTA 0512/H/P User manual

BELLOSTA

BELLOSTA 0512/H/P User manual

BELLOSTA charlotte 0701/C User manual

BELLOSTA

BELLOSTA charlotte 0701/C User manual

BELLOSTA Electa 5200/1/P/E User manual

BELLOSTA

BELLOSTA Electa 5200/1/P/E User manual

BELLOSTA garage 4705/6/E User manual

BELLOSTA

BELLOSTA garage 4705/6/E User manual

BELLOSTA brunsin 5701/4 User manual

BELLOSTA

BELLOSTA brunsin 5701/4 User manual

BELLOSTA bambu 0400/Q User manual

BELLOSTA

BELLOSTA bambu 0400/Q User manual

BELLOSTA f-vogue bijoux 3303/2 User manual

BELLOSTA

BELLOSTA f-vogue bijoux 3303/2 User manual

BELLOSTA FUNTANIN User manual

BELLOSTA

BELLOSTA FUNTANIN User manual

BELLOSTA 7905/3/A User manual

BELLOSTA

BELLOSTA 7905/3/A User manual

BELLOSTA b-uno 7901/4/A/E User manual

BELLOSTA

BELLOSTA b-uno 7901/4/A/E User manual

BELLOSTA 6605 User manual

BELLOSTA

BELLOSTA 6605 User manual

BELLOSTA f-vogue 3005/3 User manual

BELLOSTA

BELLOSTA f-vogue 3005/3 User manual

BELLOSTA bambu 0403/2/1N User manual

BELLOSTA

BELLOSTA bambu 0403/2/1N User manual

BELLOSTA f-vogue 3000 User manual

BELLOSTA

BELLOSTA f-vogue 3000 User manual

Popular Plumbing Product manuals by other brands

Weka 506.2020.00E ASSEMBLY, USER AND MAINTENANCE INSTRUCTIONS

Weka

Weka 506.2020.00E ASSEMBLY, USER AND MAINTENANCE INSTRUCTIONS

American Standard DetectLink 6072121 manual

American Standard

American Standard DetectLink 6072121 manual

Kohler K-6228 Installation and care guide

Kohler

Kohler K-6228 Installation and care guide

Uponor Contec TS Mounting instructions

Uponor

Uponor Contec TS Mounting instructions

Pfister Selia 49-SL Quick installation guide

Pfister

Pfister Selia 49-SL Quick installation guide

Fortis VITRINA 6068700 quick start guide

Fortis

Fortis VITRINA 6068700 quick start guide

Kohler K-12183 Homeowner's guide

Kohler

Kohler K-12183 Homeowner's guide

Maxxus MX-M206-01 instruction manual

Maxxus

Maxxus MX-M206-01 instruction manual

Viega Prevista Pure 8512 Instructions for use

Viega

Viega Prevista Pure 8512 Instructions for use

Kohler Centerset K-15240 Homeowner's guide

Kohler

Kohler Centerset K-15240 Homeowner's guide

Viega Prevista Dry 8522.33 Instructions for use

Viega

Viega Prevista Dry 8522.33 Instructions for use

Sanela Lema SLP 59RB Instructions for use

Sanela

Sanela Lema SLP 59RB Instructions for use

Elkay EDF15AC Installation, care & use manual

Elkay

Elkay EDF15AC Installation, care & use manual

Hans Grohe AXOR Citterio E 36702000 Instructions for use/assembly instructions

Hans Grohe

Hans Grohe AXOR Citterio E 36702000 Instructions for use/assembly instructions

baliv WT-140 manual

baliv

baliv WT-140 manual

Kohler Mira Eco Installation & user guide

Kohler

Kohler Mira Eco Installation & user guide

Bristan PS2 BAS C D2 Installation instructions & user guide

Bristan

Bristan PS2 BAS C D2 Installation instructions & user guide

Crosswater Heir 18-31 installation instructions

Crosswater

Crosswater Heir 18-31 installation instructions

https://manuals.online logo
https://manuals.online logoBrands
  • About & Mission
  • Contact us
  • Privacy Policy
  • Terms and Conditions

Copyright 2026 Manuals.Online. All Rights Reserved.

Revivre Young
Istruzioni di installazione / Installation instruction
Art. 0431/4/B/B
1
IMPORTANTISSIMO
EQB
Rubinetti d'autore Made in Italy
DESIGN
MADE IN ITALY
This product has been entirely manufactured
in Italy, by top quality raw materials.
Questo prodotto è stato realizzato interamente in
Italia con l'utilizzo di materie prime di altissima qualità
MADE IN ITALY
Per installatore: Al fine di garantire la durata del prodotto
installare rubinetti con filtro da pulire periodicamente. Effettuare
risciacquo delle tubazioni prima di installare il prodotto (PUNTO
1)
Eventuali residui se finissero all'interno della cartuccia
potrebbero causarne il danneggiamento
For installator: In order to guarantee a long duration of the product
install valves with filter, which have to be regulary cleaned (POINT 1).
Carry out the rinsing of the pipes before install the tap.
Some external materials may demage the cadrige if not removed
before the installation.
ufficio tecnico BELLOSTA
C.A. 09/18 ISO 9001:2015
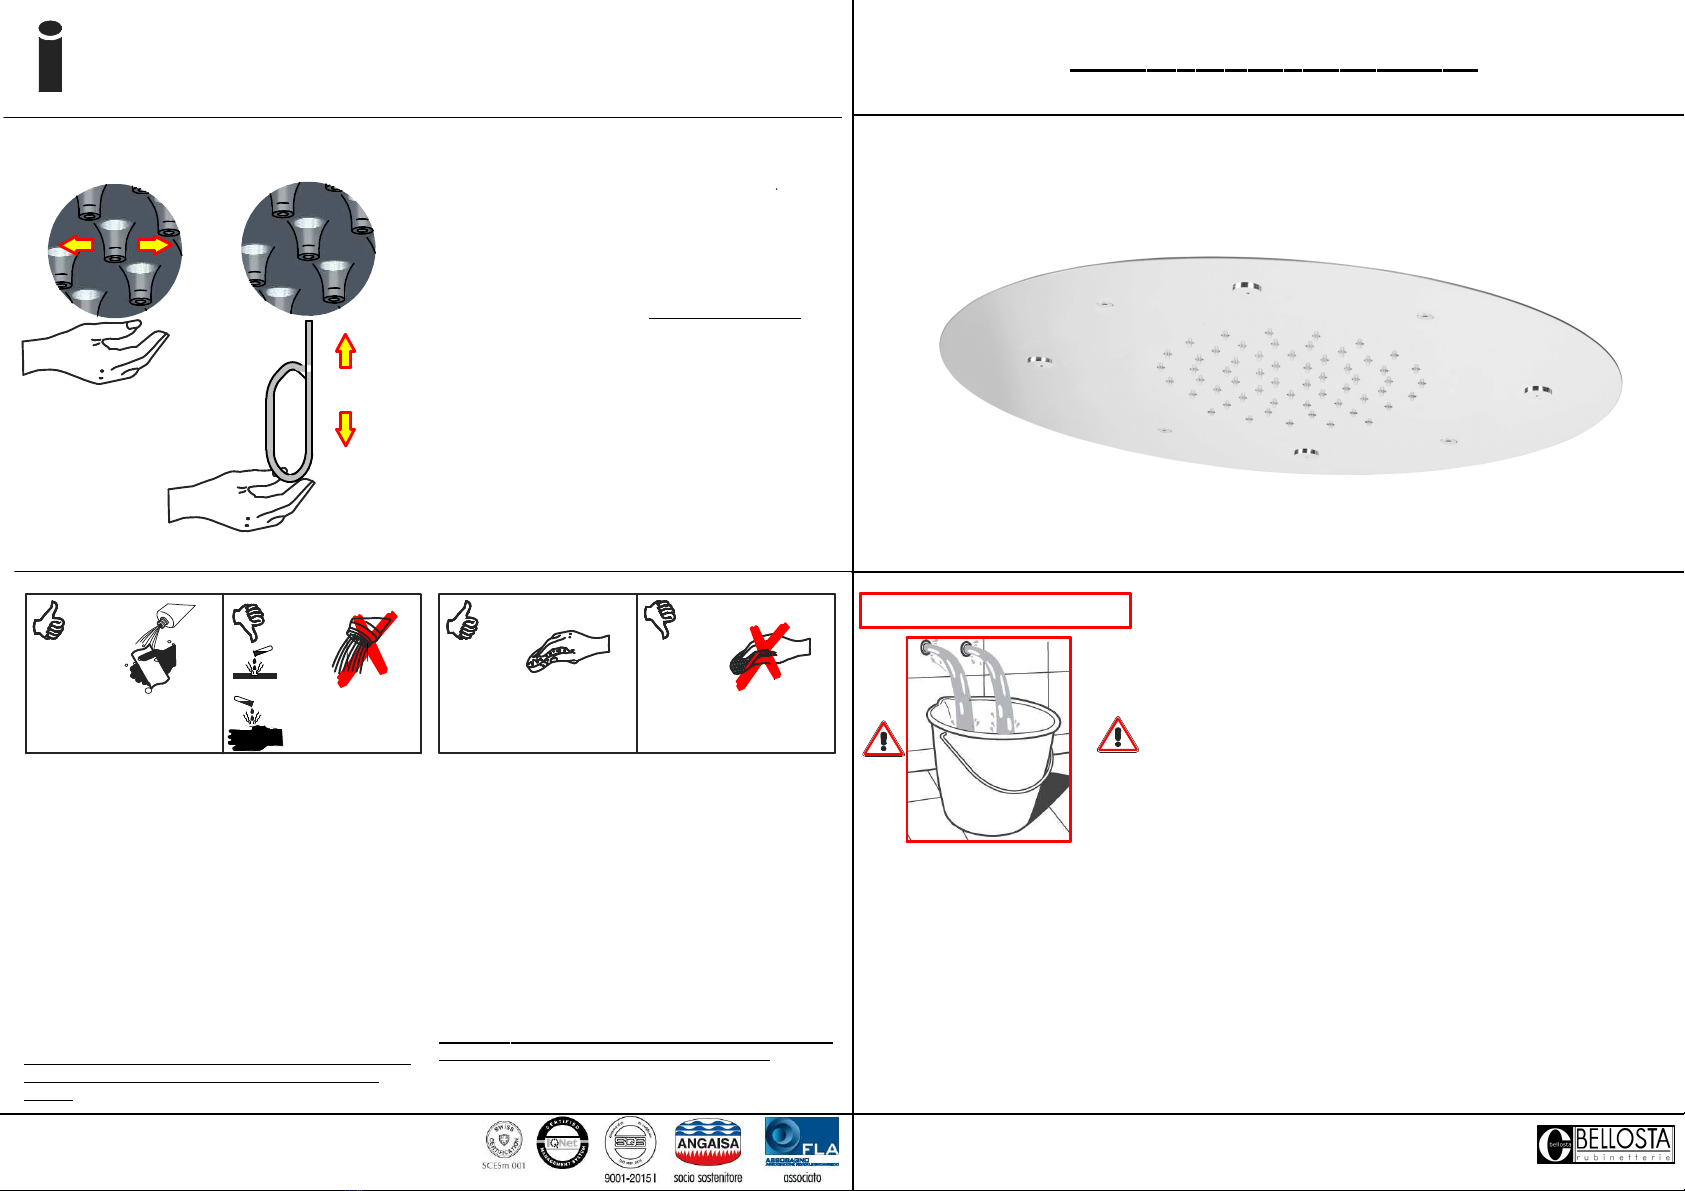
MANUTENZIONE E PULIZIA
MAINTENANCE AND CLEANING
1° 2°
ATTENZIONE:
Il vostro soffione è dotato di tettarelle di erogazione in silicone
che durante il normale utilizzo queste potrebbero ostruirsi;
per una corretta pulizia è sufficiente agire sulla singola tettarella
ostruita con un dito effettuando delicati movimenti rotatori
per liberarlo dalle impurità (punto 1).
In caso di ostruzioni particolarmente resistenti aiutarsi con
una spilla (punto 2).
Effettuare queste manovre regolarmente (almeno una volta al mese)
CAUTION:
Your shower head is equipped with silicone teats that during
normal use these may clog; for a correct cleaning it is sufficient
to act on the single teat obstructed with a finger performing
delicate rotary movements to free it from impurities (point 1).
In case of particularly resistant obstructions help yourself with
a brooch (point 2).
Perform these maneuvers regularly (at least once a month)
Per una corretta manutenzione e pulizia di questo
prodotto, raccomandiamo alcuni semplici accorgimenti:
• Utilizzare
detergenti neutri
, spruzzando il prodotto
direttamente su un panno morbido onde evitare
infiltrazioni
• Evitare
sempre
il contatto con prodotti acidi o abrasivi
•
Risciacquare bene
con abbondante acqua per
eliminare eventuali residui ed
asciugare sempre
con un
panno morbido
• Effettuare una
pulizia periodica
al fine di prevenire le
formazioni calcaree
For a proper maintenance and cleaning, we
recommend the following:
• Use
neutral detergents
, avoiding to spray directly
on taps to avoid residual infiltration
•
Avoid
contact with acid or abrasive products
•
Rinse
with water and
always dry
with a clean cloth
to avoid residue of detergent
• Perform a
periodic cleaning
to prevent limestone
deposits
La BELLOSTA CARLO & C. non è RESPONSABILE di
danni derivati dall'utilizzo di prodotti impropri per la
pulizia.
BELLOSTA CARLO & C. cannot be held responsible for
damages due to an improper use of detergents
ATTENZIONE: installare sempre la guarnizion
e filtro (fornita in dotazione) tra il corpo s
oone e l’impianto idraulico. Si consiglia inoltre un
sistem
a filtrante a monte dell'impianto per evitare impurità che potrebbero danneggiare irreparabilmente il prodotto. Questo s
offione va
installato con una pressione massima del f
lusso proveniente dalla rete idrica di 2 bar, in caso di pressione superiore è necessario
utilizzare un riduttore di portata (fornito in dotazione) .
Questo s
offione può essere danneggiato dal “colpo d’ariete”, che si manifesta quando il
flusso d’acqua all’interno di una condotta chiusa
subisce un’accelerazione o un blocco repentino.
In caso di installazione su cartongesso fare in modo che il
soffione sia assicurato alla struttura portante.
CAUTION: Before connecting each of the products, always install
the lter gasket (supplied) between the showerhead and the hydraulic
system. We also recommen
d a lter system upstream of the system to avoid impurities that could irreparably damage the product. This
showerhead must be installed with a maximum pressure of 2 bar, in case of higher pressure it is necessary to use
a ow restrictor
(supplied).
This shower head can be damaged by the "water hamme
r" eect, which occurs when th
e ow of water inside of a pipe or a closed lock
accelerates abruptly. When installing on a plasterboard,make sure that the showerhead is secured to the load-bearing structure.
Per qualsiasi richiesta di informazioni, preghiamo contattare l'Ufficio Tecnico presso:
info@bellostarubinetterie.com
For any technical inquiries, please contact the Technical Office at: info@bellostarubinetterie.com
3
Prima di fissare telaio, assicurarsi che
sia perfettamente allineato al soffitto.
Before fixing the frame, make sure
that it is aligned with the ceiling.
2
Nebulizzazione
Atomization
Pioggia
Rainfall
FORO NEL SOFFITTO
CEILING HOLE
1/2"G
O
390
A
BB
C
Per una corretta installazione del soffione
multifunzione è necessario fissare saldamente
il telaio di sostegano alla struttura del soffitto
(o eventuallmente ala telaio del controsoffitto)
per mezzo delle alette di fissaggio (A) o con viti autofilettanti passanti nei fori (B). Se possiible
utilizzare anche le staffe di fissaggio laterali (C) per il migliorare il bloccaggio. Il corretto
posizionamento del telaio di sostegno prevede le due uscite dell'acqua in posizione centrale.
For a correct installation of the multifunction showerhead, you need to firmly secure the
support frame to the ceiling structure (or to the false ceiling structure) through the fins (A) or
through set screw in the slots (B). If it is possible use also fixing bars (C) to improve locking.
A correct placement of frame provides the two water inlets at the center of the frame.
4a 4b
Sigillare gli eventuali spazi vuoti
fra telaio e soffitto.
Seal the space between frame
and ceiling.
Collegare correttamente i flessibili
alle prese acqua
Connect correctly the flexible hose
to water inlet
5
6a
D
Prima di agganciare il corpo soffione al telaio di supporto, assicurare il soffione stesso al telaio
per mezzo di cavi di sicurezza (D); se il telaio fosse agganciato ad un controsoffitto, per
maggiore sicurezza e stabilità, assicurare il telaio a ganci di sicurezza fissati al soffito in
muratura (non forniti).
Before coupling the showerhead with the frame, hook the safety wires (D). For higher security,
if the frame is hooked to the false ceiling
, secure the frame to the masonry ceiling with safety
hooks (not provided).
Dopo aver verificato la tenuta idraulica, procedere al fissaggio del corpo soffione avvitando
le viti nelle apposite sedi.
After checking the hydraulic system, proceed with fixing the showerhead body by tightening
the screws in the appropriate seats.
6b