Belshaw Brothers Snack Master User manual

Snack Master®
Multi-Purpose Fryer
Operator’s Manual
Belshaw Bros., Inc.
814 44th Street Northwest, Suite 103
Auburn, WA 98001 USA
Phone: (206) 322-5474 •Fax: (206) 322-5425


If you accept the machine from the shipping
company, you are, in effect, saying that the
machine is in good condition, and you must
pay for the machine. The freight company has
accepted the responsibility for the safe delivery
of our machines. For your protection, inspect
the machine to see that no parts are bent,
scratched, or otherwise damaged. If any damage
has occurred in shipping, file a freight claim with
the shipping company immediately.
EQUIPMENT RECORD
Please provide the information below when you correspond with us about your machine.
Purchased by _____________________________________________________________________
Installed by ______________________________________________________________________
Date of Installation ________________________________________________________________
Model number ___________________________________________________________________
Serial number
092308
MN-1012EN
Belshaw Bros., Inc.
814 44th Street Northwest, Suite 103
Auburn, WA 98001 USA
Phone: (206) 322-5474 •Fax: (206) 322-5425


Belshaw Bros., Inc. www.belshaw.com •Phone 206-322-5474 •Fax 206-322-5425
Snack Master OM MN-xxxxEN iii
Contents
Contents
1Operation 1
2Cleaning 4
Cleaning the Conveyor and the Kettle 5
Removing the Shortening 5
Washing 6
Rinsing 7
Drying 8
3Maintenance 9
Daily 9

Belshaw Bros., Inc. •www.belshaw.com •Phone 206-322-5474 •Fax 206-322-5425
iv MN-xxxxEN Snack Master OM
Preface
The Snack Master fryer is designed to
automatically fry fresh cut tortilla chip and other
frozen snack food products utilizing a fully
submerging conveyor.
The Snack Master fryer is designed to be used on
a flat, stationary table or countertop. A specially
designed table come as an option with the full
fryer system. The operator must work safely at
all times and read this manual and follow its
instructions and warnings.
The Snack Master produces only 71.5 dB(A) of
equivalent A-weighted sound pressure at
workstations. This has been determined during a
dry run of the machine, using a Bruel & Kjaer
sound level meter, type 2236.
Study the instructions and warnings in this
manual carefully. A thorough understanding of
how to install, maintain, and safely operate the
Snack Master will prevent production delays and
injuries.
To use the Snack Master fryer safely, heed the
following warnings and all other warnings that
appear in this manual:
•Make sure the machine is secured to the
work surface. Doing so will prevent the
machine from moving or falling, which
could cause serious injury.
•Never let water and hot shortening come
in contact. Moisture causes hot
shortening to spatter, which may cause
serious burns.
•Do not overfill the kettle with
shortening. If shortening overflows the
kettle, it could cause serious burns or
could cause someone to slip on the floor
and be seriously injured.
•Hot shortening can cause serious burns.
Make sure that the system and the
shortening are cool before attempting
any adjustment, repair, disassembly, or
cleaning.
•To avoid electrocution or other injury,
unplug the machine before attempting
any adjustment, repair, disassembly, or
cleaning.
•To avoid damaging the machine, never
use force to assemble, disassemble,
operate, clean, or maintain it.
•Be careful never to get shortening,
water, or other materials on the floor. If
anything does get spilled on the floor,
clean the area immediately. Materials on
the floor can cause people to slip or fall,
resulting in serious injury or loss of life.
•To prevent unintentional startup and
possible fire, unplug the machine if there
is a local power outage. When the
power is restored, it is safe to plug the
machine in again.
•To avoid electrocution, make sure that
all electrical cords are not frayed or
cracked and that they do not pass
through any water or shortening.
•Make sure that all electrical cords are
routed so that no one will trip over them.
Belshaw Bros., Inc. www.belshaw.com •Phone 206-322-5474 •Fax 206-322-5425
Snack Master OM MN-xxxxEN 1
1 Operation
Read each step completely before doing what it
tells you to do.
1. If necessary, place lower conveyor in
kettle. Ensure that the conveyor drive is
placed in the conveyor drive sprocket.
Place the upper conveyor on top of lower
conveyor. Make sure that the upper
conveyor drive sprocket ride on the lower
conveyor drive chain.
Put cover and infeed chute in place
WARNING
Do not operate fryer without cover on
place. Doing so may expose operator to
steam and pinch points
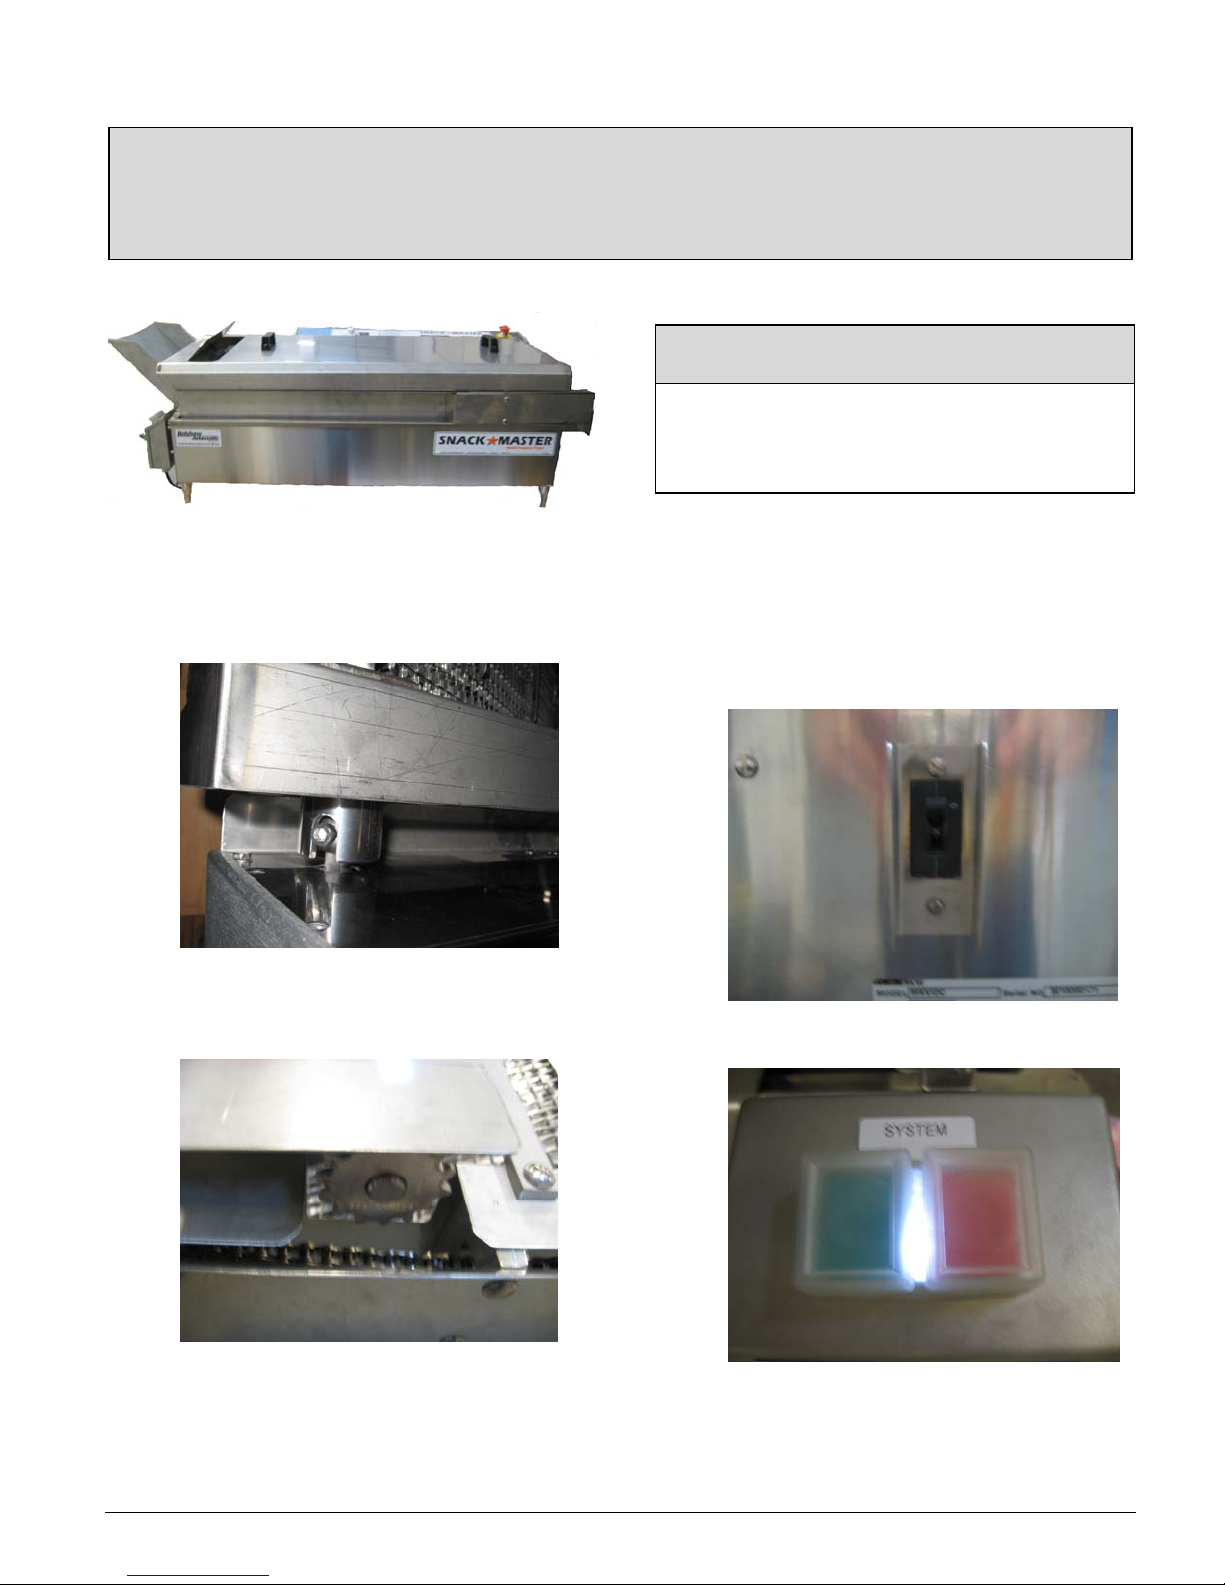
2. Plug in the fryer power cord or turn on
main supply breaker.
3. Insure that the Emergency Stop is not
activated by pull out.
4. Check that the control power switch on
the back of the fryer heater head is on.
5. Press the green SYSTEM button on the
control box to ready fryer.

Belshaw Bros., Inc. •www.belshaw.com •Phone 206-322-5474 •Fax 206-322-5425
2 MN-xxxxEN Snack Master OM
6. Set the temperature to the desired
temperature turning the temperature dial
above 200°F/93°C.
7. Turn HEAT selector switch to on the
control box to the on position. The lamp
in the selector switch is on to indicate
that the fryer heat has been turned The
pilot light on top of the heater head cycles
on when the elements are on and heating
the shortening
8. When the shortening reaches the correct
temperature, verify the shortening level.
Shortening expands as it increases in
temperature. This means that unless the
shortening is at frying temperature when
you put it in the kettle, you should put it
in gradually. Let the shortening in the
kettle heat up before you add more.
Proper shortening level is checked using
the level indicators on the lower
conveyor.
NOTE
The proper shortening level may change
based on the product being fried
•Pre-melt shortening in a pan on the stove
and carefully pour it into the kettle.
•Use the optional EZ Melt to melt
shortening and transfer it to the kettle.
See your EZ Melt manual.
WARNING
Hot shortening causes severe burns.
•Put solid shortening into the kettle,
packing it tightly around the elements
and bulbs.
WARNING
Air spaces can cause the shortening to
overheat and catch on fire.
8. Wait for the shortening to reach the desired
temperature. When it does, the pilot light on
the top of the heater head will go out. DO
NOT run the conveyor until all the
shortening has melted.
9. Choose the appropriate fry time for your
product using the fry time control knob on
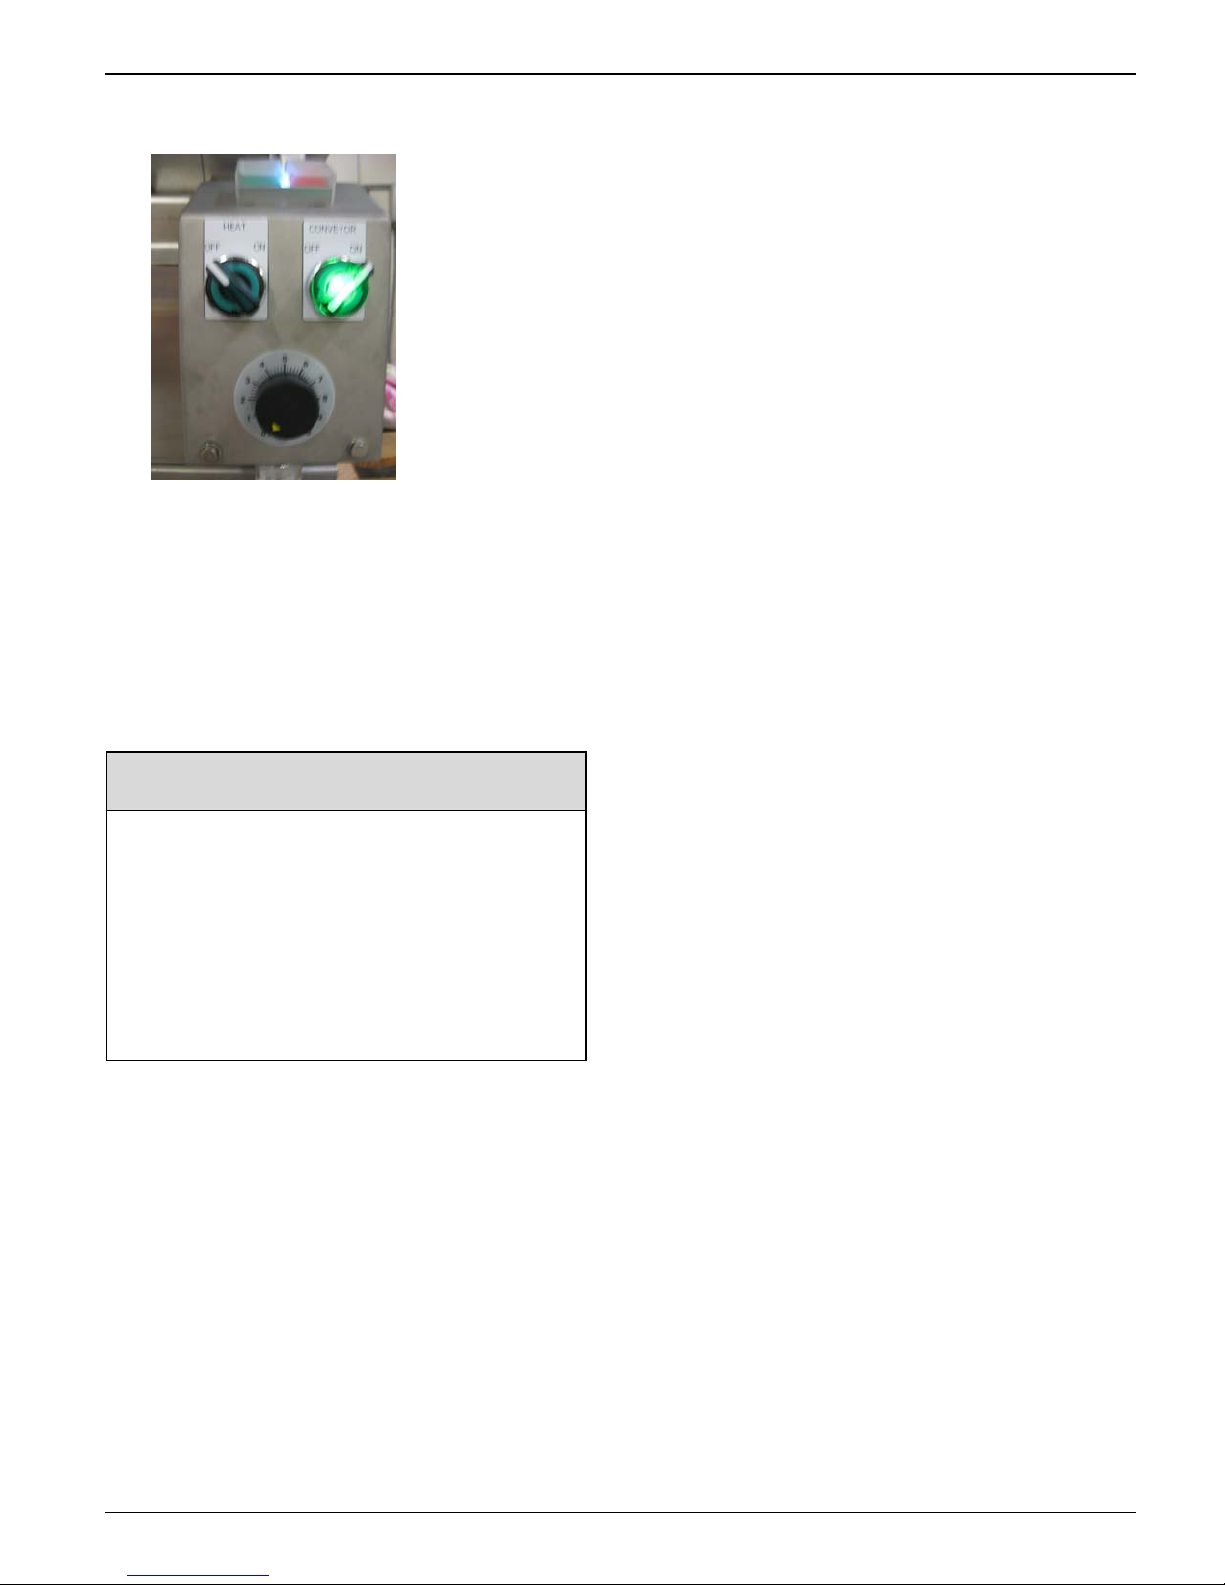
Belshaw Bros., Inc. www.belshaw.com •Phone 206-322-5474 •Fax 206-322-5425
Snack Master OM MN-xxxxEN 3
the control box .
10. . Turn on the conveyor drive using the
selector switch on the control box.
Note: If the conveyor becomes jammed, a
warning buzzer will sound about a minute
later and stop when the conveyor is turned
off. The conveyor drive is impedance-
protected so it will not burn out due to
jamming.
WARNING
If the conveyor becomes jammed:
1. Turn off the conveyor drive and the
heater.
2. Allow the system to cool down.
HOT SHORTENING IS DANGEROUS.
3. Determine the cause of the jamming.
4. Clear it.
5. Restart the system.
11. Continue adding shortening to the kettle to
maintain the proper shortening level (see
step 2). There are two ways to do this:
•Melt some shortening in a pan on the
stove and carefully pour it into the kettle.
•If you are using the optional EZ Melt,
transfer more shortening from it. See
your EZ Melt manual.
12. To cook product, drop on infeed chute.
Beware of steam exiting out from under the
hood. Place a food bin at the at feed to catch
product as it comes out the outfeed conveyor.

Belshaw Bros., Inc. •www.belshaw.com •Phone 206-322-5474 •Fax 206-322-5425
4 MN-xxxxEN Snack Master OM
2 Cleaning
WARNING
Thoroughly clean and dry the floor if
shortening, water, or other materials are
spilled. Materials spilled on the floor can
cause serious injury or loss of life.
WARNING
To avoid electrocuting yourself or
damaging the machine, never allow water,
steam, shortening, cleaning solution, or any
other liquid to enter the heater.

Belshaw Bros., Inc. www.belshaw.com •Phone 206-322-5474 •Fax 206-322-5425
Snack Master OM MN-xxxxEN 5
Cleaning the Conveyor and
the Kettle
There are four basic steps to cleaning the
conveyor and the fryer kettle: removing the
shortening, washing, rinsing, and drying. You
must perform all four steps and perform them in
the order listed.
Removing the Shortening
WARNING
To avoid being burned or electrocuted,
disconnect the machine from the power
source before cleaning the fryer.
1. Disconnect the machine from the power
source.
2. Let the shortening cool to 100°F/38°C.
3. Remove the conveyor assembly as follows:
a. Obtain two pieces of wood, at least 1” x
1” x 15” (2.5 cm x 2.5 cm x 38 cm).
b. Remove cover from fryer.
WARNING
To prevent injury it is recommended that
two people are used for lifting the upper
and lower conveyors
c. Lift upper conveyor assembly from the
lower conveyor. The upper conveyor
weighs 36 pound/16.3 KG. To prevent
injury it is recommend that two people
are used lift the upper conveyor. Turn
slightly clockwise and rest on lower
conveyor to allow excess shortening to
drain off the conveyor and into the
kettle. After shortening has drained off
remove completely.
c. Lift the lowerr conveyor and pull it away
from the heater head to disengage the
main drive shaft coupling from the
conveyor drive coupling. The lower
conveyor weighs 60 pounds/27.2KG. to
prevent injury it is recommended that
two people are used to lift the lower
conveyor. Slide one piece of wood under
the conveyor and lay it across the top of
the kettle. Lift the other end of the
conveyor and do the same with the other
piece of wood. The conveyor will now
be resting on the two pieces of wood.
Let the shortening drain off of the
conveyor and into the kettle

Belshaw Bros., Inc. •www.belshaw.com •Phone 206-322-5474 •Fax 206-322-5425
6 MN-xxxxEN Snack Master OM
WARNING
All parts must be dried thoroughly.
Moisture causes hot shortening to spatter,
which may cause serious injury.
4. After the shortening has drained off of the
conveyor assembly, set the conveyor
assembly aside.
9. Check again to see that the shortening in the
kettle has cooled to 100°F/38°C.
10. Remove the shortening from the kettle using
one of these methods:
•Using the drain valve, drain shortening
into optional EZ-Melt Shortening filter.
•Using the drain valve, drain shortening
into metal bucket. The method will
require some means to remove
impurities from the shortening
•Using a small saucepan or a metal
pitcher, scoop as much of the shortening
as you can into one or more large metal
buckets. Then lift the kettle out of the
fryer case and carefully pour the rest of
the shortening into a metal bucket. Be
careful not to disturb the sediment that
has accumulated in the bottom of the
kettle.
WARNING
Do not use plastic buckets for shortening
storage. If the shortening is not cool
enough, the buckets will melt; possibly
causing you to be burned, and causing
shortening to get on the floor.
WARNING
Do not allow the shortening to overflow the
buckets. Shortening will get on the floor,
and if the shortening is not cool enough,
you may be burned.
WARNING
Thoroughly clean and dry the floor if
shortening is spilled. Shortening on the
floor can cause serious injury or loss of life.
11. Return the kettle to the fryer case, if you
have removed it.
12. Tilt the heater assembly down.
13. Brush off any carbon that has accumulated
on the heating element. Accumulated
carbon can cause corrosion and ineffective
heating.
14. Tilt the heater head assembly back, raising
the heating element out of the kettle.
15. Lift the kettle out of the fryer case. Remove
and dispose of the remaining shortening and
the accumulated sediment. Dry the outside
of the kettle.
16. Put the kettle back in the fryer case.
17. Tilt the heater head assembly down.
19. Install the conveyor assembly.
Washing
1. Pour hot water into the kettle, up to the
normal level of the shortening. Add about
2 oz/59 ml of trisodium phosphate or other
appropriate cleaner.
2. Connect the machine to the power source.
Heat the solution to 200°F/93°C. Turn on
the conveyor. Keep the solution at this
temperature for 15-20 minutes.

Belshaw Bros., Inc. www.belshaw.com •Phone 206-322-5474 •Fax 206-322-5425
Snack Master OM MN-xxxxEN 7
3. Turn off the conveyor and scrub the soiled
parts while the solution is under heat. Do
not use any abrasive cleaners or scrapers.
4. Turn off the heater and disconnect the
machine from the power source. Allow the
cleaning solution to cool to 100°F/38°C.
5. Remove the conveyors and tilt the heater
head back as you did before.
6. Remove the cleaning solution from the
kettle using one of these methods:
•Using the drain, valve drain the cleaning
solution into metal buckets When the
cleaning solution has stopped draining,
carefully carry the buckets to the sink
and slowly pour the solution into the
sink.
•Using a small saucepan or a metal
pitcher, scoop as much of the cleaning
solution as you can into one or more
large metal buckets. Then lift the kettle
out of the fryer case and carefully pour
the rest of the cleaning solution into a
metal bucket. Carefully carry the
buckets to the sink and slowly pour the
solution into the sink.
WARNING
Do not use plastic buckets. If the cleaning
solution is not cool enough, the buckets will
melt; possibly causing you to be burned,
and causing cleaning solution to get on the
floor.
WARNING
Do not allow the cleaning solution to
overflow the buckets. Cleaning solution
will get on the floor, and if the solution is
not cool enough, you may be burned.
WARNING
Thoroughly clean and dry the floor if
cleaning solution is spilled. Liquid on the
floor can cause serious injury or loss of life.
7. Lift the kettle out of the fryer case.
8. Rinse the kettle thoroughly and dry it on the
outside.
9. Install the kettle, tilt the heater head
assembly down, and install the conveyor
assembly as before.
Rinsing
1. Pour clean water into the kettle, up to the
normal level of the shortening.
2. Connect the machine to the power source.
Heat the water to 200°F/93°C.
3. Run the conveyor for 5-10 minutes.
4. Turn off the heater and disconnect the
machine from the power source. Allow the
water to cool to 100°F/38°C.
5. Lift the conveyor assembly out of the fryer
case. Tilt the heater head assembly back.
6. Remove the water from the kettle using one
of these methods:
•Using the drain valve, drain the cleaning
solution into metal buckets. When the
water has stopped draining, carefully
carry the buckets to the sink and slowly
pour the water into the sink.
•Using a small saucepan or a metal
pitcher, scoop as much of the water as
you can into one or more large metal
buckets. Then lift the kettle out of the
fryer case and carefully pour the rest of
the water into a metal bucket. Carefully
carry the buckets to the sink and slowly
pour the water into the sink.

Belshaw Bros., Inc. •www.belshaw.com •Phone 206-322-5474 •Fax 206-322-5425
8 MN-xxxxEN Snack Master OM
WARNING
Do not use plastic buckets. If the water is
not cool enough, the buckets will melt;
possibly causing you to be burned, and
causing water to get on the floor.
WARNING
Do not allow the water to overflow the
buckets. Water will get on the floor, and if
the water is not cool enough, you may be
burned.
WARNING
Thoroughly clean and dry the floor if water
is spilled. Water on the floor can cause
serious injury or loss of life.
Drying
1. Thoroughly dry all parts, including the
conveyor, the heating element(s), the inside
of the kettle, and the drain.
WARNING
All parts must be dried thoroughly.
Failure to dry the kettle, conveyor, and all
parts of the Donut Robot completely will
cause spattering or an eruption.
Shortening will spatter or overflow the
fryer and may result in fire, injury, or
death.
2. Assemble the Snack Master as before.
3. Make sure no water is in the drain or drain
tube.
4. If your kettle has the optional drain
assembly, close the drain valve.

Belshaw Bros., Inc. www.belshaw.com •Phone 206-322-5474 •Fax 206-322-5425
Snack Master OM MN-xxxxEN 9
3 Maintenance
WARNING
To avoid being burned, electrocuted, or
otherwise injured, always unplug the
machine and allow it to cool down before
making adjustments, clearing obstructions,
lubricating, cleaning, or disassembling.
Daily
Before using the machine each day, inspect the
upper and lower conveyors for damage.


Snack Master
Multi-Purpose Fryer
Technical Supplement
Belshaw Bros., Inc.
814 44th Street Northwest, Suite 103
Auburn, WA 98001 USA
Phone: (206) 322-5474 Fax: (206) 322-5425


If you accept the machine from the shipping
company, you are, in effect, saying that the
machine is in good condition, and you must
pay for the machine. The freight company has
accepted the responsibility for the safe delivery
of our machines. For your protection, inspect
the machine to see that no parts are bent,
scratched, or otherwise damaged. If any damage
has occurred in shipping, file a freight claim with
the shipping company immediately.
EQUIPMENT RECORD
Please provide the information below when you correspond with us about your machine.
Purchased by _____________________________________________________________________
Installed by ______________________________________________________________________
Date of Installation ________________________________________________________________
Model number ___________________________________________________________________
Serial number
0205
MN-1013EN
Belshaw Bros., Inc.
814 44th Street Northwest, Suite 103
Auburn, WA 98001 USA
Phone: (206) 322-5474 Fax: (206) 322-5425

Table of contents
Other Belshaw Brothers Fryer manuals


Popular Fryer manuals by other brands


Gourmia
Gourmia GAF-395A user manual

MAXXMEE
MAXXMEE HIC-AF-8024LD operating instructions

Kalorik
Kalorik MAXX AFO-50939-SS manual

Rankam
Rankam Outdoor Gourmet TF2005101-OG-01 Assembly instructions and user's manual

PowerXL
PowerXL VORTEX quick start guide

Frigidaire
Frigidaire EAF180-BLACK instruction manual


