BENADO EFFECTS Adverb User manual
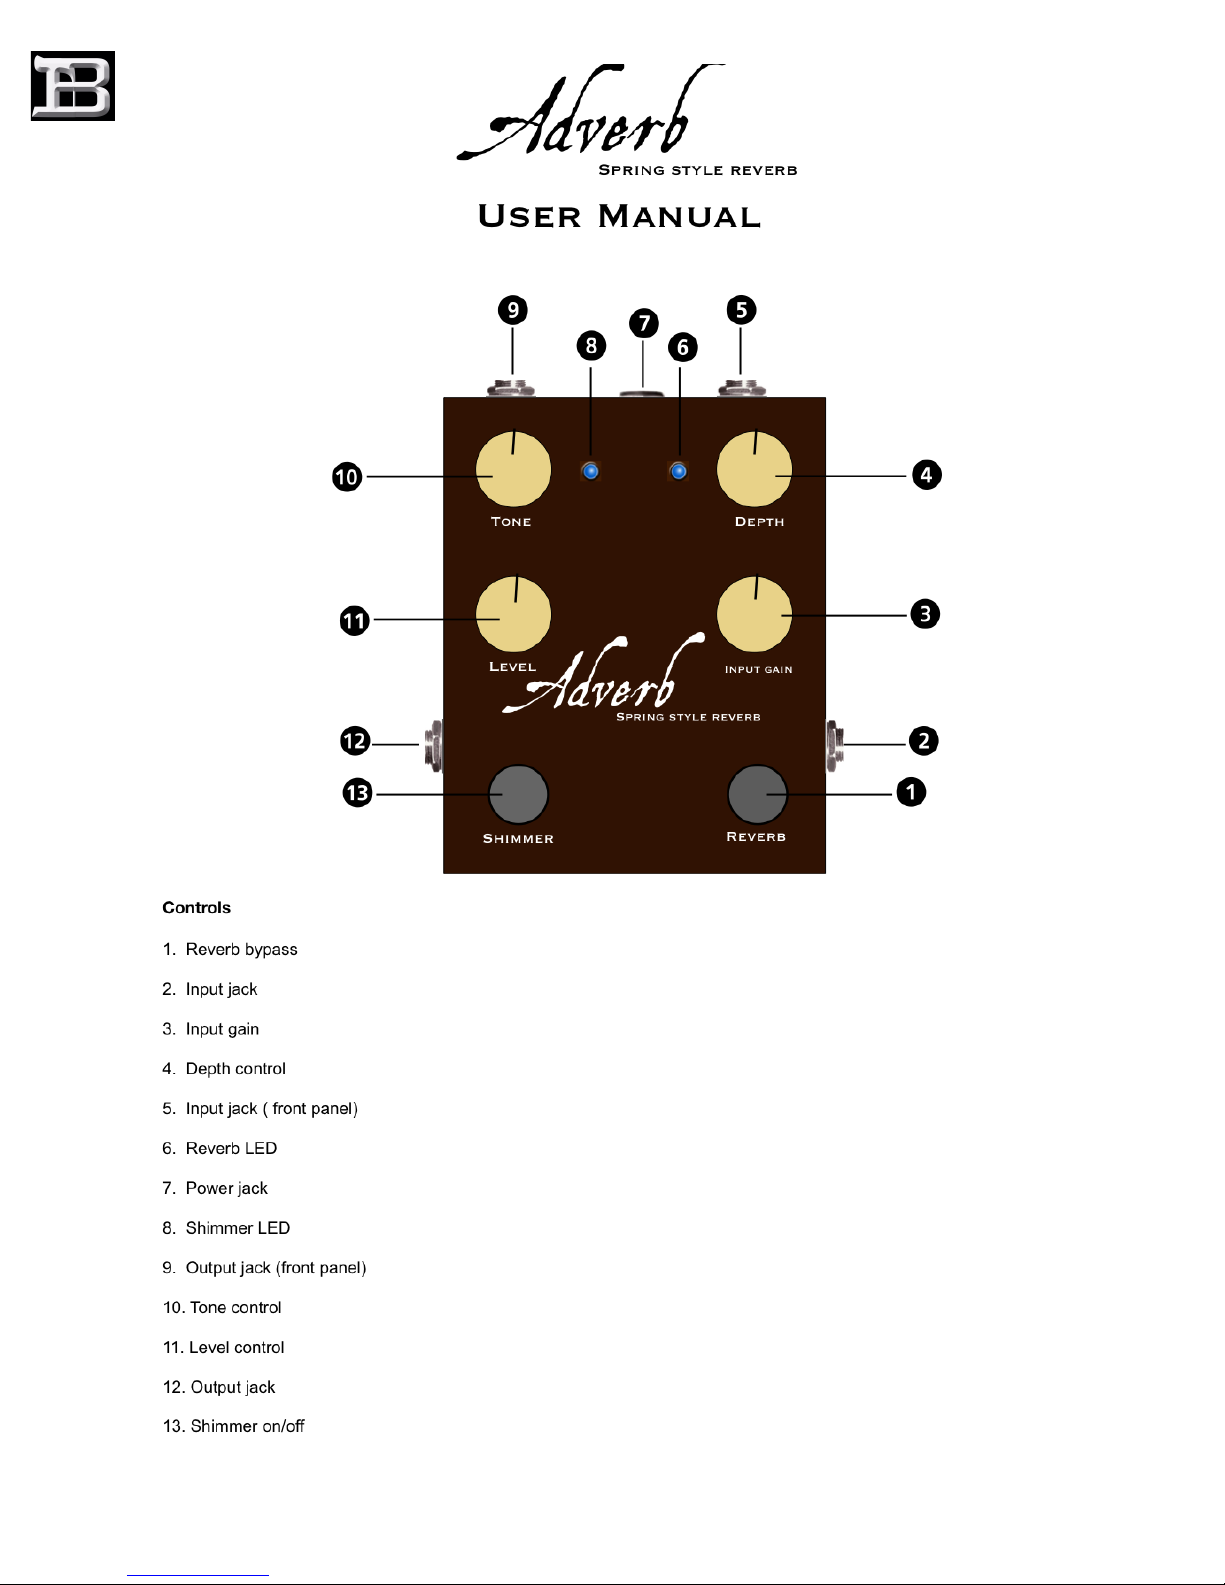
Benado effects
pg. 1

Adverb !
spring style reverb!
!
Thank you for purchasing the Adverb Reverb single unit pedal. In this full manual I will walk you through
all the controls and their uses. I hope you'll find this manual informative and at the same time easy to
read.!
!
Some basic settings are included that will help you understand the functionality of the unit.!
You are welcome to submit your own settings by email and it might find its way to my users settings page
on the website.!
!
Please register your product for warranty. You can do so on my website!
www.benadoeffects.com!
!
Thank you,!
!
Sage Benado.!
!
!
!
Please note: The "Adverb" does not come with a battery due to limited
space.!
Do not use an adaptor with a higher output voltage than the specified 9VDC
center pin negative. An adapter with an AC voltage output should!
never be used with the unit as it will permanently damage the unit.!
I recommend using the Visual Sound 1 Spot 9V DC Power Supply.!
!
!
Warranty!
Warranty is in effect for 2 years from day of purchase. Repairs during this
time will be free of charge due to manufacturing defect and not caused by
the end user. Upon receiving the unit, warranty repairs will be granted
pending inspection of the unit. (There is a 7 day, no questions asked return
policy, beginning on the date you receive your pedal. The cost of shipping
will be at your expense, and any damages caused by end user will be
deducted from the refund.!
Units purchased from a dealer do not qualify for this 7-day no questions
asked policy. If you purchased your pedal from a dealer contact them for
store warranty policies). Any unauthorized modifications to the pedal will
void your warranty. Any damage caused by using the incorrect adapters
mentioned above will void your warranty.!
!
!
!
!
Benado effects
pg. 2

!
!
!
!
!
!
!
!
!
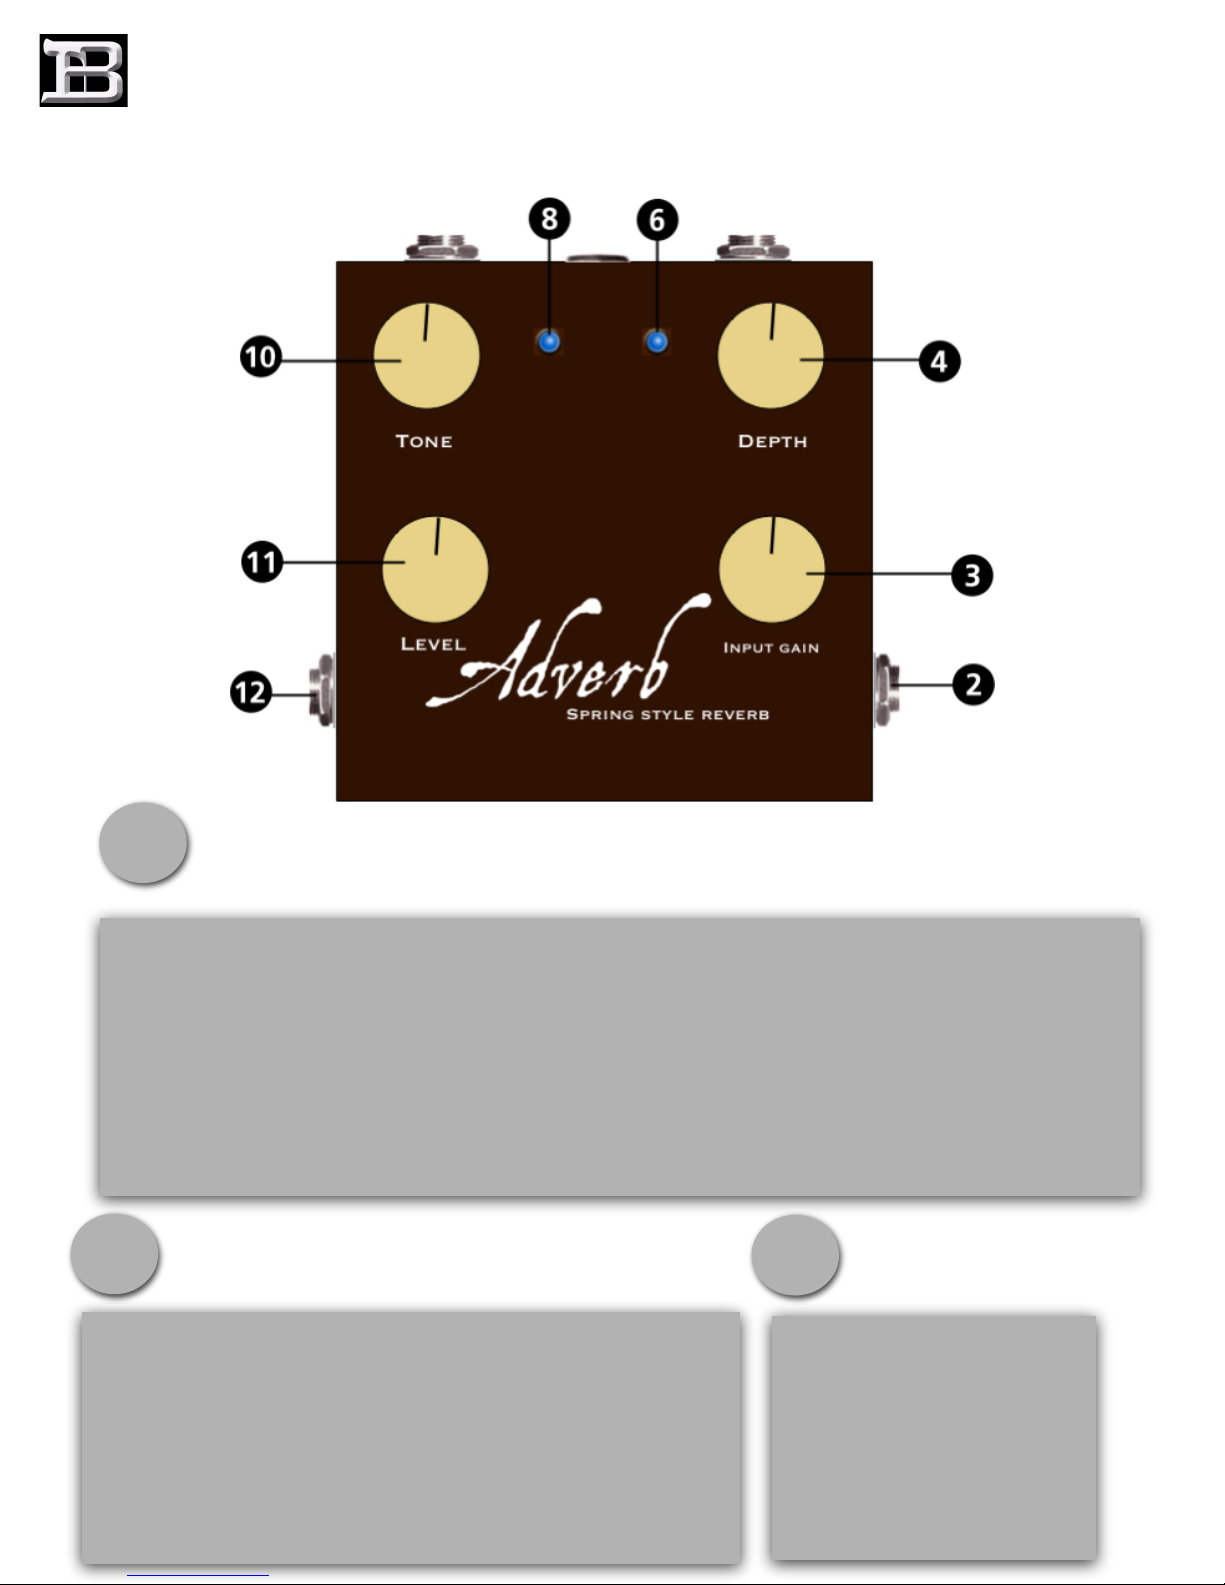
Input
Output
Shimmer
Reverb
The Reverb and Shimmer switches.
The "Adverb reverb comes with two stompswitches. I chose relay switches for
smooth feel and reliability. The Reverb bypass (marked as 1) and the Shimmer
(marked as 13). The Reverb bypass will turn the pedal on or off and turn on the
Reverb effect part of the pedal.!
!
NOTE: if the shimmer is on and the Reverb is off the pedal is in off position.!
If Shimmer is off but the Reverb is on only Reverb can be heard. !
When both are on you will hear Reverb with Shimmer sound blend nicely
together.!
!
The shimmer is a nice warm and subtle chorus-like sound that I was able to
implement into the Adverb. With a few different settings ( see settings page on this
manual), you can get a cool Reverb with chorus sound blended in.!
Benado effects
pg. 3
!
!
!
!
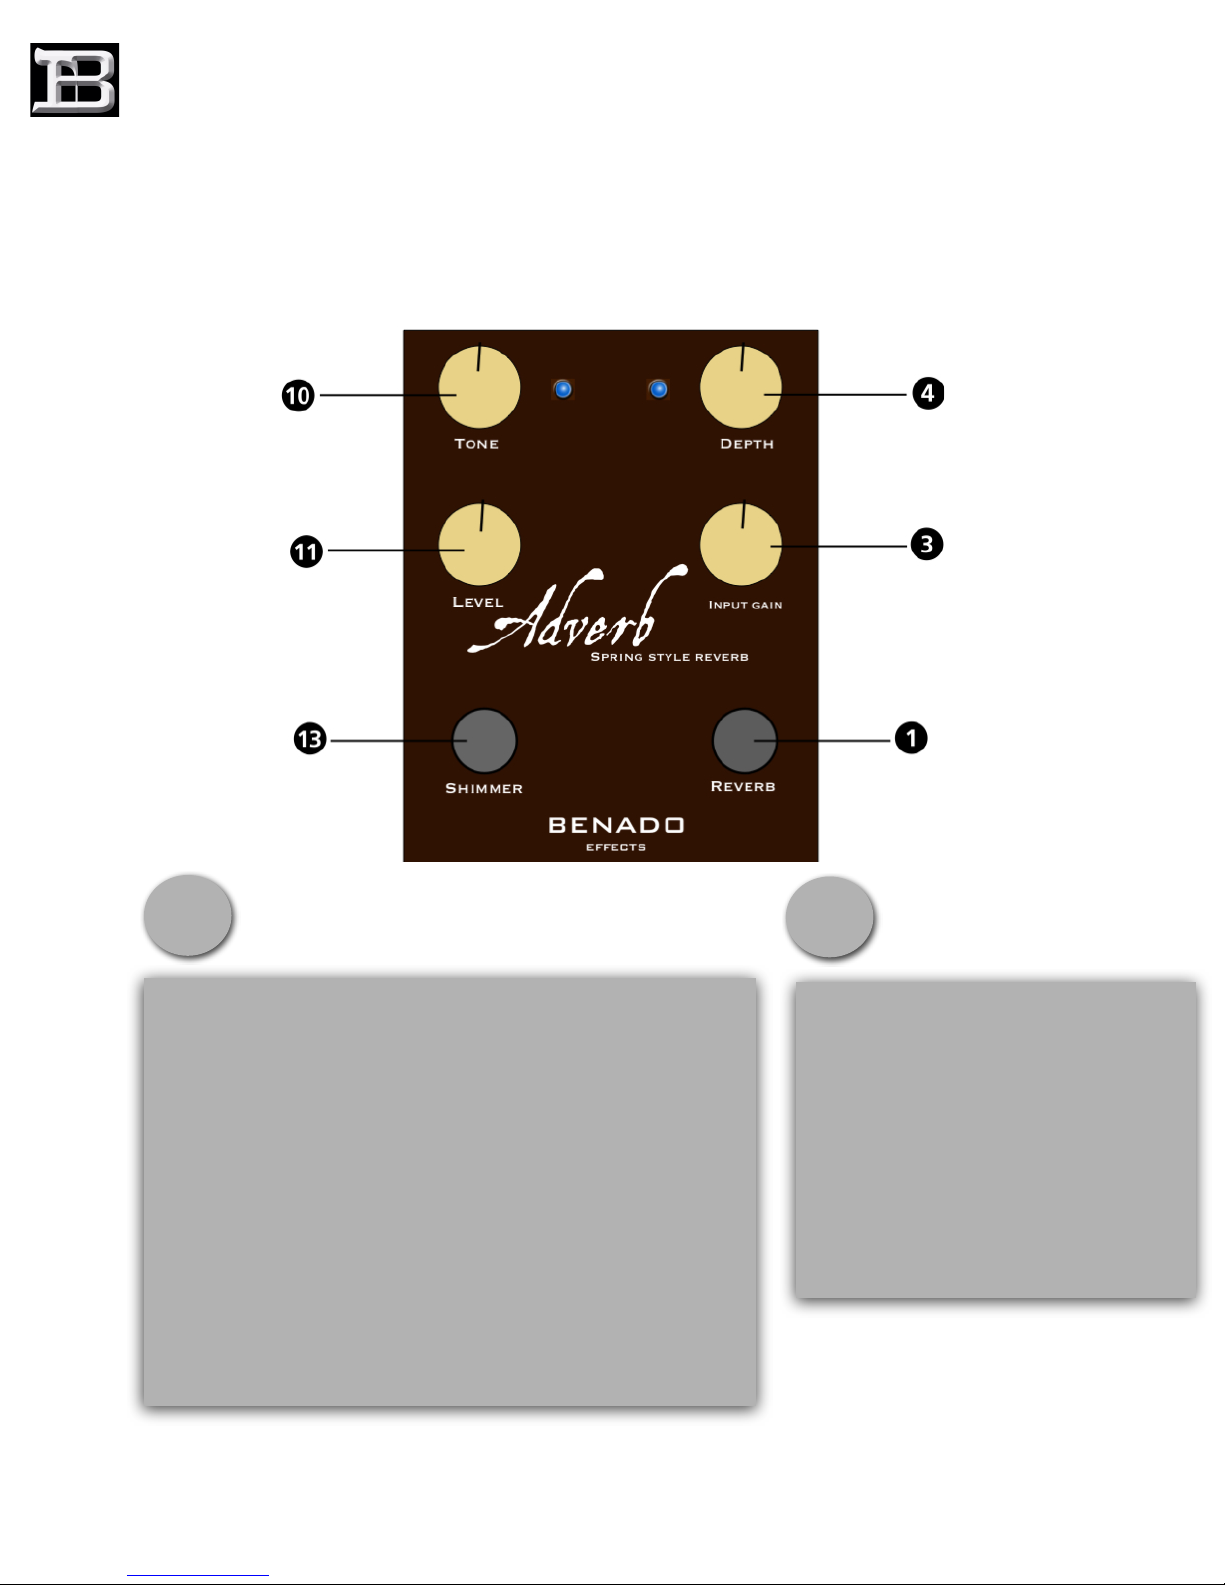
The controls
The controls marked as 3, 4 , 10, 11. !
First let's start with LEVEL control (marked as 11).!
I recommend using the LEVEL control to set your unity signal first. That way you will not lose volume or
increase volume when turning the pedal on.!
Turn all controls to off position (all the way to left) keep TONE (marked as 10) at 12 o'clock and keep
pedal off. Set your guitar to the desired playing volume. Now turn pedal on (mark as Reverb).!
If there is no change in volume than you're are fine. If you feel a slight decrease of volume start turning
the LEVEL knob (marked as 11), and keep turning the pedal on and off till you achieve unity. Now you
can safely use the pedal and never worry about your over all signal volume. ( This is something that was
very important for me when I designed that pedal). !
1
2
Now, when unity is all set while DEPTH (marked as 4) and INPUT
GAIN (marked as 3) are still on the off position, click on REVERB
(mark as 1). !
Now slowly turn the DEPTH control (marked as 4) until achieve
desired REVERB sound.!
The INPUT GAIN (marked as 3) controls the amount of signal
that comes into the chip, and gives you full control of how much of
the "SPRINGS" sound you want to hear. The higher you turn the
INPUT GAIN, the more of the "springs" sound you'll hear.
3
For a warmer and more vintage
type effect you can dial the
TONE, (marked as 10) to 9-10
o'clock.!
For more modern tone and
brighter Reverb tone, turn the
TONE, (marked as 10) above
12 o'clock as desired.
Benado effects
pg. 4
!
!
!
!
!
!
!
!
The shimmer effect
The shimmer effect is something that happened while
working on the pedal and I really liked it. Here is how to use
it correctly for the maximum effect.!
!
While the REVERB (marked as 1) is on turn the INPUT
GAIN (marked as 3) to around 9 o'clock and the DEPTH
(marked as 4) to 10-11 o'clock. Click on the SHIMMER
(marked as 13) and arpeggio a few chords. You'll hear the
REVERB with a CHORUS type of effect that blends in nicely.
You can also play single notes but make sure not to hit the
strings too hard; you will drive the chip and might get too
much of it. But it is all individual taste, and I'm sure you'll be
the judge of your own tone.!
!
NOTE: The SHIMMER has its own dedicated LED letting
you know when it's on.
1
2
For a brighter SHIMMER effect turn the
TONE (marked as 10) up to 12-3
o'clock. !
For a warmer and more vintage sound
turn TONE (marked as 10) to around 9
o'clock. !
Another way of using the SHIMMER
effect with less REVERB is to turn the
INPUT GAIN (marked as 3) to 10-12
o'clock and turn DEPTH (marked as 4)
7-9 o'clock.
Benado effects
pg. 5
Table of contents


