Benchmark 5073-039 User manual

READ ALL INSTRUCTIONS BEFORE FIRST USE.
KEEP THIS MANUAL FOR FUTURE REFERENCE.
KEEP AWAY FROM CHILDREN.
Maximum initial battery voltage (measured without a load)
is 20 volts. Nominal voltage is 18 volts.
WEAR CSA APPROVED
EYE PROTECTION
WEAR EAR
PROTECTION
WEAR A
FACE MASK
E114847
JD5515
Includes 1 battery & 1 charger
5 Year Limited Warranty on tool
3 Year Limited Warranty on battery and charger
20V MAX BRUSHLESS
GRASS TRIMMER
5073-039f EnProdManual P.indd 15073-039f EnProdManual P.indd 1 2020-12-17 1:58 PM2020-12-17 1:58 PM

1
PRODUCT SPECIFICATIONS
GRASS TRIMMER
Head speed 7,600 RPM (no load)
Head type Dual line bump feed system
Head type 0.08"
Cutting swath 12" (30 cm) maximum
Weight 5 lbs 10 oz
BATTERY AND CHARGER
Battery voltage 20 V Max add 4Ah Li-ion (Maximum charged
battery voltage, measured without load, is 20V
with a nominal value of 18V)
Charger Up to 120 minutes
Replacement battery 5350-011
Replacement charger 5350-010
NEED ASSISTANCE?
Call us on our toll- free customer support line:
1-866-349-8665 (Monday through Friday 9am – 5pm Eastern Standard Time)
• Technical questions
• Replacement parts
• Parts missing from package
5073-039f EnProdManual P.indd 15073-039f EnProdManual P.indd 1 2020-12-17 1:58 PM2020-12-17 1:58 PM

5073-039
20V MAX BRUSHLESS GRASS TRIMMER
2
TABLE OF CONTENTS
Product Specications .................................................................................. 1
Table of Contents .......................................................................................... 2
General Safety Warnings ............................................................................... 3
Electric Gardening Tool Safety ....................................................................... 5
Specic Safety Rules ..................................................................................... 7
Battery & Charger Safety.............................................................................. 10
Battery Pack Recycling ............................................................................... 11
Symbols ...................................................................................................... 11
Know your Grass Trimmer ............................................................................ 12
Checking the Battery Charger Status ........................................................... 13
Assembly and Operation ............................................................................. 13
Maintenance ............................................................................................... 23
Exploded View ............................................................................................ 24
Parts List .................................................................................................... 25
Warranty ..................................................................................................... 26
5073-039f EnProdManual P.indd 25073-039f EnProdManual P.indd 2 2020-12-17 1:58 PM2020-12-17 1:58 PM

3
GENERAL SAFETY WARNINGS
IMPORTANT SAFETY INSTRUCTIONS
Read and understand all safety and operational instructions. Failure to follow the
safety rules listed below and other basic safety precautions may result in serious
personal injury. Keep this manual, sales receipts, and applicable warranty forms
for future reference.
SAFETY SYMBOLS
The purpose of safety symbols is to alert you of the potential safety RISKS.
Recognize and understand them. Follow the instructions provided.
SYMBOL MEANING
Failure to obey a DANGER safety alert WILL result in serious personal
injury or death to you or to others. Always obey all messages following
this symbol to reduce the risk of serious personal injury or death.
Failure to obey a WARNING safety alert MAY result in serious personal
injury or death to you or to others. Always obey all messages following
this symbol to reduce the risk of potential serious personal injury or
death.
Failure to obey a CAUTION safety alert MAY result in personal injury
or property damage to you or to others. Always obey all messages
following this symbol to reduce the risk of personal injury or
property damage.
Failure to obey a NOTICE or a CAUTION (without a safety alert)
MAY result in property damage to you or to others. Always obey all
messages following this symbol to reduce the risk of property damage.
ALWAYS WEAR EYE PROTECTION THAT CONFORMS WITH CSA
Z94.3 or ANSI SAFETY STANDARD Z87.1
FLYING DEBRIS can cause permanent eye damage. Prescription
eyeglasses ARE NOT a replacement for proper eye protection.
The usage of a safety standard compliant face shield placed over
proper safety glasses or goggles can reduce the risk of facial injury.
Non-compliant eyewear can cause serious injury if broken during
the operation of a power tool.
Use hearing protection, particularly during extended periods of
operation of the tool, or if the operation is noisy.
WEAR A DUST MASK THAT IS DESIGNED TO BE USED WHEN
OPERATING A POWER TOOL IN A DUSTY ENVIRONMENT.
Refer to Page 7 of this manual for California Prop 65 warnings relating
to hazardous dust particles.
5073-039f EnProdManual P.indd 35073-039f EnProdManual P.indd 3 2020-12-17 1:59 PM2020-12-17 1:59 PM

5073-039
20V MAX BRUSHLESS GRASS TRIMMER
4
SYMBOL MEANING
Always wear non-slip gloves that t properly to protect your hands
and to help you grip the tool.
Always wear sturdy clothing with long sleeves and long pants.
Never operate the tool while wearing shorts, short sleeve shirt or
while shirtless.
Always wear non-slip safety boots to prevent foot injuries and slipping
that could cause loss of control of the tool.
To avoid electrical hazards, re hazards or damage to the tool,
use proper circuit protection.
This tool is wired at the factory for 120 V AC operations.
It must be connected to a 120 V AC, 15 A circuit that is protected by
a time-delayed fuse or circuit breaker. To avoid shock or re, replace
power cord immediately if it is worn, cut or damaged in any way.
WARNING: Ventilation openings in batteries and chargers must
always be open to allow cooling air to circulate freely. Air vents that
are blocked, restricted or covered may result in the battery or charger
overheating. Overheating may lead to damage to the tool or cause a
re, resulting in possible serious injury.
5073-039f EnProdManual P.indd 45073-039f EnProdManual P.indd 4 2020-12-17 1:59 PM2020-12-17 1:59 PM

5
ELECTRIC GARDENING TOOL SAFETY
GENERAL SAFETY WARNINGS
WARNING: Read all safety warnings and all instructions. Failure to follow the
warnings and instructions may result in electric shock, re and/or serious injury.
Save all warnings and instructions for future reference.
General Electric Gardening Tool Safety Warnings – Work Area Safety
Do not operate power tools in explosive atmospheres, such as in the presence
of ammable liquids, gases or dust. Power tools create sparks which may ignite
the liquids, fumes or dust.
Keep children and bystanders away while operating a power tool.
Distractions can cause you to lose control.
GENERAL ELECTRIC GARDENING TOOL SAFETY WARNINGS
– ELECTRICAL SAFETY
Battery charger plugs must match the outlet. Never modify the plug in any way.
Do not use any adapter plugs with earthed (grounded) chargers. Unmodied
plugs and matching outlets will reduce risk of electric shock.
Avoid body contact with earthed or grounded surfaces such as water pipes.
There is an increased risk of electrical shock if your body is earthed or grounded.
Do not expose power tools, battery chargers or batteries to rain or wet
conditions. Water entering the tool, chargers or batteries will increase the risk
of electric shock.
Do not abuse the cord. Never use the power cord for carrying, pulling or
unplugging the charger. Keep the power cord away from heat, oil, sharp edges,
and moving parts. Damaged or entangled cords increase the risk of electric shock.
When operating the charger outdoors, use an extension cord suitable for
outdoor use. Use of a cord suitable for outdoor use reduces the risk of electric shock.
Never operate a power tool in the rain.
If operating a charger in a damp location is unavoidable, use a residual current
device (RCD) protected supply. An RCD is also known as a ground fault circuit
interrupter (GFCI) or earth leakage circuit breaker (ELCB). Use of an RCD
reduces the risk of electric shock.
GENERAL ELECTRIC GARDENING TOOL SAFETY WARNINGS
– PERSONAL SAFETY
Stay alert, be aware of your surroundings, watch what you are doing and use
common sense when operating a power tool. Do not use a power tool while you
are tired or under the inuence of drugs, alcohol, or medication. A moment of
inattention while operating a power tool may result in serious personal injury.
Use personal protective equipment. Always wear eye protection. Protective
equipment such as dust mask, non-skid safety shoes or boots, sturdy gloves,
durable long pants, long sleeve shirt and hearing protection will reduce the risk
of personal injuries.
5073-039f EnProdManual P.indd 55073-039f EnProdManual P.indd 5 2020-12-17 1:59 PM2020-12-17 1:59 PM

5073-039
20V MAX BRUSHLESS GRASS TRIMMER
6
Prevent unintentional starting. Ensure the switches are in the o position
before connecting the battery to the power tool or plugging it into the power
supply. Never pick up or carry the power tool with your nger on the trigger
switch. Carrying power tools with your nger on the switch or energizing power
tools that have the switch on invites accidents.
Remove any adjustment key or wrench before turning the power tool on.
A wrench or a key left attached to a rotating part of the power tool may result
in personal injury.
Do not overreach. Keep proper footing and balance at all times.
This enables better control of the power tool in unexpected situations.
Dress properly. Do not wear loose clothing or jewellery. Keep your hair,
clothing and gloves away from moving parts. Loose clothing, jewellery or long
hair can be caught in moving parts.
Do not force the tool. Use the correct tool for the application. The correct power
tool will do the job better and safer when used at the rate for which it was designed.
Do not use a power tool if the switch does not turn it on or o. Any power tool
that cannot be controlled using the switch is dangerous and must be repaired.
Remove the battery from the power tool or the plug from the power source
before making any adjustments, replacing or repairing parts, cleaning the
tool, leaving the tool idle or unattended, transporting or storing the tool. Such
preventive safety measures reduce the risk of starting the power tool accidentally.
Store idle power tools out of the reach of children and do not allow persons
unfamiliar with the power tool or these instructions to operate the power tool.
Power tools are dangerous in the hands of untrained users.
Maintain power tools. Check for misalignment or binding of moving parts,
breakage of parts and any other condition that may aect the power
tool’s operation. If damaged, have the power tool repaired before use.
Many accidents are caused by poorly maintained power tools.
Use the power tool and accessories in accordance with these instructions,
taking into account the working conditions and the work to be performed.
Use of the power tool for operations dierent from those intended could result
in a hazardous situation.
GENERAL ELECTRIC GARDENING TOOL SAFETY WARNINGS – SERVICE
Have your power tool or charger serviced by a qualied repair person using
only identical replacement parts. This will ensure that the safety of the power
tool or charger is maintained.
5073-039f EnProdManual P.indd 65073-039f EnProdManual P.indd 6 2020-12-17 1:59 PM2020-12-17 1:59 PM

7
SPECIFIC SAFETY RULES
WARNING: Some dust created by power sanding, sawing, grinding, drilling,
and other construction activities contain chemicals known to cause cancer,
birth defects, or other reproductive harm. Some samples of these chemicals are:
• lead from lead-based paints,
• crystalline silica from bricks and cement and other masonry products, and
• arsenic and chromium from chemically treated lumber.
Your risk from these exposures varies, depending on how often you do this type
of work. To reduce your exposure to these chemicals: work in a well-ventilated
area, and work with approved safety equipment, such as those dust masks that
are specially designed to lter out microscopic particles.
WARNING: Know your grass trimmer. Do not plug in the charger or
install the battery onto the grass trimmer until you have read and
understand this Instruction Manual. Learn the tool’s applications
andlimitations, as well as the general and specic potential hazards related
to this tool. Following these instructions will reduce the risk of electric shock,
re or serious injury.
WARNING: Always wear appropriate eye protection. Any power tool can
throw foreign objects into your eyes and cause permanent eye damage.
ALWAYS wear appropriate safety goggles or properly tted safety glasses
that comply with the most recent version of ANSI Z87.1 safety standards. Ordinary
vision or sunglasses generally do not provide adequate impact or side shield / wrap
around penetration protection. Ordinary glasses ARE NOT safety glasses. To reduce
the risk of injury to your face you should also wear a face shield over your safety
goggles or safety glasses.
WARNING: Glasses, goggles or face shields not in compliance with
ANSI Z87.1 or CAN/CSA – Z94.3 could cause serious injury if they break
upon impact.
WARNING: Prevent foot injuries! Never operate when barefoot,
or wearing open toed shoes, or sandals. Always wear sturdy protective
shoes or boots with non-slip soles when operating the grass trimmer.
Steel-toed safety boots are recommended.
WARNING: Protect your hands by wearing heavy-duty, non-slip gloves
and to improve your grip and control when handling the grass trimmer.
Cover as much of your body as possible to help protect you from debris
and pieces of toxic and allergenic plants being thrown by the grass trimmer.
WARNING: Use hearing protection such as ear plugs or ear muers
to protect your hearing, particularly if the grass trimmer is used for extensive
periods or if the surrounding environment of operation exposes the operator
to loud noises. When wearing hearing protection, you will have impaired ability
to hear alarms, warnings and shouts from approaching people or approaching
vehicles. Be extra diligent and observant of hazards and bystanders when wearing
hearing protection devices. When someone approaches, turn the grass trimmer
OFF immediately.
5073-039f EnProdManual P.indd 75073-039f EnProdManual P.indd 7 2020-12-17 1:59 PM2020-12-17 1:59 PM

5073-039
20V MAX BRUSHLESS GRASS TRIMMER
8
WARNING: Never use xed blades or metal saw blades with this
trimmer. Serious injury may result. Never use wire or metal-reinforced line or other
material in place of the polymer trimmer line. Pieces of wire or metal reinforced line
can break o and can be thrown with great force striking against and injuring the
operator or bystanders.
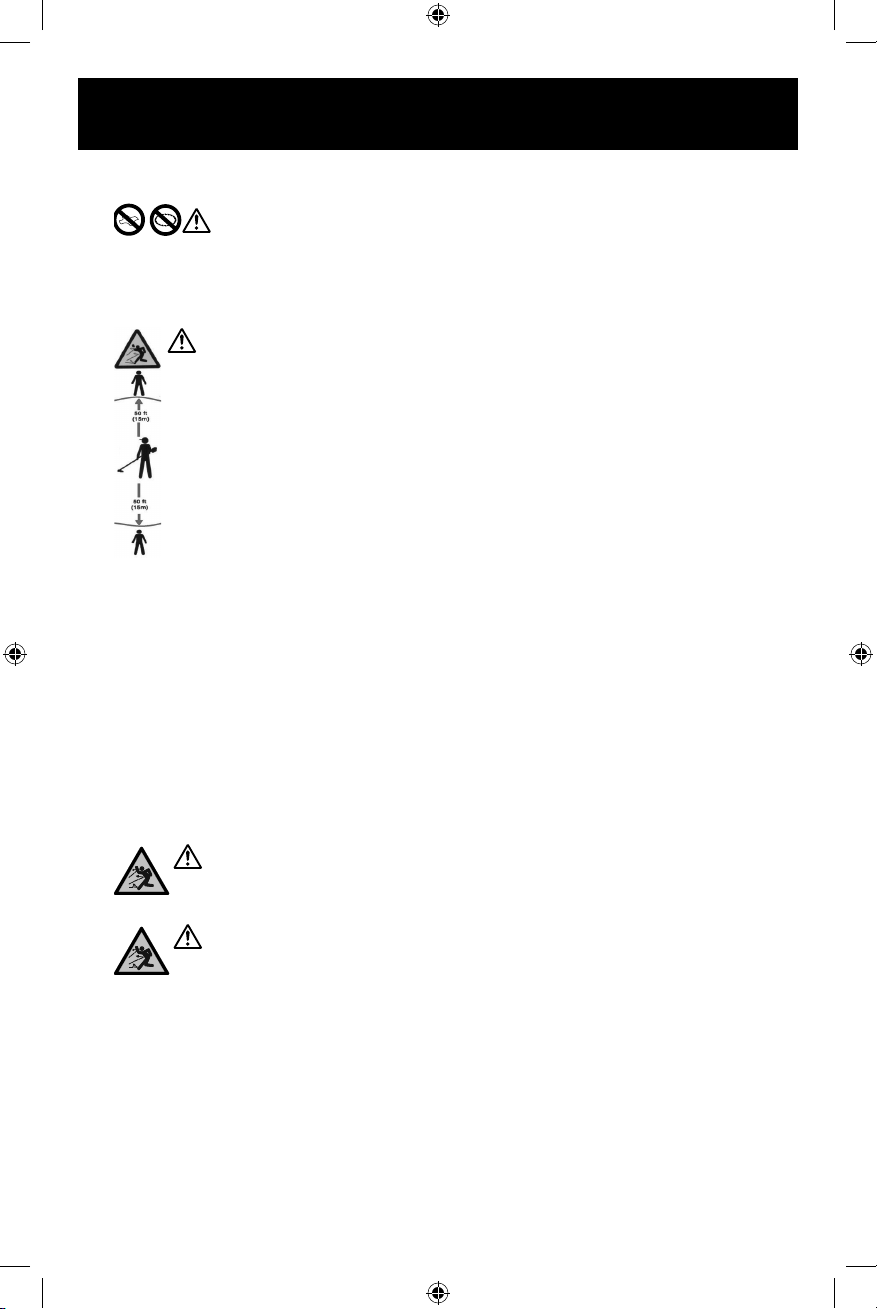
WARNING: The rotating trimmer line and trimmer head will throw
objects and debris violently and the objects and debris will ricochet in all
directions. You or bystanders can be blinded or injured. Keep children,
bystanders, pets and other animals at least 50 feet (15 meters) away from
the operating trimmer. Turn the trimmer OFF immediately if approached,
or if you are approaching such bystanders. Bystanders should be encouraged
to wear eye protection, even if they are kept at a distance. The debris shield
on the trimmer is designed to reduce the danger. The debris shield provided
with your trimmer may not protect the operator or bystanders from all objects
or debris thrown by the rotating polymer line or trimmer.
Thrown objects may also ricochet and strike the operator or bystander. Utilize extra
caution, when the trimmer is being used on paved or hard surfaces, as pieces of
metal, concrete, brick, stones, gravel, sand, glass, sticks and other objects can be
thrown at high speed and force by the rotating line and such objects can be thrown,
skip along or ricochet long distances o of hard surfaces. Do not use this trimmer
for sweeping debris that may contain hard objects, e.g. pebbles, stones, sticks,
glass, metal, etc. as such hard objects can be thrown with great force and cause
injury to the operator or bystanders, and / or damage property, e.g., screens,
windows, building siding, glass doors, or vehicles.
NOTE: Avoid operating the trimmer near property that can be easily damaged
by thrown or ricocheting objects such as screens, windows, building siding, glass
doors and vehicles.
WARNING: To reduce the risk of ricochet / rebound injury or property
damage, work by going away from any nearby solid object such as wall, steps,
large stones, tree, etc. Use great care when working close to solid objects.
WARNING: Inspect the area to be trimmed for hazards before each use.
Remove any foreign objects such as sticks, rocks, broken glass, nails, wire,
tools, toys, etc. which can be thrown by or become entangled in the trimmer
line. Always locate, and then avoid cutting near electrical power lines, power
conduit, or extension power cords. Avoid contacting hard objects with the trimmer
head as the objects can damage the trimmer head and / or the objects can be
thrown causing serious injury.
Use this trimmer only for trimming, scalping, mowing of grass and weeds, and for
light edging of lawns, and for sweeping of only light lawn debris on paved areas.
Do not use this trimmer for brush cutting, pruning or hedge trimming.
Never use this trimmer on gravely or sandy areas.
5073-039f EnProdManual P.indd 85073-039f EnProdManual P.indd 8 2020-12-17 1:59 PM2020-12-17 1:59 PM

9
WARNING: To reduce the potential of serious injury, cut only from your
left toward your right. Cutting on the right side of the deector shield and
moving directionally towards your right will cause the debris and objects to
be thrown predominately away from the operator thereby reducing the risk of
personal injury to the operator, although the risk of injury due to ricochet is not
lessened. Whereas cutting on the left-side of the deector shield or moving
directionally towards your left will cause for comparatively more debris to be thrown
towards the operator thereby increasing the risk of personal injury.
Hold the trimmer rmly with both hands to ensure proper control.
Never operate the trimmer with one hand.
Keep the trimmer head below waist level and away from all parts of your body.
Do not draw the trimmer head towards your feet or legs.
WARNING: Always remove the battery pack when making adjustments,
changing accessories, replacing the trimmer line, removing or untangling debris,
leaving the tool idle or unattended, cleaning, servicing, storing or transporting the
tool. Such preventive measures reduce the risk of starting the tool accidentally and
causing serious injury. Never use the trimmer with the guard removed, damaged or
incorrectly positioned. Serious injury may result. Maintain rm footing and balance
at all times. Do not overreach or use the trimmer from unstable surfaces such as
ladders, trees, steep slopes, slippery surfaces, rooftops, etc. Use only in daylight or
in good quality articial light. Inspect the trimmer head before each use. If any parts
are worn or damaged, replace them before using the trimmer. Only use the 0.08"
line size for the trimmer. Use of any other type could result in serious injury. Never
use the trimmer for anything other than its intended purpose. Use for anything other
than trimming grass and weeds can be dangerous. It may also damage the trimmer.
WARNING: Dust created by use of this product may contain chemicals known
to the State of California and medical experts to cause cancer, respiratory injuries,
birth defects or other reproductive harm. Some examples of these chemicals are:
• Compounds in fertilizers
• Compounds in insecticides, herbicides and pesticides
• Arsenic and chromium from chemically treated lumber.
• Commercial and household chemicals.
To reduce your exposure to these chemicals, wear approved safety equipment such
as dust and / or vapor masks that are specically designed to lter out microscopic
particles or gaseous components. Additionally, dust created by these products
may contain allergens, bacteria and viruses, PM 10 and / or PM 2.5 particulates,
exposure to such hazardous airborne matter can be reduced by wearing approved
safety equipment such as dust masks that are specically designed to lter out the
microscopic particles.
WARNING: Breathing asbestos or dust with silica in its composition may
contain hazardous crystalline silica. Silica is a fundamental component of sand,
quartz, brick, clays, granite and many other materials and rocks, including masonry,
concrete and cement products. Such crystalline silica dust is dangerous and must
be avoided, as it can cause severe or fatal respiratory illness or cancer.
5073-039f EnProdManual P.indd 95073-039f EnProdManual P.indd 9 2020-12-17 1:59 PM2020-12-17 1:59 PM

5073-039
20V MAX BRUSHLESS GRASS TRIMMER
10
BATTERY & CHARGER SAFETY
WARNING: Only use the diagnostic charger supplied with this kit to charge
the 20V Li-ion battery. Charging any other batteries may damage the charger and
possibly cause serious injury.
Do not store or carry the battery in a manner in which metal objects could contact
the exposed metal end. Do not place the battery in aprons, pockets, drawers, etc.
with loose nails, screws, keys etc. The battery could short circuit causing a re,
personal injury or damage to the battery.
Never attempt to open the battery for any reason. If the housing of the battery
breaks or cracks, immediately discontinue use and do not recharge.
Do not charge the battery if it is wet or shows any evidence of corrosion.
A small leakage from the battery may occur under extreme usage, charging or
temperature conditions. This does not indicate a failure. However, if the outer
seal is broken and this leakage gets on your skin, follow these steps:
1. Wash immediately with soap and water.
2. Neutralize with a mild acid such as lemon juice or vinegar.
3. If liquid gets into your eyes, ush immediately with clean water for a minimum
of 10 minutes and seek medical attention.
NOTE: The battery liquid is slightly acidic.
Do not incinerate the battery. It can explode in a re.
Do not use an extension cord. Plug the charger cord directly into an electrical outlet.
Use the charger only in a standard 120V, 60 Hz electrical outlet.
Do not use the charger in wet or damp conditions. It is intended for indoor use only.
Do not use the charger near sinks or tubs. Do not immerse the charger in water.
Do not allow the cord to hang over the edge of a table or counter or touch hot
surfaces. The charger should be placed away from sinks and hot surfaces.
Do not use the charger to charge any batteries other than the grass trimmer
batteries. Other batteries may explode.
Do not operate charger if the cord or plug is damaged. Replace the damaged cord
and plug immediately.
Do not operate the charger if it has received a sharp blow, been dropped or
otherwise damaged in any way. Have a qualied technician examine the charger
and repair it if necessary. Do not disassemble the charger.
Do NOT charge the batteries when the work area or the battery temperature
is at or below 0°C (32°F) or above 45°C (113°F).
Unplug the charger when not in use and before cleaning or maintenance.
5073-039f EnProdManual P.indd 105073-039f EnProdManual P.indd 10 2020-12-17 1:59 PM2020-12-17 1:59 PM

11
BATTERY PACK RECYCLING
To preserve our natural resources, please recycle or dispose of
batteries properly. The batteries charged by this charger may contain
chemicals and metals that are harmful to the environment. Never
dispose of rechargeable batteries in your normal household garbage
or in landll sites as they will add to the pollution of the environment.
SYMBOLS
WARNING: Some of the following symbols may appear on the grass trimmer.
Study these symbols and learn their meaning. Proper interpretation of these
symbols will allow for more ecient and safer operation of this tool.
VVolts
AAmperes
Hz Hertz
WWatts
HHours
Direct current
Alternating or direct current
Warning symbol
Shock hazard
Striking hazard
Keep bystanders back
at least 50' (15 m)
Read the manual
Wear safety glasses
Wear safety goggles
Wear full-face shield
Wear hearing protection
Wear breathing protection
Wear safety gloves
Wear safety boots
No xed blades
No saw blades
Risk of re
This symbol designates that this tool is listed with U.S. requirements
by ETL Testing Laboratories, Inc.
Conforms to UL Std. 82.
Certied to CAN/CSA STD C22.2 NO. 147.
5073-039f EnProdManual P.indd 115073-039f EnProdManual P.indd 11 2020-12-17 1:59 PM2020-12-17 1:59 PM

7
6
5
8
9
4
2
1
3
5073-039
20V MAX BRUSHLESS GRASS TRIMMER
12
KNOW YOUR GRASS TRIMMER
1. Bump knob
2. Guard
3. Hinge
4. Assist handle
5. Lock o switch
6. Battery release button
7. Battery 5350-011
8. Main handle
9. Variable speed trigger switch
Battery 5350-011
Air vents
Red LED
Green LED
Battery Charger
5350-010
5073-039f EnProdManual P.indd 125073-039f EnProdManual P.indd 12 2020-12-17 1:59 PM2020-12-17 1:59 PM

13
CHECKING THE BATTERY CHARGER STATUS
The level of charge remaining in the battery can be checked by using the battery
LED power indicator that is contained on the end of the battery.
NOTE: The battery charge remaining may be checked while the battery is installed
in the tool with the ON/OFF switch turned OFF. It may also be checked while the
battery is removed from the tool. DO NOT check the battery charge remaining while
the battery is in the charger.You will get a false reading
and you may also damage the battery status system.
1. Press and hold the battery status button
located on the end of the battery.
2. One or more of the Four LED lights in the LED
window will come ON to indicate the amount of
charge that is remaining in the battery as follows:
Charge level
indicator
Amount of charge
remaining 10-25% 25-50% 50-75% 75-100%
3. Release the battery status button to turn the LEDs OFF.
ASSEMBLY AND OPERATION
CHARGING THE BATTERY PACK
1. Place the battery charger (1) in a dry location near a 110–120V 60 Hz
electrical outlet (Fig. 2).
2. Plug the battery charger into the outlet and make sure the green LED
indicator light (5) comes ON. If it does not, refer to the chart (Fig. 3)
to identify the problem.
3. Turn the battery (2) upside down and slide it onto the charger.
NOTE: Make sure the grooves (3) in the sides of the battery slide over the
matching tabs on the charger (4) until the battery latch “clicks” into place.
NOTES:
1. When the charger is plugged into the wall receptacle and NO battery
is on the charger, the green indicator light (5) will turn ON indicating the
charger is “live”.
2. When a discharged battery is installed on the charger, the green indicator light
will turn OFF and the red indicator light (6) will turn ON. The red indicator light
indicates the battery is being charged.
3. If the red indicator light does not come ON, check to make sure battery pack
is slid fully onto the charger and the electrical outlet is working properly.
4. See Fig. 3 below for other indicator light functions.
5. A discharged battery pack should be fully charged in approximately 2 hrs.
5073-039f EnProdManual P.indd 135073-039f EnProdManual P.indd 13 2020-12-17 1:59 PM2020-12-17 1:59 PM

3
2
4
1
5073-039
20V MAX BRUSHLESS GRASS TRIMMER
14
6. It is normal for the battery charger to hum and be warm to the touch
during operation.
7. If the battery pack does not charge properly, check to make sure the electrical
outlet is “live”.
8. Do NOT charge batteries when the work area or the battery temperature
is at or below 5°C / 41°F or above 40.5°C / 105°F.
INSTALLING A BATTERY ON THE BRUSHLESS GRASS TRIMMER
1. Remove the discharged battery (1) from the brushless grass trimmer by pressing
downward on the battery release button (2) and sliding the battery backward
until it is removed from the brushless grass trimmer port (3) (Fig. 4).
2. Slide the fully charged battery onto the matching keys (4) in the brushless grass
trimmer port (3) where the discharged battery has been removed.
GREEN
LIGHT
RED
LIGHT
BATTERY
INSERTED
INTO CHARGER
CHARGING STATUS
ON OFF NO Charger connected
to power supply
OFF Blink YES Battery being
charged
ON OFF YES Battery fully charged
OFF ON YES Battery is charged
but not operational
on tool. This may
indicate defective /
bad contact
on battery.
ON ON YES Charging conditions
are either too hot
or too cold
FIG. 2 FIG. 3
FIG. 4
NOTE: Make sure the slots in the
battery are fully engaged with the
mounting keys in the brushless grass
trimmer port (3) . The battery release
button will “click” into place when the
battery is fully installed.
WARNING: Do not immerse the battery
pack in water. Sudden cooling could
cause a hot battery to explode or leak.
5073-039f EnProdManual P.indd 145073-039f EnProdManual P.indd 14 2020-12-17 1:59 PM2020-12-17 1:59 PM

12
1
15
BEFORE OPERATING TRIMMER-UNFOLD THE TOOL SHAFT:
1. Remove battery pack from trimmer.
2. Remove screw from shaft Fig. 5 (1).
3. Unfold the shaft.
4. Insert the screw into the shaft Fig.6
(1) and then tighten the screw with the Allen key supplied Fig. 6
(2) to lock the shaft into place.
5. Re-insert battery.
INSTALLING THE GUARD
WARNING: The guard must be installed before installing the battery pack
in the tool. Serious injury may result if the tool is turned ON without the
guard in place.
1. Place the tool on its back on a clean work surface (Fig. 7a).
2. Slide the guard in the direction as indicated by the arrow (1).
NOTE: Make sure the trimmer line (2) is not trapped between the guard mount
and the guard.
Install 2 screws into the matching holes (3) in the motor housing.
3. Tighten screw using a #2 Screwdriver.
4. NOTE: Do not over tighten the screws.
You will strip the threads in the motor housing.
FIG. 5
FIG. 7a
FIG. 6
3
1
2
5073-039f EnProdManual P.indd 155073-039f EnProdManual P.indd 15 2020-12-17 1:59 PM2020-12-17 1:59 PM

5073-039
20V MAX BRUSHLESS GRASS TRIMMER
16
ADJUSTING THE TRIMMING LINE
The trimmer head allows the operator to release more cutting line without stopping
the motor. As line becomes frayed or worn, additional line can be released by lightly
tapping the bump knob on the ground while operating the trimmer.
For best results, tap the bump knob on bare ground or hard soil as Figs. 8 & 9.
The motor may overheat if line release is attempted in tall grass.
LINE TRIMMING KNIFE
It is important to limit the length of trimming lime that is exposed outside the
trimmer spool. The line trimming knife will automatically cut the exposed line at
the correct length that will produce a 12" (30.5 cm) cutting diameter. This is the
optimum line length to produce both ecient cutting action and to provide the
longest battery life. The motor may overheat if line release is attempted in tall grass.
Adjusting the Assist handle (Fig.7b).
NOTE: The assist handle mounting bracket can be slid up or down the shaft,
rotated from side to side or tilted forward or backward to place the assist handle
in the most comfortable position. Turn locking lever(1) before adjusting the assist
handle position and retighten it to lock the assist handle in the new position.
FIG. 8
FIG. 7b
FIG. 9
1
1
5073-039f EnProdManual P.indd 165073-039f EnProdManual P.indd 16 2020-12-17 1:59 PM2020-12-17 1:59 PM

17
LOCK-OFF AND TRIGGER SWITCHES
The grass trimmer is equipped with both a lock-o and trigger switch.
To turn the grass trimmer ON:
1. Press the lock-o switch (2) Fig. 10.
2. While continuing to press the lock-o switch, squeeze the variable speed trigger
switch (1).
3. The variable speed trigger switch delivers higher speed with increased trigger
pressure/lower speed with decreased trigger pressure.
4. When the grass trimmer starts, release the lock-o switch while continuing to
squeeze the variable speed trigger switch. The grass trimmer will continue to
run. To turn the grass trimmer OFF, release the variable speed trigger switch.
NOTE: To restart the grass trimmer, press the lock-o switch and squeeze the
variable speed trigger switch.
REMOVING THE TRIMMER LINE SPOOL
WARNING: Remove the battery from the tool before attempting to replace the
trimmer line spool.
1. Press the spool locking buttons (1) & (2) on
either side of the spool housing (2) (Fig. 11).
NOTE: There are two spool locking buttons
located on opposite sides of the spool housing.
variable speed trigger switch.
2. While pressing both spool locking buttons,
pull the spool cap (3) out of the spool housing
(Fig. 12).
3. Pull the empty spool (4) upward to remove the
spool and any remaining trimmer line from the
spool housing (Fig. 13).
4. Once the empty spool has been removed from
the spool housing, use a soft brush to remove
any debris from the spool housing.
FIG. 10
FIG. 11
1
2
1
2
5073-039f EnProdManual P.indd 175073-039f EnProdManual P.indd 17 2020-12-17 1:59 PM2020-12-17 1:59 PM

5073-039
20V MAX BRUSHLESS GRASS TRIMMER
18
INSTALLING THE REPLACEMENT SPOOL
Remove all packaging from the replacement spool.
1. Pull the loose ends of the
trimmer lines out of the
retaining slots in the spool.
NOTE: Be sure to feed the
lines into the notches on each
side of the outer face of the
spool to prevent them from
unwinding. Ensure you remove
both lines from the notches
before feeding the lines into the
eyelets on the spool housing.
2. Unwind approximately 5" (12.7 cm) of the line from the spool before
threading the loose end of trimmer lines through the respective eyelets
in the spool housing.
3. While holding pull slightly on the loose lines, slide the spool onto the housing
spindle as far as it will go.
4. Once the replacement spool is fully inserted into the spool housing, replace the
spool cap by inserting the locking buttons into the spool housing.
5. Press the spool cap fully into the spool housing until the locking buttons “click”
into the matching holes in the spool housing.
6. Bump line out as necessary.
MANUAL INSTALLING AND WINDING NEW LINE ON SPOOL
1. Remove all packaging from the replacement spool. NOTE: There may be shrink
wrap holding the trimmer line in place on the replacement spool. This must be
removed, but be sure to hold the line in place with your ngers to prevent it from
unwinding from the spool.
2. Press the two release tabs on the spool base and remove the spool retainer
by pulling it straight out (FIG 14).
3. Remove the spool. Use a clean cloth to clean the inner surfaces of the spool
retainer and spool base.
4. Check the spool retainer, spool, and spool base for worm parts.
5. Take approximately 15'(4.5 m) of 0.08"(2.0 mm) diameter cutting line. Fold the
line in half and then adjust it so that one end is 4 1/2"(11 cm) longer than the
other (FIG 15).
6. Hold the folded end of the cutting line onto either of the slots in the spool.
7. Wind the line, in two even and tight layers, onto the spool. Wind the line in the
direction indicated on the spool.
8. Place the ends of the line in the two opposite notches in the spool, with
approximately 5"(12.5 cm) protruding from each side (FIG 16).
FIG. 12 FIG. 13
5073-039f EnProdManual P.indd 185073-039f EnProdManual P.indd 18 2020-12-17 1:59 PM2020-12-17 1:59 PM

Tal
4 1/2”
(11 CM)
5”(12.5 cm)
19
FIG. 14
FIG. 16
FIG. 18
FIG. 15
FIG. 17
FIG. 19
9. Align the notches of the spool from which the lines protrude with the eyelets in the
spool retainer and position the spool in the retainer (FIG 17).
10. Holding the spool and spool retainer, grasp one end of the line and pull it to
release the line from the notch in the eyelet (FIG 18). Repeat with the other end.
11. With the spool base facing downward, align the slots in the spool retainer with
the tabs on the spool base and press the retainer evenly down until it snaps into
place (FIG. 20).
5073-039f EnProdManual P.indd 195073-039f EnProdManual P.indd 19 2020-12-17 1:59 PM2020-12-17 1:59 PM
Table of contents
Popular Trimmer manuals by other brands

Core Outdoor Power
Core Outdoor Power CPL 410 instruction manual

hillvert
hillvert HT-FORBES-27T user manual

Poulan Pro
Poulan Pro 545154698 instruction manual

Pulsar
Pulsar PTG1022H Operator's manual

Briggs & Stratton
Briggs & Stratton Snapper 7800958 instruction manual

Hitachi
Hitachi CG 36DL Handling instructions