BeneCheck Uni BSG010-1 User manual

C5 K45
C100 M70 K30
User’s Manual
General Life Biotechnology Co., Ltd.
5F., No. 240, Shinshu Rd.,
Shin Juang Dist.,
New Taipei City 242, Taiwan
TEL : +886-2-22053698
FAX : +886-2-22080779
MDSS GmbH
Schiffgraben 41
30175 Hannover, Germany
Doc.#: FIG-540BNK0ADXA-3 Jan, 2019
⢥埮㜨埮㜨♐▜䯀
),*%1.$';$%1.$';$手冊,Uni,BSG01D-1,四國[PP
㏚⌙ⶐ棱ĻġĹıő桹搔虇ᾙ㷃ㆶ⋘㏚⌙⋶榐Ļġķıő懢㤦
BSG010-1ҷBSG01D-1
Self-Testing
Uni Blood Glucose Monitoring System
C100 M45
CCXXxxLPyyyZz

BeneCheck Meter Kit Meter (Front Side & Back Side) / BeneCheck Messgerät
Messgerät (Vorderseite & Rückseite) / Kit Medidor BeneCheck Medidor (Parte delantera y
parte trasera) / Kit de l’Appareil BeneCheck Appareil (Face Avant et Face Arrière)
LCD Screen
LCD-Display
Pantalla LCD
Écran LCD
Right “S” Button
Rechte S-Taste
Botón “S” Derecha
Bouton “S” droit
Test Port
Test-Port
Puerto de análisis
2UL¿FHGH7HVWBattery
Batterie
Batería
Pile
Battery Lid
Batterieabdeckung
Tapa de batería
Couvercle de la pile
Meter Label
Messgeräteetikett
Etiqueta de medidor
Étiquette de l’Appareil
Left “M” Button
Linke M-Taste
Botón “M” Izquierda
Bouton “M” gauche
Serial Number Sticker
Seriennummer
Pegatina de número de serie
Vignette du Numéro de Série
Doc.#: FIG-511BNK0AEQA-2 Jan, 2019
Uni Blood Glucose Meter
Model: BSG01D
General Life Biotechnology Co., Ltd.
5F., No. 240, Shinshu Rd.,Shin Juang Dist.,
New Taipei City 242,Taiwan
Battery:1.5V AAAx2
Self-Testing
CCXXxxLPyyyZz
LR03 or R03
FCC ID:2AKJC-17PN005

Alert Tones: • Normal Alert: a short “beep”
• Warning Alert: 3 short “beeps”
7XUQLQJ2Q2ϑDORQJ³EHHS´Alarmtöne: • Normaler Alarm: ein kurzer “Piep”
• Warnalarm: 3 kurze “Piepser”
• An-/Ausschalten: ein langer “Piep”
Tonos de alerta: • Alerta normal: un pitido corto
• Alerta de advertencia: 3 pitidos cortos
• Encender/ Apagar: un pitido largo
Tonalités d’Alerte : • Alerte Normale: un “bip” court
• Alerte de Mise en Garde: 3 “bips” courts
• Marche/ Arrêt: un “bip” long
LCD Screen Display: Information and test result display
LCD-Displayanzeige: Anzeige von Informationen und Testergebnissen
Visualización de pantalla LCD: Visualización de información y resultados de prueba
$ϒFKDJHGHO¶eFUDQ/&'$ϒFKDJHGHO¶LQIRUPDWLRQHWGXUpVXOWDWGHWHVW①②③④⑤⑥⑦⑧⑨Result Area / Messergebnisse/ Zona de resultado/
=RQHGX5pVXOWDWCode Number Icon / Codenummersymbol / Icono de
FyGLJRQXPpULFR,F{QHGH1XPpURGH&RGHLow Battery / Schwache Batterie / Batería baja /
Batterie Faible
Average (GLU) / Durchschnitt (GLU) / Media (GLU) /
Moyenne (GLU)
8QLW,FRQ(LQKHLWVV\PERO,FRQRGHXQLGDG,F{QHG¶8QLWpBlood Loading Icon / Blutentnahmesymbol / Icono
de sangre cDUJDQGR,F{QHGH&KDUJHPHQWGX6DQStrip Loading Icon / Streifenbeladungssymbol /
,FRQRGHWLUDFDUJDQGR,F{QHGH&KDUJHPHQWGHODBandelette
Memory Mode Icon /Speichermodussymbol / Icono
dHPRGRGHPHPRULD,F{QHGH0RGH0pPRLUHSystem Check, Data upload successful /
Systemüberprüfung, Daten-Upload war erfolgreich
/ Control del sistema, Subida de datos correcta
9pUL¿FDWLRQGX6\VWqPH7pOpFKDUJHPHQWGHVGRQQpHVUpXVVLBluetooth on / Bluetooth an / Bluetooth activado /
%OXHWRRWKDFWLYp⑩
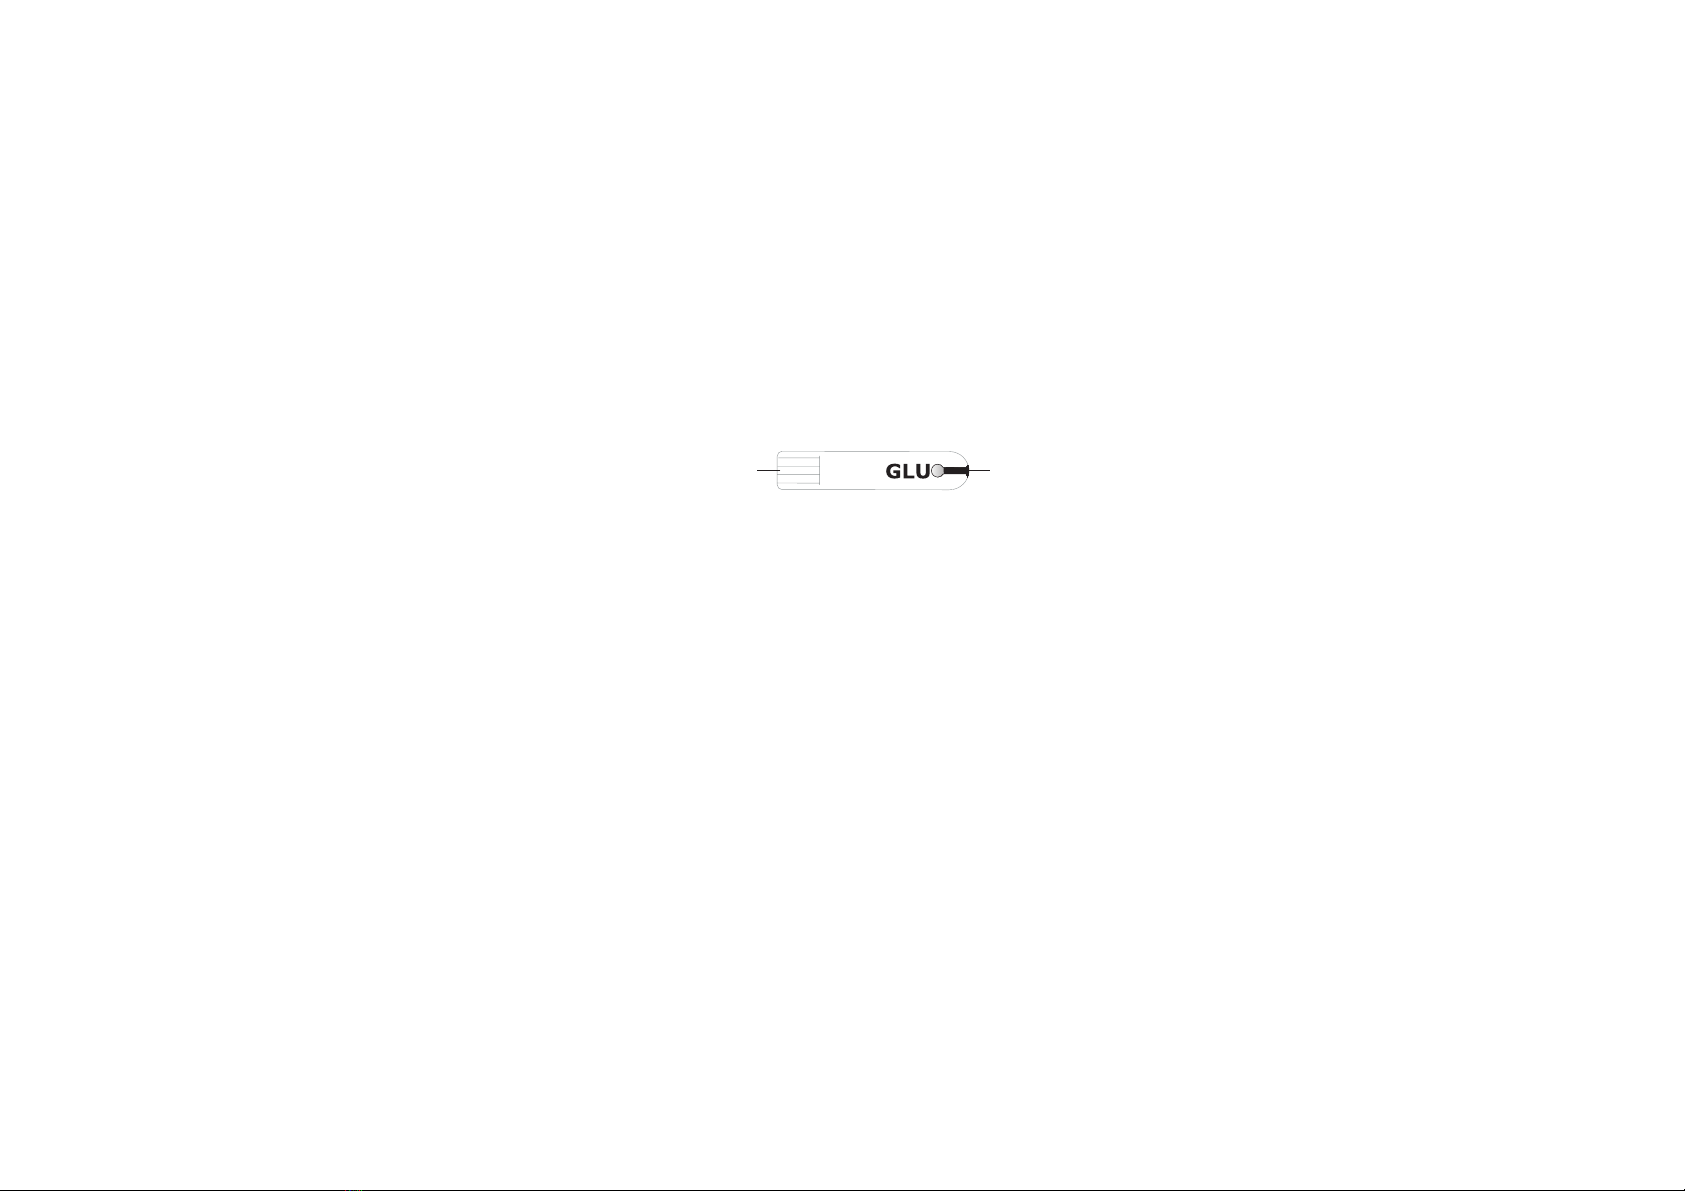
Test Strip / Teststreifen / Tira reactiva / Bandelette de Test:
GLU- Glucose / Glucose / Glucosa / Glucose
Electronic Contact Bars
Elektronische Kontaktleisten
Rodillos de contacto electrónicos
Barres de Contact Electroniques
Sample Inlet
Probeneinlass
Entrada de muestra
Entrée de l’échantillon

Labelling and Information / Etikettierung und Informationen / Etiquetado e información/
Etiquetage et Information
•
Caution, consult accompanying documents
•
Vorsicht, Begleitdokumente lesen
•
Cuidado, consulte los documentos adjuntos
•
Attention, consulter les documents joints
• Do not re-use • Nicht wiederverwenden
• No reutilizar •1HSDVUpXWLOLVHU• Keep dry • Trocken halten
• Mantener seco • Garder au sec • Operation temperature limitation
•
Temperaturbegrenzung Arbeitsbereich
•
Límite de temperatura de funcionamiento
•
7HPSpUDWXUHGH)RQFWLRQQHPHQW/LPLWpH
•
In-vitro diagnostic
•
In-Vitro-Diagnostik
• Diagnóstico in vitro •
Diagnostic In-vitro
• Lot number • Chargennummer
• Número de lote • 1XPpURGHORW&(FHUWL¿FDWLRQ&(=HUWL¿NDW&HUWL¿FDGR&(&HUWL¿FDWLRQ&(•
Read instructions
•
Anweisungen lesen
•
Leer instrucciones
•
Lire les instructions
• Storage & Transportation Condition
•
Temperaturbegrenzung Lagerung und Transport
•
Condiciones de almacenamiento y transporte
• Condition de Transport et de Stockage
• Use by • Verwenden bis
• Fecha de caducidad • Utiliser avant
•
EU Representative
• EU Repräsentant
• Representante UE •
5HSUpVHQWpGDQVO¶8(• Date of Manufacture • Herstellungsdatum
• Fecha de fabricación • Date de fabrication
• Manufactured by • Hersteller
• Fabricado por • )DEULTXpSDU• Keep away from sunlight
• Vom Sonnenlicht fernhalten
• Mantener alejado de la luz solar
•&RQVHUYHUjO¶DEULGHODOXPLqUHOperation
90%
10%
Storage &
Transportation
• Serial number • Seriennummer
1~PHURGHVHULH1XPpURGHVpULH¶•
Storage & Transportation Relative Humidity
•
Lagerung & Transport Relative Luftfeuchtigkeit
•
Humedad relativa de almacenamiento y transporte
•
+XPLGLWp5HODWLYHSRXUOH7UDQVSRUWHWOH6WRFNDJH
Storage &
Transportation
4
•
Comply with WEEE Directive 2012/19/EU
•
Entspricht der WEEE Richtlinie 2012/19/EU
•
Eento con la Directiva WEEE 2012/09/EU
•
Conforme à la Directive DEEE 2012/19/EU
• NCC

EN
Chapter 1 Introduction ................................................................................. 1
Chapter 2 Setting the Meter
2.1 Installing/ Replacing the Batteries...................................................... 2
2.2 Set the Date and Time .................................................................... 2
Chapter 3 How to Perform the Test
3.1 Perform the Test........................................................................... 3-5
3.2 Alternate Site Testing (AST) .......................................................... 5-6
Chapter 4 Meter Memory Function ................................................................ 7
Chapter 5 Control Solution Test .................................................................... 8
Chapter 6 Transmission Function ............................................................9-10
Chapter 7 Care and Maintenance
7.1 Storing Your Meter and Strip ............................................................11
7.2 Cleaning and Caring for Your Meter ...................................................11
Chapter 8 Error Message and Trouble Shooting.......................................12-13
&KDSWHU6SHFL¿FDWLRQ................................................................................14

1
Chapter 1 Introduction
Introduction
Please read carefully before using meter kit, and consult healthcare professional before
making any important medical decision. Please contact your local customer service for further
assistance with the product.
Normal Environmental Conditions
This meter designed under the following conditions:
• Indoor use • Overvoltage category II • Pollution degree 2
Electromagnetic Compatibility
This meter meets the electromagnetic compatibility, emission, and immunity, and the
requirements of IEC 61326-2-6, ISO 18113-5 and IEC 61010-1.
Intended Use
•In vitro diagnostic use only.
0HDVXULQJEORRGJOXFRVHLQIUHVKFDSLOODU\ZKROHEORRGIURP¿QJHUWLSSDOPRUIRUHDUP• The meter can be used by laypersons or healthcare professionals.
Principles of the Examination Method
• Electrochemical biosensor technology.
The meter is plasma-calibrated by reference instruments, which are traceable to the following
standard reference materials and methods.
Test Standard Method
Glucose NIST SRM 917 Glucose Oxidase

2
Chapter 2 Setting the Meter
2.1 Installing/ Replacing the Batteries
This meter uses AAA battery*2. Please remove the plastic tab under the battery before using.
Note: Dispose the batteries according to your local environmental regulations.
2.2 Set the Date and Time
Press “S” Button (3 secs)
˛
One “Beep” Sound
˛
Setting Mode
˛7XUQ2ϑAutomatically after Setting
• Setting order: Year/ Month/ Date/ Hour/ Minute/ Unit
• Press “M” button to advance one unit, “S” button to enter next setting.
Note: Correct setting is important while managing your health records.
1 2 3
3
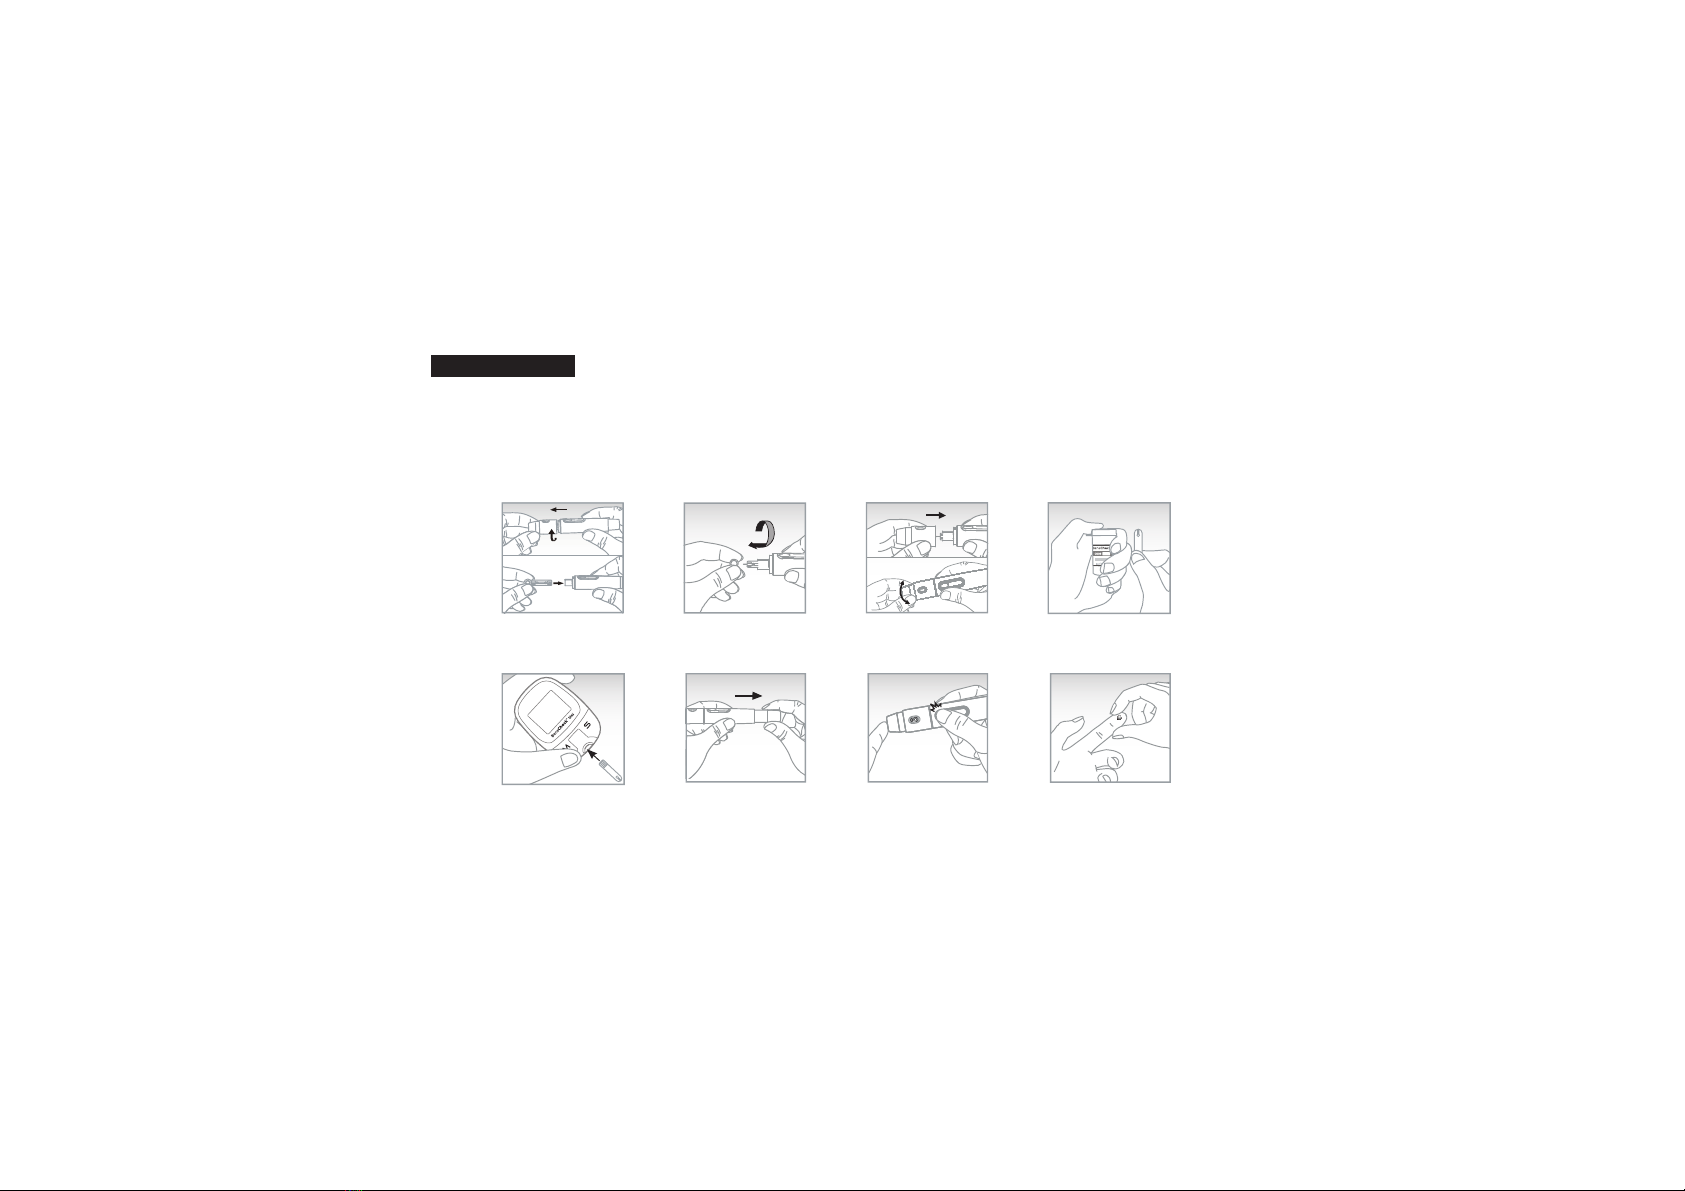
Materials you need to perform the test:
BeneCheck Meter/ BeneCheck Test Strip/ Lancing Device/ Lancets/ Tissue or Cotton Ball with
75% Ethanol or Disinfection Wipes
3.1 Perform the Test
• Wash and clean your hands with disinfection wipes, and make sure your hands are dry
before testing.
Chapter 3 How to Perform the Test
Insert lancet
¿UPO\Remove and save
the protective
cap.
Recap lancing
device and adjust
penetration depth.
Take a strip and
close the vial
immediately.
Insert the strip.
1 2 3 4
5
Operation
TestStrip
ControlRange
7142
Pull the sliding
barrel till it clicks. Press the release
button to sample. :LSHRϑ¿UVWGURSof blood and start
sampling.
6 7 8
4
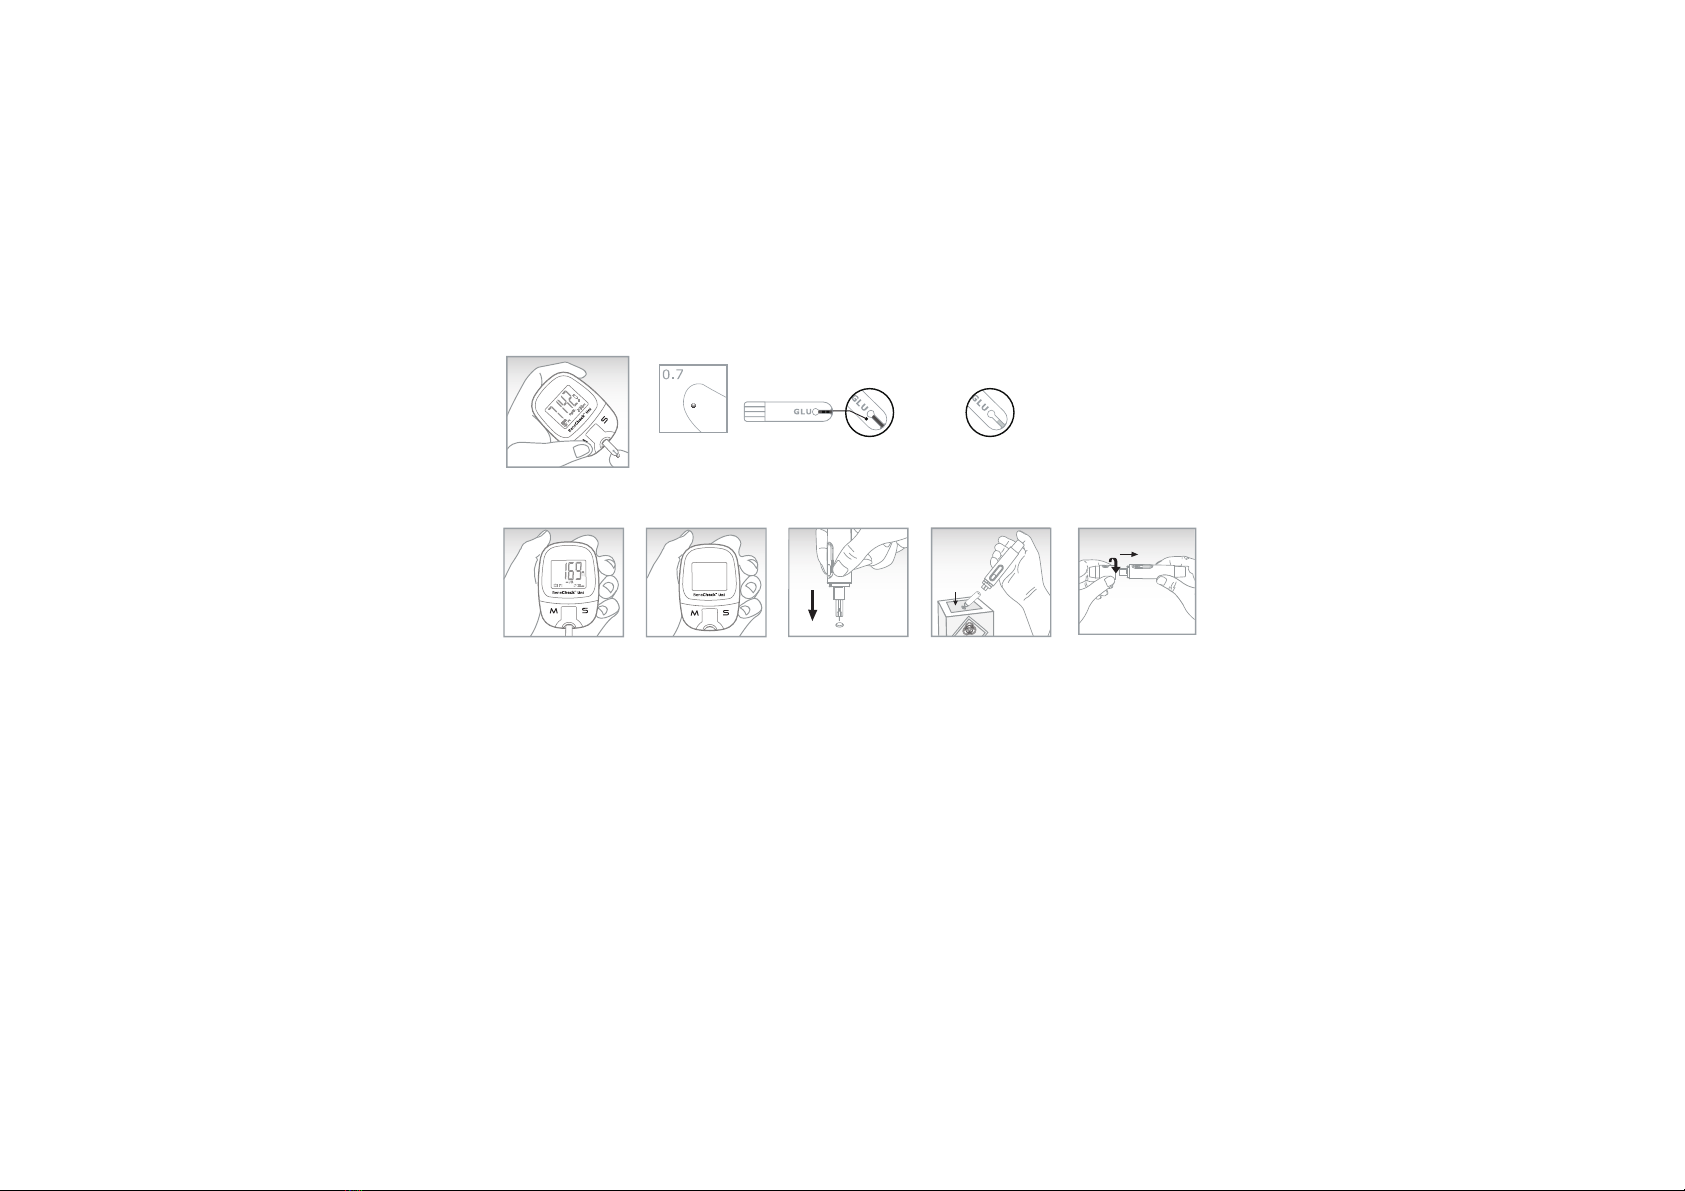
Note: ,QVXϒFLHQW¿OOXSRIEORRGVDPSOHFRXOGOHDGWRLQDFFXUDWHRUIDLOHGWHVWUHVXOW'RQRWUH¿OOWKHWHVWVWULSGlucose
Fill up ok Fill up FAILED
9
10 12 13 14
ނᙴᕍቲకނ
11
Touch the blood
sample with strip.
Result will show
after countdown.
Then discard
the used strip
to biohazard
container.
Pierce used
lancet into
protective cap.
Discard used lancet
to biohazard
container.
Recap lancing
device and
storage.
Note: Please refer to Lancing Device Instructions for
detail procedure.
The meter
ZLOOWXUQRϑautomatically.
GLU Nj/

5
Note:
3OHDVH¿QLVKWKHWHVWZLWKLQPLQXWHVRUWKHPHWHUZLOOWXUQRϑDXWRPDWLFDOO\• The meter will not turn on if you insert the wrong end or wrong side of strip.
• Marked open date on new open strip vial, do not use expired strip.
• Dropping, bumping or other violent impact will damage the meter or cause malfunction.
• Do not use the meter in an environment with possible magnetic, electromagnetic, and
radioactive interferences.
• Do not inhale or swallow.
• Education level at least 15 years old and 8 years intensive reading experience (school), no
maximum.
3.2 Alternate Site Testing (AST)
<RXFDQWHVW\RXUJOXFRVHIURP¿QJHUWLSSDOPRUIRUHDUP7DNLQJEORRGIURPSDOPRUIRUHDUPFRXOGUHGXFHWKHSDLQEXWWKHJOXFRVHOHYHOFKDQJHVIDVWHU7KHVHGLϑHUHQFHVPD\FDXVHwrong medical decision.
Note: Please consult healthcare professional before AST sampling.
Suitable timing to acquire blood sample from alternate sites:
• Routinely before meal.
• Prior or 2 hours after meal/ short-acting or rapid-acting insulin analogue/ exercise.
Warning:
ł3OHDVHIROORZORFDOUHJXODWLRQVWRGLVFDUGXVHGWHVWVWULSVDQGODQFHWVł8VHGWHVWVWULSVODQFHWVDQGDQ\RWKHUPDWHULDOWKDWKDVEHHQLQFRQWDFWwith blood should be treated as potential biohazards.
ł,IXVHUKDVLQIHFWLRXVGLVHDVHWKHXVHGWHVWPDWHULDOVFRXOGEHVRXUFHVRIinfection.
ł/DQFHWVFDQQRWEHUHXVHGł$OZD\VXVHFHUWL¿HGODQFHWVWRHQVXUHVDIHW\ł.HHSWKHV\VWHPDZD\IURPFKLOGUHQDQGSHWV

6
DO NOT test from alternate sites:
• During or less than 2 hours after meal/ short-acting or rapid-acting insulin analogue/ exercise.
• When you think your glucose level is low or unaware of your low blood glucose condition.
• When you are examined for hypoglycemia or hyperglycemia.
• Your AST test result does not match your health condition.
• When you are ill, or you are operating machinery or driving a car.
Sampling from an Alternative Site:
1.Repeat the steps 1-6 in Chapter 3.1.(Replace the lancing device tip with adjustable AST tip.)
2.Hold the lancing device against sampling site, and press the release button.
.HHSKROGLQJWKHODQFLQJGHYLFHDJDLQVWVDPSOLQJVLWHXQWLOVXϒFLHQWVDPSOHIRUPHG3.Then repeat steps 9-14 in Chapter 3.1.
Note:
6DPSOLQJIURP¿QJHUWLSLI\RXU$67WHVWUHVXOWGRHVQRWPDWFK\RXUKHDOWKFRQGLWLRQ• Repeat puncturing the same spot may cause soreness and calluses.
'RQRWVTXHH]HWKHVLWHH[FHVVLYHO\,WPD\WDNHORQJHUIRUVXϒFLHQWEORRGVDPSOHWRIRUP• Do not use smeared blood sample, please acquire new blood sample.
• If you continue failing in getting enough blood samples, please try to get lancets in lower
JDXJHRUVDPSOHIURP¿QJHUWLSLQVWHDGPalm sampling
• No visible veins.
• Away from deep palm prints.
Forearm sampling
• Away from bones, visible
veins and hair.
7
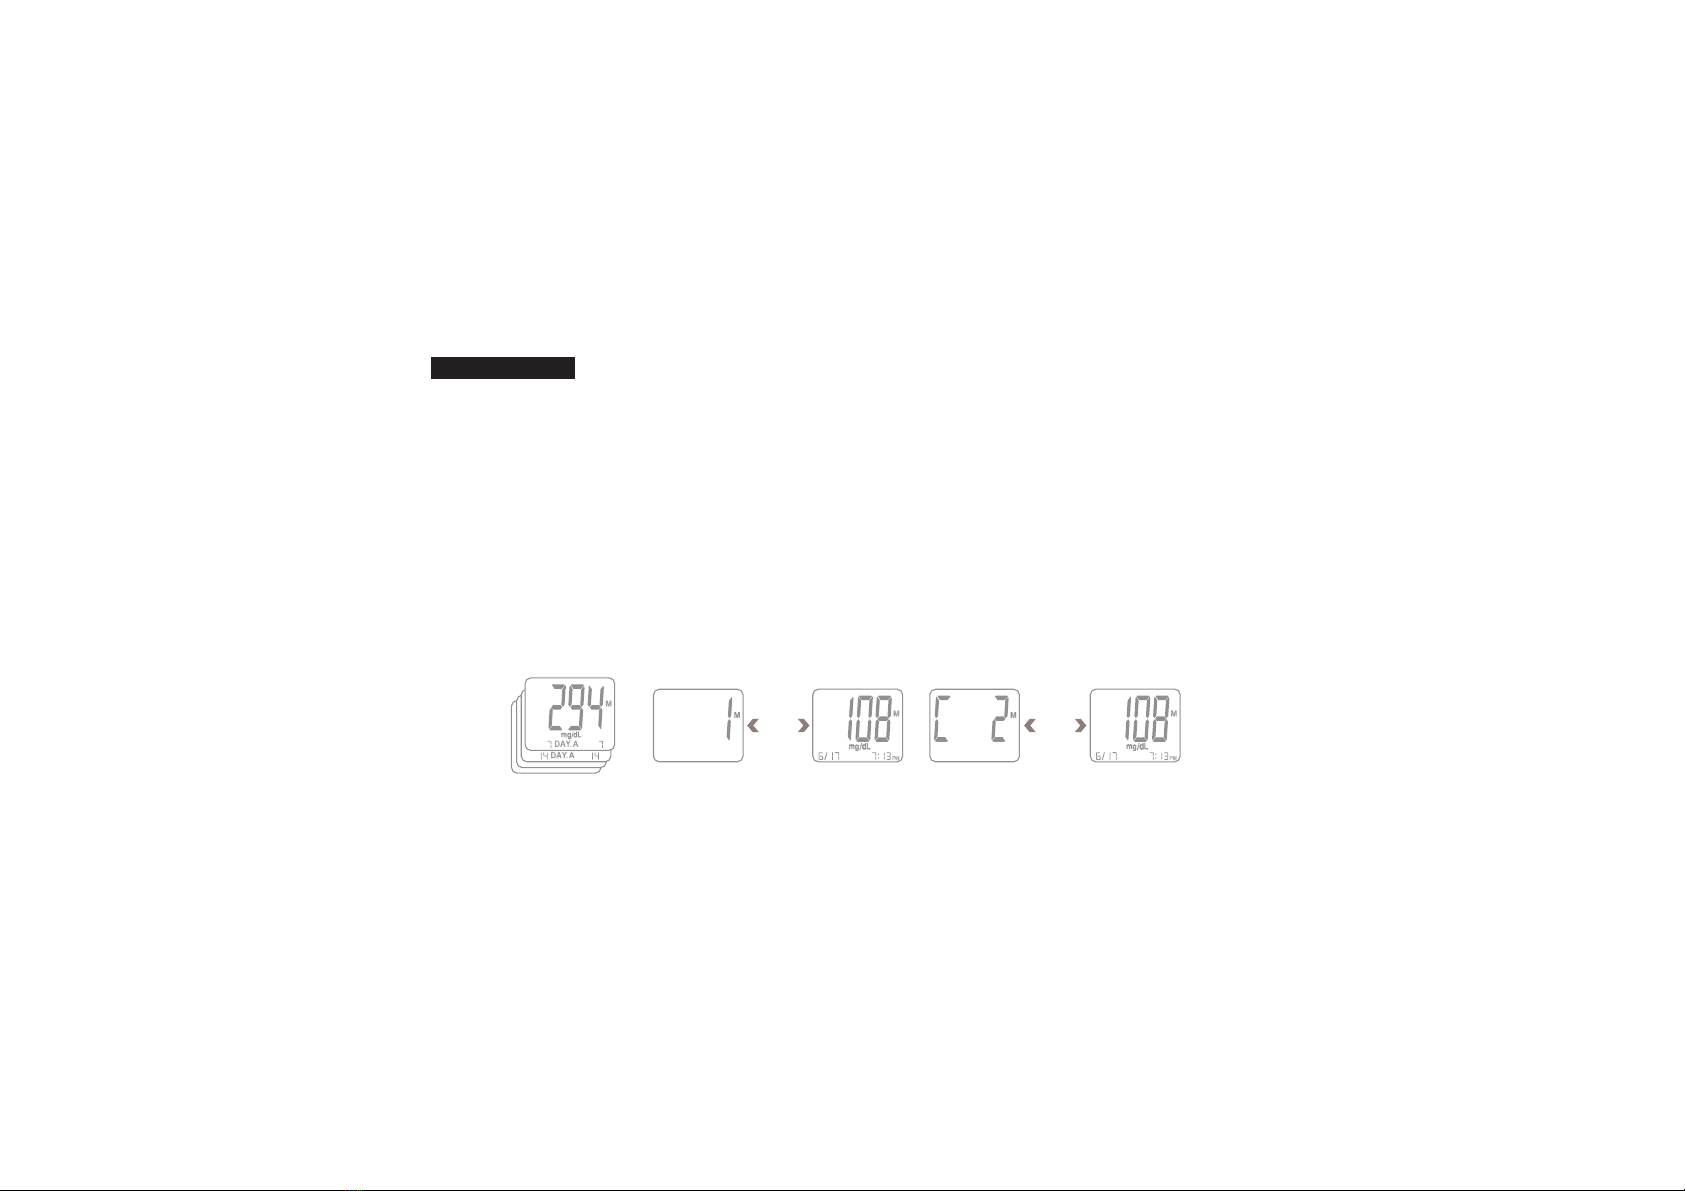
• Glucose - 300 results, capable in counting 7-, 14-, 21- and 28- days average
The latest test result will replace the oldest when the records exceed maximum memory
capacity. The memories start record from M1 to M300, include test results and control
solution test results.
Note: The control results are not included in the average.
Directions for Checking Memories:
No Test Strip in the Meter
˛
Press “M” Button (3 secs)
˛
Full Display on Screen
˛!
Two “Beep”s
˛
Enter the Memory Mode
˛
Press “S” Button for Next Test Record/
Press “M” Button for Previous Record
˛3UHVV³0´%XWWRQVHFVWR7XUQ2ϑ,QPHPRU\PRGHLWZLOOGLVSOD\GD\VDYHUDJH¿UVW2QFH\RXHQWHURQHPHPRU\PRGH\RXFDQQRWVZLWFK<RXQHHGWRWXUQRϑWKHPHWHU(Press “M” button for 3 seconds) and enter the memory mode again.
Memory Records are shown as follows:
Chapter 4 Meter Memory Function
7-, 14-, 21-, 28-
days average Test Record Control Record
Blink Blink
8
Chapter 5 Control Solution Test
Control solution is used to check the performance of the kit.
The meter kit should be check:
• When the meter and strip do not work properly.
• When the test result is unusual or inconsistent.
Control solution range is shown as follow:
Please check your strip vial label for exact range.
Perform a Control Test:
Insert an Unused Strip
˛
Press “M” Button (3 secs)
˛
Enter Control Solution Mode
(Shown CL on Screen)
˛
Shake the Control Solution Well
˛
Discard First Three
Drops
˛
Put One Drop onto a Clean Surface
˛
Touch the Control Solution with Strip
Sample Inlet
˛
Test Result Display after Count Down
˛
Compare the Result with the
Range Listed on Test Strip Vial
Note:
• Do not reuse the test strip.
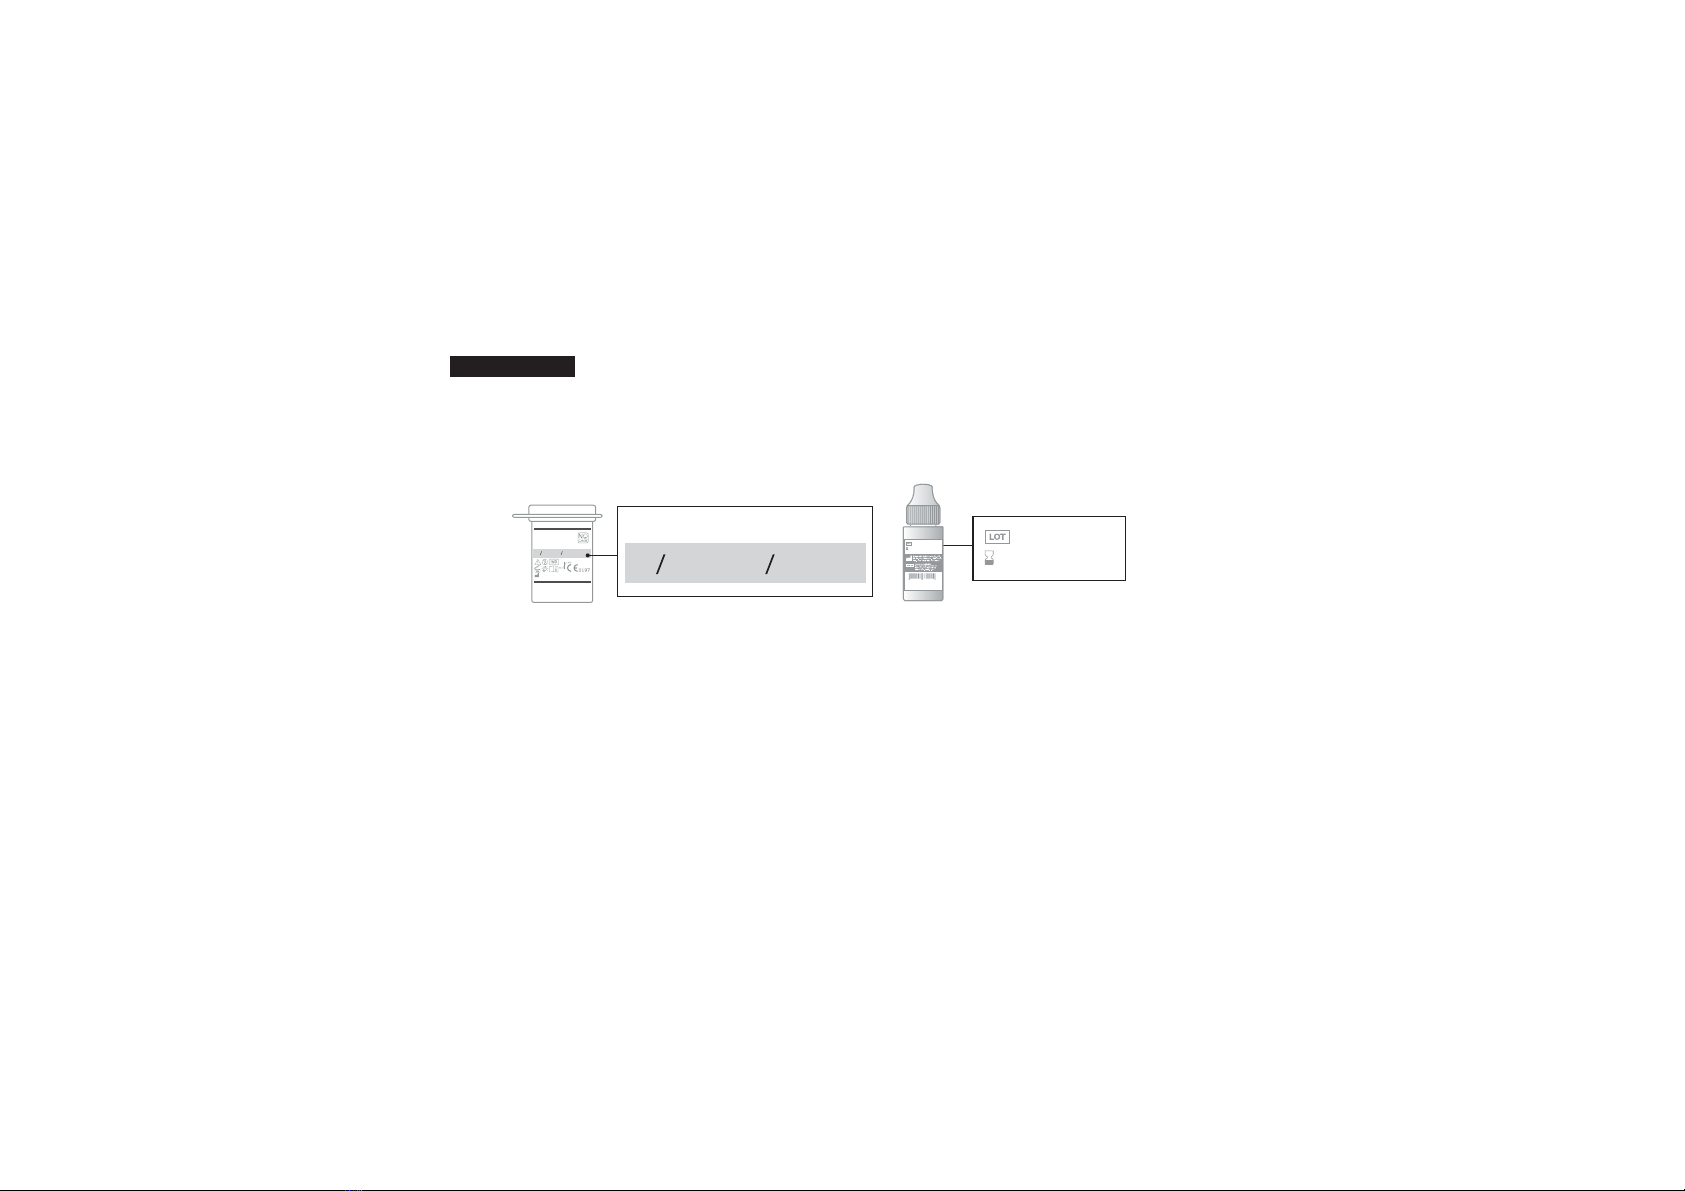
• Marked open date on new open control solution.
• Do not use the meter if the control test is out of range.
• If the control test keeps result wrongly, please contact an authorized distributor.
• Control solutions are not included. Please contact an authorized distributor for purchasing.
98-164 mg/dL
5.4-9.1 mmol/L
EA13120901
Control Range LV1
2019-01
EA13120901
2019-01
General Life Biotechnology Co.,Ltd.
5F., No.240, Shinshu Rd., Shin Juang Dist.,
New Taipei City 242, Taiwan
Storage
98-164 mg/dL
5.4-9.1 mmol/L
9
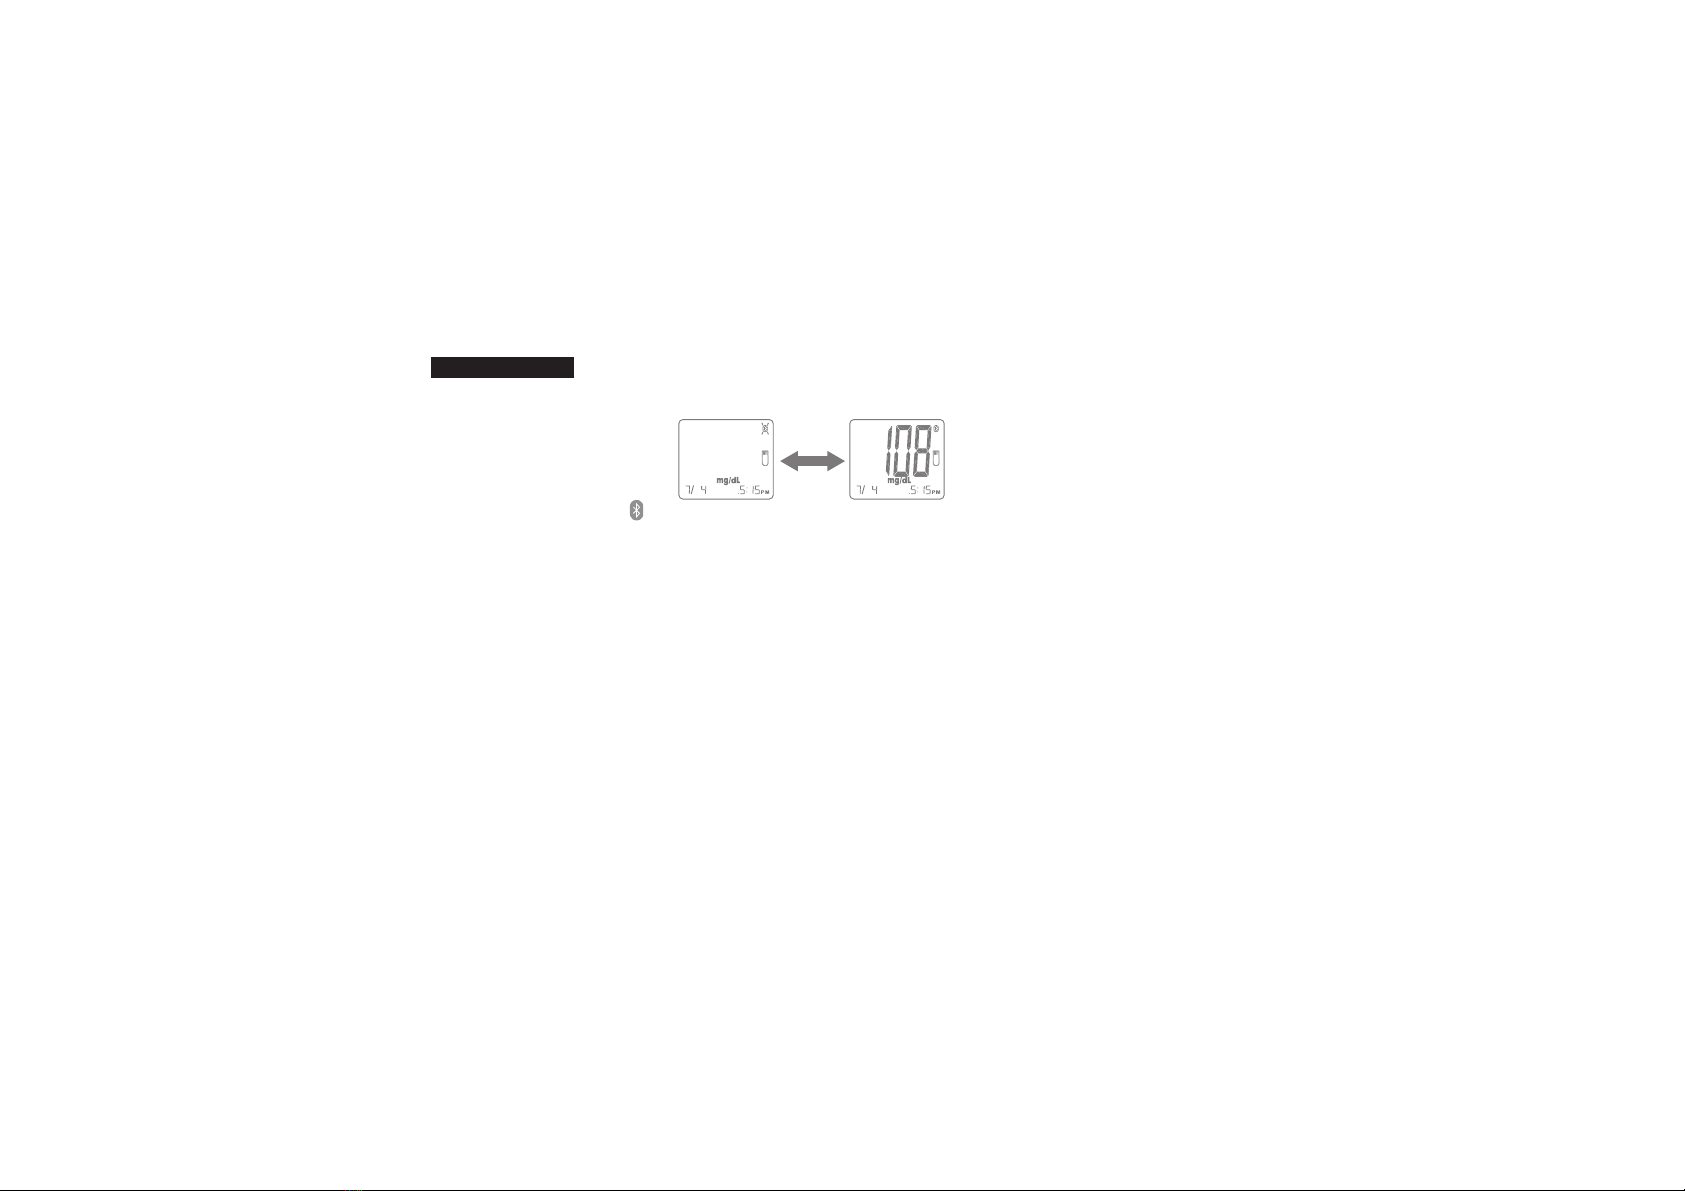
Chapter 6 Transmission Function
The meter provides Bluetooth transmission function. It can transmit test results to connected
device wirelessly via Bluetooth.
The screen show " " means Bluetooth transmission function is working.
• The meter with Bluetooth 4.0 can apply to IOS, Android 2.3.3 and above.
• The meter complies with IEC 60601-1-2 and the relevant EMC (electromagnetic
compatibility) and RF (radio transmission) requirements regulated by US Federal
Communications Commission. The purpose of these requirements is to ensure that meter
GRHVQRWDϑHFWRUEHLQJDϑHFWHGE\RWKHUGHYLFHVGXULQJRSHUDWLRQ• The meter and the transmission function may be interfered while other device is operating
nearby. Ex: mobile phone, wireless internet, etc.
• If the transmission has been interfered. Please keep the meter away from the source of
LQWHUIHUHQFHRUWXUQRϑWKHLQWHUIHULQJGHYLFH• Please make sure the meter and the receiving device are placed within a reasonable
GLVWDQFHOHVVWKDQ¿YHPHWHUVGXULQJWUDQVPLVVLRQYLD%OXHWRRWK• Please do not share the meter with other people if you are using Bluetooth transmission
function. The test results from other people will also transmit to the receiving device, and it
ZLOOLQÀXHQFH\RXUWHVWUHFRUG• The Bluetooth transmission function may not work on certain types of mobile phone due to
the compatibility of Android systems.
• Frequency range: 2402 – 2480MHz. RF power: -6.88 dBm @ room temperature Typical.

10
/$$陪铃⣜亙⡜⸆桧ꨶ岚鱖㼙䚍ꨶ堥盘椚鳵岁•痧⼧✳哭竤㘗䒭钢阮ざ呔⛓⡜⸆桧㼙걽ꨶ堥ꬌ竤鏪〳Ⱇ㉂贫䧴⢪欽罏㖳♶䖤乲荈隶刿걽桧⸈㣐⸆桧䧴隶刿⾲鏤鎙⛓暶䚍⿻⸆腋•痧⼧㔋哭⡜⸆桧㼙걽ꨶ堥⛓⢪欽♶䖤䕧갠굳菕㸞⿻䎁仠ざ岁鸒⥌竤涮植剤䎁仠植韍儘䥰用⽰⨢欽⚛佖㊥荛搂䎁仠儘倰䖤糒糵⢪欽갪ざ岁鸒⥌䭸⣜ꨶ⥌岁鋊㹁⡲噠⛓搂箁ꨶ鸒⥌⡜⸆桧㼙걽ꨶ堥갭䗾「ざ岁鸒⥌䧴䊨噠猰㷸⿻ꄴ派欽ꨶ岚鱖㼙䚍ꨶ堥鏤⪔⛓䎁仠

11
7.1 Storing Your Meter and Strip
Meter:
• Avoid bump or violent behavior.
• Do not use in extremely dry environment. It may cause static discharges.
• Do not use under electromagnetic radiation, ex: electrical equipment.
• Do not disassemble the meter for any reason.
• Keep meter clean by wiping the exterior appearance with tissues or lint-free cloth.
1RPRGL¿FDWLRQRIWKLVHTXLSPHQWLVDOORZHG• Do not expose the meter under lint, dust, sunlight, heat or humid environment.
Strip:
• Do not store in high humidity environment, or expose directly to sunlight.
• Do not freeze or refrigerate the meter and strips.
• Keep your hand dry and clean while handing the strips and performing the test.
• Do not bend, cut or fold the strips.
7.2 Cleaning and Caring for Your Meter
Please use soft cloth slightly damp with one of the following solution to clean meter surface
DIWHU¿QLVKWKHWHVW• 75% alcohol
• Super Sani-Cloth disposable wipes
• Mild dishwashing liquid with water
• 10% household bleach solution and 90% water
Note:
• Do not allow any other wet cloth or liquid.
• Do not allow any liquid run in or around the test port and battery cover.
• Make sure the meter is completely dry before use.
3URWHFWLRQLPSDLUPHQWLIXVHGLQDPDQQHUQRWVSHFL¿HGE\WKHPDQXIDFWXUHUChapter 7 Care and Maintenance
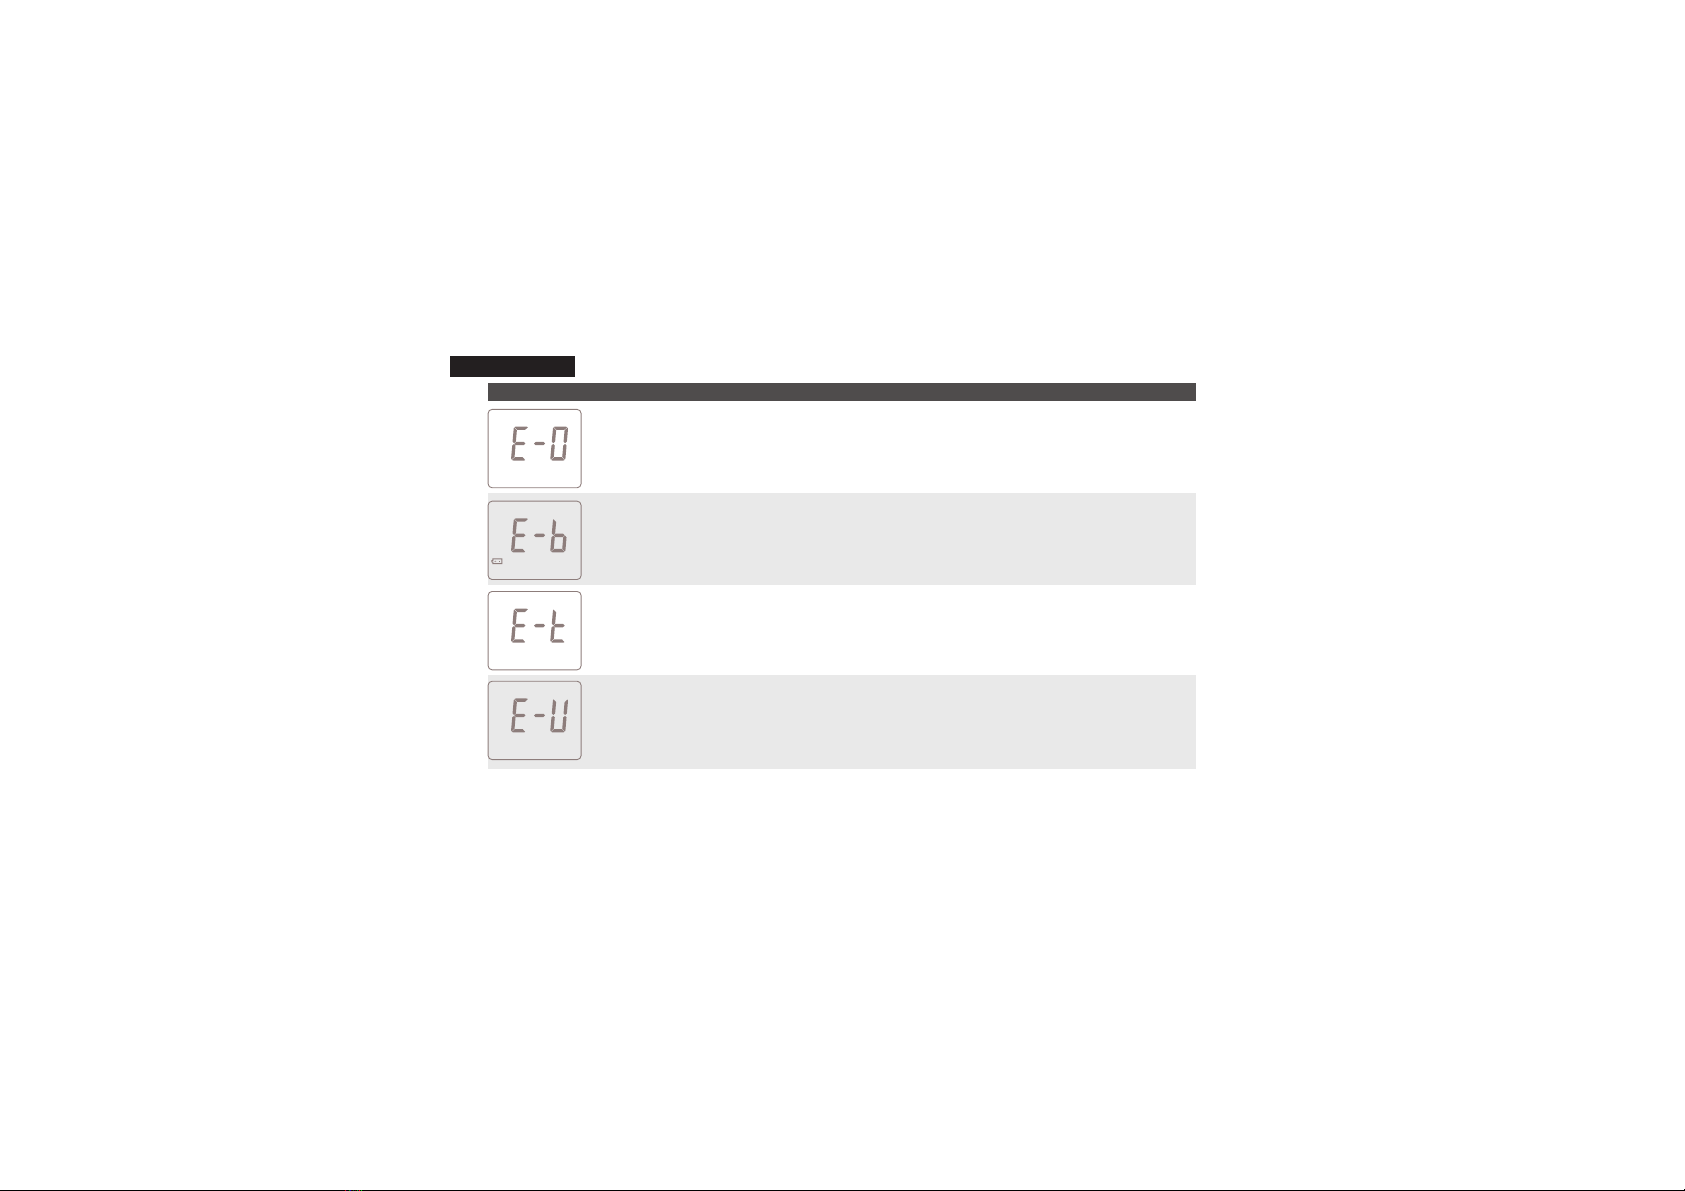
12
• Incorrect meter
operating temperature.
Repeat the test after meter return to operating
temperature. If the problem persists, please
contact local distributor for service.
Chapter 8 Error Message and Trouble Shooting
Message Cause Solution
• Problem with test strip.
• Insert strip improperly.
Repeat insert the strip again. If the problem
persists, please contact local distributor for
service.
• Low battery. Replace with new battery.
• Used strip.
• Damped strip.
Follow Chapter 3.1 and repeat the test with
a new strip. If the problem persists, please
contact local distributor for service.

13
• Test incomplete due to
removing the strip during
measuring.
Follow Chapter 3.1 and repeat the test with a
new strip. Do not remove the strip before the
test is completed.
• Test result is higher than
the range listed on
Chapter 9.
Follow Chapter 3.1 and repeat the test with
a new strip. If the problem persists, please
contact local distributor for service.
• Test result is lower than
the range listed on
Chapter 9.
Follow Chapter 3.1 and repeat the test with
a new strip. If the problem persists, please
contact local distributor for service.
• Sample volume not
enough.
Repeat the test with a new strip, and make
sure the sample volume is enough. If the
problem persists, please contact local
distributor for service.
14
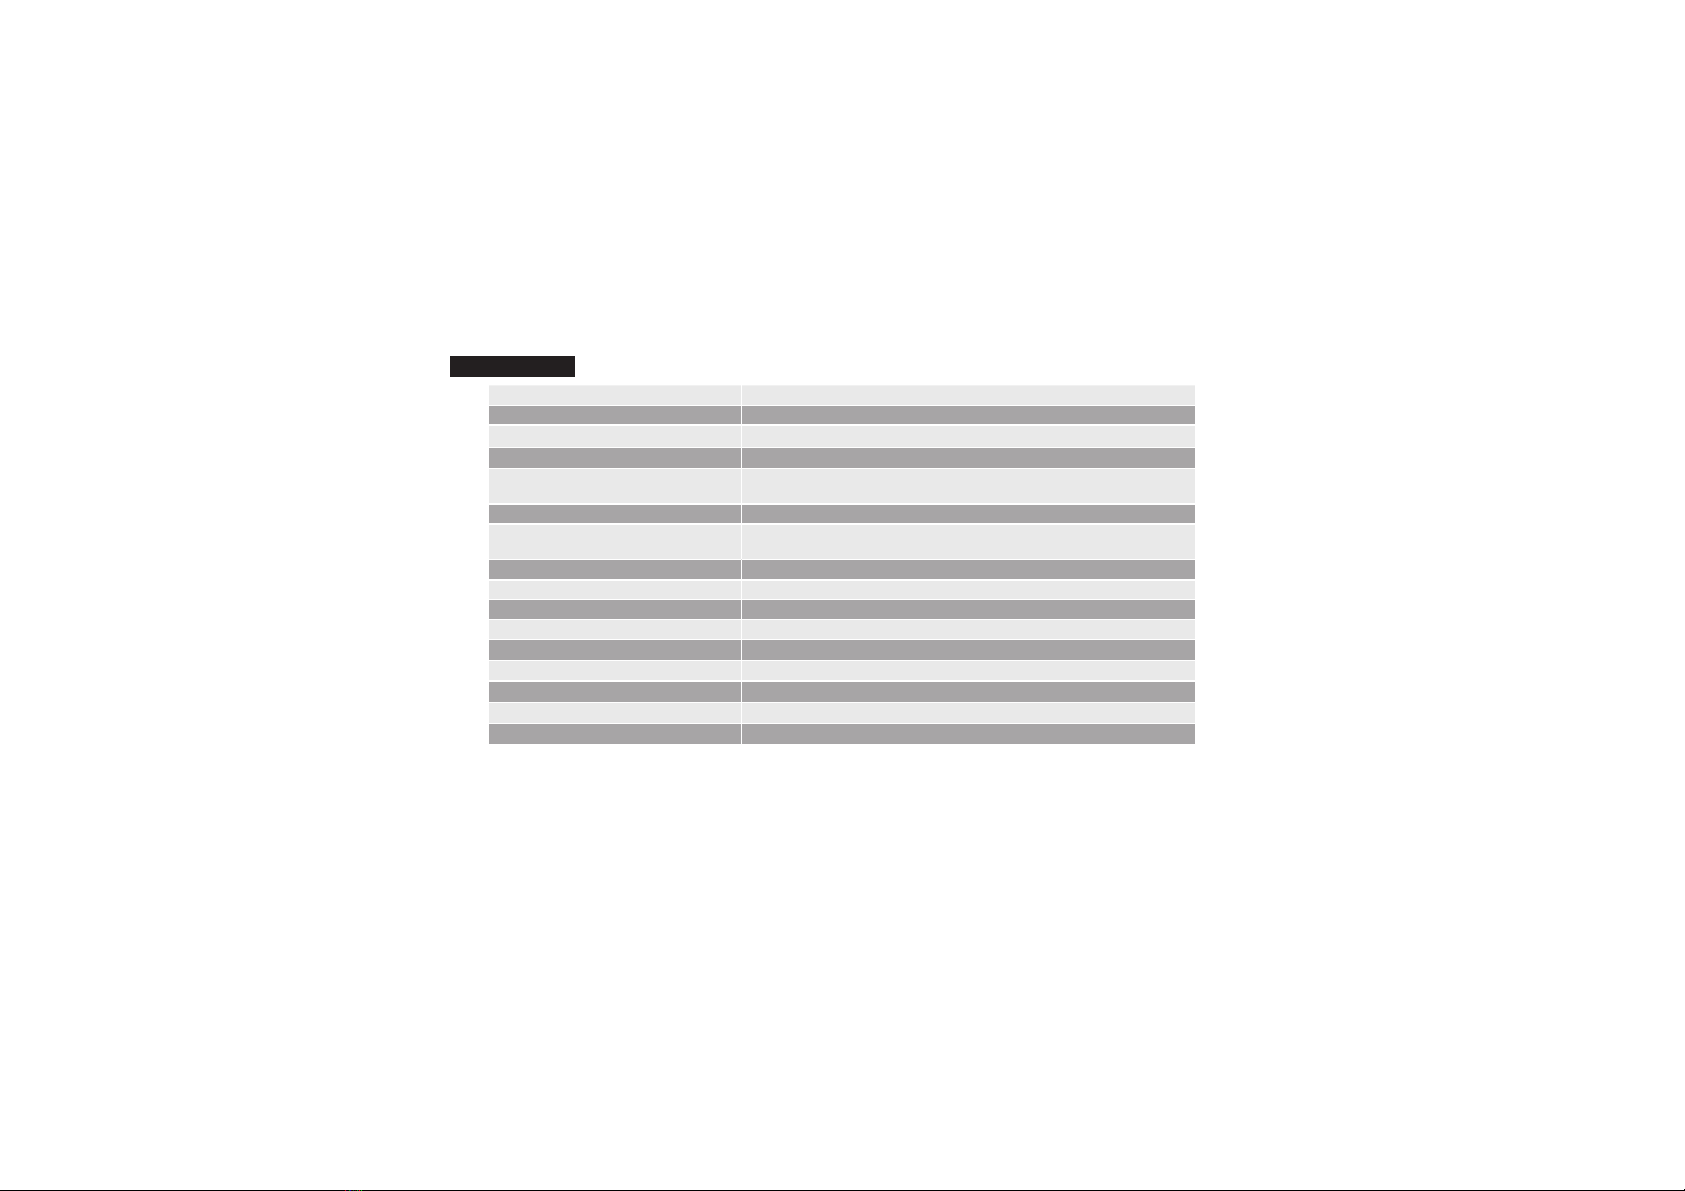
Chapter 9 6SHFL¿FDWLRQNote:
• Please refer to the strip insert for accuracy, precision, limitation, and other important
information.
Test Sample )UHVK&DSLOODU\:KROH%ORRGIURP¿QJHUWLSSDOPRUIRUHDUPMeasuring Time 5 seconds
Measuring Range 20-600 mg/dL (1.1-33.3 mmol/L)
Sample Volume 0.7 µL
Storage & Transportation
Condition Û&Û)Operation Temperature Û&Û)Storage & Transportation
Relative Humidity 10-90%
Open Vial Relative Humidity 10-90 %
Memory 300 Test Results
Battery Type AAA battery * 2
Battery Life Approximately 1,000 tests
Dimensions 62*88*24 mm
Weight About 64g (with battery)
Altitude 10,000 feet (3048 m) (700~1013 hpa)
Expected Service Life 5 years (Approximately 10,000 times)
Transmission Function Bluetooth 4.0 for BSG01D
This manual suits for next models
1
Table of contents
Languages:
Other BeneCheck Blood Glucose Meter manuals


