TysonBio EVOLVE User manual

User’s Manual
For in vitro diagnostic use only
EVOLVE
Blood Glucose Monitoring System
TysonBio


Important Information ..................................................................................3
Introduction ..................................................................................................7
About the Product ........................................................................................8
About the TysonBio EVOLVE Meter .....................................................9
About the TysonBio EVOLVE Meter Display .......................................11
About the TysonBio EVOLVE Test Strip ..............................................13
About the TysonBio EVOLVE Test Strip Vial .......................................14
About the Glucode Chip .....................................................................15
Installing/Replacing the Battery ..........................................................16
Setting Up the Meter ...................................................................................17
Setting Up the Date, Time ...................................................................17
Setting Up Alarm ................................................................................18
Unit Selection and Code Setting.........................................................21
Coding Your TysonBio EVOLVE Meter ......................................................22
Table of Contents 1

The Control Solution Test ..........................................................................24
Testing Your Blood Glucose Level ............................................................28
Preparing the Test Strip ......................................................................29
Obtaining a Blood Sample .................................................................30
Applying Blood Sample to the Test Strip .............................................31
Memory Features ........................................................................................34
Transfer Test Results to a Computer ........................................................36
Care and Storage ........................................................................................37
Display Messages ......................................................................................38
Specications .............................................................................................45
Limitations of the Procedure ..............................................................47
Service and Warranty .................................................................................47
Customer Service
2

Available Alternative Sites Testing : Palm and Forearm.
TysonBio EVOLVE Blood Glucose Monitoring System provides you alterna-
tive sites testing (AST). This system provides you to test on the palm and the
forearm with the equivalent results to ngertip testing.
There are limitations for doing AST. Please
consult your healthcare professional before
you do AST.
Forearm
Palm
Important Information 3

Alternative site results differ from ngertip results when glucose levels are
changing rapidly such as after a meal, after taking insulin, during exercise,
or when you are ill or under stress. Use blood from a ngertip rather than an
alternative site if:
● you think your blood glucose is low,
● you don’t regularly have symptoms when your blood glucose is low, or
● how you feel doesn’t match the results from the alternative site.
● when you have just taken insulin, or any time during or after exercise.
● when there are unknown variables occurring in your day, such as illness.
● whenever you are about to drive.
4
CAUTION:
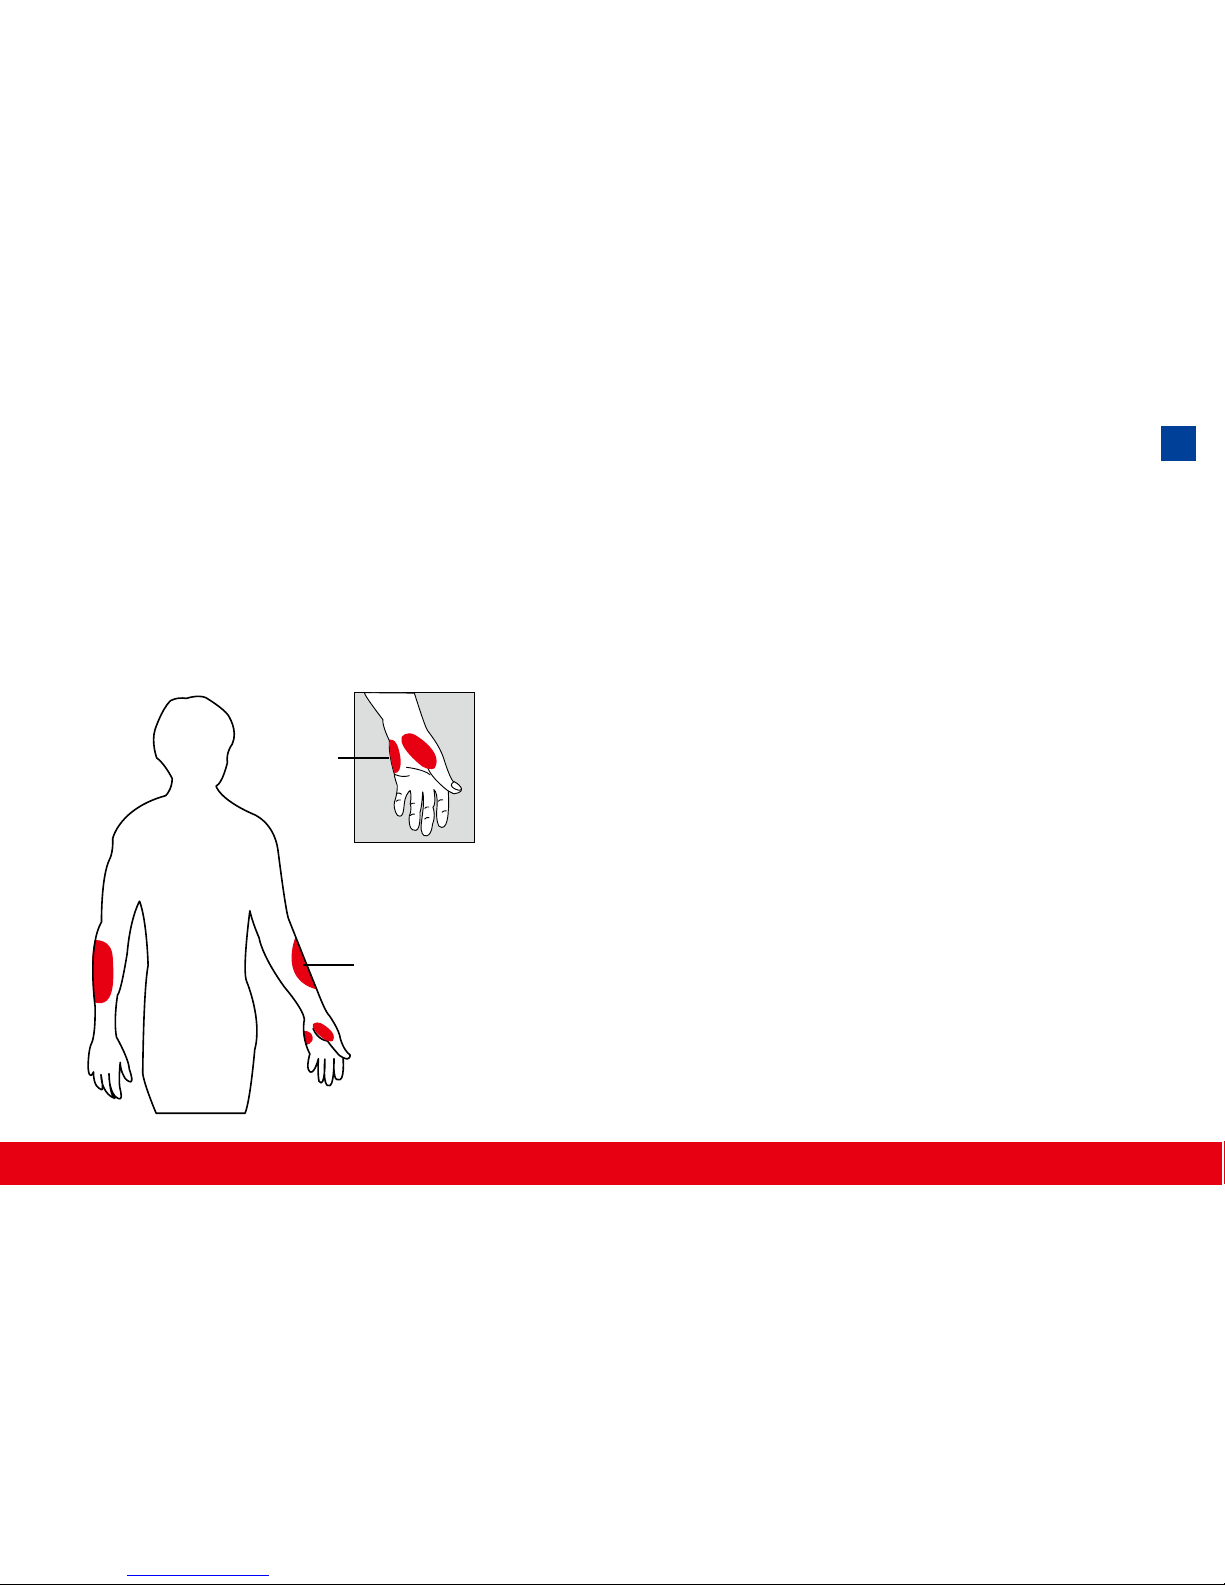
1. Physiologic differences in the circulation between the nger and other test
sites like the forearm and palm may result in differences in blood glucose
measurements from the other test sites and your ngertips. Changes in
blood glucose may be observed in nger blood samples sooner than blood
samples from the forearm and other alternate sites. Rub the alternate test
sites about 20 seconds before lancing. If you are testing for hypoglycemia
(low blood glucose), or if you suffer from hypoglycemia unawareness, we
recommend that you test on your ngertips.

2. Talk to your doctor to see if alternative site testing is right for you. With a
little bit of education, you can give your ngertips a rest and maybe test
more often than you do now. For people with diabetes, more frequent test-
ing is a good thing. Just remember: any time you want to be sure of an ac-
curate, up-to-date blood glucose reading, test on your ngertip.
3. We strongly recommend you do AST ONLY in the following intervals:
● In a pre-meal or fasting state (more than 2 hours since the last meal).
● Two hours or more after taking insulin.
● Two hours or more after exercise.
DO NOT use AST if:
● You think your blood glucose is low.
● You are unaware of hypoglycemia.
● Your AST results do not match the way you feel.
● You are testing for hyperglycemia.
● Your routine glucose results are often uctuating.
● If you are pregnant.
5

● Low or high blood glucose readings can indicate a potentially serious med-
ical condition. If your blood glucose reading is unusually low or high, or if
you do not feel the way your reading indicates, repeat the test with a new
test strip. If your reading is not consistent with your symptoms or if your
blood glucose result is less than 60 mg/dL (3.3 mmol/L) or higher than 240
mg/dL (13.3 mmol/L) you should contact your healthcare professional and
follow his or her treatment advice.
● Any change or administer of medication based on the TysonBio EVOLVE
blood glucose test results without the consent and advice of a physician or
healthcare professional is not recommended.
● Severe dehydration and excessive water loss may cause false low results.
If you believe you are suffering from severe dehydration, consult your phy-
sician immediately.
6

Thank you for choosing the TysonBio EVOLVE Blood Glucose Monitoring
System, the latest advancement in biosensor technology. As you already
know, self monitoring of blood glucose (SMBG) is a necessary part of the
treatment plan of people with diabetes mellitus. The Diabetes Control and
Complications Trial (DCCT) has confirmed the significant benefits from
SMBG when practiced as part of a larger intensive strategy to tightly control
blood glucose concentrations.
Adapted for its ease of use and quick response time, the TysonBio EVOLVE
System has the ability to process accurate results utilizing only a small vol-
ume of blood for in vitro diagnostics. The TysonBio EVOLVE Blood Glucose
Monitoring System is intended for use in the home and in professional set-
tings to monitor whole blood glucose levels obtained from the ngertip, palm
and forearm. This is an over the counter (OTC) product.
Please read the entire User’s Manual carefully before using this product.
Introduction 7

Your TysonBio EVOLVE System is made up of several components. This
booklet is designed to guide you through the operation of the system with
detailed directions and pictures. Your TysonBio EVOLVE System contains:
● TysonBio EVOLVE Meter
● One vial of TysonBio EVOLVE Test Strips (10 strips)
● One Glucode Chip (outside the strip vial)
● One Lancing Device (option)
● Ten Lancets (option)
● One Control Solution
● One carrying case
● User’s Manual
● Log book (option)
● Quick Reference Guide
Note: 25, 50 test strips vial can be purchased individually.
About the Product
8

About the TysonBio EVOLVE Meter 9

1. Display Your test results are displayed here. The large, easy to read
screen guides you through the test by using numbers and symbols.
2. M Button The M(mode) button is used to set time, alarm, enters the
memory mode to show the consecutive 7/14/30-day average results and
turns the Meter on and off.
3. S Button The S(select/set) button is used to select year, month, day,
time, memory of results and control solution mode.
4. Test Port This is where you insert the Test Strip into the Meter.
5. Unit Switch Switch for mmol/l or mg/dL.1 mmol/l =18 mg/dL
6. Battery Cover
7. Label
8. Reset Button Press this button to re-set the system.
9. Data Port Connect interface cable to transfer data.
10. Strip Ejection Button Push button to eject the used strip.
11. Glucode Chip Insert the Glucode Chip for coding.
10

1. Date
2. Time
3. Control Solution Test
Appears when doing a control
solution test and marking the
result as a control solution
test.
4. Code Symbol
Appears with the code number
of the Test Strips in use.
5. Memory Symbol
Indicates in memory mode.
6. Units of Measurement Unit
of mmol/l or mg/dL will appear
with the test result.
About the TysonBio EVOLVE Meter Display
6
4
8
3
52
9
11
7
12
10
14
1
13
11

7. Battery Symbol
Appears when the battery is low or must be replaced.
8. Blood Drop Symbol
Flashes when it is ready to apply sample to Test Strip.
9. Warning Symbol
Appears when result is out of the range of your setting reference value.
10. Alarm Function Symbol
Appears when the clock alarm is set.
11. Test Strip Symbol
Appears to tell you when the meter is ready for test.
12. Day Average Symbol
Shows the average value of test results.
13. Test Result Area
Display test results.
14. Temperature Message
Appears if your meter is out of operating temperature range.
12

About the TysonBio EVOLVE Test Strip
The TysonBio EVOLVE Test Strip is used to per-
form the blood glucose test in conjunction with the
TysonBio EVOLVE Meter.
Each strip can be used only once.
The Test Strip consists of the following parts:
1. Conrmation Window
This is where you can conrm that enough blood
has been applied to the target area.
2. Target Area
This is where blood is drawn into the Test Strip.
3. Contact Bar
This end of the Test Strip is inserted into the
Test Port to activate the Meter. (white side face
up).
3
1
2
13

About the TysonBio EVOLVE Test Strip Vial
Code Number
Control Solution Range
Lot Number
Expiration Date
VIAL LABELTEST STRIP VIAL
811
0537
Manufacturer:
Tyson Bioresearch, Inc.
5F, #22, Ke E. Road III Science-
Based Industrial Park, Chu Nan,
Taiwan Tel : +886-37-585998
Storeat 4-30°C ( 39-86°F). Do not refrigerate.
Do not store test strips outside this vial.
Re-cap immediately.
WARNING: Always close lid tightly.
For testing of glucose in capillary whole blood.
For in vitro diagnostic use.
Usewithin 90 days after first opening.
Use
EVOLVE
meter only !
811
H8T121205
Aug 2010
31-61
84-144
348-438
1.7-3.4
4.7-8.0
19.3-24.3
Low:
Normal:
High:
14

About the Glucode Chip
The Glucode Chip is used to ensure that your Meter provides you with
accurate results. Before performing the blood glucose test or starting a new
strip vial, please check your Meter with the Glucode Chip to ensure proper
performance (further instructions for use of the Glucode Chip is provided on
page 22-23). After checking your Meter, the Glucode Chip is also used to
code setting.
Note:
●
Always use the Glucode Chip to ensure your Meter is performing
properly.
● DO NOT misplace your Glucode Chip.
966
Code Number
15

When the battery is low, the Meter will show a warning
signal. When this display appears, it is time to replace
a new battery. When the low battery warning signal is
shown, the Meter will provide accurate results for ap-
proximately 50 more measurements.
1. From the back of the Meter, gently slide and remove the battery cover.
2. Turn over the battery cover and insert a 3-Volt Lithium battery (CR-2032)
with the “+” side facing down.
3. Slide battery cover back into place with the battery side facing down.
Installing/Replacing the Battery
How to Replace the Battery
16
+
CR2032
3V

Setting Up the Meter
Setting Up the Date, Time
To turn the Meter on, rst insert a battery, then press the reset button located
at the back of the Meter and proceed with the following instructions.
1. Press the Mbutton to enter this mode.
Press and release Sbutton to choose “24hr”
or “12hr” display. With your favorite clock
mode, press Mbutton and the year setting
will be appeared. Press and release the S
button until the correct year appears. (Fig.1)
2. To enter the year and move on to choose
the month, press the Mbutton. To change
the month, press the Sbutton. (Fig.2)
3. To enter the month and move on to choose
the day, press the Mbutton. To change the
day, press the Sbutton. (Fig.3)
M S
(Fig.1)
(Fig.2)
(Fig.3)
17

4. To enter the day and move on to choose the hour setting,
press the Mbutton. (Fig.3)
5. To change the hour, press the Sbutton. To enter the hour
and move on to change the minutes, press the Mbutton.
(Fig.4)
6. To change the minutes, press the Sbutton. To enter the
minutes and move on to choose the alarm setting, press
the Mbutton. (Fig.4)
7. To set the rst alarm, press the M button (y). If you press
S button (n), it will be moved on to health manage-
ment alarm setting (step 11). To change the hour, press
Sbutton. To enter the hour and move on to change the
minutes, press Mbutton. To change the minutes, press S
button. To enter the minutes and move on to choose the
second alarm setting, press the M button. (Fig.5)
Setting Up Alarm
(Fig.4)
(Fig.5)
18
Table of contents
Other TysonBio Blood Glucose Meter manuals

TysonBio
TysonBio AC500 User manual

TysonBio
TysonBio HS200-B User manual

TysonBio
TysonBio TB 100 User manual

TysonBio
TysonBio SuperB User manual

TysonBio
TysonBio EZ Smart-608 User manual

TysonBio
TysonBio TB200 User manual

TysonBio
TysonBio AC100 User manual

TysonBio
TysonBio AC100 User manual

TysonBio
TysonBio HT100-B User manual

TysonBio
TysonBio HS100-B User manual
Popular Blood Glucose Meter manuals by other brands

Arkray
Arkray ASSURE PLATINUM Reference manual

EZ Smart
EZ Smart 606 user manual

Cambridge Sensors
Cambridge Sensors microdot Operation manual

made for movement
made for movement NF-walker user manual

Bayer HealthCare
Bayer HealthCare Breeze2 Quick test guide

Lifescan
Lifescan OneTouch Profile blood glucose monitor owner's booklet