BeneCheck Knight User manual

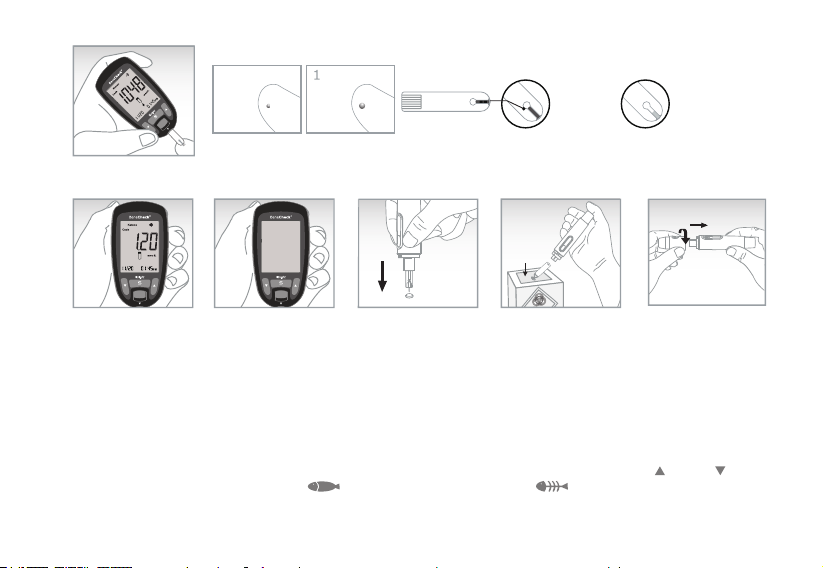
BeneCheck Meter Kit Meter (Front Side & Back Side)
Serial Number Sticker
Battery Lid
Meter Label
LCD Screen
“S” Button
Right “ ” Button
Test Port
Ejection Button
Battery
Left “ ” Button
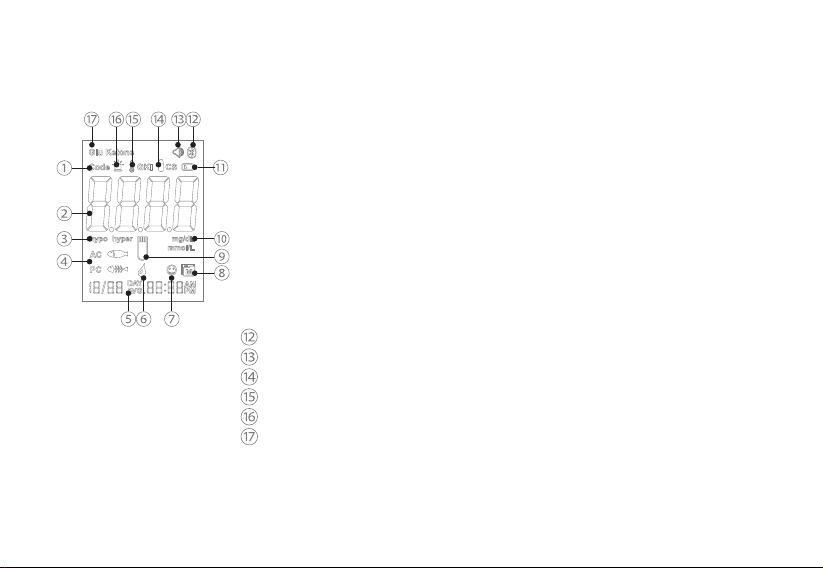
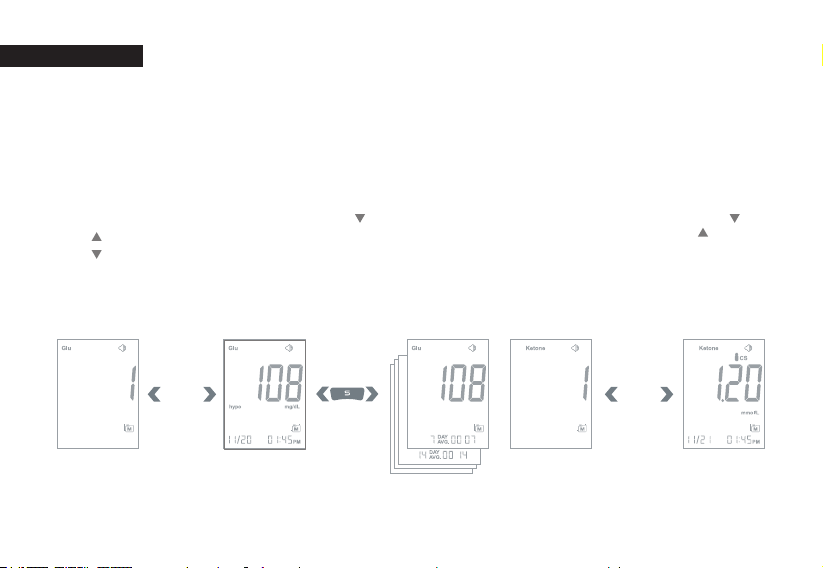
LCD Screen Display: Information and test result display
①
②
③
④
⑤
⑥
⑦
⑧
⑨
⑩
⑪
Code Number Icon
Result area
Hypo/Hyperglycemia Icon
Pre/Post-meal tag
Average(GLU)
Blood Loading Icon
System Check
Memory Mode Icon
Strip Loading Icon
Unit Icon
Low Battery
Bluetooth on
Beeper Icon
Control Solution
Temperature Icon
Alarm Icon
Test Mode Icon
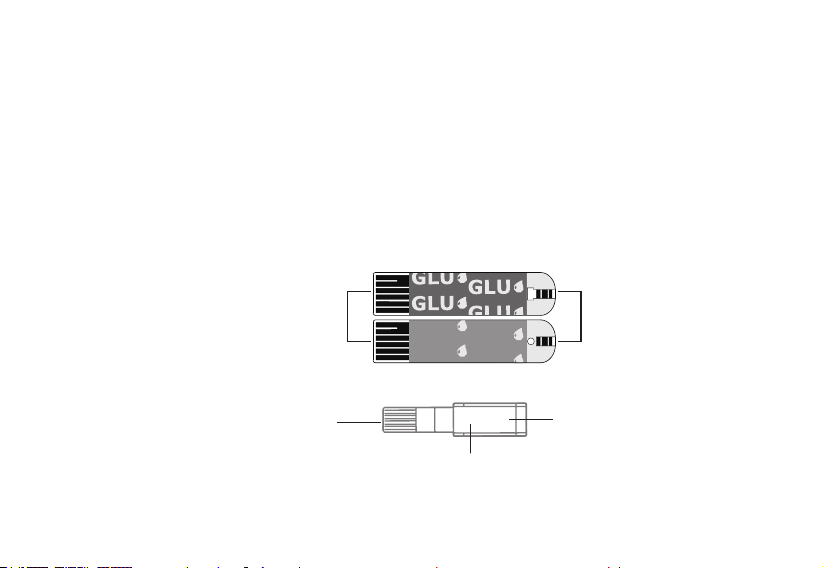
Test Strip :
GLU (GDH-FAD)- Glucose KET - Ketone
Electronic Contact Bars Sample Inlet
Contact Bar Code
KET
KET
KET
KET
KET 1048
Test Mode
Alert Tones:
• Normal Alert: a short “beep”
• Warning Alert: 3 short “beeps”
• Turning On/ O: a long “beep”
Code Strip :
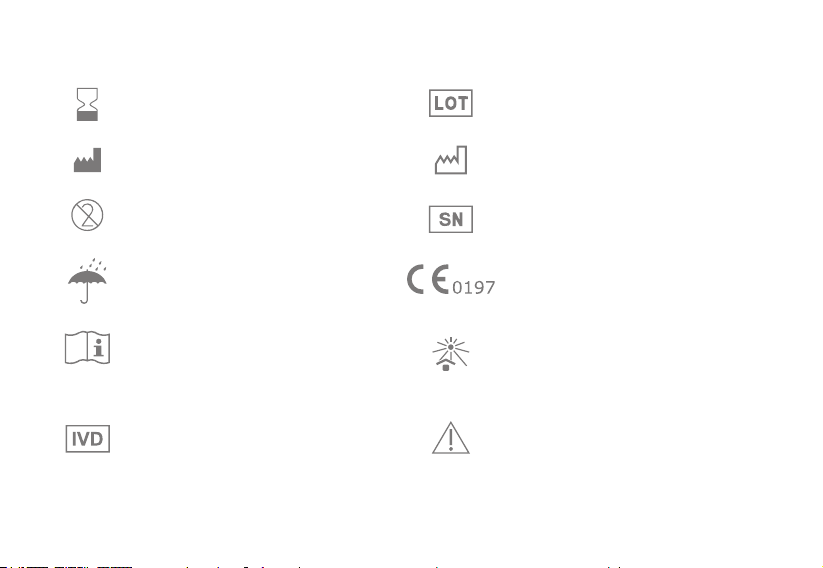
Labelling and Information
•
Caution, consult accompanying documents
• Do not re-use
• Keep dry
•
In-vitro diagnostic medical device
• Batch code
•
Consult instructions for use
• Use-by date
• Date of Manufacture
• Manufacturer
• Keep away from sunlight
• Serial number
• CE certication

• Temperature limitation
•
Humidity limitation
•
Authorized representative in the European
Community
• Catalogue number
•
Comply with WEEE Directive 2012/19/EU
•
Use within 3/6 months after rst opening

EN
Chapter 1 Introduction ................................................................................. 1
Chapter 2 Setting the Meter
2.1 Installing/ Replacing the Batteries...................................................... 2
2.2 Setting up the Meter ........................................................................ 2
2.3 Code the Meter................................................................................ 3
Chapter 3 How to Perform the Test
3.1 Perform the Test .............................................................................. 4
3.2 Glucose Ketone Index (GKI) .............................................................. 6
3.3 Alternate Site Testing (AST) .............................................................. 8
Chapter 4 Meter Memory Function ...............................................................10
Chapter 5 Control Solution Test ...................................................................11
Chapter 6 Transmission Function for BC010D ..............................................12
Chapter 7 Care and Maintenance
7.1 Storing Your Meter and Strip ............................................................13
7.2 Cleaning and Caring for Your Meter ...................................................13
Chapter 8 Error Message and Trouble Shooting............................................14
Chapter 9 Specication ................................................................................16
Chapter 10 Federal Communications Commission (FCC) Statement ...............17
1
Chapter 1 Introduction
Introduction
Please read carefully before using meter kit, and consult healthcare professional before
making any important medical decision. Please contact your local customer service for further
assistance with the product.
Normal Environmental Conditions
This meter designed under the following conditions:
• Indoor use • Overvoltage category II • Pollution degree 2
Electromagnetic Compatibility
This meter meets the electromagnetic compatibility, emission, and immunity, and the
requirements of IEC 61326-2-6.
Intended Use
BeneCheck Knight Blood Glucose & β-Ketone Monitoring System is only for in vitro diagnostic
use which is used for quantitative measurement of blood glucose or β-Ketone level in fresh
capillary whole blood as aid in monitoring diabetes management at home or in clinical
settings. Alternative site for glucose testing is allowed (ngertip, palm & forearm).
Fresh venous or artery whole blood drawn by healthcare professionals can be used only for
testing blood glucose, not for the diagnosis.
Principles of the Examination Method
• Electrochemical Biosensor.
The meter is plasma-calibrated by reference instruments, which are traceable to the following
standard reference materials and methods.
Test Standard Method
Glucose NIST SRM 917 Glucose Dehydrogenase
β-Ketone internal master calibrator UV

2
Chapter 2 Setting the Meter
2.1 Installing/ Replacing the Batteries
This meter uses 1.5V AAA battery * 2. Please remove the plastic tab under the battery before
using. Note: Dispose the batteries according to your local environmental regulations.
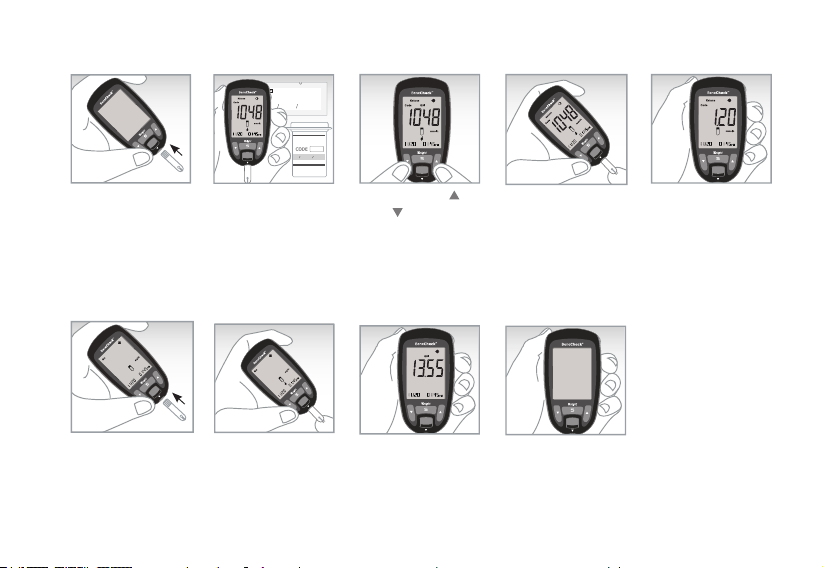
2.2 Setting up the Meter
No Test Strip in the Meter →Press "S" (3 secs) →Enter Setting mode →Turn O
Automatically after Setting
• Setting order: Year/Month/Day/Time Format (12h or 24h)/Hour/Minute/Units/Sound/Hypo/
Hyper Alarm
• Press " " or " " to correct the setting, and press "S" to enter the next setting.
Note: Correct setting is important while managing your health records.
2 31

3
2.3 Code the Meter (β-Ketone)
• Code your meter when you rst use it or open a new retail box of strips.
• Make sure the meter is o before you insert the code strip.
• Make sure the code on screen, code strip, and strip vial label or single foil pack are the same.
Note: With Auto Strip Recognition function, once you code your meter, the meter will switch to
the test mode automatically when you insert a strip.
21
KET 1048
ControlRange
Code
Model
K1303190
2020/12 BK-SK1
1048
LV1
0.1-8 mmol/L
1048
β-Ketone Test Strip
BK-SK1
0.1- 8 mmol/L
1048
KET 1048
3
KET 1048

4
9
5 6 7 8
Make sure the
code number is
correct.
Pull the sliding
barrel till it clicks.
Press the release
button to sample.
Wipe o rst drop
of blood and start
sampling.
Chapter 3 How to Perform the Test
Materials you need to perform the test:
BeneCheck Meter / BeneCheck Test Strip / Lancing Device / Lancets / Tissue or Cotton Ball
with 75% Ethanol or Disinfection Wipes
3.1 Perform the Test
• Wash and clean your hands with disinfection wipes, and make sure your hands are dry
before testing.
• Please refer to Lancing Device Instructions for detail procedure.
Insert lancet
rmly.
Remove and save
the protective
cap.
Recap lancing
device and adjust
penetration depth.
Take a strip and close the vial
immediately.
1 2 3 4
GeneralLife Biotechnology Co.,LTD.
5F.,No. 240, Shinshu Rd., Shin Juang Dist.,
NewTaipei City 242, Taiwan
e Total Cholesterol Test Strip
BK-SC2
Storage
Self-Testing
109-164 mg/dL
6.1-9.1 mmol/L
7142
Doc.#:FIG-XXXXXXXXXXX-1 Sep, 2018
General LifeBiotechnology Co.,LTD.
β-K
In-vitro diagnostic use only.
Self-Testing.
Use immediately after opening.
5F., No.240,Shinshu Rd., Shin Juang Di
New Taipei City242, Taiwan
Insert the strip.
β-Ketone Test Strip
BK-SK1
0.1 - 8 mmol/L
1048
Control Range
Code
Model
K1303190
2020/12 BK-SK1
1048
LV1
0.1-8 mmol/L
5
Note: Insucient ll up of blood sample could lead to inaccurate or failed test
result. Do not rell the test strip.
Result will show
after countdown.
Then eject
the used strip
to biohazard
container.
11 13 14 15
Pierce used
lancet into
protective cap.
Discard used lancet
to biohazard
container.
Recap lancing
device and
storage.
物醫療廢棄物
Touch the blood
sample with strip.
The meter
will turn o
automatically.
12
Glucose/ β-Ketone
Fill up ok Fill up FAILED
0.7µL µL
10
KET
GLU
After the blood glucose test result is displayed right after a test, press “ ” or “ ” to
select a before-meal ag(AC ) or after-meal ag (PC ).
Remove the test strip while the ag has selected, the test result is stored with ag.
6
3
Press both
and for 3 sec.
Then enter GKI
mode.
3.2 Glucose Ketone Index (GKI)
Touch the blood
sample with
strip.
4
Result will show
after countdown.
Then eject
the used strip
to biohazard
container.
5
6
Insert the
glucose test
strip.
7
Touch the blood
sample with strip.
8
Result will show
after countdown.
Then eject
the used strip
to biohazard
container.
1 2
Make sure the
code number is
correct.
Insert the ketone
test strip.
β-Ketone Test Strip
BK-SK1
0.1 - 8 mmol/L
1048
Control Range
Code
Model
K1303190
2020/12 BK-SK1
1048
LV1
0.1-8 mmol/L
The meter
will turn o
automatically.
9
7
Note:
• Please nish the test within 3 minutes or the meter will turn o automatically.
• The meter will not turn on if you insert the wrong end or wrong side of strip.
• Marked open date on new open strip vial, do not use expired strip.
• Dropping, bumping or other violent impact will damage the meter or cause malfunction.
• Do not use the meter in an environment with possible magnetic, electromagnetic, and
radioactive interferences.
• Do not inhale or swallow.
• Education level at least 15 years old and 8 years intensive reading experience (school), no
maximum.
Warning:
● Please follow local regulations to discard used test strips and lancets.
● Used test strips, lancets and any other material that has been in contact
with blood should be treated as potential biohazards.
● If user has infectious disease, the used test materials could be sources of
infection.
● Lancets cannot be reused.
● Always use certied lancets to ensure safety.
● Keep the system away from children and pets.
8
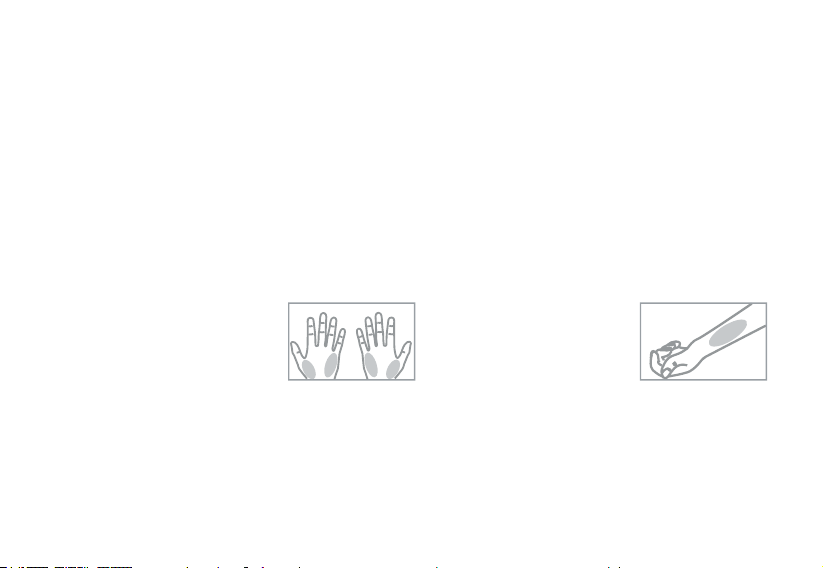
3.3 Alternate Site Testing (AST)
You can test your glucose from ngertip, palm or forearm. Taking blood from palm or forearm
could reduce the pain, but the glucose level changes faster. These dierences may cause
wrong medical decision.
Note: Please consult healthcare professional before AST sampling.
Suitable timing to acquire blood sample from alternate sites:
• Routinely before meal.
• Prior or 2 hours after meal/ short-acting or rapid-acting insulin analogue/ exercise.
DO NOT test from alternate sites:
• During or less than 2 hours after meal/ short-acting or rapid-acting insulin analogue/ exercise.
• When you think your glucose level is low or unaware of your low blood glucose condition.
• When you are examined for hypoglycemia or hyperglycemia.
• Your AST test result does not match your health condition.
• When you are ill, or you are operating machinery or driving a car.
Sampling from an Alternative Site:
1.Repeat the steps 1-7 in Chapter 3.1.(Replace the lancing device tip with adjustable AST tip.)
2.Hold the lancing device against sampling site, and press the release button.
Keep holding the lancing device against sampling site until sucient sample formed.
3.Then repeat steps 10-15 in Chapter 3.1.
Palm sampling
• No visible veins.
• Away from deep palm prints.
Forearm sampling
• Away from bones, visible
veins and hair.

9
Note:
• Sampling from ngertip if your AST test result does not match your health condition.
• Repeat puncturing the same spot may cause soreness and calluses.
• Do not squeeze the site excessively. It may take longer for sucient blood sample to form.
• Do not use smeared blood sample, please acquire new blood sample.
• If you continue failing in getting enough blood samples, please try to get lancets in lower
gauge or sample from ngertip instead.
10
• Glucose - 800 results, capable in counting 7-, 14-, 30-, 60- and 90-day average
• Ketone - 200 results
• GKI - 200 results
The latest test result will replace the oldest when the records exceed maximum memory
capacity. The memories start record from 1 to 800 or 1 to 200, include test results and
control solution test results.
Note: The control results are not included in the average.
Directions for Checking Memories:
No test strip in the meter →Press “ ” (3 secs) →Enter memory mode →Press “ ”
or “ ” to switch mode (Glu/ Ketone/ GKI) →Press “S” to conrm →Press “ ”
or “ ” to view each test record →Press “S” (3 secs) to turn o
• In Glu memory mode, Press “S” will display 7-, 14-, 30-, 60- and 90-day average.
• Once you enter one memory mode, you cannot switch. You need to turn o the meter
(Press "S" for 3 seconds) and enter the memory mode again.
Memory Records are shown as follows:
Chapter 4 Meter Memory Function
7-, 14-, 30-, 60-
and 90-day average
Test Record Control Record
Blink Blink

11
Control solution is used to check the performance of the kit.
The meter kit should be check:
• When the meter and strip do not work properly.
• When the test result is unusual or inconsistent.
Control solution range is shown as follow:
Please check your strip vial label or single foil pack for exact range.
Perform a Control Test:
Insert an unused strip →Make sure the code number is correct (Ketone) →Press
“S” (3 secs) →Enter control solution mode (shown CS on screen) →Shake the
control solution well →Discard rst three drops →Put one drop onto a clean
surface →Touch the control solution with strip sample inlet →Test result display
after count down →Compare the result with the control range on test strip vial or
single foil pack
Note:
• Do not reuse the test strip.
• Marked open date on new open control solution.
• Do not use the meter if the control test is out of range.
• If the control test keeps result wrongly, please contact an authorized distributor.
• Control solutions are not included. Please contact an authorized distributor for purchasing.
Chapter 5 Control Solution Test
EA13120901
2020-01
EA13120901
2020-01
β-Ketone Test Strip
BK-SK1
0.1 - 8 mmol/L
1048
Control Range LV1
Control Range LV1
0.1-8 mmol/L
Control Range
Code
Model
K1303190
2020/12 BK-SK1
1048
LV1
0.1-8 mmol/L

12
Chapter 6 Transmission Function for BC010D
The meter provides Bluetooth transmission
function. It can transmit test results to
connected device wirelessly via Bluetooth.
The screen show " " means Bluetooth transmission function is working.
• The meter with Bluetooth 4.0 can apply to IOS, Android 2.3.3 and above.
• The meter complies with IEC 61326-2-6 and the relevant EMC (electromagnetic
compatibility) and RF (radio transmission) requirements regulated by US Federal
Communications Commission. The purpose of these requirements is to ensure that meter
does not aect or being aected by other devices during operation.
• The meter and the transmission function may be interfered while other device is operating
nearby. Ex: mobile phone, wireless internet, etc.
• If the transmission has been interfered. Please keep the meter away from the source of
interference or turn o the interfering device.
• Please make sure the meter and the receiving device are placed within a reasonable
distance (less than ve meters) during transmission via Bluetooth.
• Please do not share the meter with other people if you are using Bluetooth transmission
function. The test results from other people will also transmit to the receiving device, and it
will inuence your test record.
• The Bluetooth transmission function may not work on certain types of mobile phone due to
the compatibility of Android systems.
• Frequency range: 2402 - 2480MHz. Maximum RF power: 6 dBm.

13
7.1 Storing Your Meter and Strip
Meter:
• Avoid bump or violent behavior.
• Do not use in extremely dry environment. It may cause static discharges.
• Do not use under electromagnetic radiation, ex: electrical equipment.
• Do not disassemble the meter for any reason.
• Keep meter clean by wiping the exterior appearance with tissues or lint-free cloth.
• No modication of this equipment is allowed.
• Do not expose the meter under lint, dust, sunlight, heat or humid environment.
Strip:
• Do not store in high humidity environment, or expose directly to sunlight.
• Do not freeze or refrigerate the meter and strips.
• Keep your hand dry and clean while handing the strips and performing the test.
• Do not bend, cut or fold the strips.
7.2 Cleaning and Caring for Your Meter
Please use soft cloth slightly damp with one of the following solution to clean meter surface
after nish the test.
• 75% alcohol
• Super Sani-Cloth disposable wipes
• Mild dishwashing liquid with water
• 10% household bleach solution and 90% water
Note:
• Do not allow any other wet cloth or liquid.
• Do not allow any liquid run in or around the test port and battery cover.
• Make sure the meter is completely dry before use.
• Protection impairment if used in a manner not specied by the manufacturer.
Chapter 7 Care and Maintenance

14
• Incorrect meter
operating temperature.
Repeat the test after meter return to operating
temperature. If the problem persists, please
contact local distributor for service.
Chapter 8 Error Message and Trouble Shooting
Message Cause Solution
• Problem with code strip.
• Problem with test strip.
• Insert strip improperly.
Repeat the coding procedure (Chapter 2.3) and
insert the strip again. If the problem persists,
please contact local distributor for service.
• Low battery. Replace with new battery.
• Problem with code strip
or meter.
• Insert code strip
improperly.
Repeat the coding procedure (Chapter 2.3).
If the problem persists, please contact local
distributor for service.
• Used strip.
• Damped strip.
Follow Chapter 3.1 and repeat the test with
a new strip. If the problem persists, please
contact local distributor for service.
This manual suits for next models
2
Table of contents
Other BeneCheck Blood Glucose Meter manuals


