Benno HIGH RAIL PLUS User manual
HIGH RAIL PLUS INSTALLATION
For Benno®Boost (EVO 4,5) Rear Racks PLUS
READ CAREFULLY BEFORE INSTALLATION AND USAGE. TO BE INSTALLED BY MECHANIC AT AUTHORIZED BENNO DEALER.
IMPORTANT: The High Rail PLUS can only be installed with
the Rail Clamps PLUS on the Boost Rear Rack PLUS.
(All Boost model year 2020 and later come standard with a Boost Rear Rack PLUS)
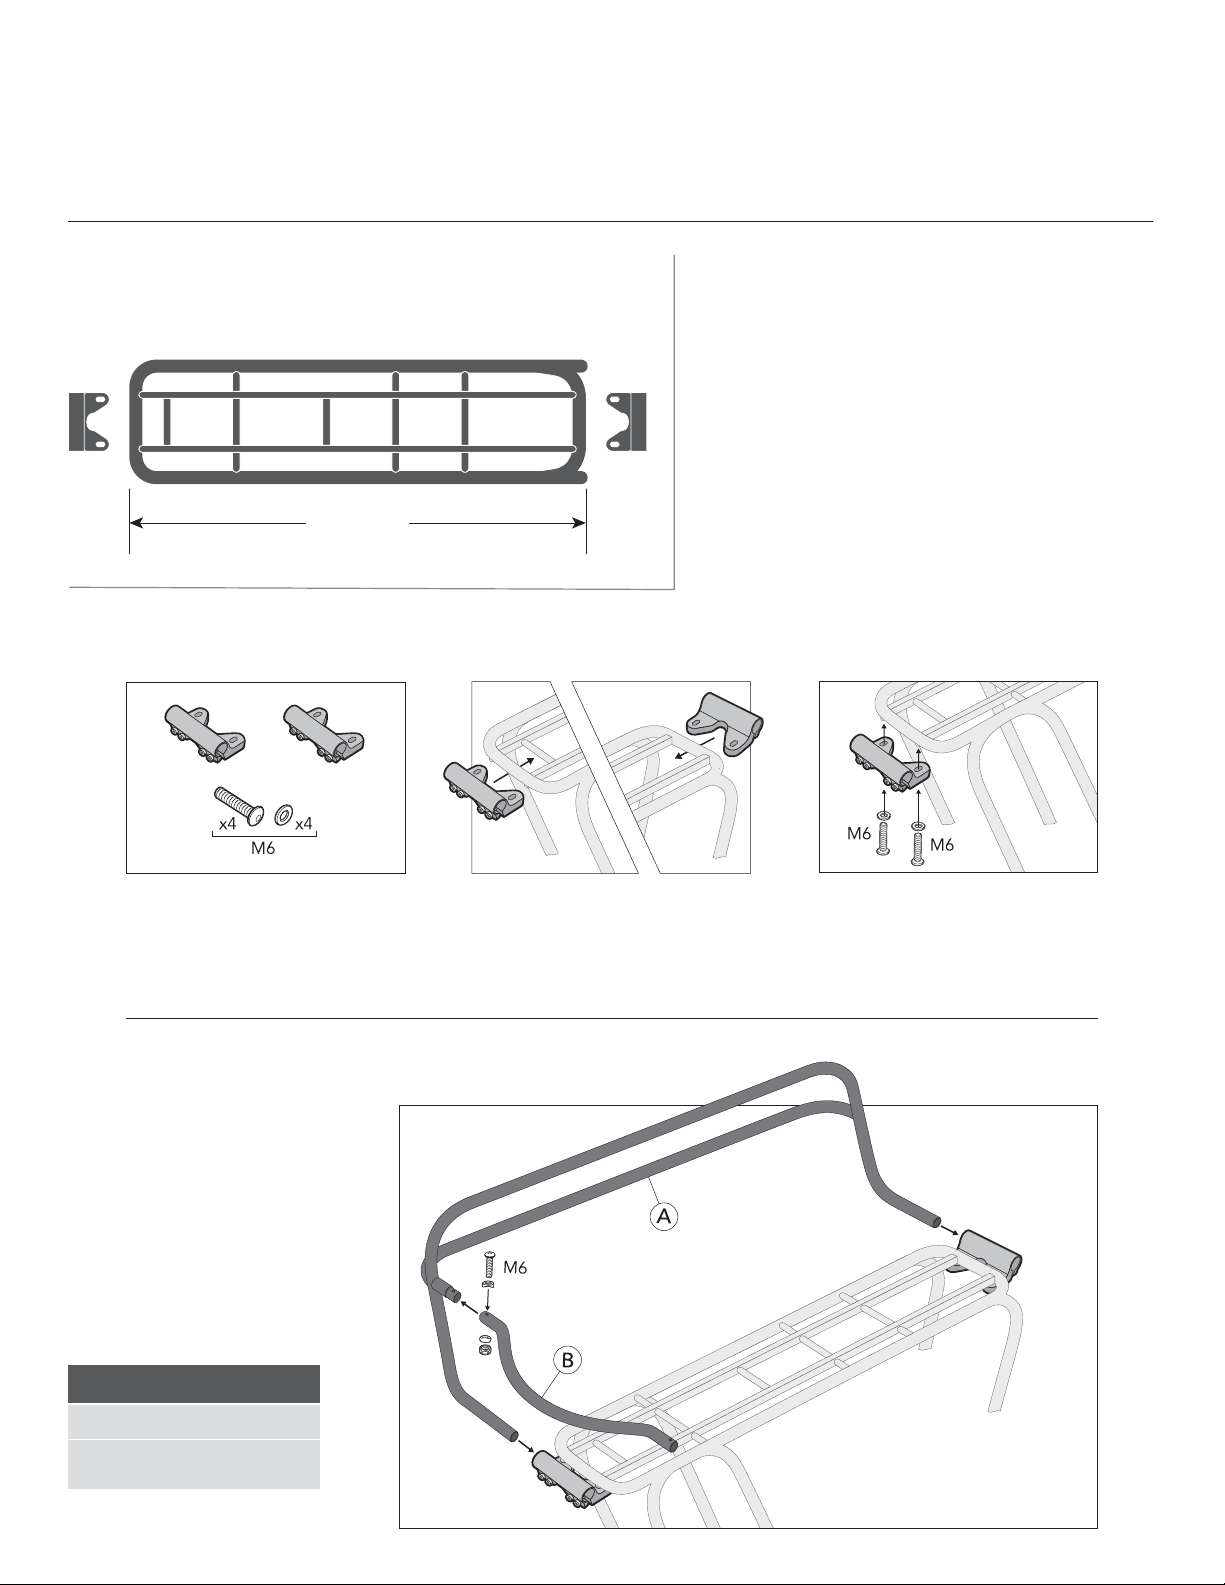
26”/66cm
Boost Rear Rack PLUS
IMPORTANT: Notes to mechanic: See diagram. Install Benno Rail
Clamps PLUS and Rails PLUS only on compatible Benno Boost
Rear Racks PLUS and use only pre-drilled holes and fittings. M5
bolts are to be tightened to 5Nm and M6 bolts to 6Nm. Do not
mount clamps and rails to damaged racks. Use only original
Benno Rails PLUS with Benno Rail Clamps PLUS. Do not modify
clamps, racks or rails, change position or drill new holes as this
will void any warranties and/or claims for liability.
Notes to owner: Periodically check to make sure all nuts and bolts
remain tightened as vibrations may loosen them. Ensure that
either Benno Wheel Guards or Utility Pannier Bags remain on the
bike while carrying passengers. Always make sure no parts of the
body or clothing come near moving parts on the bicycle such as
chain, spokes, tires or brakes.
STEP 1: RAIL CLAMP PLUS INSTALLATION (NOT INCLUDED/SOLD SEPARATELY)
2. Place one clamp on each end of the rack
(front and rear). Insert clamps from below
and line up with the two fittings on the
underside of the rack.
1. Ensure correct hardware count before
installation. Included are two clamps and
four M6 bolts and washers.
3. Insert the two M6 bolts through the
slotted holes of the clamp and screw into
the fittings on the underside of the rack.
HAND-TIGHTEN BOLTS SLIGHTLY — CLAMPS
STILL NEED TO BE ABLE TO MOVE.
4. Insert both lower ends of left rail (A)
from the left side all the way into the
center of the clamps until they come to
a stop. Loosen clamp bolts as needed for
easy insertion. DO NOT TIGHTEN YET.
Then connect rear rail (B) to the upper
end of the left rail (A) as shown. Use M6
bolt, spacers and nut as shown to ensure
connection between rail (A) and rail (B).
FRONT
REAR
STEP 2: HIGH RAIL PLUS INSTALLATION
COMPATIBILITY
BOOST
FOR BOOST EVOLUTION FINDER GO TO:
BENNOBIKES.COM/BOOST/EVOLUTION
EVO 4,5
EVO (evolution) replaces model years and refers
to design generations.

WWW.BENNOBIKES.COM/SUPPORT/HIGH_RAIL_PLUS
HIGH_RAIL_PLUS_INSTALLATION_MANUAL_AUG21 · COPYRIGHT 2021 BENNO® BIKES
WARNING! WHEN CARRYING PASSENGERS, REAR WHEEL MUST BE COVERED! INSTALL BENNO WHEEL GUARDS OR UTILITY PANNIER BAGS. FAILURE
TO DO SO COULD RESULT IN SERIOUS INJURY! MAKE SURE THAT NO PARTS OF THE BODY OR CLOTHING COME NEAR MOVING PARTS ON THE BICYCLE,
SUCH AS CHAIN, SPOKES, TIRES OR BRAKES. BENNO RAILS MAY HELP STABILIZE LOAD DURING NORMAL OPERATION BUT DO NOT PROTECT IN THE EVENT OF
AN ACCIDENT OR BIKE FALLING OVER. RAILS DO NOT INCREASE MAX LOAD INDICATED ON RACK. DO NOT SIT OR STAND ON RAILS.
INSTALL BENNO WHEEL GUARDS OR UTILITY
PANNIER BAGS WHILE CARRYING PASSENGERS.
5. Insert both lower ends of right rail (C)
from the right side into the center of the
clamps until they come to a stop while
connecting the upper end to the rear rail (B)
as shown. Use M6 bolt, spacers and nut as
shown to ensure secure connection
between rail (B) and rail (C).
FRONT
REAR
6. Once all pieces are installed, adjust and
straighten rails and clamps as needed.
IMPORTANT:
NOW TIGHTEN ALL HARDWARE FIRMLY
(see Nm in illustration).
Please double-check all 14 nuts and bolts.
Tighten all Hardware
(same as other side)


