BenQ E24 Series User manual

Welcome
E24/E26 Series LED Backlight TV
User Manual

Disclaimer
BenQ Corporation makes no representations or warranties, either expressed
or implied, with respect to the contents of this document. BenQ Corporation
reserves the right to revise this publication and to make changes from time to
time in the contents thereof without obligation to notify any person of such
revision or changes.
Copyright
Copyright 2011 BenQ Corporation. All rights reserved. No part of this
publication may be reproduced, transmitted, transcribed, stored in a retrieval
system or translated into any language or computer language, in any form or
by any means, electronic, mechanical, magnetic, optical, chemical, manual or
otherwise, without the prior written permission of BenQ Corporation.
SRS TruSurround HD
Safety, Warning, Notice, and Regulatory statements
Before you start using the TV, be sure to carefully read the documents for
safety, warning, notice, and regulatory statements on the accompanying CD.
is a trademark of SRS Labs, Inc.
TruSurround HD technology is incorporated under
license from SRS Labs, Inc.
SRS TruSurround HD™ creates an immersive, feature-
rich surround sound experience from two speakers,
complete with rich bass, high frequency detail and clear
dialog.

3
Table of Contents
Disclaimer........................................................................2
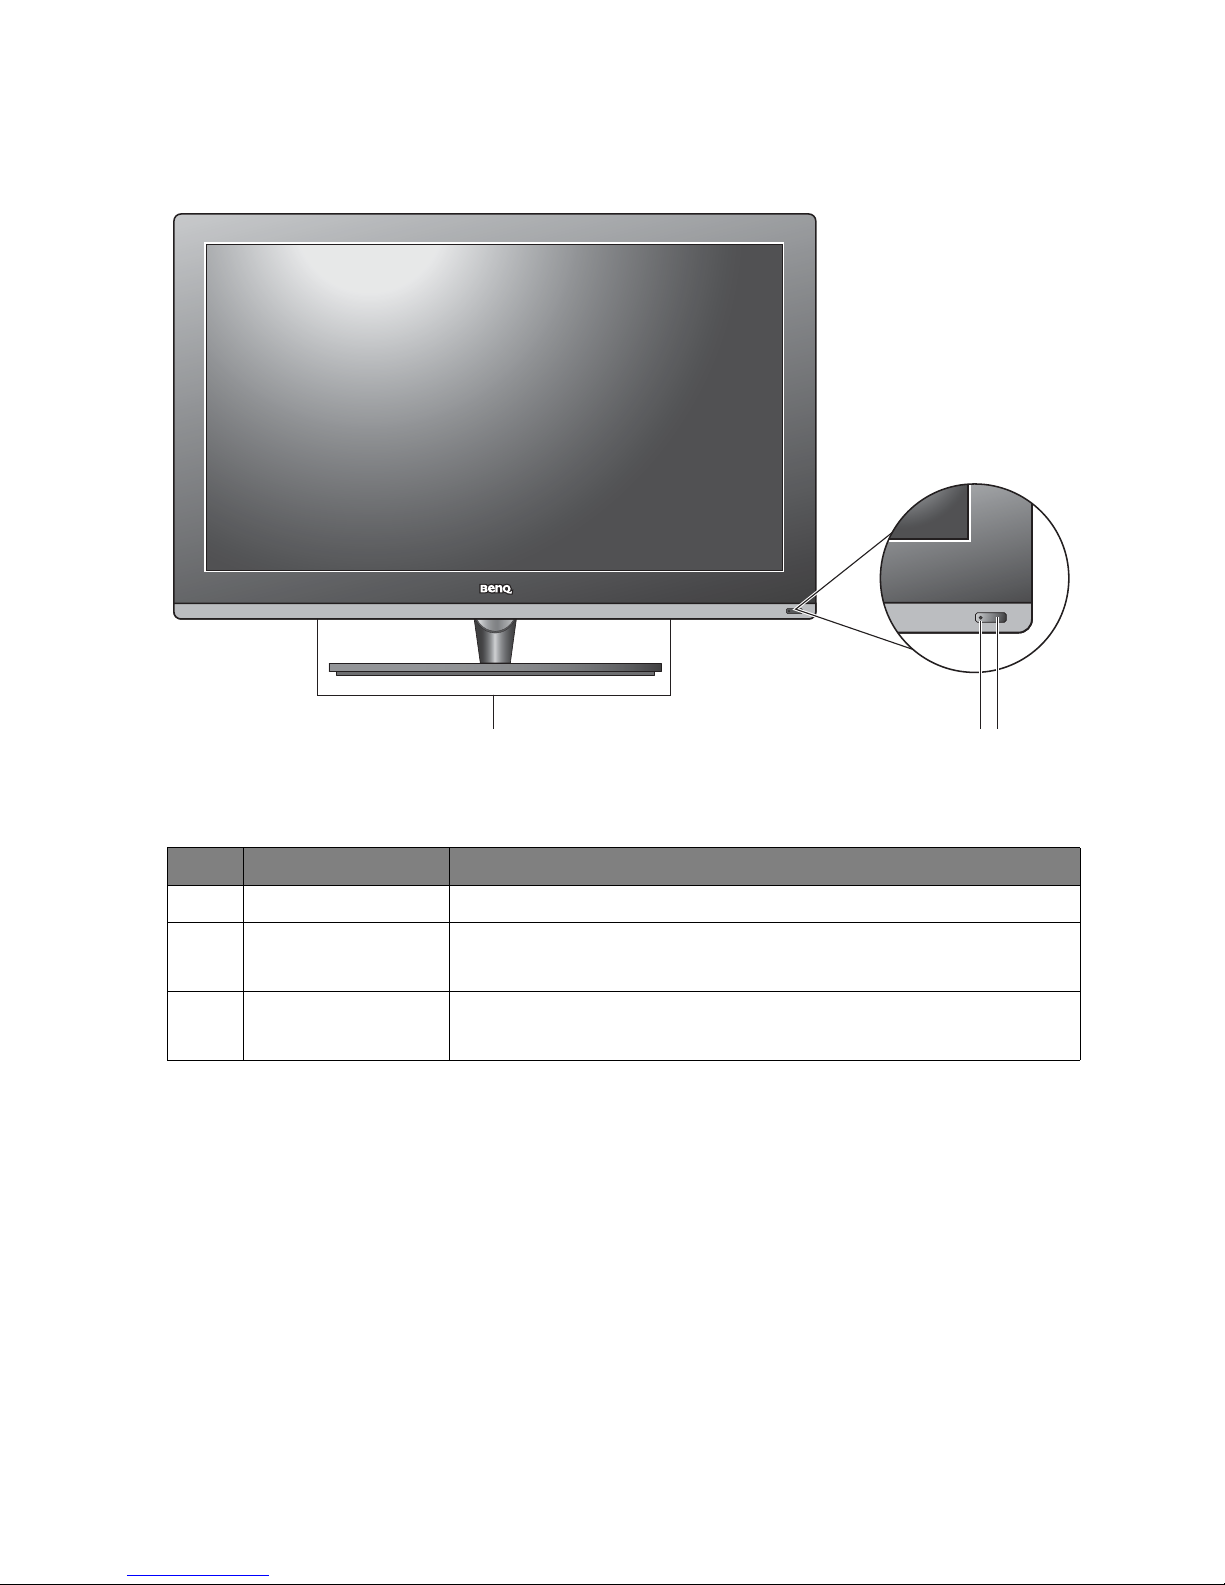
Getting to know your TV................................................5
Front view .................................................................................. 5
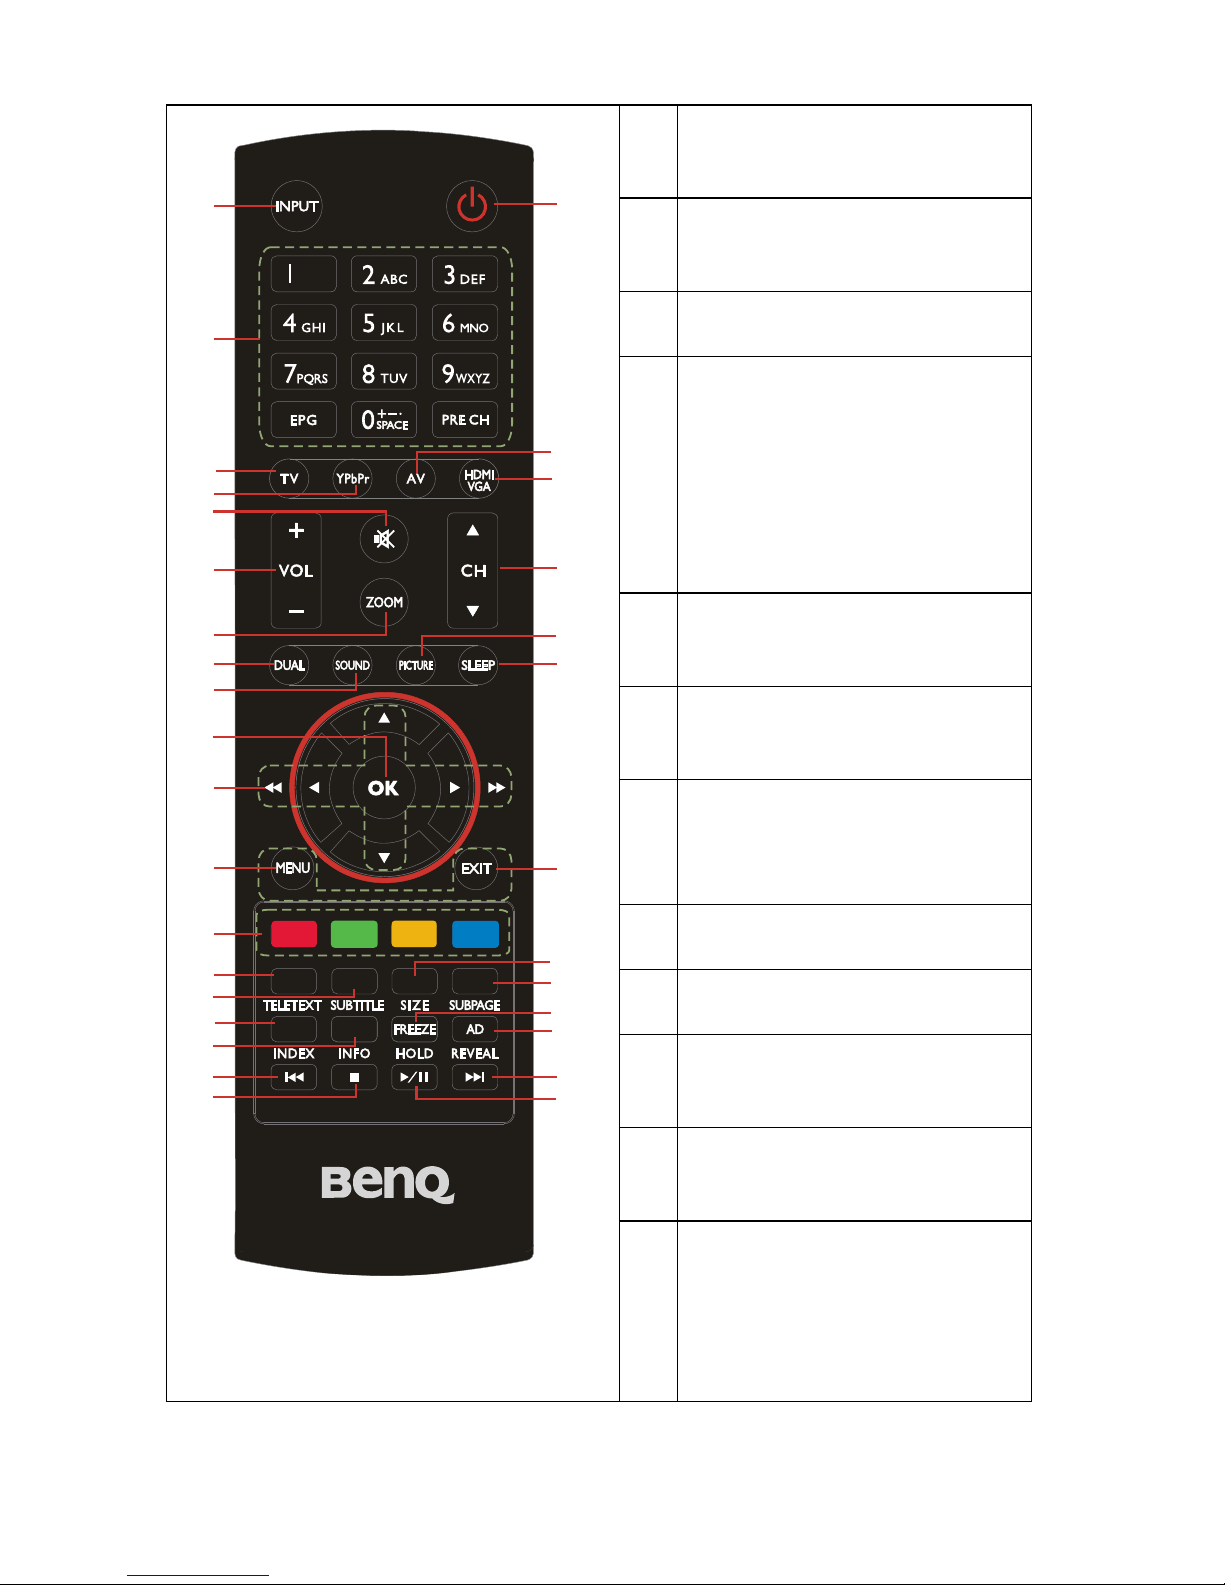
Remote Control ......................................................................... 6
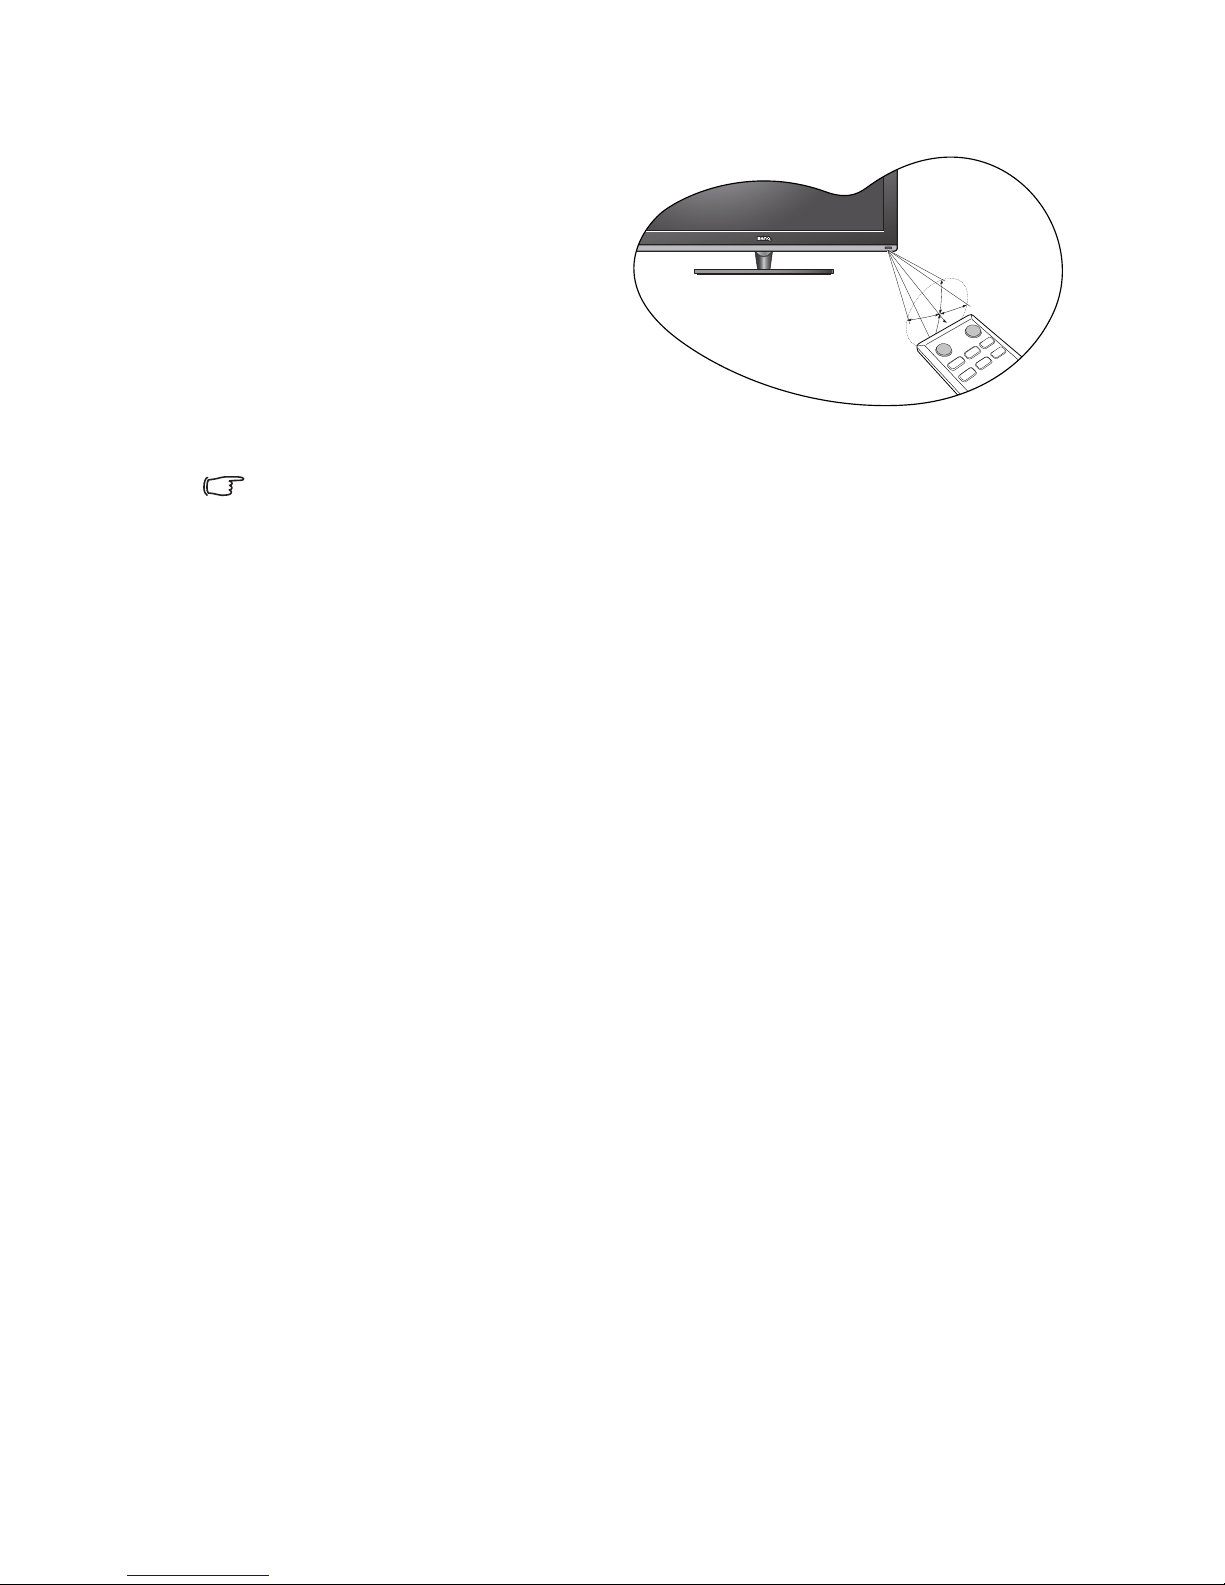
Remote control usage tips........................................................................9
Control panel........................................................................... 10
Rear view.................................................................................. 11
Connecting the Composite Video input ................................ 13
Connecting the SCART input................................................. 13
Connecting the S-Video input................................................ 14
Connecting the Component Video input .............................. 14
Connecting the computer D-Sub (VGA) input..................... 15
Connecting the computer DVI input..................................... 15
Connecting the HDMI input .................................................. 16
Connecting the SPDIF audio output...................................... 16
Connecting the antenna.......................................................... 17
Connecting the Common Interface........................................ 17
Connecting via USB ................................................................ 17
Connecting the headphone audio output.............................. 18
Adjusting aspect ratio.............................................................. 19
Navigating the OSD menu............................................21
Picture menu .................................................................................... 22
Picture menu (if connected to a computer via VGA) ..........................23
Sound menu ..................................................................................... 24
Channels menu ................................................................................ 25
Setup menu ...................................................................................... 26
Time-shift ......................................................................28
Viewing images/videos or listening to the music ........29
Reference .......................................................................30
Dimensions .............................................................................. 30

4
Specifications............................................................................32
Supported HDMI video timing .......................................................34
Supported computer (D-Sub/VGA) input signal resolutions .......35
Setting up appropriate output resolution on a computer....................35
Troubleshooting.......................................................................36

Getting to know your TV 5
Getting to know your TV
Front view
123
No. Name Description
1 Speakers --
2Remote control
sensor window --
3Power/status
indicator • Lights up blue when the TV is powered on.
• Lights up amber when the TV is in standby mode.

Getting to know your TV6
Remote Control
1 INPUT
Selects an input source.
2 Power
3 Number / Alphabet
• EPG: Enters or exits the Electronic
Program Guide.
• PRE CH: Returns to the previously
selected channel.
4 TV
Switches to the television mode.
5 YPbPr
Switches to the YPbPr (Component
Video) mode.
6 AV
Switches to the Composite Video or
the SCART mode.
7 HDMI / VGA
Switches to the HDMI or the
computer (VGA) mode.
8 MUTE
9 VOLUME
10 CHANNEL
11 ZOOM
Toggles among different picture
formats (in various display aspect
ratios).
12 DUAL
Toggles among different sound
channels.
13 SOUND
Toggles among different sound
effects.
1
3
4
5
8
11
12
13
18
20
9
21
22
25
26
29
30
16
17
2
6
7
14
15
19
10
23
24
27
28
31
32

Getting to know your TV 7
14 PICTURE
Toggles among different picture
modes.
15 SLEEP
Sets the countdown timer for the TV
to enter the standby mode.
16 OK
Confirms an input or setting.
17 Navigation controls
Moves through menus or program
guides.
Fast rewind / Fast forward
The left and right keys toggle among
different speeds for rapid
advancement during time-shift
playback.
18 MENU
Enters/exits the on-screen display
(OSD) menu.
19 EXIT
Returns to the upper level of the On-
Screen Display (OSD) menu.
20 Options (depicted by 4
colors)
Provides controls when Teletext or
USB device is in use.
21 TELETEXT
Displays or hides Teletext.
22 SUBTITLE
Turns on/off subtitles.
23 SIZE
To g g l e s a m o n g d i f f e re n t Te l e t e x t
display modes.
24 SUBPAGE
Displays Teletext information on
other pages.
25 INDEX
Displays the Teletext index page.
TV programming list
Displays the current TV
programming list for you to choose
from.
1
3
4
5
8
11
12
13
18
20
9
21
22
25
26
29
30
16
17
2
6
7
14
15
19
10
23
24
27
28
31
32

Getting to know your TV8
Time-shift is only available for digital TV channels only.
26 INFO
Displays resolution information or
more information on Teletext.
27 FREEZE
Turns on/off the frozen TV picture
screen.
HOLD
Stops loading more Teletext.
28 AD (Audio Description)
Provides additional audio
commentary (if available).
REVEAL
Displays hidden Teletext information.
29 Play backward
Moves backward a little during time-
shift playback.
30 Stop
Exits the time-shift mode.
31 Play forward
Moves forward a little during time-
shift playback.
32 Record / Play / Pause
• Starts time-shift recording
• Starts time-shift playback
• Temporarily stops playback during
time-shift playback.
1
3
4
5
8
11
12
13
18
20
9
21
22
25
26
29
30
16
17
2
6
7
14
15
19
10
23
24
27
28
31
32

Getting to know your TV 9
Remote control usage tips
• Do not let the remote control become wet, or place it in humid environments (like
bathrooms.)
• If the remote control sensor window on the TV is in direct sunlight or strong light, the
remote control may not operate properly. In this situation, change the light source or
readjust the angle of your TV, or operate the remote control from a location closer to
the remote control sensor window on the TV.
• The remote control must be held at an
angle within 30 degrees of the TV's
remote control sensor window to
function correctly. The distance
between the remote control and the
sensors should not exceed 6 meters.
• Do not cover the sensor window on the
front of the TV, or place objects in front
of it which will block the direct line-of-
sight between the remote control and
the sensor window on TV.
30 degrees
6meters

Getting to know your TV10
Control panel
No. Name Remote
Control Description
1MENU button Enters or exits the OSD menu.
2VOL (Volume)
+/-button • +: Volume up / Navigates to the right (OSD)
• -: Volume down / Navigates to the left (OSD)
1
2
3
4
5

Getting to know your TV 11
Rear view
3CH (Channel)
/button • : Channel up / Moves up (OSD)
• : Channel down / Moves down (OSD)
4INPUT button
• Selects an input source.
• In the OSD menu, executes selections or to enter
a submenu you have selected.
5Power Turns on/off the TV.
AC Power In
E24

Getting to know your TV12
Front views, rear views, available jacks, jack names, and their locations may be
different depending on the TV models available in your country or region.
Common
Interface
HDMI 2
LR
YPb Pr
SPDIF OUT
HDMI 1
VGA
S-VIDEO
AV L R
SCART
ANTENNA
AV IN
PC
AUDIO IN
AC Power In
E26
YPbPr SCART
HDMI
Common
Interface
USB
HDMI
headphone
output
SPDIF
VGA
PC Audio In
S-Video AV In Antenna

Getting to know your TV 13
Connecting the Composite Video input
Connecting the SCART input
AV L R
AV IN
LR
YPb Pr
SPDIF OUT
HDMI 1
VGA
S-VIDEO
AV L R
SCART
ANTENNA
AV IN
PC
AUDIO IN
VCR
Composite Video (AV) cable
LR
YPb Pr
SPDIF OUT
HDMI 1
VGA
S-VIDEO
AV L R
SCART
ANTENNA
AV IN
PC
AUDIO IN
SCART
AV device
SCART cable

Getting to know your TV14
Connecting the S-Video input
Connecting the Component Video input
LRS-VIDEO
LR
YPb Pr
SPDIF OUT
HDMI 1
VGA
S-VIDEO
AV L R
SCART
ANTENNA
AV IN
PC
AUDIO IN
DVD player
Audio cable
S-Video cable
LRYPb Pr
LR
YPb Pr
SPDIF OUT
HDMI 1
VGA
S-VIDEO
AV L R
SCART
ANTENNA
AV IN
PC
AUDIO IN
TV game console
Component
Video cable
Audio cable

Getting to know your TV 15
Connecting the computer D-Sub (VGA) input
Connecting the computer DVI input
VGA
PC
AUDIO IN
LR
YPb Pr
SPDIF OUT
HDMI 1
VGA
S-VIDEO
AV L R
SCART
ANTENNA
AV IN
PC
AUDIO IN
Computer
Audio cable
D-Sub cable
Common
Interface
HDMI 2
PC
AUDIO IN
LR
YPb Pr
SPDIF OUT
HDMI 1
VGA
S-VIDEO
AV L R
SCART
ANTENNA
AV IN
PC
AUDIO IN
DVI to HDMI adaptor cable
Audio cable
Computer
or

Getting to know your TV16
Connecting the HDMI input
Connecting the SPDIF audio output
Be sure to turn on SPDIF from the TV OSD menu after cable connection is complete.
Common
Interface
HDMI 2
LR
YPb Pr
SPDIF OUT
HDMI 1
VGA
S-VIDEO
AV L R
SCART
ANTENNA
AV IN
PC
AUDIO IN
HDMI cable
Blu-ray disc player
or
SPDIF OUT
LR
YPb Pr
SPDIF OUT
HDMI 1
VGA
S-VIDEO
AV L R
SCART
ANTENNA
AV IN
PC
AUDIO IN
Coaxial SPDIF audio cable
Amplifier

Getting to know your TV 17
Connecting the antenna
Connecting the Common Interface
Connecting via USB
LR
YPb Pr
SPDIF OUT
HDMI 1
VGA
S-VIDEO
AV L R
SCART
ANTENNA
AV IN
PC
AUDIO IN
Antenna
Common
Interface
HDMI 2
Card provided by
TV broadcaster
Common
Interface
HDMI 2
To a USB device

Getting to know your TV18
Connecting the headphone audio output
• Once connected, the TV’s built-in speakers will be muted automatically. The volume
level can be adjusted from the TV and the remote control.
• Avoid prolonged use of the headphone or listening in an excessive volume level,
otherwise your hearing will be damaged.
Common
Interface
HDMI 2
Stereo headphone

Getting to know your TV 19
Adjusting aspect ratio
The TV can resize and reshape an image to suit your requirements. The visual
result depends upon the setting your have chosen, and the original aspect
ratio of the input image. Press Zoom on the remote control to cycle through
different aspect ratios.
Auto Normal 4:3 Wide
Video
source
(HD) 4:3
X
Video
source
(HD) 16:9
X
Video
source
(SD) 4:3
X
Video
source
(SD) 16:9
X
Computer
source 4:3 XX X
Computer
source
16:9
XX X

Getting to know your TV20
• “X” means that the related aspect ratio is not available.
• Available aspect ratio options are dependent on the type of input signal being
selected. When the TV is connected to a computer (via D-Sub or HDMI), only 16:9
and 4:3 are available for selection.
• If the input video signal is inletter box format, select “Zoom” to obtain a wider viewable
area.
• To avoid possible “image retention” or “screen burn-in” on the LCD screen of your TV,
it is recommended that you change the aspect ratio from time to time and prevent the
TV from displaying a static image for a prolonged period of time.
• The available menu items are dependent on the input source being selected.
Unavailable items will be greyed out or not displayed.
Zoom 1 Zoom 2 Panorama Full Screen
Video
source
(HD) 4:3
XXXX
Video
source
(HD) 16:9
XXXX
Video
source
(SD) 4:3
X
Video
source
(SD) 16:9
X
Computer
source 4:3 XXX
Computer
source
16:9
XXX
This manual suits for next models
3
Table of contents
Other BenQ TV manuals