Berghoch HDDVR Series Technical manual

HD DVR recording device
Assembly & Planning

Create security yourself.

Declaration of conformity
Planning
Information about the monitoring system
The cables
Connection to the switch
Tips to build
Construction
Connecting the HD DVR recorder
IMPORTANT NOTE on the power supply
Connect cameras
IMPORTANT NOTICE about the mountain-top POE system
The POE network switches
Connect POE network switches
Switches included
Connection without internet
Connection with Internet
Supply multiple switches with power
Supply two switches with power
Power more than two switches
Systems with> 10 cameras
Commissioning
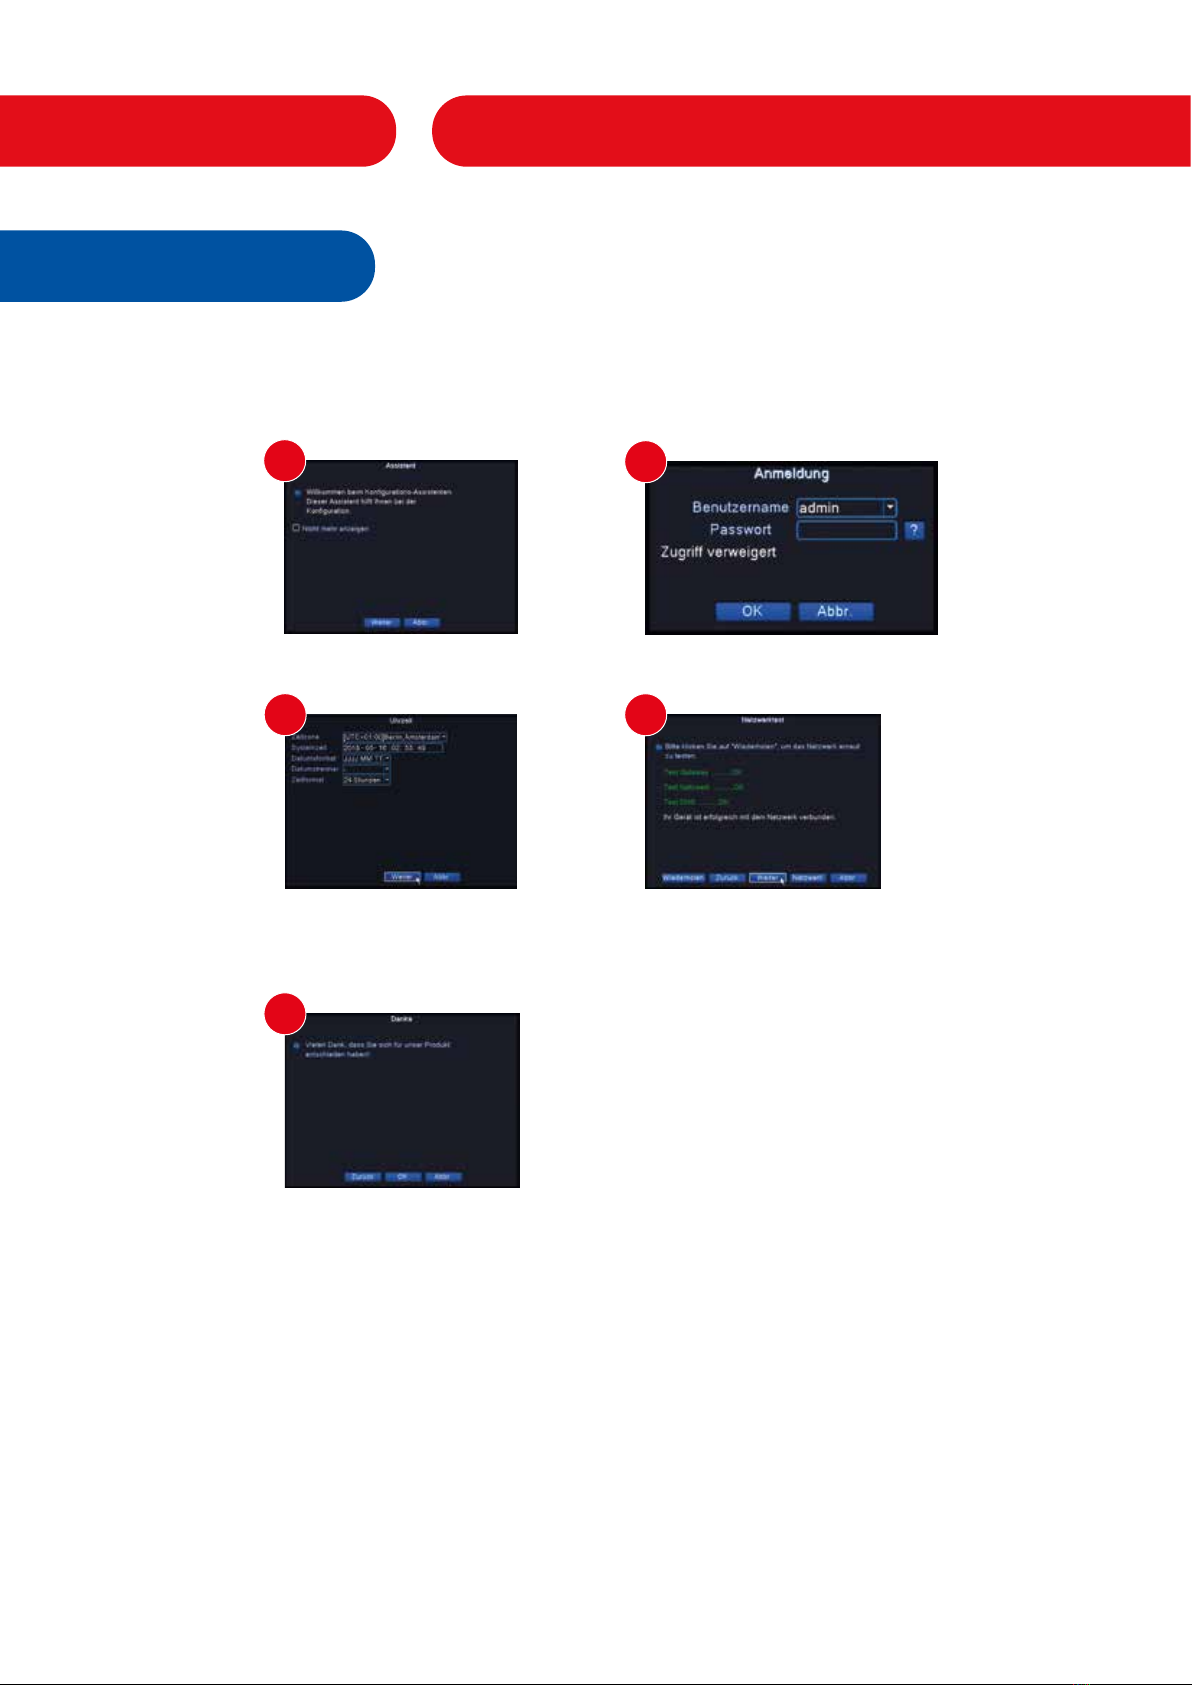
Start Wizard
Optimization of the HD DVR
fluidity picture
Assembly
Assembly 1080p cameras
Assembly 4MP cameras
Assembly 4MP dome cameras
Assembly instructions
After assembly
Connection without POE switch
Table of Contents
1
from 2
2
2
2
2
from 3
3
3
4
4
5
5
5
6
7
8
8
9
10
from 11
11
12
12
from 13
13
13
14
15
16
16

Damage caused by disregarding this manual invalidates the guarantee! For consequential
damages there is no liability!
Any damage to property or personal injury caused by improper handling or failure to observe
the safety instructions will invalidate any liability and warranty claims.
Commissioning must be carried out by qualified personnel to ensure safe operation. The
system must be maintained continuously.
BERGHOCH assumes no liability for damage caused by the system, faulty alarm, defect and /
or the resulting damage caused by third parties.
This is to certify that this product complies with the requirements of the Council Directive for
the approximation of Member States' legislation with regard to the Directive on
Electromagnetic compatibility 2004/108 / EEC met. This is a class A product.
In residential environments, this product may cause radio interference. In this case, it is up to
the user to take appropriate measures to remedy the fault.
Technical and software changes reserved, all illustrations are similar.
Hints 1
Declaration of conformity
Class A

Planning2
Information about the monitoring system
The BERGHOCH monitoring system works digitally with BERGHOCH IP network cameras.
The cameras are supplied with power via the network cable. There are no additional power
cables to the camera to be placed.
The cables
The supplied cables for the cameras are 30m long. It is not possible to extend the cable with
an adapter.
We recommend to buy a new cable in the appropriate size. These are standard network
cables that you can buy at the lowest price on the Internet.
Network cables come in different categories. From 30m to 60m you need CAT 6 network
cable.
From 60m to max. 100m you need CAT 7.
We recommend to test the cable before laying, as there are different qualities between manu-
facturers.
When laying flush-mounted, the purchase of network cable on a roll is recommended.
The rolls are available as installation cables in various lengths.
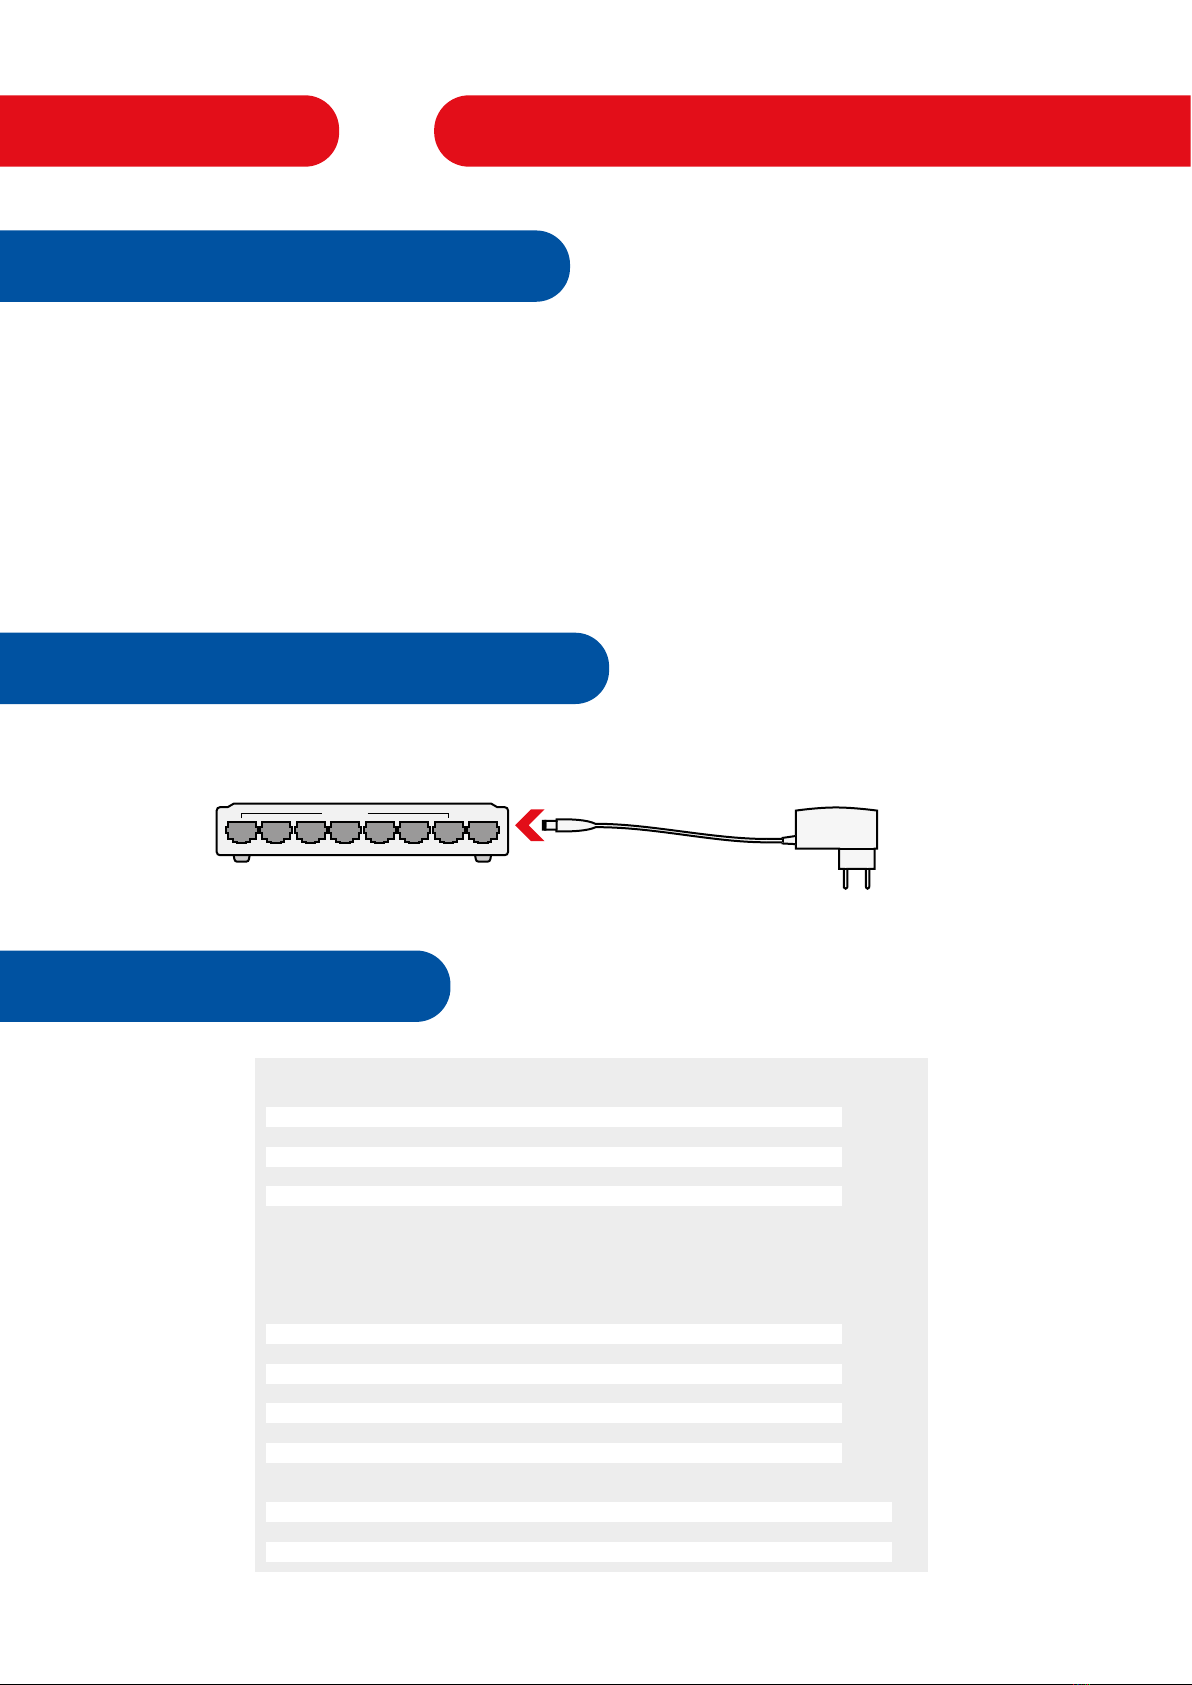
Connection to the switch
It is possible to use several POE network switches in one system.
Use at least CAT 6 network cable and from 60m to max. 100m CAT 7 network cable to connect
the POE network switches.
Before you install the system permanently, we recommend that you first set up the system on
a table. This gives you the opportunity to familiarize yourself with the technology and to
clarify any questions before the final installation.
Tips for building

Construction 3
For the first setup, the HD DVR recorder must be connected to an external monitor or TV. The
connection is made via the HDMI or VGA connection.
The enclosed computer mouse can be connected at the front or the back to a USB port.
After that, the power adapter is connected to the HD DVR and then plugged into the power
outlet.
HDMI USB MOUSE
USB2.0
RJ45
DC12V
+-
VGA
12V
Monitor
HMDI cable
Connecting the HD DVR recording device
Computer mouse
Only use the 12 Volt power supply for the HD DVR!
Other power supplies would damage the device and lead to the loss of the warranty!
IMPORTANT NOTE about the power supply
12V
YES
24V
NO

Construction4
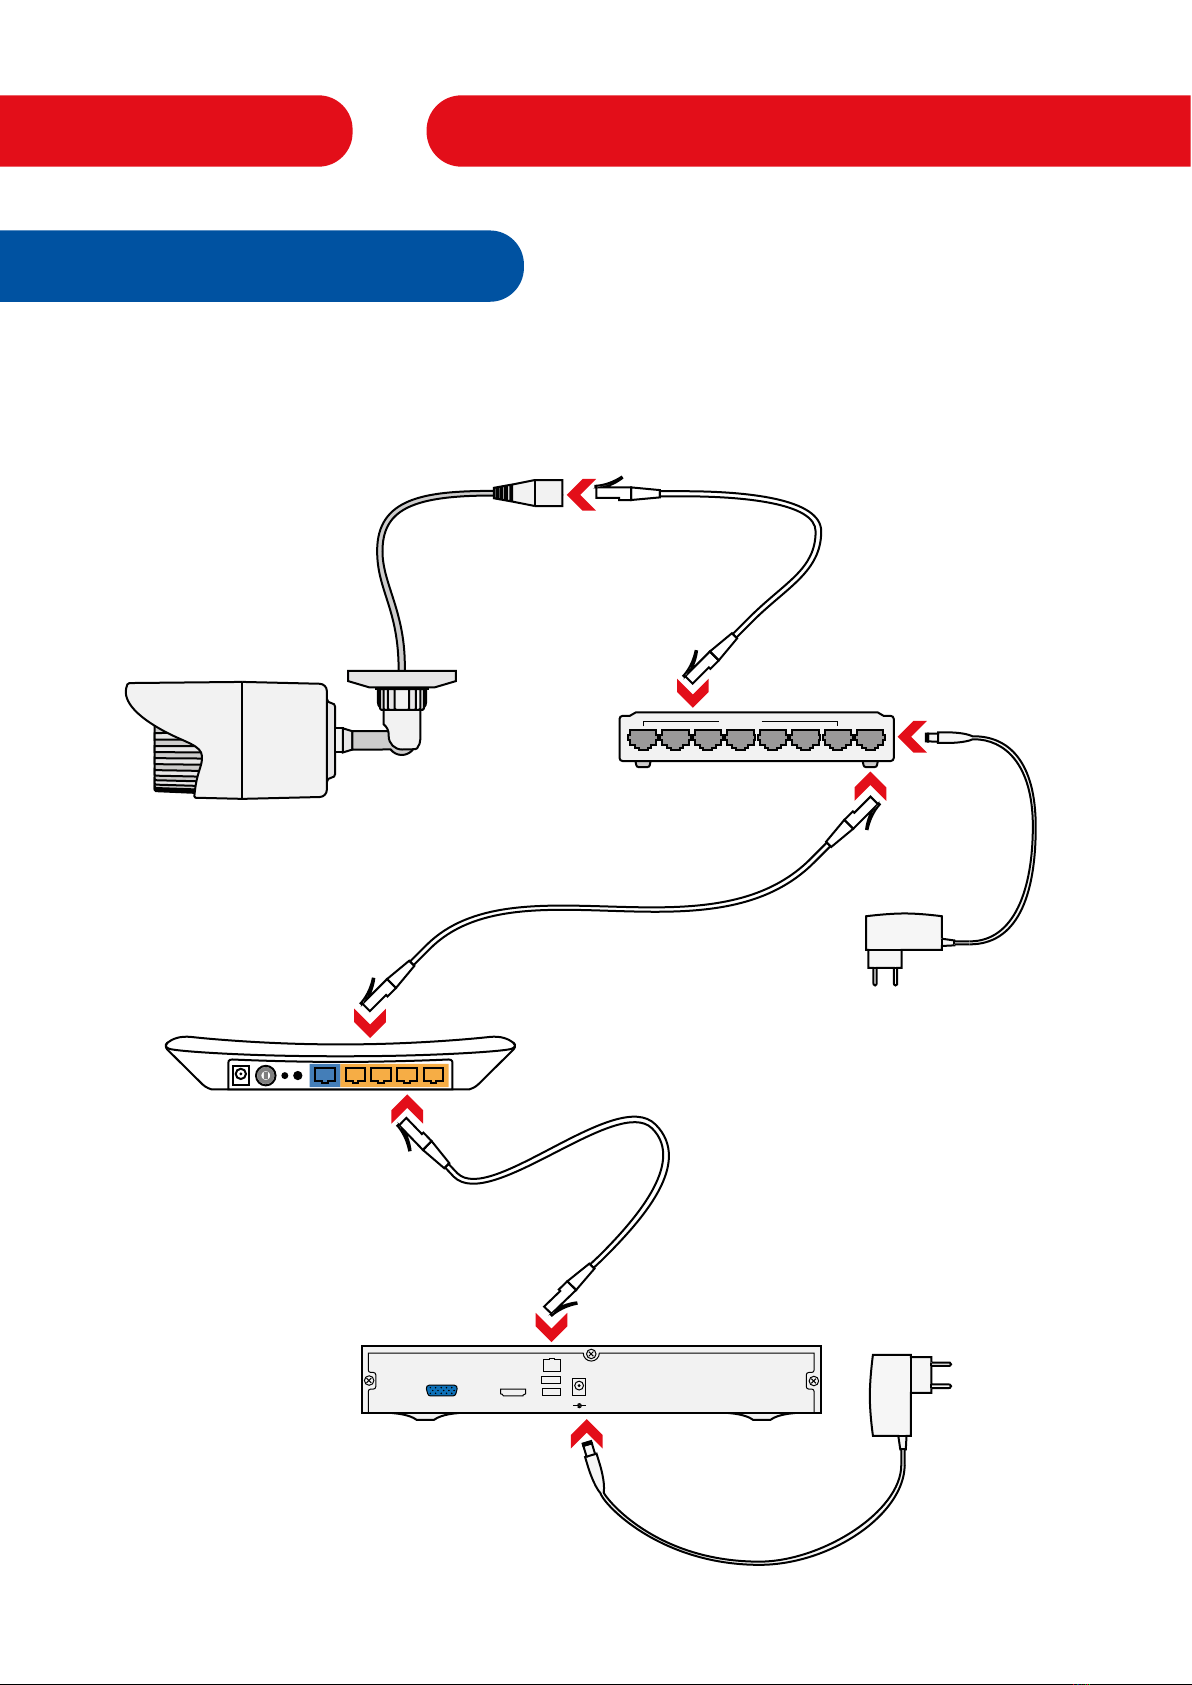
Connect cameras
The cameras have, depending on the model, a built-in or attached to the camera POE voltage
converter. The POE voltage converter provides the power from the network cable in 12V.
Camera version with internal POE voltage converter:
LINK POWER UP link
8 7 6 5 4 3 2 1
In the house Outside with
weather-sleeve
(waterproof)
IMPORTANT NOTICE about the mountain-top POE system
BERGHOCH IP surveillance cameras are only compatible with BERGHOCH POE network swit-
ches (24V).
You can not use the cameras with standard POE network switches.
These work with up to 52 volts and destroy the electronics of the camera.
This would result in the loss of the warranty.
BERGHOCH POE network switch
BERGHOCH camera with
internal POE voltage
converter
Network cable
Cameras can be
connected to everyone
Ports, except the "UPLINK"
Port can be connected
The POE network switch does not have to be near the HDDVR device and can be set up, for
example, in another room or building.
Each BERGHOCH system has a 1m network cable per switch. For longer distances use CAT 6
network cables and for distances from 60 to 100m CAT 7 network cable.
We recommend to test the cable before laying, as there may be quality differences between
the manufacturers.
Construction 5
The POE network switches
Connect the enclosed 24V power supply to the POE network switch.
Connect POE network switch
LINK POWER UP link
8 7 6 5 4 3 2 1
BERGHOCH POE network swtich
24V
Switches included
BERGHOCH HDDVR video surveillance set
Scope of delivery 7 + 1 port 8 + 1 port 24V power supply
2 cameras 1x 1x
4 cameras 1x 1x
6 cameras 1x 1x
8 cameras 1x 1x
The video surveillance sets from 10 cameras will be additional
still a standard network Gigabit Switch included. The wiring
should be star-shaped. See example on page 8.
10 cameras 2x 2x
12 cameras 2x 2x
14 cameras 2x 2x
16 cameras 2x 2x
18 cameras 2x 3x
20 cameras 3x 3x
22 cameras 3x 3x
24 cameras 3x 3x
7 + 1 port version = 7 ports with power (24V) and an uplink port for router / HDDVR
8 + 1 port version = 8 ports with power (24V) and one uplink port for router / HDDVR

Construction6
Connection without internet
LINK POWER UP link
8 7 6 5 4 3 2 1
BERGHOCH POE
Network switch
BERGHOCH camera with
internal POE voltage
converter
Network cable
Cameras can be connected
to everyone Ports,
except the "UPLINK"
Port can be connected
24V
HDMI USB MOUSE
USB2.0
RJ45
DC12V
+-
VGA
12V
If your surveillance system is to be connected without an Internet connection, connect the
HDDVR directly via the network cable to the "UPLINK" port of the POE switch.
HD DVR only to the "UPLINK"
Connect the port of the POE switch
Construction 7
Connection with internet
LINK POWER UP link
8 7 6 5 4 3 2 1
BERGHOCH POE
network switch
BERGHOCH camera with
internal POE voltage
converter
Network cablel
Cameras can be connected
to everyone Ports,
except the "UPLINK"
Port can be connected
24V
HDMI USB MOUSE
USB2.0
RJ45
DC12V
+-
VGA
12V
If your surveillance system is to be connected to the internet, connect your router to the
"UPLINK" port of the POE switch.
You also need to connect the HD DVR to your router.
HD DVR only to the "UPLINK"
Connect the port of the POE switch
your
network
router
Not contain
in
delivery
Exactly this is how it is
with several POE switches.
Construction8
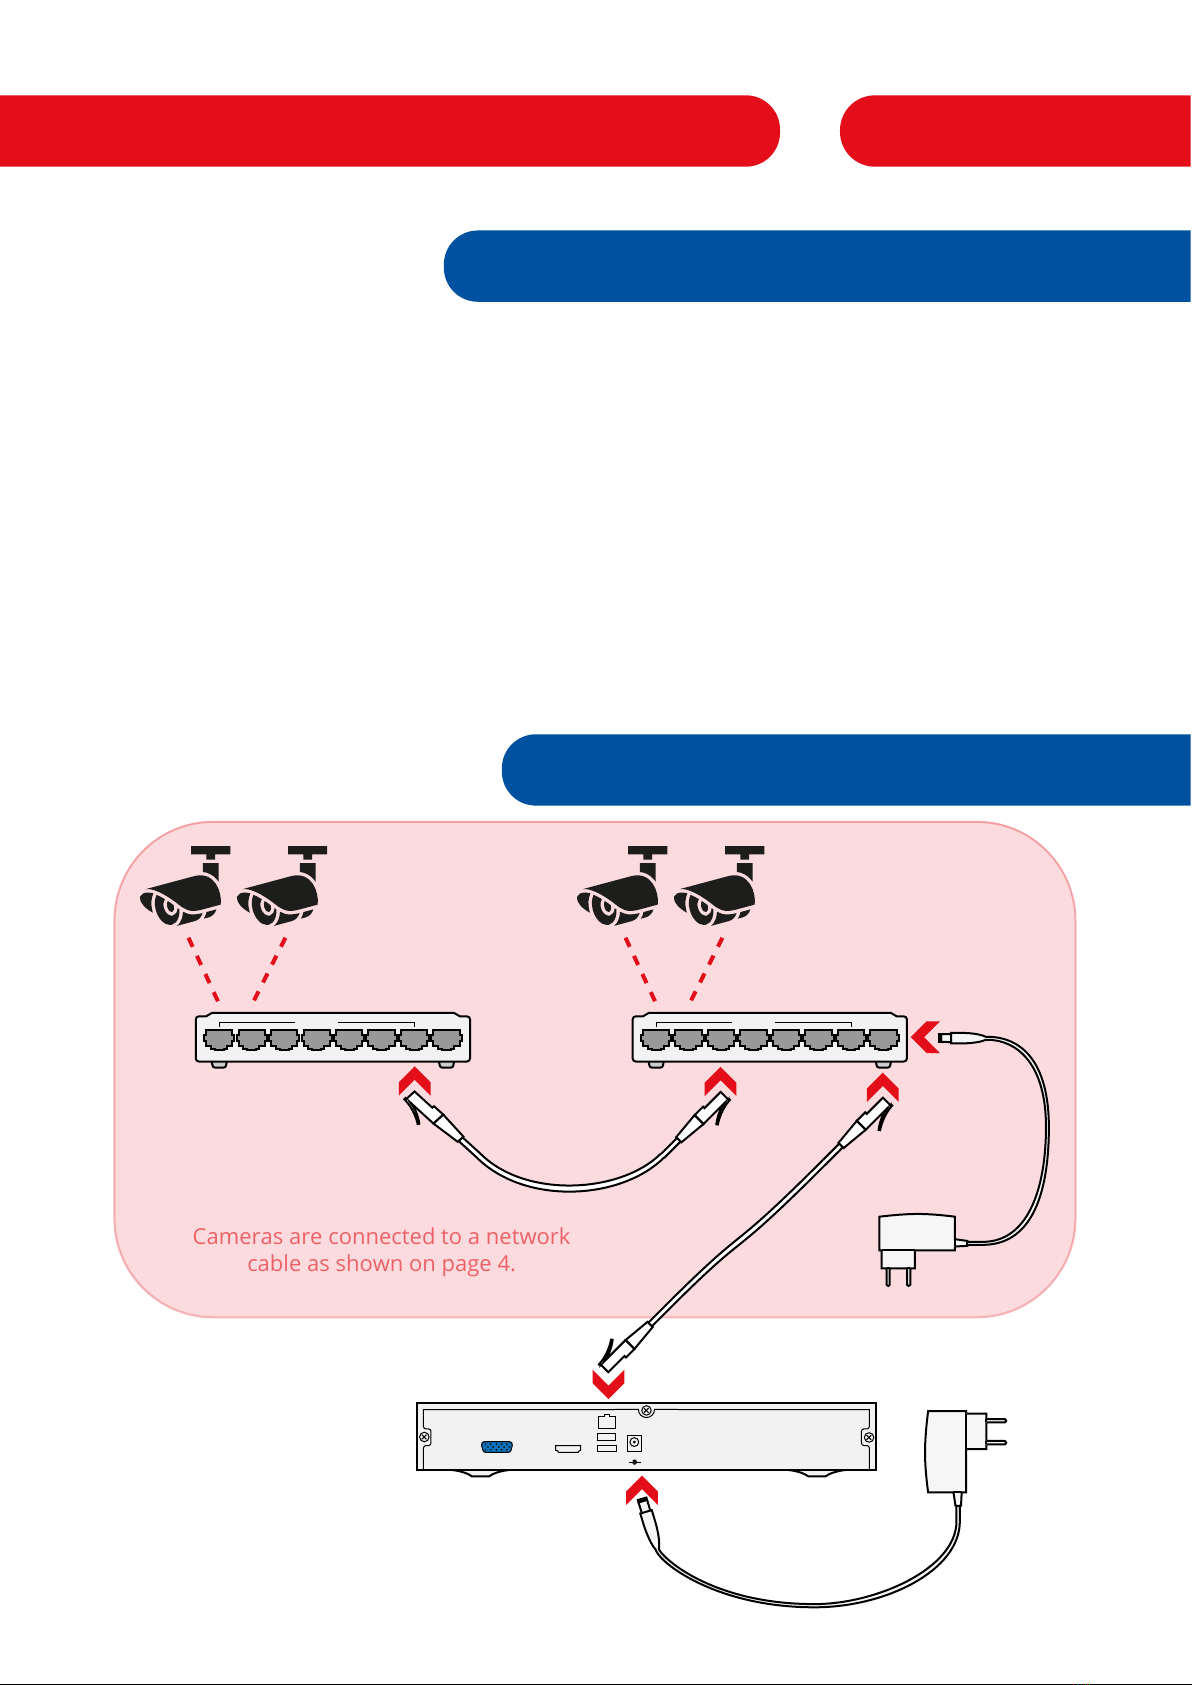
Supply multiple switches with power
The use of POE network switches makes cabling easier and there is no need to have a power
outlet with each camera.
A maximum of two POE network switches can be connected in series, otherwise the data rate
is insufficient.
If you want to connect a POE switch to a second one, do not use the "UPLINK" port. (see
picture below)
We recommend that you test the configuration on a desk before you install it, because depen-
ding on the length and quality of the network cables, the power can be reduced and may not
be enough to supply enough power to all the cameras.
A maximum of 8 cameras can be supplied with one power supply.
LINK POWER UP link
8 7 6 5 4 3 2 1
24V
LINK POWER UP link
8 7 6 5 4 3 2 1
Network cable Network cable
HDMI USB MOUSE
USB2.0
RJ45
DC12V
+-
VGA
12V
HD DVR only to the "UPLINK"
Connect the port of the POE switch
Supply two switches with power
max. 8 cameras per power supply
Cameras are connected to a network
cable as shown on page 4.
Construction 9
power more than two switches
LINK POWER UP link
8 7 6 5 4 3 2 1
24V
LINK POWER UP link
8 7 6 5 4 3 2 1
Network cable Network cable
HDMI USB MOUSE
USB2.0
RJ45
DC12V
+-
VGA
12V
HD DVR only to the "UPLINK"
Connect the port of the POE switch
max. 8 cameras per power supply
LINK POWER UP link
8 7 6 5 4 3 2 1
LINK POWER UP link
8 7 6 5 4 3 2 1
Network cable

Construction10
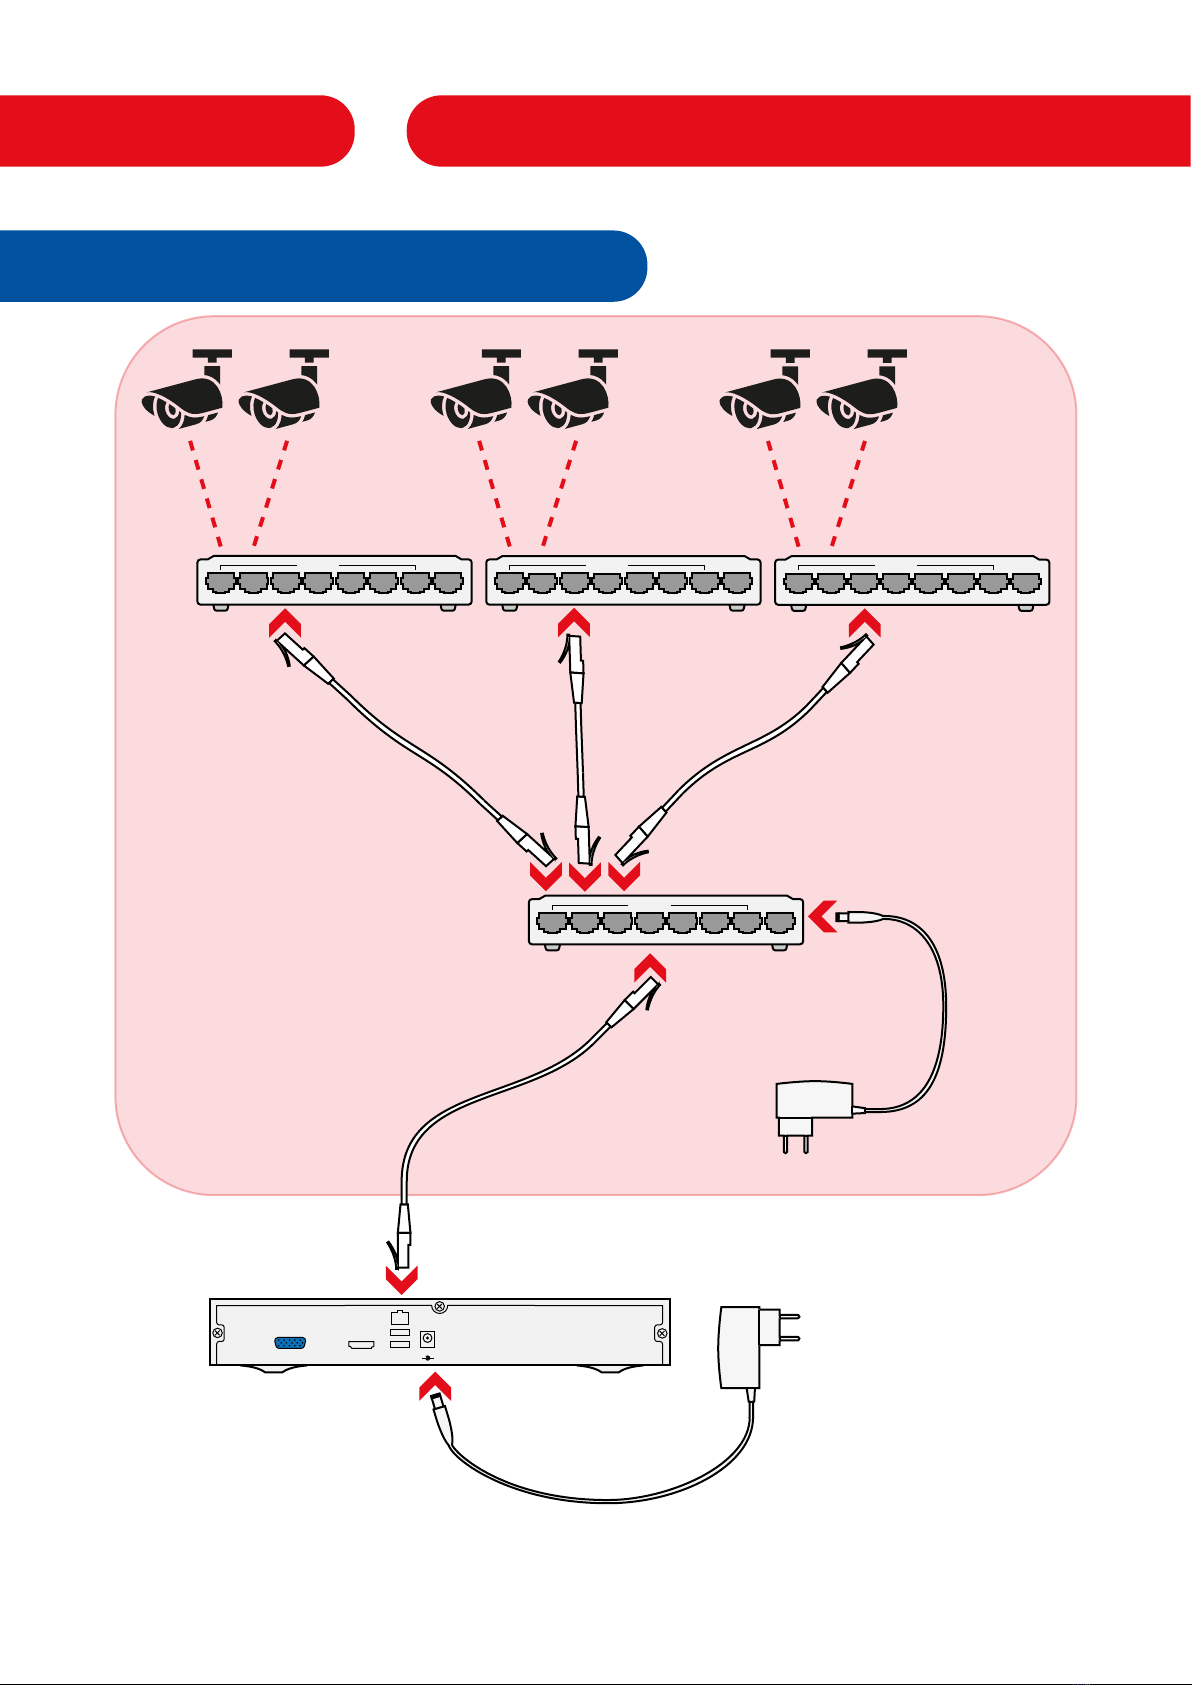
Systems with> 10 cameras
In a large system, always connect the POE network switches in a star shape.
Otherwise, there may be a reduction in the data rate in the network.
LINK POWER UP link
8 7 6 5 4 3 2 1
24V
LINK POWER UP link
8 7 6 5 4 3 2 1
Network cable
Network cable
max. 8 cameras
per power supply
LINK POWER UP link
8 7 6 5 4 3 2 1
24V
max. 8 cameras
per power supply
LINK POWER UP link
8 7 6 5 4 3 2 1
24V
max. 8 cameras
per power supply
Network router
(optional)
HDMI USB MOUSE
USB2.0
RJ45
DC12V
+-
VGA
12V
HD DVR
recording device
8 7 6 5 4 3 2 1
Gigabit network switch
(included in delivery
from 10 cameras)
Always use the "UPLINK" port
to connect the
gigabit network switch!
Commissioning 11
Start-wizard
If you have a power adapter (12 V) connected to the HD DVR, it automatically powers up.
When starting for the first time, a wizard opens to guide you through your first steps on the
HD DVR:
Press "Next" Press “OK“
Set date / time
and press "Next"
Press "Next"
Press “OK“
1. 2.
3. 4.
5.
By default, no password is assigned to the HDDVR recorder.
Just press "OK" when the HDDVR recording device asks for a password.
Hints about step 4 .:
It may take up to 5 minutes for the HDDVR recorder to perform the test in a positive way. If no
internet router is connected, the network test will always be negative.
Go to "Next".

Commissioning12
Optimization of the HD DVR
If you see any jerkiness or black images in the preview of the HD DVR or in the Mobile APP,
you can adjust the "secondary data stream".
Go to the menu item Main menu> System> Encode.
In the right column (side data) set the resolution from "D1" to "CIF" (for 4MP: from "720P" to
"D1") and the BpS from 25 to 7.
Repeat the step for all affected channels.
Fluidity picture
If there are fragments or parts missing in the recordings, the encoding can be changed.
Go to the menu item Main menu> System> Digital> Digital channels.
Select the channel and set the coding from "Medium" to "Liquid 4".

Assembly 13
Assembly 1080p-Cameras
Our BERGHOCH IP network cameras are easy to mount.
Please do not loosen the screw connection with force or a tool.
The brackets can be opened easily by hand.
Assembly 4MP-Cameras
Our BERGHOCH IP network cameras are easy to mount.
Please do not loosen the screw connection with force and only with the enclosed tool.
outdoor camera-
Loosen ring for alignment
Dome camera-
Camera shell loose to the alignment.
4MP outdoor camera-
Loosen screws for alignment.
Mounting holes for attachment.

Assembly14
Assembly 4MP- Dome cameras
Our BERGHOCH IP network cameras are easy to mount.
Please do not loosen the screw connection with force and only with the enclosed tool.
Screws open for installation. Adjusting screws of the lens for
align.
Open the screw cap on the side cable version. Open pre-cut groove with a side cutter.
solve
Left Right
adjust
Assembly 15
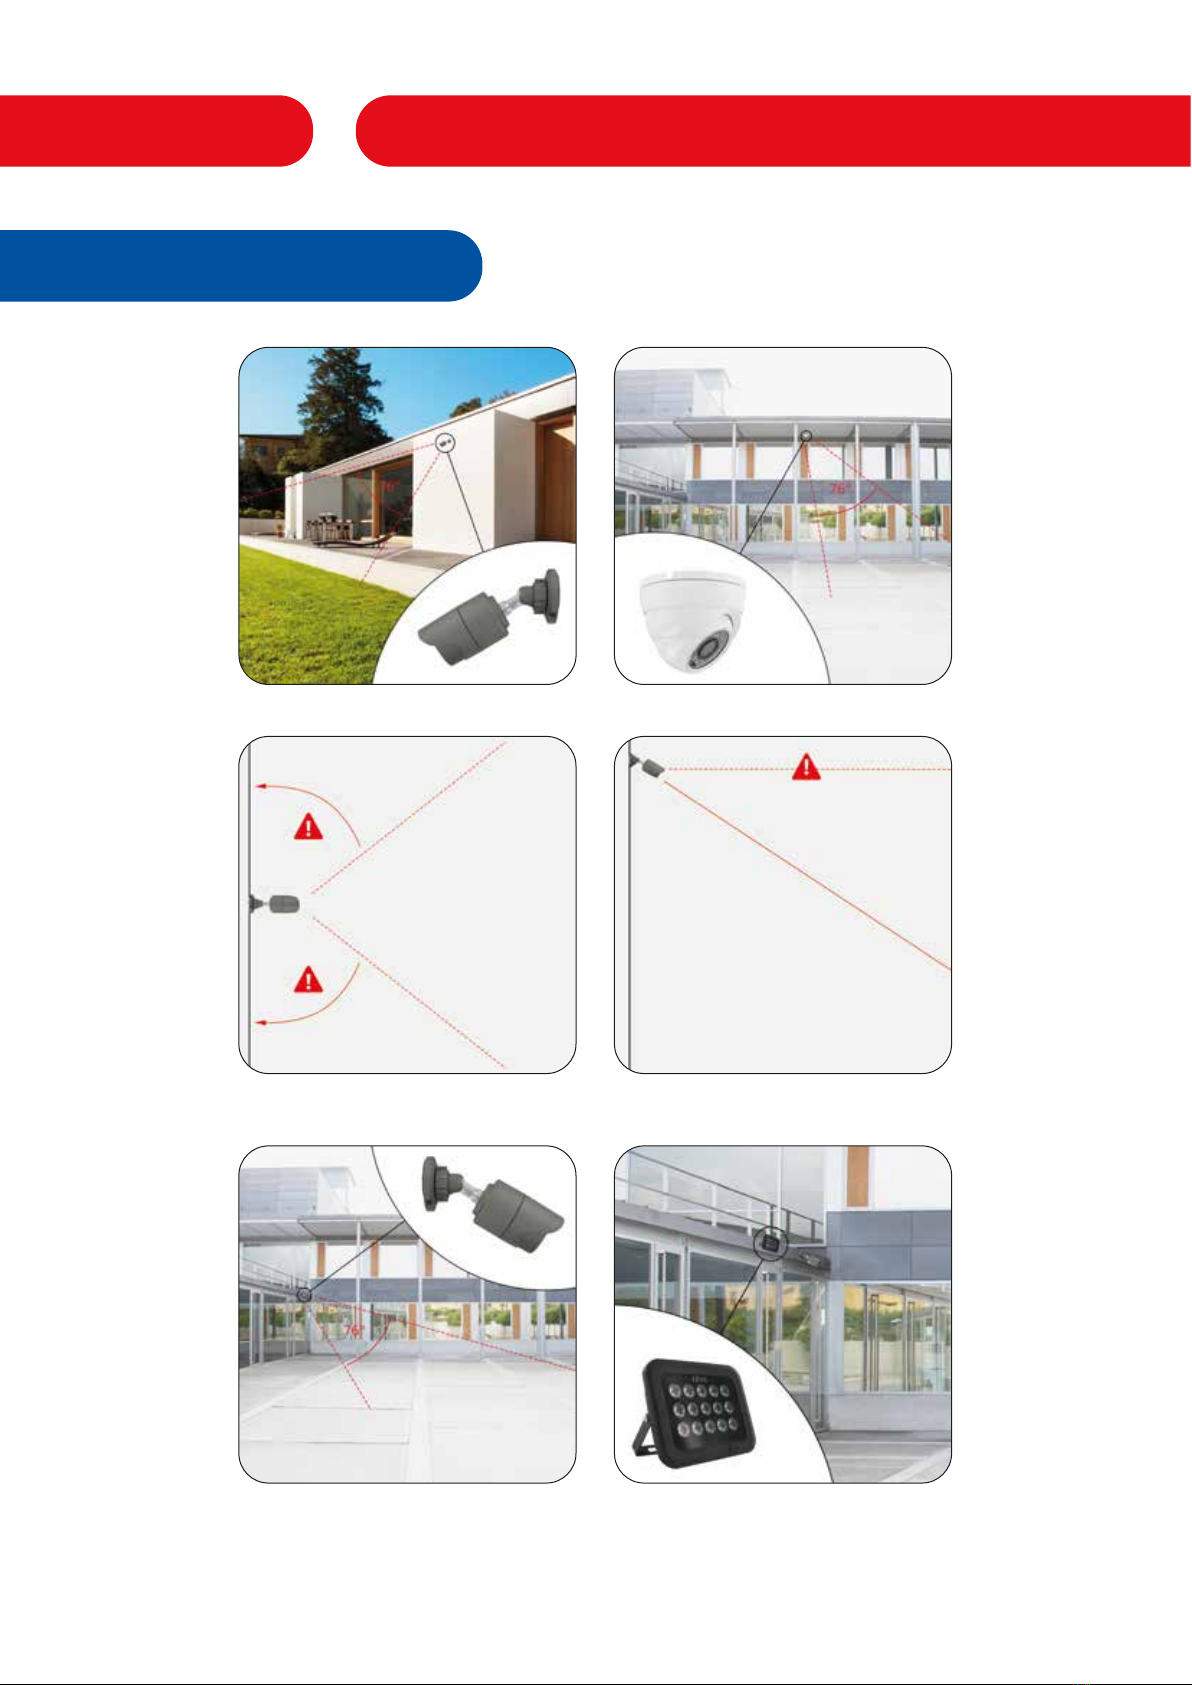
Assembly instructions
Sample mounting on a wall.
Sample installation in the yard.
Sample mounting of a dome camera.
In large yards should be an additional
Spotlights are installed.
Do not aim the camera directly at walls.
Infrared light is reflected.
Never align the camera horizontally!
Always in the direction of the ground!

Assembly16
After assembly
After mounting, clean the lens of the camera with a soft cloth.
Fingerprints can cause reflection in the image at night.
Connection without POE switch
Connection of the cameras without BERGHOCH POE Switch. The camera can be used with a
12V power supply even without POE switch.
12 V
YES
12 V
24 V
YES
BERGHOCH
POE Injector

Version 2.0
Editor / Publisher
BERGHOCH Sicherheitstechnik
Rheinlanddamm 201a
44139 Dortmund
Deutschland
Table of contents


