Diamante DMT9 User manual

Manual

1
2
3
4
5
6
7
8
9
11
15
16
17
18
19
14
20
21
22
23
1. Photoresistor
2. IR LED Light
3. Microphone
4. LED Fill Light
5. Lens
6. Audio Recording Button
7. Video Resolution Switch
8. Power ON/OFF
9. Charging/WIFI Indicator
10. Working Indicator
11. Loudspeaker
12. Reset Button
13. Clip Slot
14. Display Screen
15. Menu/Confirm Button
16. Up/Left Button
17. Down/Right Button
18. Back Button
19. USB port
20. Video Recording Button
21. Photo Button
22. Fill Light/ Tagging Button
23. Dock Interface
10
12
13
01
OVERVIEW

19
No. Description Functionality
Infrared LED can record more details in
low-light environment.
5Lens To record images
Press this button to start/stop recording
audio file.
Audio Recording
Button
6
9Charging/WIFI
Indicator
Charging indicator is blue, when battery is
fully charged, this indicator will be off.
12
02
2IR LED Light
8Powe ON/OFF
Single-press this button to turn on camera.
Press and hold this button to turn off camera,
when camera is powered on, single-press
this button to turn on/off screen LED.
10 Working
Indicator
In standby mode, this indicator will be green.
When recording video, this indicator will be
red and blinking. When recording a audio file,
this indicator will be orange and blinking.
When taking a picture, this indicator will be
red and flash once.
Resetting camera will power off the camera
forcely, it helps when the camera is down.
Reset Button
13 This camera can be assembled with a
360-degreen rotatable clip.
Clip Slot
14 TFT LCD display 2.0 inches display screen
Press Menu button in Preview Mode(After
camera powered on, the unit will enter into
Preview Mode) to enter menus, and press
this button to enter sub-menus.
15 Menu/Confirm
Button
Press this button move cursor Up/Left. In
Preview Mode, press and hold this button
Zoom out.
16 Up/Left Button
17
Press this button move cursor Down/Right.
In Preview Mode, press and hold this button
Zoom in.
Down/Right
Button
Press this button to return to previous menu.
18 Back Button
Charging device via using USB cable to
connect to PC or wall socket. Uploading data
via using USB cable to connect to PC.
USB port
20
Press this button to start/stop recording in
Preview Mode. Press and hold this for about
3 seconds to turn on camera and start
recording immediately.
Video Recording
Button
Press this button to take picture. Press and
hold this button to turn on/off flashing fill light.
21 Photo Button
22 Fill Light Press this button to turn on/off Infrared LED light.
Press and hold this button to turn on/off fill light.
Camera
Specifications
Battery
Others
Standard Accessories
03
SPECIFICATIONS
Image Sensor CMOS
Video Resolution 2304x1296p(30 FPS) / 1920x1080P(30 FPS)
1280x720(60 FPS)/ 1280x720(30 FPS)
Video Format H.264 .MOV
Watermark User ID, Date&Time
Camera 32 Mega Pixels
Image Resolution Up to 4608*3456 JPEG
Screenshot Capture image while recording video
Recording Time 12 hours
Storage Space 32G/64G
Main Features Video Recording, Audio Recording,
Photographing, Auto IR
Infrared Light 2PCS
FOV 140-degree
Night Vision 15 meters
Ingress Protection Ip66
Clip 360-degree Rotatable
Type Built-in 3200mAh Li-ion Battery
Charging Time 3.5 hours
ID 8-character Device ID, 6-character User ID
Encryption Password
Size 79 * 56.9 * 26.6mm
Weight 130g
Screen Size 2-inch
USB cable, Charger, Clip, Manual
FUNCTIONALITIES
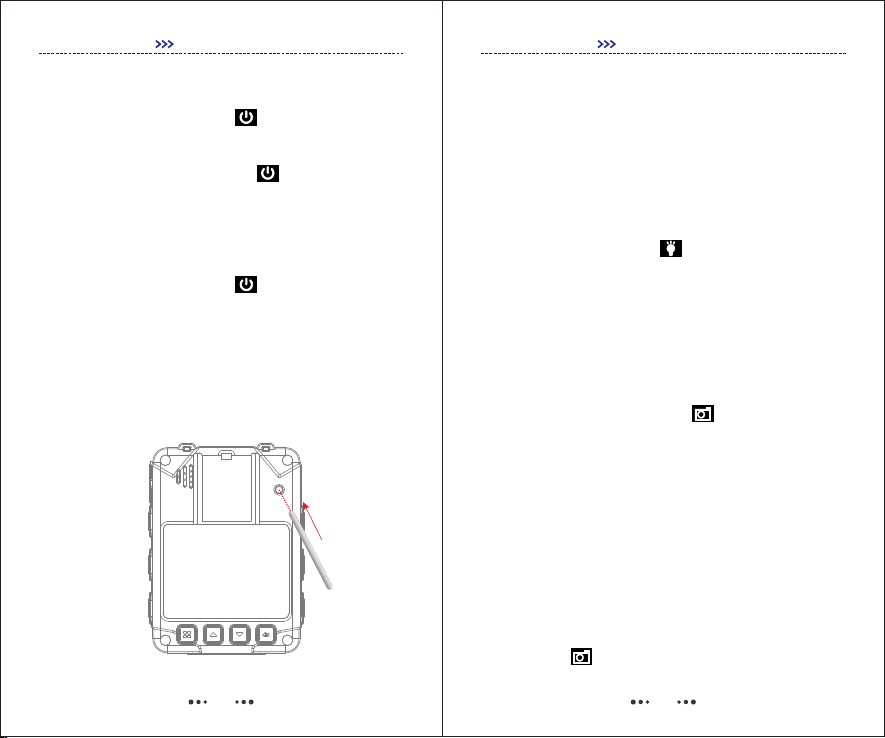
1. Power ON/OFF
1) Power ON : Single-press to turn on camera
from OFF-mode, and enter into Preview Mode.
2) Power OFF : Press and hold to turn off
camera. Before shutting down, video being recorded
will be saved.
04
GETTING STARTED
2. Turn ON/OFF Screen Light
Single-press “Power Button” to turn on/off screen
light and save power.
3. Reset
Resetting camera will power off the camera forcely, it
helps when the camera is down.
05
4. Infrared Light
In low-light environment (At night or in the dark),
turning on IR can help user to record more details, and
images recorded will be black and white.
In Preview Mode, press Menu button to enter Menus,
and go to SETUP, find IR CUT in SETUP-Settings
[SETUP-Video, SETUP-Photo, SETUP-Settings].
1) Manual : Single-press to turn on/off Infrared
Light.
2) Auto : At night or in the dark, when photoresistor
senses the low-light environment, Infrared Light will be
turned on/off automatically.
GETTING STARTED
5. Photograph Feature
In Preview Mode, single-press , and the unit will
start taking pictures similar to a digital camera.
In SETUP menu, user can set image resolution,
quality, burst capture and auto exposure.
6. Burst Mode
Burst Capture means to capture a continuous
sequence of photos.
7. Screenshot
To capture picture while video is being recorded, just
single-press .

06
000:00:15 17:11:42
2017/05/04 201927 17:11:24
PID:000000 N:8888888S
GETTING STARTED
8. Video Recording
In Preview Mode, single-press to start recording
video, press the button again to stop recording.
When using “Press and Hold” to start recording,
there will be a “ ” icon appeared, and the video will
be saved in a special “Event” folder.
9. Video Splitter
To set “Video File Duration” in SETUP menu, videos
recorded will split into clips in different length.
10. Pre-recording
In SETUP-Video menu, turn on Pre-record, the unit will
pre-record 5-30 seconds prior to pressing “Video
Recording” button.
07
11. Post-recording
In SETUP-Video menu, set Post-record with a
specified length, the unit will automatically extend
recording with the specified length.
GETTING STARTED
12. Motion Detection
In SETUP-Video menu, turn on Motion Detect, single-
press , the unit will start motion detecting, once
the video scene moves or changes,
camera will start recording. Then, if the video scene
has not been moved or changed over 20 seconds,
camera will stop recording.
13. Audio Recording
In Preview Mode, single-press to record a audio
file, press again to stop recording.
14. One Button Recording
Press and hold in OFF-mode, camera will power
on and start recording video immediately.
15. File Tagging
While video is being recorded, press and hold for
about 3 seconds, there will be a “ ” icon appeared,
video recorded will be saved in “Event” folder. Single-
press again to cancle tagging.

08
000:00:15 17:11:42
2017/05/04 201927 17:11:24
PID:000000 N:8888888S
16. Video resolution Switch
Single-press “ ”to change video resolution
directly in Preview Mode.
GETTING STARTED
FN
17. Change User ID
Find “Change User ID”in SETUP-Settings, default
password is 000000, use to confirm and press
/ to move the cursor.
18. Set Date&Time
Find “Date&Time” in SETUP-Settings, default
password is 000000, use to confirm (or move
to next) and press / to change the
number.
19. Switch Between Video Recording and
Audio Recording
1) When video is being recorded, press to stop
recording video and start audio recording, video will be
saved.
09
GETTING STARTED
20. Working as USB Flash Disk
Connect camera to PC via USB cable, enter correct
password, and camera will be recognized like a USB
flash disk on PC. Default password is .000000
21. Playback
1) Press , and find "Video, Photo, Audio", all
files recorded can be browsed.
2) Press and Hold to check the last file
recorded.
19. Switch Between Video Recording and
Audio Recording
1) When video is being recorded, press to stop
recording video and start audio recording, video will be
saved.
2) When an audio file is being recorded, press to
stop audio recording and start video recording, audio
file will be saved.
10
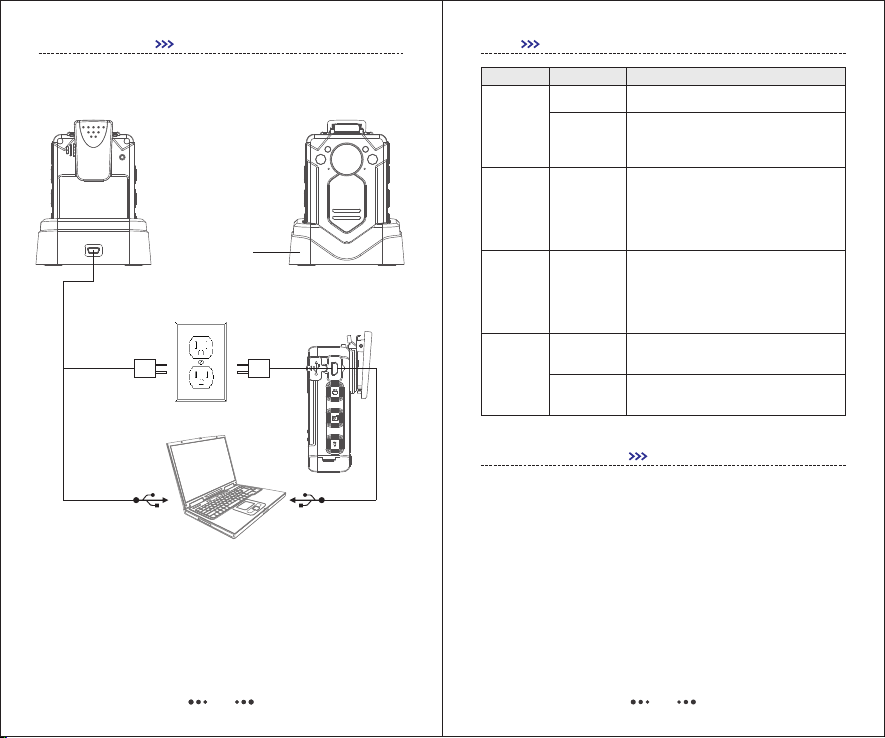
Drop-in Dock
GETTING STARTED
22. Charging
23. Connect with External Camera
Connect with external camera, the unit will record
video via external camera, not the main camera.
11
Q & A
Even if within the warranty period, if the
following occurs, certain maintenance costs
will be charged.
1) The malfunction and damaged caused by incorrect
use, the unauthorized repairs and alteration.
2) The damage caused by fire, flood, abnormal
voltage, other natural disasters and secondary product
damage.
Question Analysis Answer
Out of battery
Mainboard
Protection
Charge for 3.5 hours.
Use Reset button
Camera
can’t be
powered
on
Working
time of
camera
is short
Camera was
not fully
charged
Charging time should not be less than
3.5 hours.
Data
Uploading
Interrupted
frequently
Front panel
of mainframe
can’t supply
enough
power
Use the USB port of back panel.
Camera
can’t be
recognized
by PC
USB cable
issue Change USB cable.
Wrong driver Reinstall driver.
N O T I C E F O R U S E R
Electrical Outlet
PC
Charging
Data Transferring
Charging
Data Transferring

3) The product malfunction caused by the fall and
transportation failures after purchase.
4) The product malfunction caused by Not in
accordance with the user manual operation.
5) The malfunction and damaged caused by the other
barriers (man-made factors or external device).
N O T I C E F O R U S E R
12
Table of contents
Popular DVR manuals by other brands


annke
annke HD SERIES quick start guide

Weixun Electronics
Weixun Electronics iNeVAS6000 user guide

Bunker Hill Security
Bunker Hill Security 61624 Owner's manual & safety instructions

Milesight
Milesight MS-N10090-UT quick start guide

urmet domus
urmet domus 1093 Series quick guide

HIK VISION
HIK VISION DS-7300HWI-SH Series user manual


