Berghoff 2415600 User manual

2415600 |2415601

2
English ........................................................................................................................3
Deutsch...................................................................................................................15
Français ...................................................................................................................27
Español....................................................................................................................39
Pусский...................................................................................................................51
Polski.........................................................................................................................63
Nederlands............................................................................................................75
Italiano.....................................................................................................................87

3
ENGLISH
English ........................................................................................................................3
Deutsch...................................................................................................................15
Français ...................................................................................................................27
Español....................................................................................................................39
Pусский...................................................................................................................51
Polski.........................................................................................................................63
Nederlands............................................................................................................75
Italiano.....................................................................................................................87
INTRO
These instructions contain important information and warnings. It is therefore
important that you read the instructions carefully before starting to use the table
grill.
With BergHOFF’s Table Grill, it’s easy to grill anywhere - in your garden, on your
balcony, in the park or even on the beach when this is allowed.
The lid handle makes it easy to transport the grill. The grill is supplied with a
convenient strap which holds the various parts in place during transport or storage.
After use, it is easy to clean the grill and empty ash and coals from the re basket.
The table grill is made of powder coated steel with silicone handles. The grid is
made of chromium-plated steel. The strap is made of polystyrene. The table grill is
22cm high and 35cm in diameter. The grid is 32cm in diameter.
A unique feature of BergHOFF’s Table Grill is that you can manage easily the airow
that goes into the charcoal by adjusting the position of the bottom holes in the
body.
IMPORTANT SAFETY WARNINGS
WE WANT YOU TO ASSEMBLE AND USE YOUR TABLE
GRILL AS SAFELY AS POSSIBLE.
THE PURPOSE OF THIS SAFETY ALERT SYMBOL
READ ALL SAFETY WARNINGS AND INSTRUCTIONS
CAREFULLY BEFORE ASSEMBLING AND OPERATING
YOUR GRILL.
MANUAL TABLE GRILL
EN

4
ENGLISH
PREPARATION
BergHOFF’s Table grill compromises the
following parts:
1. Strap
2. Grid lifting tool
3. Lid/footpad
4. Grid
5. Charcoal grid
6. Fire basket
7. Body
8. Heat shield
WARNING
• For outdoor use only. Do not operate the grill indoors or in an enclosed area.
• Proper clearance of 3 meter (10 feet) between the grill and combustible mate
rial (bushes, trees, wooden decks, fences, buildings, etc.) or construction should
be maintained at all times when the grill is in use. Do not place the grill under a
roof overhang or other enclosed area.
• For household use only. Do not use this grill and relating tools for other than its
intended purpose.
• Only use this grill on a hard, level, non-combustible, stable surface (concrete,
ground, etc. capable of supporting the weight of the grill) and on a surface,
capable of resisting the radiant heat from a hot barbeque. Never use on
wooden, plastic or other surfaces that could burn or melt. Be aware that the
radiant heat can be very high and will remain for a long time.
• If you still would like to use the grill on an outdoor table, be sure you use an
extra non-combustible stable underground (sheet, plate, board,…) of min
1mx1m deecting the radiant heat away from the table and protect it from any
deterioration (burning, discoloring, melting, deforming,…)
• DO NOT use the grill without charcoal rack in place. DO NOT attempt to re
move charcoal tray while tray contains hot coal.
• We recommend the use of a Charcoal chimney starter to avoid the dangers as
sociated with charcoal lighting uid. If you choose to use charcoal lighting
uid, only use lighting uid approved for lighting charcoal. Carefully read
▲
!
1
2
3
4
5
6
7
8

5
ENGLISH
manufacturer’s warnings and instructions on the charcoal lighting uid and
charcoal prior to the use of their product. Store charcoal lighting uid safely
away from the grill.
• Do not use gasoline, kerosene or alcohol for lighting charcoal.
CAUTION! Do not use spirit or petrol for lighting or relighting! Use only re
lighters complying to EN 18603. Use of any of these or similar products could
cause an explosion possibly leading to severe body injury.
• Do not store lighter uid or other ammable liquids or materials in the neigh
borhood of the grill.
• When using charcoal lighting uid, allow charcoal to burn until covered with a
light ash (approximately 20 to 30 minutes). This will allow charcoal lighting
uid to burn off. Failure to do this, could trap fumes from charcoal lighting uid
in grill and may result in a ash re or explosion.
• Never use charcoal that has been pre-treated with lighting uid. Use only a high
grade plain charcoal or charcoal/wood mixture.
WARNING Do not use gasoline, kerosene or alcohol for lighting charcoal. Use
of any of these or similar products could cause an explosion possibly leading to
severe injury.
• Never add charcoal lighting uid to hot or even warm coals as ashback may
occur causing severe burns.
• Place the grill and relating tools in an area where children and pets cannot
come into contact with unit. Close supervision is necessary when the grill or
relating tools are in use.
• Do not leave the grill or relating tools unattended when in use.
• When adding charcoal and / or wood, use extreme caution.
• Use caution when handling the grill grid, use the appropriate handle tool and an
oven mitt. The grill grid will be hot when in use.
• The grill is hot when in use. To avoid burns:
* DO NOT attempt to move the grill.
* Wear protective gloves or oven mitts.
* DO NOT touch any hot grill surfaces.
* DO NOT wear loose clothing or allow hair to come in contact with the grill.
• When grilling, grease from meat may drip into the charcoal and cause a grease
re. If this should happen, take off the meat from the grill or the complete BBQ
grid, until the grease res has extinguished by itself. For fatty food, we
recommend to use a grill pan. Do not use water to extinguish grease res.
• Use caution since ames can are-up when fresh air suddenly comes in contact
with re. Keep hands, face and body a safe distance from hot steam and ame
are-ups.
• Do not exceed a temperature of ±200° (±400°F). Do not allow charcoal and/or
wood to rest on the walls of the grill. Doing so will greatly reduce the life of the
metal and nish of your grill.
▲
!

6
ENGLISH
• Use caution when assembling and operating your grill to avoid scrapes or cuts
from sharp edges of metal parts. Use caution when reaching into or under the
grill.
• In windy weather, place the grill in an outdoor area that is protected from the
wind.
• Never leave coals and ashes in the grill unattended, before the grill can be left
unattended, remaining coals and ashes must be removed from the grill. Use
caution to protect yourself and property: ll a non-combustible metal container
with water, then – with the greatest care – dump the remaining coals and ashes
in the water. Make sure they are completely emerged in water. Allow coals and
water to remain in metal container 1 hour prior to disposing.
• Extinguished coals and ashes should be placed at a safe distance from all
structure and Combustible materials.
• When used on the ground, wet the surface beneath and around the grill with
a garden hose to extinguish any ashes, coals or embers which may have fallen
during the cooking or cleaning process. With a garden hose completely wet the
surface beneath and around grill to extinguish any ashes, coals or embers which
may have fallen during the cooking or cleaning process.
• When used on a table, wait long enough until the grill has cooled down.
Carefully take the grill from the table and put it temporary on a safe non-
combustible ground surface for further cooling down. Then remove carefully
your extra protection sheet and move to a safe ground surface where you can
remove all ashes, coals or embers, which may have fallen during the cooking or
cleaning process. Use a garden hose to completely wet this surface to
extinguish any ashes, coals or embers.
• After each use, clean and dry the grill thoroughly.
• Use caution when lifting or moving the grill to prevent strains and back injuries.
• We advise that a re extinguisher be on hand. Refer to your local authority to
determine proper size and type of a re extinguisher.
• Cover the grill to protect it from excessive rusting. But wait for covering and
storing until grill has completely cooled down
• Store the grill out of reach of children and in a dry location when not in use. Pay
extra attention on the related tools for this grill. These tools are NO TOYS and
should only be used by adults. Use caution and common sense when using and
storing these tools.
• Do not attempt to service the grill other than normal maintenance as explained
in “this manual”.
• Properly dispose of all packaging material.
• Use caution and common sense when operating your grill.
Failure to adhere to safety warning and guidelines in this manual could result in
bodily injury or property damage.
Save this manual for future reference.
▲
!

7
ENGLISH
ASSEMBLY INSTRUCTION:
1. Parts list
1. Strap
2. Grid lifting tool
3. Lid/footpad
4. Grid
5. Charcoal grid
6. Fire basket
7. Body
8. Heat shield
1
2
3
4
5
6
7
8
8
ENGLISH
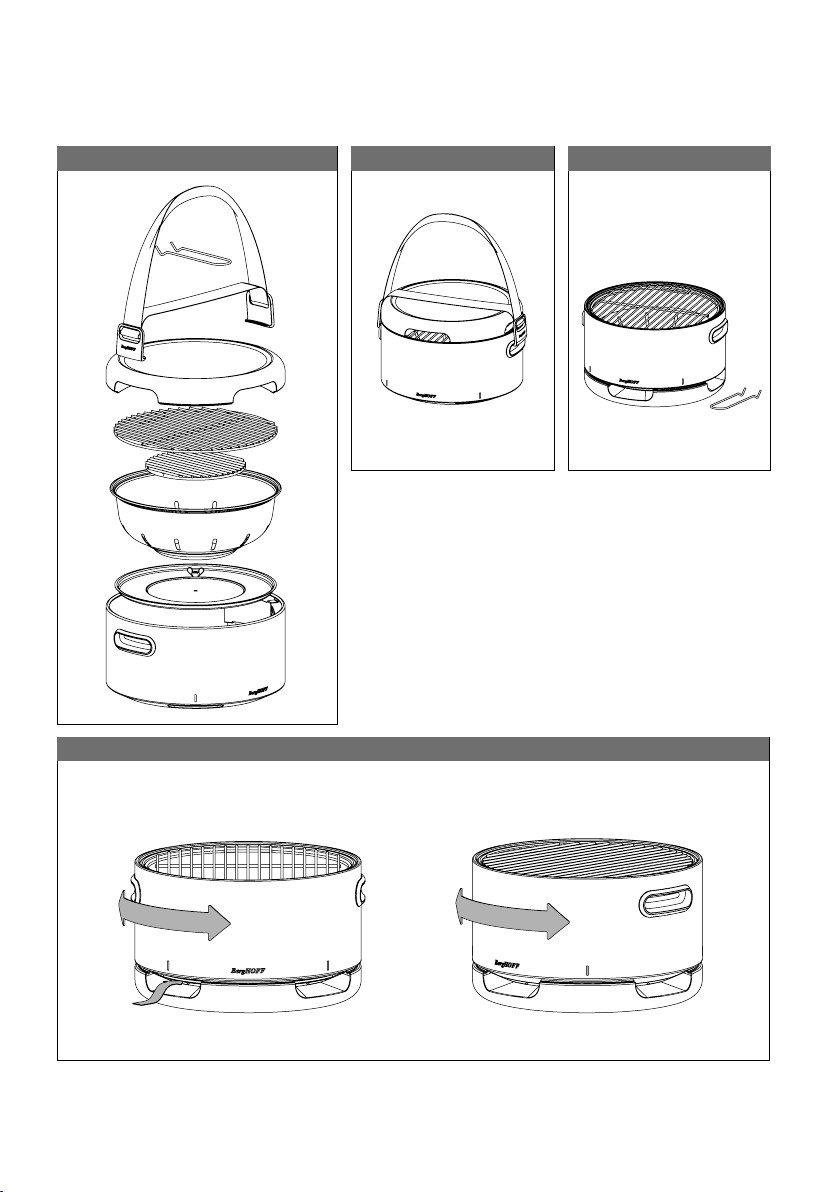
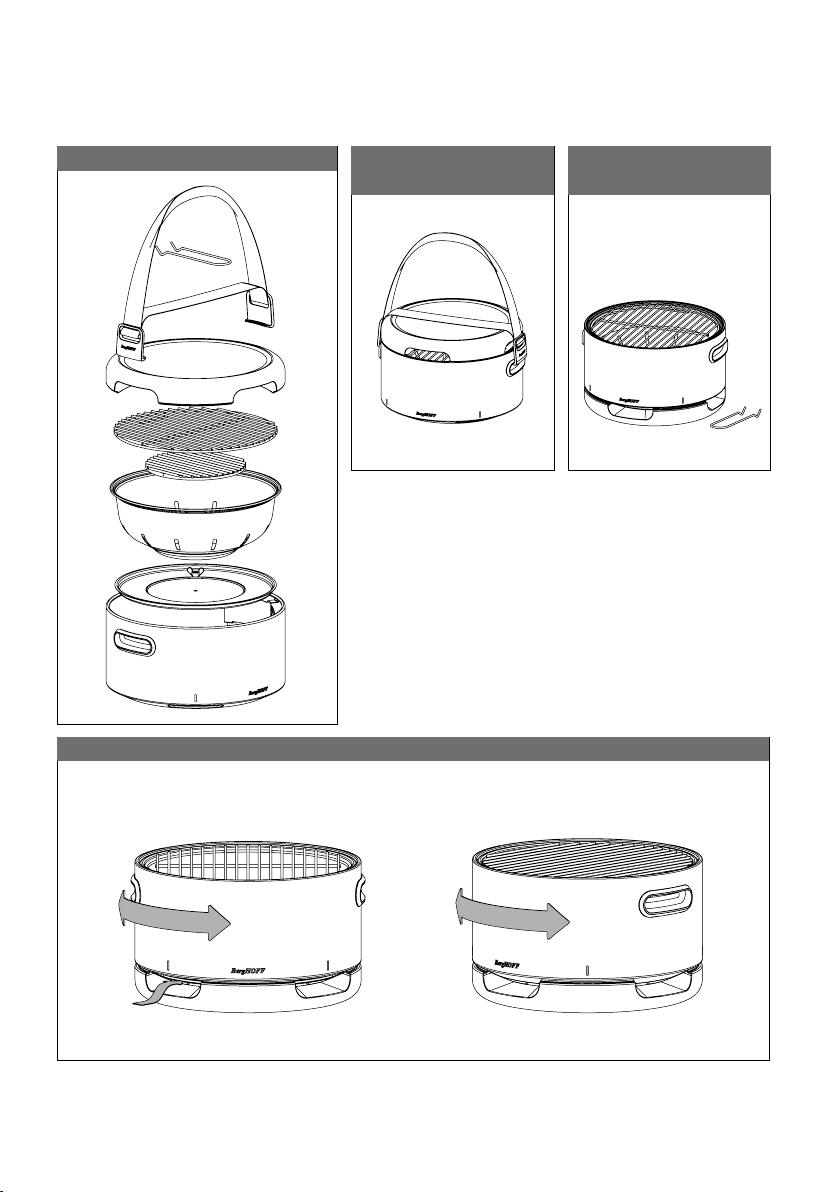
Assembled
Usage view - Adjusting the airow
On the go view Grill viewExploded view

9
ENGLISH
WARNING
Place the grill outdoors on a hard, level, non-combustible surface away from roof
overhang or any combustible material. Never use on wooden or plastics or other
surfaces that could burn or melt. Place the grill away from open windows or doors
to prevent smoke from entering your house. In windy weather, place the grill in
an outdoor area that is protected from the wind.
WARNING
Read all safety warnings and instructions carefully before operating your grill.
PREPARATION FOR USE & LIGHTING INSTRUCTIONS
-> Before rst use
Prior to your rst use of the grill, follow the instructions below carefully to
assemble in grill mode.
Step 1: choose carefully the position of your BBQ area
Be sure the BBQ is correct positioned as described above:
Place the grill outdoors on a hard, level, non-combustible surface away
from roof overhang or any combustible material. Never use on wooden or
other surfaces that could burn. Place the grill away from open windows
or doors to prevent smoke from entering your house. In windy weather,
place the grill in an outdoor area that is protected from the wind. Place
an extra deecting shield, non-combustible plate, board or sheet that
can resist the heat radiation during use, under the cork bottom if
necessary (+/- 1x1m)
Step 2: mounting
Charcoal basket + deector must be in place at all time, before starting
the lighting. Be sure the air vents are not obstructed and are free.
For proper airow, remove accumulated ashes from previous BBQ
sessions on the Charcoal rack if present (coals should be fully extin
guished before removing). Charcoal requires oxygen to burn, so be sure
of a good airow and that nothing will obstruct the vents.
Step 3: fuel and lighting choice
Follow the instructions below carefully to build a re. You may use
charcoal (or charcoal briquettes) as fuel in the grill.
▲
!
▲
!
▲
!
10
ENGLISH
For lighting the charcoal:
A. We advise to use dry crumpled paper or lighter cubes (both
are non-toxic, odorless and tasteless).
B. or using a small charcoal chimney starter
C. IF YOU STILL CHOOSE TO USE CHARCOAL LIGHTING FLUID,
ONLY use charcoal lighting uid approved for lighting the charcoal.
Do not use gasoline, kerosene, alcohol or other ammable material for
lighting charcoal.
NOTE: To extend the life of your grill, make sure that hot coals
and wood do not touch the walls of the grill itself. Be sure
only charcoal is in the charcoal rack. Never exceed the
instructed max. lling level (=top of the vertical vent holes-see
picture step 4)
NOTE: It is important that the exterior of the grill is not scraped
or rubbed during the heating process.
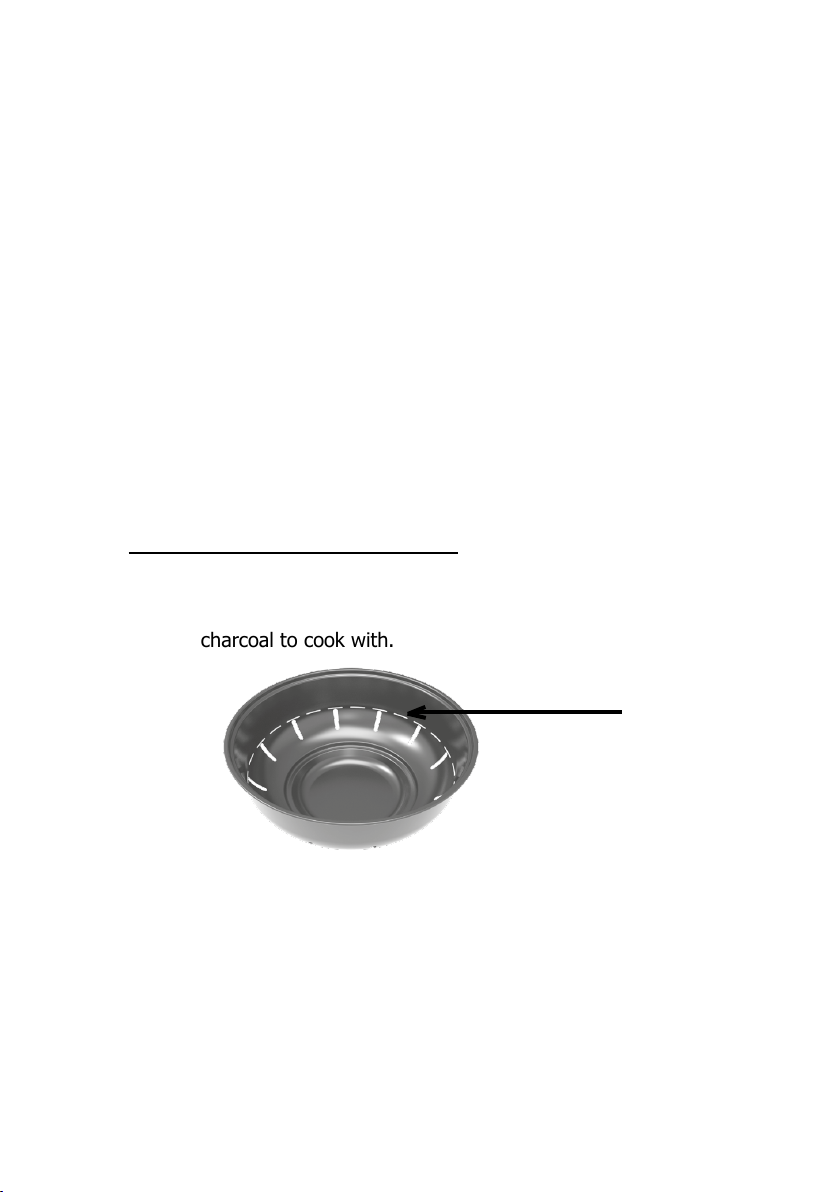
TO START THE CHARCOAL GRILL
Step 4: lling
Mount the charcoal or briquettes into a pyramid-shaped pile. Fill the
rebasket till max. the top of the vertical vent holes. This should be
enough charcoal to cook with.
WARNING
Never use charcoal that has been pre-treated with lighter uid. Use only
a high grade plain charcoal.
DO NOT use grill without deector and charcoal basket in place.
DO NOT attempt to remove charcoal basket and deector tray while tray
contains hot coals.
▲
!
MAX. charcoal
▲
!

11
ENGLISH
Step 5: lighting
A. ->IF USING LIGHTER CUBES OR PAPER
Spread lighter piled cubes (non-toxic, odorless and tasteless) or dry
crumpled paper under the charcoal and light. Be sure the paper or
lighter cubes are well spread and also mixed under the charcoal, so all
charcoal starts burning equal.
B.->IF USING CHARCOAL CHIMNEY STARTER
Follow all manufacturer’s warnings and instructions regarding the use
of their product. Fill the rebasket max. till the top of the vertical vent
holes. This should be enough charcoal to cook with. Pour this amount
of charcoal in the chimney starter and light according the
manufacturer’s instructions. When charcoal is burning strong inside
the chimney starter, carefully place hot coals in the center of each
charcoal basket.
C. WE DO NOT RECOMMEND, BUT IF YOU STILL CHOOSE TO USE
CHARCOAL LIGHTING FLUID, ONLY use charcoal lighting uid
approved for lighting the charcoal.
Do not use gasoline, kerosene, alcohol or other ammable material for
lighting charcoal.
CAUTION! Do not use spirit or petrol for lighting or relighting! Use only
relighters complying to EN 18603. Fill the re basket (6) max. until the
top of the vertical vent holes. This should be enough charcoal to cook
with. Place the charcoal in the center of each charcoal grate.
Saturate the piled charcoal with lighting uid. Wait 2 to 3 minutes to
allow lighting uid to soak into charcoal. Store lighting uid a safe
distance from the grill.
With coals burning strong, allow the temperature to reach ± 100°C
(± 225°F). Maintain this temperature for 1/2 hour.
Increase the temperature to ± 200°C (± 400°F). This can be achieved
by adding more charcoal.
Caution: never exceed the instructed lling level of step 4. Maintain this
temperature for ½ hour then allow unit to cool completely.
Step 6: pre-heating time
After lighting when no longer ames are noticeable and all coals are
covered with a grey ash (usually after 20 to 30 minutes).
Make sure that hot coals do not touch the walls of the grill. It will extend
the life of your grill.
▲
!
MAX. charcoal

12
ENGLISH
Step 7: additional avoring
For additional smoke avor, consider adding moistened fresh herbs such
as rosemary, thyme, or bay leaves. Place the wet herbs directly on the
coals just before you start cooking.
The grill is now ready to start cooking according your preferable
cooking method.
TIPS FOR GRILLING & FOOD SAFETY
• Don’t try to save time by placing food on a grill that’s not yet ready. Let charcoal
burn until it’s coated with light-grey ash.
• Always start with a well cleaned BBQ grid. Food rests from previous sessions
should be removed by a bristle barbeque brush or crumpled aluminum.
• Unless otherwise stated in the recipe, turn your food only once.
• A light coating of oil will help brown your food evenly and keep it from sticking
to the cooking grate. Always brush or spray oil on your food, not on the cooking
grate.
• Do not defrost meat, sh or poultry at room temperature. Defrost in the
refrigerator or micro- wave oven.
• Never place cooked food on the same plate the raw food was placed on.
• Wash all plates and cooking utensils which have come into contact with raw
meats or sh with hot, soapy water and rinse.
PROPER CARE & MAINTENANCE
->After use:
DO NOT remove the charcoal tray, while tray contains HOT coal. Wait until the
coal has cooled down.
Never leave coals and ashes in grill unattended.
Before grill can be left unattended, remaining coals and ashes must be removed
from the grill. Use caution to protect yourself and property: ll a non-combustible
metal container with water, then – with the greatest care – dump the remaining
coals and ashes in the water. Make sure they are completely emerged in water.
Allow coals and water to remain in metal container 1 hour prior to disposing.
Extinguished coals and ashes should be placed on a safe distance from all
structure and combustible materials.
Completely wet the surface beneath and around the BBQ cleaning zone to
extinguish any ashes, coals or embers which may have fallen during the cooking
or cleaning process.
▲
!
▲
!

13
ENGLISH
->After each use: clean the grill as follows:
1. Make sure the grill is cool and coals are cooled off completely or totally
extinguished. Take note that it can take more than 24hours before there are
no more hot embers hidden in the ash.
2. Remove the BBQ grid.
Note: the following steps 3 & 4 should be done according the instructions
given in above paragraph “After use”.
3. Remove the cooled charcoal or briquettes in the BBQ basket.
4. Remove carefully the charcoal basket and remove the ashes.
5. Eventually wash your grill and your BBQ white or black body with warm soapy
water (with a mild detergent). Rinse well with clear water and wipe dry.
6. BBQ grid: Simply loosen residue with a bristle barbeque brush or crumpled
aluminum foil, then wipe off with paper towels. After some BBQ sessions
regularly wash the BBQ grid thoroughly.
7. The cork bottom or cover can be cleaned with warm soapy water and a soft
brush and/or with a damp cloth. Do not submerge in water.
General: to protect your grill from excessive rust, the unit must be
proper cleaned and dried before storing and covered at all times when
not in use.
NOTE: While using the grill high temperatures can result in discoloring
some in- side parts of the grill, especially the parts in direct contact
with the hot charcoal can discolor or release its coating. This is
inevitable and will not inuence the performance of your grill.
▲
!

14
ENGLISH
WARRANTY
This BergHOFF BBQ grill comes with a limited two years warranty on production
aws, from the date of purchase and to the extent the use corresponds with the
present instructions for use & care in this manual. The receipt, mentioning the
date of purchase counts as guarantee card.
This BBQ grill is not suited for professional use.
Wear, corrosion, deformation and discoloration of the parts that are directly
exposed to the re is quite normal and will therefore in no event ever be
considered as a production aw: it is the logical result of their use.
Hence, the charcoal basket, BBQ grid and the silicone body handles can be
strongly deformed after some time in use and it is normal to have this part
replaced by the customer without any warranty.

15
DEUTSCH
EINFÜHRUNG
Diese Anleitung enthält wichtige Informationen und Warnungen. Es ist daher
wichtig, dass Sie die Anweisungen sorgfältig lesen, bevor sie den Grill in Betrieb
nehmen.
Mit dem Tischgrill von BergHOFF können Sie einfach überall grillen - in Ihrem
Garten, auf Ihrem Balkon, im Park oder sogar am Strand, wo das erlaubt ist.
Der Deckelgriff macht den Transport des Grills leicht. Der Grill ist mit einem
bequemen Tragriemen ausgestattet, der die verschiedenen Teile während des
Transports oder der Lagerung zusammenhält.
Nach dem Gebrauch kann der Grill leicht gereinigt werden. Die Asche und Kohlen
aus der Feuerschale lassen sich einfach entleeren.
Der Tischgrill besteht aus pulverbeschichtetem Stahl mit Silikongriffen. Der Rost
besteht aus verchromten Stahl. Der Tragriemen besteht aus Polystyrol. Der
Tischgrill ist 22 cm hoch und hat einen Durchmesser von 35 cm. Der Rost hat einen
Durchmesser von 32 cm.
Ein einzigartiges Merkmal des Tischgrills von BergHOFF ist, dass Sie den Luftstrom,
der in die Holzkohle geht, leicht anpassen können, indem Sie die Position der
Bodenlöcher im Gehäuse anpassen.
WICHTIGE SICHERHEITSHINWEISE
WIR MÖCHTEN, DASS SIE IHREN TISCHGRILL SO
SICHER WIE MÖGLICH AUFBAUEN UND NUTZEN.
DER ZWECK DIESES GEFAHRENZEICHENS LESEN SIE
SORGFÄLTIG ALLE WARNHINWEISE UND
ANWEISUNGEN, BEVOR SIE DEN GRILL AUFBAUEN
UND IN BETRIEB NEHMEN.
ANLEITUNG TISCHGRILL
DE

16
DEUTCH
VORBEREITUNG
Der Tischgrill von BergHOFF besteht
aus den folgenden Teilen:
1. Tragriemen
2. Rost-Hebewerkzeug
3. Deckel/Grillgutabdeckung
4. Rost
5. Kohlerost
6. Grillwanne
7. Gehäuse
8. Wärmeabschirmung
WARNUNG
• Nur für den Außengebrauch. Betreiben Sie den Grill nicht innen oder in einem
geschlossenen Bereich.
• Der angemessene Abstand zwischen Grill und brennbarem Material (Büsche, Bäume,
Holzfußböden, Zäune, Gebäude usw.) oder Bauwerken von 3 Metern (10 Fuß) sollte
immer eingehalten werden, wenn der Grill in Betrieb ist. Stellen Sie den Grill nicht
unter ein Vordach oder in andere geschlossene Raume.
• Nur für den Hausgebrauch. Verwenden Sie dieses Produkt nicht für andere Zwecke
als zur vorgesehenen Verwendung.
• Verwenden Sie diesen Grill nur auf einem festen, ebenen, nicht brennbaren,
stabilen Untergrund (Beton, Erde usw., der in der Lage ist, das Gewicht des Grills
zu tragen) und auf einem Untergrund, der der Strahlungshitze eines heißen Grills
widerstehen kann. Setzen Sie ihn niemals auf Holz- oder Plastikböden sowie auf
andere Oberächen, die brennen oder schmelzen könnten. Achten Sie darauf, dass
die Strahlungshitze sehr groß sein kann und eine ganze Zeit lang anhält.
• Wenn Sie den Grill trotzdem auf einem Gartentisch einsetzen möchten, sorgen Sie
dafür, dass Sie eine zusätzliche, nicht-brennbare, stabile Unterlage (Blech, Platte,
Brett...) von mindestens 1 x 1 m haben, die die Hitze vom Tisch abhält und vor jeder
Beeinträchtigung (Brand, Verfärbung, Schmelzen, Verformung...) schützt.
• Verwenden Sie den Grill NICHT, ohne den Kohlenrost einzusetzen. Versuchen Sie
NICHT, die Kohlenauffangschale zu entnehmen, wenn sie noch heiße Kohle enthält.
• Wir empfehlen die Nutzung eines Kohle-Schornstein-Starters, um die Gefahren,
die mit einer üssigen Kohle-Zündhilfe verbunden sind, zu vermeiden. Wenn Sie
▲
!
1
2
3
4
5
6
7
8

17
DEUTSCH
eine üssige Kohle-Zündhilfe verwenden, verwenden Sie nur Grillanzünder, der
zum Anzünden von Grillkohle zugelassen ist. Lesen Sie die Warnhinweise und
Anweisungen des Herstellers auf den Verpackungen der üssigen Kohle- Zündhilfe
und Holzkohle sorgfältig, bevor Sie das Produkt einsetzen. Lagern Sie die üssige
Kohle-Zündhilfe in sicherem Abstand zum Grill.
• Verwenden Sie kein Benzin, Diesel oder Alkohol zum Anzünden der Holzkohle.
VORSICHT! Keinen Spiritus oder Benzin zum Anzünden oder erneuten Zünden
des Feuers benutzen! Verwenden Sie nur Grillanzünder, welche die Norm EN 18603
erfüllen. Die Verwendung dieser oder ähnlicher Produkte könnte eine Explosion
verursachen, die möglicherweise schwere Verletzungen hervorruft.
• Lagern Sie keine üssigen Zündhilfen oder andere brennbare Flüssigkeiten in der
Nähe des Grills.
• Wenn Sie eine üssige Kohle-Zündhilfe nutzen, lassen Sie die Holzkohle so lange
glühen, bis sie mit einer hellen Asche bedeckt ist (etwa 20 bis 30 Minuten). Dadurch
kann die üssige Kohle-Zündhilfe vollständig verbrennen. Wenn dies nicht gemacht
wird, könnte sich Rauch vom üssigen Grillanzünder im Grill sammeln und zu einer
Verpuffung oder einer Explosion führen.
• Verwenden Sie niemals Holzkohle, die mit einer üssigen Zündhilfe vorbehandelt
wurde. Verwenden Sie nur hochwertige Grillholzkohle oder eine Kohle-/Holz-
Mischung.
WARNUNG
• Verwenden Sie kein Benzin, Diesel oder Alkohol zum Anzünden der Holzkohle. Der
Einsatz dieser oder ähnlicher Produkte könnte eine Explosion verursachen, die
möglicherweise schwere Verletzungen hervorruft.
• Geben Sie niemals üssigen Grillanzünder auf heiße oder sogar noch warme
Kohlen, da ein Flammenrückschlag auftreten könnte, was möglicherweise schwere
Verbrennungen hervorruft.
• Platzieren Sie den Grill und das betreffende Zubehör in einem Bereich, der für Kinder
und Haustiere nicht zugänglich ist. Besondere Aufsicht ist notwendig, wenn der Grill
oder betreffendes Zubehör in Gebrauch ist.
• Lassen Sie den Grill oder betreffendes Zubehör niemals unbeaufsichtigt!
• Wenn Sie Holzkohle und/oder Holz nachlegen, lassen Sie außerordentliche Vorsicht
walten.
• Seien Sie vorsichtig, wenn Sie mit dem Grillrost hantieren und verwenden Sie das
passende Grillrost-Hebewerkzeug und einen Backhandschuh. Der Grillrost wird heiß,
wenn er im Einsatz ist.
• Der Grill wird heiß, wenn er im Einsatz ist. Um Verbrennungen zu vermeiden:
* Versuchen Sie NICHT, den Grill zu verschieben.
* Tragen Sie Schutzhandschuhe oder Backhandschuhe.
* Berühren Sie KEINE heißen Grillächen.
* Tragen Sie KEINE locker anliegende Kleidung oder kommen Sie mit den Haaren
dem Grill NICHT zu nahe.
• Beim Grillen könnte Fett aus dem Fleisch in die Holzkohle tropfen und einen
Fettbrand verursachen. Wenn dies geschehen sollte, nehmen Sie das Fleisch vom
Grill oder entfernen Sie den kompletten Grillrost, bis der Fettbrand wieder von selbst
erloschen ist. Beim fettigen Fleisch empfehlen wir die Verwendung einer Grillpfanne.
▲
!

18
DEUTCH
Löschen Sie Fettbrände nicht mit Wasser.
• Seien Sie vorsichtig, weil die Flammen auodern könnten, wenn frische Luft plötzlich
mit dem Feuer in Kontakt kommt. Achten Sie auf eine sichere Entfernung von
Händen, Gesicht und Körper bei heißem Dampf und auodernden Flammen.
• Lassen Sie die Temperatur nicht auf über ±200° (±400°F) steigen. Lassen Sie die
Holzkohle und/oder das Holz nicht an den Grillwänden liegen. Wenn Sie das tun, wird
sich die Nutzungsdauer des Metalls und der Lackierung stark verkürzen.
• Seien Sie vorsichtig, wenn Sie Ihren Grill zusammenbauen oder betreiben, um
Kratzer oder Schnitte von scharfen Metallkanten zu vermeiden. Seien Sie vorsichtig,
wenn Sie in oder unter den Grill greifen.
• Bei windigem Wetter stellen Sie den Grill draußen in einen windgeschützten Bereich.
• Lassen Sie Kohlen und Asche niemals im Grill unbeaufsichtigt, bevor der Grill
unbeaufsichtigt stehen gelassen werden kann. Restkohle und -asche muss aus dem
Grill entfernt werden. Seien Sie vorsichtig und schützen Sie sich und Ihr Eigentum:
Füllen Sie einen nicht-entzündlichen Metallbehälter mit Wasser und tauchen Sie
dann - mit äußerster Vorsicht - die restlichen Kohlen und die Asche in das Wasser.
Vergewissern Sie sich, dass sie vollständig in Wasser eingetaucht wurden. Lassen Sie
die Kohlen und das Wasser mindestens 1 Stunde lang im Metallbehälter, bevor Sie sie
entsorgen.
• Gelöschte Kohlen und Asche sollte in sicherer Entfernung von allen Gebäuden und
brennbarem Material untergebracht werden.
• Wenn Sie den Grill auf dem Erdboden verwendet haben, wässern Sie die Oberäche
unter und um den Grill mit einem Gartenschlauch, um die Asche, Kohlen oder Glut zu
löschen, die während des Grill- oder Reinigungsvorgangs herabgefallen sein könnten.
Wässern Sie die Oberäche vollständig unter und um den Grill mit einem
Gartenschlauch, um die jegliche Asche, Kohlen oder Glut zu löschen, die während
des Grill- oder Reinigungsvorgangs herabgefallen sein könnten.
• Wenn Sie ihn auf einem Tisch benutzt haben, warten Sie so lange, bis sich der
Grill abgekühlt hat. Nehmen Sie den Grill vorsichtig vom Tisch und stellen Sie
ihn zwischenzeitlich auf eine nicht-entzündliche Oberäche, damit er sich weiter
abkühlen kann. Dann entfernen Sie vorsichtig das zusätzliche Schutzblech und
bringen Sie ihn an einen sicheren Platz auf dem Erdboden, wo Sie die ganze Asche,
Kohlen oder Glut, die während des Grill- oder Reinigungsvorgangs herabgefallen sein
könnten, entfernen können. Wässern Sie diese Oberäche vollständig mit einem
Gartenschlauch, um die Asche, Kohlen oder Glut zu löschen.
• Reinigen Sie und trocknen Sie das Gerät vollständig nach jedem Gebrauch.
• Seien Sie vorsichtig, wenn Sie den Grill anheben oder verschieben, um Zerrungen
oder Rückenverletzungen zu vermeiden.
• Wir raten Ihnen, einen Feuerlöscher parat zu haben. Wenden Sie sich an die
zuständige Behörde, um die geeignete Größe und Art des Feuerlöschers zu ermitteln.
• Bedecken Sie den Grill, um ihn vor übermäßigem Verrosten zu schützen. Aber warten
Sie mit dem Abdecken und Verstauen, bis sich der Grill vollständig abgekühlt hat.
• Lagern Sie den Grill außerhalb der Reichweite von Kindern und an einem trockenen
Ort, wenn er nicht in Gebrauch ist. Widmen Sie Ihre Aufmerksamkeit auch dem
betreffenden Zubehör für diesen Grill. Dieses Zubehör ist KEIN SPIELZEUG und
sollte nur von Erwachsenen verwendet werden. Seien Sie vorsichtig und gehen
Sie mit gesundem Menschenverstand vor, wenn Sie dieses Zubehör nutzen oder
verstauen.
▲
!

19
DEUTSCH
AUFBAUANLEITUNG:
1. Ersatzteilverzeichnis
1. Tragriemen
2. Rost-Hebewerkzeug
3. Deckel/Grillgutabdeckung
4. Rost
5. Kohlerost
6. Grillwanne
7. Gehäuse
8. Wärmeabschirmung
1
2
3
4
5
6
7
8
• Versuchen Sie nicht, den Grill auf andere Weise zu bedienen, wie in „dieser
Anleitung“ erklärt wurde.
• Entsorgen Sie das Verpackungsmaterial ordnungsgemäß.
• Seien Sie vorsichtig und gehen Sie mit gesundem Menschenverstand vor, wenn Sie
den Grill betreiben.
Wenn Sie die Sicherheitshinweise und Richtlinien in dieser Anleitung nicht befolgen,
könnte das zu körperlichen Verletzungen oder Schäden am Eigentum zur Folge haben.
Bewahren Sie diese Anleitung zum späteren Nachschlagen gut auf.
20
DEUTCH
Montiert
Ansicht zur Einstellung - Den Luftstrom regulieren
Ansicht im
transportablen Zustand Ansicht im
grillbereiten Zustand
Explosionszeichnung
This manual suits for next models
1
Table of contents
Languages:
Other Berghoff Grill manuals


Popular Grill manuals by other brands

Green Mountain Grills
Green Mountain Grills Daniel Boone quick start guide

Coleman
Coleman 9995B Series Instructions for use

Huntington
Huntington 24025HNT Assembly manual and parts list

Bodum
Bodum Bistro 11133 Instructions for use

Vulcan-Hart
Vulcan-Hart VCB-S Specifications

KYOWA
KYOWA KW-3752 instruction manual


