Bergstrom K033 User manual

AM/FM Armband Radio
K033 v01: 18/06/21
Please read and retain these instructions for future reference
SPECIFICATION
Power supply: 3VDC, 2x AAA Batteries (not included)
Frequency: FM 87.5 –108 MHz
AM 522-1620KHz
Earphone: 32 ohms
IMPORTANT SAFETY INFORMATION
•Do not use the radio near water.
•Clean only with a dry cloth.
•Do not block any ventilation openings.
•Install in accordance with manufacturer’s instructions.
•Do not install or operated near any heat sources such as radiators, stoves or other apparatus
that produces heat.
•No naked flame sources such as candles should be placed on the product.
Dimensions
(H) 6.43 x (W) 2.45 x (D) 7.85cm
•INCLUDES SAB-55 RADIO, STEREO EARBUDS, AND
DETACHABLE BELT CLIP
•MULTIFUNCTION LCD
•AM/FM STEREO RECEIVER WITH 10 AM AND 10 FM
PRESETS
•DIGITAL TUNING
•DIGITAL CLOCK WITH ALARM
•BASS BOOST
•ADJUSTABLE NONSLIP ELASTIC ARMBAND
•REFLECTOR SAFETY RING
•RUBBERIZED FINISH
•HEADPHONE JACK
AM/FM Armband Radio K033 Instructions for Use
Please read and retain these instructions for future reference v001: 18/06/21
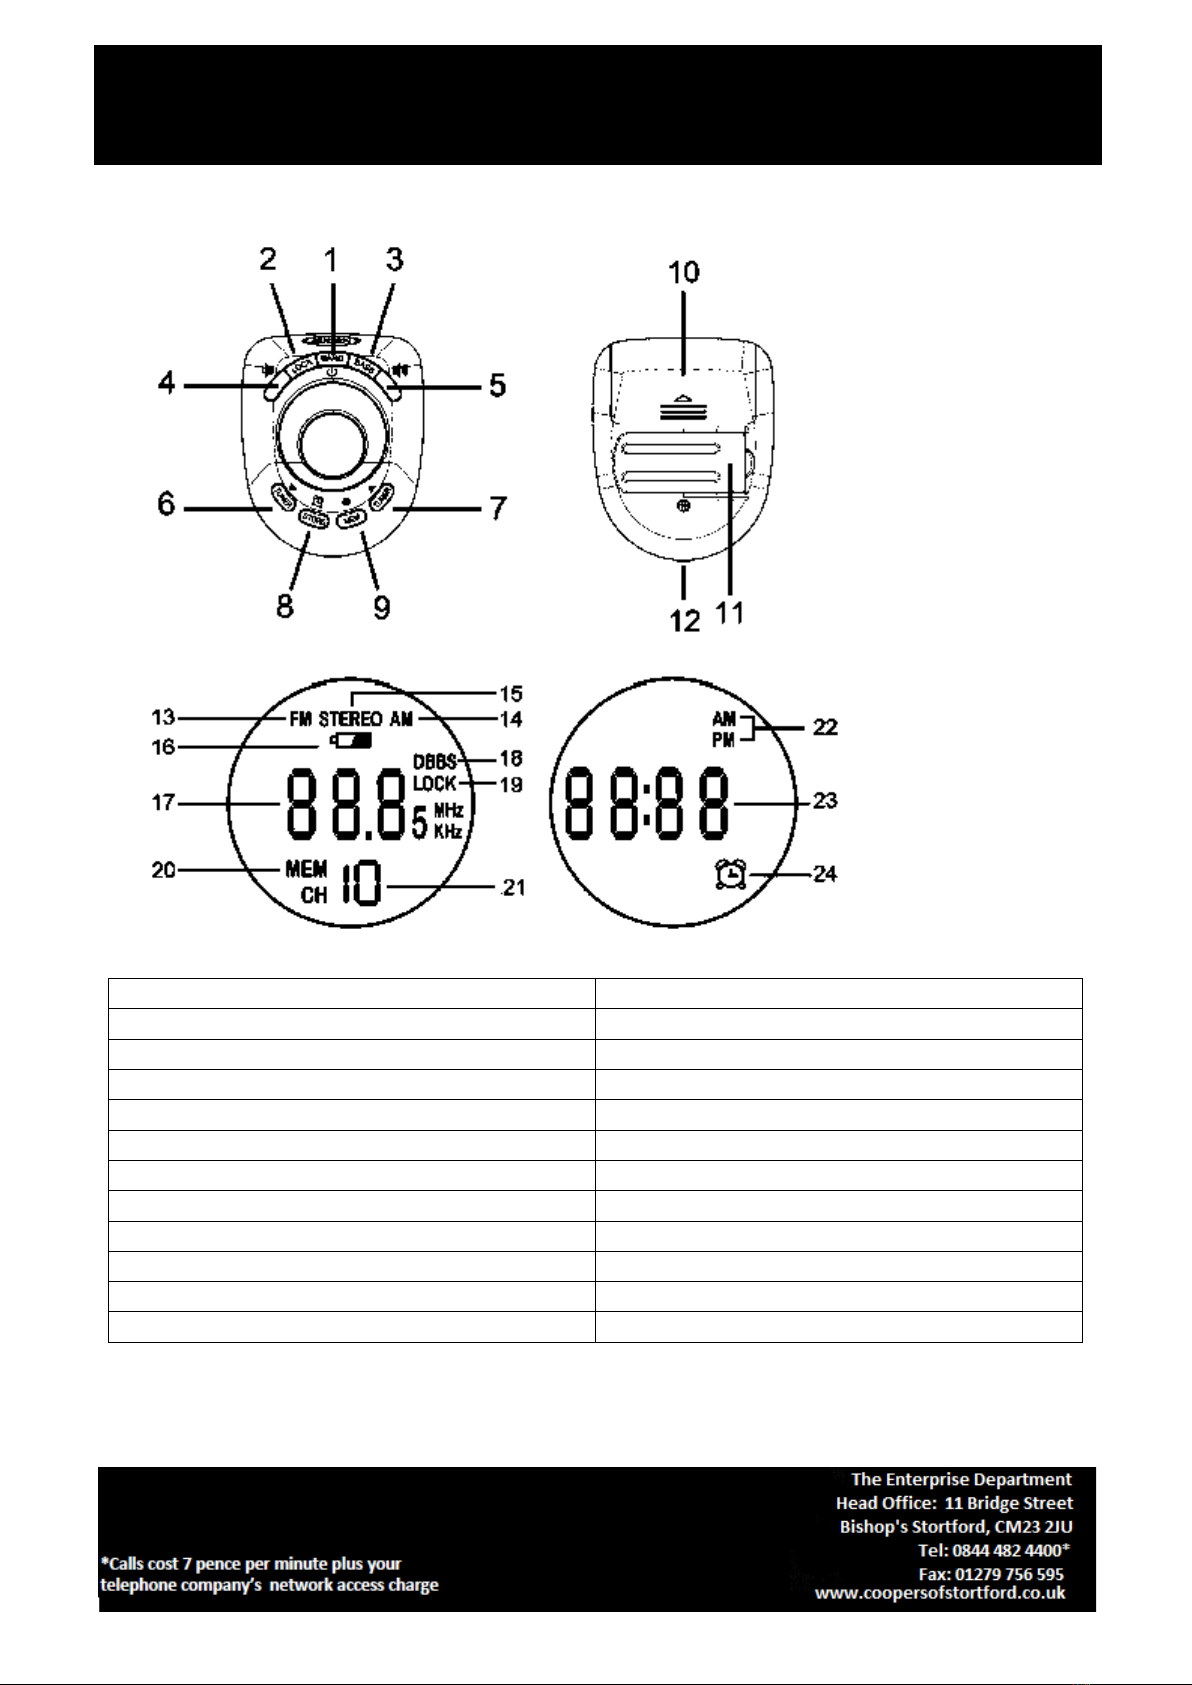
LOCATION OF CONTROLS
1. Power/Band Button
13. FM Radio Indicator
2. Lock Button
14. AM Radio Indicator
3. Bass Button
15. FM Stereo Indicator
4. Volume Down Button
16. Low Battery Indicator
5. Volume Up Button
17. Frequency Reading
6. Tuner Down Button
18. DBBS Indicator
7. Tuner Up Button
19. Lock Indicator
8. Store/Alarm Button
20. Memory Indicator
9. Memory/Time Button
21. Preset Channel Number
10. Battery Compartment
22. AM/PM Indicator
11. Belt Clip
23. Time Display
12. Earphone Jack
24. Alarm Clock Indicator

AM/FM Armband Radio K033 Instructions for Use
Please read and retain these instructions for future reference v001: 18/06/21
POWER SOURCE
This digital AM/FM Armband Radio operates on 2 x AAA batteries (not included).
INSTALLING THE BATTERY
1. Remove the BATTERY DOOR
2. Following the polarity diagram (+ and -)
shown in the battery compartment
(10), insert 2x AAA batteries (not
included).
3. Close the BATTERY DOOR.
Notes:
•Replace batteries when the LOW
BATTERY INDICATOR (16) shows on the
LCD display.
•When changing batteries in clock mode,
the unit will retain the time and your presets for 45 seconds. Change the batteries within this
45 seconds time frame or you will need to reset the time and all your saved presets. IF you
remove the batteries in radio mode, the unit will power off and the time will have to be reset.
•For better performance and longer operating time, we recommend the use of alkaline-type
batteries.
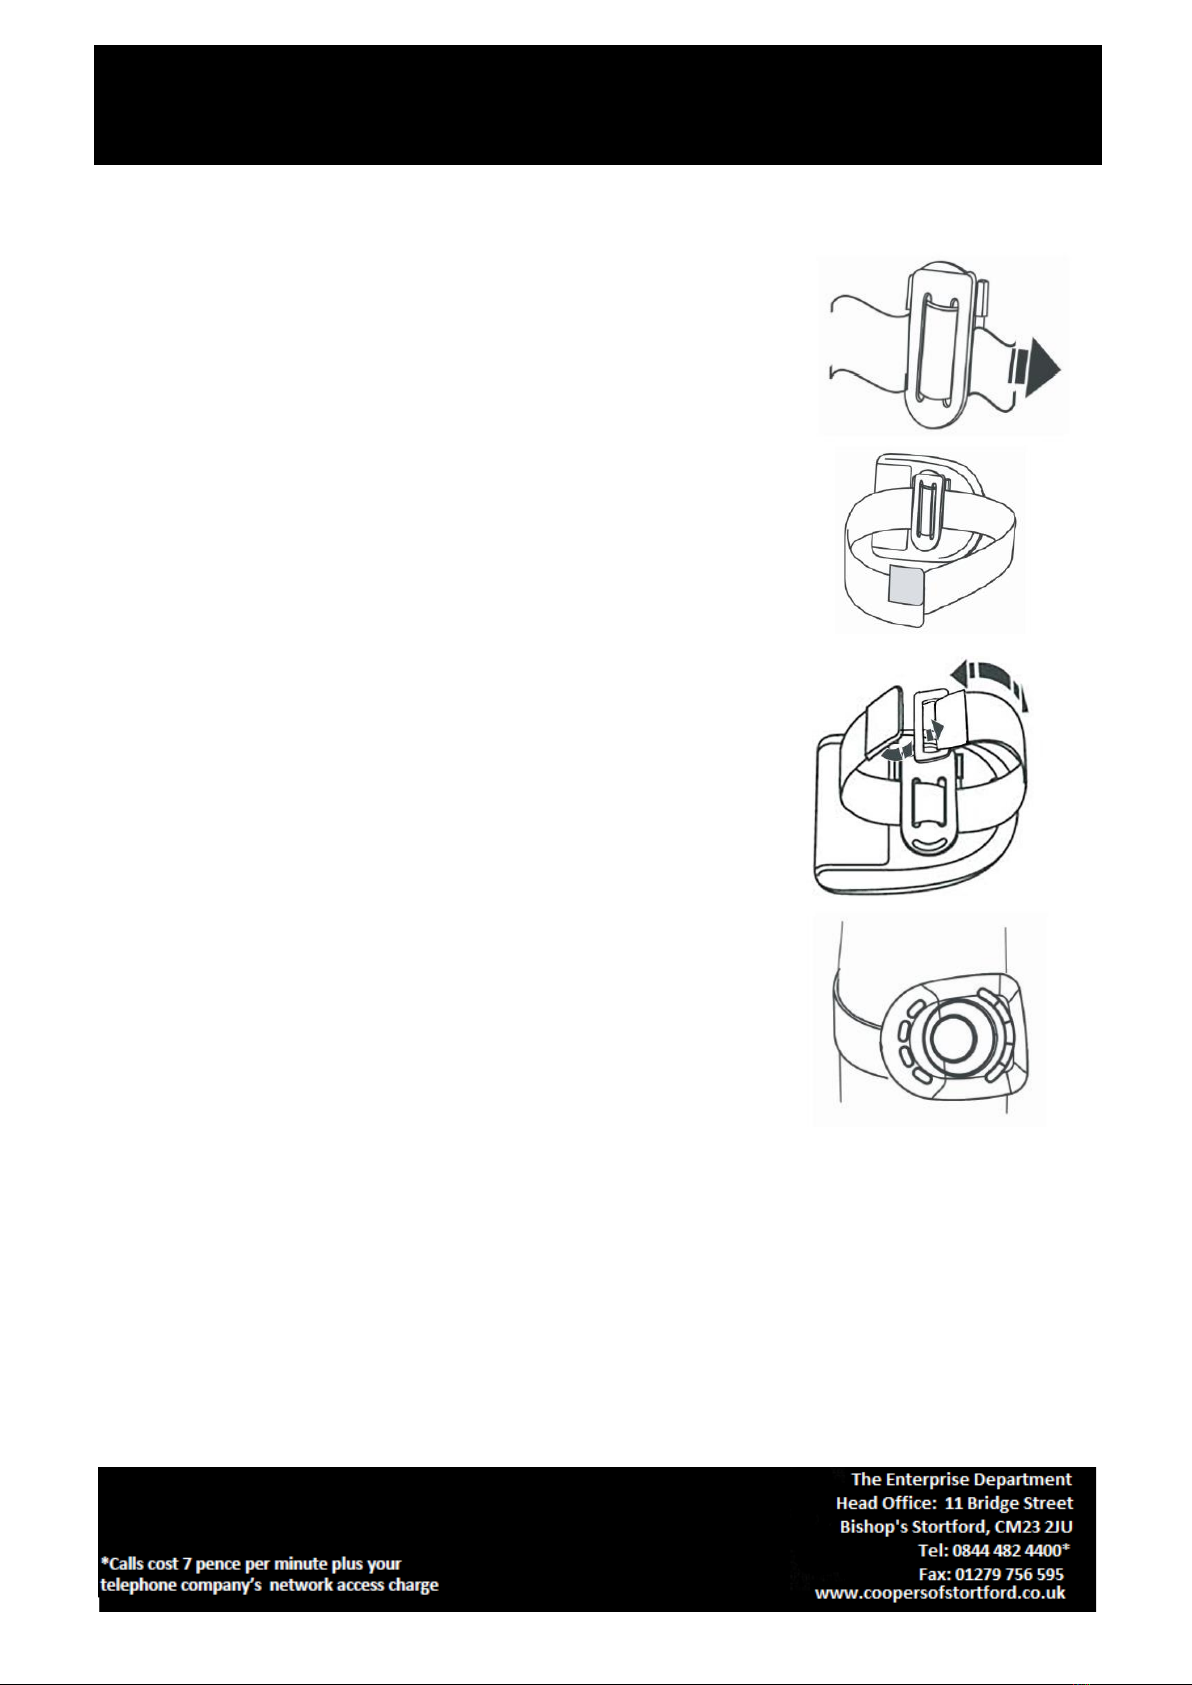
USING THE BELT CLIP
The supplied BELT CLIP allows you to attach the Armband Radio on
your belt for convenient use.
1. Attaching the BELT CLIP
2. Removing the BELT CLIP
AM/FM Armband Radio K033 Instructions for Use
Please read and retain these instructions for future reference v001: 18/06/21
USING THE ARMBAND
With the supplied ARMBAND, you can wear your unit on your arm
for convenient use.
1. Attaching the ARMBAND to the BELT CLIP.
2. Attaching the BELT CLIP to your unit.
3. Adjusting the ARMBAND
4. Wearing the Radio on your arm.
SETTING THE CLOCK TIME
1. When you place the batteries, the unit will automatically switch into standby mode showing a
12:00 AM on the display, a beep sound will be heard.
2. Remark: You can press the hold and POWER/BAND Button (1) to switch the radio to standby
mode.
3. Press and hold MEM/TIME BUTTON (9), the hour digits on the display will blink.
4. Within seconds, press the TUNER UP (7) / TUNER DOWN BUTTON (6) repeatedly until the
correct hour is reached.
5. Press the MEM/TIME BUTTON (9) again and the minute digits on the display will blink.
6. Within seven seconds, press the TUNER UP BUTTON (7) / TUNER DOWN BUTTON (6) repeatedly
until the correct minute is reached.

AM/FM Armband Radio K033 Instructions for Use
Please read and retain these instructions for future reference v001: 18/06/21
7. Press the MEM/TIME (9) to confirm the time.
Note:
Make sure the hour is set so that AM or PM is correctly displayed. If the PM INDICATOR (22) is
showing on the display, the displayed time is “PM”. If the AM INDICATOR (22) is showing on the
display, the time displayed is “AM”.
RADIO OPERATION
1. Insert the earbuds into the EARPHONE JACK (12) and press and hold the POWER/BAND BUTTON
(1) to turn on the radio.
2. Press the POWER/BAND BUTTON (1) repeatedly to select AM or FM.
3. Press and hold the TUNER UP BUTTON (7)/TUNER DOWN BUTTON (6) to search next/previous
available station. If reception is poor, try manual tuning to fine-tune the station. Press the
TUNER UP BUTTON (7)/TUNER DOWN BUTTON (6) briefly to manually tune through the
frequency band.
4. Adjust the VOLUME UP/VOLUME DOWN BUTTONS (5 and 4) to obtain the desired sound level.
5. Press the BASS BUTTON (3) to enhance the bass effect of the music being played. Press the BASS
BUTTON (3) again to turn the effect off.
6. Press and hold the POWER/BAND BUTTON (1) to turn off the Armband Radio when you have
finished listening. The radio will display the time.
TIPS FOR BEST RECEPTION
FM The FM radio uses the cord from the earbuds as the antenna. Unwrap and extend the cord
for best reception. The FM STEREO INDICATOR will show on the display when receiving a
stereo broadcast and signal is strong enough.
AM The AM antenna is located inside the cabinet of the unit. If AM reception is weak, change
the position of the radio until the internal antenna picks up the strongest signal.
SETTING THE RADIO STATION PRESETS
The Armband Radio allows you to store up to 10 FM station and 10 AM stations for easy recall at
any time.
1. In the FM or AM mode, tune to the radio station you want to store in memory by using the
TUNER UP BUTTON (7) / TUNER DOWN BUTTON (6).
2. Press Store/Alarm Button (8). The MEMORY INDICATOR (20) and the PRESET CHANNEL NUMBER
(21) will be flashing on display.
3. To change the preset channel number location, press the TUNER UP BUTTON (7) / TUNER
DOWN BUTTON (6) to step through the preset locations (1-10).
4. To confirm the preset location, press the STORE/ALARM BUTTON (8).
5. To store up to 10 FM and 10 AM station presets, repeat steps 1 to 4 above.
RECALLING THE PRESET RADIO STATIONS
1. Set the armband radio to FM or AM mode.
2. Press the MEMORY/TIME button (9) repeatedly to select the desired preset station.

AM/FM Armband Radio K033 Instructions for Use
Please read and retain these instructions for future reference v001: 18/06/21
ALARM OPERATION
The Armband Radio has an alarm that will wake you up with a beeping sound.
The alarm beeper is built into the case so it is not necessary to connect earphones to hear the
alarm.
1. In standby mode, press and hold the STORE/ALARM BUTTON (8), the hour digits of the alarm
time will blink and the ALARM INDICATOR will show on the display.
2. Within three seconds, press the TUNER UP BUTTON (7)/ TUNER DOWN BUTTON (6) until the
correct hour is reached.
3. Press the STORE/ALARM BUTTON (8) again and the minute digits of alarm time will blink.
4. Within three seconds, press the TUNER UP BUTTON (7)/ TUNER DOWN BUTTON (6) until the
correct minute is reached.
5. Press the STORE/ALARM BUTTON (8) to confirm the alarm time.
6. The alarm will sound for 60 minutes at the time you entered.
TO STOP THE ALARM SOUND
When alarm sounds, press the STORE/ALARM BUTTON (8) or the POWER/BAND BUTTON (1) once
to stop the alarm and it will repeat next day same time.
TO COMPLETELY TURN OFF ALARM (NOT RESET FOR NEXT DAY)
In standby mode, press the STORE/ALARM BUTTON (8)repeatedly until the ALARM Indicator (24)
disappears.
LOCK FUNCTION
To prevent accidental function changes during active use, this unit is fitted with a function lock.
After the unit has been powered on and the required station tuned, press the LOCK BUTTON (2) to
lock all functions. LOCK INDICATOR (19) will show on the display.
CARE AND MAINTENANCE
1. Clean your unit with a damp (never wet) cloth. Solvent or detergent should never be used.
2. Avoid leaving your unit in direct sunlight or in hot, humid, Or dusty places.
3. Keep your unit away from heating appliances and sources of electrical noise such as fluorescent
lamps or motors.
CAUTION: Never allow any water or other liquids to get inside the unit while cleaning.
BATTERIES
•Keep batteries away from children and pets.
•Do not mix used and new batteries.
•Remove the batteries if left for long periods.
•Never dispose of batteries in a fire.

AM/FM Armband Radio K033 Instructions for Use
Please read and retain these instructions for future reference v001: 18/06/21
•Battery disposal, spent or expired batteries must be properly disposed of and recycled in
compliance with local regulations. For detailed information, contact your local authority.
•Follow the battery manufacturer’s safety, usage, and disposal instructions.
DISPOSAL
•Coopers of Stortford use recyclable or recycled packaging where possible.
•Please dispose of all packaging, paper, cartons, packaging in accordance with your
local recycling regulations.
•Plastics, polybags –Contains the following recyclable plastic.
Code & Symbol
Type of Plastic
Low Density Polyethylene
ABS
Commonly used for
Shopping bags, bread bags, squeezy bottles,
stretch/pallet wrap, bubble wrap, multi-pack
can holders
CD’s, crisp packets, various flexible
packaging, baby bottles, sunglass
lenses
Notes
Usually recyclable supermarket deposit
points. Check other plastic films as any non-
polythene film e.g. cling film, crisp packets
film lids
Not often or widely recycled
•At the end of the product’s lifespan please check with your local council authorised household
waste recycling centre for disposal.
Table of contents
Other Bergstrom Radio manuals


