berlinger Fridge-tag 2 User manual

Connect the device via
USB with your PC/MAC.
For more informaon download the whole
user manual from
www.berlinger.com/user-manuals.
The display indicates
the word LOC for a
period of 10 minutes
(factory preset),
during this me the
device does not
measure the tempe-
rature to avoid false
readings. Place the
device immediately to
the supervised goods.
The Fridge-tag will now generate a PDF and ASCII
report of max. 30 or 60 days (oponal factory seng).
This process can take up to 30 seconds.
Note: Disconnect the external sensor from the device
rst.
yyyd y__d
Note: Press and hold the READ buon again for at least
3 seconds and the next alarm event will appear on the
screen.
Opon 2: Read out alarms
directly on the device
Alarm-Super-Jump funcon (30-day history)
Press and hold READ
for 3 seconds.
Quick Info - User Guide
EN
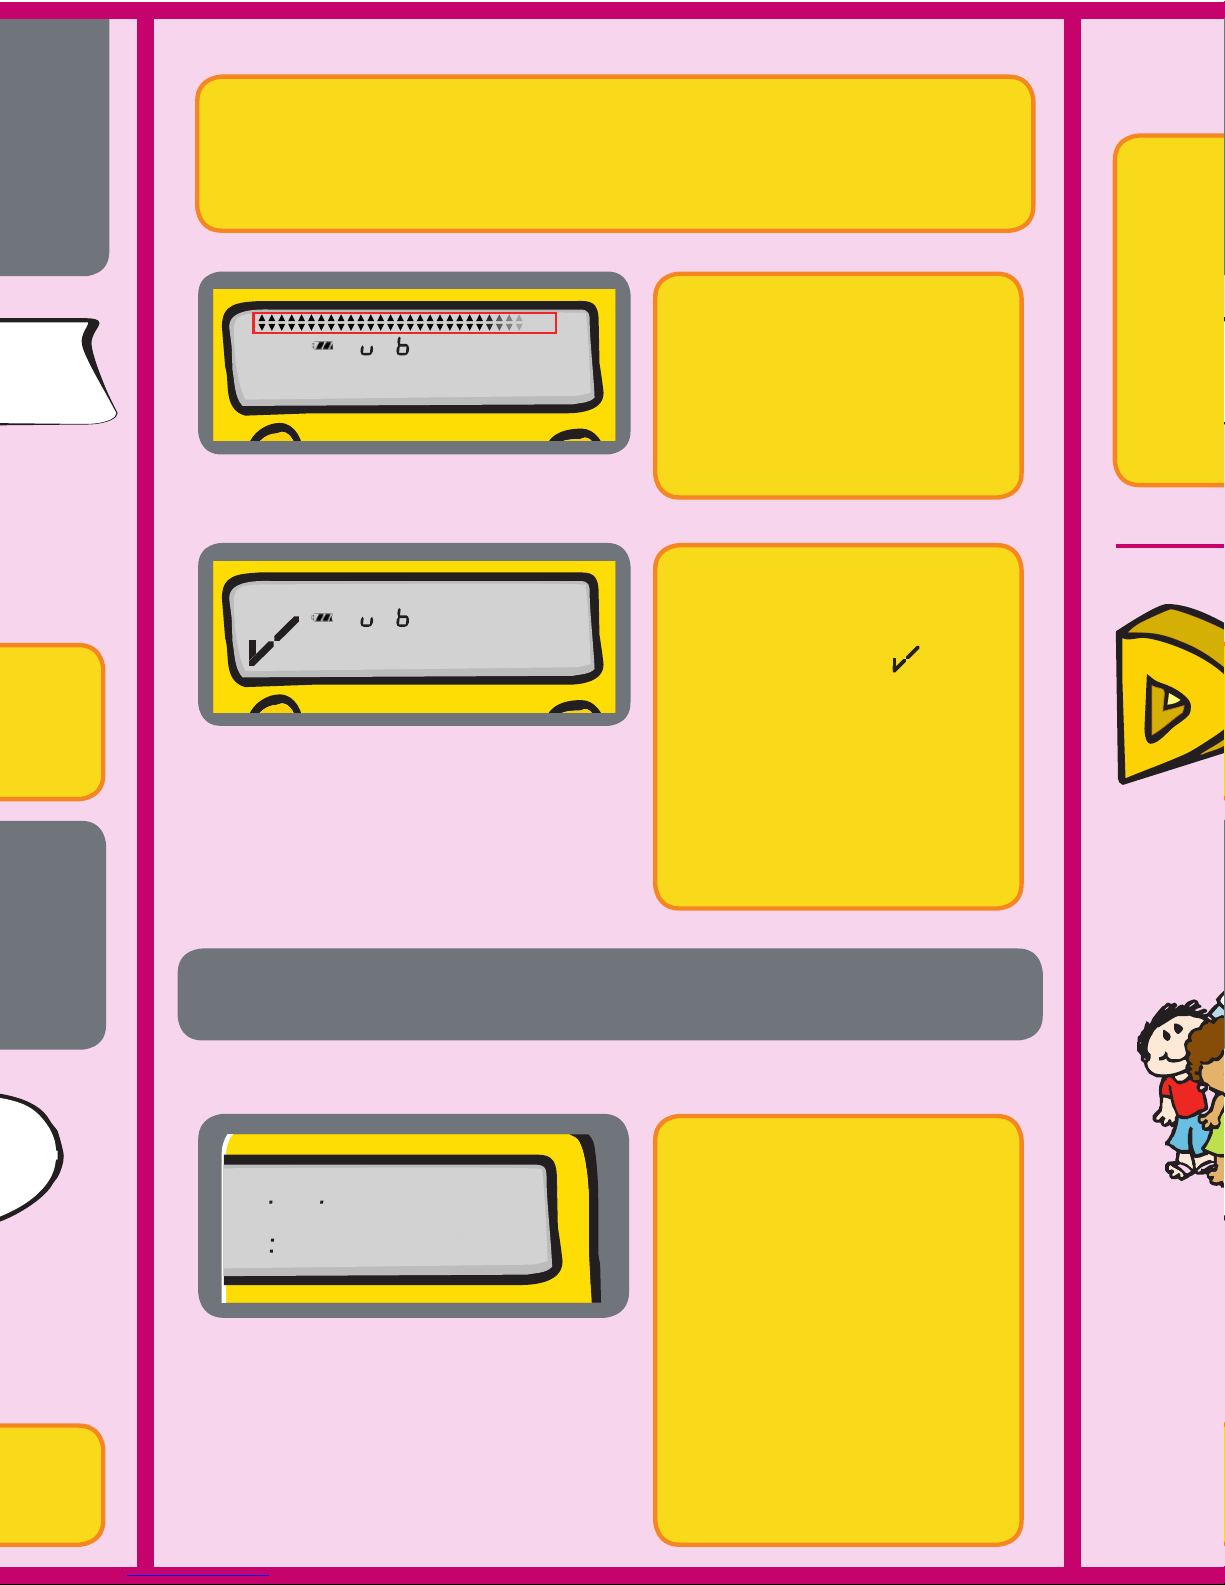
The connuously
appearing arrows
in the upper display
area indicate that the
device is processing.
This process must not
be interrupted unl
the OK symbol ap-
pears on the display.
This indicates that
the creaon of the
ASCII and PDF les
has been successfully
completed.
5
5
8101 2026
loC
1 038
Back to normal operaon
Internal sensor
Please connect the device with the external sensor
again. Aer 10 minutes (factory standard) without
a connecon between the device and the external
sensor:
• The whole display starts blinking.
• Any conrmaon will stop the display from blinking.
More details see chapter “Connecon error” in the
Quick Info “Set Up Fridge-tag 2”.
Berlinger & Co. AG
Mieldorfstrasse 2
9608 Ganterschwil
Switzerland
Tel. +41 71 982 88 11
www.berlinger.com
EN_QI_UG_FT2_V1_052018
Opon 3: Read out data from the
les generated by connecng the
device with a computer
internal/external sensor
User Guide
Fridge-tag® 2
External sensor
Reading the history
Opon 1: Read out day per day directly on the device (30-day history)
Alarm display and conrmaon
opons
Opon 1- Alarm indicaon “all alarms”
With this opon the alarms will be visible on the display
with an alarm symbol for 30 days. By pressing the
READ buon, the warning symbol
!
will be disabled for
the corresponding alarms. The alarm symbol cannot
be canceled nor reset.
• In this mode only one upper and one lower alarm will
be triggered per day.
• The alarm symbol will be present on the display for
30 days.
• The warning symbol
!
will disappear when conrming
all exisng alarms in the readout mode.
Opon 2 - Alarm indicaon “unconrmed alarms”
The alarms are shown with the alarm symbol unl
all alarms (in the 30-day history) have been conrmed
as solved by pressing the READ buon. Aerwards the
display will show the OK symbol unl a new alarm is
triggered.
Conrmaon: Device is within the set alarm limits.
Press the READ buon and the alarm symbol and the
warning symbol
!
will immediately disappear. A new
alarm will be triggered as soon as the set alarm limits
are exceeded again.
Conrmaon: Device is outside the set alarm limits.
If the READ buon is pressed sll during a temperature
violaon the alarm symbol and the warning symbol
!
will stay on the display for the corresponding alarm.
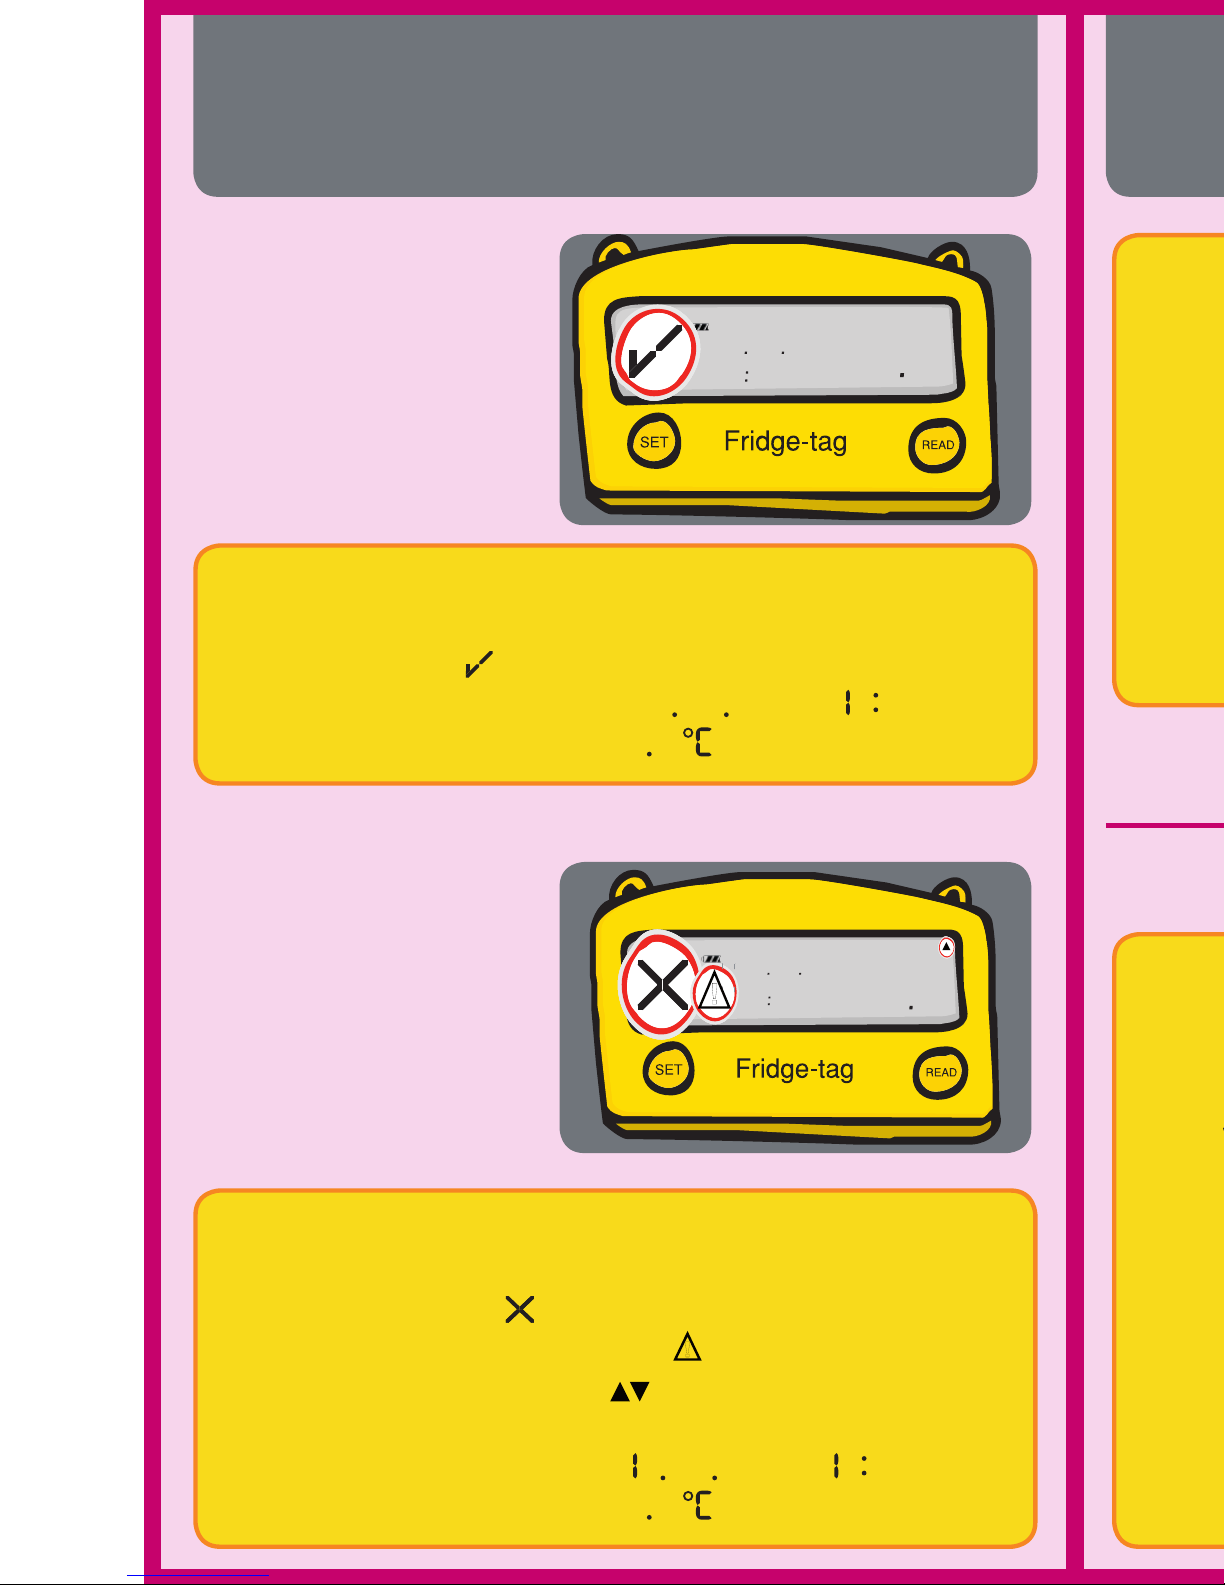
Example of an OK display
Press READ.
Example of an alarm display
Press READ a
second me.
Note: Connue repevely pressing the READ buon to read
out the details of the past 30 days.
The following informaon is indicated on the screen:
• The alarm- and the warning symbol
!
• The corresponding ashing arrow (alarm indicator)
(example: Temperature out of lower alarm limit)
• The date of alarm:
1
6 02 2018
• The me of alarm:18 21
The following addional informaon is indicated on the
screen:
• Lowest recorded temperature of that day: -1
.1 ° C
• The duraon ot the exceedance of the preset low
temperature limit:
01:35
(hrs:min)
• Temperature recording in this example with internal
sensor
The following informaon is indicated on the display:
• The OK symbol
• The corresponding ashing arrow
(example: high arrow “today”
• The highest recorded temperature of that day: 0 5
• The me duraon out of the preset temperature
high limit: (hrs:min)
• Temperature recording in this example with internal
sensor
051
0 320
max.
°C
Int.Sensor
2nd display
1st display
Press READ once.
8101 2026
1 218
!
-11
0 351
min.
Int.Sensor
!°C
Indicaon of an
OK display
Indicaon of an
alarm display
8101 2026 56
1 473
°C
Int.Sensor
8101 2026
88
1 425
°C
Int.Sensor
!
In measurement mode, when an alarm has been trig-
gered, the following informaon is indicated:
• The alarm symbol
• An addional warning symbol
!
• The corresponding arrow (alarm indicator),
upper/lower alarm
• The current date and me: 6 02 2018/ 5 42
• The current temperature: 8 8
In measurement mode, when no alarm has been trig-
gered, the following informaon is indicated:
• The OK symbol
• The current date and me:16 02 2018/3 47
• The current temperature: 5 6
Screen displays during
measurement mode

Reading the history
Opon 1: Read out day per day directly on the device (30-day history)
Alarm display and conrmaon
opons
Opon 1- Alarm indicaon “all alarms”
With this opon the alarms will be visible on the display
with an alarm symbol for 30 days. By pressing the
READ buon, the warning symbol
!
will be disabled for
the corresponding alarms. The alarm symbol cannot
be canceled nor reset.
• In this mode only one upper and one lower alarm will
be triggered per day.
• The alarm symbol will be present on the display for
30 days.
• The warning symbol
!
will disappear when conrming
all exisng alarms in the readout mode.
Opon 2 - Alarm indicaon “unconrmed alarms”
The alarms are shown with the alarm symbol unl
all alarms (in the 30-day history) have been conrmed
as solved by pressing the READ buon. Aerwards the
display will show the OK symbol unl a new alarm is
triggered.
Conrmaon: Device is within the set alarm limits.
Press the READ buon and the alarm symbol and the
warning symbol
!
will immediately disappear. A new
alarm will be triggered as soon as the set alarm limits
are exceeded again.
Conrmaon: Device is outside the set alarm limits.
If the READ buon is pressed sll during a temperature
violaon the alarm symbol and the warning symbol
!
will stay on the display for the corresponding alarm.
Example of an OK display
Press READ.
Example of an alarm display
Press READ a
second me.
Note: Connue repevely pressing the READ buon to read
out the details of the past 30 days.
The following informaon is indicated on the screen:
• The alarm- and the warning symbol
!
• The corresponding ashing arrow (alarm indicator)
(example: Temperature out of lower alarm limit)
• The date of alarm:
1
6 02 2018
• The me of alarm:18 21
The following addional informaon is indicated on the
screen:
• Lowest recorded temperature of that day: -1
.1 ° C
• The duraon ot the exceedance of the preset low
temperature limit:
01:35
(hrs:min)
• Temperature recording in this example with internal
sensor
The following informaon is indicated on the display:
• The OK symbol
• The corresponding ashing arrow
(example: high arrow “today”
• The highest recorded temperature of that day: 0 5
• The me duraon out of the preset temperature
high limit: (hrs:min)
• Temperature recording in this example with internal
sensor
051
0 320
max.
°C
Int.Sensor
2nd display
1st display
Press READ once.
8101 2026
1 218
!
-11
0 351
min.
Int.Sensor
!°C
Indicaon of an
OK display
Indicaon of an
alarm display
8101 2026 56
1 473
°C
Int.Sensor
8101 2026
88
1 425
°C
Int.Sensor
!
In measurement mode, when an alarm has been trig-
gered, the following informaon is indicated:
• The alarm symbol
• An addional warning symbol
!
• The corresponding arrow (alarm indicator),
upper/lower alarm
• The current date and me: 6 02 2018/ 5 42
• The current temperature: 8 8
In measurement mode, when no alarm has been trig-
gered, the following informaon is indicated:
• The OK symbol
• The current date and me:16 02 2018/3 47
• The current temperature: 5 6
Screen displays during
measurement mode

Connect the device via
USB with your PC/MAC.
For more informaon download the whole
user manual from
www.berlinger.com/user-manuals.
The display indicates
the word LOC for a
period of 10 minutes
(factory preset),
during this me the
device does not
measure the tempe-
rature to avoid false
readings. Place the
device immediately to
the supervised goods.
The Fridge-tag will now generate a PDF and ASCII
report of max. 30 or 60 days (oponal factory seng).
This process can take up to 30 seconds.
Note: Disconnect the external sensor from the device
rst.
yyyd y__d
Note: Press and hold the READ buon again for at least
3 seconds and the next alarm event will appear on the
screen.
Opon 2: Read out alarms
directly on the device
Alarm-Super-Jump funcon (30-day history)
Press and hold READ
for 3 seconds.
Quick Info - User Guide
EN
The connuously
appearing arrows
in the upper display
area indicate that the
device is processing.
This process must not
be interrupted unl
the OK symbol ap-
pears on the display.
This indicates that
the creaon of the
ASCII and PDF les
has been successfully
completed.
5
5
8101 2026
loC
1 038
Back to normal operaon
Internal sensor
Please connect the device with the external sensor
again. Aer 10 minutes (factory standard) without
a connecon between the device and the external
sensor:
• The whole display starts blinking.
• Any conrmaon will stop the display from blinking.
More details see chapter “Connecon error” in the
Quick Info “Set Up Fridge-tag 2”.
Berlinger & Co. AG
Mieldorfstrasse 2
9608 Ganterschwil
Switzerland
Tel. +41 71 982 88 11
www.berlinger.com
EN_QI_UG_FT2_V1_052018
Opon 3: Read out data from the
les generated by connecng the
device with a computer
internal/external sensor
User Guide
Fridge-tag® 2
External sensor
Other manuals for Fridge-tag 2
9
Table of contents
Other berlinger Other manuals


