Besco Medical PRIMUS ML 2.0 User manual

INSTRUCTION MANUAL
PRIMUS ML 2.0
Lightweight wheelchair

Instruction manual for PRIMUS ML 2.0 wheelchair
2
Preliminary Note
Dear user,
Thank you for choosing a PRIMUS ML 2.0 wheelchair from Besco
Medical!
You now have a modern aid to support you in your everyday life.
We have paid attention to functionality and quality when manu-
facturing this wheelchair.
Your new wheelchair has numerous adjustment options and can
be adapted to your needs.
Please read this instruction manual carefully before using the
wheelchair for the first time in order to familiarise yourself with
the adjustment options. The instruction manual also contains val-
uable tips and important safety instructions for the correct use
and care of the wheelchair.
Please store this instruction manual carefully so that you can
make notes and look up functions while using the wheelchair too.
If you have any questions or need additional information, please
contact the dealer who supplied you with the wheelchair, who will
be happy to advise you.
Your wheelchair is delivered from the factory fully assembled and
packaged in a cardboard box. Please keep the packaging if possi-
ble. It can be used to store the wheelchair at a later date if nec-
essary.
Before using for the first time, you simply need to unfold the
wheelchair and hook in the leg supports. In the following chapters,
you will find instructions on how to make the wheelchair ready for
use and how to use it. But first, here are the safety instructions.

Instruction manual for PRIMUS ML 2.0 wheelchair
3
CONTENTS
1 General information .............................................................................................................................................4
2 Signs and symbols.................................................................................................................................................5
3 Intended use.............................................................................................................................................................5
4 Indications.................................................................................................................................................................6
5 Contraindications...................................................................................................................................................6
6 Delivery contents....................................................................................................................................................6
7 Getting to know your wheelchair ...................................................................................................................7
8 Safety information.................................................................................................................................................8
9 Putting the wheelchair into operation......................................................................................................14
9.1 Unfolding ............................................................................................................................ 14
9.2 Inserting the footrests ........................................................................................................ 14
9.3 Adjusting the lower leg length ............................................................................................ 15
9.4 Adjusting the brakes ........................................................................................................... 15
10 Additional setting options...............................................................................................................................15
10.1 Assembling and disassembling the rear wheels ................................................................. 15
10.2 Adjusting the height of the rear wheels ............................................................................. 16
10.3 Adjusting the height of the front wheels ............................................................................ 17
10.4 Adjusting the knee lever brakes ......................................................................................... 17
10.5 Adjusting the drum brake (depending on model) .............................................................. 19
10.6 Swinging away and disassembling the footrests ................................................................ 19
10.7 Foot board (fold-up) ........................................................................................................... 20
10.8 Folding up the side panels .................................................................................................. 21
11 Using the wheelchair..........................................................................................................................................21
11.1 Getting into the wheelchair from the side ........................................................................ 21
11.2 Getting into the wheelchair from the front ...................................................................... 22
11.3 Seat in the vehicle for transporting disabled people .......................................................... 23
12 Travelling in the wheelchair..........................................................................................................................26
12.1 General information ........................................................................................................... 26
12.2 Push handles ....................................................................................................................... 27
12.3 Braking ................................................................................................................................ 27
13 Declaration of conformity...............................................................................................................................28
13.1 Labelling .............................................................................................................................. 28
14 Accessories and attachments....................................................................................................................... 29
14.1 Tilting aid ............................................................................................................................ 29

Instruction manual for PRIMUS ML 2.0 wheelchair
4
14.2 Anti-tip wheels (optional) .................................................................................................... 30
14.3 Seat belt (optional) .............................................................................................................. 30
14.4 Drum brake (depending on model) ..................................................................................... 30
15 Care instructions.................................................................................................................................................. 31
15.1 Cleaning ............................................................................................................................... 31
15.2 Disinfection ......................................................................................................................... 32
16 Storage and transport.......................................................................................................................................33
16.1 General information ............................................................................................................ 33
16.2 Storage conditions: .............................................................................................................. 33
17 Disposal....................................................................................................................................................................33
18 Passing on the wheelchair..............................................................................................................................34
19 Technical data.......................................................................................................................................................34
20 Inspection and maintenance.........................................................................................................................36
20.1 Regular maintenance .......................................................................................................... 37
21 Warranty and guarantee ..................................................................................................................................39
1 GENERAL INFORMATION
This instruction manual is intended to help the wheelchair occu-
pant and a carer to become more familiar with the operation and
handling of the wheelchair. The manual is an integral and neces-
sary part of the wheelchair. Keep the instruction manual handy
and include it if you pass on the wheelchair to another owner. In
this instruction manual, the generic masculine is used for better
readability. Female and other gender identities are explicitly in-
cluded. Please read the instruction manual in full before using the
wheelchair for the first time. The wheelchair is designed for a max-
imum load of 130 kg.
Please note that despite careful review, it is possible that this in-
struction manual may contain incorrect information. Therefore,
please visit our website regularly and check to see whether there
is a recent version.

Instruction manual for PRIMUS ML 2.0 wheelchair
5
2 SIGNS AND SYMBOLS
To provide a quick overview of the contents of this instruction
manual, we use the following symbols:
Serial number
Enables the assignment of the medical device to
a production batch
Manufacturer
Indicates the manufacturer of the medical de-
vice
Date of manufac-
ture
Time of manufacture
Observe instruction
manual
The instruction manual must be read in full by
the user before use.
CE marking
Declaration of conformity, device complies with
the European Medical Device Regulation MDR
2017/745
Safety information
Safety information refers to risks that can lead to
hazards and injuries. Safety information must be ob-
served without fail.
Labelling
Medical device
Important infor-
mation
Tips and suggestions that can facilitate the use
of the product.
Labelling
Attachment point for force nodes when used in
a vehicle for transporting disabled people.
3 INTENDED USE
The wheelchair is designed for indoor and outdoor use. It is in-
tended exclusively for the transport of a person sitting on the seat,
either independently or with the assistance of a third party.

Instruction manual for PRIMUS ML 2.0 wheelchair
6
4 INDICATIONS
This aid is intended to support people who are unable to walk or
who have severely impaired mobility as a result of
- Paralysis
- Loss of a limb
- Limb defect/deformation
- Joint contractures/joint damage (not on both arms)
- Other diseases
5 CONTRAINDICATIONS
This aid must not be used for
- Perception disorders
- Severe balance disorders
- Loss of both arms
- Joint contractures/joint damage in both arms
- Inability to sit
- Reduced or insufficient vision
6 DELIVERY CONTENTS
After receipt of the goods, please immediately check the delivery
in order to verify that the contents are complete and intact. The
content consists of:
- Outer packaging
- Wheelchair (pre-assembled)
- Pair of leg supports
- Operating instructions
- Service booklet
Instruction manual for PRIMUS ML 2.0 wheelchair
7
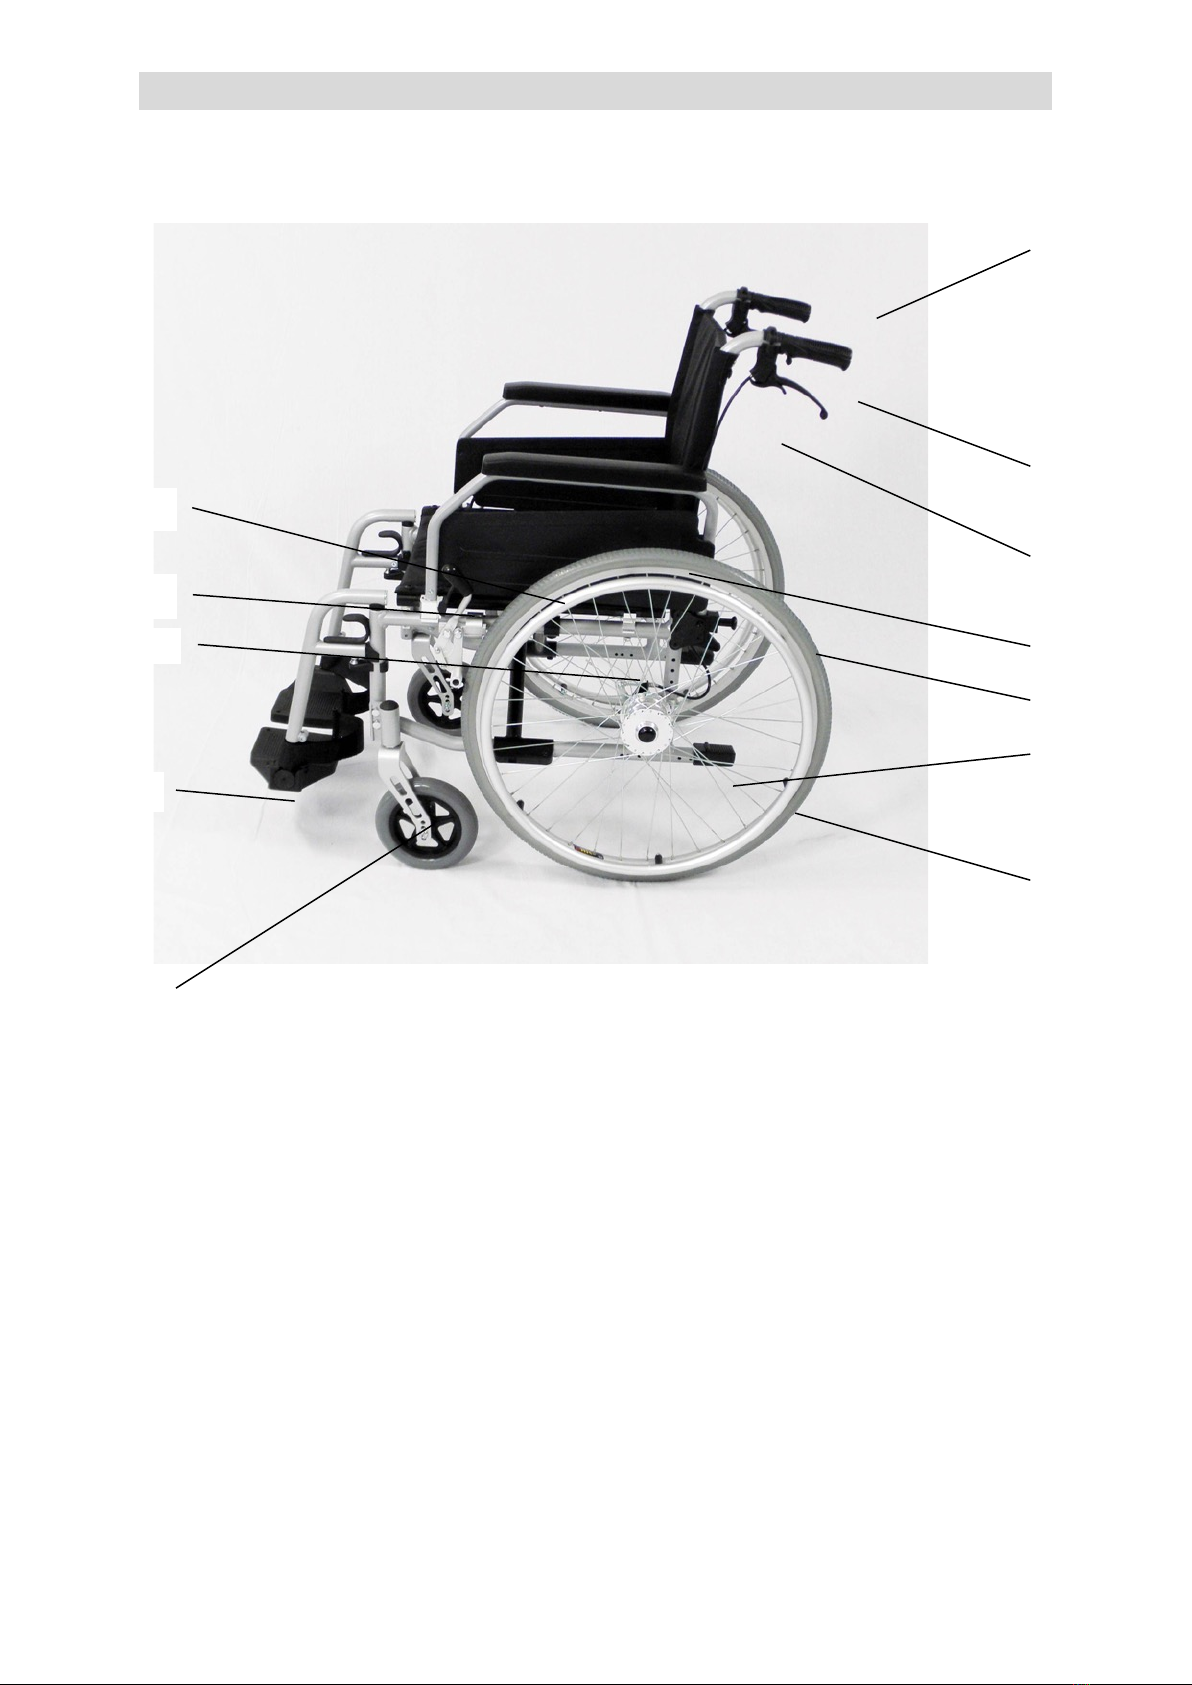
7 GETTING TO KNOW YOUR WHEELCHAIR
1
Push handles
2
Lever for drum brake
3
Back cushion
4
Side panel with armrest (padded, fold-away, removable)
5
Push rims (aluminium)
6
Drive wheel
7
Tilting aid
8
Steering wheels
9
Foot plates (fold-up)
10
Parking brake
11
Footrest, fold-up and removable
12
Seat
1
2
3
4
5
6
7
8
9
10
11
12

Instruction manual for PRIMUS ML 2.0 wheelchair
8
8 SAFETY INFORMATION
Flawless condition
Before each use of the wheelchair, please check that all at-
tached parts are properly attached and that the wheelchair
as a whole looks functionally safe. Do not use the wheelchair if
you have any doubts about its fitness for use.
Please check the wheelchair for obvious defects and wear and tear
before each use. If you notice a defect or excessive wear, the
wheelchair must no longer be used, as a safety risk may arise. In
this case, the wheelchair must be repaired by a qualified specialist
dealer.
Handling practice
To avoid falls and dangerous situations, you should first
practise using your new wheelchair on level, manageable
terrain. It is recommended that you are assisted by an accompa-
nying person in this case. Thoroughly familiarise yourself with the
braking and acceleration behaviour when travelling straight
ahead and round corners. Only use the wheelchair when you feel
confident in doing so.
Intended use
The intended use is described in the intended purpose. Any
other use is at the sole risk of the user.
Never use the wheelchair under the influence of alcohol or other
substances that affect attention or physical and mental percep-
tion and reaction.
Danger of burns or frostbite
Please note that the upholstered parts and metal parts that
are exposed to direct sunlight may heat up and cause skin
injuries if touched. Therefore, make sure to cover these parts or
protect the wheelchair from sunlight.

Instruction manual for PRIMUS ML 2.0 wheelchair
9
You should also avoid exposing the wheelchair to frost for long
periods of time. In particular, metal parts that have cooled down
considerably may cause injuries if they come into contact with the
skin.
Children and young people
Children and young people must never be left unattended
in wheelchairs.
Dimensions
The dimensions of the wheelchair exceed the recom-
mended values of DIN EN 12183:2014/A.1 and PRM TSI Annex
M fordimensions and manoeuvring range.
Risk of injury
Your wheelchair consists of mechanical parts that move
when settings are being adjusted or when the wheelchair is
in use. Always handle the wheelchair with care in order to avoid
injury from moving parts. For example, there is a risk of jamming
when unfolding the wheelchair.
Armrests and footrests
Before each use, make sure that the armrests and footrests
are properly secured.

Instruction manual for PRIMUS ML 2.0 wheelchair
10
Transporting the wheelchair
Never lift an occupied wheelchair by the armrests, as this
could cause injury to the user and damage to the frame of
the wheelchair. If the wheelchair needs to be lifted, this is only
permitted if it is not occupied.
Getting in and out of the wheelchair
Never stand on the footrests when getting in and out of the
wheelchair. There is a danger of tipping over!
Brakes
The brakes acting directly on the tyres of the wheels must
only be used as parking brakes, i.e. they must only be ap-
plied when the wheelchair is at a standstill, and not to reduce the
driving speed. Always lock both brakes before sitting in or getting
up from the wheelchair.
Tyres
To ensure the safe use of the wheelchair, the tyre tread sur-
face must be free from damage. The tyres are solid rubber
tyres and must be replaced if damaged.
Obstacles
To overcome obstacles (e.g. kerbs, steps, etc.), please be
sure to use ramps or obtain the assistance of a third party.
Avoid driving into an obstacle without braking or driving down
high ledges.

Instruction manual for PRIMUS ML 2.0 wheelchair
11
Uphill and downhill gradients, risk of tipping over
Please note that the risk of tipping over may increase when
the weight is shifted due to body movements or when the
wheelchair is loaded. The same applies to uphill and downhill gra-
dients of more than 10°.
Anti-tip supports can be fitted for increased protection against
tipping backwards.
Only drive on uphill and downhill gradients of more than 10° with
the assistance of a third party, otherwise the wheelchair will gain
speed in an uncontrolled manner and it will no longer be possible
to slow down.
Using the adjustment options
The wheelchair settings should always be chosen such that
the wheelchair user can counteract the risk of tipping over
by shifting their upper body. If necessary, opt for settings with a
low centre of gravity or move the rear axle backwards if possible.
The installation of anti-tip supports can reduce the risk of tipping.
Surface condition
It is not recommended to use the wheelchair on muddy or
sandy surfaces due to the risk of getting stuck.
Take extra care when driving on wet or icy surfaces, as there
is an increased risk of slipping.
You should always cross ruts, rails or similar obstacles at a
right angle (90°) if you cannot avoid them.
Stairs
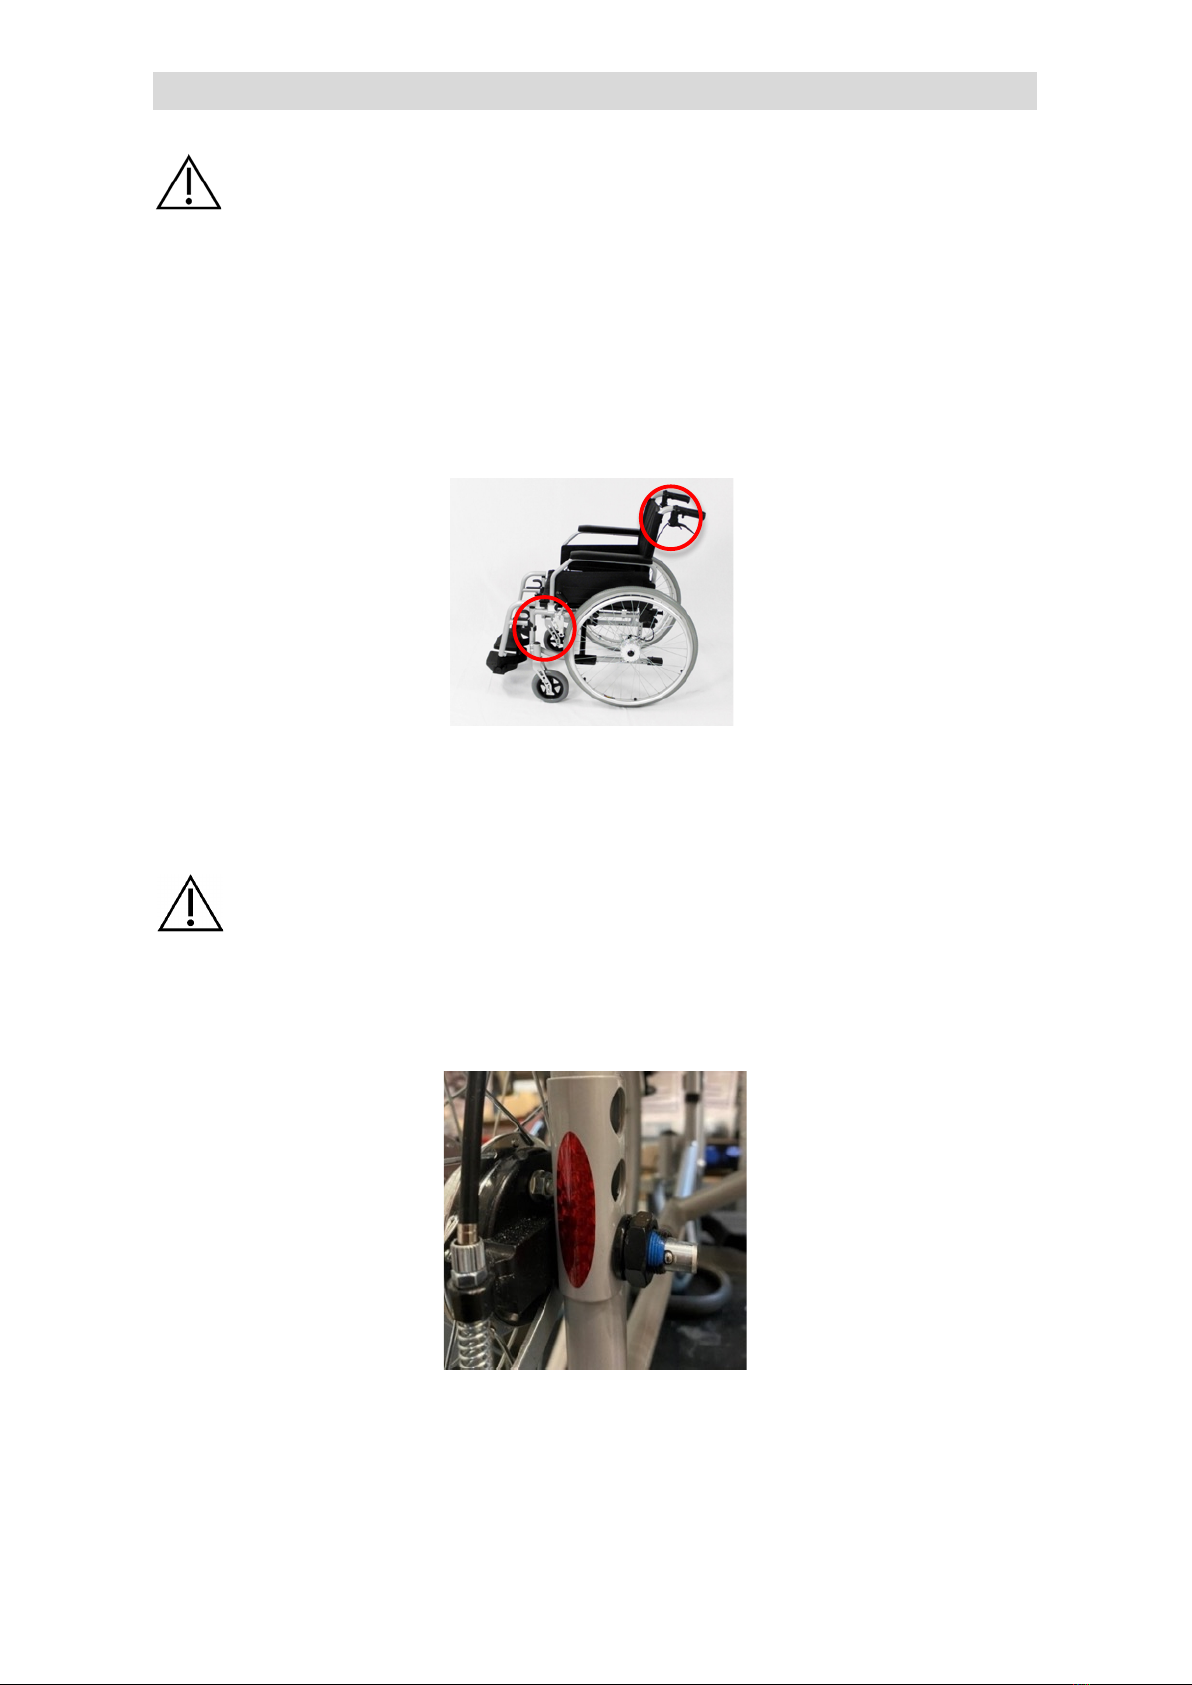
Instruction manual for PRIMUS ML 2.0 wheelchair
12
Stairs must only be climbed with the assistance of a third
party. Any existing ramps or lifts must be used. In the ab-
sence of such facilities, the obstacle should be overcome by hav-
ing two assisting people carry the wheelchair up the stairs.
Make sure that the assisting persons only touch the wheelchair at
permanently mounted components (see Fig. 1). Footrests or
side panels are unsuitable for this purpose because they could
come loose or break and therefore cause injuries.
Fig. 1: Parts and areas where the wheelchair may be carried
Use of public roads
The wheelchair is designed for indoor and outdoor use.
When using the wheelchair in road traffic, the applicable
road traffic regulations must be observed. Do not cover the reflec-
tors attached to the rear of the frame and replace the reflectors
attached in the spokes if lost.
Fig. 2 :Reflectors on rear frame
Modifications to the wheelchair

Instruction manual for PRIMUS ML 2.0 wheelchair
13
It is not permitted for the user to make any constructional
modifications to the wheelchair. Any such changes may en-
danger safety and possibly impair the service life.
Repairs and maintenance work
Repairs and maintenance work must only be carried out by
specially trained persons. Improperly performed work may
impair the safety and durability of the medical device.
Obligation to report serious incidents
Any serious incident occurring in relation to the device must
be reported to the manufacturer and the competent au-
thority of the Member State in which the user and/or patient is
established.
Service life
If all safety, care and maintenance instructions are ob-
served, the expected service life is 5 years when used as
intended. The wheelchair can be used beyond this period
if it is in a safe condition.
Instruction manual for PRIMUS ML 2.0 wheelchair
14
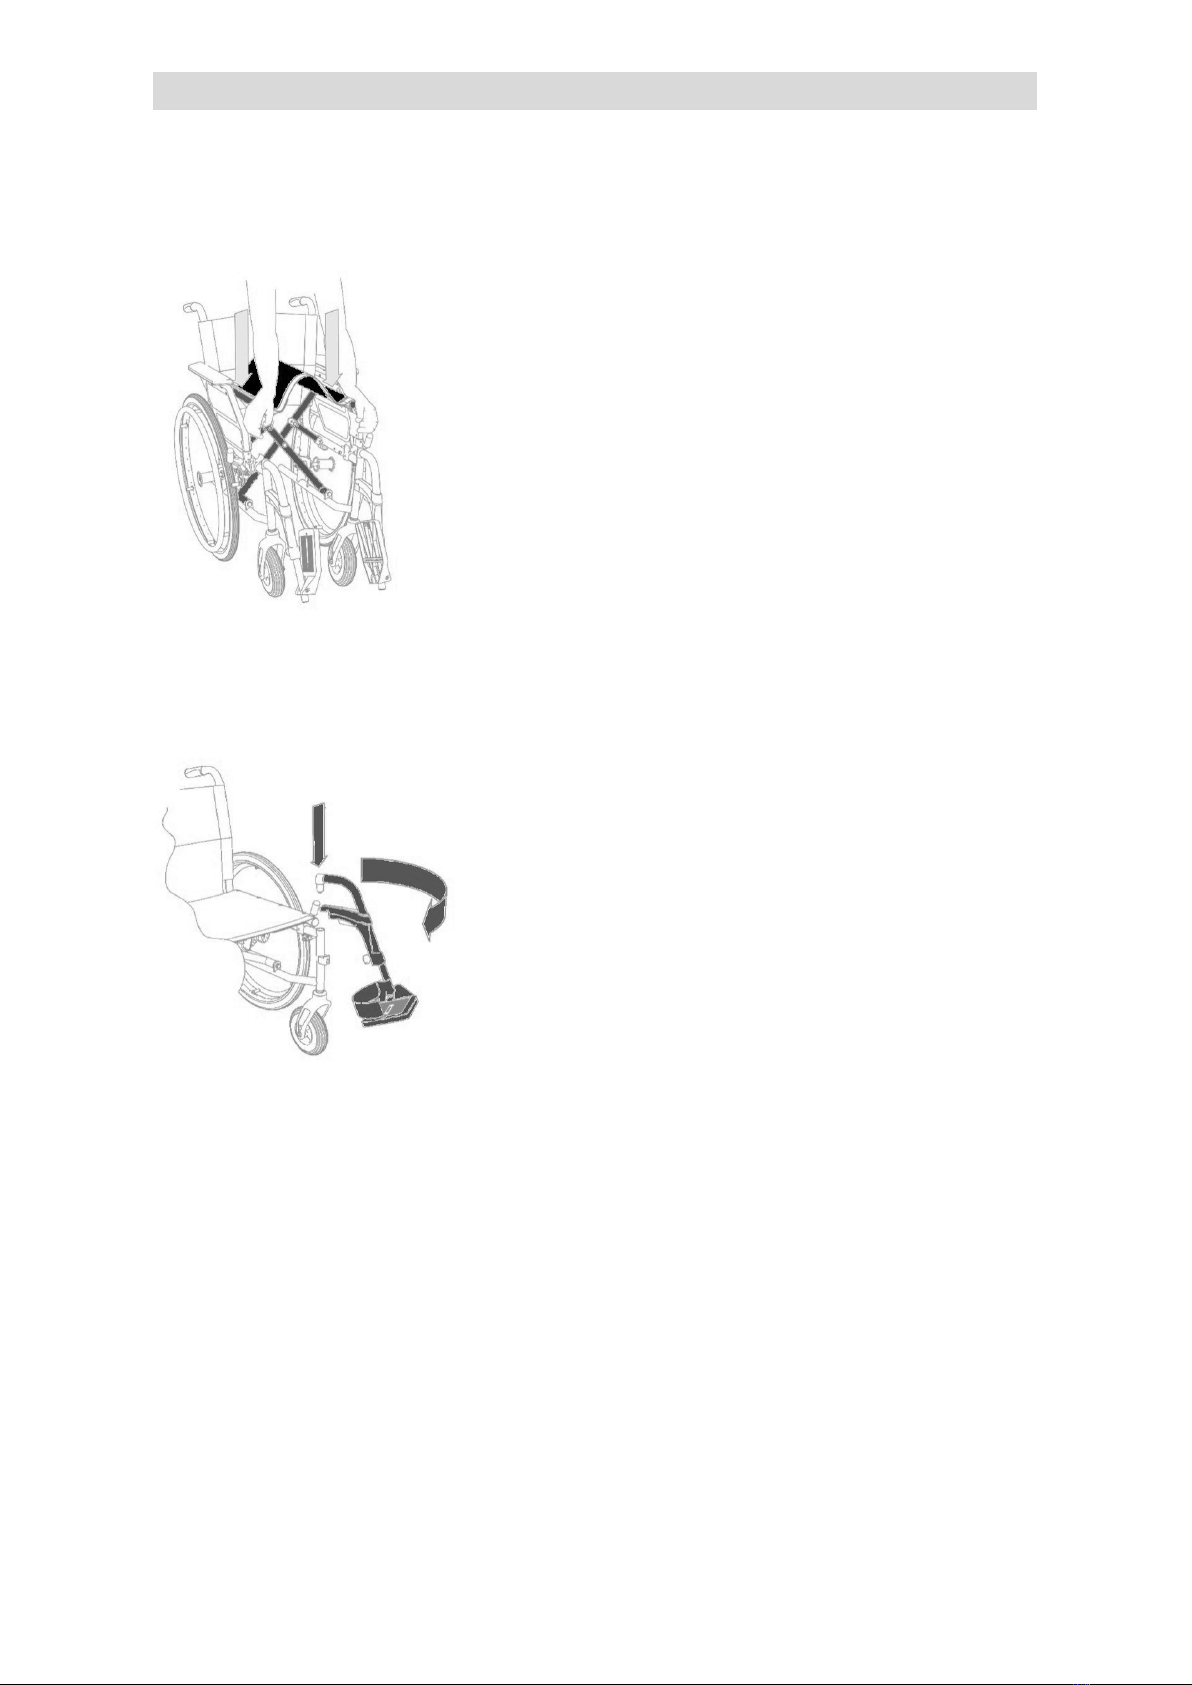
9 PUTTING THE WHEELCHAIR INTO OPERATION
9.1 Unfolding
Fig. 3: Unfolding the wheelchair
With the wheelchair folded up, simulta-
neously press down the right and left
seat bars with the palm of your hands.
This causes the cross strut to unfold. The
mechanism audibly engages.
After unfolding, test whether the mecha-
nism is engaged. Only then sit should
you sit in the wheelchair.
9.2 Inserting the footrests
Fig. 4: Inserting the leg supports
Insert the footrests into the mounting in
the frame from above. Please note that
the right and left footrests are con-
structed differently. The rests must be
mounted so that the footrest always
faces the centre of the wheelchair. Now
align the footrests so that the feet can be
placed comfortably on the rests. When
correctly aligned, the supports will audi-
bly click into place.

Instruction manual for PRIMUS ML 2.0 wheelchair
15
9.3 Adjusting the lower leg length
The length is correct when the foot rests comfortably on
the rests while seated and the lower legs have good contact
with the seat surface without the weight of the leg obstruct-
ing the blood supply to the foot. If necessary, readjust this setting
after a few hours of use.
9.4 Adjusting the brakes
Before putting the wheelchair into operation, make sure
that the brakes are correctly adjusted. The brakes should
be adjusted by trained personnel. The instructions for adjusting
the brakes can be found in 10.4.
10 ADDITIONAL SETTING OPTIONS
To set up your wheelchair optimally to your needs, you will need
a set of Allen keys and ring spanners. With a little manual skill,
you can adjust the settings yourself.
Please contact your specialist dealer if you have any ques-
tions. Risk of jamming! Pay attention to your fingers when
making adjustments.
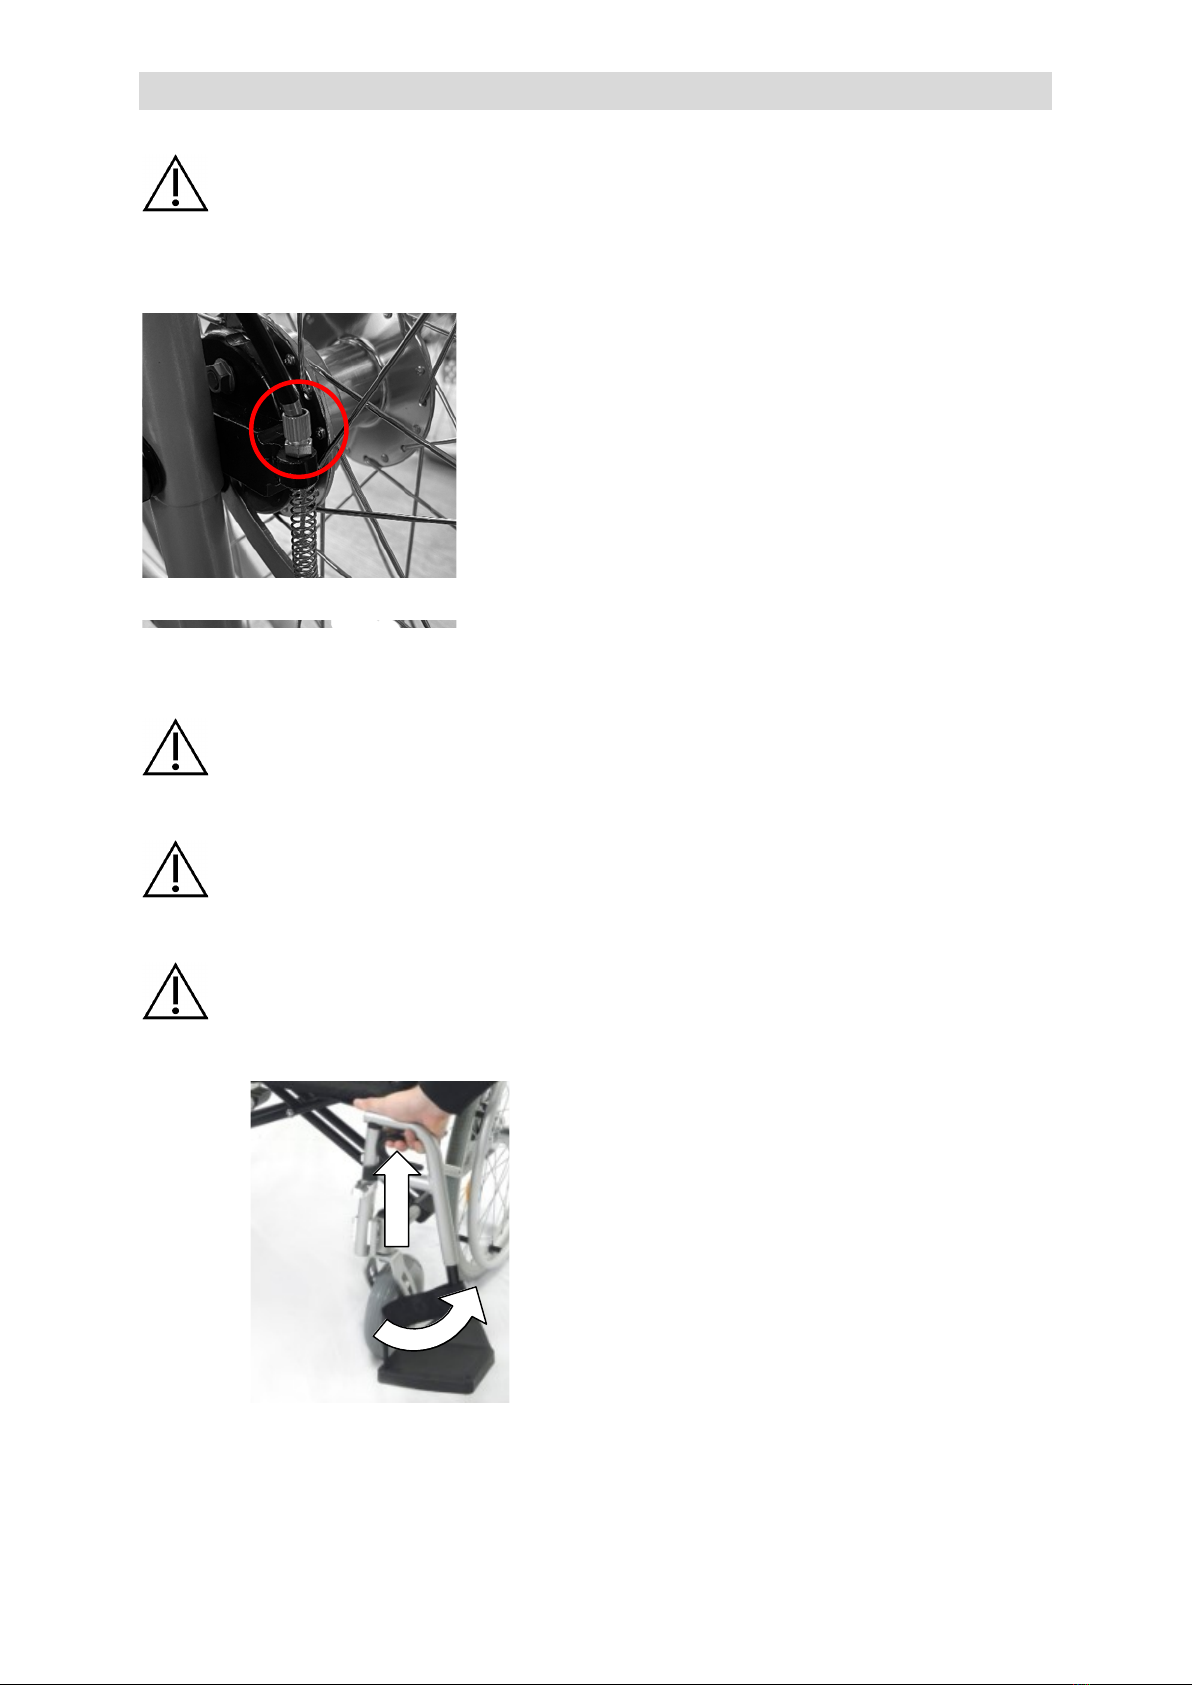
10.1 Assembling and disassembling the rear wheels
Fig. 5: Adjusting the lower leg
length
The footrest can be adjusted in height
and thereby adapted to your lower leg
length.
To adjust the height of the footrest,
loosen the hexagon socket set screw on
the back of the footrest (see figure).
Then move the lower footrest tube in the
guide until you have reached the desired
position. Finally, tighten the hexagon
socket set screw again.

Instruction manual for PRIMUS ML 2.0 wheelchair
16
Before setting off again, make sure that the wheel is fully
engaged.
10.2 Adjusting the height of the rear wheels
Repeat the process on the other rear wheel.
If the drive wheel height is adjusted, the brakes will need to
be readjusted (see 10.4).
Fig. 6: Disassembling the rear wheel
The rear wheels can be re-
moved, e.g. for transporta-
tion.
To do this, push the quick-
release button on the quick-
release axle as far as it will
go (see figure).
The rear wheel can now be
removed by pulling it out-
wards. To re-assemble,
place the rear wheel on the
quick-release axle until the
quick-release button en-
gages automatically.
Fig. 7: Adjusting the height of the rear
wheel
Before you can adjust the height of
the rear wheels, you will need to dis-
assemble them (see 10.1). To adjust
the height, loosen the screw on the
corresponding wheel mount. Then
move the wheel mount to the de-
sired hole position. Finally, tighten
the screws again.

Instruction manual for PRIMUS ML 2.0 wheelchair
17
The correct seat position depends on the physiological
needs of the wheelchair user. After completing the adjust-
ment work, make sure that all screws are tightened and that
the height adjustment has been performed equally on both sides.
Be aware that a higher seat setting reduces the tipping stability.
Make sure that the front wheels and rear wheels are in the same
hole position.
10.3 Adjusting the height of the front wheels
After completing the adjustment work, make sure that all
screws are tightened and that the height adjustment has
been performed equally on both sides.
Please note that the wheelchair must be balanced when
the adjustments have been completed.
Changing the height of the front wheels can change the angle of
the steering wheel axis. However, this should always be 90° to the
horizontal and must be adjusted if necessary. To do this, loosen
the two screws on the front wheel axle bracket and adjust the
bracket to an angle of 90°. To do this, the bracket can be rotated
slightly (when the screws are loose). Replace the nuts with new
safety nuts. Replace the screw lock. Tighten the screws again.
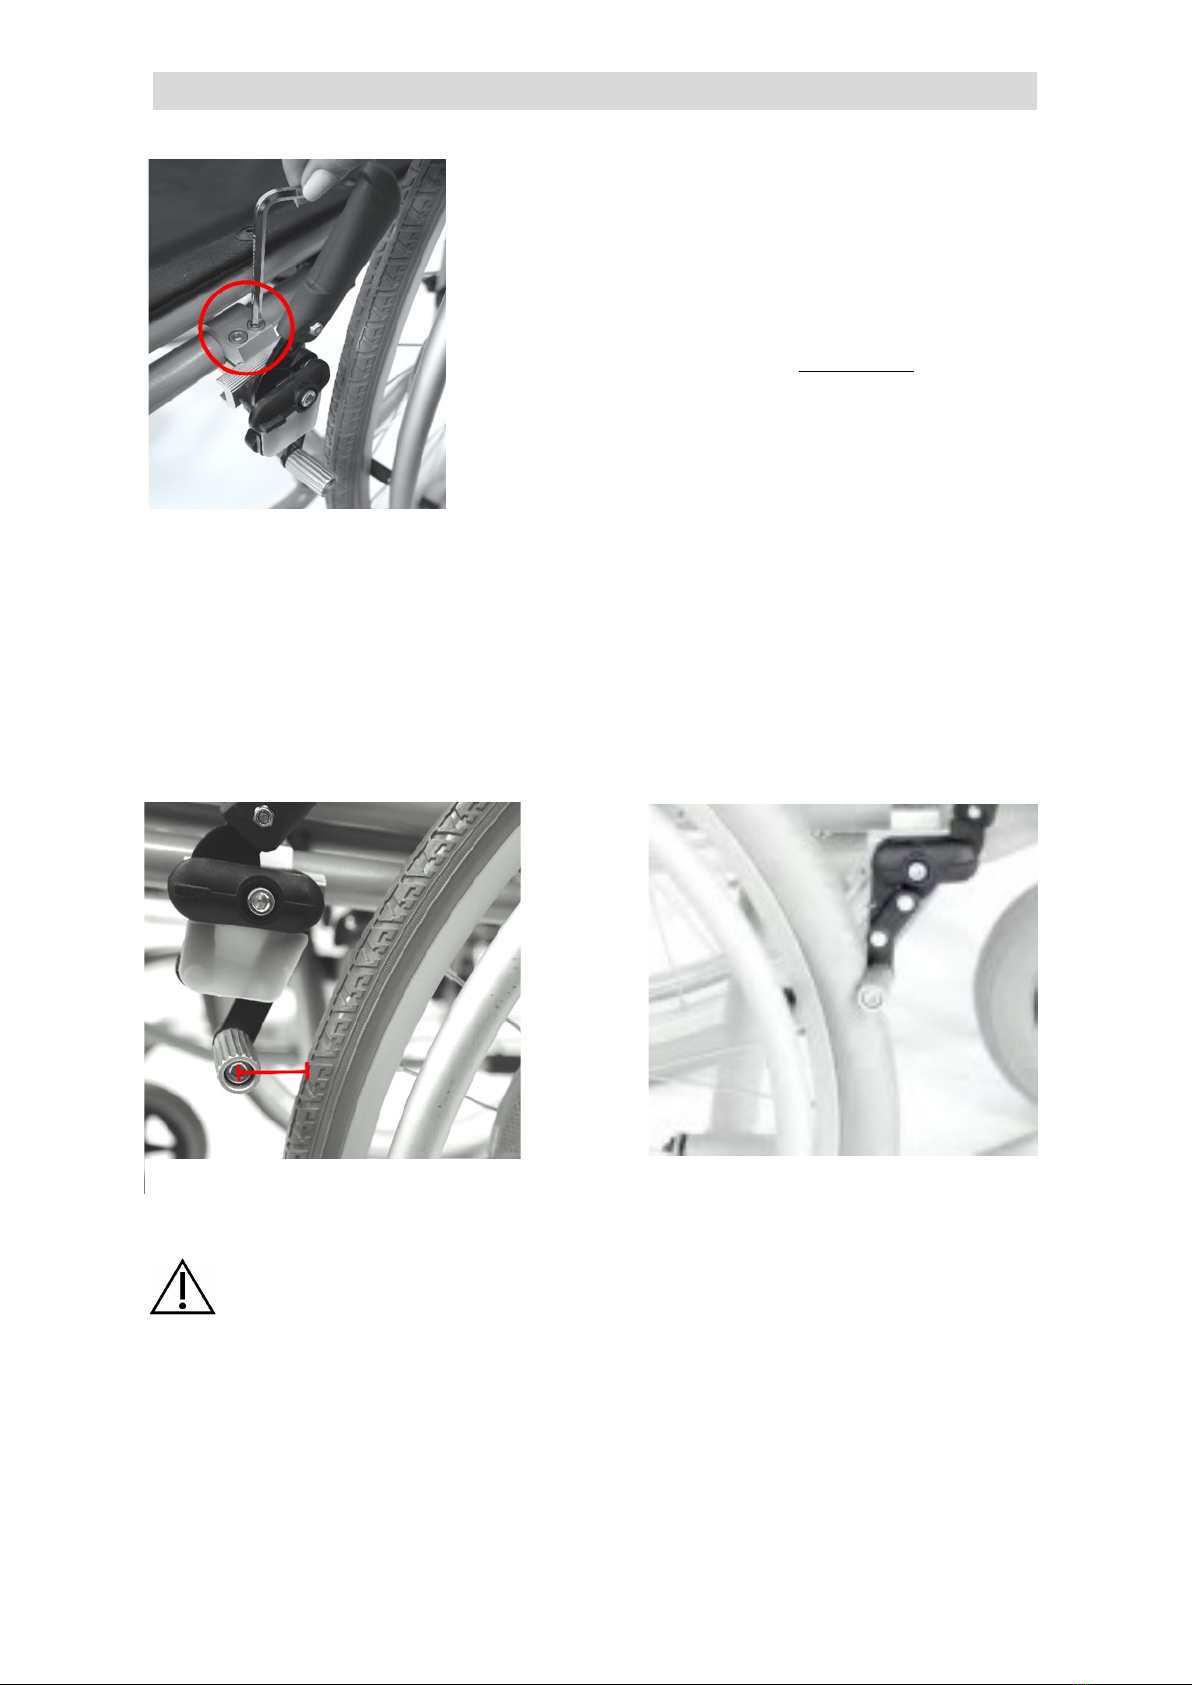
10.4 Adjusting the knee lever brakes
Fig. 8: Adjusting the height of the
front wheel
To adjust the height, loosen the
screw on the corresponding wheel
mount. Then move the wheel mount
to the desired hole position. Then
tighten the screws again. Repeat the
process on the other wheel. Finally,
tighten the screws again.
Instruction manual for PRIMUS ML 2.0 wheelchair
18
Then slide the brake system on the frame tube into the correct po-
sition. The distance between the centre of the brake pad and the
tyre (see Fig. 11) should be approx. 2-3 cm depending on the height
setting, and should cause the tyre to be slightly pressed in on brak-
ing (see Fig. 12). The force used to apply the brake must not exceed
60N.
Finally, tighten both hexagon socket screws again. The
brakes must only be adjusted by persons with the appropri-
ate expertise. Always remember that incorrectly adjusted brakes
can have life-threatening consequences. Make sure that the brake
shoe fully engages when the lever is operated and does not spring
back.
Fig. 9: Adjusting the brakes
The wheelchair has a knee lever brake.
The distance between the brake bolt
and the tyre is adjusted such that the
brake can be locked with a force of 60 N
(6kg).
To adjust the distance, carefully loosen
the two hexagon socket screws at the
bottom of the brake bracket (see Fig.
10).
Fig. 12: Parking brake applied
Fig. 11: Brake adjustment distance
Instruction manual for PRIMUS ML 2.0 wheelchair
19
A faulty brake, especially one that is set too tightly, can re-
duce the service life of the wheelchair.
10.5 Adjusting the drum brake (depending on model)
Depending on the model, your wheelchair
may have a drum brake, which can be ad-
justed using the cable clamping screw
and the adjusting nut on the brake cable
(see Fig. 13). The drum brake is correctly
adjusted when the brake lever on the
push handle is engaged at level two and
when the wheelchair is stationary on even
ground and no longer rolls. Please note
that each drum brake only acts on one drive wheel.
The brake setting should only be changed if the brake force
is insufficient. Furthermore, such an adjustment must only
be performed by appropriately qualified persons.
The brakes should be checked before each use of the wheel-
chair in order to ensure that natural signs of wear and any
decrease in braking efficiency are identified in good time.
If the braking efficiency decreases, the wheelchair must no
longer be used!
10.6 Swinging away and disassembling the footrests
Fig. 14: Disassembling the footrests
The footrests are removable.
To do this, pull the lock on
the footrest upwards. After
unlocking the lock, you can
swing the footrest sideways
and then upwards out of the
guide tubes (see Fig. 14).
Fig. 13: Drum brake adjusting screw
Instruction manual for PRIMUS ML 2.0 wheelchair
20
To insert, follow the above steps in the reverse order. Before using
the wheelchair again, make sure that the footrests are correctly
mounted.
The footrests are designed exclusively for resting the feet
when sitting in the wheelchair. Never stand on either one or
both footrests. Incorrect loading of the footrests could cause
damage to the wheelchair and poses a risk of injury.
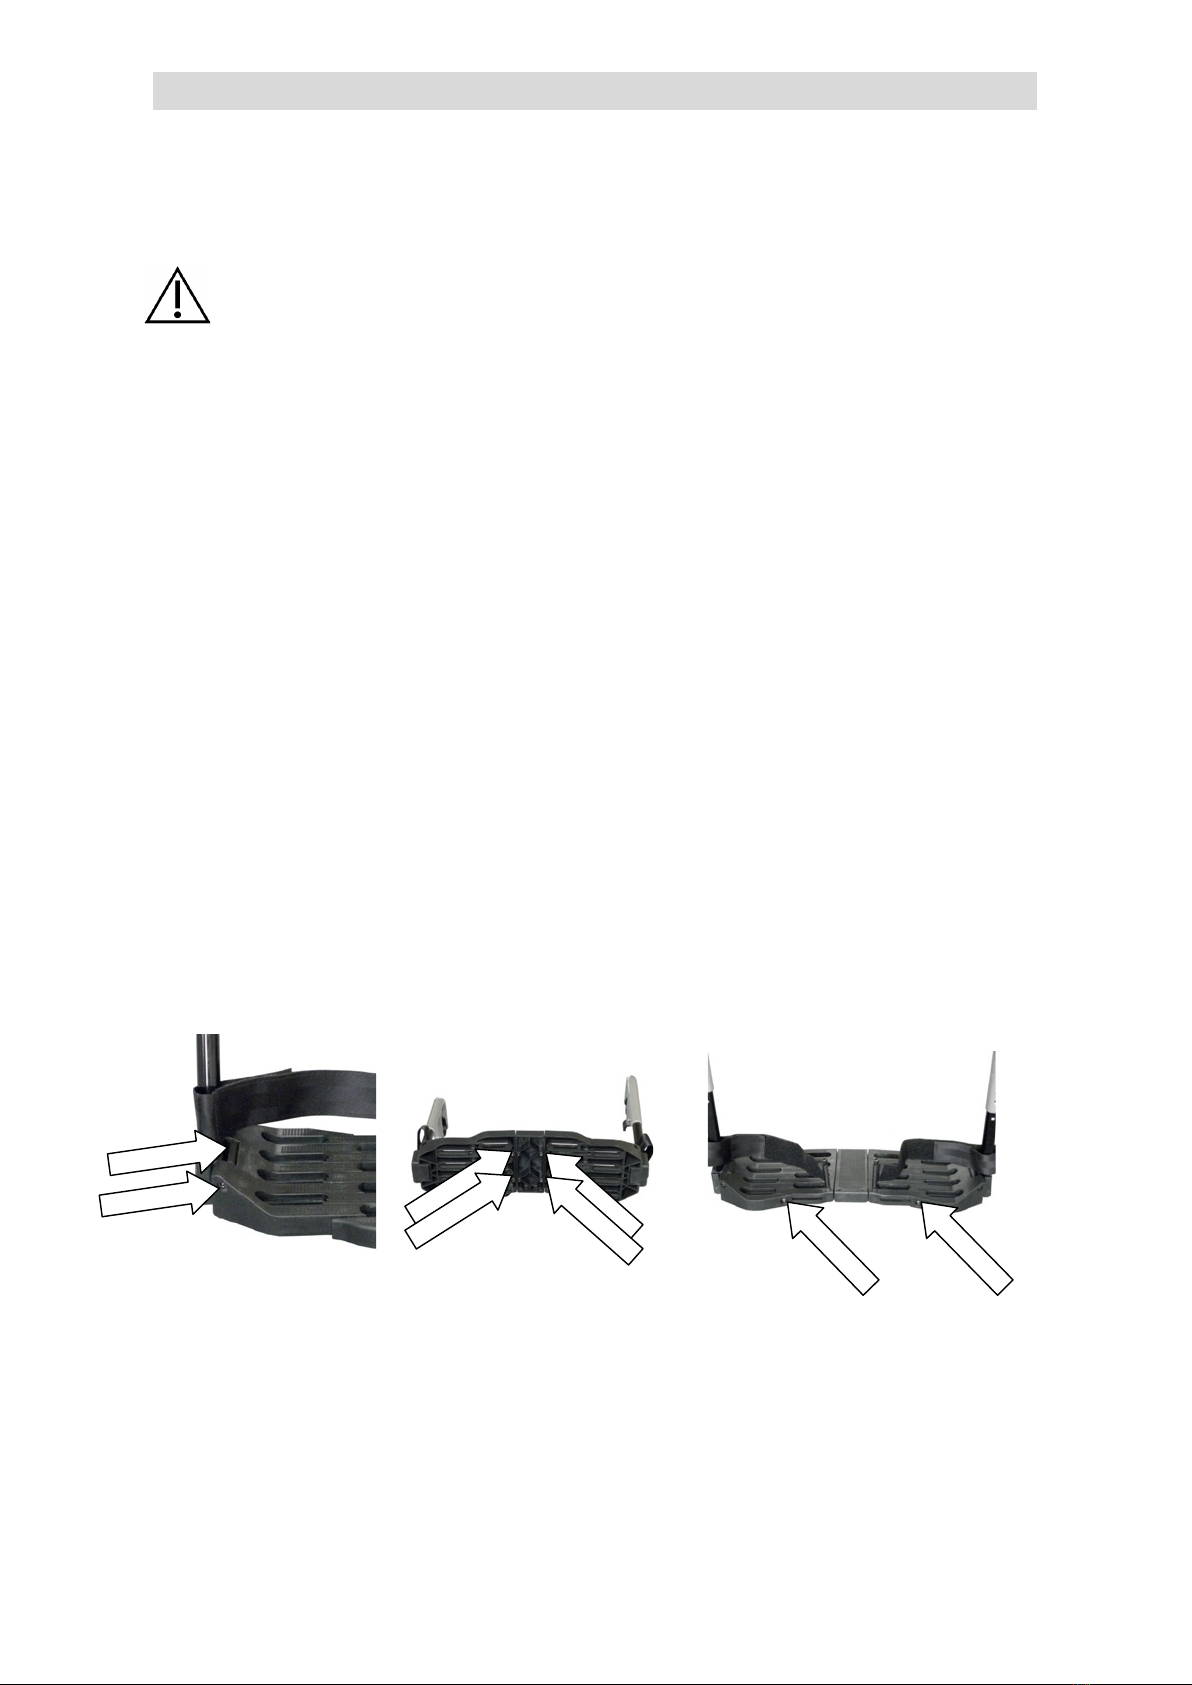
10.7 Foot board (fold-up)
The foot plates can be connected with a connector to form a foot
board.
• When replacing the screws, the screw lock must also be re-
placed. Firstly, remove both footrests.
• Then remove the fastening screw on the foot plate (step 1).
• Replace the dismantled nuts with new safety nuts and tighten
the screws.
• Now push the wedge out sideways (step 2).
• The connector can now be screwed onto the underside of the
foot plates.
• Adjust the width of the foot board by loosening the adjusting
screws and sliding the foot board apart until it snaps easily
into the bracket. Then tighten the screws again.
2
1
Table of contents
Other Besco Medical Wheelchair manuals


