Best Tugs ROMEO R5 User manual

ROMEO
USER MANUAL
R5, R8 & R12
Best Tugs
Because Your Pla ne Deserves It

INTRODUCTION
Best Aviation
Products
252 West 3560 North
Spanish Fork, UT 84660
800.914.2003
At Best Tugs™, we pride ourselves on building the most innovative
and advanced tugs in the world. We work diligently to ensure
that the quality and workmanship of your tug exceeds your
expectations and are confident that you will see the difference in
every part of your Best Tugs™experience.
We designed this guide to provide you the information needed to
make your experience even better… and while we are confident
that this guide will answer your questions, we are always here to
chat with you on the phone. You can reach us at 800-914-2003.
Thank you again for choosing Best Tugs™.
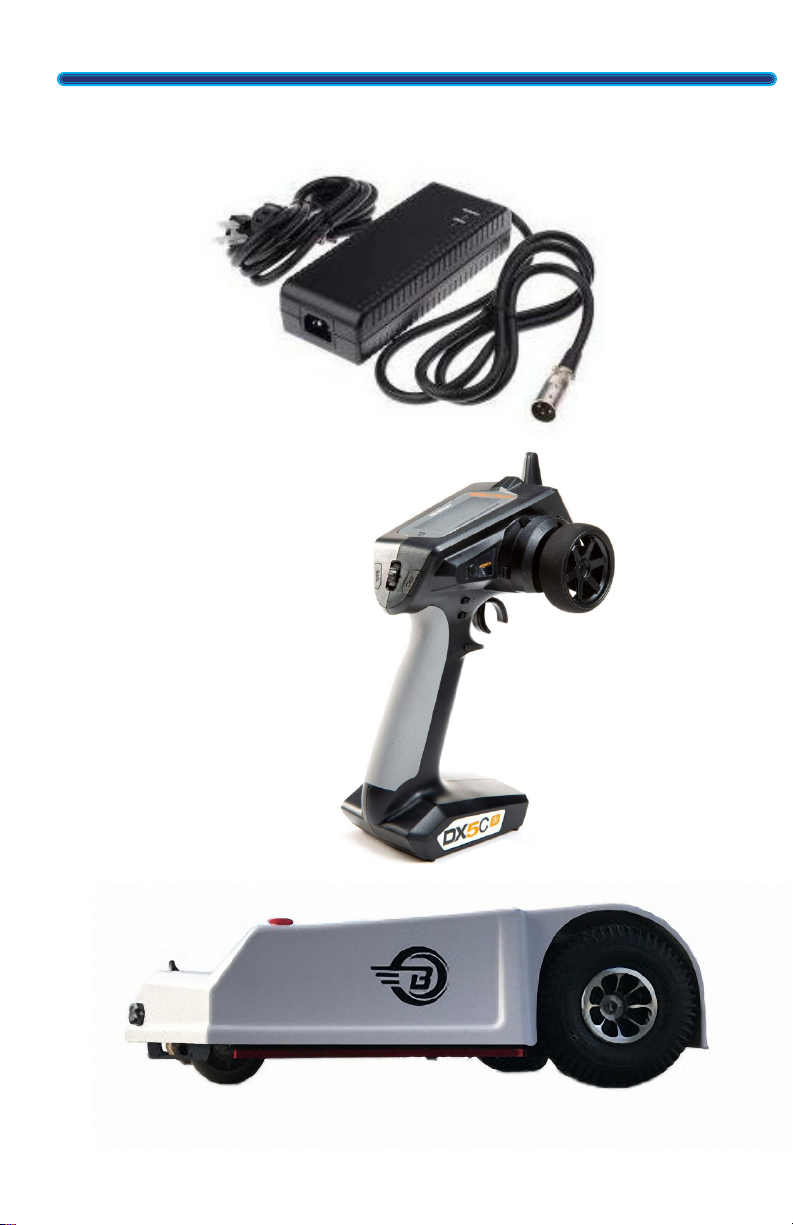
WHAT’S IN THE CRATE?
External Charger
Remote Control
ROMEO
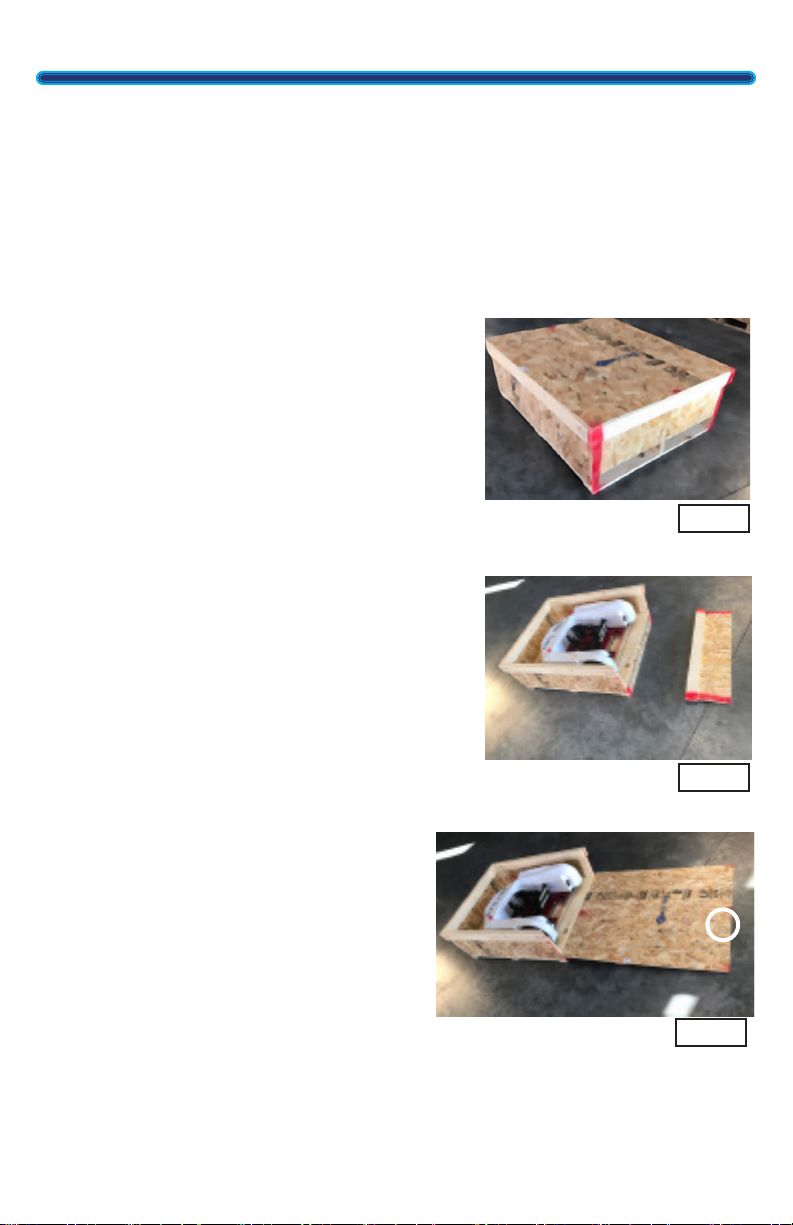
UNCRATING INSTRUCTIONS
Please read these instructions
before beginning.
For any questions
call us at 800.914.2003
Tools Needed:
• Phillips Head
Screwdriver
(Drill/Impact is easiest)
• 7/16 Socket
1. Start by removing the screws
marked with red paint from the
lid. Remove the top lid from the
crate.
Keep the lid nearby to be used in
step 3. (FIG 1)
2. Remove the screws from the
wall nearest the tug’s drive tires
(Marked with red paint.)
3. Place the lid on the edge of the
crate, creating a ramp for the
tug to drive out. We recommend
placing your foot on the ramp to
add a bit of extra security while
pulling the tug out. (FIG 3)
4. Remove four (4) lag bolts with
a 7/16 socket from the Romeo’s
base plate. (Note: The bolts are
indicated with tags.) These bolts
are securing the tug to the crate.
5. Take the remote out of the
packaging. Turn on the remote
by pushing the power button
behind the steering wheel. Push
the throttle away from the handle
to drive out of the crate. (FIG 4)
FIG 2
Foot Here
FIG 3
FIG 1
22
11
Note: Foam filed tires have
a screw in the tire from the
factory. It is safe to remove
the screw.

Power Switch
FIG 4
E-Stop
Master Switch
Air Compressor
(optional)
FIG 5
6. Double-check to make sure
both E-Stop switches are in
the popped-out position by
twisting them clockwise.
7. Push the master switch to the
“on” position. The light on the
switch turns blue when the
tug is on. (FIG 5)
Note: The switch next to the
master is for an optional air
compressor, this switch is
present only if you purchased
this accompany option.
8. Observing all safety
precautions, attach your Best
Tugs™tug to your aircraft.
UNCRATING INSTRUCTIONS
Continued
We want to keep a picture of your
aircraft and tug in our files if you
would like to share them.
Please Email cool pictures of your tug
You may also see it on our website
or social media. (By sending images,
you expressly permit us to use these
images for marketing purposes.)
The controller is the first
device to be powered on. It
is also the LAST device to be
powered off.
Failure can lead to severe
damage to yourself, your
plane and your tug!
Remote Control
1. THROTTLE TRIM:
If tug inches forward/backward when
throttle is released, use this to remedy.
2. STEER TRIM:
If tug is drifting left/right use this to
remedy.
3. ROTATE/LOCK:
Raise/Lower Lazy Susan rotation
locking pin.
4. LOAD/UNLOAD:
Locks the loading hook.
See page 6 for more.
5. LOAD/UNLOAD INDICATOR:
Visual image for position of loading
hook.
6. LOCK/ROTATE INDICATOR:
Visual image for Lazy Susan locking
pin.
7. POWER:
Push to turn on.
Hold to turn off.
Always turn the controller off last.
8. LIGHT:
Forward to turn on.
Backward to turn off.
9. Throttle:
Forward/Backward
The more you push/pull it, the faster
the tug goes.
Warning: Throttle reversal of
direction overrides the Autothrottle,
stressing landing gear. Allow the
autothrottle to stop the tug—just let go
of the throttle and it will auto-park.
9
8
7
5
5
1
2
3
4
6

USING YOUR TUG
1. Turn on the remote
(if you turn the tug on first, there’s a
chance the unit will go into “Safety
Mode” which will require you to
reset the tug by turning it off and
back on again.)
2. Turn on the tug
3. Take a moment to orient yourself
regarding the tug’s position and the
movements you need to make.
4. As you familiarize yourself with
how the tug drives and maneuvers,
make slow, subtle adjustments.
We strongly recommend driving the
tug around the ramp/hangar without
an aircraft loaded to get comfortable
with the handling.
Please note that directions are relative
to the tug only, not to the remote. Keep
that in mind as you are driving your
tug. Also, Remember you are guiding a
massive plane with wings, propulsion
systems, and tails, not a small tug.
Reverse the process to shut down. Turn
off the tug first and then the remote.
Warning: Best Tugs™ is not liable
for damage to your plane or person(s)
while using your tug. Be smart, be
aware of your surroundings, including
the plane itself. Remember this much
mass can’t stop on a dime.
First Use
If you are using an easy load
or Lazy Susan configuration:
the tug comes from the
factory with the tire cradle
in a loaded position. Use the
remote to unlock the hook
and then physically pull the
locking hook back to release
the cradle before physically
moving the ramp to the
loading position. Note: Before
each use, double-check your
loading tray. Repeat the step
of manually lowering the
ramp if needed.
See BestTugs.com for videos

Lazy Susan/EZ Load Operation
Your Cage can and should be
adjusted to more tightly fit your
wheel. Both the diameter (thumb-
screws) and width (slider) can be
adjusted. See Initial Use on page 7
for set up instructions.
If you have a Lazy Susan, lock the
rotation before loading or unload-
ing. Locked, the Lazy Susan now
behaves as an EZ Load. Be sure
your tug and aircraft are in line
with each other before loading/
unloading to avoid damage to your
tug/aircraft.
To lock the Lazy Susan so it cannot
rotate, engage the locking mecha-
nism by selecting Load or Unload/
Down, depending on what you
are going to do, and line up the
plane and tug until the locking
mechanism engages. You can not
unload a plane until the Lazy Susan
is alighed AND locked. To allow the
Lazy Susan to rotate—push Rotate/
UP, to disengage the locking mech-
anism.
In the Unload/Down switch posi-
tion (hold the silver button down
on older models), the EZ load
locking device releases when the
weight of the plane’s wheel shifts
from contacting the ramp and
presses against the back of the
Cage. Note: this is a safety feature
to prevent the tug from releasing
while you are pulling your tug.
Loading:
Make sure the ramp is down. If it
is not in the down position, select
Unload/Down and manually lower
the ramp. Drive the tug under your
wheel. When your plane is loaded
correctly, the ramp automatically
locks into the upright and locked
position.
Unloading:
Select Unload/Down on the rocker
switch (silver button on older mod-
els) to allow your plane to unload.
Carefully move the tug towards the
chocked aircraft; this causes the
nose wheel to contact the back of
the Cage, relieving pressure from
the ramp and disengages the lock-
ing device. Then as you pull away
from the plane, the tire pushes the
ramp open.
An advanced maneuver is; while
moving the plane towards you,
press the Unlock on the rocker
switch (silver button on older mod-
els) to allow the locking device to
release when the ramp pressure is
removed, then reverse the throttle.
The tug’s autothrottle allows the
plane to continue to move towards
you for a moment during the
autothrottle’s slow-down/reverse.
That lets your plane press against
the back of the Cage, removing the
pressure against the locking device,
and then you can pull the tug from
under your wheel.
See BestTugs.com for videos

Moving Your Plane
We strongly recommend using your tug
without an aircraft attached to get used to
the controls and movements; this is a very
user-friendly system, but it can take a bit of
practice to get familiar with initially. Make
sure you are comfortable with the throttle,
maneuverability, and functionality of the tug
before moving your plane.
Please familiarize yourself with how long it
takes for your plane to ramp up/down and
stop; that “coast” when slowing is due to the
software that protects your nose gear from
unnecessary damage and stress. Take the
time to get used to this feature and be aware
of it as you move your aircraft.
Check your plane’s POH to verify the
maximum turn radius for your particular
nose gear. The tug can turn your plane at
an angle that may exceed the nose gear’s
maximum turn radius. Best Tugs™
assumes no responsibility for any damage
caused by the tug operator misusing the
equipment. As the operator, you have the
responsibility to be familiar with your tug,
your plane, and their specific limitations.
Check the surroundings of the plane,
remove any obstructions, verify that your
path is clear, and your propulsion systems
(prop), wings, and tail will clear. Please
verify that your wheel is secure on the tug,
including strapping it down. Finally, remove
the wheel chocks. You are ready to move
your plane.
StorageStorage
Store your tug in an area that is
dry and safe from the elements.
Limited exposure to rain and snow
will not affect the electrical systems,
however, extended exposure is not
recommended.
If you do not plan on using your
tug for an extended period of time,
leave your tug plugged in and our
smart charger will take care of the
battery. Always make sure your tug
and accessories are TURNED OFF.
Maintenance
The Lazy Susan option needs to
have the central bolt tightened
annually. It is found under the
Romeo and centered under the
Lazy Susan. Failure to maintain this
may cause the failure of the bear-
ing ring. Loosen the locking nut
and tighten the central nut until
tight, but not so tight that the Lazy
Susan cannot rotate. Re-tighten the
locking nut after you have com-
pleted the adjustments.
If the Lazy Susan’s locking mech-
anism fails to engage, disconnect
the wires (unplug the pins) of the
solenoid (Left side when looking
from the ramp side and golden in
color) and twist counterclockwise
to remove. Locate the only open-
ing by manually aligning the Lazy
Susan. Clean the opening below
of oils and debris. Replace the sole-
noid and re-plug in the wires.
Your tug has a smart charger with
trickle charge and battery mainte-
nance cycles. To charge, plug the
charger cord into the tug, then the
power cord into a standard power
outlet. You cannot overcharge
when using the included charger.

12 Volt 18 Ah Sealed AGM Battery.
Acceptable brands include Duracell, UPG, Bright Way Group, Panasonic, Interstate, and others.
(The previous are registered trademarks of the respective companies.)
Length: 7.17 in
Width: 3.03 in
Height: 6.57 in
Voltage: 12
Lead Acid Type: Deep Cycle
Capacity: 18ah
Chemistry: Lead Acid
Lead Acid Design: AGM
Product Category: Sealed Lead Acid
Product Subcategory: Deep Cycle
Terminal Type:
• M6 Nut and Bolt, NB, Nut, and Bolt.
To recover the battery pack or diagnose their condition:
• Connect a twelve (12) Volt charger with a meter across the terminals of each battery, one
battery at a time.
• If you get a reading of zero (0) volts, a short circuit has occurred, replace the battery.
• If your battery reads less than 10.5VDC when charging, then the battery has a dead cell,
replace the battery
• The battery charger indicates fully charged, but the voltage is below 12.4VDC? The
battery is sulfated, replace the battery soon.
Are all batteries fully Charged? The tug should be able to resume normal functions.
We suggest charging your tug when
the battery falls below around 70% (at
rest) for optimal battery life (for sure be-
fore 30% at rest). Note: The tug contin-
uously and instantaneously calculates
the state of charge, which is why the
percentage fluctuates while moving
your plane. We have seen as low as
a 10% charge displayed when using
a fresh battery and moving a heavy
plane. To read the resting battery’s
charge, leave the tug at rest for at least
60 seconds. We have seen a 10% drop
from freshly charged just by moving
the tug in and out of the hanger. The
discharge rate is non-linear.
If you notice shorter times needed
between charges, your batteries are
beginning to wear out.
Lead Acid batteries are surprisingly del-
icate—damaged by direct and indirect
effects: environmental, user induced,
misapplication, and on and on. For in-
stance, charging with a voltage above
14.4 volts or allowing the battery to
discharge completely are the two most
common ways to damage a lead-acid
battery.
You can ruin even new batteries that
are discharged too much or left un-
charged for too long in just a few
weeks; for this reason, Best Tugs cannot
warranty the batteries as we have no
control over the end-users’ actions.
Modern microprocessor-based smart
chargers use switching circuits; they are
lightweight and designed to protect
themselves against reverse polarity con-
nection. They also have an annoying
feature of not charging if the battery’s
voltage is below some arbitrary value.
If you left the tug on and it no longer
charges, a cheap 12-volt car charger
with a volt-meter is your best option to
try and restore the battery. Note: Most
local battery/automotive stores carry
replacement batteries.
Battery Care

Critical Cautions
Our tugs do not instantly stop.
This feature is to protect your air-
craft’s landing gear. Failure to com-
pensate for this soft stop can cause
damage to your aircraft. “Slowly” is
the word to live by when you are
in tight spaces or loading the tug.
We recommend practicing with the
tug before using it on your aircraft
to allow familiarization with this soft
stop feature. Exception: E-Stop stops
the tug NOW! An emergency stop
can damage the landing gear and
damage the tug’s motor control
module. The “E” in E-stop stands for
EMERGENCY.
Chock your mains! You don’t
want to push your aircraft into the
hanger wall...
During operation, be aware of
your surroundings. Never put
yourself between the tug and any
object! A tug capable of pushing
thousands of pounds of aircraft can
push you against an obstacle with
thousands of pounds of pressure.
There is a risk of serious injury,
death, or dismemberment. Proper
operation is your responsibility.
Best Tugs™ tugs do not have
secondary brakes; the motor/
transmission provides all braking.
Your aircraft can roll freely if your
transmission fails. As the operator,
it is your responsibility to keep your
aircraft within safe limits. Never
move an aircraft on a slope or
environment where the loss of tug
breaking would put you or your
aircraft in danger.
Exceeding the parameters of
the tug can cause future power
train failure. We designed Best
Tugs™ tugs load ratings around
hard flat and level surfaces; use on
a slope drastically changes those
parameters. The steeper the grade,
the more energy it takes to move
your plane—it is as if the plane’s
load parameter increased. The
transmission’s gears have a superior
hardened surface; a one-time event
that exceeds the tug’s parameters
can degrade that surface—eventual-
ly leading to total failure.
Rough surfaces, such as grass,
can increase the rolling resistance
of your tires. The lower your tire
pressure, the larger the tire’s con-
tact patch, the more extreme the
tire deflection, resulting in more
rolling resistance. It now takes
more energy to move the airplane—
which is functionally equivalent
(In regards to the loaded weight
charts) to the plane weighing more.
Even a ten percent under-inflation
could cause your load to be over
the limit—you have just damaged
the gears. Failure is now a matter of
when—not if.

Did we mention that you need to chock your mains?
Critical Cautions
LOADED WEIGHT
R5 Load & Duty Cycle
Degree 2,500 3,750 5,000
0.0 100 100 100
0.5 100 100 85
1.0 100 83 62
1.5 98 65 N/A
2.0 81 54 N/A
2.5 69 N/A N/A
3.0 60 N/A N/A
R8 Load & Duty Cycle
Degree 4,000 6,000 8,000
0.0 100 100 100
0.5 100 100 86
1.0 100 84 63
1.5 99 66 N/A
2.0 82 54 N/A
2.5 69 N/A N/A
3.0 61 N/A N/A
R12 Load & Duty Cycle
Degree 6,250 9,375 12,500
0.0 100 100 100
0.5 100 100 96
1.0 100 94 70
1.5 100 74 55
2.0 91 61 N/A
2.5 78 52 N/A
3.0 68 N/A N/A
Overloading
DC motors heat up from the inside
out. If the casing is hot to your
touch, the internal components are
probably red hot. The larger the
aircraft, the more energy it takes to
move that load, causing heat build-
up. Slopes and rough terrain are
like moving a larger aircraft causing
more heat buildup. Moving aircraft
long distances also causes heat
buildup; excessive heat buildup can
damage the tug’s motor, drastically
reducing the tugs life span. We de-
signed Best Tugs™ tugs for intermit-
tent use. The larger the tug (with
an appropriately smaller than rated
load), the longer a tug can be in
continuous usage. If you must move
your aircraft a long-distance, slow
down, or pause now and then (See
Loaded Weight Tables) to allow for
heat dissipation.
Example 1: You have an R5 tug you
bought for your Meridian, and you
do your buddy a favor and move
their fully loaded King Air 350i—you
have just damaged the gears. Fail-
ure is now a matter of when—not if.
Example 2: You used the R5 tug
you bought for your Meridian, and
pulled your fully-loaded Meridian
up a 3-degree slope—you have just
damaged the gears. Failure is now
a matter of when—not if. The R8
would be a better choice. If you find
that you have the wrong tug for
your plane’s environment, please
call us and exchange it for the ap-
propriate model. We have a 30-day
exchange policy; you only pay for
the price difference and freight.

Optional Accessories
LED Flood Lamp
A high Intensity LED light to
assist in loading and unloading
your airplane. The control panel
light switch controls the action
of the light when the main pow-
er switch is on. Note: The main
power must be on for the LED
lamp to light up.
Compressor
Tankless air pump, 110 PSI max.
The Control panel switch en-
ables the pump. Note: The com-
pressor turns on automatically
at, or below, 90 PSI. Press on
the lever at the chuck to allow
the air chuck to slip over the air
stem. Release the lever to lock
the chuck in place. Read aircraft
Pilots Operating Handbook to
verify the tire pressure required
by your aircraft.
Tundra Package
Better operation on grass fields.
No user interaction required.
Proper air pressure must be
maintained, or the inner-tube
could slip, ripping the valve stem
out. Note the tires use a 3.00x4
inner-tube.
Standard Ramp (R12)
Default tire ramp, handles up to
a 7.5” wide tire.
Double Wide Ramp (R12)
Extra-wide tire ramp, handles up
to 14” wide tire.
Easy Load 18” or 22”
Captures the tire in a cradle. Can
lock or unlock the cradle from
the control panel.
Lazy Susan 16” or 18” (R12)
Captures the tire in a cradle. Can
lock or unlock and rotate the
cradle from the control panel.
Under Glow
LED accent lights. Depending
on the selected options, you
have an on/off switch or remote
control. Note: Under-glow only
functions when the tug is on.
When in doubt, calling the
Best Tugs™support team is
suggested. 800.914.2003

The Romeo’s tire cradle comes
configured to accept a maxi-
mum 16” diameter by 7” wide
tire. Note: exceeding these
parameters may force and hold
the locking mechanism into a
locking position. The oversized
tire must be lifted out of the
cradle manually to release it.
After first loading your aircraft
into the cradle, adjust the cradle
so that it properly cradles your
tire and tighten. Note: these
bolts are only hand-tightened
from the factory. Adjust the
side plates to center your tire
and tighten. Use a 3/16” allen
wrench. Using a metric size may
damage the tug.
Exceeding the tug parameters
creates situations where the
locking hook or Lazy Susan
locking pin may not engage or
disengage. Carefully jogging
the tug back and forth may
help. Calling the Best Tugs™
support team is suggested.
800.914.2003
Always turn off the master
switch when charging.
Turn on the controller
Before turning on the tug.
Turn off the tug before
Turning off the controller.
Failure can lead to severe
damage to yourself, your
plane and your tug!
Customization, Tips, and Tricks

Warranty
Best Tugs™DOES NOT WARRANTY BATTERIES
Best Tugs™includes a one (1) year warranty on all parts, including
the drive train, from date of delivery. Warranty excludes labor and
the cost of shipping. Call sales if you want to purchase the optional
extended warranty.
This warranty does not apply to any Best Tugs™component(s)
that have damage caused by, misuse of the vehicle, accidents,
collision or object striking the vehicle, vandalism, fire, explosion,
water damage, customer-applied chemicals to painted surfaces,
improper handling or application, nor does it extend to Best Tugs™
parts which have been repaired or altered outside of Best Tugs™
provided maintenance of an authorized service representative.
Furthermore, any modification of Best Tugs™electrical system MUST
be pre-approved and documented in writing by Best Tugs™. Failure
to do so voids the unit’s electrical component warranty. Best Tugs™
parts which have been repaired or altered outside of Best Tugs™
provided maintenance of an authorized service representative as well
as any modification of a Best Tugs™tugs MUST be pre-approved and
documented in writing by Best Tugs™. Failure to do so voids the
warranty.
Exclusions may apply. Visit BestTugs.com for the full and overriding
Warranty. Exclusions may apply.

252 West 3560 North
Spanish Fork, UT 84660
Release Date: April 22, 2020
or call 1-800-914-2003
Sales Ext 2
Support Ext 3 Best Aviation
Products
This manual suits for next models
2
Table of contents


