Bestok 5210GM User manual

Scouting Camera
12MP
5210GM(GP)User Manual
Thank you for purchasing 5210GM (GP )Hunting camera, please read this
manual before using it. If you encounter problems when you are using this
product , please contact the local dealers or contact us directly.

- 1 -
Contents
Product Information................................................................................................................- 2 -
1.1 The Introduction of Product.................................................................................- 2 -
1.2 Application.................................................................................................................. - 3 -
1.3 Package Contents.................................................................................................... - 3 -
1.4 Illustration.................................................................................................................. - 4 -
Quick Start..................................................................................................................................- 6 -
2.1 Installing the Battery............................................................................................. - 7 -
2.2 Installing the SD Card........................................................................................... - 7 -
2.3 Setup Mode................................................................................................................ - 7 -
2.4 Enter Live Mode........................................................................................................ - 8 -
2.5 Review the Photos and Videos........................................................................... - 8 -
2.6 Enter Off Mode.......................................................................................................... - 8 -
Function and Technical Parameters Setting.................................................................. - 9 -
3.1 Functions Setting..................................................................................................... - 9 -
3.2 Technical Parameters Setting............................................................................- 12 -
MMS and GPRS Setting........................................................................................................- 13 -
4.1 MMS Automatical Setting................................................................................... - 13 -
4.2 MMS Manual Setting............................................................................................. - 15 -
4.3 GPRS Automatic Setting..................................................................................... - 17 -
4.4 GPRS Manual Setting........................................................................................... - 19 -
Trouble Shooting.................................................................................................................... - 22 -
5.1 Firmware Upgrade................................................................................................. - 22 -
5.2 Update Steps........................................................................................................... - 22 -
5.3 Common Problems and Solutions................................................................... - 22 -
Warranty................................................................................................................................. - 25 -

- 2 -
Product Information
1.1 The Introduction of Product
This is a far-infrared HD outdoor surveillance cameras (also called hunting
cameras, animals surveillance cameras, plant observation cameras, etc.), it can
be triggered by sudden change of ambient temperature caused by moving game
in a region of interest (ROI), which is detected by a highly sensitive Passive
Infra-Red (PIR) sensor, and then take pictures or video clips automatically. It
also has a far-infrared LED light, you can shoot high-definition pictures and
videos during the day or night . It is hidden, waterproof, wireless and long
standby time, suitable for using in the wild environment or long time security
use.
Main Features:
Its special filter system completely solved the problems such as color cast,
motley and low sharpness and satisfied both day and night outside work. It
also adopt OV image sensor to protect the stability of shooting quality.
The quality of pictures would reach up to 12MP
Adopt Germany Hyman infrared sensor technology, which response
accurately, and the trigger time reach up to 1seconds.
Installed with 2.4 inches color screen, easy to use.You can playback and
browse, take photos manually, set parameters, etc.
The maximum capacity of its memory card is upto 32GB.
Waterproof IP54
Camouflage design is suitable for field hidden
New energy-saving technology ensures longer standby time. If
accompanied by special solar power system, it can be realized the
continuous electricity supply to achieve the long-term use purpose after
installed.
Perform in the most extreme temperatures from -22°F to 158°F
Serial Number function enables you to code locations in the photos. This
helps multi-camera users identify the location when reviewing the photos
Date, time, temperature and moon phase can be stamped in the pictures
Lockable and password protected
Can be equipped with special anti-theft case
Advanced remote cellular technology transmits images to your cell phone
and email account constantly at lower battery consumption and shorter
transmission time,compared to products of its kind on the market.
Operates globally via GSM/GPRS network. Supports four bands: 850 / 900
/ 1800 /1900MHz.
Can be equipped with special anti-theft case

- 3 -
1.2 Application
1) Trail camera for hunting
2) Animal or event observation
3) Used for plant growth record or observation on research
4) Used for bee form safety surveillance or forest anti-cutting surveillance
5) Used for other outdoor surveillance or evidence collection
6) All other indoor/outdoor surveillance where invasion evidence needed
1.3 Package Contents
A Digital
Camera
A Strap
A USB Cable
A TV Cable
A warranty
card
A CD
SD card
(optional )
Solar panel
(optional)
Anti-theft case
(optional)

- 4 -
1.4 Illustration
1.4.1 Front View
1.4.2-1Internal Structure

- 5 -
1.4.2-2Internal Structure
1.4.3-1 Bottom View

- 6 -
1.4.3-2 Bottom View
Quick Start
If you are not familiar with the operation of this camera, the following
instructions will help you get a quick overview. Before doing any
operation,please make sure you have loaded batteries and plugged the SD
cardcorrectly.
Attention: If the SD card is not inserted correctly or its write-protect is
enabled,the device will turn off automatically.
This easy installation guide guides the installation and operation of the
camera. If you want to set MMS or GPRS, please read the MMS setting
and GPRS setting section in the instructions carefully.

- 7 -
2.1 Installing the Battery
Install the battery on the camera, please follow the instructions below:
1) Unlock the two buckles, open the camera and keep the power button in OFF
position.
2) Open the battery box, install 8 AA batteries according to the direction of the
positive and negative mark, ensure polarity matching and ensure that battery
should be assembled in place.
Recommend you use high-performance alkaline AA batteries. You can also
connect an external power supply and battery; please sure that voltage
matches the camera. When connecting an external power supply or battery, the
camera will use the external power preferentially.
2.2 Installing the SD Card
The camera itself does not have the storage, so the camera will turn off
automatically if there is not SD card.
Attention: Please select brand SD card and use after formatted on a computer
and then use ordinary neutral card is not guaranteed to work.
Before inserting the SD card, please sure that the SD card write-protection
button is in “close” position (not “lock” position).
The camera maximum supports 32 GB SD card, please sure that the SD card
you choose is within this range.
CAUTION: ALWAYS SWITCH THE CAMERA TO OFF MODE BEFORE YOU INSTALL
OR REMOVE THE BATTERIES OR THE SD CARD.
2.3 Setup Mode
Switch to the SET position to enter the Test mode. In this mode you can take
pictures or video clips like a regular digital camera, or enter the Menu to set up
parameters. On the keypad there are six “shortcut”functional keys working as
below:
1) Press the key to set the camera to shoot video clips.
2) Press the key to set the camera to take still pictures.
3) Press the SHOT key to manually trigger the shutter. A photo or video

- 8 -
(depending on the camera setting) will be taken and saved to the SD card.
Also,press to Play / Pause the video.
4) Press the REPLAY key to review/playback photos/videos on the LCDscreen,
and you can magnify and shrink photos through and buttons, or control
the forward or backward of the video.
5) If you want to delete files, please press Menu when reviewing the photo or
video, you can choose delete one or all, then press OK to confirm.
2.4 Enter Live Mode
Switch to the ON position to enter the Live mode. After entering the Live mode,
the camera will
begin to take picture or video according to the previous programmed setting
when human or animal enters monitor area. If there are not any goals within the
range, the camera would enter into sleeping mode automatically.
Before entering the operation modes, please notice:
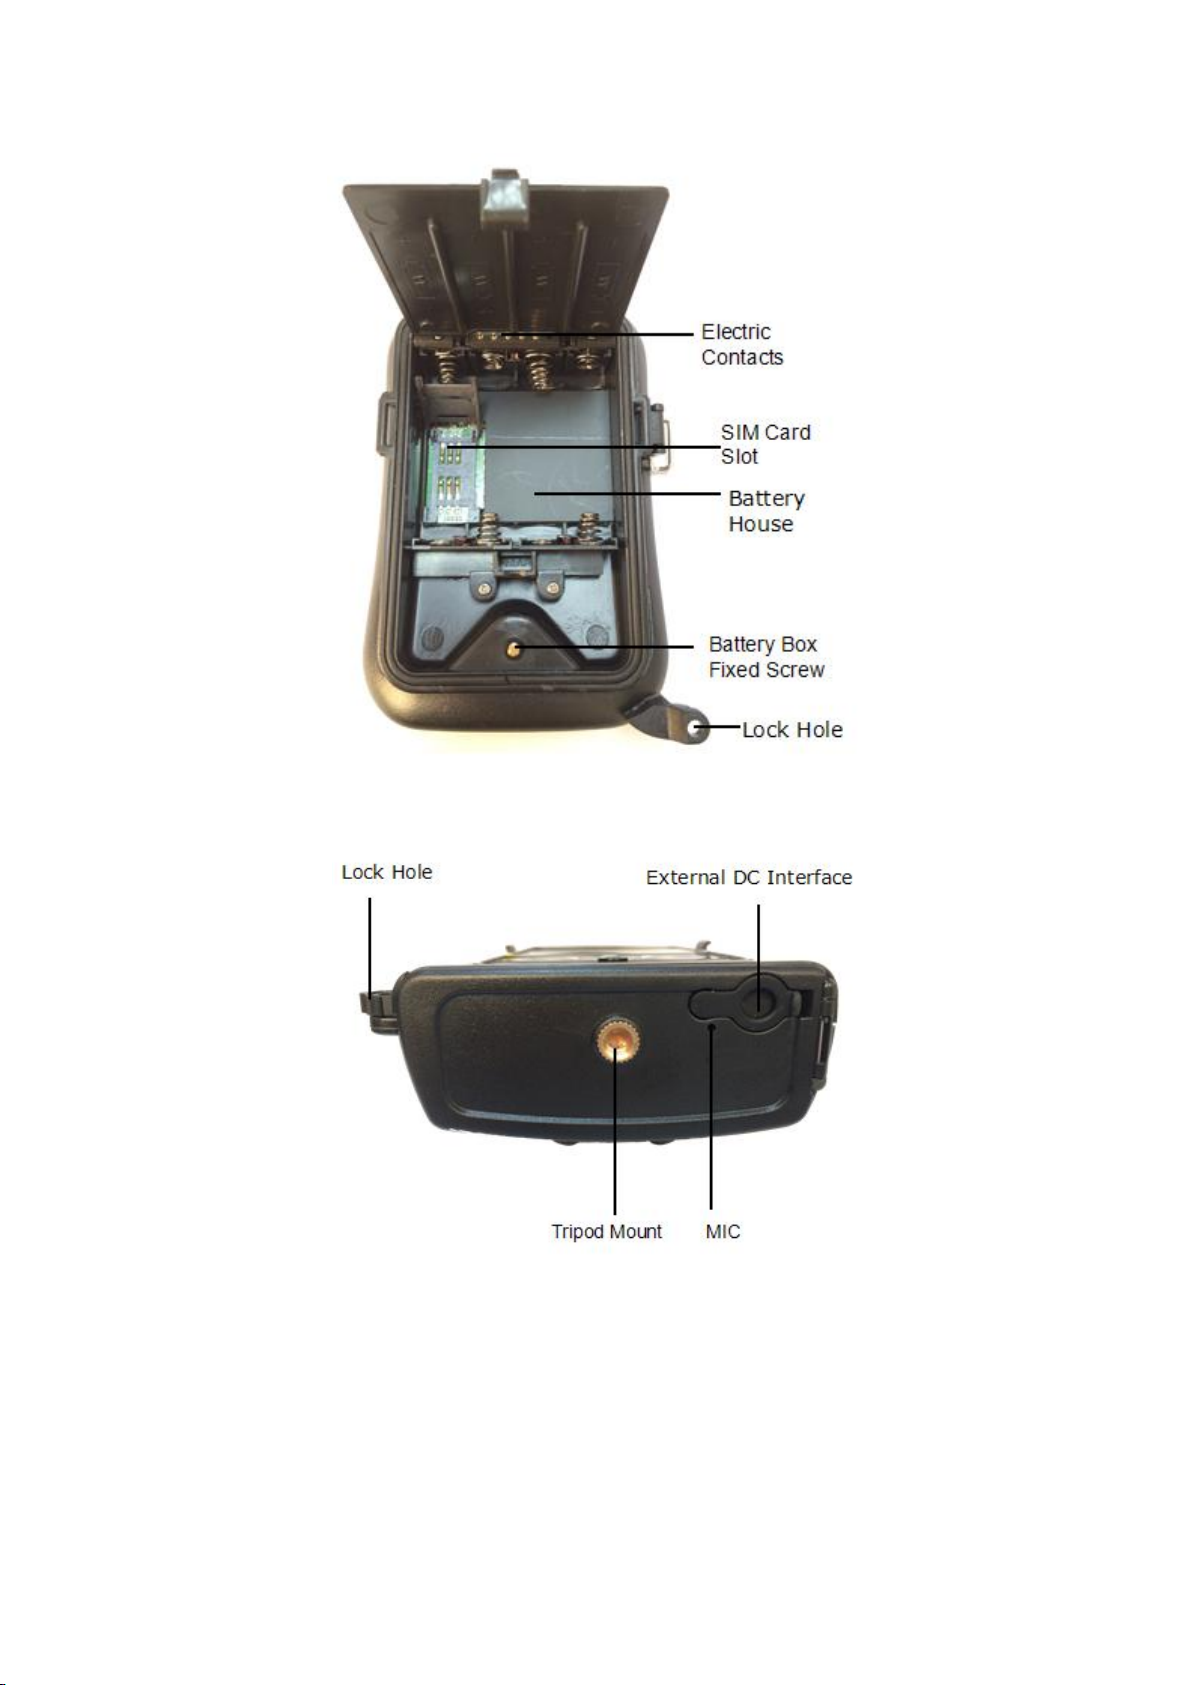
1) Make sure the power is sufficient
2) Make sure the SD card has sufficient space.
3) Make sure the power switch of camera is on the ON position.
Generally recommend that the camera should be attached above the ground
3-6 feet (1-2 meters). In order to avoid the potential wrong trigger because of
temperature and movement obstacle, do not point the lens toward the heat
source (such as the sun) or branch. Meanwhile, make sure that there is not
obstructive objects in front of the camera or next the camera.
2.5 Review the Photos and Videos
There are three ways to review captured picture or video:
1) Turn the camera off, remove the camera’s SD card using a card reader to view
in the computer;
2) Connect camera with television or other visual display device through TV
cable, and then switch to SET mode to view.
3) Connect the camera with computer through USB cable to view
2.6 Enter Off Mode
Just put the power switch on OFF position to turn off the camera.
Warning: If you do not use the camera for a long time, we strongly
recommend that you remove the battery from the camera, in order to
avoid the damage of camera caused by possible acid leak.

- 9 -
Function and Technical Parameters Setting
3.1 Functions Setting
The camera comes with preset manufacturer settings. You can also change the
settings to meet your needs
Make sure the power button of camera is in the SET position.
Press the MENU button to enter/exit the main menu and start a menu option
through , , , . All settings should press button to confirm. Always
remember to press to save the change. Otherwise you will lose your new
setting.
Manual
Contents
Setting Contents
Instructions
Mode
Camera,
Video,
Camera + Video
Select whether still photos or video clips
are taken. In Camera + Video mode,It
can first take photos and then shoot
videos afterward. Please notice, it would
cost much electric during the video
taking. If you use for a long time
outside, we suggest choose only camera
mode, or set video taking time within 10
seconds in the menu to increase the
standby time.
Language
English, China,
French, Norwegian,
German, Spanish,
Portuguese,
Japanese, Russian,
Finnish, Czech,
Italian, Romanian,etc
This camera supports multi-languages,
you can select according to your need.
Format
No
Yes
All files will be deleted after formatting
the SD card. Highly recommend you
format the SD card if it has been used
previously in other devices.
Caution:make sure wanted files on the
SD card
have been backed up first!
Photo Size
1MP/3MP/5MP/
You can select to shoot 1MP to 12 MP

- 10 -
8MP/12MP
pictures according to your need. Please
notice: Higher
resolution produces better quality
photos, but creates larger files that take
more of the SD card capacity. In
addition, larger files needs longer time
to write in the SD card, this will influence
the reflect speed of camera and cost
more electric.
Video Size
1280×720
720×480
640×480,
320×240
You can take several types of video
according to your need. Please notice:
Higher resolution produces better
quality videos, but creates larger
files that take more of the SD card
capacity.In addition, larger file needs
longer time to write in the SD card, this
will influence the reflect speed of camera
and cost more electric.
Set Date &
Time
OK
Press OK to set up date and time.
Picture No.
01 Photo
02 Photo
03 Photo
Select the number of photos taken in
equence per trigger in Camera mode.
Please also refer to the Interval
parameter.
Video Length
1-30 seconds
Videos are in AVI format that can be
played back on most video players.
Please notice: The greater the power of
the camera, the faster the power
consumption .Suggest only choose
camera mode when needing longer
standby time, or avoid long time video
taking.
Interval
1 second -60
minutes
Select the shortest length of time that
the camera will wait until it responds to
any subsequent triggers from the PIR
sensor after a game is first
detected.During the selected interval,
the camera
will not take pictures/videos. This
prevents the SD card from filling up with
too many redundant images.

- 11 -
Sense Level
Standard
High
Low
Select the sensitivity of the PIR sensor.
The High setting suits indoors and
environments with little interference,
while the Normal/Low suits outdoors
and environments with more
interference. Temperature also affects
the sensitivity. The High setting is
suitable when the ambient temperature
is warm, and the Low setting is helpful in
cold weather.
Date Stamp
Off
Date
Date/ time
You can add date label in the picture you
shot, you can show shooting time,
temperature phase and so on.
Timer
On /Off
You can set camera working in a period
everyday.
Password
setting
On
Off
Set up a password to protect your
camera from unauthorized users.
Serial
number
On
Off
Select On to assign a serial number to
each camera you have. You can use
the combination of 4 digits and/or
alphabets to record the location in the
photos. This helps users identify the
location when reviewing the photos.
Time Lapse
On
Off
If set On, the camera will automatically
take photos/videos according to the set
interval, regardless of whether the PIR
sensor has detected any game. This is
helpful when observing cold-blooded
animals like snakes, or the process of
flowering, etc.
Please notice: if this setting is open, the
PIR sensor would in off condition and
you can not shooting by sensitivity.
WIFI SD
card
On
Off
If set ON, camera can link WIFI for 1, 2,
3 minutes. On the SET condition, the
time to link WIFI is not limited.
On the off condition, it can not link WIFI.
(this function must use WIFI-SD card,
user who use ordinary SD card just
ignore this function.)
MMS Setup
On
Off
Press OK to input the phone number you
want to send MMS to. To input more
phone numbers, or to set up email
accounts, reference PC MMS setting.

- 12 -
PC setting software can fill the quantity
of MMS. 0 represents unlimited ,
1-99/day means the sent quantity you
can choose.
MMS Status
VGA
QVGA
Off
Default setting is closed. If you want
MMS work, choose VGA=640x480 or
QVGA=320x240, if the original file is too
large, in order to save time,MMS will
change it to QVGA form and send .
Audio
On
Off
You can choose whether record or not
when recording.
Default
setting
On
Off
Press OK Enter to return all your camera
settings back to the manufacturer
default.
Version
Version number of camera software
3.2 Technical Parameters Setting
Category
Parameters
Image Sensor
12 Mega Pixels Color CMOS
Maximum Pixel
4000x3000
Lens Angle
52degrees
Maximum sense
distance
65 feet/20 meters
LCD Screen
48x35mm(2.36")
Sense Angle
90 degrees
Operation Keypad
6 Keypad
Storage Support
SD card (8MB ~32GB)
Image Size
12MP=4000x3000;
5MP = 2560x1920;
Video Size
1280x720p: 30fps; 720x480: 30fps;
640x480: 30fps; 320x240: 30fps
PIR sensitivity
High/Standard/Low
Operation Mode
Day/Night
Trigger Time
The fastest reach 1 seconds(Using SD card below 2G)
Trigger interval
5 seconds-60 minutes adjustable
Video Length
1-30 seconds adjustable
Camera+Video
Take photo first then take video
Playback ZoomIn
1-8 times
Time Stamp
Optional,you can add the serial number of camera

- 13 -
Timer
On/Off; Programmable
Password setting
4-Digit Numbers
Camera number
Support the 4number composed by letters and numbers
freely
Time Lapse
On/Off; 1 Second ~ 24 Hours
Programmable
Audio
On /Off
Languages
English/Chinese/French/Norwegian/German/Spanish/Portu
guese/Japanese/Russian/Czech/Italian/Romanian/Finnish
MMS Status
VGA = 640x480; QVGA = 320x240;OFF
optional
MMS Numbers
“0” = unlimited; 0 ~ 99/day
MMS Phone No.
1 ~ 3 telephone numbers
MMS email address
1~3 email addresses
GPRS Email address
1~3 email addresses
WiFi SD card
1/2/3 minutes, optional
Battery
Support 4/8/ AA battery
Standby time
Up to 3-6months
Interface
TV output (NTSC); USB; SD card; 6V DC External
Mounting
Support Strap fixed and tripod fixed
Waterproof
IP54
Work Temperature
-22~+158°F/-30 ~+70°C
Work Humidity
5% ~ 95%
Certificate
FCC & CE & ROHS
MMS and GPRS Setting
4.1 MMS Automatical Setting
Please prepare:
8 new AA batteries
A SD Card (Please format the SD card in the computer before setting.)
An activated sim card which can send and receive MMS
4.1.1 First, open the attached CD, and find the following file in the MMS and
GPRS folder.
And then start up the setup software:

- 14 -
4.1.2 Choose MMS option as shown in picture
4.1.3 Open the following interface:
First, you need to choose how you like to set up the MMS Mode
--Auto,then you need to choose the country

- 15 -
and the Mobile
Phone Network Operator (MPNO),input the phone number and/or email
address you’d like the MMS pictures to be sent to. You can enter up to three
different phone numbers and/or email accounts.
Note: The Phone Number and Email must be filled in at least one of
them; other two Phone or Email can be left blank.
4.1.4 Click on to choose the directory to save the settings, usually
under the root
directory of the SD card (You need to insert the SD card in the SD card reader
and plug it in your
computer.) Then, click on . A file named setup.dat as following file
will be created and saved in the directory you just selected.
4.1.5 Alter the attribute of the setup.dat as “read-only”.
4.1.6 Take out the SD card then insert it into camera. Switch to the TEST
position.Check it whether set successfully or not (check method: open the MMS
setting in menu, check whether the receivers’ numbers have existed in the
camera or not.)
Notice: The operator data maybe changed sometimes,if the saved data
in setup software can not be updated in time, the mms would not be
sent successfully in auto setting. If this situation happened, please try
manual settings.
4.2 MMS Manual Setting
4.2.1 Enter the MMS Settings interface; Choose the manual Settings, as shown
in the picture follows (China mobile APN info is used as an example):

- 16 -
Note:The Phone Number and Email must be filled in at least one of them;
other two Phone or Email can be left blank.
Attention: The URL/APN/GATEWAY/PORT are very important, they
must be filled in correctly or it will lead to MMS can not be used in
normal, please consult using operator or provide the operator’s
website, we would like to help finish the correct information!
4.2.2 Click on to choose the directory to save the settings, usually
under the root
directory of the SD card (You need to insert the SD card in the SD card reader
and plug it in your
computer.) Then, click on . A file named setup.dat as following file
will be created and saved in the directory you just selected.
4.2.3 Alter the attribute of the setup.dat as read-only.

- 17 -
4.2.4 Take out the SD card then insert it into camera. Switch to the TEST
position.Check it whether set successfully or not (check method: open the MMS
setting in menu, check whether the receivers’ numbers have existed in the
camera or not.)
4.3 GPRS Automatic Setting
Please prepare:
8 new AA batteries
A SD Card (Please format the SD card in the computer before setting.)
An activated sim card which can send and receive emails with attachments.
4.3.1 First, open the attached CD, and find the following file in the MMS and
GPRS folder.
And then start up the setup software:
4.3.2 Choose SMTP option as shown in picture
4.3.3 Open the following interface and fill in according to the picture. (Sender
Default Mode)

- 18 -
4.3.3.1 Choose SMTP Mode --Auto,then choose your
country and mobile operator,Fill in the recipient email address (1-4 email
address optional).
4.3.3.2 If you don’t want to use Sender Default Mode,please Remove the tick
of the Sender default mode.and fill in the sender email
information: SMTP Server, SMTP Port, Email address and password

- 19 -
4.3.3.3 And then fill in the recipient email address (1-4 email address optional).
4.3.4 Click on to choose the directory to save the settings, usually
under the root
directory of the SD card (You need to insert the SD card in the SD card reader
and plug it in your
computer.) Then, click on . A file named setup.dat as following file
will be created and saved in the directory you just selected.
4.3.5 Alter the attribute of smtp file as read-only
4.3.6 Take out the SD card, then insert it into camera and start the menu
parameters setting.
Attention: The operator data maybe changed sometimes,if the saved
data in setup software can not be updated in time, the mms would not
be sent via GPRS successfully in auto setting. If this situation happened,
please do manual settings.
4.4 GPRS Manual Setting
4.4.1 Enter into the GPRS settings interface; choose the manual Settings, as
shown in the picture (Sender Default Mode):
Table of contents
Other Bestok Scouting Camera manuals