BlazeVideo A280W User manual

Wi-Fi TRAIL CAMERA
MODEL#: A280W
INSTRUCTION MANUAL
V1.0

TABLE OF CONTENT
1. IN THE BOX......................................................................... 1
2. IMPORTANT NOTE.............................................................1
3. INTRODUCTION................................................................. 2
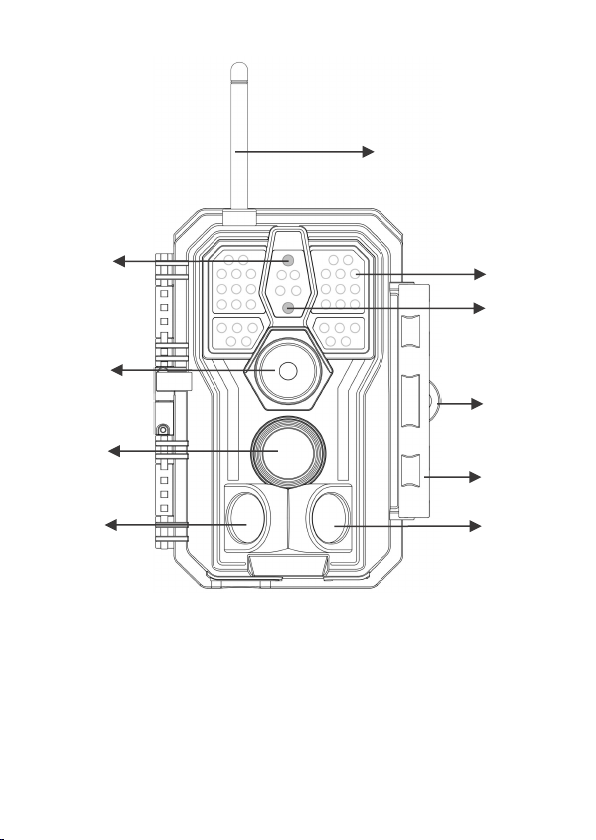
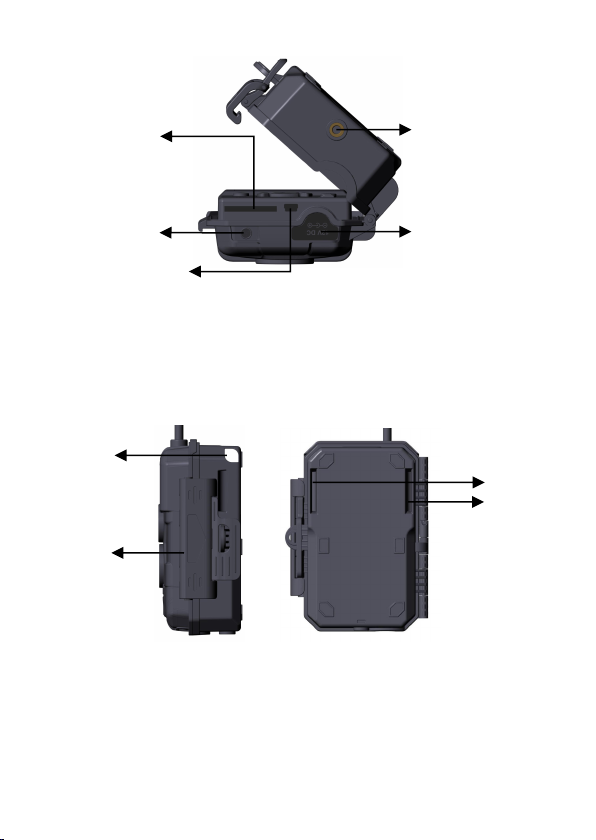
4. PARTS AND CONTROLS................................................... 4
5. INSTALLING THE BATTERIES AND SD CARD.............8
5.1. Loading Batteries...................................................... 8
5.2. Inserting the SD Card................................................9
6. USING THE CAMERA...................................................... 10
7. THE OFF, ON, AND SURVEILLANCE MODES.............10
7.1. OFF Mode............................................................... 11
7.2. ON Mode................................................................. 11
7.3. SURVEILLANCE Mode...........................................12
8. Wi-Fi CONNECTION......................................................... 12
8.1. Download TrailCam Mobile App............................ 12
8.2. Enable Wi-Fi and Bluetooth....................................13
8.3. Add Your Camera....................................................13
8.4. Select Camera Type.................................................14
8.5. Search Your Camera and Link................................ 15
8.6. App Navigation........................................................17
8.7. Important Notes on App Wi-Fi Connection.............19
9. ADVANCED SETTINGS................................................... 20
10. MOUNTING AND POSITIONING..................................24
10.1. Mounting............................................................... 24
10.2. Sensing Angle and Distance Test.......................... 25
10.3. Starting.................................................................. 27
11. REVIEW PHOTOS OR VIDEOS..................................... 27
12. TECHNICAL SPECIFICATIONS.................................... 28
13. TROUBLESHOOTING.....................................................30
14. WARRANTY.................................................................... 31

1
1. IN THE BOX
1 x Camera, 1 x Mounting Strap,
1 x Instruction Manual, 1 x Mini USB Cord, 1 x Antenna
Note: Memory card and batteries are not included (user supplied).
2. IMPORTANT NOTE
2.1. About Batteries
Require eight (8) 1.5V AA Alkaline or Lithium batteries. We
recommend the use of Energizer AA Lithium batteries in this
camera to obtain maximum battery life.
Do not mix old and new batteries. Do not mix battery type.
Rechargeable NiMH AA batteries can be used, but are NOT
recommended as the lower voltage (generally 1.2V) they
produce can cause night recording issues, and you also may
have to replace them frequently.
Remove batteries when the camera is NOT in use.
2.2. About SD Card and Protective Films
Require a standard-size SDHC/SDXC memory card (max
capacity 512GB, Class 10). Recommend using SanDisk 32GB
SDHC/Class10 memory cards in the camera to obtain the best
cost-performance.
Before use, please format your SD card in the camera.
Before use, please gently remove the protective films on the
front of the camera to get the best performance, especially the
protective films on the PIR lens may cause motion detection
performance downgrades, even no captures.

2
2.3. About App Wi-Fi Connection
Please refer to Section 8 for details.
For better performance, we recommend that your phone is
within 15 meters (45 feet) of your camera. Since there may be
interference around, if the signal is not good, please move
closer to the camera gradually.
Legal attribution: Apple and the Apple Logo are trademarks of Apple Inc.,
registered in the U.S. and other countries. Google Play and the Google Play
logo are trademarks of Google LLC.
3. INTRODUCTION
3.1. About the Camera
The A280W is a new generation of Wi-Fi trail camera. The
camera has a built-in Wi-Fi and Bluetooth module, so that you
can connect and operate the camera through a dedicated App
(“TrailCam Mobile”). The Bluetooth module, operating in low
power, is used for device discovery, and Wi-Fi is used for
preview, image transmission and settings.
The camera features the all-new innovative and ultra-clear
imaging technology, encompasses smart night vision, blur
reduction, and noise reduction technology to deliver high
resolution image quality.
3.2. Main Features
Bluetooth connection for device discovery
Wi-Fi connection for preview, playback, and settings
High quality pictures (up to 32MP still photos), 1296P 20fps
or 1080P 30fps H.264 video clips with audio

3
Clear night vision, flash range 100ft, the camera is equipped
with 36pcs high performance infrared no glow 940nm LEDs
that function as a flash (invisible to human and animal eyes)
Wide view angle - 70°
Easy to use/program with well-designed operation buttons and
built-in 2.4-inch color screen, easy to program, review pictures
and videos on the screen
Two working modes - Motion detection and Time lapse
Fast trigger time approx. 0.1~0.6 second (pre-activated
technology with 3 PIR sensors designed), Fast recovery time
of less than 0.5 second, Long trigger distance up to 90ft.
Info strip on each capture: Date, Time, Temperature & Moon
phase
Operation Hours, Loop Recording, Time Lapse, Password
Protected
Built for any climate - IP66, Operation Temperature: -4~140°F
Support SD/SDHC/SDXC memory card, max capacity 512GB
(user supplied)
Extremely long in-field battery life up to 8 months in a
stand-by state with 8 AA 1.5V batteries (user supplied)
3.3. Applications
The camera can be used as follows:
For hunting and tracking animals’ trace or habits
For wildlife observing and researching, captures pictures
and videos of wild animals
As a motion-triggered security camera, for home, farm,
office and community
All other indoor & outdoor surveillance where invasion
evidence needed

4
4. PARTS AND CONTROLS
The camera is equipped with 36pcs high efficiency infrared
LEDs, LED Indicators, Lens, PIR Sensors, Lock Holes in front
view (Figure 1).
TIP: During use, the black PIR Lens may become dirty or have
scratches, however it does not affect the performance due to
the reliability design of the PIR lens. If you must clean it,
please try to blow it off or pick out the dirt very lightly. Do not
try to wipe it, which may cause more scratches.

5
Figure 1: Front View
Install the antenna: The antenna is placed in the accessory
slot on the right side of the package box. Please screw the
antenna into the mounting base on the top of the camera and
tighten it (Figure 1).
The camera provides the following connections for external
devices: Mini USB port and SD card slot etc. (Figure 2).
IR LEDs
Lock
Hole
Optics
Lens
Central
PIR Lens
Light
Sensor
Indicator
Lock
Buckle
Antenna
Side
PIR Lens
Side
PIR Lens

6
Figure 2: Bottom View
The camera has one security cable hole and two strap holes on
the back. The strap can be put through the strap holes and
fastened securely around a tree trunk by pulling the end of the
strap firmly (Figure 3).
Figure 3: Right / Back View
The camera has a 2.4-inch built-in LCD screen, which can be
used for reviewing pictures or videos and menu displaying, and
exclusive keypad design for easy program and operation, 8 AA
batteries slot supported (Figure 4).
Tripod Base
1/4" - 20
SD Card
Holder
DC 12V/1A
Plug 5.5x2.1mm
Strap
Hole
Lock
Buckle
Mini USB Port
Microphone
Security
Cable Hole

7
Figure 4: Inside View
Figure 5: Operation Buttons
A power switch is used to power on (ON mode) or off the
camera (OFF mode). A START button is used to quickly
make the camera into the surveillance mode (motion detection
or time lapse per your settings (Figure 5). When the camera is
in the surveillance mode, press the START button to wake up
the camera.
Power
Switch
Color
Screen
Battery
Compartment
and Cover
Operation
Buttons
Surveillance
Mode

8
5. INSTALLING THE BATTERIES AND SD CARD
Before you begin learning how to use your camera, you will
first need to install a set of batteries and insert an SD card.
Although that may only take you a minute, there are some
important notes about both batteries and SD cards you should
be aware of, so please take the time to read the following
directions and cautions:
5.1. Loading Batteries
After opening the cover of the battery compartment, you will
see that the camera has eight battery slots (Figure 6). A full
eight batteries must be installed for the camera to operate. Be
sure to insert each battery with correct polarity (negative or
"flat" end against the long spring of each battery slot).
In ON mode when battery power level gets low, the message
"Low Battery" will show on the screen, please replace the
batteries. If the battery indicator shows in RED, this does mean
the batteries are not able to drive IR LEDs flash at night,
however the batteries still work at daytime until "Low
Battery". If you want to continue night vision, please replace
the batteries.

9
Figure 6: Loading the Batteries
5.2. Inserting the SD Card
Insert the SD card (with the camera powered off), before
beginning to operate the camera. Don't insert or remove the SD
card when the camera is powered on or in the surveillance
mode. (Figure 7).
Figure 7: Inserting the SD Card
The following describes how to insert and remove the SD card:
Insert the SD card into the card slot with its label side
upwards.A "click" sound indicates that the card is installed
successfully. If the wrong side of the card is facing up, you
will not be able to insert it without force, there is only one
correct way to insert cards. If the SD card is not installed
+
一

10
correctly, the device will not display an SD card icon on the
screen in ON mode.Formatting the SD card by using the
camera's "Format SD Card" menu option before first use is
recommended, especially when a card has been used in
other devices.
To take out the SD card, just gently push in the card (do not
try to pull it out without pushing in first). The card is
released from the slot and ready to be removed when you
hear the click. Be sure the camera's power is switched OFF
before inserting or removing SD cards or batteries.
6. USING THE CAMERA
Once you've prepared your camera by properly installing
batteries and an SD card, you could simply take it outside,
strap it to a tree (or not - according to your application
scenario), switch it ON, press START button and leave-and
you might get some great photos that are exactly what you
wanted. However, we highly recommend that you first spend
some additional time indoors with this manual and your camera
until you know a bit more about what those control keys do. If
nothing else, you'll probably want to at least set the date and
time so the camera will imprint them (or not-it's your option)
on your photos as they are taken, learn how to set the camera to
shoot video clips instead of still photos if you like, and read
some tips about mounting it on a tree.
7. THE OFF, ON, AND SURVEILLANCE MODES
The camera has three basic operational modes:
OFF mode: Power switch in the OFF position (The camera
is powered off).
ON mode: Power switch in the ON position (The camera is

11
powered on and its screen is on).
SURVEILLANCE mode: When the camera is powered on,
press START button to enter the surveillance mode. When
the screen is off, the camera enters standby and will perform
according to your settings.
App & Wi-Fi Connection
You can use the App to connect the camera when the camera is
operating in the ON or SURVEILLANCE mode.
7.1. OFF Mode
The OFF mode is the "safe" mode when any actions must be
taken, e.g., replacing the SD card or batteries, or transporting
the device. And of course, when you are storing or not using
the camera, you will switch it to OFF. Please note that in the
OFF mode the camera still consumes a little power. It's a good
idea to take the batteries out of the battery compartment if the
camera will not be used for a long time.
7.2. ON Mode
In the ON mode you can check and change the settings of the
camera with the help of its built-in screen. These settings,
found in the menu by pressing MENU key, let you change the
photo or video resolution, interval between photos, switch the
time imprint on, etc. (See more in Section 9 ADVANCED
SETTINGS).
On the screen display, you will see an information screen that
shows how many images have been taken, the battery level,
camera or video mode, etc.
Attention please: In the ON mode, the camera will
automatically enter SURVEILLANCE mode if there is no

12
operation (key pressing) within 5minutes. Then the camera
will perform as your settings in the menu.
In the ON mode, you can connect the camera to a computer's
USB port to download your images.
7.3. SURVEILLANCE Mode
Any time after the batteries and SD card have been inserted,
you can switch on the camera. When the START button is
pressed, the camera will enter into the SURVEILLANCE
mode. If the Mode in the settings is set as “Motion Detection”,
the camera will count down a 30-second delay and then be
ready to capture images. If the Mode is set as “Time Lapse”,
there will be no 30-second counting down, and the camera will
be ready to enter Time Lapse.
Once in the SURVEILLANCE mode, no manual controls are
needed or possible (the control keys have no effect). The
camera will take photos or videos automatically (according to
its current parameter settings).
TIP: You can press the START button again to wake up the
camera and reprogram your camera if required.
8. Wi-Fi CONNECTION
8.1. Download TrailCam Mobile App
Before using the Wi-Fi functionality, please download the
‘TrailCam Mobile’ App.

13
NOTES:
The screenshots shown in this section are indicative only. The
actual diagram on different versions of App, iOS and Android
may differ.
During the use of the TrailCam App (Referred to as App),
please grant the App access to Wi-Fi, Bluetooth, storage,
location and camera of your device, and enable the Local
Network (if on iOS14), which are necessary to take pictures
and videos.
8.2. Enable Wi-Fi and Bluetooth
Enable Wi-Fi and Bluetooth on your mobile phone before
opening the App. This step is optional, however it can speed up
the connection between App and camera.
8.3. Add Your Camera
Make sure your camera is in ON mode, and that it is near you.
To get a stable connection, please get close to your camera no
farther than 45ft away with no obstacles between you and the
camera, such as walls, glass doors etc.
Open the App, tap the orange stripe on the top to add your
camera:
Figure 8: Enable Wi-Fi and Bluetooth

14
Figure 9: Tap to add your camera
8.4. Select Camera Type
Figure 10: Select Wi-Fi camera type
Please tap Wi-Fi camera.
The App only supports Wi-Fi camera at the moment, and will
be enhanced to support cellular camera in the future (sold
separately).

15
8.5. Search Your Camera and Link
Figure 11: Select your camera
By default, in the list the camera will be indicated as ID
“NONAME_A280W” if the camera name is not assigned.
After you set the camera name in settings, the camera ID will
be updated as “XXXX_A280W” (XXXX is a 4-character
choice, you can set your camera name).
The App automatically searches for all Wi-Fi trail cameras
nearby, please make sure your camera is within the Wi-Fi
range. This process may take up to 15 seconds. If there is no
device shown in the list, please click the Refresh button on the
top-right corner.
Tap the one you want to add (Figure 11). The App starts
connecting to your camera. It might take up to 15 seconds to
build the Bluetooth and Wi-Fi connection between the App and
camera. There are 4 steps (Illustration omitted):
Step1 – Connecting through Bluetooth…
Step2 – Activating the camera…
Step3 – Searching Wi-Fi…
Step4 – Connecting through Wi-Fi…

16
Figure 12: Allow Wi-Fi Connection on iOS Device
A system pop-up message will show (Figure 12).
Please tap ‘Join’ to allow Wi-Fi connection. The string
“CAM8Z6_E9316A9F2066” is the name of Wi-Fi hotspot on
the camera to allow Wi-Fi connection. Among cameras, the
prefix CAM8Z6 is fixed, E9316A9F2066 is the internal camera
identifier which may vary from different cameras.
NOTE: On Android devices, there might be different system
pop-up messages that ask for allowing App connection to
camera since different mobile phone manufacturers may
modify and customize this system message.
After connected, a pop-up message would show as below:
Figure 13: Connected
Tap “Start” to enjoy your App journey (Figure 13).

17
8.6. App Navigation
The App supplies 4 main features:Camera, Status, Settings and
Gallery. See the Table 1 and Figure 14~17 for more details.
Table 1 - App Navigation
Features
Details
Refer to
Camera
Preview, manual taking pictures or
videos.
Figure 14
Status
Camera status, including battery
level, SD Card capacity and used
size, internal temperature of the
camera, number of pictures and
videos stored on the SD Card,
camera model, firmware version
number, etc.
Figure 15
Settings
Display or program camera
settings, such as mode, picture
quality etc.
Figure 16
Gallery
Review or download the pictures
or videos the camera has taken.
Figure 17

18
Figure 14: Camera Figure 15: Status
Figure 16: Settings Figure 17: Gallery
Table of contents
Other BlazeVideo Scouting Camera manuals

BlazeVideo
BlazeVideo A252 User manual

BlazeVideo
BlazeVideo A262 User manual

BlazeVideo
BlazeVideo A323 User manual

BlazeVideo
BlazeVideo A252 User manual

BlazeVideo
BlazeVideo T326 User manual

BlazeVideo
BlazeVideo A323 User manual

BlazeVideo
BlazeVideo A390G User manual

BlazeVideo
BlazeVideo A323 User manual

BlazeVideo
BlazeVideo A350 User manual

BlazeVideo
BlazeVideo A350W User manual