BETTCHER INDUSTRIES Whizard Power Knife User manual

OPERATOR’S
MANUAL
Manual #109200
Re-Issued: 09-25-02
TMC #802
For Assistance, Write:
BETTCHER INDUSTRIES INC.
P.O. Box 336
Vermilion, Ohio 44089-0336
U.S.A.
Phone: 440/965-4422
Phone: 800/321-8763
Fax: 440/328-4535
Internet: http://www.bettcher.com
COMPANY CONFIDENTIAL

Operating Bettcher Industries, Inc. Whizard® Power Knife Manual
Instructions Rev. January 29, 2016
Information in this document is subject to change without notice.
No part of this document may be reproduced or transmitted in any form or any
means, electronic or mechanical, for any purpose, without the express written
permission of Bettcher Industries, Inc.
Written permission to reproduce in whole or part is herewith granted to the legal
owners of the Whizard® Power Knife with which these Operating Instructions
have been supplied.
This Operating Instructions contains translation into French, German, Greek,
Spanish, Swedish and Turkish. Additional copies of the Operating Instruction are
available by calling or writing the local representative or by contacting :
BETTCHER INDUSTRIES, INC.
P.O. Box 336
Vermilion, Ohio 44089
U.S.A.
Telephone : 1-440-965-4422
(In the U.S.A.) : 1-800-321-8763
Fax : 1-440-328-4535
The Information Provided In These Operating
Instructions Are Important To Your Health, Comfort
And Safety. For Safe And Proper Operation, Read
This Entire Manual Before Using This Equipment.
Copyright 1999 By Bettcher Industries, Inc.
All Rights Reserved.
Original Instructions
i
COMPANY CONFIDENTIAL

Operating Bettcher Industries, Inc. Whizard® Power Knife Manual
Instructions Rev. January 29, 2016
TABLE OF CONTENTS
SECTION 1.0 Machine Specifications 1
SECTION 2.0 Designated Use 2
2.1 Warning 2
2.2 Recommended Operation 2
SECTION 3.0 Function 2
3.1 Machine Functions 2
SECTION 4.0 Safety Features 2
SECTION 5.0 Unpacking 3
5.1 Safety First 3
5.2 Included With Your Machine 3
SECTION 6.0 Installation 3
SECTION 7.0 Instructions For Operation 4
7.1 Fault Detection And Correction 7
SECTION 8.0 Maintenance 8
8.1 Headpiece Assembly 8
8.2 Motor Unit 11
8.3 Power Supply 12
ii
COMPANY CONFIDENTIAL

Operating Bettcher Industries, Inc. Whizard® Power Knife Manual
Instructions Rev. January 29, 2016
TABLE OF CONTENTS
(continued)
SECTION 9.0 Cleaning 13
9.1 Cleaning The Headpiece Assembly 13
9.2 Cleaning The Motor Unit 13
9.3 Cleaning The Power Supply 13
9.4 Daily Cleaning 13
SECTION 10.0 Spare Parts List 15
10.1 Headpiece Assembly 15
10.2 Motor Unit 16
10.3 24 VDC Power Supply 17
10.4 Power Supply Wiring Diagrams 18
SECTION 11.0 About These Operating Instructions 19
11.1 Other Languages 19
11.2 Document Identification 19
11.3 Software And Duplication 19
SECTION 12.0 Contact Addresses And Phone 20
iii
COMPANY CONFIDENTIAL

Operating Bettcher Industries, Inc. Whizard® Power Knife Manual
Instructions Rev. January 29, 2016
Page 1
SECTION 1.0 Machine Specifications
The Whizard® Power Knife designed with the highest possible standards for safety,
ergonomics and quality, is a highly effective tool with a carefully engineered and durable
cutting edge which can provide uniform and constant yield control to all operations.
The Whizard® Power Knife described in this Operating Instruction has been tested by an
independent and certified body, Inchcape Testing Services (UK) Ltd, ETL Albury, Manfield
Park, Cranleigh, Surrey, England and complies with the Low Voltage Directive 73/23/EEC
and EMC 89/336/EEC which includes compliance with the following standards :
EN 55014
EN 60555
EN 50082-1
IEC 801
EN 60335-2-64
In addition, this product also conforms to the American standards established by NSF, and
UL.
Mechanical Specifications:
Blade Speed:
1400 RPM (no load)
Blade Surface Speed:
1040 SFPM
Electrical Specifications:
Model 109001
115V/1 Phase/60 Hz
1.5 Amps
Model 109002
220-240V/1 Phase/50-60 Hz
.75 Amps
General Information:
Shipping Weight:
12.3 lbs. (5.59 kg)
Machine Weight:
1.88 lbs. (0.855 kg)
Overall Size:
Handpiece
12.2” Long x 3.6” Wide x 2.0” High
(310mm) x (91mm) x (51mm)
Power Supply
8.5” Long x 4.3” Wide x 4.6” High
(216mm) x (109mm) x (117mm)
CAUTION
USE ONLY REPLACEMENT PARTS MANUFACTURED BY
BETTCHER INDUSTRIES, INC.
USE OF SUBSTITUTE PARTS WILL VOID THE WARRANTY
AND MAY CAUSE INJURY TO OPERATORS AND DAMAGE
TO EQUIPMENT.
COMPANY CONFIDENTIAL

Operating Bettcher Industries, Inc. Whizard® Power Knife Manual
Instructions Rev. January 29, 2016
Page 2
SECTION 2.0 Designated Use
2.1 Warning
WARNING
THE MANUFACTURER ASSUMES NO LIABILITY FOR ANY
UNAUTHORIZED DESIGN CHANGES, MODIFICATIONS, OR
USE OF PARTS NOT SUPPLIED BY THE MANUFACTURER
OR
THE USE OF PARTS NOT DESIGNED FOR USE ON THIS
SPECIFIC MODEL, AND INCLUDES CHANGES IN
OPERATING PROCEDURES MADE BY THE OWNER
OR ANY OF HIS PERSONNEL.
FOR SAFE AND PROPER OPERATION, READ THE ENTIRE
MANUAL BEFORE USING THIS EQUIPMENT.
2.2 Recommended Operation
The Whizard® Power Knife is a hand-held, motorized circular knife created especially for
slicing thin strips of cooked meat for sandwiches such as Gyros and Kabobs. This meat
comes pre-formed as a "cone", which is normally slow-cooked on a vertical oven or broiler.
SECTION 3.0 Function
3.1 Machine Functions
Cutting is accomplished by means of a circular blade driven by a low-voltage motor inside
the handle of the tool. The bottom inner edge of this blade is ground and honed to razor
sharpness. An adjustable depth gauge determines how deep the blade is allowed to cut into
the meat, and also helps to guard the blade. The bottom of the Headpiece frame forms a
support on which to rest the Power Knife when not in use. This ensures that the sharp blade
edge is safely facing downward, and also allows the hot meat juices to drain from the blade.
SECTION 4.0 Safety Features
The Power Knife incorporates a safety trigger to minimize accidental starting of the tool and
an adjustable depth gauge which helps to guard the blade.
COMPANY CONFIDENTIAL

Operating Bettcher Industries, Inc. Whizard® Power Knife Manual
Instructions Rev. January 29, 2016
Page 3
SECTION 5.0 Unpacking
5.1 Safety First
WARNING
SHARP BLADES MAY CAUSE CUT INJURY!
UNPACK THE WHIZARD® POWER KNIFE CAREFULLY.
5.2 Included With Your Machine
The following parts are included with each Whizard® Power Knife. Please check when
unpacking and advise your local Bettcher Industries representative if the delivery is
incomplete.
Head Assembly
Motor Assembly
24 VDC Power Supply
Special Stone For Sharpening
Special Steel For Sharpening
Operating Instructions
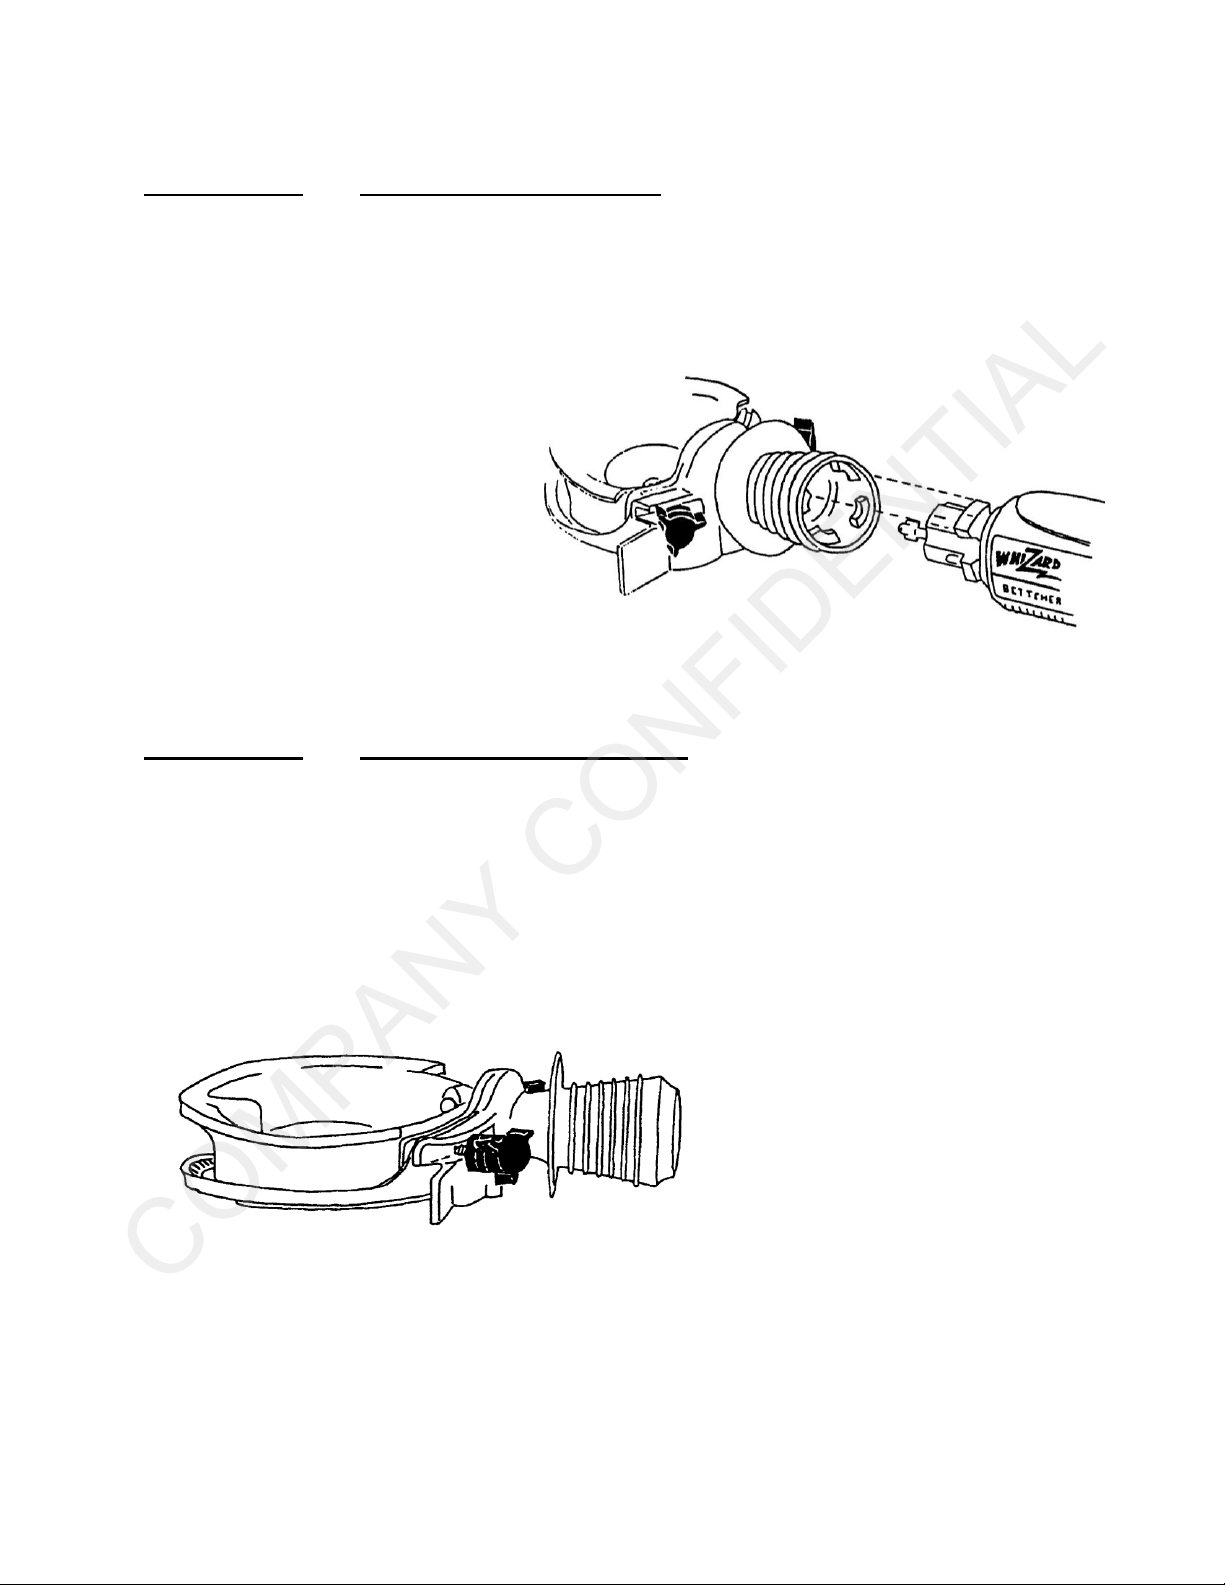
SECTION 6.0 Installation
Please review and read all instructions carefully before attempting to use your Whizard®
Power Knife.
To use the Whizard® Power Knife, first provide a
clear work area. Place the Power Supply in a
clean, dry location near the vertical oven or
broiler. Plug the power cord into an appropriate
wall outlet. (Refer to the data plate on the power
supply cover for voltage information for your
unit). Plug the Motor Unit into the power supply
receptacle, lining up the locator tabs on both the
cord and the receptacle as shown at right. Tighten
the knurled fitting.
COMPANY CONFIDENTIAL
Operating Bettcher Industries, Inc. Whizard® Power Knife Manual
Instructions Rev. January 29, 2016
Page 4
SECTION 6.0 Installation (continued)
A six-foot long extension cable is available (Part Number 109128), which allows the Power
Supply to be located away from the work area. A tool holder (part number 109164) may be
installed on the countertop to provide secure storage for the PowerKnife between uses.
Assemble the Motor Unit into the
back of the Headpiece Assembly,
lining up the four lugs on the Motor
Unit with the four notches in the
Headpiece frame. Turn Motor Unit
clockwise until snug, but do not over
tighten as it may damage the handle.
The finned driver will automatically
align itself with the drive pinion
during assembly. Note that the
motor unit will fit into the Headpiece
only one way.
SECTION 7.0 Instructions For Operation
The Power Knife is easy to use. Slice thickness is carefully and consistently controlled by
the depth gauge. This uniform quality of product has traditionally been possible only from a
highly skilled operator using a straight knife. Uniformly-cooked meat can be served due to
its consistent thickness.
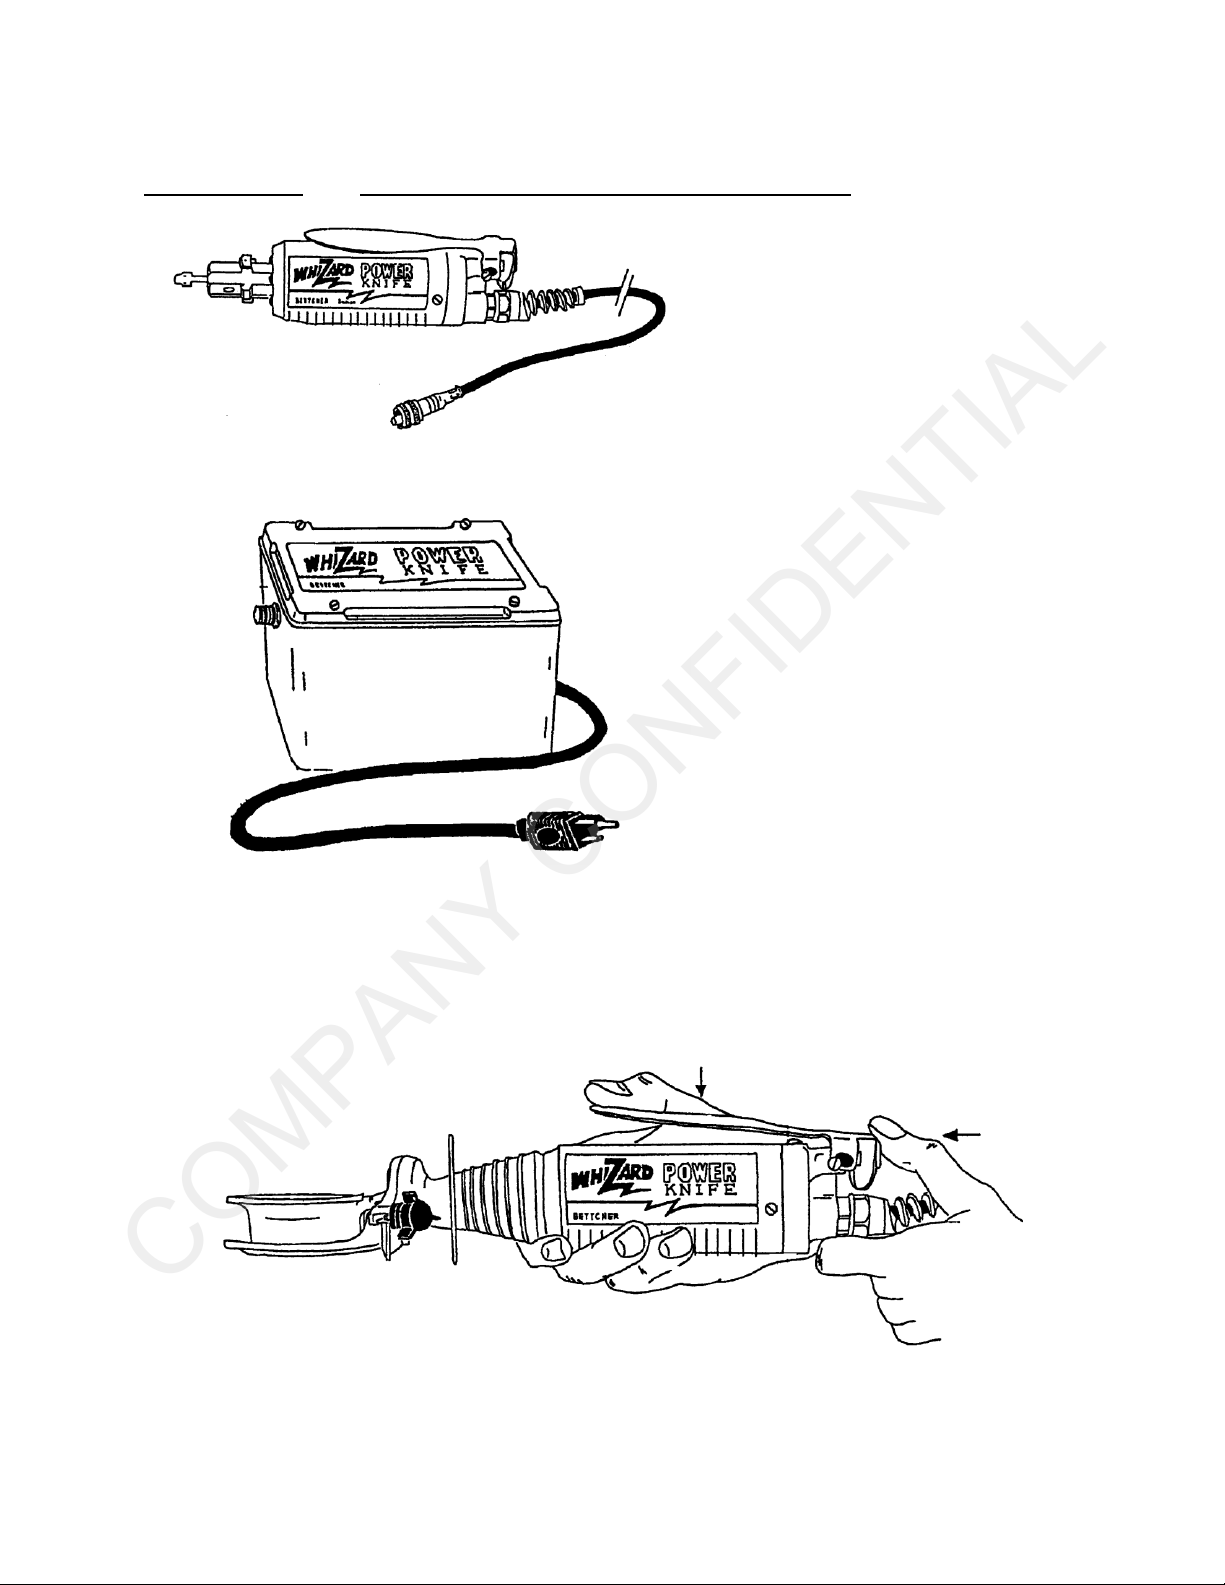
The Power Knife consists of three components:
1. The Headpiece Assembly.
This contains the frame
assembly, blade, blade
housing, drive pinion, pinion
cover, depth gauge, and two
bolts with hand knobs.
There is also an optional
blade cover available. This
Headpiece assembly is
quickly removable, and may
be disassembled without
tools. This assembly is fully
cleanable.
COMPANY CONFIDENTIAL
Operating Bettcher Industries, Inc. Whizard® Power Knife Manual
Instructions Rev. January 29, 2016
Page 5
SECTION 7.0 Instructions For Operation (continued)
2. The Motor Unit. This
consists of the motor in a
handle-shaped housing, the
drive adapter with a
replaceable finned driver, the
cap/switch assembly with
power cable, and the switch
lever.
3. The Power Supply. The
Power Supply converts
normal grounded AC line
voltage to low-voltage DC
for the motor.
Each component assembly will be covered fully in the sections which follow.
The Power Knife incorporates a safety trigger to minimize accidental starting. TO START,
hold the tool in your operating hand. Use your other hand to push the end of the lever
forward, and simultaneously squeeze the lever with your operating hand. TO SHUT OFF,
simply release the lever.
The tool may be used in either hand.
COMPANY CONFIDENTIAL

Operating Bettcher Industries, Inc. Whizard® Power Knife Manual
Instructions Rev. January 29, 2016
Page 6
SECTION 7.0 Instructions For Operation (continued)
To slice meat, START the Power Knife and hold it against the meat with the handle
horizontal (see illustration). Apply a slight cutting pressure and move the knife up (or down)
the meat, as you prefer. Cutting is always done with the trailing edge of the blade- i.e., if
you use a down-stroke, the top half of the blade is cutting. Conversely, on an up-stroke, the
bottom half of the blade is cutting. (Refer to the illustration) Near the bottom of the cone, it
is necessary to use an up-stroke to trim as close as possible to the cone support plate.
The strips of meat will drop from between the blade and the depth gauge as they are cut.
Note: The Power Knife will not cut properly without its depth gauge in place.
UP STROKE
DOWN
STROKE
COMPANY CONFIDENTIAL

Operating Bettcher Industries, Inc. Whizard® Power Knife Manual
Instructions Rev. January 29, 2016
Page 7
7.1 Fault Detection And Correction
Problem
Probable Cause
Remedy
Motor unit will not run
No power to unit
Check power at outlet -
Correct as needed Check
fuse in Power Supply -
Replace if necessary
Defective motor
Replace
Motor hums, but blade
does not turn
Grease buildup in blade,
housing, or pinion
Clean and reassemble
Blade tight in housing or
worn
Re-adjust housing
Motor runs, but blade
does not turn
Drive pinion worn or
damaged
Replace
Finned driver sheared or
worn
Replace
Tool vibrates excessively
Grease buildup in blade,
housing, or pinion
Clean and reassemble
Blade tight in housing
Re-adjust housing
Worn pinion
Replace
Worn blade
Replace
Worn blade housing
Replace
Tool runs hot
Blade tight in housing
Re-adjust housing
Grease buildup
Clean and reassemble
Tool does not cut
properly
Dull blade
Sharpen and re-steel blade
Depth gauge improperly
adjusted
Re-adjust depth gauge
COMPANY CONFIDENTIAL

Operating Bettcher Industries, Inc. Whizard® Power Knife Manual
Instructions Rev. January 29, 2016
Page 8
SECTION 8.0 Maintenance
This tool is easily disassembled for cleaning without the use of tools. For best
operation, the Power Knife must be kept clean and sharp.
8.1 Headpiece Assembly
WARNING:
The cutting edge of this blade is VERY SHARP! Handle with care!
Note: The use of cut-resistant gloves is recommended
when handling the blade.
Adjusting the Depth Gauge
This operation is to be performed with the POWER OFF.
The Power Knife is adjustable for
depth of cut by moving the depth
gauge up or down. Two types of
depth gauges are available for the
Power Knife. The regular depth
gauge is shown in the top
illustration. When using the
optional blade cover a short-style
gauge must be used. Both types of
gauges are adjusted the same way.
To adjust, loosen the two knobs
and slide depth gauge UP for
thicker cuts, or DOWN for thinner
cuts. For normal cuts, a setting
where the bottom of the depth
gauge is even with the bottom of
the blade is correct.
Re-tighten the knobs. Do not over-
tighten.
COMPANY CONFIDENTIAL

Operating Bettcher Industries, Inc. Whizard® Power Knife Manual
Instructions Rev. January 29, 2016
Page 9
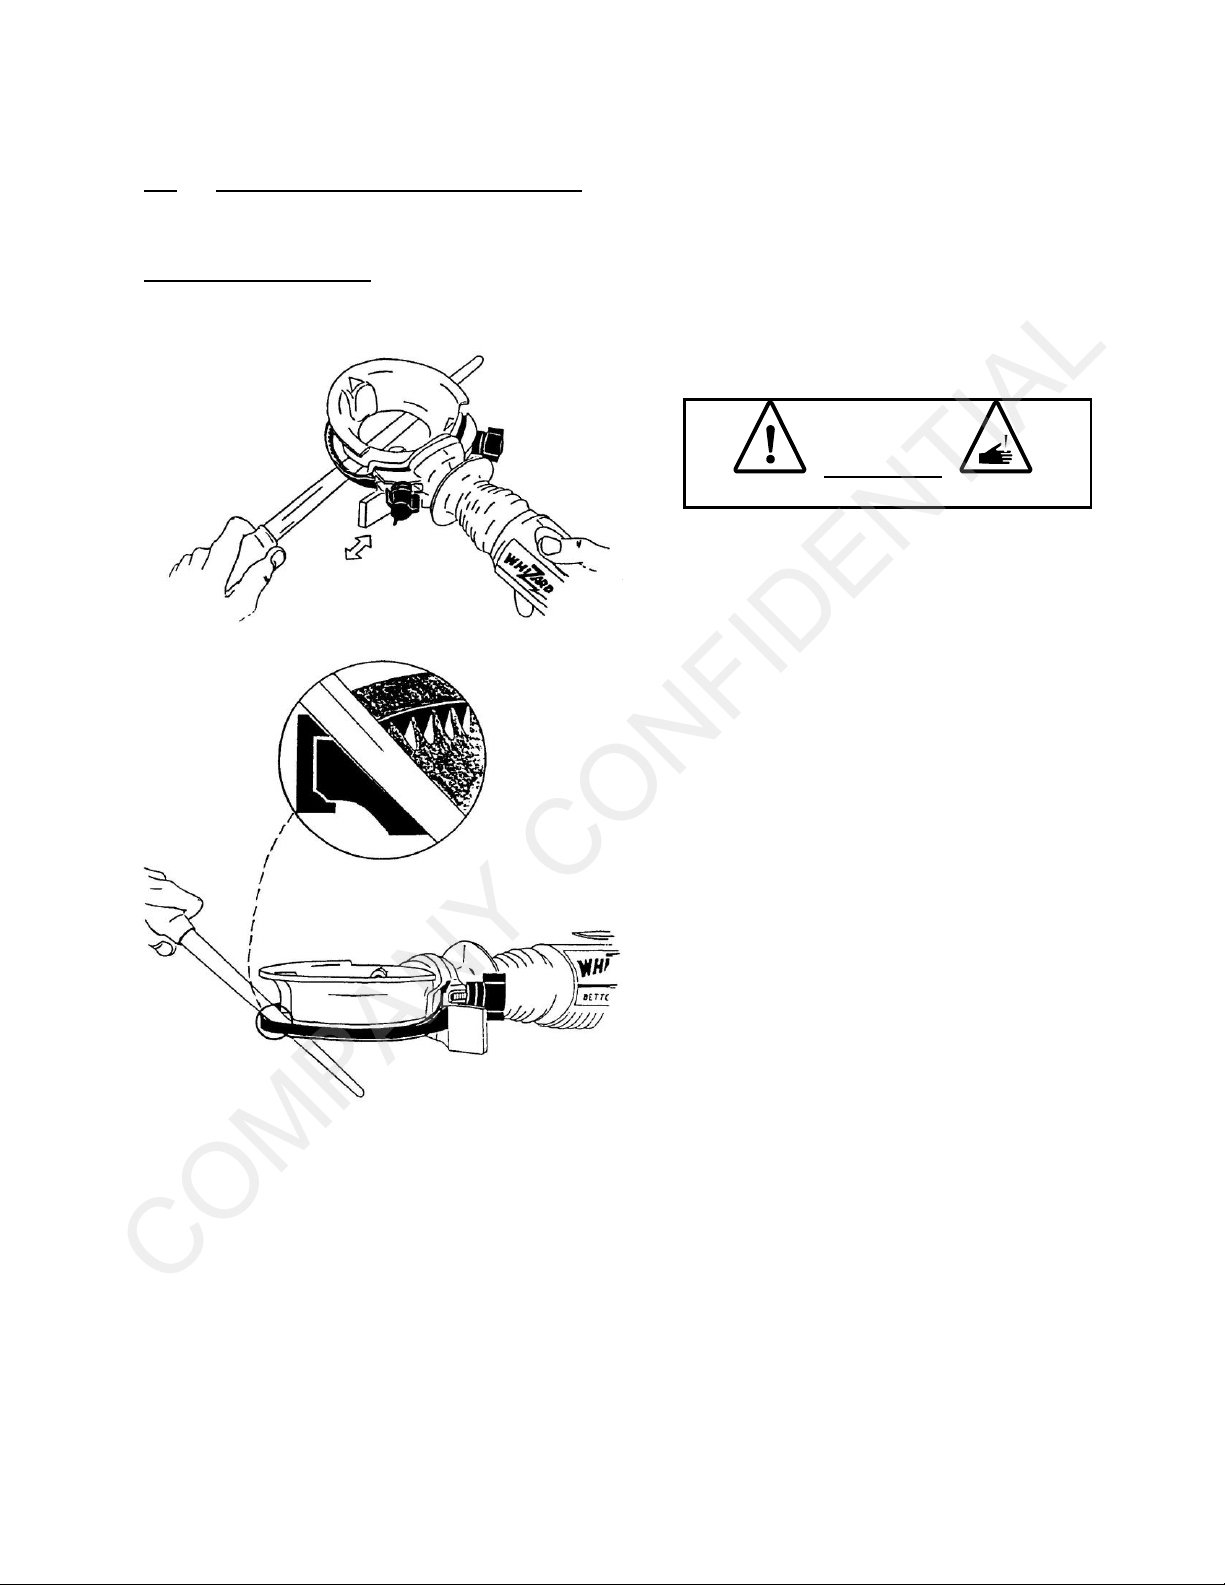
8.1 Headpiece Assembly (continued)
Adjusting the Blade Housing
IMPORTANT: During normal
operation, it may be necessary to
periodically loosen and re-tighten
the knobs ONE AT A TIME with
the tool running to allow the
blade to reposition itself within
its housing.
BE CAREFUL! Keep your
hands away from the moving
blade edge.
If the depth gauge is allowed to
move, it must be readjusted as
described.
Blade Maintenance
A sharpening stone and a Bettcher "steel" are
provided with your Power Knife to help you
maintain a good cutting edge, as a sharp
blade requires less effort to cut and gives
better results. When sharpening or steeling
the blade, move the depth gauge up enough
to expose the blade edge. Re-adjust after
sharpening.
STEELING the blade hones the edge to razor
sharpness. This should be done frequently.
However, when the blade edge becomes
nicked and dull and can no longer be brought
to a sharp condition, it is necessary to
SHARPEN the blade using the stone
provided. Sharpening actually removes some
of the blade material to repair the blade edge.
Clean tool thoroughly after sharpening.
COMPANY CONFIDENTIAL
Operating Bettcher Industries, Inc. Whizard® Power Knife Manual
Instructions Rev. January 29, 2016
Page 10
8.1 Headpiece Assembly (continued)
STEELING the Blade
CAUTION:
Sharp Blade Cut Hazard
Hold Power Knife in your operating
hand and START tool.
Holding steeling rod horizontal with
your other hand, lay knife flat on the
steel and move it lightly back and forth
across steel several times. Next place
the end of the steeling rod down
through the notch in the depth gauge
and lightly touch the inside surface of
the blade to `raise' the edge for better
cutting. The notch helps to hold the
steel at the proper angle to the blade
edge to prevent "rounding off" or
rolling the edge.
Clean tool thoroughly after sharpening.
COMPANY CONFIDENTIAL

Operating Bettcher Industries, Inc. Whizard® Power Knife Manual
Instructions Rev. January 29, 2016
Page 11
8.1 Headpiece Assembly (continued)
SHARPENING the Blade
CAUTION:
Sharp Blade Cut Hazard
Before sharpening, clean the Power Knife
according to the instructions in Section 9.0.
Reassemble the tool.
Place the sharpening stone on a soft, non-
skid surface such as a folded rag or paper
towel.
Turn power ON.
Carefully lower the blade down against the stone. DO NOT get your fingers near the revolving blade, as it is
extremely sharp. Keep the blade level and parallel with the stone. Hold the blade against the stone while
moving it lightly back and forth. Do this just long enough to make the bottom surface of the blade smooth and
flat.
After sharpening is complete, steel the blade following the instructions. Clean Headpiece thoroughly after
sharpening to remove all abrasive dust, following the instructions given. NOTE: Both serrated-edge blades
and straight- edge blades are sharpened and steeled in the same manner.
Blades may also be returned to Bettcher Industries for sharpening, using the small shipping box included with
your Power Knife. There is a fee for this service.
8.2 Motor Unit
Routine Service There are no adjustments on the Motor
Unit.
The finned driver is removable. The
handle has a slot at one end as shown to
allow access to the setscrew. Loosen the
setscrew and remove the driver. When
replacing the driver, make sure the fins are
seated properly in the metal adapter before
tightening the setscrew. Do not over tighten
the setscrew as it can damage the plastic
driver. A drop of nail polish or threadlocker
may be applied to the threads to prevent
loosening. The setscrew should be checked
periodically, as well as the condition of the
driver.
IMPORTANT: The Motor Unit is not
waterproof. DO NOT IMMERSE IT IN
WATER! Damage to the motor could
result.
COMPANY CONFIDENTIAL

Operating Bettcher Industries, Inc. Whizard® Power Knife Manual
Instructions Rev. January 29, 2016
Page 12
8.3 Power Supply
Maintenance
WARNING:
Risk Of Shock Hazard - Disconnect From Line Voltage Before Servicing.
There is no regularly-scheduled maintenance required on the Power Supply.
Changing the Fuse
Risk of shock hazard.
Disconnect from line voltage
before servicing.
The Power Supply is protected
by a 5-ampere slow-blow fuse.
This fuse is located inside the
power-supply enclosure
To change the fuse, remove the
cover by loosening the four
captive screws. The fuse is
located in a holder at the top of
the controller board. Remove it
carefully, and replace it with the
proper 5-ampere slow-blow fuse.
Re-install cover. Ensure gasket
is properly seated.
COMPANY CONFIDENTIAL

Operating Bettcher Industries, Inc. Whizard® Power Knife Manual
Instructions Rev. January 29, 2016
Page 13
SECTION 9.0 Cleaning
9.1 Cleaning the Headpiece Assembly
IMPORTANT: For all cleaning operations, Power Knife MUST be disconnected from the power
supply. BE CAREFUL when handling the sharp blade.
To remove the Headpiece Assembly from the Motor Unit,
hold the Motor Unit in one hand and rotate the Headpiece
Assembly one quarter-turn counterclockwise with the other
hand. Then withdraw it from the end of the Motor Unit.
To take Headpiece Assembly apart for cleaning or for
maintenance, remove the two knobs and bolts. All parts can
now be removed from the frame.
The drive pinion may be removed now.
CAUTION: Handle blade carefully, as the inner edge is SHARP!
To remove the blade from the blade housing, place
housing on table with blade edge down. Spread housing
open and lift away from blade.
Clean all parts using a mild detergent solution. A scrub
brush is useful for cleaning the gear teeth on both the
blade and the drive pinion, and for inside the blade
housing.
NOTE: DO NOT use cleaners which contain lemon oils,
as they may damage the finish of your tool
Examine all parts for wear or breakage. Replace as necessary. A shipping box has been included as part
of the Power Knife kit in which to send parts for replacement.
Reassemble in reverse order, making sure blade is free to rotate in the blade housing and meshes
properly with teeth on drive pinion.
Re-adjust depth gauge setting and re-adjust blade housing following instructions given.
COMPANY CONFIDENTIAL

Operating Bettcher Industries, Inc. Whizard® Power Knife Manual
Instructions Rev. January 29, 2016
Page 14
9.2 Cleaning the Motor Unit
The motor unit may be cleaned with soap and water. Do not submerge Motor Unit in water.
Damage to the motor will result. Unplug the Motor Unit when cleaning or servicing.
9.3 Cleaning the Power Supply
WARNING:
Risk Of Shock Hazard - Disconnect From Line Voltage Before Servicing.
Risk of shock hazard. Disconnect from line voltage before servicing. The Power Supply
enclosure may be wiped clean, but do not submerge unit in water. Damage to the Power
Supply will result.
9.4 Daily Cleaning
For cleaning, the lever may be taken
off by removing the two shoulder
screws. The flat spring may be
removed from its stud. Do not
remove the other screws. The strain
relief may also be unscrewed for
cleaning. When reassembling, the
hole in the flat spring fits on the
molded stud and its other end is
captured by the tab at the end of the
lever.
BETTCHER INDUSTRIES, INC. PROUDLY
MANUFACTURES QUALITY PARTS FOR YOUR
BETTCHER EQUIPMENT. FOR OPTIMUM
PERFORMANCE OF YOUR BETTCHER EQUIPMENT, USE
ONLY PARTS MANUFACTURED BY
BETTCHER INDUSTRIES, INC.
COMPANY CONFIDENTIAL

Operating Bettcher Industries, Inc. Whizard® Power Knife Manual
Instructions Rev. January 29, 2016
Page 15
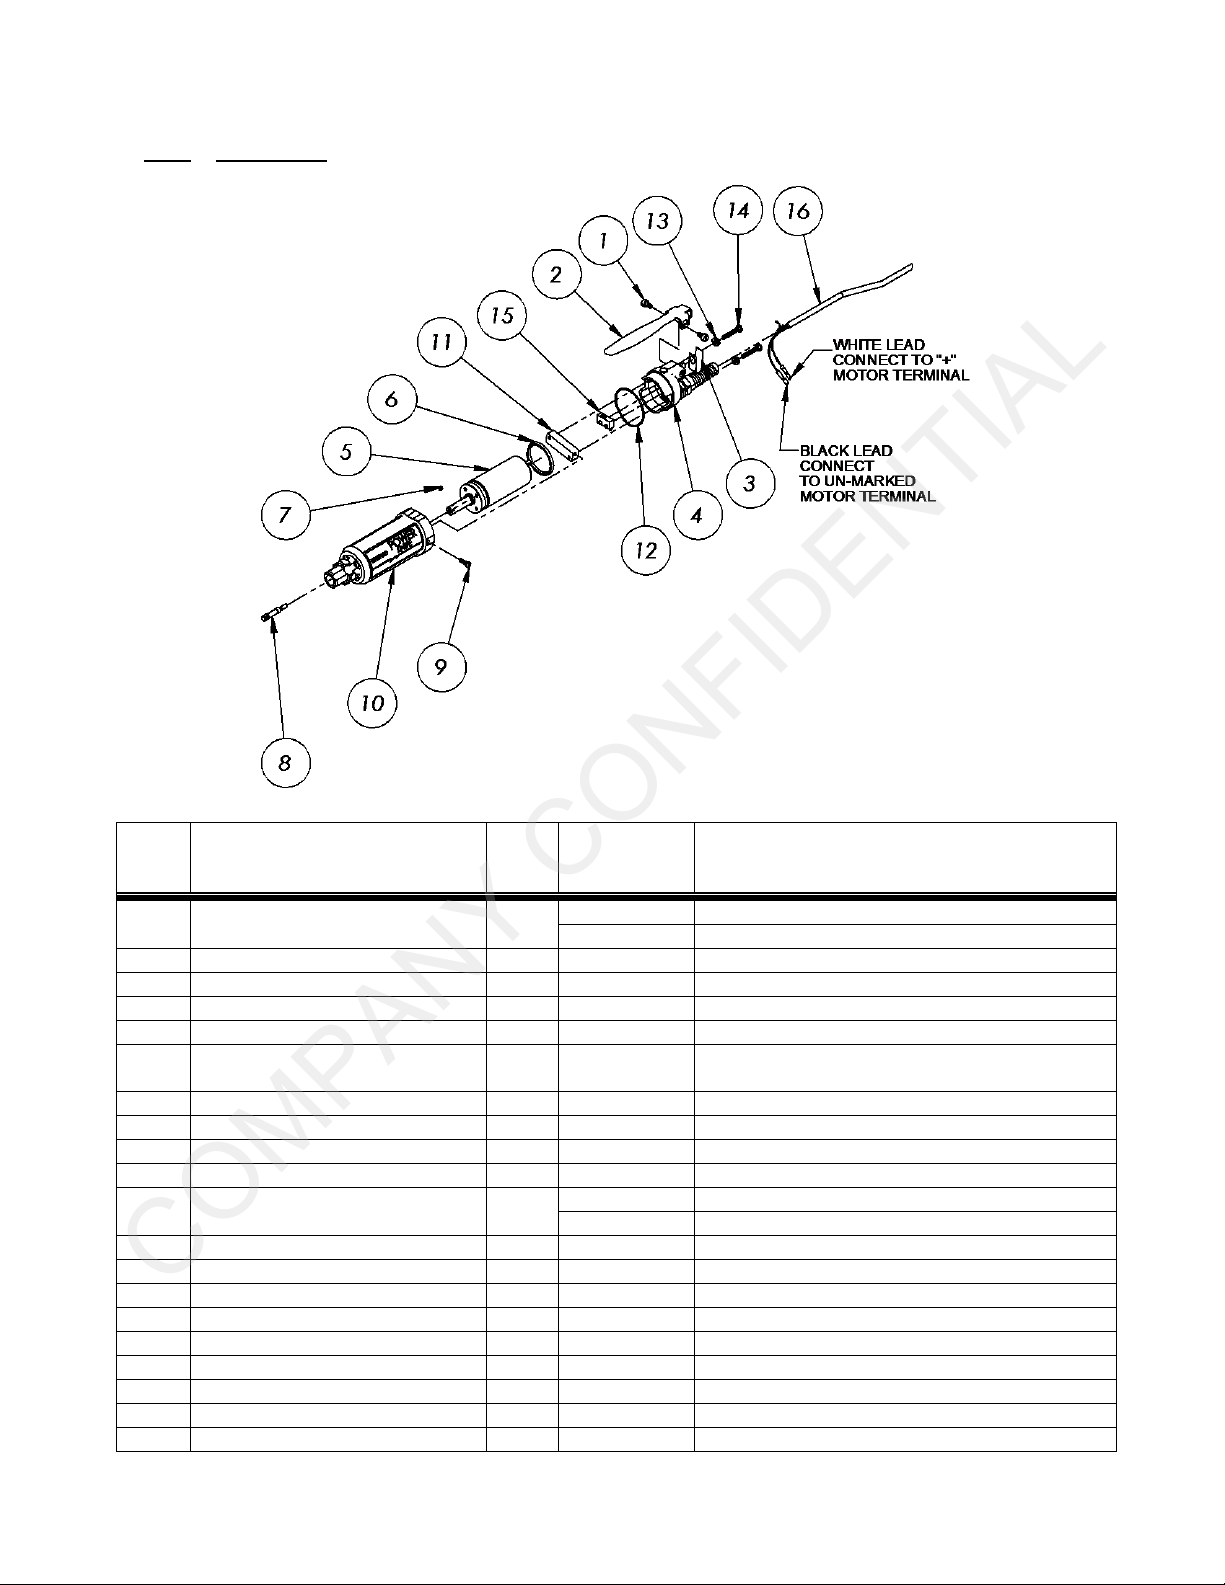
SECTION 10.0 Spare Parts List
10.1 Headpiece Assembly
Item
Part
Description
Qty
115V
Model
109001
115V
Model with
Serrated
Blade
109289
220-240V
Model
109002
Notes
Head Assembly
109053
109288
----------
Includes items 1 - 8
----------
----------
109072
Includes items 1 –7, 9,10
1
Frame Assembly
1
109049
109049
109049
2
Drive Pinion
1
109227
109227
109227
3
Blade –Standard
1
109059
----------
----------
Blade –Serrated
1
----------
109287
109117
4
Blade Housing
1
109058
109058
109073
5
Pinion Cover
1
109057
109057
109057
6
Bolt
2
122727
122727
122727
7
Handpiece Knob
2
122297
122297
122297
8
Depth Gauge –Regular
1
109082
109082
9
Depth Gauge –Short R/H
1
----------
----------
109120
Use with 109121 R/H Blade Cover
Depth Gauge –Short L/H
1
----------
----------
109143
(Option) requires 109142
L/H Blade Cover
10
Blade Cover –R/H
1
----------
----------
109121
Requires 109120 R/H
Depth Gauge
Blade Cover –L/H
1
----------
----------
109142
(Option) requires 109143
L/H Depth Gauge
COMPANY CONFIDENTIAL
Operating Bettcher Industries, Inc. Whizard® Power Knife Manual
Instructions Rev. January 29, 2016
Page 16
10.2 Motor Unit
Item
Part
Description
Qty
(Both
Models)
Part Number
Notes
Motor Unit Complete
109154
Includes items 1 - 5
109161
Canadian Only
1
Shoulder Screw
2
109076
2
Switch Lever
1
109022
3
Flat Spring
1
109077
4
Cap/Switch Assembly
1
109268
5
Motor Replacement Kit
1
109141
Includes Motor Assembly plus items 6-9 and 12-
14.
6
Motor Support Ring
1
109266
7
Set Screw
1
123111
8
Finned Driver
1
109259
9
#6 Self-Sealing Screw
6
123277
10
Handle Assembly
1
109271
109278
Canada Only
11
Plate
1
109265
12
O-ring
1
122488
13
#8 Sealing Washer
2
122487
14
#8 Sealing Screw
2
123278
--
6 foot Extension Cable
1
109128
Optional
--
Tool Holder Kit
1
109164
Optional
--
Cap/Handle Replacement Kit
1
109279
Optional
15
Switch
1
124802
16
Cable
1
109027
COMPANY CONFIDENTIAL
This manual suits for next models
2
Table of contents
Languages:


