Better Homes and Gardens BHS23619315319R User manual

Better
Homes
&
Gardens®
iz2
INSTRUCTION
MANUAL
Pedestal
Fan
Model:
BHS23619315319R
1lI!1N{
ii
I/1
/t`
READ
AND
SAVE
THESE
INSTRUCTIONS
Attention:
Pictures
in
the
IM
are
for
reference
only.

IMPORTANT
SAFETY
INSTRUCTIONS
CAUTION
Read
Rules
for
Safe
Operation
and
Instructions
Carefully.
WARNING
1.
Do
not
leave
the
fan
running
unattended.
2.
This
appliance
should
not
be
used
by
children.
To
avoid
possible
accidental
injury,
close
supervision
is
necessary
when
any
appliance
is
used
by
or
near children
or
individuals
with
certain
disabilities.
3.This
appliance
has
a
polarized
plug
(one
blade
is
wider
than
the
other).
To
reduce
the
risk
of
electric
shock,
this
plug
is
intended
to
fit
in
a
polarized
outlet
only
one
way.
If
the
plug
does
not
fit
fully
in
the
outlet,
reverse
the
plug.
If
it
still
does
not
fit,
contact
a
qualified
electrician.
Do
not
attempt
to
defeat
this
safety
feature.
4.
Do
not
operate
any
appliance
with
a
damaged
cord
or
plug
or
after
the
appliance
malfunctions,
or
is
dropped
or
damaged
in
any
manner.
Return
appliance
to
the
nearest
authorized
service
facility
for
examination,
repair
or
electrical
or
mechanical
adjustment.
5.
When
the
fan
is
assembled,
the
rotor
blade
guard
should
not
be
removed.
-
Prior
cleaning
unplug
the
fan.
-
The
rotor
guard
should
not
be
dissembled/opened
to
clean
the
rotor
blades.
-
Wipe
the
fan
enclosure
and
rotor
blade
guard
with
a
slightly
damp
cloth.
1

6.
WARNING
—When
using
electrical
appliances,
basic
precautions
should
always
be
followed
to
reduce
the
risk
of
fire,
electric
shock,
and
injury
to
persons.
7.This
product
employs
overload
protection
(fuse).
A
blown
fuse
indicates
an
overload
or
short-circuit
situation.
If
the
fuse
blows,
unplug
the
product
from
theoutlet.
Replace
the
fuse
as
per
the
user
servicing
instructions
(follow
product
marking
for
proper
fuse
rating)
and
check
the
product.
If
the
replacement
fuse
blows,
a
short-circuit
may
be
present
and
the
product
should
be
discarded
or
returned
to
an
authorized
service
facility
for
examination
and/or
repair.
a)
"Do
not
operate
any
fan
with
a
damaged
cord
or
plug.
Discard
fan
or
return
to
an
authorized
service
facility
for
examination
and/or
repair."
b)
"Do
not
run
cord
under
carpeting.
Do
not
cover
cord
with
throw
rugs,
runners,
or
similar
coverings.
Do
not
route
cord
under
furniture
or
appliances.
Arrange
cord
away
from
traffic
area
and
where
it
will
not
be
tripped
over."
8.
WARNING
-
To
reduce
the
risk
of
fire
or
electric
shock,
Do
not
use
this
fan
with
any
solid-state
speed
control
device.
2

INSTALLATION
INSTRUCTIONS
■
Parts
and
Features
Prior
to
installation,
please
remove
the
spinner
and
plastic
nut
Plastic
nut
from
the
motor
head
Motor
Supply
cord
Cross
stand
Column
I
n
fastening
v
knob
Spinner
Rear
grill
Operation
Interfa
Right-angle
bolt
Pole
Front
grill
Lock
nut
of
blade
•
Lock
nut
of
blade
anticlockwise,
and
then
install
the
front
fan
cover.
Blade
•
Pull
the
blade
to
rotate
after
installing,
so
as
to
ensure
that
the
blade
can
be
normally
rotated.
Lock
nut
of
grill
•
Screw
the
lock
nut
of
grill
clockwise,
and
in
the
meantime,
fix
the
rear
grill.
3

Front
and
Rear
Guard
Installation
I
g
Guard
Catch
3
3
1
1
•
•
-
Align
Catch
of
the
Front
Guard
with
the
illustrated
position
of
the
Rear
Guard.
Press
guards
sequentially
with
both
hands.
Self
-Catch
Installation.
Cross
Stand
Installation
0
"
Iuo
e
Align
the
initial
position
of
the
arrow
on
the
cross
stand
with
the
direction
of
the
operation
interface,
and
then
tighten
it
clockwise
The
tightening
state
is
that
the
arrow
on
the
cross
stand
aligns
with
the
horizontal
line
on
the
fan
body,
as
shown
in
the
drawing
Insert
the
pole
into
the
cross
stand
and
tighten
the
column
fastening
knob
4

INSTRUCTIONS
FOR
USE
■
Remote
Control
Operation
U
On/off
button
Q
Oscillating
button
O+
+"
button
O
='
button
Q
Timer
button
9
Sleep
mode
button
Q
Max
speed
button
U'
On/off
button:
Press
it
once,
the
fan
will
turn
on
and
press
it
again
to
shutoff.
63
Oscillating
button:
Oscillating
Function:
After
the
fan
starts,
short
press
the
button
once
to
start
oscillation.
Press
the
button
again
to
stop
it
in
the
desired
direction.
63
Timer
button
Setting
a
Starting
Time:
Plug
in
the
unit.
Press
the
timer
button
when
the
fan
is
off
to
activate
the
auto
on
timer.
Then
press
the
0
to
select
desired
time
from
"1
to
12
hours"
with
an
increment
of
1
(The
desired
timer
could
also
be
increased
or
decreased
by
pressing
button
of
"+"
and
"-".).When
the
set
time
number
on
screen
switches
to
speed
number,
and
switches
again
to
the
desired
time
number,
the
desired
auto
-start
time
is
set
up.Then
a
clock
signal
will
be
on
display.
Then
the
fan
will
turn
on
automatically
after
the
desired
time
is
set.
Setting
a
Stopping
Time:
After
turning
on
the
fan,
press
the
timer
button.
Then
press
the
U
to
select
time
from
"1
to
12
hours"
with
an
increment
of
1
(The
desired
timer
could
also
be
increased
or
decreased
by
pressing
button
of
"+"
and
"-".)
When
the
set
time
number
on
screen
switches
to
speed
number,
the
desired
stopping
time
is
set
up.
Then
the
fan
will
turn
off
automatically
after
the
desired
time
is
set.
Wind
speed
setting:
Press
the
63
,
and
wind
speed
will
change
according
to:
shifts
of
1-2-3-4-..
.-12
;
press®
to
change
the
wind
speed
12-...-3-2-1.
Q
Sleep
mode
button
Press
(3
button,
the
fan
will
run
at
the
lowest
speed
which
is
recommend
for
a
good
night
sleep.
Max
speed
button
Press
(3
button,
the
fan
will
run
at
the
highest
speed.
5

BATTERIES
INSTRUCTIONS
(Not
Included)
2
x
AAA batteries
are
not
include.
1.
Do
not
dispose
of
batteries
in
fire,
batteries
may
explode
or
leak.
2.
Do
not
mix
old
and
new
batteries.
3.
Do
not
mix
alkaline,
standard
(carbon
-zinc)
or
rechargeable
(nickel
-cadmium)
batteries.
4.
Non
-rechargeable
batteries
are
not
to
be
recharged.
5.
Batteries
are
to
be
inserted
with
the
correct
polarity.
6.
Remove
batteries
when
exhausted
or
when
storing
product
to
prevent
damage.
7.
Batteries
must
be
removed
from
the
remote
controller
before
disposal
and
disposed
of
per
local
regulations.
Remote
Control
Holder
There
is
a
remote
control
holder
in
the
package.
Consumer
may
assemble
onto
the
rear
of
the
fan
pole
as
pictured
below.
6
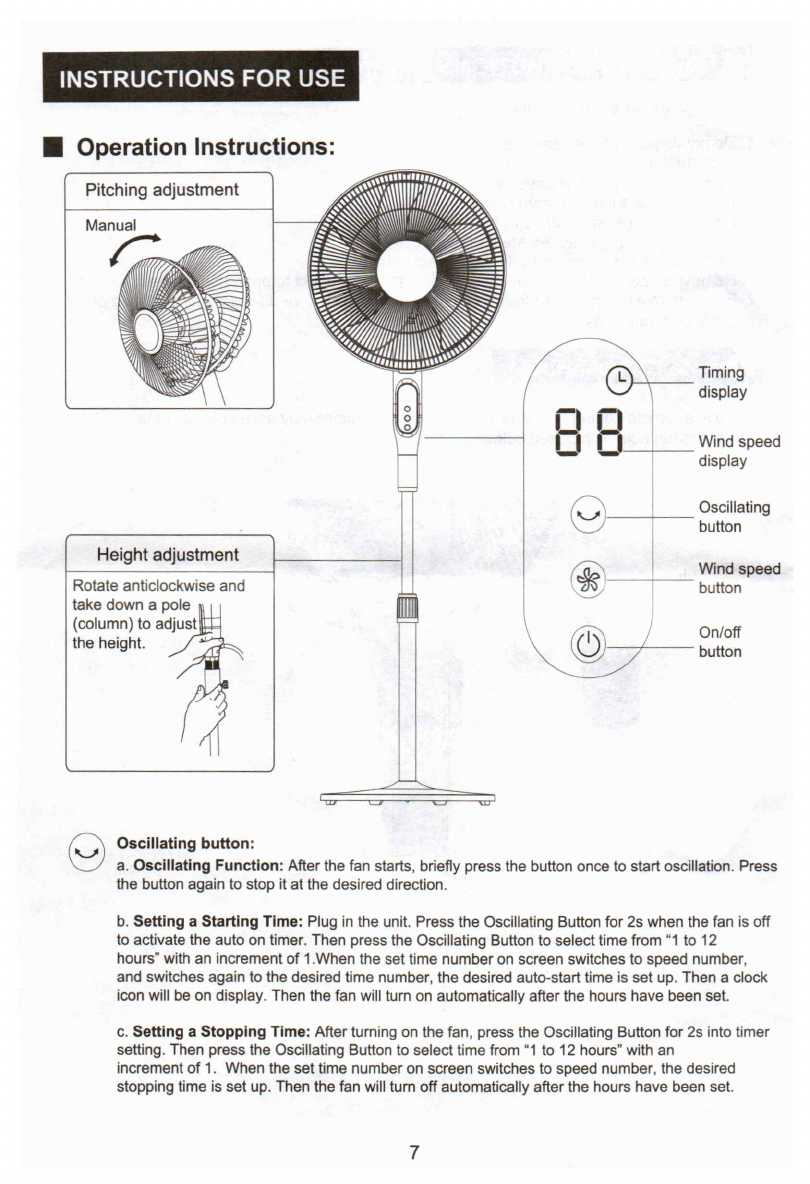
INSTRUCTIONS
FOR
USE
■
Operation
Instructions:
Pitching
adjustment
Height
adjustment
Rotate
anticlockwise
and
take
down
a
pole
(column)
to
adjust
the
height.
p. ,
BB
O
Timing
display
Wind
speed
display
Oscillating
button
Wind
speed
button
On/off
button
Oscillating
button:
a.
Oscillating
Function:
After
the
fan
starts,
briefly
press
the
button
once
to
start
oscillation.
Press
the
button
again
to
stop
it
at
the
desired
direction.
b.
Setting
a
Starting
Time:
Plug
in
the
unit.
Press
the
Oscillating
Button
for
2s
when
the
fan
is
off
to
activate
the
auto
on
timer.
Then
press
the
Oscillating
Button
to
select
time
from
"1
to
12
hours"
with
an
increment
of
1.When
the
set
time
number
on
screen
switches
to
speed
number,
and
switches
again
to
the
desired
time
number,
the
desired
auto
-start
time
is
set
up.
Then
a
clock
icon
will
be
on
display.
Then
the
fan
will
turn
on
automatically
after
the
hours
have
been
set.
c.
Setting
a
Stopping
Time:
After
turning
on
the
fan,
press
the
Oscillating
Button
for
2s
into
timer
setting.
Then
press
the
Oscillating
Button
to
select
time
from
"1
to
12
hours"
with
an
increment
of
1.
When
the
set
time
number
on
screen
switches
to
speed
number,
the
desired
stopping
time
is
set
up.
Then
the
fan
will
turn
off
automatically
after
the
hours
have
been
set.
7

Wind
speed
button:
Short
press
the
wind
speed
button,
and
wind
speed
will
change
according
to:
shifts
of
01-02-03-04-...-12;
press
the
wind
speed
button
for
a
long
time
to
realize
quick
adjustment
of
wind
speed
U
On/Off
button:
Press
it
once,
the
fan
will
turn
on
and
press
it
again
to
shut
off.
USER
SERVICING
INSTRUCTIONS
a)
Grasp
plug
and
remove
from
the
receptacle
or
other
outlet
device.
Do
not
unplug
by
pulling
on
cord.
b)
Open
fuse
cover.
Slide
open
fuse
access
cover
on
top
of
attachment
plug
towards
blades.
C)
Remove
fuse
carefully.
Insert
the
tip
of
your
tool
into
fuse
slot
(close
with
the
terminal),
then
prize
the
fuse
gradually
and
slowly,
but
not
overexert.
If
you
feel
tight,
you
can
try
it
at
several
times
and
prize
the
fuse
little
by
little.
When
one
side
of
the
fuse
has
been
prized,
then
you
can
get
the
fuse
out
entirely.
d)
Risk
of
fire.
Replace
fuse
only
with
2.5
Amp,
125
Volt
fuse.
e)
Close
fuse
cover.
Slide
closed
the
fuse
access
cover
on
top
of
attachment
plug.
f)
Risk
of
fire.
Do
not
replace
attachment
plug.
Contains
a
safety
device
(fuse)
that
should
not
be
removed.
Discard
product
if
the
attachment
plug
is
damaged.
Notice:
1.
When
you
replace
the
fuse,
please
don't
operate
suddenly
or
overexert,
or
else
the
product
will
be
damage
or
cause
accident.
2.
When
you
feel
it
hard
to
be
operated,
please
make
sure
you
have
got
the
right
way.
WARNINGS:
1.
Never
insert
fingers,
pencils,
or
any
other
object
through
the
grille
when
fan
is
running.
2.
Disconnect
fan
when
moving
from
one
location
to
another.
3.
Be
sure
fan
is
on
a
stable
surface
when
operating
to
avoid
overturning.
4.
DO
NOT
use
fan
in
window,
rain
may
create
electrical
hazard.
5.
Household
use
only.
CLEANING
•
Be
sure
your
fan
is
in
the
OFF
position.
•
Unplug
the
fan
before
cleaning.
• Use
only
a
soft,
damp
cloth
to
gently
wipe
the
fan
clean.
•
DO
NOT
immerse
the
fan
in
water
and
never
allow
water
to
enter
the
Motor
Housing.
•
DO
NOT
use
gasoline,
paint
thinner
or
other
chemicals
to
clean
the
fan.
•
Removal
of
the
Front
Grille
for
Cleaning
•
Gently
wipe
the
Fan
Blade
and
Grilles
with
a
soft,
damp
cloth.
•
Assemble
the
fan
by
following
the
last
three
steps
in
the
ASSEMBLY
INSTRUCTIONS.
8
SERVICE
&
SUPPORT
In
the
event
of
a
warranty
claim
or
if
service
is
required
for
this
fan,
please
contact
us
at
the
following:
Toll
Free:
1-866-646-4332
For
questions
or
comments,
please
write
to:
Midea
America
Corp.
5
Sylvan
Way,
Suite
100
Parsippany,
NJ
07054
Phone:
866
646
4332
For
your
records,
staple
your
sales
receipt
to
this
manual
and
record
the
following:
DATE
OF
PURCHASE:
PLACE
OF
PURCHASE:
(STAPLE
SALES
RECEIPT
HERE)
NOTE:
PROOF
OF
PURCHASE
IS
REQUIRED
FOR
ALL
WARRANTY
CLAIMS
9

ONE
1
YEAR
LIMITED
WARRANTY
•
Please
read
all
instructions
before
attempting
to
use
this
product.
Midea
America
Corporation
warrants
as
limited
herein
to
the
original
purchaser
of
retail
that
each
new
Fan,shall
be
free
of
defects
in
material
and
workmanship
for
a
period
of
one
(1)
year
from
the
date
of
original
purchase.
This
one
(1)
year
warranty
is
limited
to
the
Motor
and
Electric
Element.
In
the
event
of
malfunctions
or
failure
of
your
Fan,
simply
deliver
or
send
the
Fan,
postage
prepaid
along
with
PROOF
OF
PURCHASE,within
the
warranty
period
of
one
(1)
year,
to
Midea
America
Corporation.Midea
America
Corporation
reserves
the
right
to
inspect
the
claimed
defective
part
or
parts
to
determine
if
the
defect
or
malfunction
complaint
is
covered
by
this
warranty.Midea
America
Corporation
shall,within
sixty(60)days
after
receipt
of
the
product,
at
its
option,repair
and/or
replace
the
defective
part
or
parts
free
of
charge.This
warranty
shall
only
cover
defect
arising
from
normal
usage.
Midea
America
Corporation
assumes
no
responsibility
whatsoever
if
the
Fan
should
fail
during
the
warranty
period
by
reason
of:
•
Misuse,
negligence,
physical
damage
or
accidents.
•
Lack
of
maintenance
(see
instructions
for
proper
maintenance).
•
Repair
by
any
unauthorized
party
during
the
warranty
period.
•
Damage
caused
by
connection
to
an
improper
input
voltage
(see
specification
label
on
your
Fan).
Midea
America
Corporation
makes
no
further
warranties
or
representations,express
or
implied
except
those
contained
herein.No
representative
or
dealer
is
authorized
to
assume
any
other
liability
regarding
the
Fan.The
duration
of
the
implied
warranty
granted
under
State
law,
including
warranties
of
merchantability
and
fitness
for
particular
purpose
are
limited
in
duration
should
the
duration
of
the
express
warranty
grant
it
hereunder.
Midea
America
Corporation
shall
in
no
event
be
liable
for
direct,
indirect,
special
or
consequential
damages.
Some
states
do
not
allow
limitations
on
how
long
an
implied
warranty
lasts,
and/or
the
above
limitations
or
exclusion
may
not
apply
to
you.
This
warranty
gives
you
specific
legal
rights
and
you
may
have
other
rights
which
vary
from
state
to
state.
10

Better
Homes&
Gardens®
MANUAL
DEL
PROPIETARIO
Ventilador
de
pedestal
Modelo:
BHS23619315319R
LEA
Y
GUARDE
ESTAS
INSTRUCCIONES
Atencion:
Las
imagenes
en
el
manual
de
instruccion
son
solo
de
referencia.

INSTRUCCIONES
DE
SEGURIDAD
IMPORTANTES
PRECAUCION
Lea
detenidamente
las
Reglas
de
operacion
segura
y
las
Instrucciones.
ADVERTENCIA
1.
No
deje
el
ventilador
desatendido
mientras
funciona.
2.
Este
aparato
no
debe
ser
utilizado
por
ninos.
Para
evitar
posibles
lesiones
accidentales,
se
debe
supervisar
cualquier
aparato
que
sea
utilizado
por
o
este
cerca
de
ninos
o
personas
con
determinadas
discapacidades.
3.
Este
artefacto
tiene
un
enchufe
polarizado (un
contacto
es
mas
ancho
que
el
otro).
Para
reducir
el
riesgo
de
una
descarga
electrica,
este
enchufe
esta
disenado
para
entrar
en
un
tomacorriente
polarizado
de
una
sofa
manera.
Si
el
enchufe
no
entra
por
completo
en
el
tomacorriente,
invierta
el
enchufe.
Si
aun
asi
no
entra,
pongase
en
contacto
con
un
electricista
calificado.
No
omita
esta
recomendacion
de
seguridad.
4.
No
utilice
el
artefacto
si
el
cable
o
el
enchufe
estan
danados,
si
el
artefacto
no
funciona
correctamente
o
Si
se
ha
caido
0
danado
de
alguna
manera.
Devuelva
el
artefacto
al centro
de
servicio
autorizado
mas
cercano
para
su
revision,
reparacion
o
ajuste
electrico
o
mecanico.
5.
Una
vez
armado
el
ventilador,
no
debe
retirar
nunca
el
protector
del
rotor.
-
Antes
de
limpiar
el
ventilador,
debe
desenchufarlo.
-
No
debe
retirar
ni
abrir
el
protector
del
rotor
para
limpiar
las
aspas.
-
Limpie
la
cubierta
del
ventilador
y
las
aspas
del
rotor
con
un
pano
ligeramente
humedecido.
1

6.
ADVERTENCIA—AI
usar
aparatos
electricos,
siempre
deben
seguirse
precauciones
basicas
para
reducir
el
riesgo
de
incendio,
descargas
electricas
y
lesiones
personales.
7.
Este
aparato
esta
protegido
contra
sobrecargas
(fusible).
Un
fusible
quemado
indica
una
situacion
de
sobrecarga
o
cortocircuito.
Si
el
fusible
se
quema,
desenchufe
el
aparato
del
tomacorriente.
Remplace
el
fusible
segun
las
instrucciones
(observe
la
placa
del
producto
para
el
voltaje
nominal)
y
revise
el
producto.
Si
el
fusible
nuevo
se
quema,
es
posible
que
el
aparato
tenga
un
cortocircuito,
por
to
que
debe
descarar
el
aparato
o
Ilevarlo
a
un
centro
de
servicio
autorizado
para
su
revision
y/o
reparacion.
a)
"No
opere
su
ventilador
con
el
cable
o
el
enchufe
danados.
Descarte
el
ventilador
o
Ilevelo
a
un
centro
de
servicio
autorizado
para
su
revision
y/o
reparacion."
b)
"No
coloque
el
cable
debajo
de
alfombras.
No
cubra
el
cable
con
tapetes,
corredores
o
cubiertas
similares.
No
coloque
el
cable
debajo
de
muebles
o
electrodomesticos.
Despliegue
el
cable
.lejos
de
zonas
con
trafico
para
evitar
tropiezos."
8.
ADVERTENCIA:
Para
reducir
el
riesgo
de
incendios
o
descargas
electricas,
NO
use
este
ventilador
con
ningun
dispositivo
de
control
de
velocidad
de
estado
solido.
2

INSTRUCCIONES
DE
INSTALACION
■
Partes
y
caracteristicas
Antes
de
la
instalacibn,
por
favor
retire
la
perilla
y
la
tuerca
de
plastico
del
cabezal
del
motor
Motor
Cable
de
alimentaci6n
Puerto
de
conexibn
Fabricacion]
en
la
cual
Chasis
Tuerca
de
plastico
Aspas
Re
illa
posterior
Panel
de
Control
Polo
Cerrojo
en
angulo
recto
Retilla
frontal
Tuerca
de
bloqueo
de
las
aspas
•
contratuerca
de
la
hoja,
en
sentido
antihorario,
luego
instale
la
proteccion
delantera
Aspas
•
Instale
las
aspas
en
el
eje
hasta
que
el
pasador
de
retenci6n
encaje
en
la
muesca
de
las
aspas.
Tuerca
de
bloqueo
de
la
rejilla
•
Ajuste
en
sentido
horario
el
tornillo
en
la
tuerca
plastica
para
fijar
la
rejilla
posterior.
3
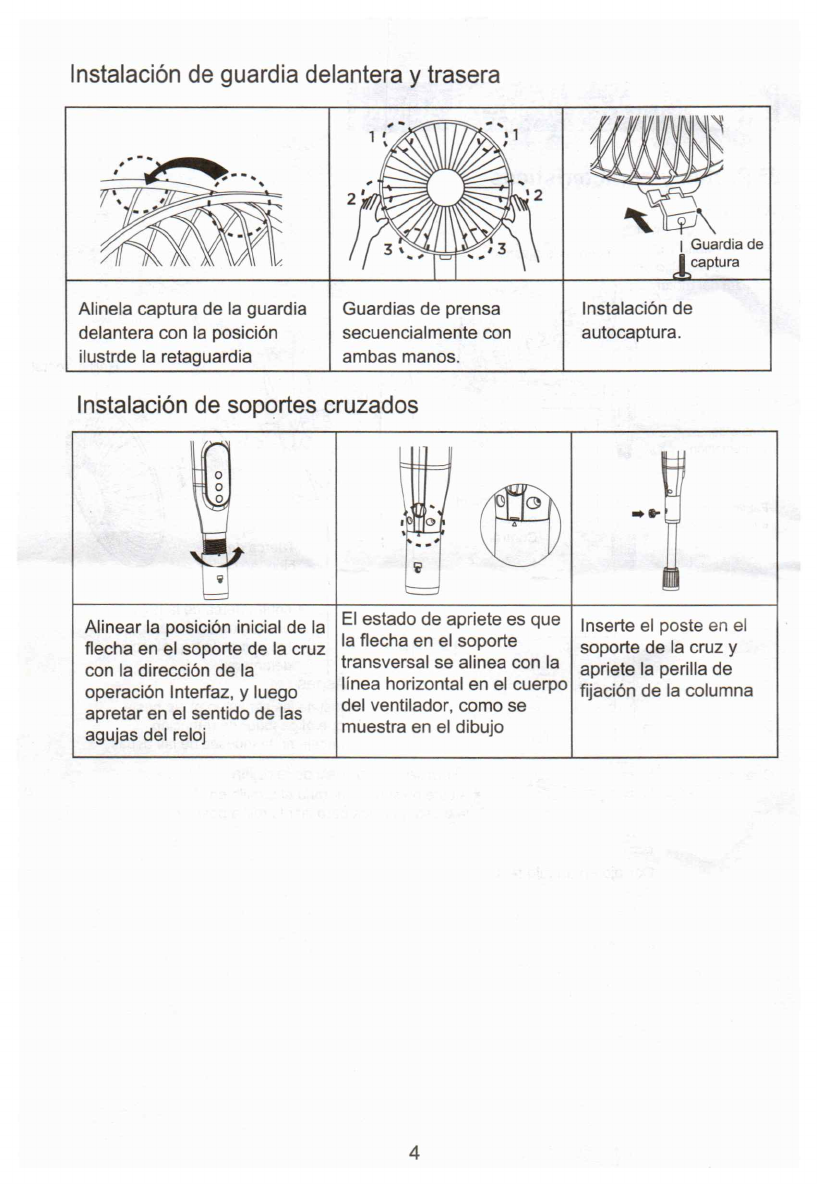
Instalacion
de
guardia
delantera
y
trasera
'
Q
I
I
captura
Guardia
de
Z
/
"
3
.
3
2
Alinela
captura
de
la
guardia
delantera
con
la
posicibn
ilustrde
la
retaguardia
Guardias
de
prensa
secuencialmente
con
ambas
manos.
Instalacion
de
autocaptura.
Instalacion
de
soportes
cruzados
Iii
O
`
°
o,
4
Ij
O
~I!
-
r
o
g
Alinear
la
posicion
inicial
de
la
El
estado
de
apriete
es
que
Inserte
el
poste
en
el
flecha
en
el
soporte
de
la
cruz
la
flecha
en
el
soporte soporte
de
la
cruz
y
con
la
direccion
de
la
transversal
se
alinea
con
la
apriete
la
perilla
de
operacibn
Interfaz,
y
luego
linea
horizontal
en
el
cuerpo
fijacion
de
la
columna
apretar
en
el
sentido
de
las
del
ventilador,
como
se
agujas
del
reloj
muestra
en
el
dibujo
4

INSTRUCCIONES
DE
USO
■
Funcionamiento
del
control
remoto
U
0
a
o®
Q'U
Baton
Encendido/Apagado
0
Baton
an
oscilacion
Q
Baton'+'
Q
BOtOn
"
0
BotOn
de
temporizador
O
BotOrr
Modo
apagado
automatico
Q
BotOn
de
uelocided
max.
Boton
Encendido/Apagado:
PresiOnelo
una
vez,
el
ventilador
se
encendera;
presiOnelo
nuevamente
para
apagarlo.
Bot6n
de
oscilacion:
Funcibn
de
oscilacion:
Despues
de
que
arranque
el
ventilador,
presione
el
boton
una
vez
brevemente
para
iniciar
la
oscilacion.
Presione
el
botOn
nuevamente
para
detenerlo
en
la direcciOn
deseada.
©
Boton
de
temporizador
Ajuste
del
tiempo
de
inicio:
Enchufe
el
aparato.
Presione
el
botbn
del
temporizador
cuando
el
ventilador
este
apagado
para
activar
el
temporizador
de
encendido
automatico.
Luego
presione
el
bothn
©
para
seleccionar
el
tiempo
deseado
de
"1
a
12
horas"
con
un
incremento
de
1
(puede
incrementar
o
disminuir
el
tiempo
deseado
presionando
los
botones
"+"
y
"-").Cuando
el
numero
del
tiempo
establecido
en
la
pantalla
cambie
al
numero
de
velocidad
y
vuelva
a
cambiar
al
numero
de
tiempo
deseado,
quedara
establecido
el
tiempo
de
inicio
automatico
deseado.
Luego
aparecera
en
pantalla
una
sepal
de
reloj.
Despues,
el
ventilador
se
encendera
automaticamente
una
vez
establecido
el
tiempo
deseado.
Ajuste
del
tiempo
de
finalizaci6n:
Despues
de
encender
el
ventilador,
presione
el
bot6n
del
temporizador.
Luego
presione
©
para
seleccionar
el
tiempo
de
"1
a
12
horas"
con
un
incremento
de
1
(puede
aumentar
o
disminuir
el
tiempo
deseado
presionando
los
botones
"+"
y
"").
Cuando
el
numero
del
tiempo
establecido
en
la
pantalla
cambie
al
numero
de
velocidad,
quedara
establecido
el
tiempo
de
parada
deseado.
Despues,
el
ventilador
se
encendera
automaticamente
una
vez
establecido
el
tiempo
deseado.
Ajuste
de
la
velocidad
del
viento:
Presione
0,
para
que
la
velocidad
del
viento
cambie
de
acuerdo
con:
cambios
de
1-2-3-4
-...-
12;
presione
©
para
cambiar
la
velocidad
del
viento
12
-...-
3-2-1.
©
Botbn
Modo
apagado
automatico
Presione
el
bot6n
©
para
que
el
ventilador
funcione
a
la
velocidad
mas
baja
que
se
recomienda
para
una
buena
noche
de
sueno.
Bot6n
de
velocidad
max.
Presione
el
boton
©
para
que
el
ventilador
funcione
a
la
velocidad
mas
alta.
5
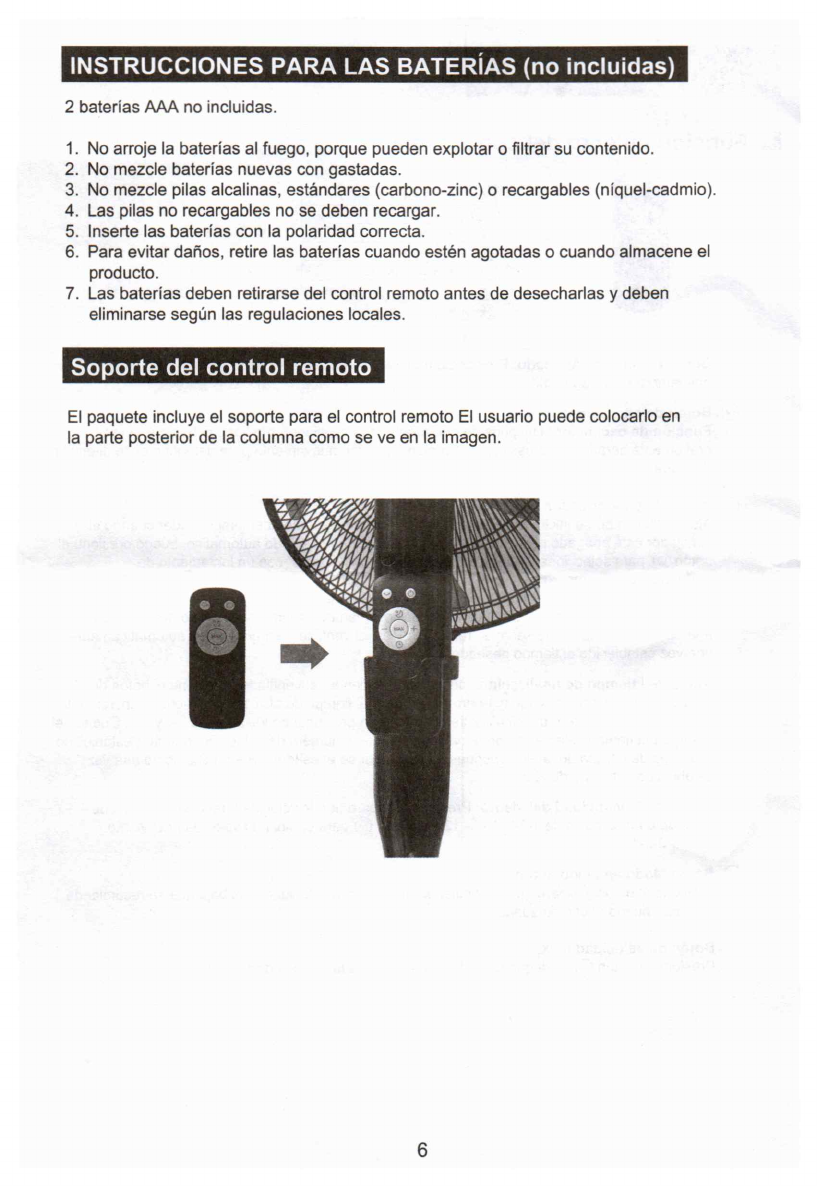
INSTRUCCIONES
PARA
LAS
BATERIAS
(no
incluidas)
2
baterias
AAA
no
incluidas.
1.
No
arroje
la
baterias
al
fuego,
porque
pueden
explotar
o
filtrar
su
contenido.
2.
No
mezcle
baterias
nuevas
con
gastadas.
3.
No
mezcle
pilas
alcalinas,
estandares
(carbono-zinc)
o
recargables
(niquel-cadmio).
4.
Las
pilas
no
recargables
no
se
deben
recargar.
5.
Inserte
las
baterias
con
la
polaridad
correcta.
6.
Para
evitar
danos,
retire
las
baterias
cuando
esten
agotadas
o
cuando
almacene
el
producto.
7.
Las
baterias
deben
retirarse
del
control
remoto
antes
de
desecharlas
y
deben
eliminarse
segun
las
regulaciones
locales.
Soporte
del
control
remoto
El
paquete
incluye
el
soporte
para
el
control
remoto
El
usuario puede
colocarlo
en
la
parte
posterior
de
la
columna
como
se
ve
en
la
imagen.
6

INSTRUCCIONES
DE
USO
■
Instrucciones
de
funcionamiento:
Ajuste
del
cabeceo
Ajuste
de
altura
Girar
en
sentido
contrario
a
las
agujas
del
reloj
y
Derribar
un
poste
(columna)
para
ajustar
La
altura.
1
Visualization
del
tiempo
Pantalla
de
LED
(La
luz
LED
se
apaga
automaticamente
en
30
segundos)
Boton
de
oscilacion
(presione
prolongadamente
para
temporizador)
Botdn
de
velocidad
del
viento
Botbn
Encendido/
Apagado
r~
Boton
de
oscilacion:
a.
Funcion
de
oscilacion:
Despues
de
que
arranque
el
ventilador,
presione
el
boton
una
vez
para
iniciar
la
oscilacion.
Presione
el
boton
nuevamente
para
detenerlo
en
la
direction
deseada.
b.
Ajuste
del
tiempo
de
inicio:
Enchufe
el
aparato.
Presione
el
boton
de
oscilacion
durante
2
segundos
cuando
el
ventilador
este
apagado
para
activar
el
temporizador
de
encendido
automatico.
Luego
presione
el
boton
de
oscilacion
para
seleccionar
el
tiempo
de
"1
a
12
horas"
con
un
incremento
de
1.Cuando
el
numero
del
tiempo
establecido
en
la
pantalla
cambie
al
numero
de
velocidad
y
vuelva
a
cambiar
al
numero
de
tiempo
deseado,
quedara
establecido
el
tiempo
de
inicio
automatico
deseado.
Luego
aparecere
el
cono
del
reloj
en
la
pantalla.
Despues,
el
ventilador
se
encendera
automaticamente
una
vez
establecido
el
tiempo.
c.
Ajuste
del
tiempo
de
finalization:
Despues
de
encender
el
ventilador,
presione
el
boton
de
oscilacion
por
2
segundos
para
ajustar
el
temporizador.
Luego
oprima
el
baton
de
oscilacion
para
seleccionar
el
tiempo
de
"1
a
12
horas"
con
un
incremento
de
1.
Cuando
el
numero
del
tiempo
establecido
en
la
pantalla
cambie
al
numero
de
velocidad,
quedara
establecido
el
tiempo
de
parada
deseado.
Despues,
el
ventilador
se
apagara
automaticamente
una
vez
establecido
el
tiempo.
7

Boton
de
velocidad
del
viento:
Presione
brevemente
el
boton
de
velocidad
del
viento
y
la
velocidad
del
viento
cambiara
de
acuerdo
con:
cambios
de
01-02-03-04
-...-
12;
presione
el
boton
de
velocidad
del
viento
durante
mucho
tiempo
para
realizar
un
ajuste
rapido
de
la
velocidad
del
viento
U
Botbn
Encendido/Apagado:
Presionelo
una
vez,
el
ventilador
se
encendera;
presionelo
nuevamente
para
apagarlo.
INSTRUCCIONES
DE
USO
PARA
EL
USUARIO
a)
Sujete
el
enchufe
y
retirelo
del
receptaculo
u
otro
dispositivo
de
salida.
No
desenchufe
tirante
del
cable.
b)
Abrir
la
tapa
del
fusible.
Deslice
en
direccion
a
las
patillas
la
cubierta
de
acceso
al
fusible
en
la
parte
superior
del
enchufe.
c)
Retire
con
cuidado
el
fusible.
Inserte
la
punta
de
la
herramienta
en
la
ranura
para
fusibles
(cierre
con
el
terminal),
luego
apalanque
el
fusible
gradualmente
y
lentamente,
pero
sin
ejercer
mucha
presibn.
Si
esta
muy
ajustado, intente
varias
veces
y
apalanque
el
fusible
lentamente.
Cuando
un
lado
del
fusible
queda
suelto,
entonces
puede
retirar
el
fusible
por
complete.
d)
Riesgo
de
incendio.
Remplace
el
fusible
solo
con
otro
de
2.5
Amp/125
Volt.
e)
Cerrar
la
tapa
del
fusible.
Deslice
la
cubierta
de
acceso
al
fusible
en
la
parte
superior
del
enchufe
en
direccion
contraria
a
las
patillas.
f)
Riesgo
de
incendio.
No
remplace
el
enchufe.
Contiene
un
dispositivo
de
seguridad
(fusible)
que
debe
ser
retirado.
Descarte
el
aparato
si
el
enchufe
esta
danado.
Aviso:
1.
Cuando
remplace
el
fusible,
no
opere
de
inmediato
ni
ejerza
sobrepresibn
para
evitar
danos
al
aparato
o
un
accidente.
2.
Si
se
dificulta
la
operacion,
asegurese
de
que
este
en
la
posicion
correcta.
ADVERTENCIAS:
1.
Nunca
introduzca
los
dedos
no
lapices
ni
ningun
otro
objeto
a
traves
de
la
rejilla
cuando
el
ventilador
esta
funcionando.
2.
Desconecte
el
ventilador
para
moverlo
de
un
lugar
a
otro.
3.
Asegurese
que
el
ventilador
este
en
una
superficie
estable
durante
su
funcionamiento
para
evitar
que
caiga.
4.
NO
use
el
ventilador
en
ventanas,
la
Iluvia
puede
causar
descargas
electricas.
5.
Solo
para
use
domestico.
LIMPIEZA
•
Asegurese
de
que
su
ventilador
este
en
la
posicion
de
APAGADO.
•
Desenchufe
el
ventilador
antes
de
limpiarlo.
•
Use
solo
un
pane
suave
y
ligeramente
humedo
para
limpiar
suavemente
el
ventilador.
•
NO
sumerja
el
ventilador
en
agua
y
no
permita
que
entre
agua
en
la
cubierta
del
motor.
•
NJO
use
gasolina,
disolvente
de
pintura
ni
otros
quimicos
para
limpiar
bel
ventilador.
•
Desarmado
de
la
rejilla
frontal
para
su
limpieza
•
Limpie
suavemente
las
aspas
del
rotor
y
las
rejillas
con
un
pane
suave
y
humedo.
•
Arme
el
ventilador
siguiendo
los
ultimos
tres
pasos
en
las
INSTRUCCIONES
DE
MONTAJE.
8
Table of contents
Languages:


