Bezerk RC Litesabre Pro10 User manual

INSTRUCTION MANUAL FOR THE BEZERK RC
Thank you for purchasing the Litesabre Pro10 chassis kit by Bezerk RC, you’ve invested in one of the
best pan car kits available today. Some of the key design features are –
- Unique stepped chassis. This allows wheelbase adjustment without having to change steering
components, higher front ground clearance that is great for high speed with higher downforce
bodies and minimising the front of chassis ever hitting the track, better cornering clearance, the
wearable rear chassis is cheaper to replace, the ability to flush mount the front bumper and clean up
the aero whilst protecting the front edge of the chassis.
- The tweak plate offers multiple setup options, single or multiple side springs, side shocks, roll
dampers, multiple body post positions to allow for different shaped bodies.
- Slider rear axle adjustment for easy to set rear ride height. Larger ¼” x ½” flanged bearings for the
rear axle to add longevity and robustness.
- Mirrored rear bulkheads and sliders to keep your spares stock cheaper. Left bulkhead makes
mounting a motor fan easy by using the motor mount slots. Also, extra holes in pod plate can be
used for balancing weights or a fan mount.
- Two servo positions, standard position and up front for higher grip levels or if you want to run a TC
battery. Ability to use either a TC servo or 12th Scale servo.
- Customisable when ordering or at a later stage. As we cut to order we can tailor the kit carbon to
suit your needs, e.g. if you want to run a CRC front end, no worries. Want to make it overall
narrower, easily done, super stiff or nice and supple, can do. All parts are available separately of
course.
This kit was the seed of an idea by Shannon Overson and bought to life by Bezerk RC. Shannon and
Clayton Hughes spent many laps developing it to a more than capable platform smashing lap records

Page 1of 16
at Brendale, fastest car to ever lap the track! Shannon and Clayton won nearly every race for the
year between them with Shannon taking the championship for the 2019 season. Bezerk then bought
it back in house and made it production ready by adding even more options and refining every little
detail.
As this is an upper end kit intended for the enthusiast pan car racer, it is partly assumed you will
already have a collection of pan car parts in your possession. Either way, here’s a list of what you’ll
need to complete a rolling chassis. Why buy a kit that has parts you won’t use or will probably
replace when you can build your ultimate platform with the parts YOU want.
- Body posts x 4
- Body clips x 8
- Servo mounts x 2
- Servo
- Servo saver
- Steering tie-rods, ballcups and ball studs
- ESC, RX and motor
- Rear axle
- Side springs, spring holders and roll dampers OR side shocks
- Ball studs and nuts for roll dampers or shocks
- Centre shock absorber and hardware
- Front end components
Some of the tools required –
- 1.5mm hex driver
- 2.0mm hex driver
- 2.5mm hex driver
- 5.5mm nut driver
- Mild threadlock for any screws into alloy parts
Hardware supplied in the kit –
- Caphead capscrews –(CH) 3x10mm, 4x12mm
- Flathead capscrews –(FH) 10x5mm, 14x8mm, 8x12mm, 6x16mm, 2x20mm
- Buttonhead capscrews –(BH) 2x5mm, 5x8mm, 4x12mm
- Set Screws –4 x M3 x 10mm
- Stainless 3 x M3 x 7mm diameter washers
- Stainless 14 x M3 Nyloc nuts
- 2 x ¼” x ½” flanged ball bearings
- M3 standoffs 1x10mm, 2x14mm, 2x15mm, 4x17mm

Page 2of 16
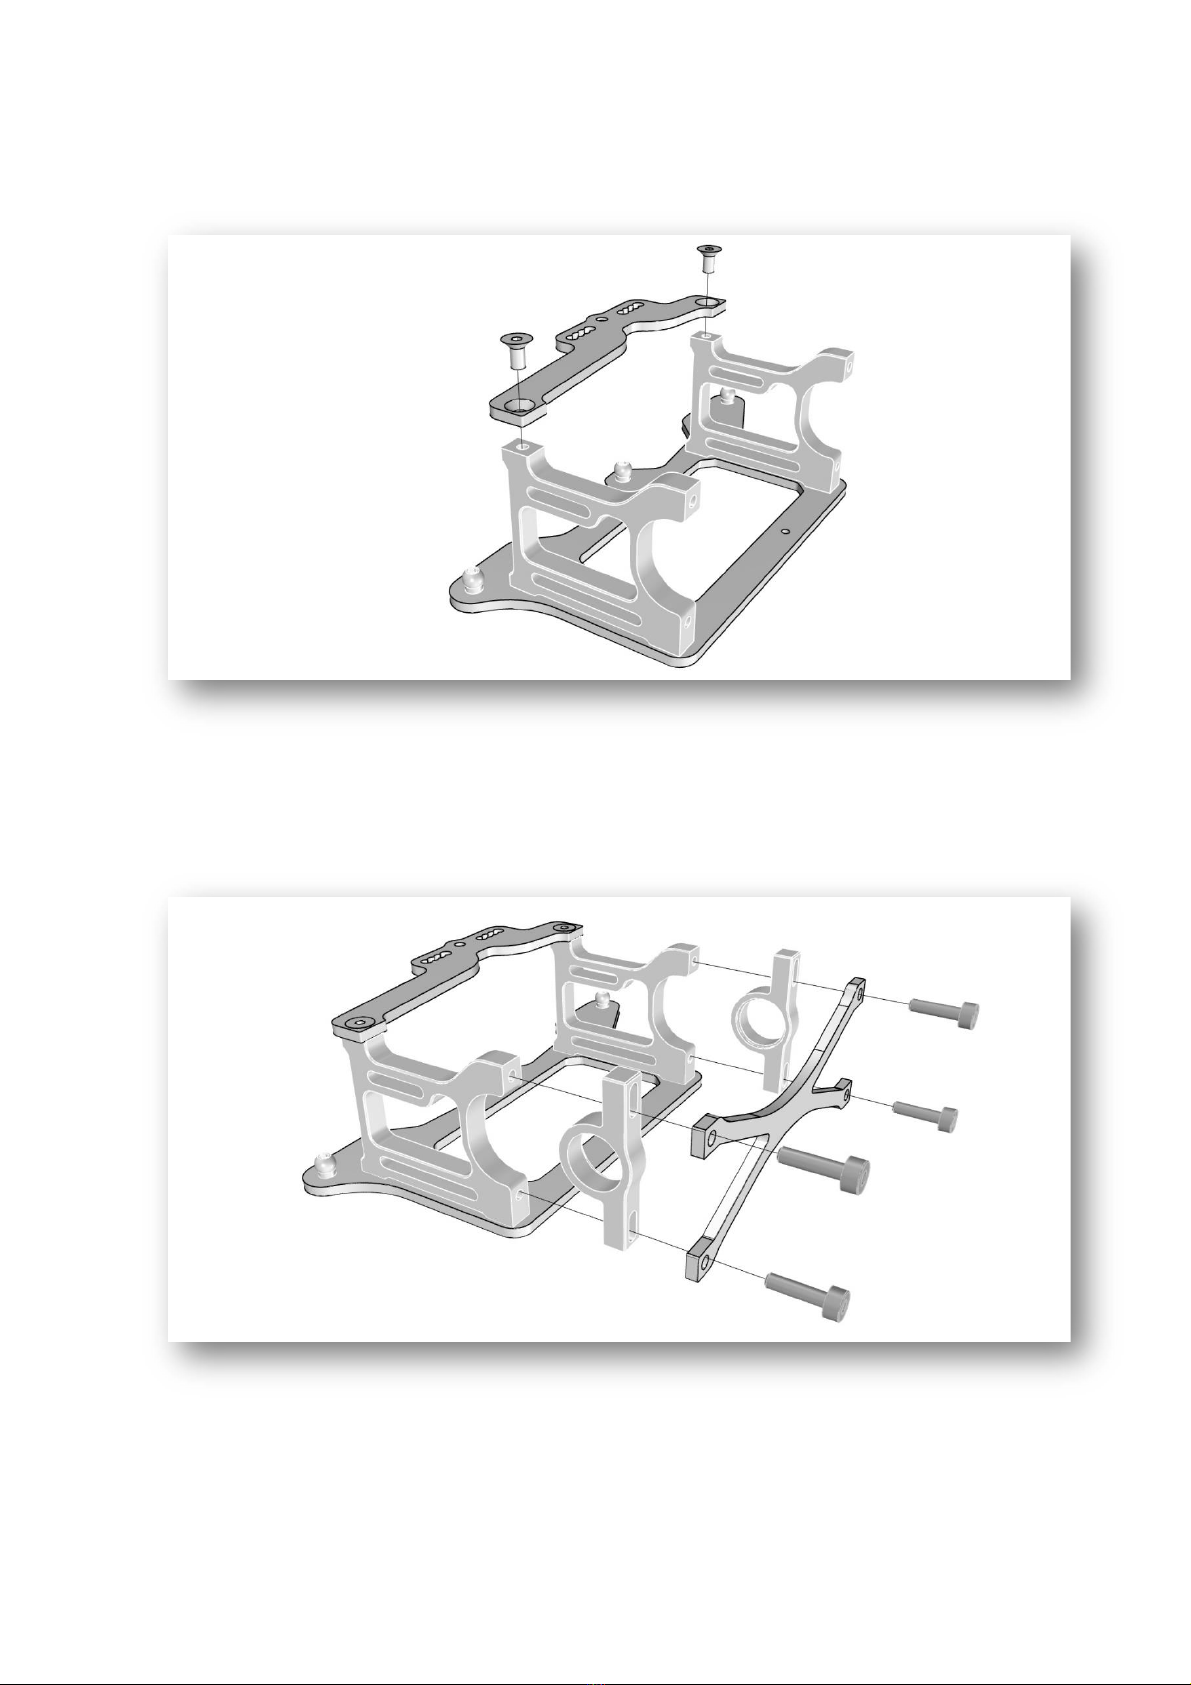
Fit up the pivot balls, center ball is in kit, outer balls are not. Use M3 x 5mm flathead screws, use a
mild thread lock.
Fit the rear bulkheads in the direction shown, thread lock the four M3 x 5mm flathead screws.
- FH M3 x 5mm 3 of
- 5mm pivot ball 1 of
- FH M3 x 5mm 4 of
Page 3of 16
Attach upper pod plate, use thread lock.
Attach rear axle sliders. Note orientation of bearing rebates in the sliders. The following page shows
the different width configs.
- FH M3 x 5mm 2 of
- CH M3 x 12 4 of

Page 4of 16
Shown below is the sliders in different width formats. Left is the wide position (Plus 1mm per side)
and on the right the narrower position. Two flanged bearings ¼”x ½”are provided for the rear axle.
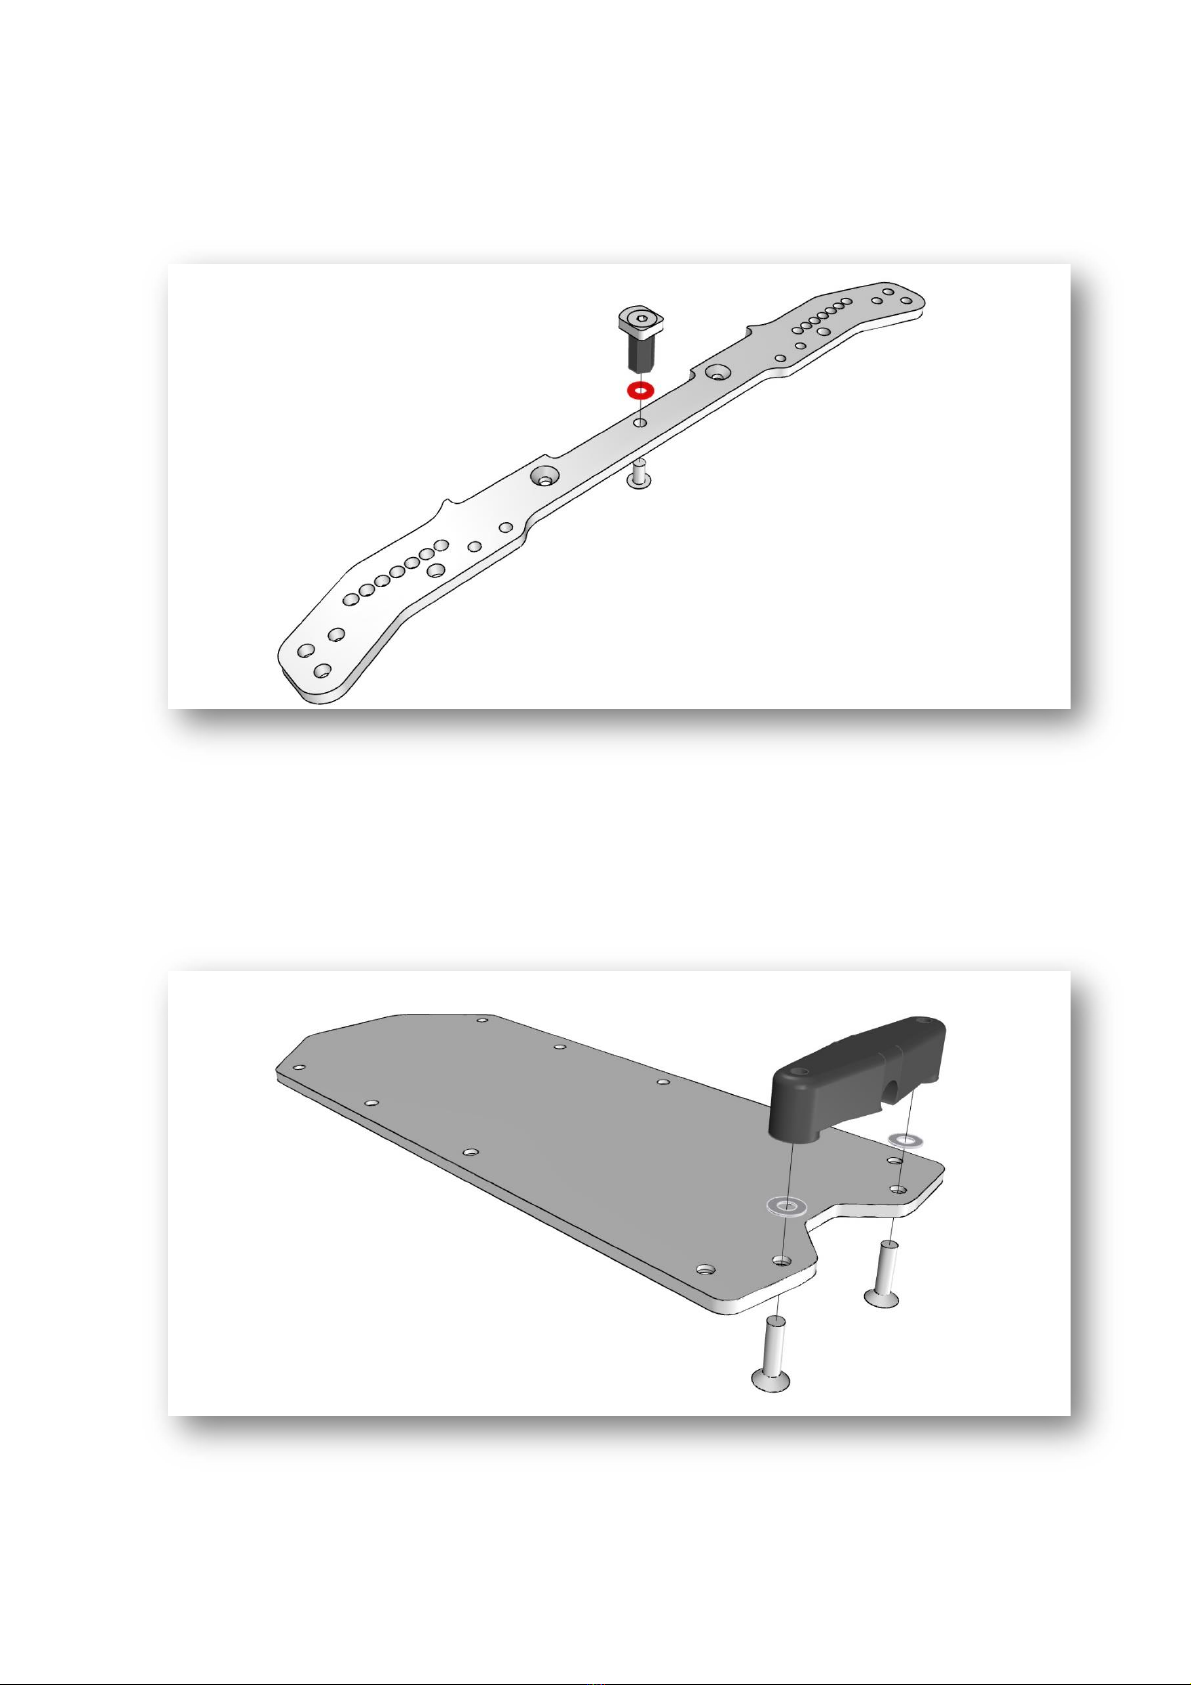
The battery strap as a rear catch. The catch serves two purposes, help hold in the shorty battery
pack when in the traverse location and to provide a topdeck for stiffness to the rear section of the
chassis. If running an inline battery this part is optional. Use thread lock.
- FH M3 x 5mm 1 of
- M3 x 10mm standoff
Page 5of 16
A spacer can be added here (not supplied) to allow for different battery heights. The proud rounded
edge of the carbon catch faces forward.
Attach the ZEN sliding pivot to the rear chassis plate. Use the provided shims with the Roche pivot
ball supplied.
- BH M3 x 8mm 1 of
- FH M3 x 12mm 2 of

Page 6of 16
Attach the two standoffs to the rear chassis plate with some thread lock.
Attach the tweak plate to the standoffs on the rear chassis plate with some thread lock.
- FH M3 x 8mm 2 of
- M3 x 14mm standoffs 2 of
- FH M3 x 8mm 2 of

Page 7of 16
Below are the hole configs for the holes in the tweak plate. Four set screws are provided (M3 x
10mm) to attach side springs. The holders for the springs are not provided. Up to two pairs of
springs can be run at one time for a variable rate. Two BH M3 x 12mm screws are provided to mount
your preference of body posts. The alternate positions allow for different body shapes. The alternate
damper positions allow for a range of brand of dampers or side shocks should you choose to run
them.
The Litesabre bumper is flush mounted to the chassis, this helps protect the front of the chassis from
wearing away on the track surface and help protect the chassis in a crash. A bumper plate is used to
fit the bumper to the front chassis plate.
- FH M3 x 8mm 4 of
- Nyloc M3 Nut 4 of

Page 8of 16
A full size or low-profile TC servo or a 12th Scale servo can be fitted depending on battery layout
preferred. Standard orientation is shown below, this will work with majority of the shorty pack
options. Two different length standoffs are provided to allow different height servos. No servo
mounts are provided. 15mm standoffs for 12th servo, 20mm for TC servo. It is suggested to have the
servo as low as possible, alloy shims under the standoffs are suggested to fine tune this height.
With the TC in-line pack config and/or in high grip conditions, a forward mounted servo option is
also a consideration. Too tight of a space up front for a TC servo, 12th Scale servo only in the position.
- BH M3 x 8mm 2 of
- FH M3 x 8mm 2 of
Page 9of 16
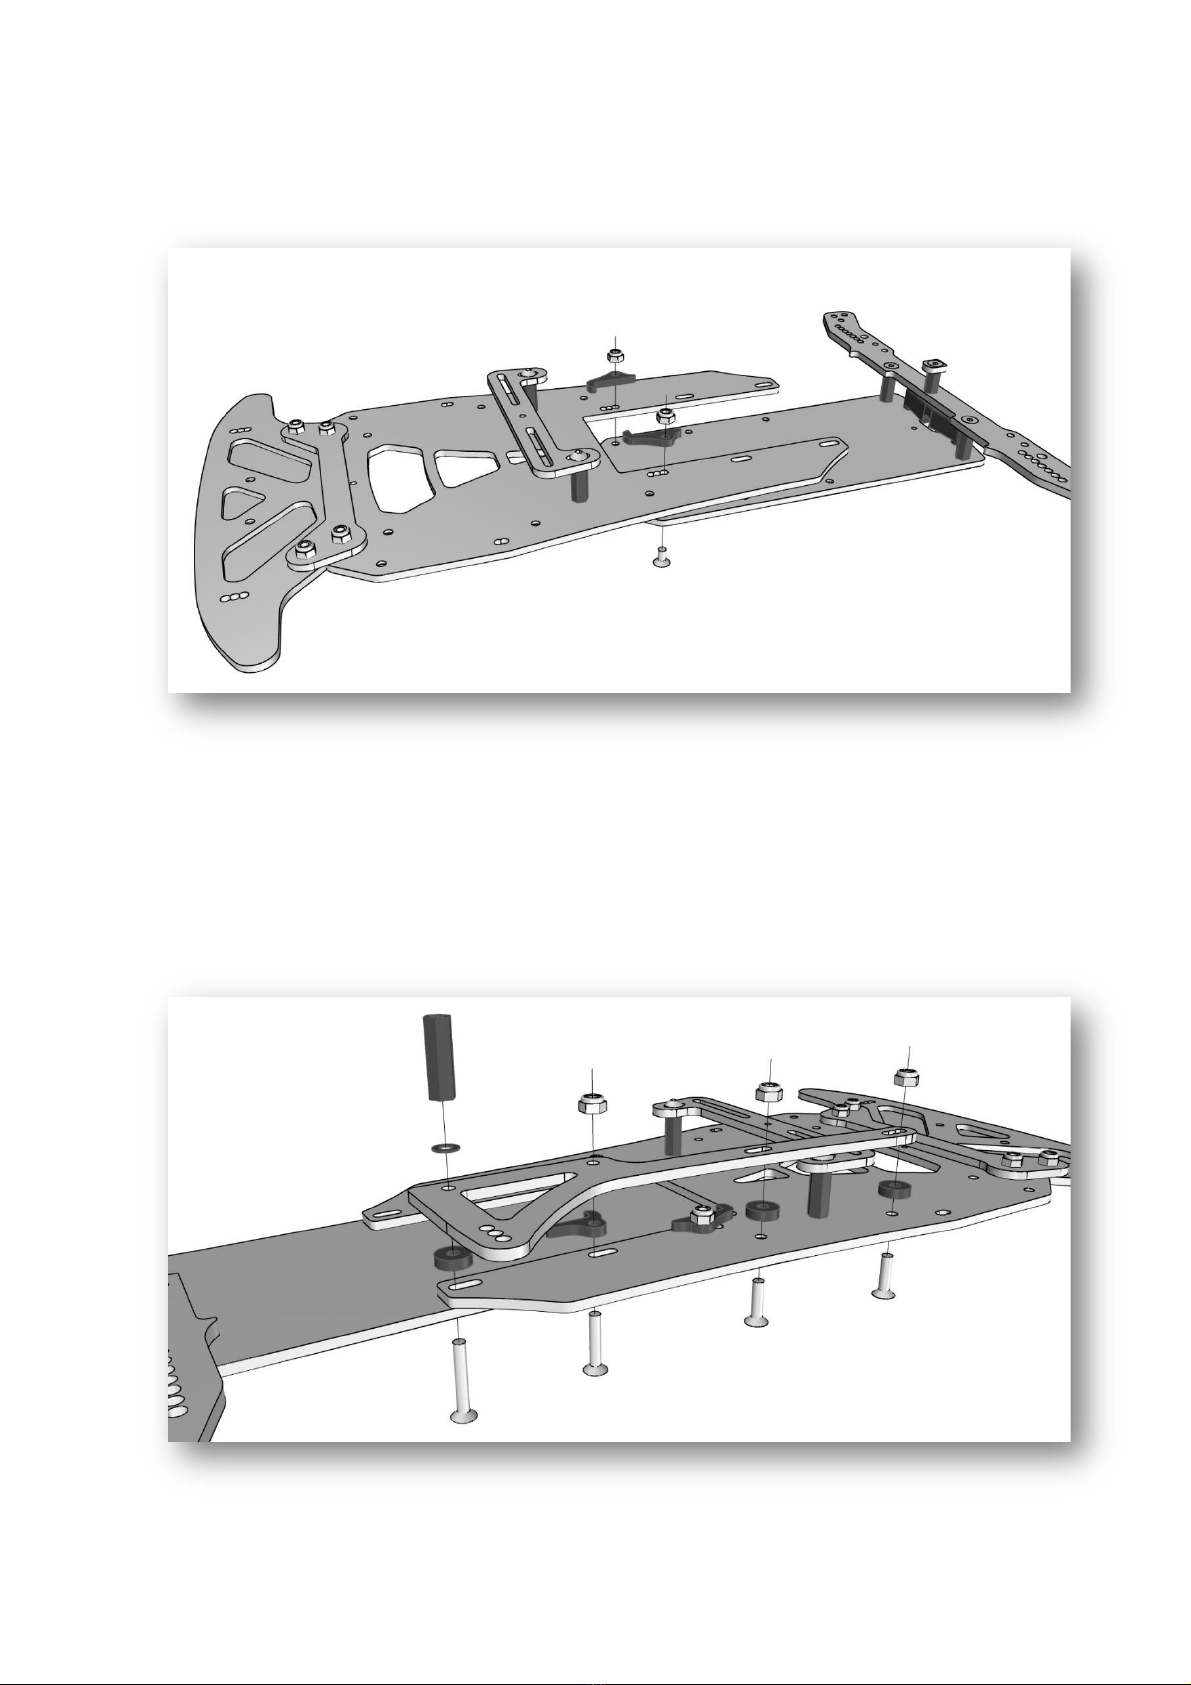
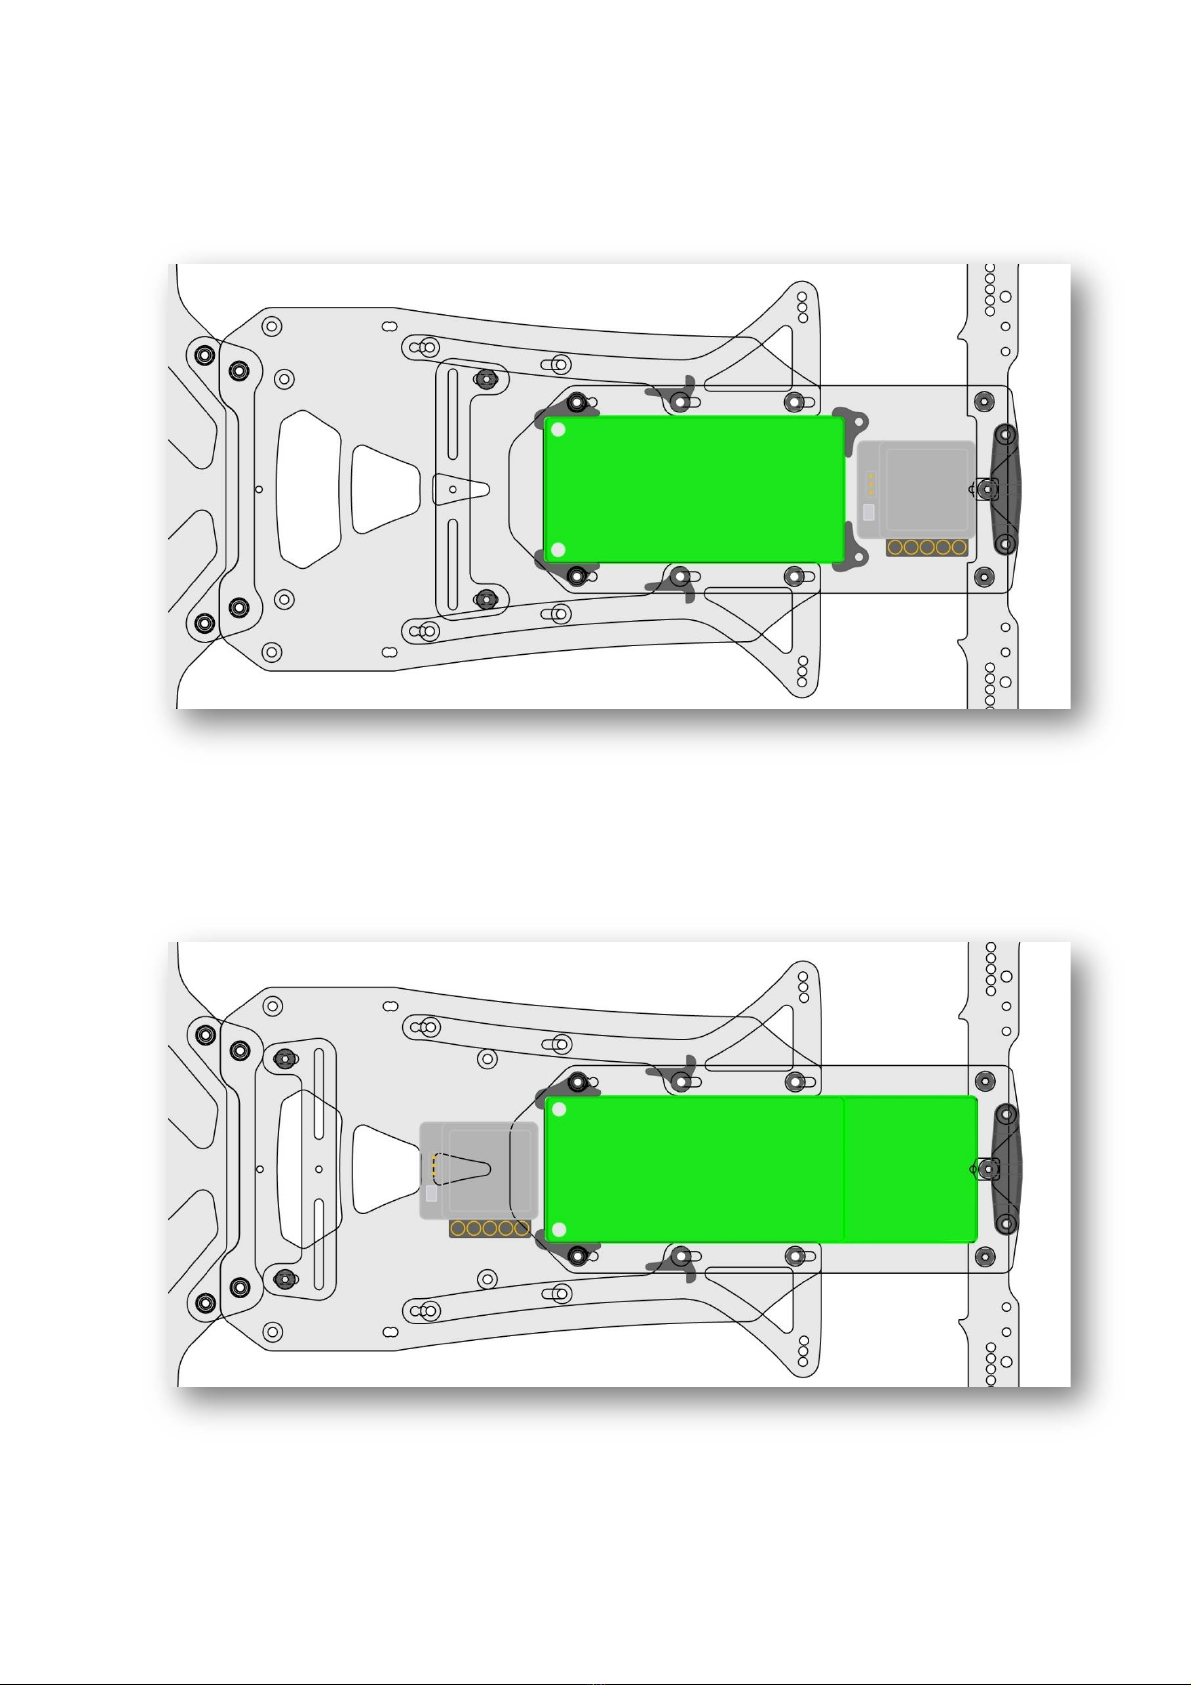
These two front screws set the wheelbase length (shown in long wheelbase below) and need to be
removed when changing to another wheelbase option. The carbon battery hooks hold the front of
the TC pack or the front of the shorty pack if running the ESC in the rear of the chassis.
Shown below is one topdeck being added to the right-hand side. Carbon spacers and hooks
(provided in kit) are put between the topdeck and the chassis. Front screws are the 12mm length,
middle screws 16mm and rear screws 20mm. The standoffs will need to be spaced upward (spacers
not provided) to suit the height of the battery you are using. Thread lock the rear screws once you
have settled on a battery height. Hardware listed below is for both sides.
- FH M3 x 8mm 2 of
- M3 Nyloc Nut 2 of
- M3 Nyloc Nut 6 of
- FH M3 x 12mm 4 of
- FH M3 x 16mm 2 of
- FH M3 x 20mm 2 of
- M3 x 17mm standoffs

Page 10 of 16
The same spacers should be able to be used all around for battery height.
Side link pivot balls can be attached in alternate positions with BH M3 x 5mm screws provided. BH
M3 x 8mm are used to hold the battery strap down.
Page 11 of 16
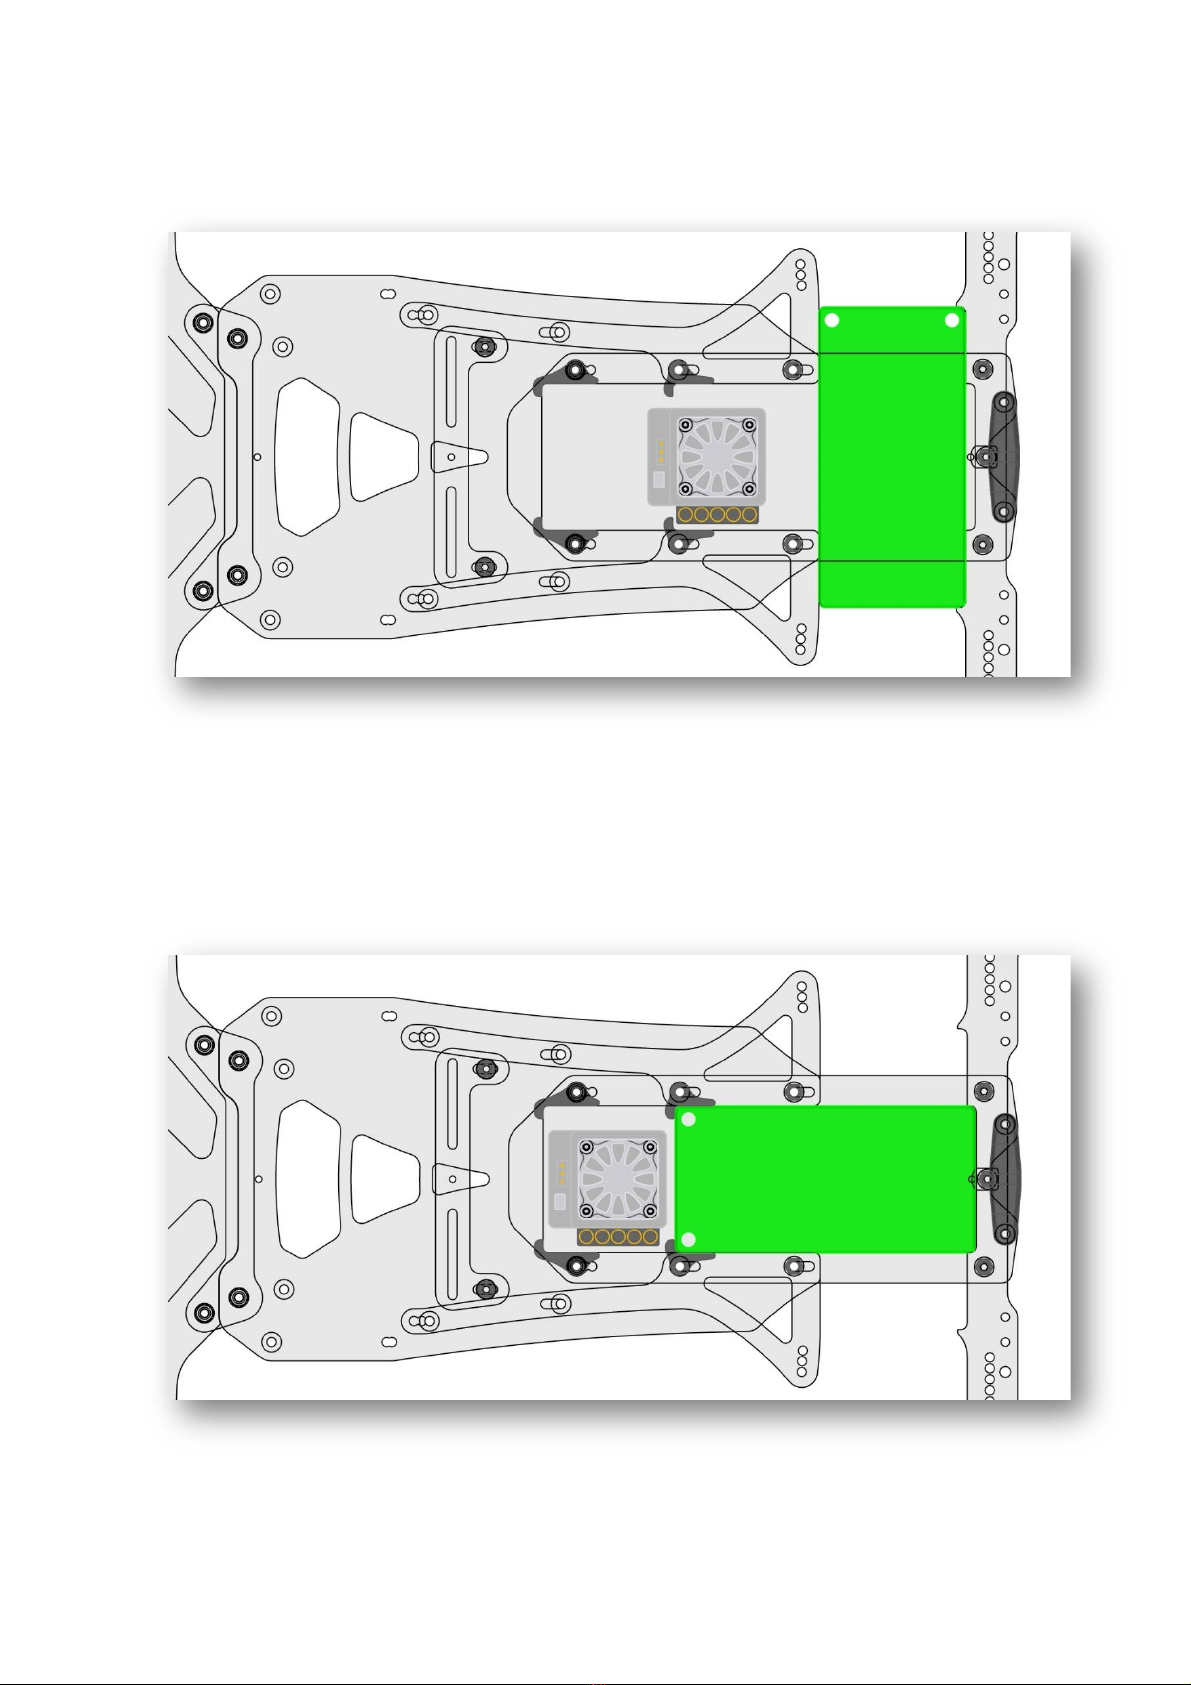
Shorty traverse orientation. Note the lower battery hook orientations or locations in the battery
configs below. We suggest leaving all the hooks in place and just loosening the screws and rotating
them around into position where required.
Shorty in-line in rear position.
Page 12 of 16
Shorty in-line in forward position. The rear hooks are the only ones that need to be added if running
this config. Remove them if using any other config. Hooks, screws and nuts are supplied in the kit.
TC battery in-line and servo up front.

Page 13 of 16
The rear pod attaches by simply sliding the pivot ball into the centre pivot holder. Attach your
preferred side links and it’s attached!
Your Litesabre is now assembled as far as the kit components will take you. There’s a parts list on
the first page that you’ll need for completion, enjoy getting it on the track! Some info on the other
features are on the next few pages.
Page 14 of 16
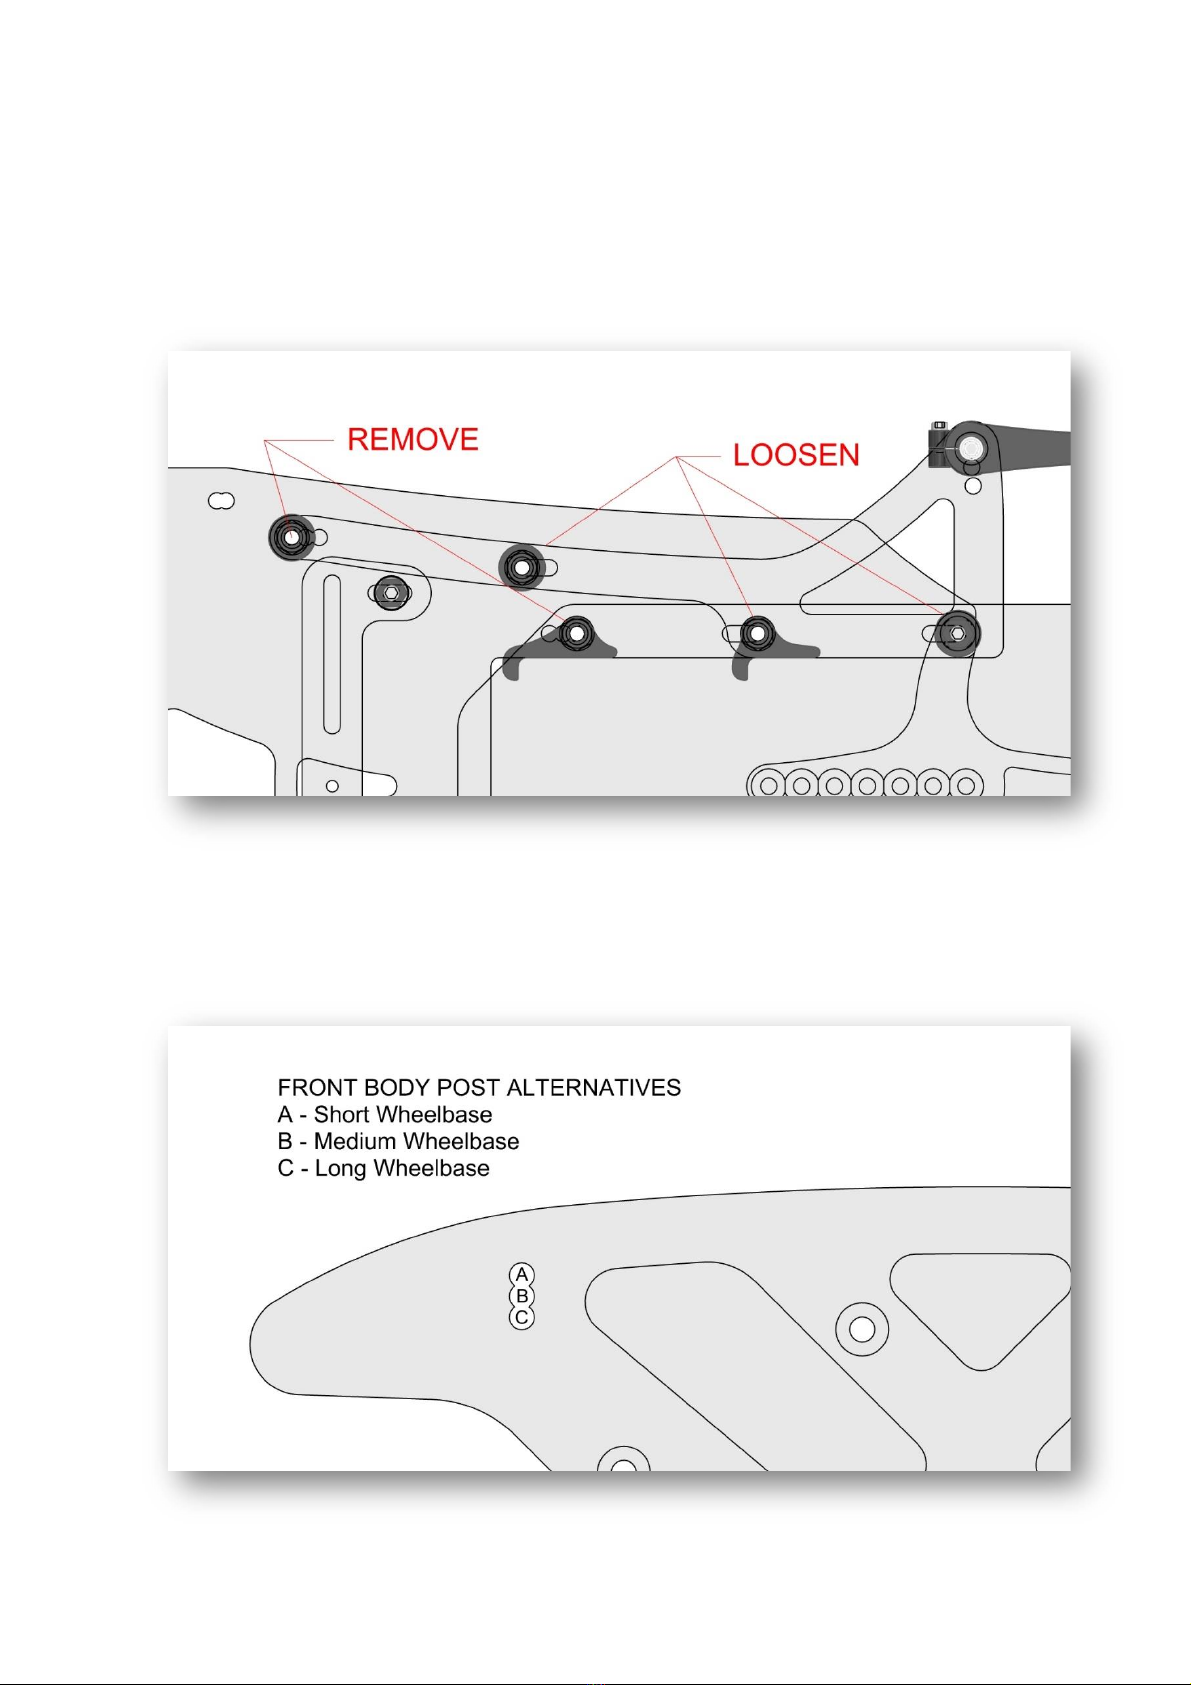
The Litesabre’s unique wheelbase adjustment provides you three different positions. Short
wheelbase for smaller tracks where you need a quicker change of direction and long wheelbase for
large tracks where stability and a smoother overall feel is needed, especially with higher powered
motors. To change loosen the screws shown and remove the front two shown on both sides of the
chassis. Servo and rear body mounts remain unchanged.
By moving the body posts fore and aft on the bumper, you can still use your body shell no matter the
wheelbase you choose. Two BH M3 x 12mm cap screws are provided to mount your choice of body
posts.
Page 15 of 16
Additional hardware provided –
- FH M3 x 12mm 4 of (to attach your choice of front-end lower arms).
- FH M3 x 8mm 2 of, M3 Nyloc nuts 2 of, short carbon battery hooks (for rear of battery if running
shorty forward).
- BH M3 x 12mm 4 of for mounting body posts.
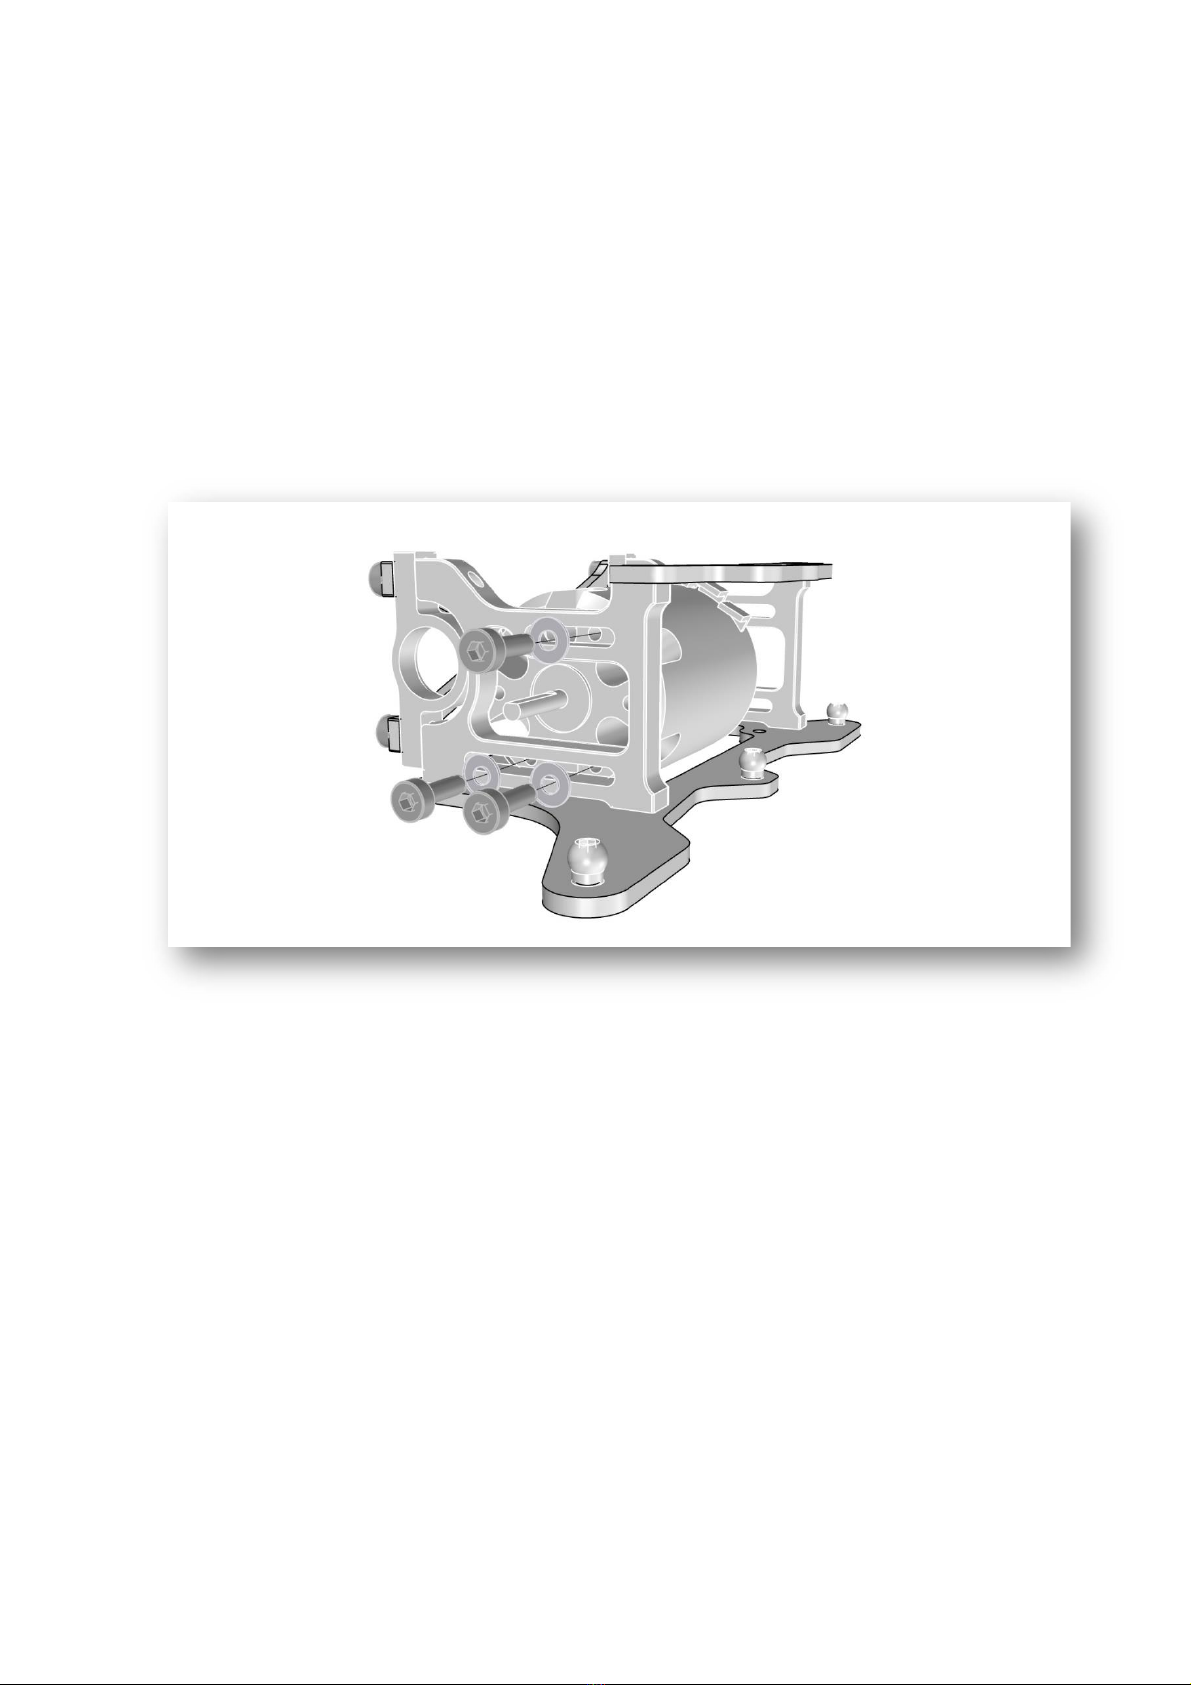
- Three CH M3 x 10mm screws and M3 washers are provided in the kit to mount the motor. The
mounts allow the use of three screws as shown which is the most secure, or the two lower screws to
allow a little flex or opposing screws for something in between.


