BG CARDIO Elite UB User manual

CARDIO
3G
®
3G
CARDIO
®
Elite UB Upright Bike
Owner’s Manual

Questions? Call 888-888-7985
3G Cardio • 14647 So. 50th St. Suite 110 • Phoenix, AZ 85044
www.3GCardio.com
CARDIO
3G
®
3G
CARDIO
®
© Copyright 3G Cardio LLC
All Rights Reserved
IMPORTANT! PLEASE READ:
CARDIO
3G
®
3G
CARDIO
®
3G Cardio Fitness Equipment
14647 So. 50th Street Suite 110
Phoenix, AZ 85044
1-888-888-7985
www.3GCardio.com
support@3gcardio.com
If you purchased your 3G Cardio product from an online retailer (3GCardio.com,
Amazon, Costco etc..) and need help or have questions, comments or concerns, please
call or email us (3G Cardio) directly. We are not operators, we are experienced tness
professionals and can help you with anything and everything!
If you purchased your 3G Cardio product from a “brick and mortar” retail store, feel
free to contact the store directly with any questions or concerns. You are still more than
welcome to contact us too!

Questions? Call 888-888-7985
3G Cardio • 14647 So. 50th St. Suite 110 • Phoenix, AZ 85044

www.3GCardio.com
CARDIO
3G
®
3G
CARDIO
®
Table of Contents
Welcome to 3G Cardio! 1
Safety Warnings and Precautions 2
Heart Rate and Exercise Preparations 3
Warm Up / Cool Down 4
Hardware List 5
Bike Assembly 6-10
Moving Your Exercise Bike: 10
Programming Your Exercise Bike
Button and Display Functions 11-12
Pre-Programmed Workouts 13-16
Heart Rate Control Programs 17
Constant Watts Programs 18
Recovery Program 18
Unit of Measure Adjustment 19
Maintenance 20
Exploded Diagram 21
Parts List 22
Warranty 23

1Questions? Call 888-888-7985
3G Cardio • 14647 So. 50th St. Suite 110 • Phoenix, AZ 85044
Welcome to the 3G Cardio Family!
We are a highly experienced team of health and tness equipment experts with over
fty years experience in the health and tness industry. Our two main goals are
to offer outstanding exercise equipment and to provide the best customer service
experience possible.
We understand that you have many choices when it comes to tness equipment. We
know that our continued success is based upon the quality of the products we deliver
and the client support we provide.
We will never cut corners to save money and we will always exceed your expectations!
If you ever have questions, problems or concerns, please contact us right away. We
are fantastic at what we do and we would love a chance to prove it to you.
3G Cardio Family
1-888-888-7985

2
www.3GCardio.com
CARDIO
3G
®
3G
CARDIO
®
SAFETY WARNING
• Read and understand owner’s manual thoroughly.
• Consult with a physician prior to using this machine.
• Misuse of this machine may result in injury.
• Do not allow children or pets on or around this machine.
• Always use this machine on a level surface.
• Keep body and clothing free and clear of all moving parts.
• Heart rate readings are for reference only and may be inaccurate.
• This product is not intended for medical purposes.
• Replace warning label if damaged, missing or illegible.
IMPORTANT: Read all instructions and warnings before using this bike.
IMPORTANT VOLTAGE INFORMATION! Before plugging the power cord into an electrical outlet, verify
that the voltage requirements for your area match the voltage of the bike that you have received. The power
requirements for this bike are: Input: 100v 240V 50/60H
GROUNDING INSTRUCTIONS: This bike must be grounded. If it should malfunction or break down, grounding
provides a path of least resistance for electric current to reduce the risk of electric shock. The plug must be
plugged into an appropriate outlet that is properly installed and grounded in accordance with all local codes
and ordinances.
DANGER! Improper connection of the equipment-grounding conductor can result in a risk of electric shock.
Check with a qualied electrician or service provider if you are in doubt as to whether the bike is properly
grounded.
CONSULT A PHYSICIAN IMMEDIATELY! Warning: Before starting any exercise program consult your
physician. This is especially important for individuals over the age of 35 or persons with preexisting health
problems. Read all instructions before using any tness equipment. 3G Cardio LLC assumes no responsibility
for personal injury or damage sustained by or through the use of this bike.
IMPORTANT SAFETY INSTRUCTIONS:
• Obtain a medical exam before beginning any exercise program.
• Keep children and pets away from the bike. Teenagers and disabled persons must be supervised while
using the bike.
• Stop exercising if you feel faint, dizzy, or experience pain at any time while exercising and consult your
physician.
• Disconnect all power before servicing this bike.
• Connect the bike to a properly grounded outlet only. • Do not operate this machine in damp or wet locations.
• Inspect the bike for worn or loose components and bolts before each use.
• Do not operate the bike if: 1) The power cord is damaged. 2) The bike is not working properly. 3) The bike
has been dropped or damaged.
• Do not use this bike outdoors.
• Read and understand this owner’s manual completely before using the bike.
• Read and understand all warnings posted on the bike and in this owner’s manual.
• Do not wear loose or dangling clothing while using the bike.
• Always wear proper footwear on or around exercise equipment.
• Set up and operate the bike on a solid, level surface.
• Modifying this bike in any way will void all 3G Cardio warranties.

3Questions? Call 888-888-7985
3G Cardio • 14647 So. 50th St. Suite 110 • Phoenix, AZ 85044
2
SAFETY
Target Heart Rate Zone
220-your age =maximum heart zone
You do not want to workout at your maximum heart rate. The
recommended Heart Rate Zone is a percentage of your
maximum heart rate. Between 60% and 75% of your
maximum heart rate.
Lower limit of Target Heart Rate Zone =maximum heart rate
X 0.6
Upper limit of Target Heart Rate Zone
=Maximum heart rate X0.75
(This is recommended by American Heart Association.
Before starting exercise program, please consult your
TARGET HEART RATE ZONE
HOW OFTEN SHOULD YOU EXERCISE:
You should exercise three to four times a week to improve your cardiovascular and muscle
fitness.
HOW HARD SHOULD YOU EXERCISE:
Intensity of exercise is reflected in your heart rate. Exercise must be sufficiently rigorous to
strengthen your heart muscle and condition your cardiovascular system. Only your doctor
can prescribe the target training heart range for you. Before starting any exercise program
consult your physician.
HOW LONG SHOULD YOU EXERCISE:
Sustained exercise conditions your heart, lungs and muscles. The longer you are able to
sustain exercise within your target heart range, the greater the aerobic benefits. To begin
maintain 2~3 minutes of steady, rhythmic exercise, then check your heart rate.
You do not want to workout at your maximum heart rate.
The recommended Heart Rate Zone is a percentage of your
maximum heart rate. Between 60% and 75% of your maximum
heart rate.
Lower limit of Target Heart Rate Zone = Maximum heart rate X
0.6
Upper limit of Target Heart Rate Zone = Maximum heart rate X
0.75
HOW OFTEN SHOULD YOU EXERCISE?
You should exercise three to four times a week, 30 minutes per
workout, or as instructed by your doctor.
HOW HARD SHOULD YOU EXERCISE?
Intensity of exercise is reected in your heart rate. Exercise must be sufciently rigorous to strengthen your
heart muscle and condition your cardiovascular system. Before starting any exercise program consult your
physician.
HOW LONG SHOULD YOU EXERCISE?
Sustained exercise conditions your heart, lungs and muscles. The longer you are able to sustain exercise
within your target heart range, the greater the aerobic benets. You should always begin a workout with at least
a 5 minute warm up at low intensity.
If you have any known heart / cardiovascular issues you must consult with your doctor to nd out if
you are healthy enough for exercise.
TARGET HEART RATE ZONE
Target Heart Rate Zone
220 – Your Age = Maximum Heart Zone
Beginner Program
HEART RATE INFORMATION
Exertion Level Duration
Week 1 Easy 6 – 12 Minutes
Week 2 Easy 10 – 16 Minutes
Week 3 Moderate 14 – 20 Minutes
Week 4 Moderate 18 – 24 Minutes
Week 5 Moderate 22 – 28 Minutes
Week 6 Slightly higher or slightly lower 30 Minutes
Week 7 Add interval training
3 minutes at moderate, then 3 minutes at
higher exertion, then 3 minutes at easy.
Continue this pattern for 24–30 minutes.

4
www.3GCardio.com
CARDIO
3G
®
3G
CARDIO
®
3
WARM-UP & COOL DOWN
WARM- UP& COOL-DOWN
A successful exercise program consists of a warm up, aerobic exercise, and a cool down. Warming up is
an important part of your workout, and should begin every session. It prepares your body for more
strenuous exercise by heating up and stretching out your muscles. At the end of your workout, repeat
these exercises to reduce sore muscle problems. We suggest the following warm-up and cool-down
exercises:
Head Rolls
Rotate your head to the right for one
count, feeling the stretch up the left
side of your neck. Next rotate your
head back for one count, stretching
your chin to the ceiling and letting your
mouth open. Rotate your head to the
left for one count, and finally, drop
your head to your chest for one count.
Shoulder Lifts
Lift your right shoulder up toward
your ear for one count. Then lift
your left shoulder up for one
count as you lower your right
shoulder.
Side Stretches
Open your arms to the side and
continue lifting them until they are
over your head. Reach your right
arm as far upward toward the
ceiling as you can for one count.
Feel the stretch up your right side.
Repeat this action with your left
arm.
Quadriceps Stretch
With one hand against a wall
for balance, reach behind you
and pull your right foot up. Bring
your heel as close to your
buttocks as possible. Hold for
15 counts and repeat with left
foot up.
Inner Thigh Stretch
Sit with the soles of your feet
together with your knees
pointing outward. Pull your feet
as close into your groin as
possible. Gently push your
knees toward the floor. Hold for
15 counts.
Toe Touches
Slowly bend forward from your
waist, letting your back and
shoulder relax as you stretch
toward your toes. Reach down
as far as you can and hold for
15 seconds.
Calf / Achilles Stretch
Lean against a wall with your
left leg in front of the right and
your arms forward. Keep your
right leg straight and the left
foot on the floor; then bend the
left leg and lean forward by
moving your hips toward the
wall. Hold, then repeat on the
other side for 15 seconds.
1
2
3
4
5
6
8
7
Hamstring Stretches
Sit with your right leg straight in
front of you. Straighten your leg
out while trying to hold on to
your outstretched leg with your
hand. Starting up with your back
straight. Slowly exhale and try
to bring your chest to the knee
of your outstretched leg. Hold,
then repeat on the other side for
15 seconds.
WARM UP & COOL DOWN
A successful exercise program consists of a warm up, aerobic exercise, and a cool down. Warming up is an
important part of your workout, and should begin every session. It prepares your body for more strenuous
exercise by heating up and stretching out your muscles. At the end of your workout, repeat these exercises to
properly cool down. We suggest the following warm up and cool down exercises:

5Questions? Call 888-888-7985
3G Cardio • 14647 So. 50th St. Suite 110 • Phoenix, AZ 85044
Plastic Cover
Central Tube
Rear Stabilizer
Front Stabilizer
Saddle
Support
Tube
Console
Main Frame
Seat
Pedals
Handle Bar
Tools
(U1) Bottle Holder
(U2) Water Bottle
(W1) Screw (W2) Washer (W3) Spring Washer
Z
O
YP
Q
X
N
S
W
R
U
T
( S1-L) ( S2-L)
Parts List
儀錶操作
COMPUTER OPERATIONS
12
6. Set GO to start programs
7. Run the program: When the time setting is 0:00, if you would like to keep running, the
speed matrix will display different picture in Custom 1; the incline matrix will display
different picture in Custom 2. The program will stop after run out all the setting.
Custom
(For user to set his own workout program)
:
1. Set Custom to custom programs.
2.Set ︽/︾ to adjust custom1 or custom 2,next Enter.
3.Set ︽/︾ to set exercise age,next Enter.
4. Set ︽/︾ to set exercise weight,next Enter.
5.1-24 BAR control panel on the console overlay for user to reach the ideal time,speed,
incline;
Set Enter adjust 1-24 bar; Set “Speed”+ / - to adjust speed;
Set “Incline”︽/︾ to set exercise Incline; Set ︽/︾ to set exercise time
CHEST STRAP (TRANSMITTER)
CHEST STRAP TRANSMITTER
To operate HRC, the user needs to wear a chest
strap transmitter
CHEST STRAP is not standard specification. It
is optional, please contact your dealer for more
details.
ATTENTION: Please use Polar belt compatible
chest strap.
1meter
TRANSMITTING AREA
The transmitting area is around 1 meter on
straight line. Please see the below drawing for
more detail for transmitting area.
Body index operation:
Body
6
www.3GCardio.com
CARDIO
3G
®
3G
CARDIO
®
N
P
W1
W3 W2
W1
W3
W2
O
N
Figure 1
Figure 2
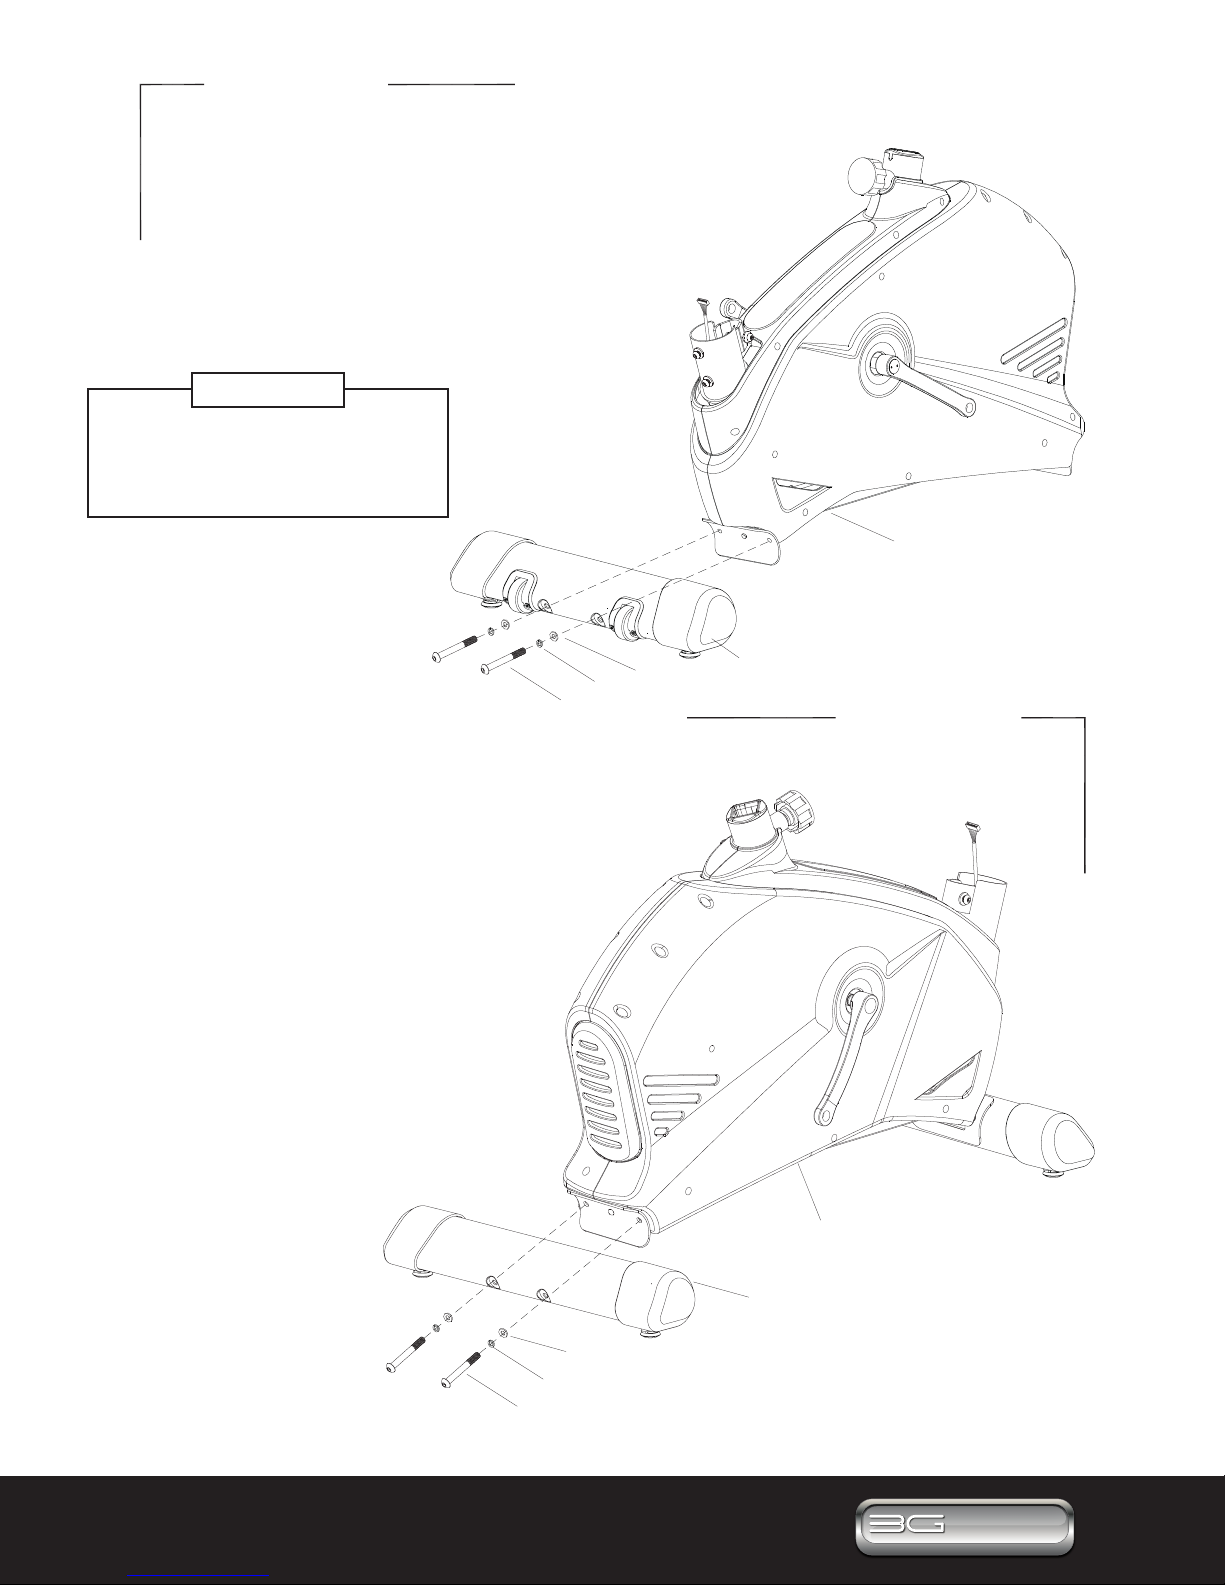
Connecting The Front Stabilizer Tube
Secure the front stabilizer tube (P) with the
main frame (N) by attaching bolt x2 (W1), spring
washer x2 (W3) and washer x2 (W2). Tighten
securely.
Tighten securely.
Connecting The Rear Stabilizer Tube
Attach the rear stabilizer tube (O) to the bracket at
the back of the main frame (N). Insert bolt 2x (W1)
and spring washer 2x (W3) and 2x washer (W2).
Use correct size tool to avoid stripping bolt!
Tighten securely.
Use correct size tool to
avoid stripping bolts!
WARNING
7Questions? Call 888-888-7985
3G Cardio • 14647 So. 50th St. Suite 110 • Phoenix, AZ 85044
N7
Z
N5
N34
N4
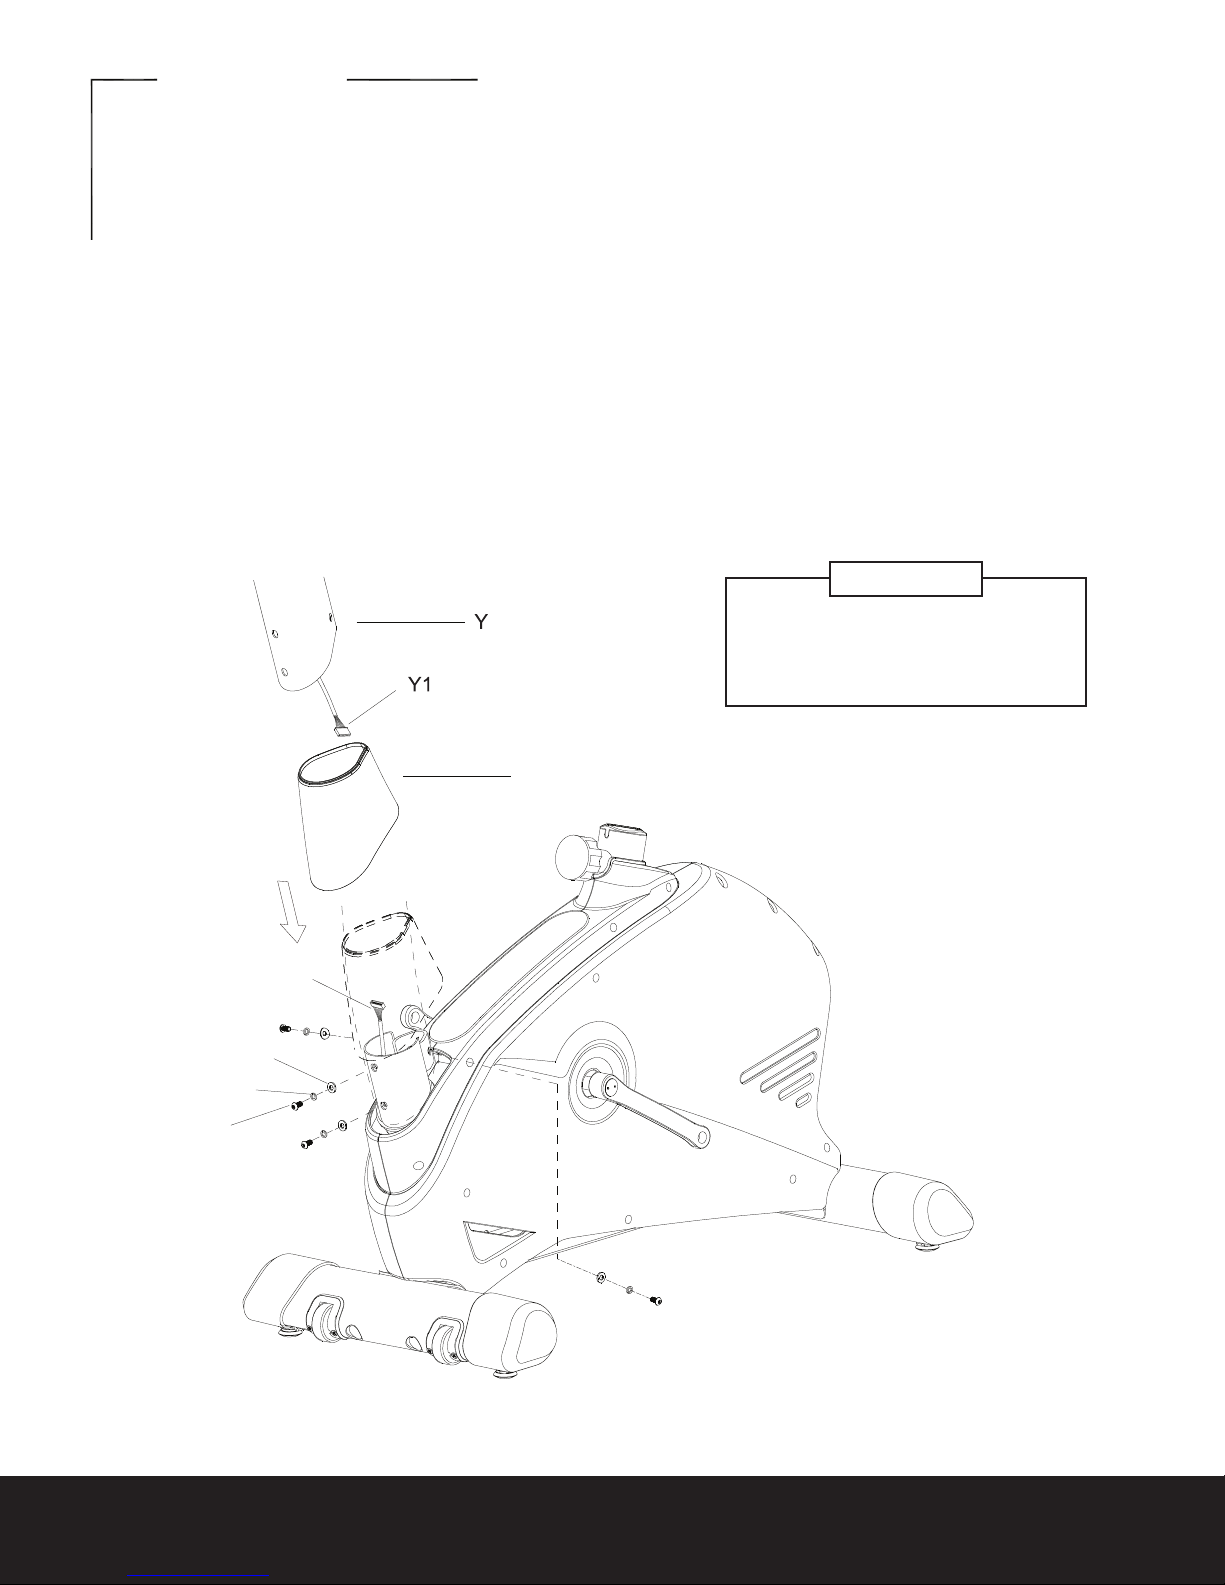
Figure 3
Assembly For Central Support Tube
STEP 1. First, remove the bolts (N5), Spring washers (N34) and washers (N4) from the main frame (N).
STEP 2. Find the Plastic Cover (Z) and slide it up the Central Support Tube (Y).
STEP 3. Connect the Sensor Wire (N7) and the Computer Cable (Y1).
STEP 4. Assemble Support Tube (Y) with the main frame (N) using bolts 3x (N5), spring washers (N34)
and washers (N4).
After all bolts are inserted then tighten securely.
CAUTION: Be careful to not pinch data cables in between frame.
Use correct size tool to
avoid stripping bolts!
WARNING

8
www.3GCardio.com
CARDIO
3G
®
3G
CARDIO
®
R3
2
R
R3 U
X
X
Z1
Figure 4
Figure 5
View A
Assembly For Handle Bar
First, remove 2x nut (Y2) from the handle bar housing.
Place the handle bar (R) into the handle bar housing
and secure it with 2x nuts (Y2). Prepare the sensor
wires (Y1 & R3) as shown on (view A).
Assembly For Console
Remove the 4x screws from the back side of the
computer (upper display).
Connect the sensor wires (R3 & Y1) with the
computer wires (Z1). Place the computer onto the
metal bracket (U) and tighten by using 4x screws.
DO NOT PINCH DATA CABLES!
Make sure all wires are correctly connected.
9Questions? Call 888-888-7985
3G Cardio • 14647 So. 50th St. Suite 110 • Phoenix, AZ 85044
1
1
Y
1
Figure 6-1
Figure 6-2
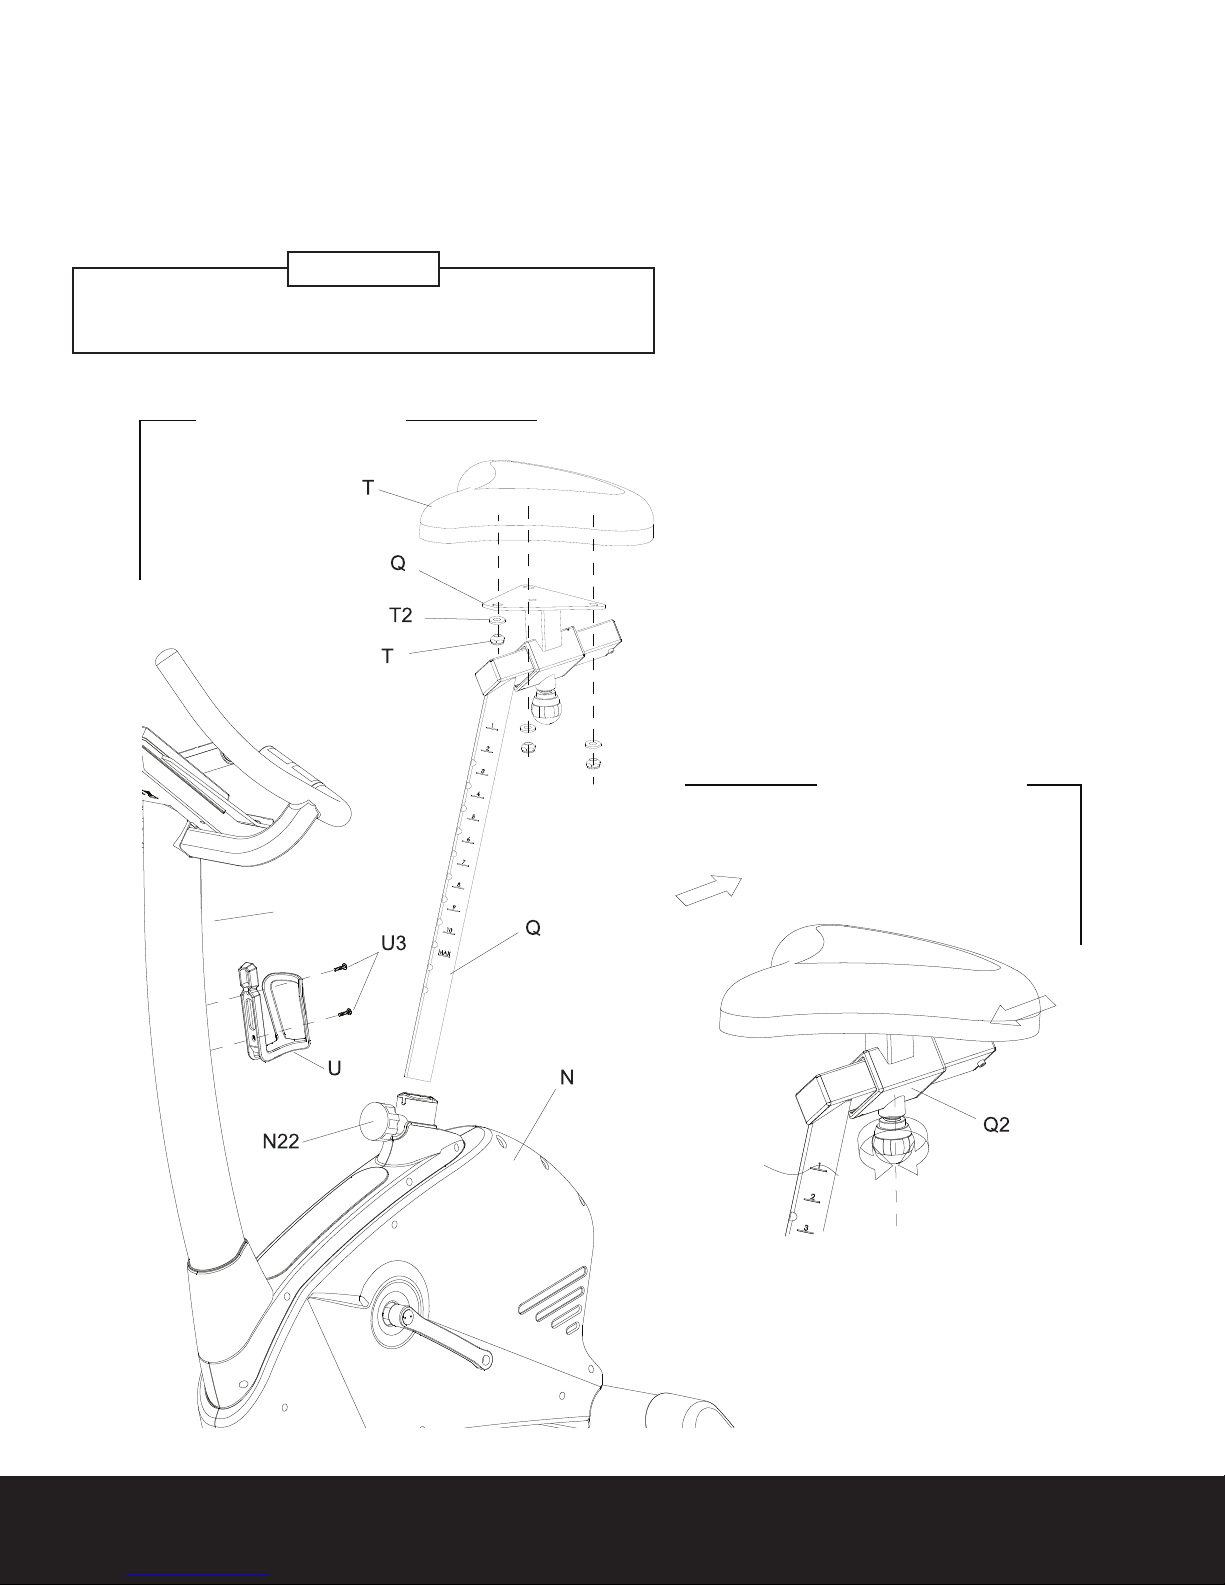
Assemble Seat Support Tube & Seat With Main Frame
STEP 1
Keep loosening knob (N22) while pulling outward until the Seat Support Tube (Q) slides into the main
frame (N). Release the knob (N22) after the Seat Support Tube is fully inserted. To tighten Seat, allow
Knob (N22) to set into one of the adjustment holes (Q) and then turn Knob (N22) to tighten.
STEP 2 SEAT ASSEMBLY
Lay the Seat onto the Seat Assembly Bracket
(Q1) and align the preinstalled bolts through
the holes in the Bracket. Attach the 3x
washer (T2) and 3x nuts (T1) on the bottom
of the bracket and tighten (T).
STEP 3: WATER BOTTLE HOLDER
AS S EM BLY
Remove the 2x screws (U3) from the support
tube (Y). Place the water bottle holder
(U1) onto the Upright Support Tube (Y) and
tighten with 2x screws (U3).
DO NOT OVERTIGHTEN!!
Insert the water bottle (U2) into the bottle
holder (U1).
Adjust The Seat
Loosen the Seat Adjustment Handle
(Q2) and move to the desired
position. Tighten before use.
Use correct size tool to avoid stripping bolts!
WARNING
10
www.3GCardio.com
CARDIO
3G
®
3G
CARDIO
®
1
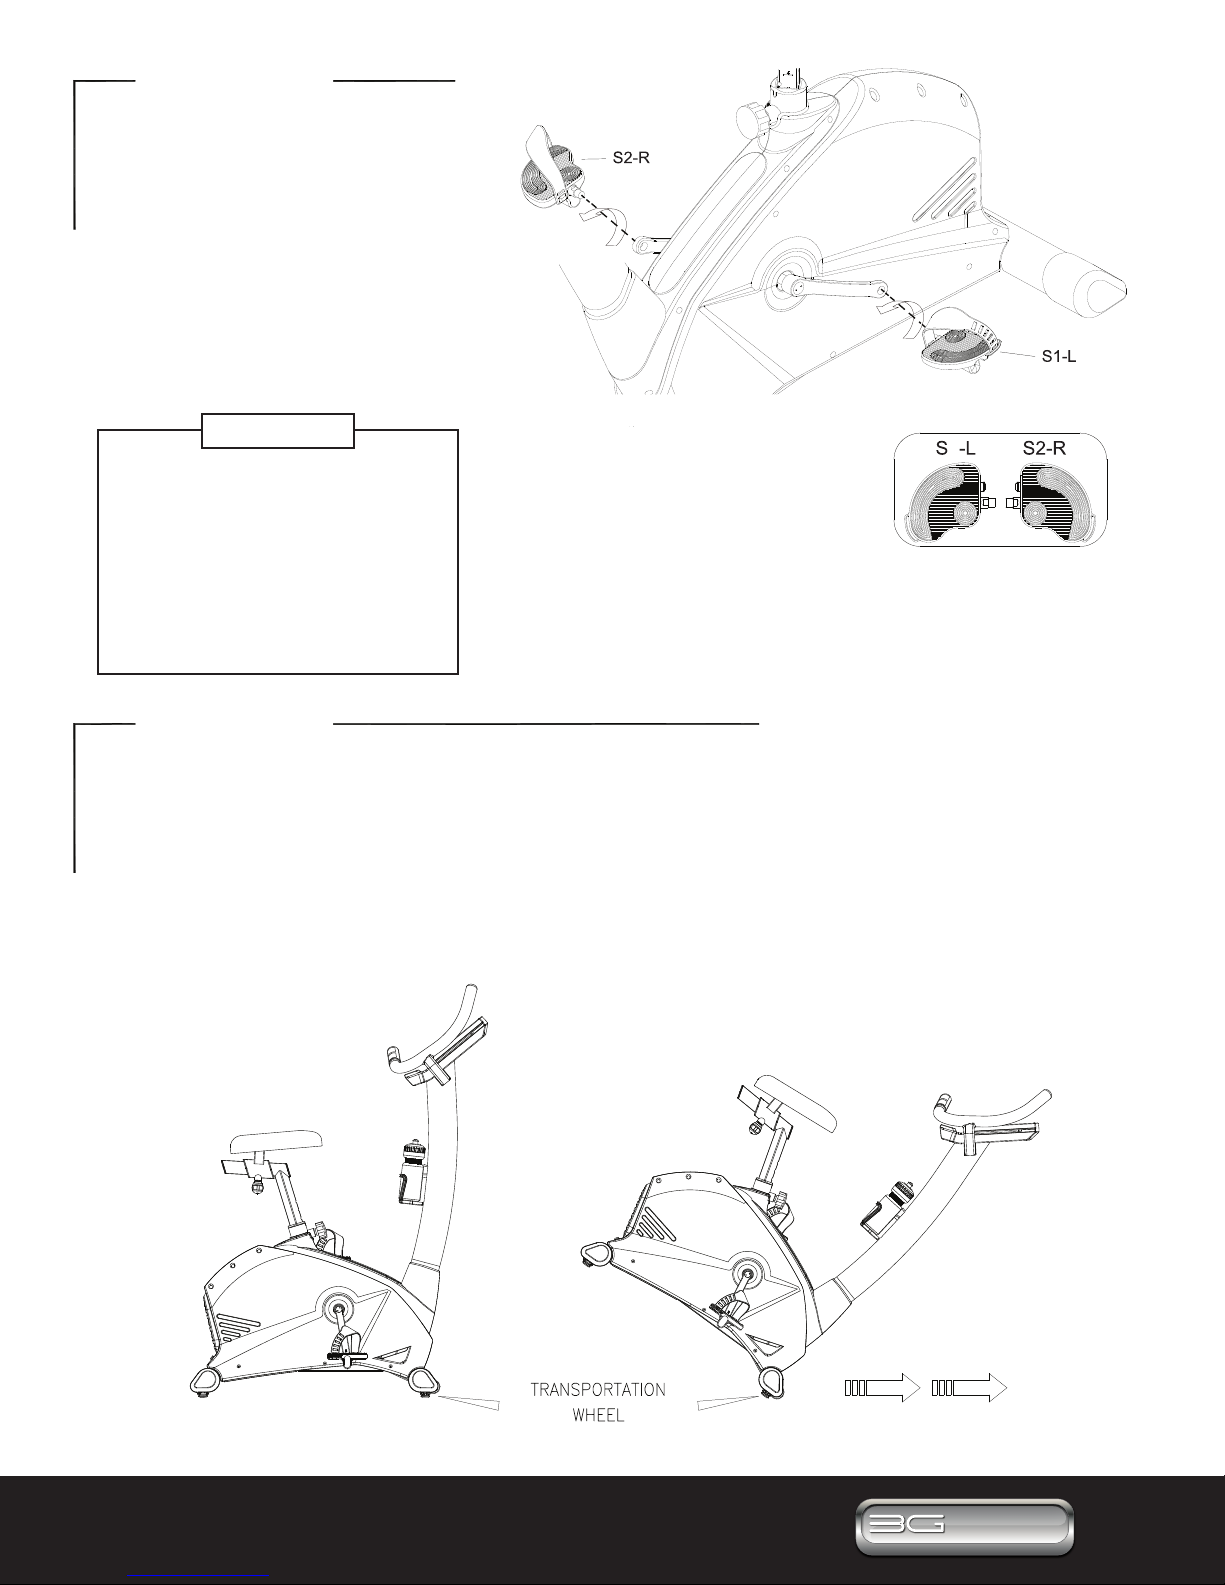
Figure 7
Figure 8
CONNECTING THE PEDALS
Attach the right pedal to user right side
crank and left pedal to left crank. Pay
special attention to the user left side
pedal “reverse threading”. To tighten
the user LEFT SIDE PEDAL, you will
turn the pedal bolt “counter clockwise.”
IMPORTANT! TIGHTEN BOTH
PEDALS VERY TIGHT!!!
MOVING YOUR 3G CARDIO UPRIGHT BIKE:
WARNING! USE CAUTION WHEN LIFTING OR ROLLING HEAVY ITEMS!
Step 1. The front stabilizer tube has built in transport wheels. Standing at the front of the bike, hold onto
the top handle bars (near the upper electronics display) and pull down to tip the bike towards you. (Never
pull on the actual electronics display)
Step 2. Lean the bike towards you until you have it balanced on the transport wheels. You can now move
the bike around.
PLEASE READ! POTENTIAL
SERVICE ISSUE!
1. Pedals must be tightened very
tight to crank arm. Failure to do so
will result in pedal bearing failure!
2. Use correct size tool to avoid
stripping bolts!
WARNING

11 Questions? Call 888-888-7985
3G Cardio • 14647 So. 50th St. Suite 110 • Phoenix, AZ 85044
ENTER
BUTTON FUNCTIONS
DISPLAY FUNCTIONS
TIME
SPEED
RPM
DISTANCE
RIGHT
LEFT
START
/ STOP
RESET
RECOVERY
CALORIES
PULSE
WATTS
To change screen data or increase
training resistance levels.
To change screen data or decrease
training resistance levels.
To conrm or approve settings.
To start a QUICK START workout or
stop a workout.
Press the RESET button for 5 seconds
to reset the electronics display to the
default screen.
To activate RECOVERY function.
Time will count from 00:00 to a maximum 99:00 minutes and can be set in 1
minute intervals. Time can be set to count up or down.
Displays current training speed in MPH. Can be changed to read KPH.
Displays the Rotation Per Minute. Display range 0~100 RPM
Accumulates total distance from 0 to 99.9 miles. The user may set a target
distance goal by adjusting the Toggle Wheel. Each increment is 0.1 miles.
Accumulates an estimated caloric expenditure during training from 0
to a maximum of 999 calories. (This calorie reading is an estimate and
should not be used for medical purposes and / or for the treating of
any medical condition)
User may set a desired target heart rate up to 230 BPM.
Display current workout watts. Display range 0~999.
12
www.3GCardio.com
CARDIO
3G
®
3G
CARDIO
®
CALORIES
PULSE User may set a desired target heart rate up to 230 BPM.
WATTS Display current workout watts. Display range 0~999.
PROGRAMMING MODE
1. Program selections are MANUAL
FIGURE 1 FIGURE 2 FIGURE 3 FIGURE 4
FIGURE 5 FIGURE 6 FIGURE 7 FIGURE 8
PROGRAM USER PROGRAM H.R.C. WATT
(FIGURE 8~12)
Accumulates an estimated caloric expenditure during training from 0 to a
maximum of 999 calories.
(This calorie reading is an estimate and should not be used for medical
purposes and / or for the treating of any medical condition)
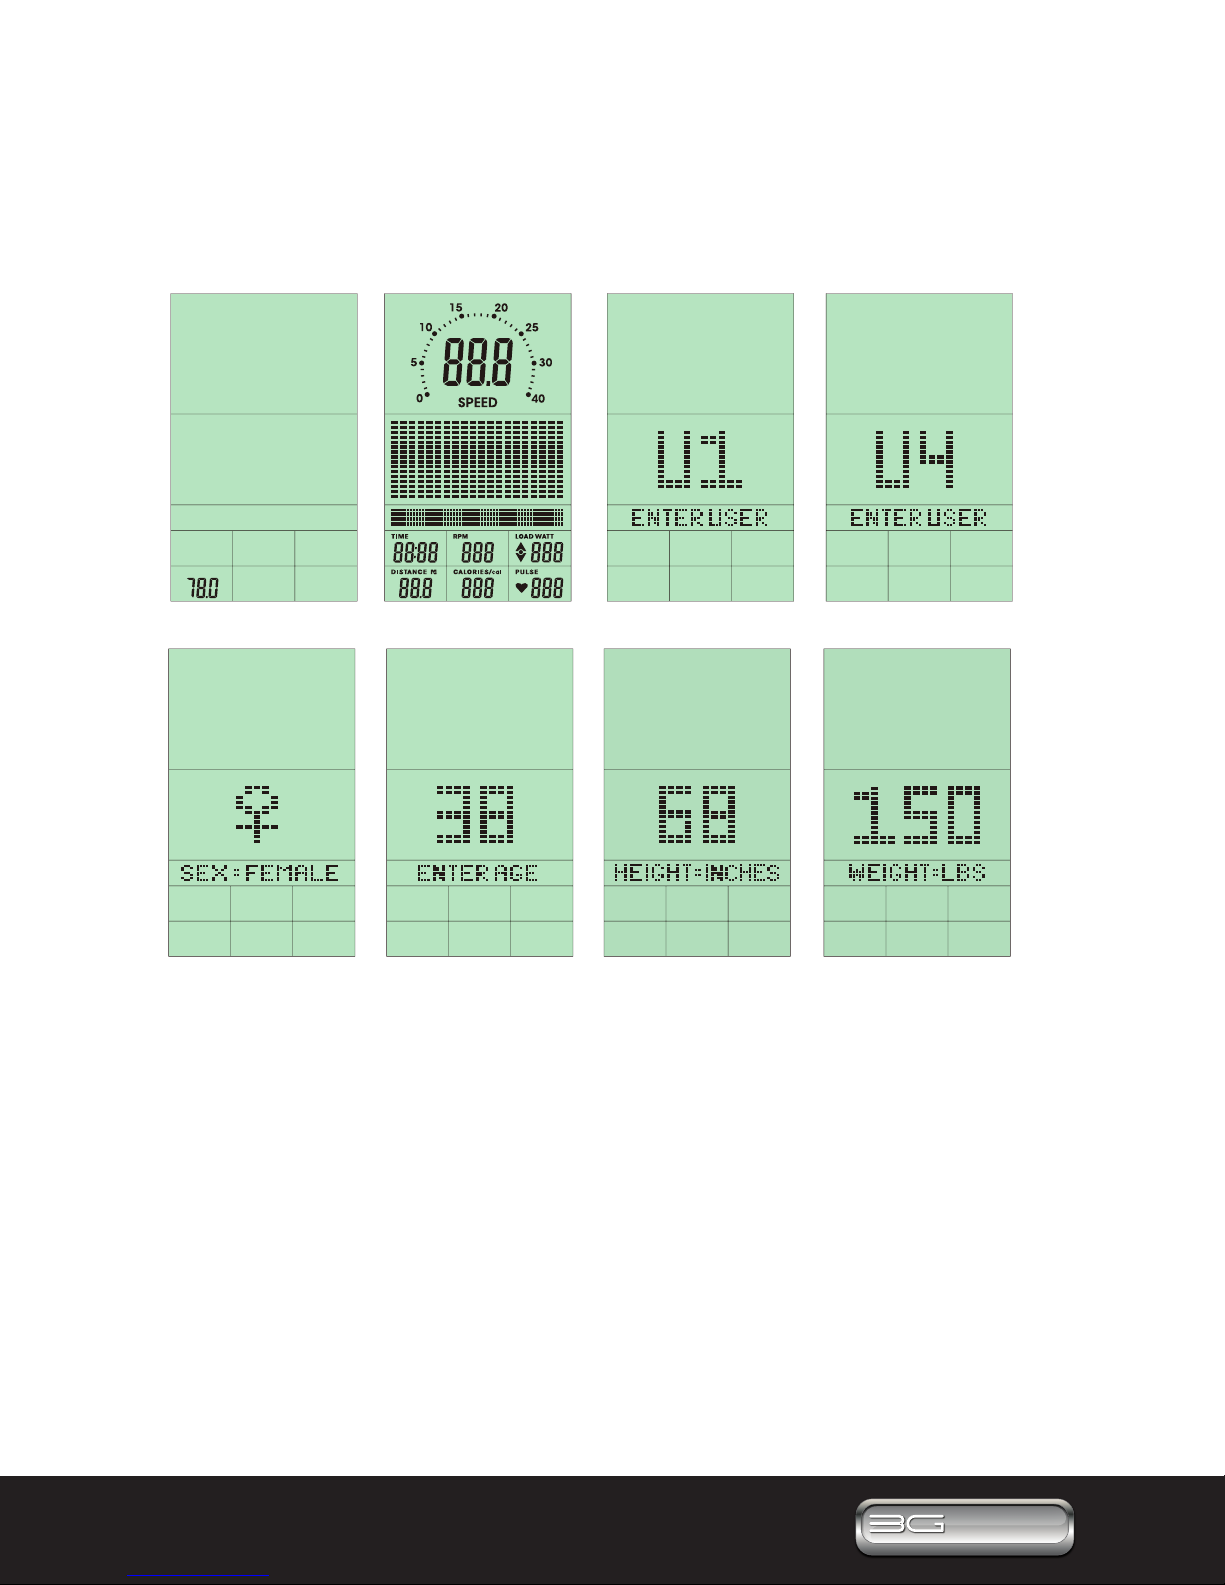
POWERING ON
Make sure bike is plugged in and turned on. Press the RESET button for 5 seconds. The LCD display will turn
all console lights on and you will hear a long 2 second beep. See below (FIGURE 1 & 2).
(1) Turn the Toggle Wheel to select User 1~4 and press ENTER for conrmation. (FIGURE 3~4).
(2) Dene user information for SEX, AGE, HEIGHT and WEIGHT. (FIGURE 5-8)
13 Questions? Call 888-888-7985
3G Cardio • 14647 So. 50th St. Suite 110 • Phoenix, AZ 85044
FIGURE 9 FIGURE 10 FIGURE 11 FIGURE 12
FIGURE 14 FIGURE 15
FIGURE 13
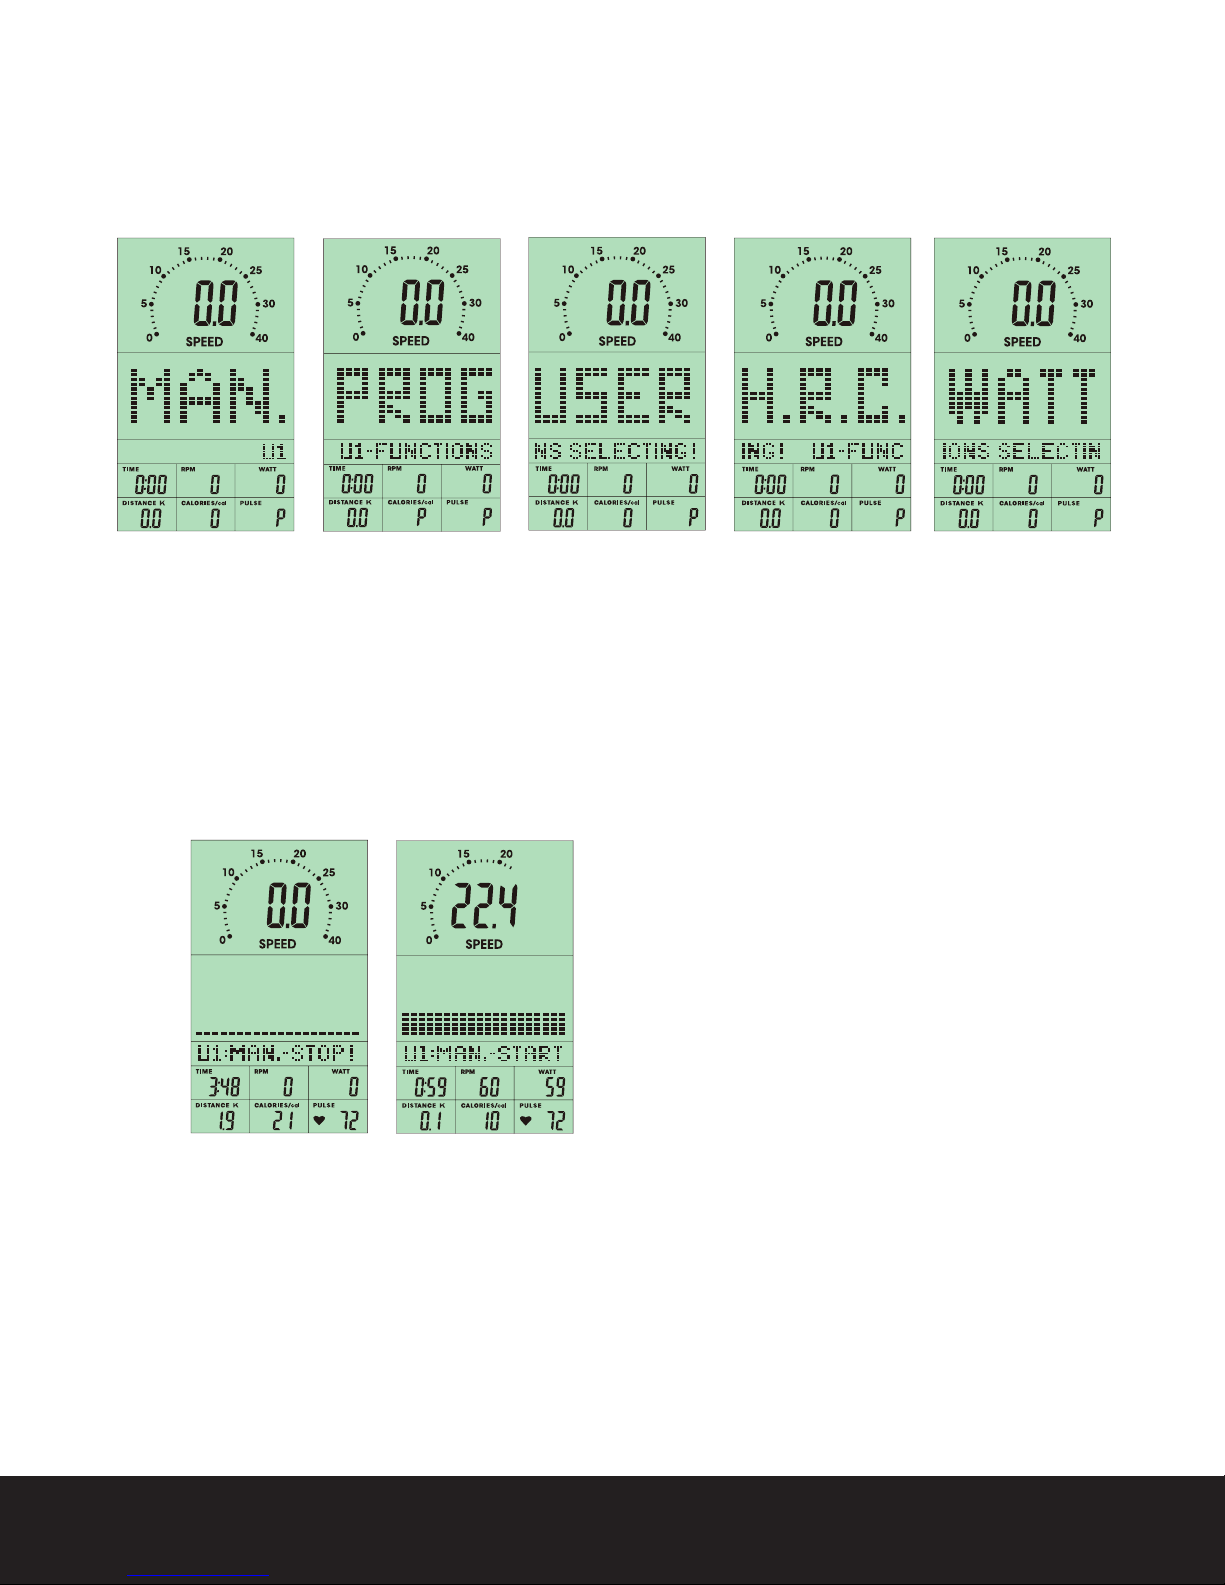
QUICK START IN MANUAL
1. Press ENTER to enter into a MANUAL program (FIGURE 14).
2. Press START/STOP to begin program. The resistance level (load) is adjustable during workout.
3. User can press START/ STOP to end program.
PROGRAMMING MODE
1. Quick Start – Press the START button for Quick Start / Manual mode. (FIG 9)
2. Program selections are MANUAL → PROGRAM → USER PROGRAM H.R.C. → WATT (FIGURE 9~13)
3. Rotate the Toggle Wheel to select the program you want and press ENTER to conrm.

14
www.3GCardio.com
CARDIO
3G
®
3G
CARDIO
®
FIGURE 14 FIGURE 15 FIGURE 16 FIGURE 17
FIGURE 18 FIGURE 19 FIGURE 20 FIGURE 21
USER SELECT U1-U4
PRESS
RESET 3 SEC
TO RESET
CLOCKWISE OR
COUNTER-CLOCKWISE
MANUAL mode
PRESS
ENTER
CLOCKWISE OR
COUNTER-CLOCKWISE
CLOCKWISE OR
COUNTER-CLOCKWISE
PRESS
ENTER
PRESS
ENTER
CLOCKWISE OR
COUNTER-CLOCKWISE
CLOCKWISE OR
COUNTER-CLOCKWISE
PRESS
ENTER CLOCKWISE OR
COUNTER-CLOCKWISE
CLOCKWISE OR
COUNTER-CLOCKWISE
PRESS
ENTER
PRESS
ENTER
FUNCTION SELECT
T
I
M
E
P
U
L
S
C
A
L
O
R
I
E
S
D
I
S
T
A
N
C
E
E
CLOCKWISE OR
COUNTER-CLOCKWISE
PRESS
ENTER
START/
STOP
MANUAL MODE
1. After selecting MANUAL mode (FIGURE 14), user can adjust the Toggle Wheel to increase / decrease
resistance level from 1 to 16, Press ENTER to conrm.
2. TIME, DISTANCE, CALORIES, and PULSE may be preset prior to the start of a workout. Rotate the Toggle
Wheel to adjust goal data and press ENTER to conrm. Press RESET to return to the MANUAL setting.
3. Resistance level (load) is adjustable during the workout.

15 Questions? Call 888-888-7985
3G Cardio • 14647 So. 50th St. Suite 110 • Phoenix, AZ 85044
FIGURE 22 FIGURE 23 FIGURE 24 FIGURE 25
USER SELECT U1-U4
PRESS
RESET 3 SEC
TO RESET
CLOCKWISE OR
COUNTER-CLOCKWISE
PROGRAM mode
PRESS
ENTER
CLOCKWISE OR
COUNTER-CLOCKWISE
CLOCKWISE OR
COUNTER-CLOCKWISE
PRESS
ENTER
PRESS
ENTER
CLOCKWISE OR
COUNTER-CLOCKWISE
CLOCKWISE OR
COUNTER-CLOCKWISE
PRESS
ENTER CLOCKWISE OR
COUNTER-CLOCKWISE
PRESS
ENTER
PRESS
ENTER
FUNCTION SELECT
T
I
M
E
CLOCKWISE OR
COUNTER-CLOCKWISE
PRESS
ENTER
PROGRAM SELECT P1 to P12
P1 P2
P3
P4
P5
P7 P6
P8
P9
P10
P11
P12
CLOCKWISE OR
COUNTER-CLOCKWISE
PROGRAM MODE
1. After entering PROGRAM mode, turn the Toggle Wheel to select a program from P1 to P12, press
ENTER to conrm.
2. Preset the desired workout TIME and press START/STOP to start workout or press ENTER to adjust
additional target goals such as TIME, DISTANCE, CALORIES, and PULSE.
Table of contents


