JUB TROPO User manual

Division of
www.justultrabikes.com
Owner’s
User Manual
T R O P O

TROPO FOR THE EVERYDAY COMMUTER
Detailed specification
Size: 20inch foldable E-Bike
Frame: Material Steel Frame
Fork: Steel front fork without shock absorber
Headset: Integrated sealed headset
Head bar: Black Aluminium Alloy head bar
Grip: Ergonomical design grip
Stem: Black Aluminium Alloy stem
Saddle: Ergonomical design E-bike saddle
Seat Post: Aluminium matt black seat-post
Kick-Stand: Two hole top class kick-stand
Shift-lever: SHIMANO 7 speed shift-lever TX30
Rear Derailleur: SHIMANO rear derailleur TY300
Paddle: Foldable paddle
Speed Shift: Lithium battery specialised speed shift-lever
Brake: Lithium battery specialised electric -off shift-lever
Brake System: Disc brake
Crankset: Steel crankset 46T
Cassette: SHIMANO TZ50 –7 speed cassette
Tyre: 20 x 1.75 Tubeless Tyre
Chain: KMC electric chain
Front Hub: Aluminium Alloy hub
Rim: Alloy aluminium colourful painting rim 36holes 14G
Painting: Germany static inner stick painting
Electric motor: 36V*250W brushless motor
Battery: 36V*10AH LG Lithium battery
Controller: 36V controller
Display: LCD Display
Light: LED spot-light
Charger: EU standard DC 2.5 charger
Speed (km/h): Speed assistance to maximum 25 km/h
Duration: Approximately 35-40km
Assistant Function: 5 assistance levels, it can make the riding easier up to 70%

READ ALL INSTRUCTIONS AND WARNINGS BEFORE USING THIS PRODUCT.
This manual provides important information on proper operation & maintenance. Every effort has been
made to ensure the accuracy of this manual. These instructions are not meant to cover every possible
condition and situation that may occur. We reserve the right to change this product at any time without
prior notice.
IF THERE IS ANY QUESTION ABOUT ACONDITION BEING SAFE OR UNSAFE, DO NOT OPERATE THIS
PRODUCT!
If you experience a problem or have any questions, contact Customer Service at +27 32 004 0036 or send
an email to sales@jubikes.com.
KEEP THIS MANUAL, SALES RECEIPT & APPLICABLE WARRANTY FOR FUTURE REFERENCE.
1 YEAR LIMITED WARRANTY
This E-Bike includes a 12-month warranty against manufacturing defects in materials or workmanship on
its frame, battery, controller, and motor assembly. This warranty is void in its entity by any modification of
the frame, fork, or components. This warranty is expressly limited to the repair or replacement of a
defective item, and said repair or replacement is the sole remedy of the warranty. This warranty extends
from the date of purchase, is offered only to the original owner, and is not transferable. This warranty
applies only if purchased through an authorized dealer or distributor. Audiomotion is not responsible for
incidental or consequential damages.
THIS WARRANTY DOES NOT COVER:
• Normal wear and tear
• Damage or failure due to accident, misuse, abuse, or neglect
• Improper assembly
• Improper follow-up maintenance
•Non-compatible installation of components that were not part of the scope of delivery at the time the
product was handed over, or damage caused by unprofessional installation of these add-on components.
• Labour charges for part replacement or changeover
Register your new E-Bike within 30 days after purchase in order to activate the warranty.
Register via email at [email protected]
IMPORTANT SAFETY INFORMATION SAFETY INSTRUCTIONS BEFORE YOU RIDE
Read all safety warnings and all instructions. Failure to follow the warnings and instructions may result in
electric shock, fire and/or serious injury. Save all safety warnings and instructions for future reference and
contact us at technical@jubikes.com for support.
Do not open the Pedal Assist Drive System (PAS) by yourself. The drive unit is maintenance free and must
be repaired only by qualified experts and only with original spare parts. This will ensure that the safety of
the drive unit is maintained. Unauthorized opening of the drive unit will void warranty claims.
All components mounted to the drive unit and all other components of the E-Bike drive may be replaced
only with identical components or components specifically approved for your E-Bike by the bicycle
manufacturer. This protects the drive unit against overload and damage.
Use only original supplied battery packs approved for your E-Bike by the manufacturer. Using other battery
packs can lead to injuries and pose a fire hazard. When using other battery packs, Audiomotion shall not
assume any liability and warranty.
Do not sit on the bicycle with the kickstand down. Kickstand is not designed to support the weight of a
person. Make sure kickstand is up before riding.
Correct tightening force on fasteners (nuts, bolts, screws) on your bicycle is important. If too little force is
applied, the fastener may not hold securely. If too much force is applied, the fastener can strip threads,
stretch, deform or break. Either way, incorrect tightening force can result in component failure, which can
cause you to lose control and fall.
Please read and observe the safety warnings and instructions.
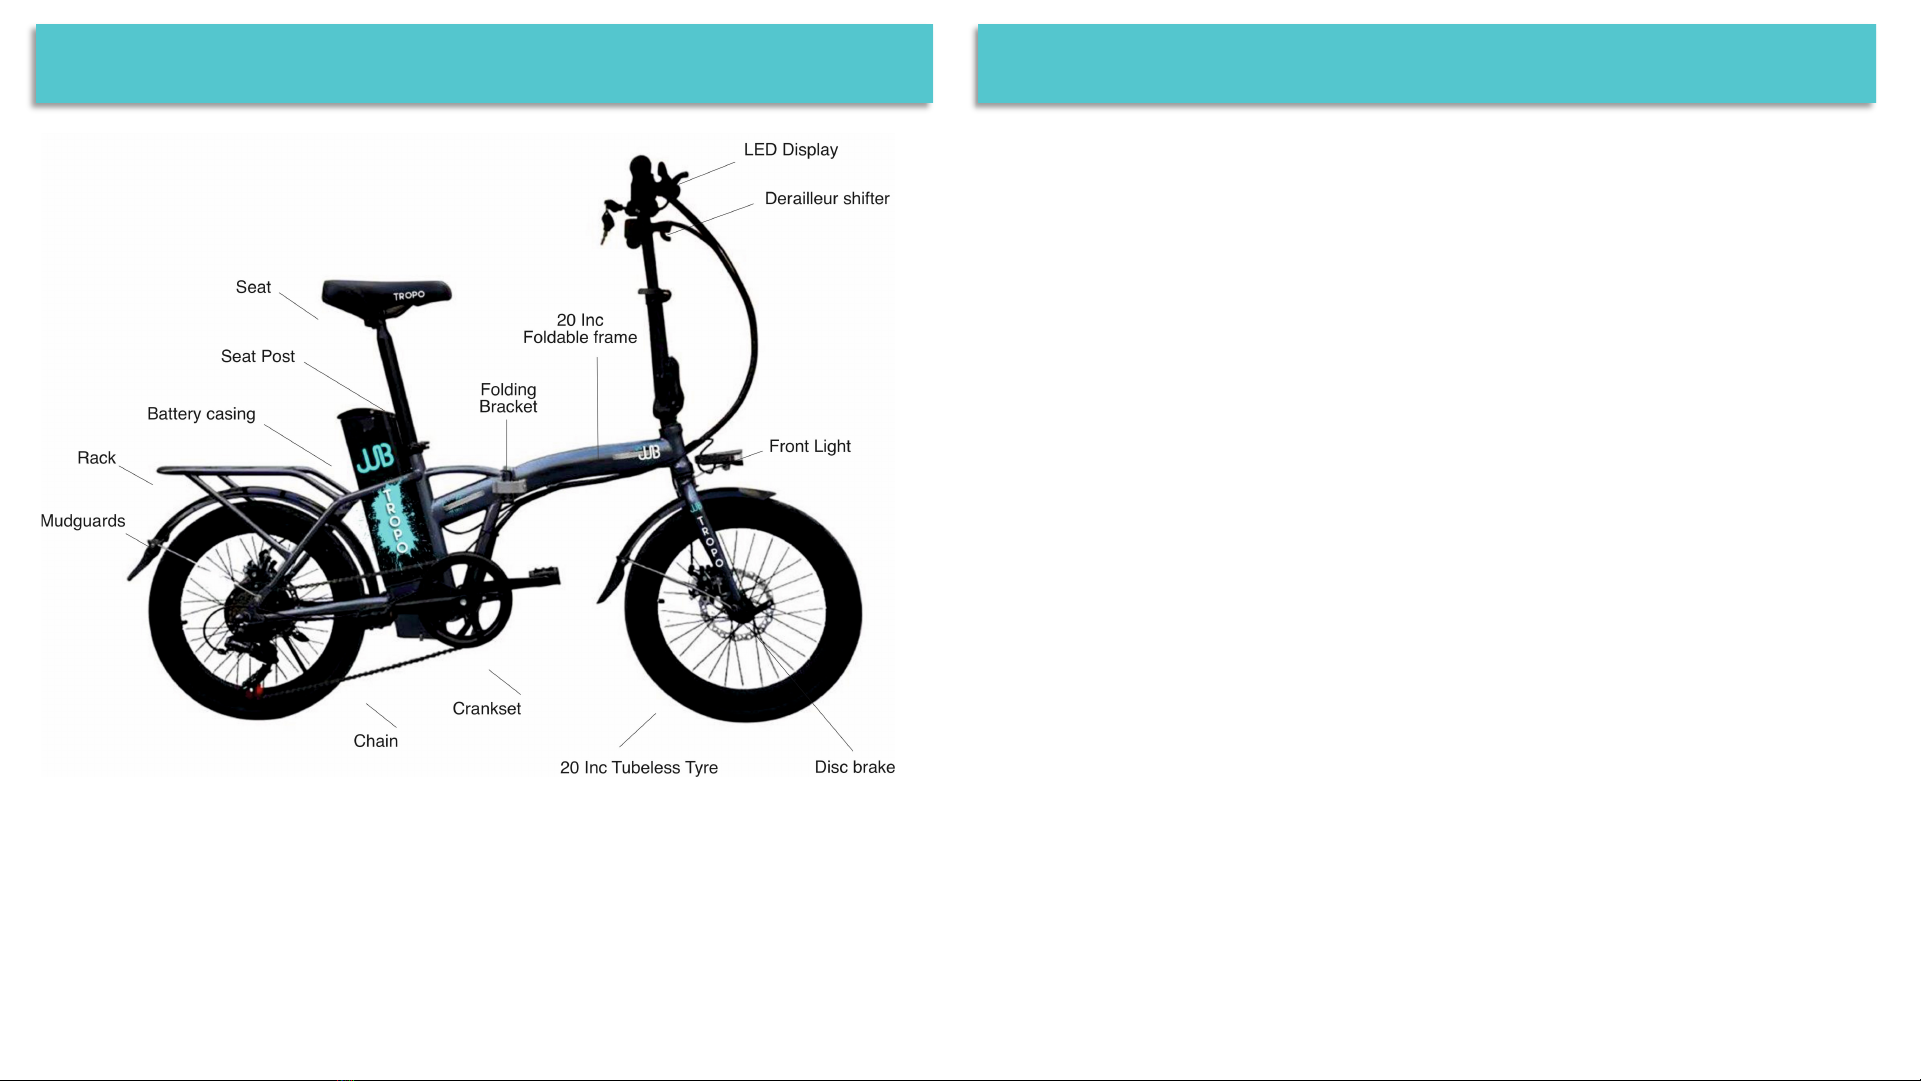
The Tropo has an electric pedal assist drive system (PAS). When the assist system is turned ON, the drive
unit engages to provide power only while you are pedalling. The amount of power provided by the drive
unit depends on your pedalling force and the assistance mode/level you set with the handlebar control
unit. At anytime, if you stop pedalling, the drive assist will disengage. The drive assist system power
reduces progressively and cuts off as the bike reaches a speed of 25 kmph or sooner if you stop pedalling.
The drive assist re-engages when speed drops below 25 kmph as long as the pedals are turning. Whenever
the drive assist system is turned OFF, you can pedal the bike normally. The drive system will not engage.
The throttle is engaged by twisting the throttle on the handle bar. When the throttle engaged, the motor
provides power and propels the bike forward.

The Tropo is designed for the ultra style commuter with intended use for paved roads, gravel or dirt roads
that are in good condition and on bike paths. The Tropo is not suitable for extreme mountain biking.
Please read the following information to help protecting you while riding.
Always wear aHelmet!
Helmets significantly reduce the possibility and severity of head injuries. Always wear a helmet that
complies with BS EN 1078:1997.Do not wear loose clothing that can become tangled in the moving parts
of the E-bike. Wear sturdy shoes and eye protection.
Always wear a properly fitted helmet which is comfortable, lightweight, has good ventilation and covers
the forehead when riding a bicycle. It is strongly advised that a properly fitted bicycle safety helmet be
worn at all times when riding your bicycle.
Know your E-bike!
Your new E-bike incorporates many features and functions that have never been built into a bicycle before.
Read the manual thoroughly to understand how those features enhance your riding pleasure and safety.
Ride Defensively!
One of the most common cycling accidents is that when the driver of a parked car opens his door into a
rider’s path. Another common occurrence is when a car or another cyclist moves suddenly into your path.
Always be aware of other vehicles around you.Do not assume that the driver or other cyclists can see you.
Get prepared to take evasive action or to stop suddenly.
Make yourself easy to see!
Make yourself more visible by wearing bright reflective clothing. Keep your reflectors clean and properly
aligned. Signal your intentions so that drivers and other cyclists can notice your actions.
Ride within your limits!
Take it slow until you are familiar with conditions that you encounter. Be extra careful especially in wet
conditions as traction can be greatly reduced and brakes less effective.Never ride faster than conditions
warrant or beyond your riding abilities. Remember that alcohol, drugs, fatigue and inattention can
significantly reduce your ability to make good judgments and ride safely.
IMPORTANT SAFETY INFORMATION
Keep your E-bike in safe condition!
Follow the inspection and maintenance guidelines. Check critical safety equipment before each and every
ride.
Know the law!
Cyclists are required to follow the traffic rules. Additionally, some communities regulate the use of
motorized bicycles regarding minimum age requirements and necessary equipment. Check with your local
police department for specific details.
Correct frame size!
When selecting a new bicycle, the proper frame size is avery important safety consideration. Most full size
bicycles come in a range of different frame sizes. These sizes usually refer to the distance between the
centre of the bottom bracket and the top of the frame seat tube.
For safe and comfortable riding there should be clearance of no less than 1-2 inches between the groin
area of the intended rider and the top tube of the bicycle frame, while the rider straddles the bicycle
with both feet flat on the ground.
The ideal clearance will vary between types of bicycles and the rider preference. This makes straddling the
frame when off the seat easier and safer in situations such as sudden traffic stops. Woman can use a men’s
style bicycle to determine the correct size of woman’s model.
Reflectors!
Reflectors are important safety devices which are designed as an integral part of your bicycle. Regulations
require every bicycle to be equipped with front, rear wheel and pedal reflectors. These reflectors are
designed to pick up and reflect street lights as well as car lights in away that helps you to be seen and
recognised as a moving cyclist.Reflectors and their mounting brackets must be checked regularly to make
sure they are clean, straight, unbroken and securely mounted. Replace damaged reflectors and straighten
or tighten any that are bent or loose.
Your bicycle is supplied with one front reflector, one rear wheel reflector, and four pedal reflectors. These
are important safety and legal requirements, and should remain securely fitted in good, clean condition at
all times. Periodically inspect all reflectors, brackets and mounting hardware for signs of wear or damage.
Replace immediately if damage is found.
IMPORTANT SAFETY INFORMATION

BATTERY WARNING
•Do not immerse the battery in water
•Store in cool, dry environment
•Only use the supplied official charger
•Do not tamper with the battery case or internal cells for any reason instead consult the supplier
•Keep out of reach of children
•The supplier and manufacturer are not responsible for breakages or other losses from misuse, incorrect
fitment or not following the correct charging procedure.
POWER CHARGING
Connect the charger to the battery, then plug into an appropriate mains power supply.
When charging, the charging indicator lights shows red. Once fully charged, the charging indicator light
shows green
CHARGING WARNING
•You must use the charger provided
•The charging time is 4 – 6 hours for a full charge on a fully depleted battery
•Never charge more than 10 hours
•Do not charge overnight
•Keep away from flammable material while charging
•If you notice any smell or smoke, stop charging and remove the plug immediately.
TROPO FOLDING E-BIKE DIAGRAM
Size:20 Inc Foldable E-Bike;Frame Material:Steel frame material;Fork:Steel front fork
without shock absorber;Shift-lever:SHIMANO 7speed shift-lever;Rear Derailleur:SHIMANO
rear derailleur;Cassette:SHIMANO 7speed cassette;Brake:Lithium battery specialised
electric-off shift-lever;Brake System:Disc brake;Speed Shift:Lithium battery specialised
speed shift-lever;Electric motor:36V*250Watt brushless motor;Battery:36V*10AH built-in
Lithium battery
SETUP: BATTERY & CHARGING

TROPO SETUP: FOLDING METHOD
TROPO SETUP: SADDLE POSITION
TROPO SETUP: PEDALS
ENSURE THE TROPOIS TURNED OFF BEFORE
PROCEEDING
•Fold the pedal (Spring clip release is located inside
the pedal body).
•Release the lock lever from its clasp on the side of
the Tropo.
•Unlock the lock lever and shift upwards to release
internal locking pin.
•Fold the bike in half.
TROPO SETUP: DERAILLEUR SYSTEM
CORRECT SADDLE ADJUSTMENT IS AN IMPORTANT FACTOR FOR BEST PERFORMANCE AND COMFORT
Up and down movement:
Your leg length determines the correct saddle height. The saddle is at the correct height if you can just
reach the pedal with your heel, when the pedal is in it’s lowest position and you are seated on the saddle.
To check the correct saddle height, perform the following:
•Sit on the saddle, and place one heel on a pedal.
•Rotate the crank until the pedal with your heel on it is in the
lowest position and the crank arm is parallel to the seat tube.
Your leg should be slightly bent and just touching the center of
the pedal. If this is not the case, your saddle height needs to be
adjusted.
The derailleur system includes a rear derailleur, the shift levers and the derailleur control cables, all of
which must function properly for smooth gear shifting to occur.
Begin by shifting the rear shifter to the largest number indicated, loosen the cable from the rear derailleur
cable anchor bolt, and place the chain on the smallest sprocket.
Adjust the high limit screw so that the guide pulley and the smallest
sprocket are lined up vertically.Re-tighten the cable, pull out any
slack, and re-tighten the anchor bolt securely. Shifting through the
gears, making sure that each gear is achieved quietly and without
hesitation.
If necessary, use the barrel adjuster to fine tune the cable tension by
turning it the direction you want the chain to go.For example, turning
clockwise will loosen the cable tension and move the chain away from
the wheel, while turning counter-clockwise will tighten the cable
tension and direct the chain to the wheel.
PEDAL INSTALLATION
Pedals come in pairs with “R” and “L” labels (Right and Left).Correctly
tighten the pedals to avoid thread damage and personal injury.
•Left Pedal must be tightened counter clockwise into left arm crank.
Carefully tighten using the supplied pedal wrench until the pedal is fully
tightened.
•Right Pedal must be tightened clockwise into right arm crank (located
on the same side as the bike chain).
•Both pedals (each side L and R) thread towards the front of the bike to
tighten, and towards the back of the bike to loosen.

To maximize the useable life of the battery, charge immediately after riding or when battery is running
low.
Attach the charger connector charge slot located on the battery, and the AC connector to a230V power
source with the supplied plug.
There is an LED indicator on the battery charger unit. When the power is connected and the battery is
charging, the LED indicator turns red. When the LED indicator turns green, it means the battery is fully
charged.
Recommended charging time : 3 – 5 hours.Do not charge continuously for more than 8hours at any
one time.
After charging, unplug the input socket first (from the outlet), then unplug the output socket (from the
bike). The battery charger must have constant voltage. Fluctuating voltage or fluctuating power supply of
any kind may damage the battery storage cells so avoid charging from a generator or off grid solar/wind
source.
Check the battery Pack before using for the first time
The battery pack is supplied partially charged. To ensure full battery pack capacity, completely charge the
battery pack for 7 hours before using for the first time.
BATTERY CARE
Even with proper care, rechargeable batteries do not last forever.Every time the battery is discharged and
subsequently recharged, its relative capacity decreases by a small percentage. You can maximize the life of
your battery by following the instructions in this guide. Batteries should be fully charged immediately
when they are fully depleted for the full recommended charge times.
For example, 100 % charge, leave the battery on the charger for one full hour after the charger indicator
lights turns green
Never charge batteries for longer than 8 hours as damage will occur
Lithium batteries do not have a “memory”.Partial discharge/charge cycles will not harm the batteries’
capability or performance.
Always be sure to turn the bike power switch to “OFF” after each use. If you leave the power switch in the
“ON” position, or your product has not been charged for a long period of time, the battery may reach a
stage at which it will no longer hold a charge.
TROPO : BATTERY CHARGING TROPO : PEDAL ASSIST SYSTEM
Your Tropo has apedal assisted drive system.
The drive assisted system consists of a driving unit, a battery, a controller, and various electronic
components (harness wires, sensors and switches). It is important to know that when the assist system is
turned on, the driving unit engages to provide power only while you are pedaling. The amount of power
provided by the drive unit depends on your pedaling force and the assistance level you set with handlebar
control unit at any time.If you stop pedaling, the drive assistant will disengage. Upon all models, the
driving assisted system power reduces progressively and cuts off as the bike reaches a speed of 25 km/h,
or sooner if you stop pedaling. The drive assist re-engages when speed drops below 25 km/h as long as the
pedals are turning.
The Tropo is equipped with a multi-function display, showing the PAS level (5 Levels), Trip distance, total
trip distance, battery level and speed.
To turn the E-bike ON, hold the power button for 3 seconds.
Pressing the “-” button will decrease the level of PAS, and pressing the “+” button with increase the PAS
level. The Tropo is equipped with throttle function. To use the function, simply twist the throttle on the
handle bar and the bike will move forward without pedaling. It can be deactivating by turning the key in
the off position.
TROPO : RIDING SAFELY
Be familiar with all of the component parts of the Tropo and test all the electric functions before riding.
Make sure all the components of the bicycle are in good condition, the battery is charged and the tyres are
correctly inflated.
When riding, please follow the road laws as all other road vehicles, including giving way to pedestrians,
stopping at red lights and stop signs.
Bike control
•Don’t carry packages or passengers that will interfere with your visibility or control of the bicycle.
•Do not lock up the brakes. When braking, always apply the rear brake first, then the front. The front
brake is more powerful and if it is not correctly applied, you may loose control.
•Maintain a comfortable stopping distance from all other riders, vehicles and objects. Safe braking
distance and force is subject to the prevailing weather conditions.

TROPO : SERVICE & MAINTENANCE
Some service and maintenance can and should be performed by the owner, and requires no special tools or
knowledge beyond what is presented in this manual.
The following are examples of the type of service you should perform yourself. All other service,
maintenance and repair should be performed in a properly equipped facility by a qualified E-bike mechanic
using the correct tools and procedures specified by the manufacturer.
Break-in Period
Your E-bike will last longer and work better if you break it in before riding it hard. Control cables may
stretch or sear when a new E-bike is first used and may require readjustment by your dealer. Your
mechanical safety check will help you identify some things that need readjustment.
Before every ride
Perform a visual safety check and check tyre pressure.
After every long hard ride, if the E-bike has been exposed to water or grit, or at least every 50 km:
•Clean the E-bike
•Lightly oil the chain, freewheel cogs and rear derailleur pulley bushings. Wipe of excess oil.Talk to your
dealer about the best lubricants and the recommended lubrication frequency for your area.
After every long or hard ride or after every 10 to 20 hours riding
•Squeeze the front brake and rock the E-bike forward and back. Does everything feel solid? If you feel a
clunk with each forward or backward movement of the E-bike, you probably have a loose headset.
•Lift the front wheel of the ground and turn it left and right. If you feel any binding or roughness in the
steering, you may have a tight headset.
•Make sure all bolts, nuts and mounting hardware are tight.
Warning
Like any mechanical device, an E-bike and its components are subject to wear and stress. Different
materials and mechanisms wear at different rates and have different life cycles.If a component’s life cycle
is exceeded, the component can suddenly fail, causing injury to the rider. Cracks, fraying and discoloration
are signs of stress-caused fatigue and indicate that a part is at the end or is useful life and should be
replaced.
TROPO : SERVICE & MAINTENANCE
Tyres information psi pressure indicated on the tyre
Please check tyre pressure regularly. This will affect the battery life on a single charge.
Basic maintenance please take your bike to an approved specialized technician. Please contact us for your
nearest approved agent.
The following procedure will help you maintain your E-bike for years of enjoyable riding.
Properly maintain the batteries by keeping them fully charged when not in use.
Do not ride your E-bike in the water and never immerse it in water as the electrical system may be
damaged.
Periodically check the wiring and connectors to ensure there is no damage and the connectors have good
continuity
Storage
Keep your E-bike in a dry location which is away from damp or rainy weather and the sun. Direct sunlight
may cause pant to fade or rubber and plastic parts to crack.Before storing your E-bike for a long period of
time, clean, lubricate all components and polish the frame.Deflate the tyres to half pressure and hang the
E-bike of the ground. Charge your batteries and make sure they are protected from water.Batteries
should be charged every 30 days to avoid capacity loss. Don’t cover the bicycle with plastic as damp and
condensation will result and it may cause rusting.
Important information to remember
Use approved replacement parts, particularly for safety –critical components.
Consult your approved professional agent.
Cycling can be a hazardous activity even under the best circumstances, giving proper maintenance to your
E-bike is your responsibility as it helps to reduce the risk of injury. This manual contains many “Warnings”
and “Cautions” concerning the consequences of failure to maintain or inspect your E-bike.

TROPO : TYRE MAINTENANCE
Flat Tyre
If you get aflat tyre,remove the wheel. Depress the tyre valve to let all the air out of the tube. Remove
one bead of the tyre from the rim by grasping the tyre at a point opposite the valve stem with both hands
lifting and peeling one side of the tyre of the rim.If the bead is on too tight for you to unseat it with your
hands, use tyre levers to lift the bead carefully over the tyre rim. Push the valve stem through the wheel
rim.Remove the inner tube.
Carefully check the outside and inside of the tyre for the cause of the puncture and remove the cause if it is
still here. If the tyre is cut, line the inside of the tyre in the area of the cut with some handy-tape, a spare
patch, a piece of inner tube, or whatever will keep the cut from pinching the inner tube.
Either patch the tube (follow the instructions in your patch kit) or use a new tube. Reinstall the tyre and
tube. Slip one tyre bead over the rim. Insert the tube valve through its hole in the rim.Feed the tube
carefully into the cavity of the tyre.
Inflate the tube just enough to give it some shape. Starting at the valve stem use your thumbs to seat the
tyre bead inside the rim.Work your way around both sides of the wheel until the entire bead is seated in
the rim.Be careful not to pinch the tube between the tyre bead and the wheel rim.If you have trouble
getting the last few inches of bead over the edge of the rim with thumb pressure, use a tyre lever and be
careful not to pinch the tube. To avoid punctures we recommend slime tyre sealant or similar.
Check to make sure the tyre is evenly seated around both sides of the rim and that the tube is inside the
tyre beads.
Push the valve stem into the tyre to make sure that the base is seated within the tyre’s beds. Inflate the
tube slowly to the recommended pressure, all the while checking to make sure that the tyre beads stay
seated in the rim. Replace the valve cap and re-install the wheel.
WARNING
Riding your E-bike with aflat or under-inflated tyre can damage the tyre, tube and E-bike, and can cause
you to lose control. Please ensure that your tyres are inflated to the correct PSI indicated on the tyre
Please visit www.justultrabikes.com to activate your warranty.
TROPO GETTING STARTED : MAINTENANCE CHECKLIST
Component or Condition Inspect
before
every ride
Inspect
periodically
Clean
and/or
lubricate
Adjust or
Tighten
Repair or
replace if
necessary
Tyre pressure √ √
Tyre wear or damage √ √
Brake pad adjustment √ √
Handlebar quick release
adjustment
√ √
Controls and displays √
Seat post quick release
adjustment
√ √
Brake pad wear √ √
Brake cable tension √ √ √
Wheel true √ √
Hub bearings √ √ √
Chain lubrication √ √
Derailleur adjustment √ √ √
Reflectors √ √
Battery and charger √ √
Headset √ √ √
Bottom bracket √ √ √

PROBLEM POSSIBLE CAUSE SOLUTION
Gear shifts not working
properly
•Derailleur cables sticking,
stretched or damaged
•Front or rear derailleur not
adjusted properly
•Indexed shifting not adjusted
properly
•Lubricate, tighten or replace
cables
•Adjust derailleurs
•Adjust indexing
Slipping chain •Excessively
worn or shipped chain
ring or freewheel sprocket teeth
•Chain work or stretched
•Stiff link in chain
•Non-compatible chain, chain ring
or freewheel
•Replace chain ring, sprockets
and chain
•Replace chain
•Lubricate or replace link
•Seek advice at a bicycle shop
Chain jumping off freewheel
sprocket or chain ring
•Chain ring out of true
•Chain ring loose
•Chain ring teeth bent or broken
•Rear or front derailleur side-to-
side travel out of adjustment
•Re-true if possible, or replace
•Tighten mounting bolts
•Repair or replace chain
ring/set
•Adjust derailleur travel
Constant clicking noises
when pedaling
•Stiff chain link
•Loose pedal axle, bearings
•Loose bottom bracket axle,
bearings
•Bent bottom bracket or pedal
axle
•Loose crankset
•Lubricate chain, adjust chain
link
•Adjust bearings, axle nut
•Adjust bottom bracket
•Replace bottom bracket axle
or pedals
•Tighten crank bolts
Grinding noise when
pedaling
•Pedal bearings too tight
•Bottom bracket bearings too tight
•Chain fouling derailleurs
•Derailleur jockey wheels dirt
•Adjust bearings
•Adjust bearings
•Adjust chain line
•Clean and lubricate jockey
wheels
Freewheel does not rotate Freewheel internal pawl pins are
jammed
Lubricate. If problems persists,
replace freewheel
TROPO SETUP: TROUBLE SHOOTING
PROBLEM POSSIBLE CAUSE SOLUTION
Brakes not working effectively •Brake blocks worn down
•Brake blocks/disc greasy, wet
or dirty
•Brake cables are binding,
stretched or damaged
•Brakes levers are binding
•Brakes out of adjustment
•Replace brake blocks
•Clean blocks and disc
•Clean, adjust, replace cables
•Adjust brake levers
•Centre brakes
When applying the brakes they
squeal or squeak
•Brake blocks worn down
•Brake block toe-in incorrect
•Brake blocks/disc dirty or wet
•Brake arms loose
•Replace blocks
•Correct block toe-in
•Clean blocks and disc
•Tighten mounting bolts
Knocking or shuddering when
applying brakes
•Brake disc bent
•Brake mounting bolts loose
•Brakes out of adjustment
•Fork loose in head tube
•Take to a bike shop for repair
•Tighten bolts
•Centre brakes and/or adjust
brake block toe-in
•Tighten headset
Wobbling wheel •Axle broken
•Wheel out of true
•Hub comes loose
•Headset binding
•Hub bearings collapsed
•QR mechanism loose
•Replace axle
•True wheel
•Adjust hub bearings
•Adjust headset
•Replace bearings
•Adjust QR mechanism
Steering not accurate •Wheels not aligned in frame
•Headset loose or binding
•Front forks or frame bent
•Align wheels correctly
•Tighten headset
•Take bike to a bike shop for
possible frame realignment
Frequent punctures •Inner tube old or faulty
•Tyre tread, casing worn
•Tyre unsuited to rim
•Replace inner rube
•Replace tyre
•Replace with correct tyre
TROPO SETUP: TROUBLE SHOOTING

TROPO SETUP: TROUBLE SHOOTING TROPO SETUP: TROUBLE SHOOTING
PROBLEM POSSIBLE CAUSE SOLUTION
Bicycle has reduced range
and/or speed
•Low batteries
•Faulty or old batteries
•Low tyre pressure
•Brakes dragging against rim
•Riding in hilly terrain, headwind,
etc.
•Charge batteries for
recommended time
•Replace batteries
•Inflate tyres to
recommended pressure
•Adjust brakes and/or rim
•Reduce range to be
expected in these types of
terrain and/or weather
conditions
Hub motor makes a “clicking”
noise and has reduce power
an/or shuts off
•Low batteries
•Damaged planetary gears
•Charge batteries for
recommended time
•Replace hub motor/wheel
No power when the switch is
turned “ON”
•Blown fuse
•Loose connectors
•Broken wire
•Faulty switch
•Faulty controller
•Replace fuse
•Check all connectors
•Inspect all wires for damage
•Replace switch and retest
•Replace controller and retest
Bicycle operates OK but
battery gauge does not light up
•Loose connectors
•Damaged wires
•Faulty battery gauge
•Check throttle and/or
battery gauge connectors
•Inspect all wires
•Replace battery gauge
Battery gauge lights up but
bicycle does not operate
•Faulty brake inhibitor
•Loose motor wire connector
•Replace brake inhibitor(s)
and retest
•Check motor wire connector
Bicycle runs at full speed
without pedaling
•Faulty sensor
•Faulty throttle
•Faulty controller
•Replace sensor and retest
•Replace throttle and retest
•Replace controller and retest
Battery indicates full charge
when tested at the charge port
but bicycle does not operate
•Faulty controller
•Loose connectors
•Poor contact between battery
terminals
•Replace controller
•Check all connectors
•Inspect and clean battery
terminals
PROBLEM POSSIBLE CAUSE SOLUTION
Bicycle has intermittent power •Loose connectors
•Damaged wires
•Check all connectors
•Inspect all wires
Charge shows a full charge in
an unusually short amount of
time
•Faulty charger
•Faulty batteries
•Replace charger
•Replace batteries
Indicator light on charger not
illuminated when charger is
plugged into outlet
•Outlet has no power
•Faulty charger
•Check outlet for power
•Replace charger
Charger (Lithium) indicator
light only flashes red and never
changes to green
•Damage wire from charger port
to battery
•Faulty batteries
•Inspect wire
•Replace batteries
BECOME PART OF THE
E-BIKE REVOLUTION
WITH
JUST ULTRA BIKES
Table of contents