BH FITNESS H673 User manual

H673
UNIDAD ELECTRÓNICA
ELECTRONIC MONITOR
UNITÉ ÉLECTRONIQUE
ELEKTRONIKEINHEIT
UNIDADE ELECTRÓNICA
IMPIANTO ELETTRONICO
ELEKTRONISCHER MONITOR

2
Fig 1 Fig 2
Fig 3

3
Español
COLOCACIÓN PILAS.
Este monitor utiliza dos PILAS
ALCALINAS «R-6» de 1,5 voltios.
Para colocar las pilas, suelte la tapa
trasera del monitor, Fig. 1, e insértelas
con precaución en el compartimento
(A) orientando correctamente la
polaridad de las mismas (haciendo
coincidir el polo «+» de las pilas con la
señal «+» del compartimento de las
pilas y el polo «-» con la señal «-»).
Cierre la tapa, como muestra la Fig. 1.
Si después de conectar el monitor, se
produjeran indicaciones erróneas o
sólo aparecen los segmentos
parcialmente, extraiga las pilas y
espere unos 15 segundos antes de
volver a instalarlas.
Las baterías débiles (descargadas)
generan cifras débiles (sin contraste)
e indicaciones erróneas. Cámbielas
inmediatamente.
Importante. Deposite las pilas usadas
en contenedores especiales, Fig. 2.
MONITOR ELECTRÓNICO.-
Para hacer más cómodo y simple el
control de su ejercicio este electrónico
muestra simultáneamente la velocidad,
la distancia, el tiempo de ejercicio, las
calorías consumidas y el pulso.
La pantalla se encenderá
automáticamente al comenzar el
ejercicio o pulsando cualquier tecla.
El monitor se apagará automáticamente
cuando la unidad esté 4 minutos
parada.
Pulsando durante más de dos
segundos la tecla MODE todos los
valores pasan a cero.
Pulsando la tecla RESET podrá borrar
el valor introducido.
A. FUNCIÓN SCAN
En el modo SCAN, el ordenador
revisa y visualiza continuamente
durante sus ejercicios todas las
funciones. La función visualizada se
indica por medio de parpadeos.
Para seleccionar la función SCAN:
1. Al comenzar el ejercicio o pulsando
cualquier tecla se enciende el monitor
en la función SCAN, que cada 6
segundos se visualizará en la pantalla
principal el TIEMPO, VELOCIDAD,
RPM, DISTANCIA, CALORÍAS,
PULSO, ODO (distancia total).
2. Pulse la tecla MODE y se eliminará
la función SCAN.
B. FUNCIÓN TIEMPO.-
La función cuenta o descuenta en
incrementos de un minuto hasta un
máximo de 99:00 minutos.
1. Pulse cualquier tecla, para poner en
marcha el monitor.
2. Pulsando la tecla MODE parpadeará
la ventana pequeña de TIME.
3. Pulsando la tecla SET seleccione el
tiempo y MODE para confirmar.
4. Comience el ejercicio y empezará a
disminuir el tiempo, una vez haya
llegado a cero emitirá pitidos durante 4
segundos, advirtiéndole que ha llegado
al tiempo seleccionado, y comenzará a
contar el tiempo hacia arriba.
C. FUNCIÓN DISTANCIA.-
La función cuenta o descuenta en
incrementos de 1 Km/ml hasta un
máximo de 999 Km/ml.
1. Pulse cualquier tecla, para poner en
marcha el monitor.

4
2. Pulsando la tecla MODE parpadeará
la ventana pequeña de DISTANCE
(DISTANCIA).
3. Pulsando la tecla SET seleccione la
distancia.
4. Comience el ejercicio y empezará a
disminuir la distancia, una vez haya
llegado a cero emitirá unos pitidos
durante 4 segundos, advirtiéndole que
ha llegado al valor seleccionado,
comenzando a contar la distancia en
sentido ascendente.
D. FUNCIÓN CALORÍAS.-
La función cuenta y descuenta de 1
en 1 caloría, hasta un máximo de 999
calorías.
1. Pulse cualquier tecla, para poner en
marcha el monitor.
2. Pulsando la tecla MODE
parpadeará la ventana pequeña de
CALORIES (CALORIAS).
3. Pulsando la tecla SET seleccione
las calorías.
4. Comience el ejercicio y empezará a
disminuir las calorías, una vez haya
llegado a cero emitirá pitidos durante 4
segundos, advirtiéndole que ha llegado
al valor seleccionado, comenzando a
contar las calorías hacia arriba.
E. INSTRUCCIONES - USO
DEL HAND-GRIP (PULSO).-
El pulso de este modelo se mide
colocando ambas manos en los
sensores (R), Fig. 3.
Una vez colocadas ambas manos en
los sensores, comenzará a parpadear
el corazón en la parte derecha de la
pantalla que indica PULSE de la
pantalla del monitor y al cabo de unos
segundos aparecerá el valor de su
ritmo cardíaco.
Si no tiene colocadas ambas manos
correctamente como muestra Fig. 3, el
pulso no funciona.
Si en pantalla aparece un «P» o no
parpadea el corazón, asegúrese de
que tiene colocadas ambas manos en
los sensores y de que el conector esté
conectado en la parte de atrás del
electrónico.
GUIA DE PROBLEMAS.-
Problema: Se enciende el display y
sólo funciona la función de Tiempo
Solución:
a.- Compruebe si el cable de conexión
está conectado.
Problema: El display no se enciende
o la visualización de los segmentos
del display es muy débil.
Solución:
a.- Compruebe que las pilas estén
colocadas correctamente
b.- Compruebe la carga de las
baterías. Si están bajas, cambie las
pilas inmediatamente.
Problema: Si algún segmento de
alguna función no se enciende o si se
producen indicaciones erróneas en
alguna función.
Solución:
a.- Desconecte las pilas durante 15
segundos y vuelva a instalarlas
correctamente.
b.- Compruebe la carga de las pilas.
Si están bajas, cambie las pilas.
c.- Si los pasos anteriores no le
ayudan, reemplace el monitor
electrónico.

5
Evite que le dé a su monitor
electrónico la luz directa del sol, pues
se puede estropear la pantalla del
cristal líquido. No lo exponga tampoco
al agua ni a golpes.
Para cualquier consulta, no dude en
ponerse en contacto con el
(S.A.T).Servicio de Asistencia
Técnica, llamando al teléfono de
atención al cliente (ver página final del
presente manual).
BH SE RESERVA EL DERECHO A
MODIFICAR LAS
ESPECIFICACIONES DE SUS
PRODUCTOS SIN PREVIO AVISO.

6
English
FITTING THE BATTERIES.-
This monitor uses two 1.5 volt
ALKALINE BATTERIES. To fit the
batteries, remove the rear cover on
the monitor, Fig. 1, and carefully insert
the two “R-6” type batteries into the
battery compartment (A) making sure
that the battery’s polarity is correct
(matching the battery’s «+» terminal
with the «+» sign inside the battery
compartment, and the «-» terminal
with the «-» sign). Close the cover, as
shown in Fig. 1.
If, after having switched the monitor
on, it displays errors or merely partial
segments then remove the batteries
and wait for about 15 seconds before
reinstalling them. Weak batteries (run
down) produce a weak digital display
(poor contrast) and erroneous
readings. Change them immediately.
Important. Discarded batteries must
be deposited in special containers,
Fig. 2.
ELECTRONIC MONITOR.-
To give you greater control over the
exercise, this electronic unit provides
simultaneous read-outs of speed,
distance, exercise time, calories burnt
and pulse rate.
The screen will switch itself on
automatically as soon as you start
exercising or by pressing any key.
The monitor will switch itself off
automatically if the unit stands idle for
more than 4 minutes.
Pressing the MODE key for more than
two seconds will reset all of the
values. Pressing RESET will delete
value set.
A. SCAN FUNCTION.-
In SCAN mode the computer
continuously scans and displays all of
the functions during exercise. The
function being displayed will flash on
and off. To select the SCAN function:
1. The monitor starts in SCAN mode as
soon as exercise begins or if any key is
pressed, the main screen will display
TIME, RPM, SPEED, DISTANCE,
ODO, CALORIES, PULSE RATE
values every 6 seconds.
2. Press the MODE key and this will
cancel the SCAN function.
B. TIME FUNCTION.-
This function counts up or down in
steps of one minute, up to a maximum
of 99:00 minutes.
1. Press any key to switch the monitor
on.
2. Press the MODE key to start the
small TIME window flashing.
3. Press the SET key to select the
time.
4. Begin the exercise and the time
value will begin the countdown, when
it reaches zero it will beep for 4
seconds, advising you that the
selected time has elapsed, the time
value will then start counting upward.
C. DISTANCE FUNCTION.-
This function counts up or down in
steps of 1 km/ml, up to a maximum of
999 km/ml.
1. Press any key to switch the monitor
on.
2. Press the MODE key to start the
small DISTANCE window flashing.
3. Press the SET key to select the
distance.

7
4. Begin the exercise and the distance
value will begin the countdown, when
it reaches zero it will beep for 4
seconds, advising you that the
selected distance has been covered,
the distance value will then start
counting upward.
D. CALORIE FUNCTION.-
This function counts up or down in
steps of 1 calorie, up to a maximum of
999 calories.
1. Press any key to switch the monitor
on.
2. Press the MODE key to start the
small CALORIES window flashing.
3. Press the SET key to select the
calories.
4. Begin the exercise and the calorie
value will begin the countdown, when
it reaches zero it will beep for 4
seconds, advising you that the
selected calorie value has been
reached, the calorie value will then
start counting upward.
E. HAND-GRIP (PULSE)
INSTRUCTIONS / USE.-
On this model the pulse rate is
measured by placing both hands on
the sensors (R), located on the
handlebar, Fig. 3.
When both hands are placed on the
sensors the heart symbol on the right-
hand side of the screen, marked
PULSE, will begin to flash and after a
few seconds a heart rate reading will
be displayed.
If both hands are not placed correctly
as shown in Fig. 3 then the pulse
function will not work.
If a “P” appears on the screen or the
heart symbol does not flash then
make sure that both hands are placed
on the sensors and that the
connectors are connected at the back
of the electronic unit.
TROUBLESHOOTING GUIDE.-
Problem: The display comes on but
only the Time function works
Solution:
a.- Make sure that the connection
cable is connected.
Problem: The display does not come
on or the displayed segments are very
weak.
Solution:
a.- Check that the batteries are fitted
correctly.
b.- Check the battery charge.
c.- If they are run down change them
immediately.
Problem: Display segments of a
function read-out are not visible or
error messages for a particular
function appear.
Solution:
a.- Remove the batteries for 15
seconds and then refit them correctly.
b.- Check the battery charge If they
are run down change the batteries
c.- If the above steps do not help then
replace the electronic monitor.
Avoid leaving the electronic monitor in
direct sunlight as this might damage
the liquid crystal display. Similarly, do
not expose it to water or knocks.
Do not hesitate to get touch with the
Technical Assistance Service if you
have any queries by phoning customer
services (see last page in manual)
BH RESERVES THE RIGHT TO
MODIFY THE SPECIFICATIONS OF
ITS PRODUCTS WITHOUT PRIOR
NOTICE

8
Français
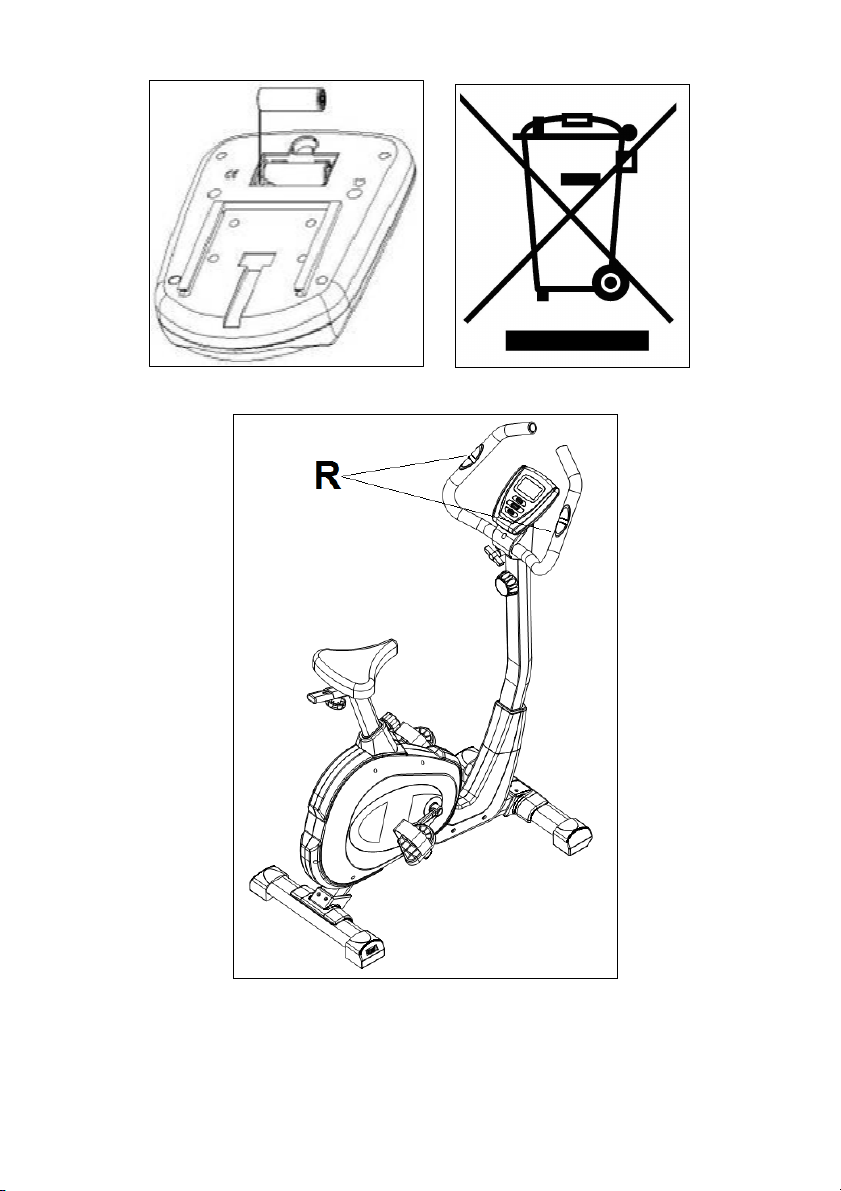
MISE EN PLACE DES PILES.-
Ce moniteur fonctionne avec deux
PILES ALCALINES de 1,5 volts. Pour
placer les piles, retirez le couvercle
arrière du moniteur, Fig. 1 et introduire
avec précaution les piles alcalines type
«R-6» dans le logement des piles (A)
en orientant correctement la polarité
des piles (en faisant coïncider le pôle
«+» des piles avec le signe «+» du
logement des piles et le pôle «-» avec
le signe «-»). Fermez le couvercle,
comme indiqué dans la Fig. 1.
Si après avoir branché le moniteur
électronique, vous constatez que les
indications sont inexactes ou que les
segments s’affichent partiellement,
retirez les piles et attendez 15 secondes
environ avant de les replacer. Des
batteries faibles (déchargées)
produisent des chiffres faibles (sans
contraste) et des informations inexactes.
Remplacezles immédiatement.
Remarque importante: Les piles
usées doivent être déposées dans des
conteneurs spéciaux prévus à cet
effet, Fig. 2.
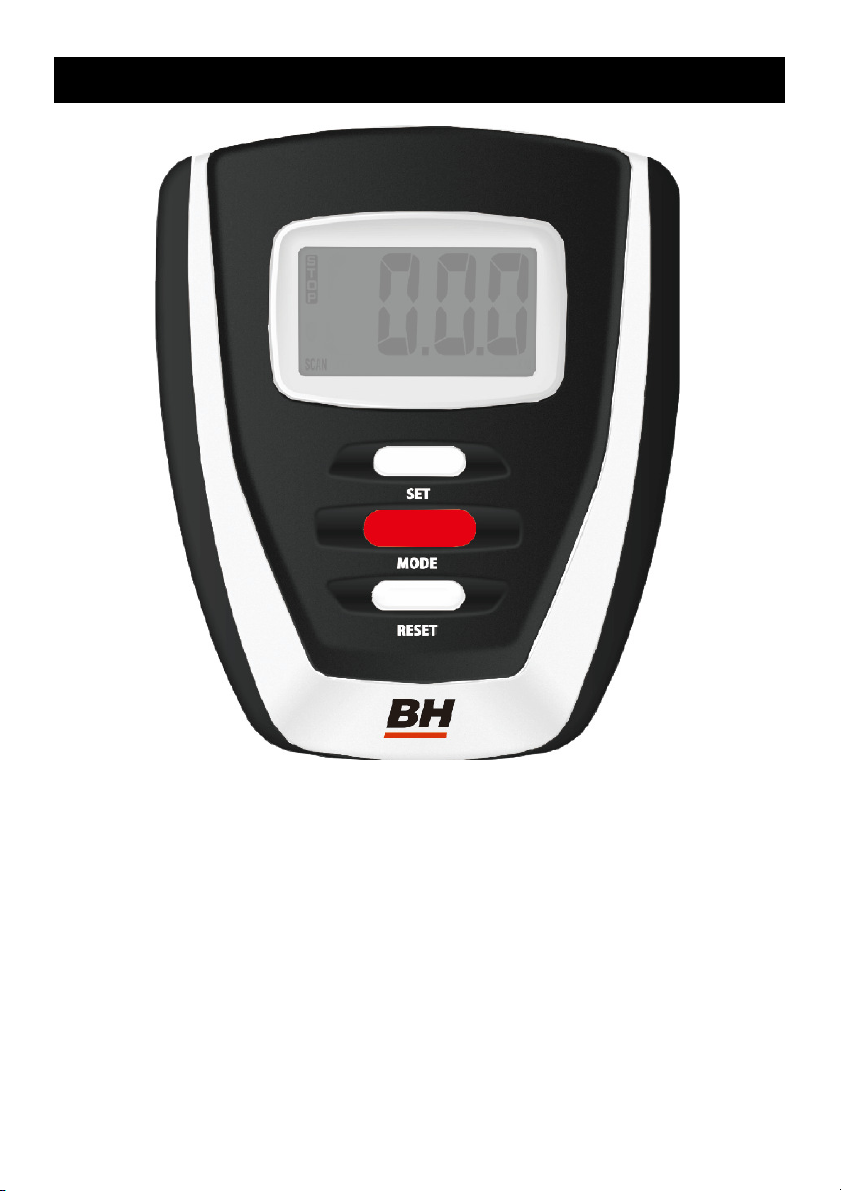
MONITEUR ÉLECTRONIQUE.-
Si l’unité est 4 minutes arrêtée, l’écran
s’éteint automatiquement.
En appuyant + de deux secondes sur
la touche MODE, toutes les valeurs
reviennent sur zéro.
En appuyant sur la touche RESET, les
valeurs reviennent sur zéro.
A. FONCTION SCAN.-
Dans le mode SCAN, l’ordinateur
révise et affiche toutes les fonctions
continuellement durant la réalisation
de vos exercices. La fonction affichée
est indiquée par des clignotements.
Pour sélectionner la fonction SCAN:
1. Au début de l’exercice ou si vous
appuyez sur l’une des touches, le
moniteur s’allume dans la fonction
SCAN et toutes les 6 secondes, la
DURÉE, la VITESSE, RPM, ODO
(Distance), la DISTANCE, les
CALORIES et le POULS seront
affichés à l’écran principal.
2. Pour annuler la fonction SCAN,
appuyez sur la touche MODE.
B. FONCTION DURÉE.-
Cette fonction ajoute ou soustrait par
des incréments d’une minute jusqu’à
un maximum de 99:00 minutes.
1. Pour mettre en marche le moniteur,
appuyez sur une touche quelconque.
2. En appuyant sur la touche MODE la
petite fenêtre TIME clignotera.
3. Pour sélectionner la durée, appuyez
sur le touche SET.
4. Commencez l’exercice, le compte à
rebours commencera et à la fin de la
durée programmée, le moniteur émet
un signal sonore durant 4 secondes
pour signaler que le temps sélectionné
s’est écoulé et que le temps
commence à augmenter.
C. FONCTION DISTANCE.-
Cette fonction ajoute ou soustrait par
des incréments de 1 km/ml jusqu’à un
maximum de 999 km/ml.
1. Pour mettre en marche le moniteur,
appuyez sur une touche quelconque.
2. En appuyant sur la touche MODE la
petite fenêtre DISTANCE clignotera.
3. Pour sélectionner la distance,
appuyez sur le touche SET.

9
4. Commencez l’exercice, la distance
commencera à diminuer et à la fin de
la distance programmée, le moniteur
émet un signal sonore durant 4
secondes pour signaler que la
distance sélectionnée a été parcourue
et qu’elle commence à augmenter.
D. FONCTION CALORIES.-
Cette fonction ajoute ou soustrait les
calories, 1 à 1, jusqu’à un maximum
de 999 calories.
1. Pour mettre en marche le moniteur,
appuyez sur une touche quelconque.
2. En appuyant sur la touche MODE la
petite fenêtre CALORIES clignotera.
3. Pour sélectionner les calories,
appuyez sur les touches SET.
4. Commencez l’exercice, les calories
commenceront à diminuer et à la fin
des calories programmées, le
moniteur émet un signal sonore durant
4 secondes pour signaler que les
calories sélectionnées ont été brûlées
et qu’elles commencent à augmenter.
E. MODE D’EMPLOI DU
HAND-GRIP (POULS).-
Sur ce modèle, le pouls se mesure en
posant les deux mains sur les senseurs
(R) placés sur le guidon, Fig. 3.
Dès que vos mains seront posées sur
les senseurs, un cœur commencera à
clignoter sur la droite de l’écran
PULSE de l’écran du moniteur et votre
fréquence cardiaque sera affichée
dans les secondes suivantes.
Si vos deux mains ne sont pas posées
correctement comme indiqué dans la
Fig. 3, la fonction pouls ne
fonctionnera pas.
Si un “P” s’affiche à l’écran ou si le
cœur ne clignote pas, vérifiez si vos
mains sont bien posées sur les
senseurs et si les connecteurs sont
bien connectés en partie arrière de
l’électronique.
GUIDE DES PROBLÈMES.-
Problème: Le display s’allume bien
mais seule fonctionne la fonction
durée.
Solution:
Vérifiez si le cordon de connexion est
bien connecté.
Problème: le display ne s’allume pas
ou l’affichage des segments du
display est très faible.
Solution:
A. Vérifiez si les piles sont bien
placées.
B: Vérifiez la charge des batteries.
C: Si la charge est faible, remplacez
les piles immédiatement.
Problème: Si un segment d’une
fonction ne s’allume pas ou si les
informations affichées sont faussées
Solution:
A. Déconnectez les piles 15 secondes
et les remettre en place correctement.
B: Vérifiez la charge des piles. Si la
charge est faible, remplacez les piles.
C: Si les problèmes persistent après
avoir suivi ces instructions, remplacez
le moniteur électronique.
Garder le moniteur électronique à
l’abri du rayonnement direct du soleil
car cela risquerait d’endommager le
verre liquide. Tenir le moniteur à
l’écart de l’eau et éviter les coups.

10
Pour toute information complémentaire
et en cas de doute sur le bon état de
l’une quelconque partie de la machine,
l’hésitez pas à appeler le Service
d’Assistance Technique (SAT) au
numéro de téléphone d’Assistance
Clientèle qui figure à la dernière page
de cette notice.
BH SE RÉSERVE LE DROIT DE
MODIFIER LES
CARACTÉRISTIQUES DE SES
PRODUITS SANS PRÉAVIS.

11
Deutsch
EINSETZEN DER BATTERIEN.-
Dieser Monitor funktioniert mit 1,5 Volt
ALKALIBATTERIEN. Zum Einsetzen
der Batterien lösen Sie bitte den
hinteren Deckel des Monitors, Abb. 1
und setzen Sie die Alkalibatterien des
Typs «R-6» vorsichtig in das
Batteriefach (A). Achten Sie dabei auf
die korrekte Ausrichtung der Polarität
der Batterien (der Pol «+” der
Batterien muss mit dem «+» Zeichen
im Batteriefach übereinstimmen,
ebenso wie der «-» Pol mit dem «-»
Zeichen). Verschließen Sie den
Deckel wie auf Abb. 1 dargestellt.
Wenn nach dem Einschalten des
Monitors falsche oder unvollständige
Anzeigen erscheinen, entnehmen Sie
bitte die Batterien, warten Sie 15
Sekunden und setzen Sie sie wieder ein.
Schwache (entladene) Batterien
führen zu schwachen (kontrastarmen)
und falschen Anzeigen. Tauschen Sie
sie umgehend aus.
Wichtig. Entsorgen Sie gebrauchte
Batterien in den entsprechenden
Containern, Abb. 2.
ANBRINGEN ES
ELEKTRONISCHEN MONITORS.-
Lösen Sie die Schrauben (9) auf der
Rückseite des Monitors, schließen Sie
die Feedbackklemmen (54D) an die
des Monitors (1) Fig.3 und setzen Sie
dann den Monitor von oben nach
unten ein, indem Sie ihn über das
Blech des Ruderrohrs (58) rutschen
lassen. Achten Sie dabei darauf, die
Kabel nicht einzuklemmen. Schließen
(9) Sie die Endklemme des Hand-Grip
(6) Fig.3.
Schieben Sie die Blenden (2L) und
(2R) über die Enden des Linkers (7)
auf Fig.3.
Schrauben Sie sie mit den Schrauben
(3) fest Fig.3.
ELEKTRONIKMONITOR.-
Um Ihnen die Kontrolle Ihres Trainings
zu erleichtern, zeigt dieser Monitor
gleichzeitig Geschwindigkeit, Rpm,
Strecke, Trainingsdauer, verbrauchte
Kalorien und Puls an
Der Bildschirm schaltet automatisch
zu Beginn der Übung bzw. bei
Betätigen einer beliebigen Taste ein.
Der Monitor schaltet automatisch aus,
wenn das Gerät 4 Minuten nicht
benutzt wird.
Betätigt man die MODE- oder RESET-
Taste länger als zwei Sekunden,
werden alle Werte auf Null gesetzt.
A. SCAN-FUNKTION.-
Im SCAN-MODUS überprüft und
aktualisiert der Computer kontinuierlich
alle Funktionen während der Übung. Die
angezeigte Funktion blinkt.
Einstellen der SCAN-Funktion:
1. Zu Beginn der Übung oder bei
Betätigen einer beliebigen Taste
schaltet der Monitor in SCAN-Funktion
ein. Dieser zeigt alle 6 Sekunden auf
dem Hauptbildschirm DAUER, ODO,
GESCHWINDIGKEIT, STRECKE,
KALORIEN, PULS an. Im unteren Teil
des .
2. Durch Betätigen der MODE-Taste
wird die SCAN-Funktion annulliert.

12
B. DAUER.-
Diese Funktion summiert oder
subtrahiert in Minutenschritten die
Zeitdauer bis maximal 99:00 Minuten.
1. Betätigen Sie eine beliebige Taste,
um den Monitor einzuschalten.
2. Betätigt man die MODE-Taste,
blinkt das kleine Fenster DAUER.
3. Stellen Sie mit Hilfe der Tasten SET
die Trainingsdauer ein.
4. Beginnen Sie die Übung und der
eingestellte Wert verringert sich
entsprechend der tatsächlich
absolvierten Trainingsdauer. Sobald
der Wert Null erreicht wird, ertönt 4
Sekunden lang ein Pfeifton, um
anzuzeigen, dass der eingestellte
Wert abgelaufen ist und dass die
Dauer nun in positiver Richtung
summiert wird.
C. STRECKE.-
Diese Funktion summiert oder
subtrahiert in 1 km/ml –Schritten die
Strecke bis maximal 999 km/ml.
1. Betätigen Sie eine beliebige Taste,
um den Monitor einzuschalten.
2. Betätigt man die MODE-Taste,
blinkt das kleine Fenster DISTANCE
(STRECKE).
3. Stellen Sie mit Hilfe der Tasten SET
die Strecke ein.
4. Beginnen Sie die Übung und der
eingestellte Wert verringert sich
entsprechend der tatsächlich zurück
gelegten Strecke. Sobald der Wert
Null erreicht wird, ertönt 4 Sekunden
lang ein Pfeifton, um anzuzeigen,
dass der eingestellte Wert abgelaufen
ist und dass die Strecke nun in
positiver Richtung summiert wird.
D. KALORIEN.-
Diese Funktion summiert oder
subtrahiert in 1 Kalorie-Schritten die
verbrauchte Kalorienzahl bis maximal
999 Kalorien.
1. Betätigen Sie eine beliebige Taste,
um den Monitor einzuschalten.
2. Betätigt man die MODE-Taste,
blinkt das kleine Fenster CALORIES
(KALORIEN).
3. Stellen Sie mit Hilfe der Tasten SET
die Kalorien ein.
4. Beginnen Sie die Übung und der
eingestellte Kalorienwert verringert
sich entsprechend. Sobald der Wert
Null erreicht wird, ertönt 4 Sekunden
lang ein Pfeifton, um anzuzeigen,
dass der eingestellte Wert abgelaufen
ist und dass die Dauer nun in positiver
Richtung summiert wird.
E. ANLEITUNG ZUR
BENUTZUNG DES HAND-
GRIP (PULS).-
In diesem Modell wird der Puls durch
Auflegen beider Hände auf die
Sensoren (R) gemessen. Diese
Sensoren befinden sich im Lenker
(Abb. 4).
Wenn beide Hände auf den Sensoren
liegen, beginnt das für PULSE
stehende Herzsymbol auf der rechten
Seite des Bildschirms zu blinken und
nach einigen Sekunden erscheint der
Wert Ihres Herzrhythmus.
Wenn nicht beide Hände korrekt auf
den Sensoren liegen (Abb. 4),
funktioniert die Puls-Funktion nicht.
Zeigt der Bildschirm “P” an oder das
Herz blinkt, vergewissern Sie sich,
dass beide Hände auf den Sensoren
liegen und dass die Steckver-
bindungen auf der Rückseite des
Monitors angeschlossen sind.

13
FEHLERLÖSUNG.-
Problem: Das Display schaltet ein
und es funktioniert nur die Dauer-
Funktion.
Lösung:
a.- Prüfen Sie, ob das Anschlusskabel
korrekt angeschlossen ist.
Problem: Das Display schaltet nicht
ein oder die Anzeige der Segmente
des Displays ist sehr schwach.
Lösung:
a.- Prüfen Sie, ob die Batterien korrekt
eingesetzt sind.
b.-Prüfen Sie den Ladezustand der
Batterien.
c.- Sollten die Batterien schwach sein,
tauschen Sie sie bitte umgehend aus.
Problem: Eines der Segmente einer
Funktion wird nicht angezeigt oder die
Anzeigen einer der Funktionen sind
nicht korrekt.
Lösung:
a.- Nehmen Sie die Batterien 15
Sekunden lang heraus und setzen Sie
sie dann wieder ein.
b.- Überprüfen Sie den Ladezustand
der Batterien. Sollte dieser niedrig
sein, tauschen Sie sie aus.
c.- Sollten die vorgenannten Schritte
keinen Erfolg haben, tauschen Sie
den Monitor aus.
Setzen Sie den elektronischen Monitor
nicht der direkten Sonneneinstrahlung
aus, da dies den Flüssigglasbildschirm
beschädigen könnte. Vermeiden Sie
Schläge und Kontakt mit Wasser.
Sollten über den Zustand einer
Komponente Zweifel bestehen, setzen
Sie sich bitte mit dem (TKD)
Technischen Kundendienst in
Verbindung, indem Sie das
Servicetelefon anrufen (siehe letzte
Seite des Handbuchs).
BH BEHÄLT SICH DAS RECHT
VOR, DIE SPEZIFIZIERUNGEN
SEINER PRODUKTE OHNE
VORHERIGE ANKÜNDIGUNG ZU
ÄNDERN.

14
Português
COLOCAÇÃO DAS PILHAS.
-
Este monitor utiliza duas PILHAS
ALCALINAS de 1,5 voltes. Para
colocar as pilhas, solte a tampa de
atrás do monitor, Fig. 1, e coloque
com precaução pilhas alcalinas do
tipo «R-6» no compartimento das
pilhas (A), orientando correctamente a
polaridade das pilhas (deverá coincidir
o polo «+» das pilhas com o sinal «+»
do compartimento das pilhas e o polo
«-» com o sinal «-»). Feche a tampa,
como se mostra na Fig. 1.
Se depois de ligar o monitor
electrónico, aparecerem indicações
erróneas ou só aparecerem
segmentos parciais, deverá retirar as
pilhas e esperar uns 15 segundos
antes de voltar a instalá-las.
As baterias fracas (descarregadas)
produzem cifras débeis (sem
contraste) e indicações erróneas.
Deverá mudá-las imediatamente.
Importante. Deposite as pilhas gastas
em contentores especiais, Fig. 2.
MONITOR ELECTRONICO.
-
Para tornar mais cómodo e mais
simples o controle do seu exercício
este electrónico mostra simultanea-
mente a velocidade, a distância, o
tempo de duração do exercício, as
calorias gastas e a pulsação.
O ecrã acender-se-á automaticamente
ao começar o exercício ou apertando
qualquer tecla.
O monitor apagar-se-á automatica-
mente quando a unidade estiver
parada durante 4 minutos e irá
mostrar a temperatura, a data ea
hora.
Apertando durante mais de dois
segundos a tecla MODE ou RESET
todos os valores passarão a zero.
A. FUNÇÃO SCAN.-
No modo SCAN, o computador revê e
visualiza continuamente durante os
seus exercícios todas as funções. A
função visualizada estará indicada
através de uma intermitência.
Para seleccionar a função SCAN:
1. Ao começar o exercício ou
apertando qualquer tecla o monitor
acender-se-á na função SCAN, que
cada 6 segundos mostrará no ecrã
principal o TEMPO, VELOCIDADE,
DISTÂNCIA, RPM, CALORIAS, ODO
(DISTÂNCIA), PULSAÇÃO.
2. Aperte a tecla MODE e ficará
eliminada a função SCAN.
B. FUNÇÃO TEMPO.-
A função conta ou desconta em
incrementos de um minuto até um
máximo de 99:00 minutos
1. Aperte qualquer tecla para pôr em
funcionamento o monitor.
2. Apertando a tecla MODE ficará
intermitente a janela pequena de
TIME.
3. Apertando a tecla SET poderá
seleccionar o tempo.
4. Comece o exercício e começará a
diminuir o tempo; quando terminar o
tempo programado o monitor emitirá
um sinal acústico de 4 segundos,
advertindo-o que terminou o tempo
seleccionado e começará
automaticamente a aumentar o
tempo.

15
C. FUNÇÃO DISTÂNCIA.-
A função conta ou desconta em
incrementos de 1 Km/ml até um
máximo de 999 Km/ml.
1. Aperte qualquer tecla para pôr em
funcionamento o monitor.
2. Apertando a tecla MODE ficará
intermitente a janela pequena de
DISTANCE (DISTÂNCIA).
3. Apertando a tecla SET poderá
seleccionar a distância.
4. Comece o exercício e começará a
diminuir a distância; quando tiver
chegado a zero emitirá um sinal
acústico de 4 segundos, advertindo-o
que chegou ao valor seleccionado e
começará automaticamente a somar a
distância percorrida.
D. FUNÇÃO CALORÍAS.-
A função conta e desconta de 1 em 1
caloria, até um máximo de 999
calorias.
1. Aperte qualquer tecla para pôr em
funcionamento o monitor.
2. Apertando a tecla MODE ficará
intermitente a janela pequena de
CALORIES (CALORIAS).
3. Apertando a tecla SET poderá
seleccionar as calorias.
4. Comece o exercício e começará a
diminuir as calorias; quando tiver
chegado a zero emitirá um sinal
acústico de 4 segundos, advertindo-o
que chegou ao valor seleccionado e
começará automaticamente a
aumentar as calorias.
E. INSTRUÇÕES – USO DO
HAND-GRIP (PULSAÇÃO).-
A pulsação neste modelo mede-se
colocando ambas as mãos nos
sensores (R), que estão colocados no
guiador Fig. 3.
Depois de ter colocado ambas as
mãos nos sensores, aparecerá um
coração intermitente na parte direita do
ecrã do monitor que indica
PULSAÇÃO e depois de uns segundos
aproximadamente, aparecerá o valor
do seu ritmo cardíaco.
Se ambas as mãos não estiverem
colocadas correctamente como mostra
a Fig. 3, a pulsação não aparecerá.
Se aparecer no ecrã um “P” ou se o
coração não aparecer intermitente,
verifique se tem ambas as mãos
colocadas nos sensores e se os
conectores estão ligados à parte de
atrás do electrónico.
GUIA DE PROBLEMAS.-
Problema: Se ao acender o display
só funcionar a função de Tempo
Solução:
a.- Verifique se o cabo de ligação está
ligado.
Problema: Não se consegue acender
o display ou os segmentos do display
só se podem ver de uma forma muito
débil.
Solução:
a.- Verifique se as pilhas estão
correctamente colocadas.
b.- Verifique se as baterias estão
carregadas.
c.- Se estiverem fracas, mude as
pilhas imediatamente.
Problema: Se não conseguir acender
algum segmento de uma função ou se
aparecerem indicações erróneas em
alguma função.
Solução:
a.- Desligue as pilhas durante 15
segundos e volte a instalá-las
correctamente.

16
b.- Verifique se as pilhas estão
carregadas. Se estão fracas, mude as
pilhas.
c.- Se os passos anteriores não
tiverem ajudado, substitua o monitor
electrónico.
Evite que a luz solar bata
directamente no seu monitor
electrónico, porque o ecrã de cristal
líquido poderia estragar-se. Também
deverá protegê-lo da água e de
golpes.
Para qualquier consulta, não hesite em
contactar com o S.A.T - Serviço de
Assistência Técnica - , telefonando
para o serviço de apoio ao cliente (ver
página final do presente manual).
BH RESERVA O DIREITO DE
PODER MODIFICAR AS
ESPECIFICAÇÕES DOS SEUS
PRODUTOS SEM PRÉVIO AVISO.

17
Italiano
COLLOCAZIONE PILE.-
Questo monitor funziona con due
PILE ALCALINE da 1,5 volt. Per
collocare le pile, tolga il coperchio
posteriore del monitor, Fig. 1, ed
inserisca con attenzione le pile
alcaline del tipo «R-6» nello
scomparto delle pile (A) orientando
correttamente la polarità delle pile
(facendo coincidere il polo «+» delle
pile con il marchio «+» dello
scomparto delle pile ed il polo «-» con
il marchio «-»). Chiuda il coperchio,
come mostra la Fig. 1.
Se dopo aver collegato il monitor
elettronico si dovessero verificare
indicazioni di errore o solo apparissero
i segmenti parzialmente, tolga le pile
ed aspetti 15 secondi prima di
introdurle di nuovo.
Le pile deboli (scariche) producono
cifre deboli (senza contrasto) ed
indicazioni di errore. Le cambi
inmediatamente.
Importante. Getti le pile usate in
contenitori speciali, Fig. 2.
MONITOR ELECTTONICO.-
Per rendere più comodo e semplice il
controllo del suo allenamento questo
elettronico mostra allo stesso tempo la
velocità, la distanza, il tempo dell’
allenamento, le calorie consumate ed
il polso.
Lo schermo si accenderà automatica-
mente nel cominciare l’ allenamento o
premendo qualsiasi tasto.
Il monitor si spegnerà automatica-
mente quando l’ apparecchio si trovi
più di 4 minuti fermo.
Premendo durante più di due secondi
il tasto MODE o RESET tutti i valori si
mettono a zero.
A. FUNZIONE SCAN.-
Nel modo SCAN, il computer controlla
e visualizza continuamente durente i
suoi allenamenti tutte le funzioni. La
funzione visualizzata viene indicata
con lampeggi.
Per scegliere la funzione SCAN:
1. Nel cominciare l’ allenamento o
premendo qualsiasi tasto si accende il
monitor nella funzione SCAN, ed ogni
6 secondi si visualizzerà nello scher-
mo principale il TEMPO, RPM,
VELOCITÀ, DISTANZA, ODO
(Distanza), CALORIE, POLSO.
2. Prema il tasto MODE e si eliminerà
la funzione SCAN.
B. FUNZIONE TEMPO.-
La funzione conta o sconta in incrementi
di un minuto fino ad un massimo di
99:00 minuti
1. Prema qualsiasi tasto per mettere in
funzionamento il monitor.
2. Premendo il tasto MODE
lampeggerà la finestra piccola di TIME.
3. Premendo il tasto SET scelga il
tempo.
4. Cominci l’ allenamento e comincerà
a diminuire il tempo, una volta arrivato
a zero si sentiranno dei fischi durante
4 secondi, avvertendo che ha
raggiunto il tempo scelto, cominciando
a contare il tempo in crescendo.
C. FUNZIONE DISTANZA.-
La funzione conta o sconta in
incrementi di 1 Km/ml fino ad un
massimo di 999 Km/ml.

18
1. Prema qualsiasi tasto per mettere in
funzionamento il monitor.
2. Premendo il tasto MODE
lampeggerà la finestra piccola di
DISTANCE (DISTANZA).
3. Premendo il tasto SET scelga la
distanza.
4. Cominci l’ allenamento e comincerà
a diminuire la distanza, una volta
arrivato a zero si sentiranno dei fischi
durante 4 secondi, avvertendo che ha
raggiunto il valore scelto, cominciando
a contare la distanza in crescendo.
D. FUNZIONE CALORIE.-
La funzione conta e sconta di 1 in 1 le
calorie, fino ad un massimo di 999
calorie.
1. Prema qualsiasi tasto per mettere in
funzionamento il monitor
2. Premendo il tasto MODE
lampeggerà la finestra piccola di
CALORIES (CALORIE).
3. Premendo il tasto SET scelga le
calorie.
4. Cominci l’ allenamento e comince-
ranno a diminuire le calorie, una volta
arrivato a zero si sentiranno dei fischi
durante 4 secondi, avvertendo che ha
raggiunto il valore scelto, cominciando a
contare le calorie in crescendo.
E. ISTRUZIONI - USO DEL
HAND-GRIP (POLSO).-
Il polso di questo modello si misura
collocando ambedue le mani nei
sensori (R), che si trovano nel
manubrio, Fig. 3.
Una volta collocate ambedue le mani
nei sensori, comincerà a lampeggiare
il cuore nella parte destra dello
schermo che indica PULSE dello
schermo del monitor e passati alcuni
secondi apparirà il valore del ritmo del
suo battito cardiaco.
Se non ha collocato correttamente
ambedue le mani come mostra la Fig.
3, il polso non funzionerà.
Se nello schermo appare uno “P” o
non lampeggia il cuore, si assicuri di
aver collocato ambedue le mani nei
sensori e che i connettori sono ben
collegati nella parte posteriore dell’
elettronico.
SOLUZIONE DI PROBLEMI.-
Problema: Si accende il display e
solo funziona la funzione di Tempo.
Soluzióne:
a.- Verifichi se il cavo di collegamento
è stato collegato.
Problema: Il display non si accende o
la visualizzazione dei segmenti del
display è molto debole.
Soluzione:
a.- Verifichi che le pile siano state
collocate correttamente.
b.- Verifichi al carica delle pile. Se sono
scariche, cambi le pile immediatamente.
Problema: Si il segmento de qualsiasi
funzione non si accende o se si
verificano indicazioni di errore in
qualche funzione.
Soluzione:
a.- Tolga le pile durante 15 secondi e
le collochi di nuovo correttamente.
b.- Verifichi la carica delle pile. Se
sono scariche, cambi le pile.
c.- Se i passi anteriori non sono d’
aiuto rimpiazzi il monitor elettronico.
Eviti che il suo monitor elettronico
riceva la luce diretta del sole, perchè
si potrebbe danneggiare lo schermo di
cristallo liquido. Non esporlo neanche
all’ acqua ed a colpi.

19
Per qualsiasi domanda, non esitate a
mettervi in contatto con il Servizio di
Assistenza Tecnica, chiamando al
telefono di attenzione al cliente
(consultare l’ultima pagina del
presente manuale).
BH SI RISERVA IL DIRITTO DI
MODIFICARE LE SPECIFICHE
TECNICHE DEI SUOI PRODOTTI
SENZA AVVERTIMENTO PREVIO.

20
Nederlands
PLAATSING BATTERIJEN.
-
Deze monitor functioneert op twee
ALKALINE BATTERIJEN van 1,5 Volt.
Om de batterijen te plaatsen, opent u
het klepje aan de achterkant, Fig. 1,
en plaatst voorzichtig alkaline
batterijen van het type «R-6» in het
batterijhuis (A) waarbij u er voor zorgt
dat de batterijen correct geplaatst
worden (zorg dat de «+» pool van de
batterijen samenvalt met het «+»
teken in het batterijhuis en de «-» pool
van de batterijen met het «-» teken).
Sluit het klepje, zoals wordt getoond in
Fig. 1.
Wanneer, na aansluiting van de
monitor, blijkt dat er foutieve of
gedeeltelijke meldingen op het
beeldscherm verschijnen, haalt u de
batterijen uit en wacht ongeveer 15
seconden voordat u ze weer opnieuw
plaatst.
Batterijen die bijna op zijn
veroorzaken moeilijk leesbare cijfers
(zonder contrast) en foutieve
indicaties. Vervang ze onmiddellijk.
Belangrijk. Deponeer gebruikte
batterijen in speciale containers Fig 2.
ELEKTRONISCHE MONITOR.-
Om de controle van uw oefeningen te
vergemakkelijken en te
vereenvoudigen toont het elektronisch
gedeelte tegelijkertijd de snelheid,
afstand, tijdsduur van de oefening, de
verbrandde calorieën en hartslag.
Het beeldscherm licht automatisch op
bij het starten van de oefening of
wanneer u op een toets drukt.
De monitor gaat vanzelf uit wanneer
het apparaat langer dan 4 minuten
niet in gebruik is.
Door langer dan twee seconden op de
toets MODE te drukken, springen alle
waarden op nul, behalve de
persoonlijke gegevens.
A. SCAN FUNCTIE.-
Tijdens de SCAN modus controleert
en toont de computer tijdens de
oefeningen continu alle functies. De
getoonde functie wordt door middel
van knipperen weergegeven.
Om de SCAN functie te kiezen:
1. Bij het begin van de oefening of
door op een willekeurige toets te
drukken schakelt de monitor in op de
SCAN modus en elke 6 seconden
wordt er op het hoofdscherm de TIJD,
SNELHEID, RPM, AFSTAND, ODO;
CALORIEËN en HARTSLAG getoond.
2. Druk op de toets MODE en de
functie SCAN wordt uitgeschakeld.
B. FUNCTIE TIJD
Deze functie telt per minuut op of af
tot een maximum van 99:00 minuut.
Door langer dan twee seconden op de
toets MODE te drukken, springen alle
waarden op nul.
1. Druk op een willekeurige toets om
de monitor in te schakelen.
2. Door op de toets MODE te drukken
gaat het kleine venster van de TIJD
knipperen.
3. Door op de toets SET te drukken,
kiest u de tijd.
Table of contents
Languages:
Popular Measuring Instrument manuals by other brands

PVE
PVE PVPM 1500X user manual

Maxcess
Maxcess TIDLAND Installation, operation and maintenance

az-instrument
az-instrument AZ8922 owner's manual

sauermann
sauermann CTV 110 quick start guide

McCrometer
McCrometer V-Cone troubleshooting guide

Leuze electronic
Leuze electronic TNT 35 Connecting and operating instructions