Bidbury & Co CHARLBURY User manual

E X CLUSI V E
Team Bidbury
REGISTER TODAY TO RECEIVE YOUR FREE EXTENDED WARRANTY
IT'S AS EASY AS 1,2,3!
www.bidburyandco.com/team-bidbury
/bidburyandcowww.bidburyandco.com
Thank you for your valued support and please help us spread the word through social media with
images and comments, once your product has been installed.
FOLLOW US
INSTALLATION INSTRUCTIONS
CHARLBURY
Bidbury & Co
.
The surface nish we use on our taps is very durable and hardwearing. However, care should still be taken
when cleaning them. They should be cleaned only with warm soapy water followed by rinsing with clean
water and drying with a soft cloth. All nishes are vulnerable to astrong cleaning agents and therefore
substances such as household cleaners, disinfectants, denture cleaners, hair dyes can cause damage to the
surface and should be avoided.
For more detailed information on taking care of your Bidbury tap visit:
www.bidburyandco.com/care-instructions/
PLEASE READ THESE INSTRUCTIONS CAREFULLY AND KEEP IN A SAFE PLACE FOR
FUTURE REFERENCE.
This guide contains general installation instructions on how to install your product. However, it is important
that the item is installed by a qualied and experienced professional. Therefore reliance on these instructions
will be minimal.
Care taken during the installation will ensure long life and trouble free operations from the tap.
It is extremely important that all pipe work is ushed thoroughly after installation to avoid damaging the
ceramic discs. It is recommended that the both hot and cold valves/handles on the tap are opened fully
before you turn the water supply back on. This will ensure no debrie will get lodged in the disc, causing
possible damage.
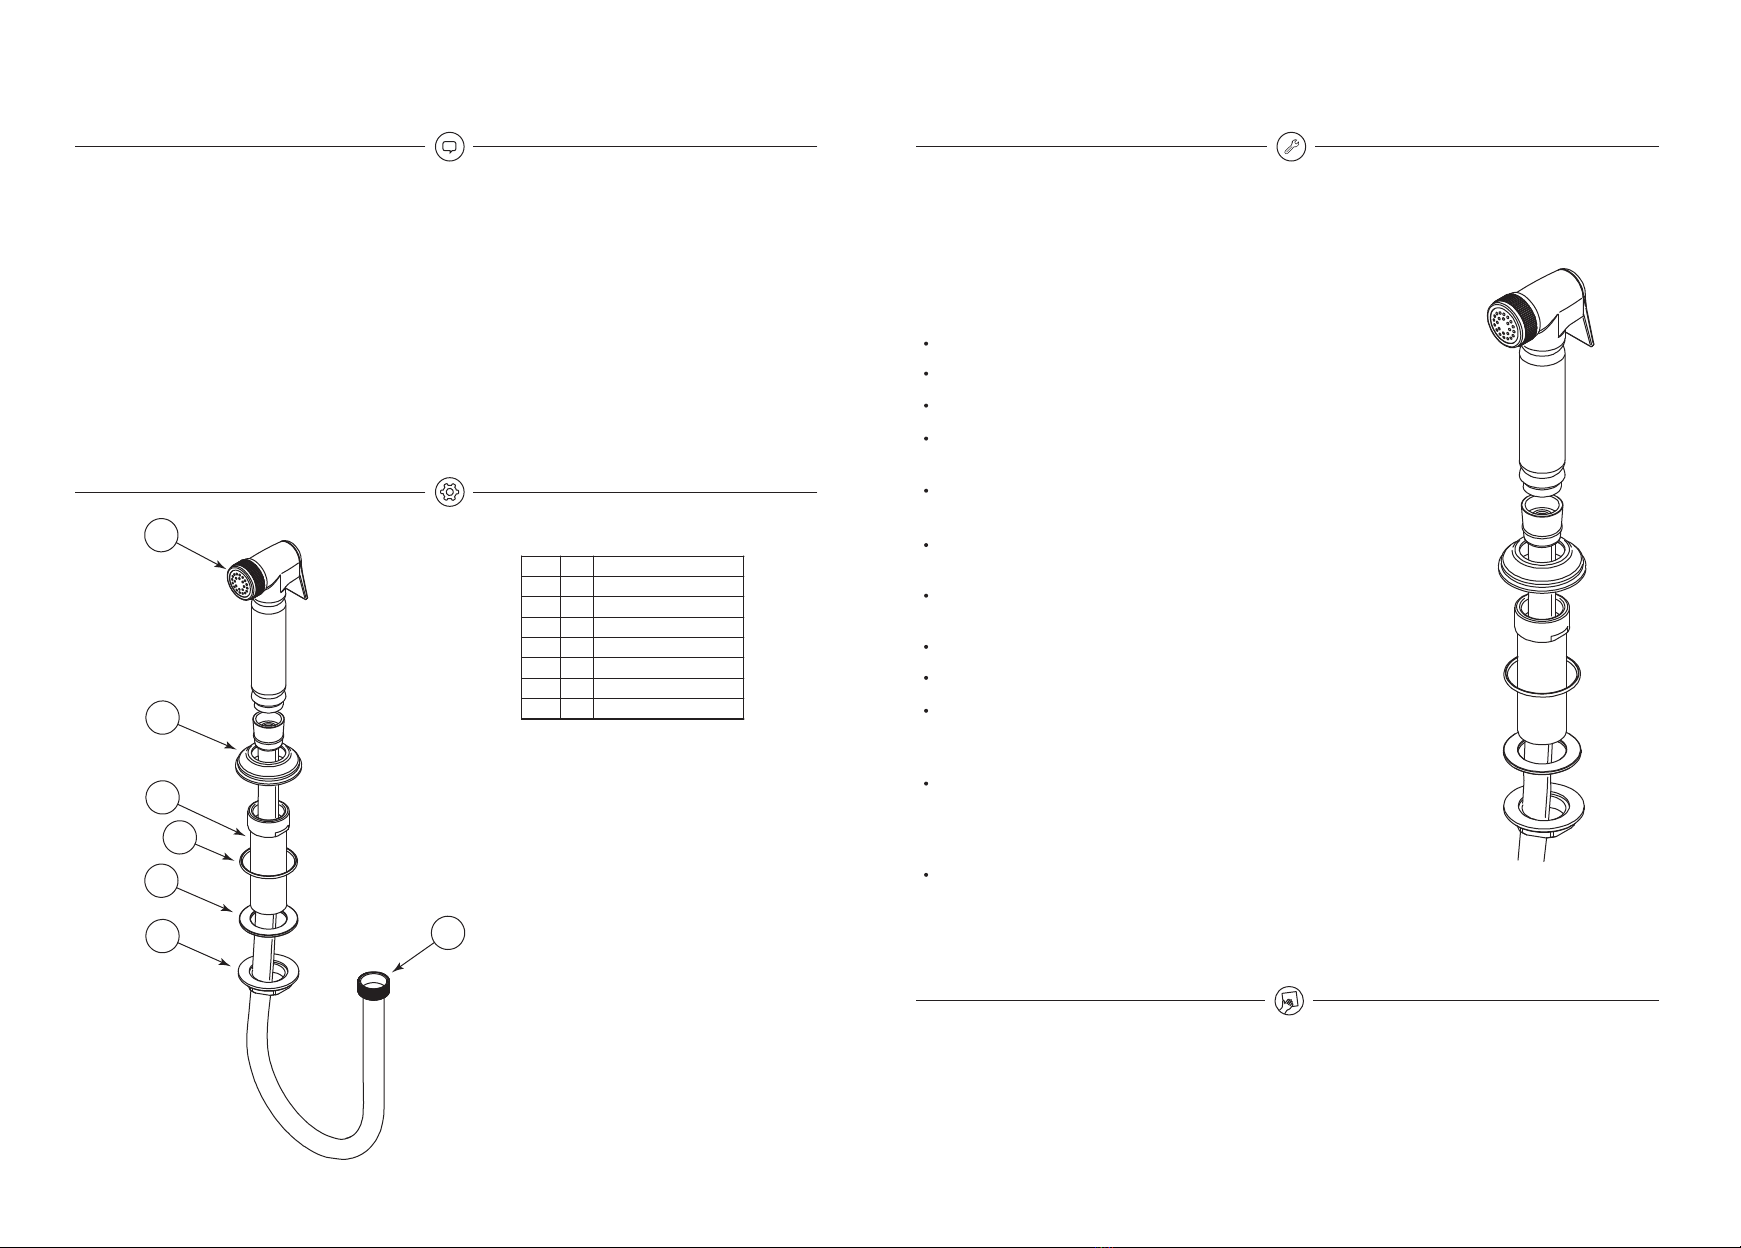
SPARE PARTS LIST
Unless you have an individual isolating valve tted, you will need to shut off your mains cold water stop
cock, open the lowest cold taps in the house and allow to run until pipes are empty.
Fitting an isolating valve to the inlet feed is recommended for ease of maintenance.
REGULAR DAILY CLEANING
REMEMBER TO TURN OFF THE MAINS WATER SUPPLY BEFORE
CONNECTING TO ANY EXISTING PIPE WORK.
Identify all components are included before tting.
Check the hole size is between 31-35mm.
Check the surface you are mounting to is between 15mm-50mm.
Install the handset holder by tightening the xing nut underneath. Do
not overtighten.
Connect the exible hose to the handset after passing it through the
holder.
YOU MUST REDUCE THE COLD WATER PRESSURE before connecting
the water supply.
Fit a pressure reducing valve to control the pressure. We recommend
setting it to a maximum of 2bar.
Ensure you have a 3/8" male connection on your supply pipe.
Fit an isolating valve on the supply to the handset connection.
Before opening the cold water supply for the rst time, press and hold
the lever on the handspray. Open the isolating valve fully and let the
water run straight through the handset for 10-20 seconds.
Check all connections are secure and water tight.
EXCESSIVE PRESSURE WILL DAMAGE THE HANDSET &
INVALIDATE THE WARRANTY.
Minimum operating pressure required: 0.5bar
INSTALLATIONINTRODUCTION
The set comprises of the following:
Check that all parts are present.
DESCRIPTIONQTY
ITEM
O-Ring24
Spray Hose1
7
Locking Nut
1
6
Washer
1
5
Handset Holder
1
3
Holder Plate
1
2
Spray Handset
1
1
1
2
5
67
3
4
Popular Bathroom Fixture manuals by other brands

Kohler
Kohler Mira Sport Max J03G Installation and user guide

Moen
Moen 186117 Series installation guide

Hans Grohe
Hans Grohe Raindance Showerpipe 27235000 Instructions for use/assembly instructions

Signature Hardware
Signature Hardware ROUND SWIVEL BODY SPRAY 948942 Install

fine fixtures
fine fixtures AC3TH installation manual

LIXIL
LIXIL HP50 Series quick start guide


