BigRoad DashLink User manual

DashLink Install Guide - Page 1
Contents
DashLink Solution Components
Locating Vehicle’s Diagnostic Port
Connecting DashLink Adapter Cable
to Vehicle’s Diagnostic Port
Connecting DashLink Adapter Cable
to DashLink Device
Attach DashLink Device to Vehicle
Linking Vehicle and DashLink
DashLink Driver Card
and Paper Logbook
Troubleshooting DashLink
DashLink Install Guide
Page 2
Page 3
Page 4
Page 4
Page 5
Page 6
Page 8
Page 9

DashLink Install Guide - Page 2
BigRoad DashLink
Device DashLink Adapter
Cable suitable for
vehicle
DashLink Solution Components
Android Device with
BigRoad app version 7.0
or higher
Cable Ties
(optional)
DashLink Install Guide - Page 3
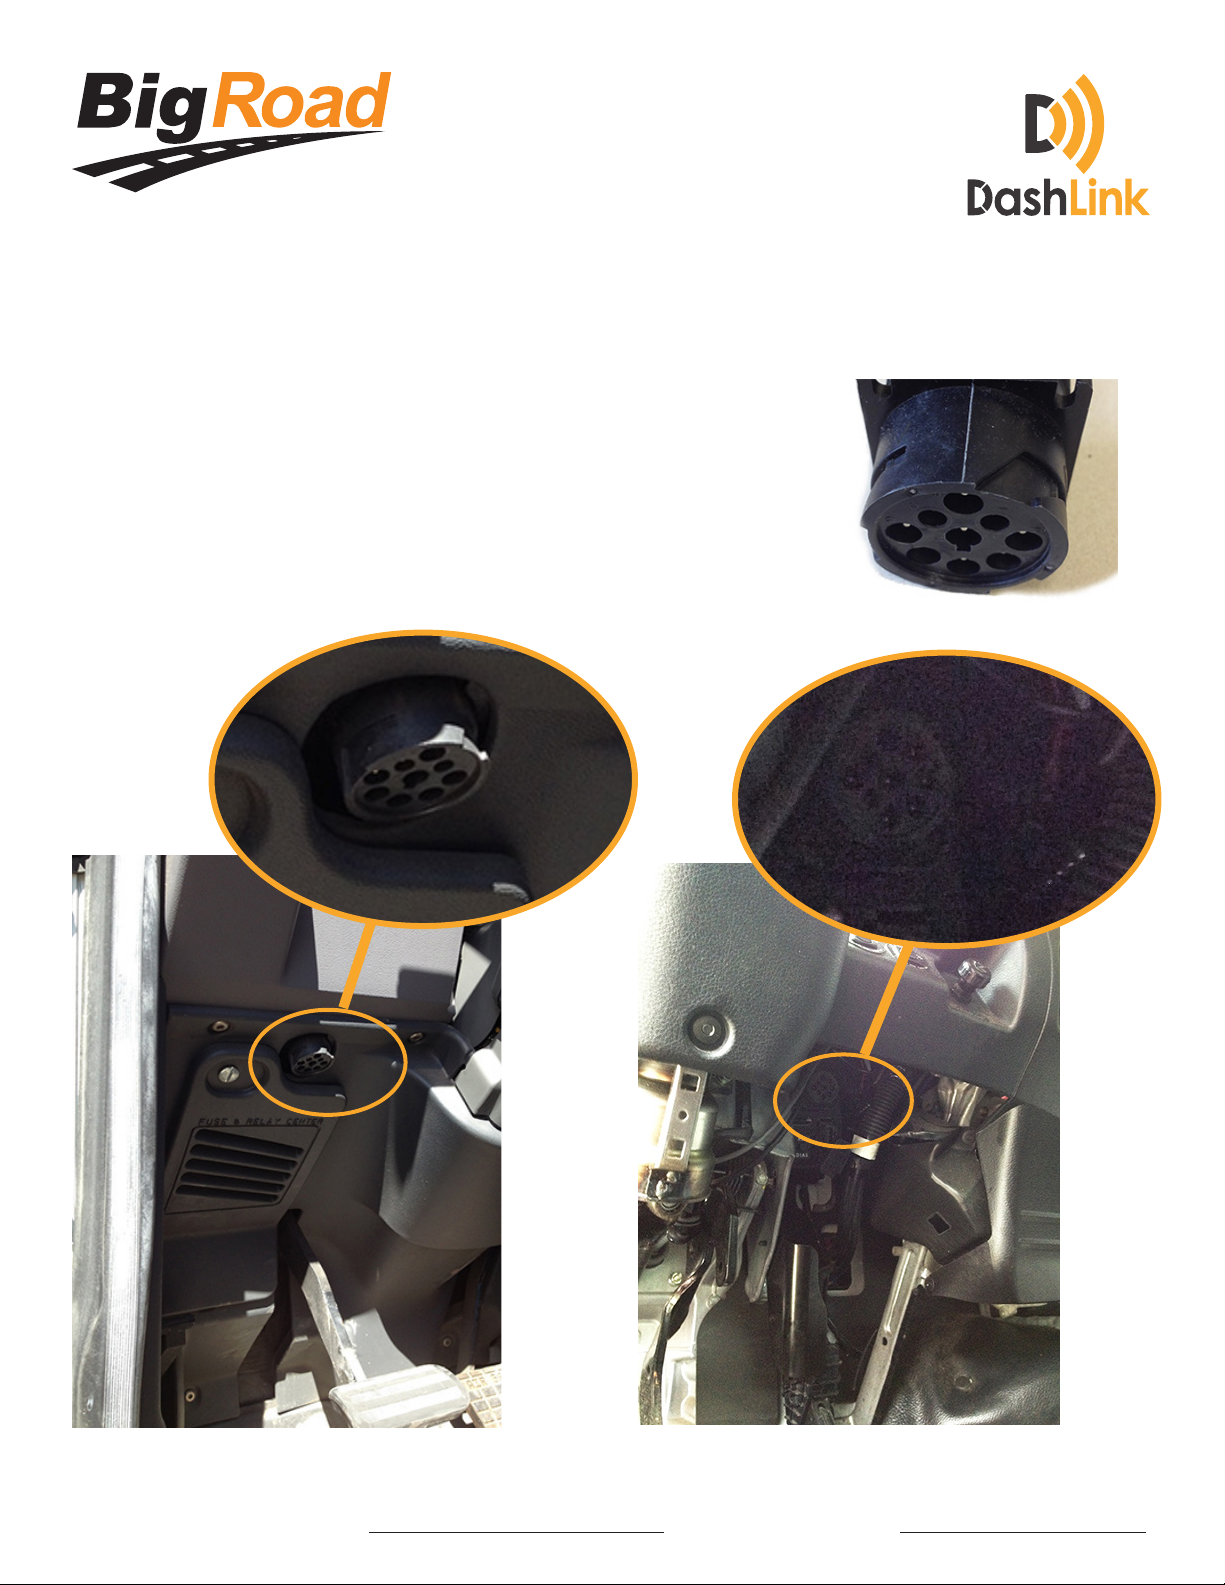
Step 1: Locating Vehicle’s Diagnostic Port
The diagnostic port is a 6-pin, 9-pin or 1-pin
connector located under the dash to the left or
right of the steering column - or - to the left of the
driver’s seat.
DashLink Install Guide - Page 4
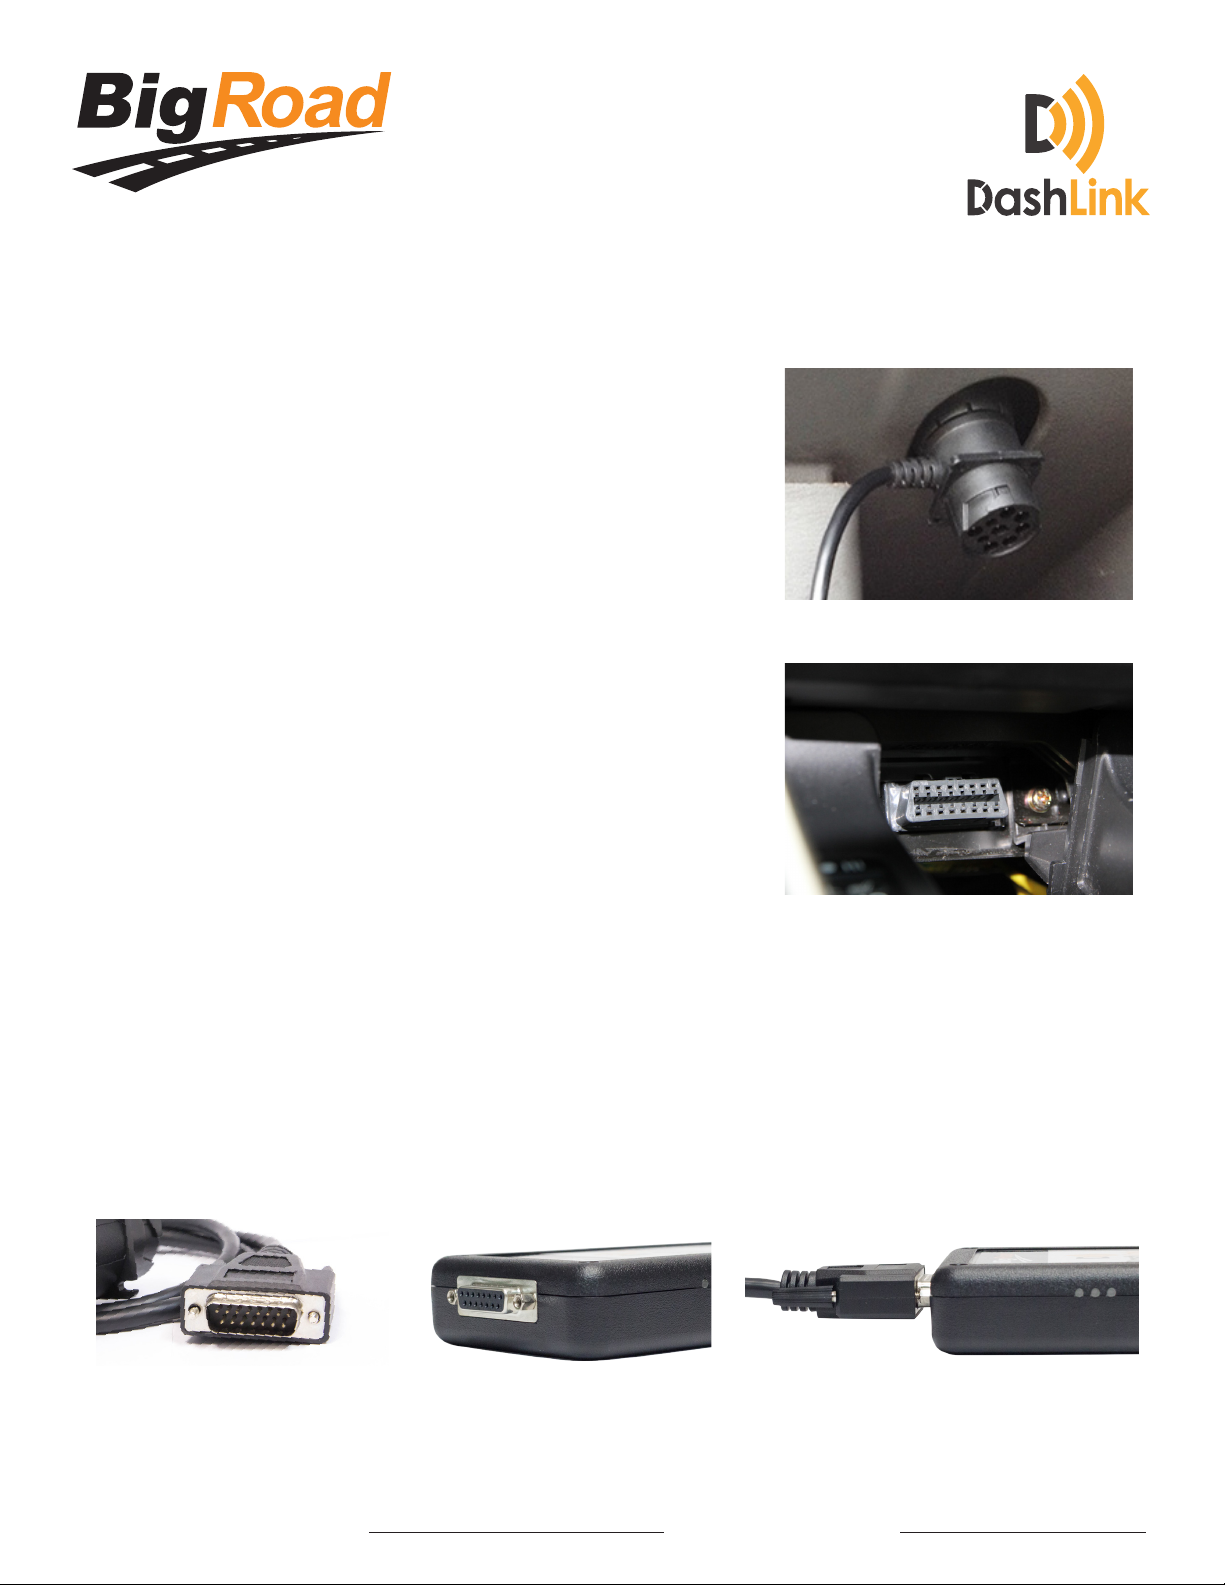
Step 2: Connect DashLink Adapter Cable to Vehicle’s
Diagnostic Port
Rotate the collar to align the
collar tabs with the matching slot on the diagnostic port.
Press firmly until the adaper cable is fully connected.
Then, rotate the collar clockwise. until it clicks:
Step 3: Connect DashLink Adapter Cable to DashLink
Device
Plug in the male DB15 connector on the adapter cable to the female DB15
connector on the DashLink device. Rotate to fully tighten the plastic screws.
For 6 Pin and 9 Pin
Ensure connector is fully insterted into the port.
For OBD-style cables
DashLink Install Guide - Page 5
Step 4: Attach DashLink Device to Vehicle
The installation location should be chosen to ensure the DashLink device and the
adapter cable do not obstruct the driver. Avoid mounting the DashLink device
within 2” of any metal fairings, to prevent interference with GPS signal. If the
DashLink device must be mounted near a fairing, ensure the sticker side of the
device faces away from the fairing.
If possible, mount the unit so that the LEDs and Device ID sticker remain visible
under the dash, to allow for troubleshooting.
Cable ties can be used to secure the unit underneath the dash.
Tip: The standard “T”-cable can be used to disconnect the existing diagnostic
connector from its mounting bracket, and to attach the female side of the T-cable to
the mounting bracket, for an unobtrusive / hidden installation.
Tidy the installation
If there is any loose cabling tie it off with cable ties.
Ensure the DashLink and cabling will not obstruct the
driver’s hands/feet/visibility, either during operation
of the vehicle or while entering/exiting the vehicle.
Leave the female side of the T-cable accessible for
ongoing maintenance/diagnostic usage.
DashLink Install Guide - Page 6
Step 5: Linking Vehicle and Dashlink
Launch the BigRoad application on an Android device and sign in to your
fleet.
If the vehicle has previously been added to the BigRoad account for your
fleet, then ensure it is selected in the mobile app by pressing the menu
button and choosing “Switch Truck”. Locate your vehicle and select it by
tapping on the truck name.
Otherwise add a new vehicle:
a. Press the menu button
b. Choose “Switch Truck”
c. Press “Add”
d. Enter the correct truck number,
license plate and odometer
units (miles/km)
e.
NB: Do not press the “Connect DashLink”
button displayed.
f. Press “Add Truck”
Navigate to the DashLink screen by pressing the menu button,
choosing “Settings”, then “DashLink”.
Turn on the vehicle.
Press “Connect DashLink”.
Ensure the DashLink device is found and the VIN that is shown matches
the VIN of the vehicle. If no VIN is shown, ensure the Device ID that is
shown matches the value printed on the DashLink device.
1
2
3
4
6
Menu
5
If the VIN or device ID does not match then choose “Skip” until the correct
DashLink device is shown.

DashLink Install Guide - Page 7
Step 5: Linking Vehicle and DashLink ...continued...
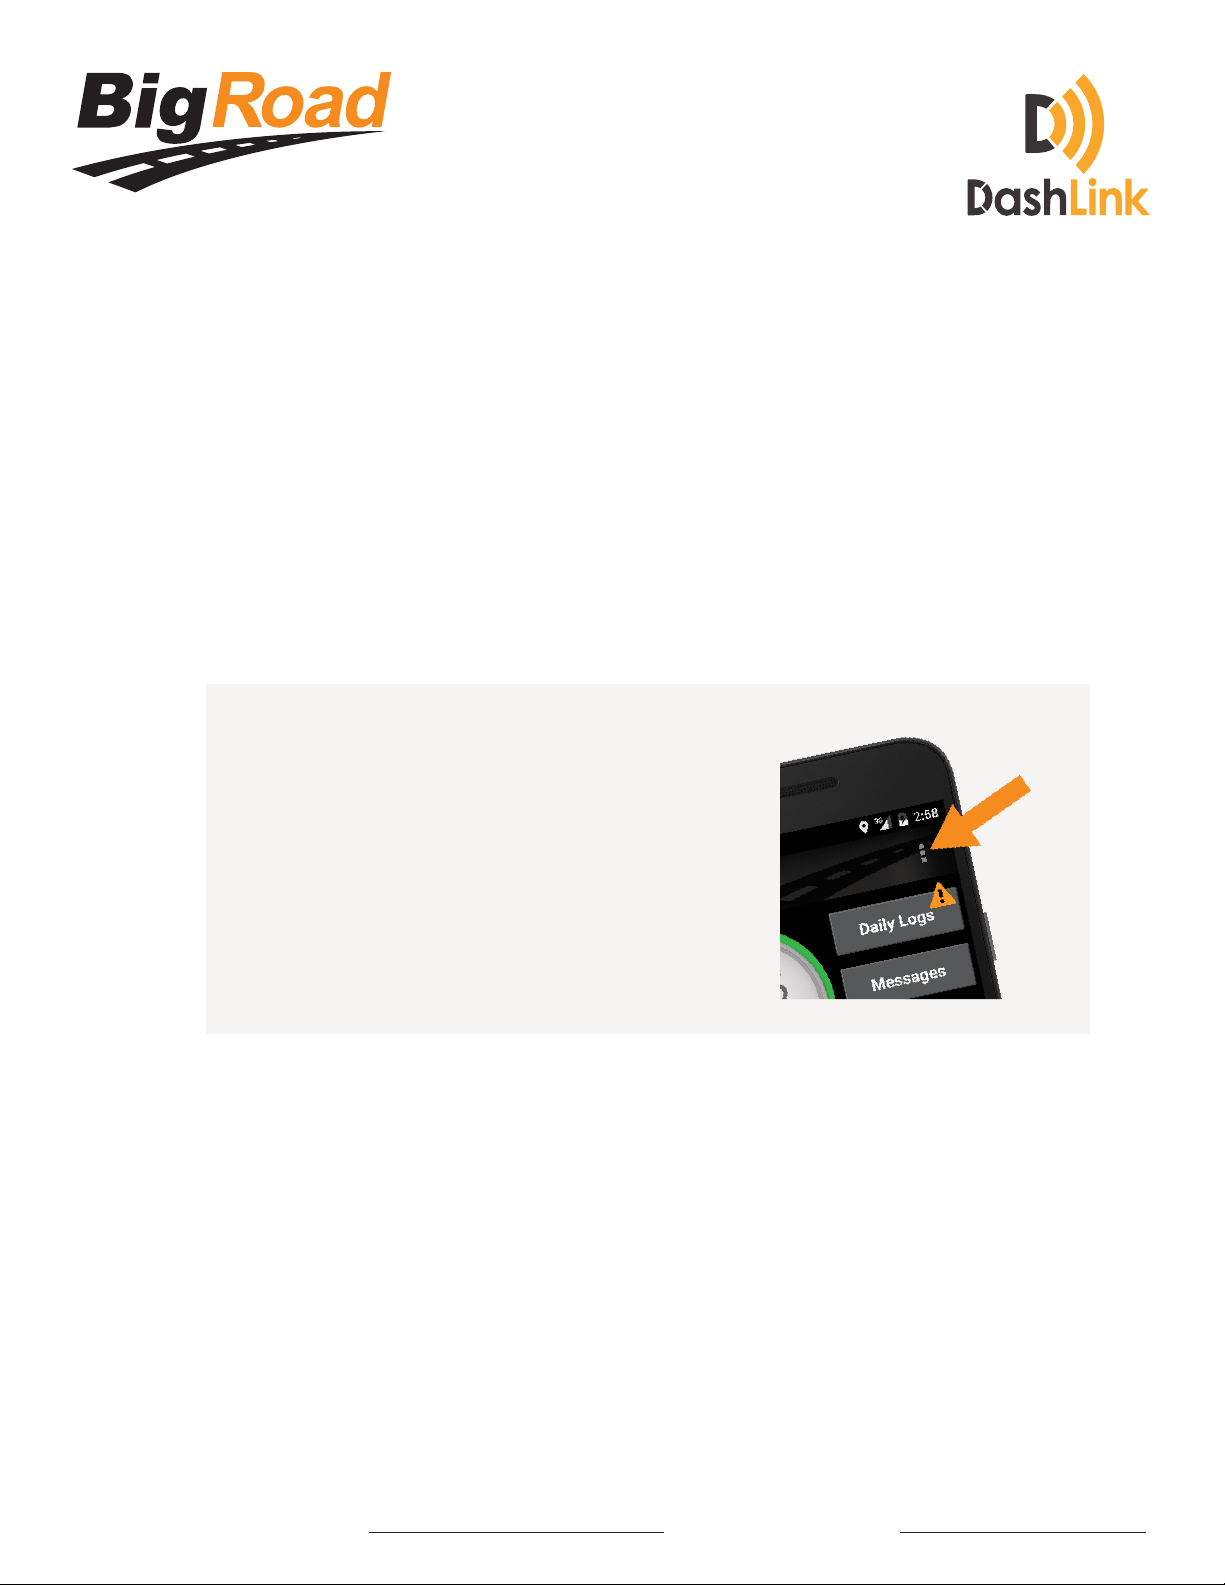
Once the correct DashLink device is shown, press “Connect”.
Verify the DashLink connection is correctly established (this may take
up to 120s in some cases).
7
8
ab
DashLink icon in
“?” state - caption
“DashLink is
connecting -
please wait”
DashLink icon in
“wifi” logo state
(eg connected)
- caption “Dash-
Link successfully
connected”
Verify the green GPS LED on the DashLink device is solid, not flashing.
A solid green LED indicates that DashLink has been able to acquire
a GPS signal. Flashing green indicates a GPS signal has not yet been
acquired. In some cases, this make take up to 2 minutes when the
DashLink is first connected to the vehicle.
9

DashLink Install Guide - Page 8
Step 6: DashLink Driver Card and Paper Logbook
A DashLink Driver Card comes with your installation kit. If you have not
received your DashLink Driver Card, simply go to www.bigroad.com/
driver-card and download the “AOBRD Driver Card”. Print a copy and
put it in the vehicle.
This card must be shown during a roadside inspection. Failure to provide it
can result in fines and/or violations. BigRoad highly recommends that you
laminate the driver card and affix it to the truck.
Ensure the driver has a paper logbook with at least 14 days of
available forms. This logbook must be shown during a roadside
inspection and failure to provide it can result in fines and/or violations.
1
2

DashLink Install Guide - Page 9
Troubleshooting
BigRoad App Does Not Find DashLink Device
If the BigRoad mobile app is not able to nd the installed DashLink
device then ensure:
The vehicle is on
The power (orange) LED is illuminated on the DashLink device
The adapter cable is correctly connected to the DashLink device
The adapter cable is fully connected to the diagnostic port of the vehicle and
the collar is locked (for vehicles with 9-pin or 6-pin diagnostic ports)
You are running the most recent version of BigRoad on your Android device
Bluetooth is enabled on your Android device
Your Android device is plugged into a charger
Ensure the vehicle you are in is properly configured in BigRoad. Have an
admin or dispatcher visit app.bigroad.com/trucks, click on the truck number,
then compare that VIN with the VIN of the vehicle. If the vehicle is configured
with a DashLink Device ID then compare the ID in BigRoad to the ID printed
on the DashLink device.
DashLink Green GPS LED is Flashing
The DashLink built-in GPS can take up to 2 minutes to acquire a signal when first con-
nected to a vehicle. If after 2 minutes, the green GPS LED remains flashing, the Dash-
Link may be mounted too closely to a metal fairing or bulkhead, which is blocking
the signal. Resolving this issue may be as simple as rotating the DashLink so that the
sticker is facing in a different direction.
1
2
3
4
5
6
7
8

DashLink Install Guide - Page 10
Troubleshooting continued...
BigRoad App Stuck “Reading Data From
DashLink Device”
Some older Android devices have unreliable Bluetooth support. Rebooting the device
should allow the DashLink connection to succeed.
DashLink Device Periodically Becomes Unavailable
While in Use
Ensure that your Android device is plugged into a charger while using a
DashLink vehicle.
Collar of Diagnostic Plug is Difficult to Lock (9/6 Pin
Connectors Only)
It is important the the collar of the diagnostic
plug is locked to ensure the device does not
become disconnected during operation. A
flathead screwdriver can be used in the gaps
on the collar.
Other manuals for DashLink
1
Table of contents


